
Welcome! This is is a blog where I post about the stuff I make. I do a lot of cosplay and fiber arts, and Tumblr is one of the few social media sites left that doesn't make me want to crawl out of my skin. If you have a question, send me an ask!
Don't wanna be here? Send us removal request.
Statistics
We looked inside some of the posts by ivorivet and here's what we found interesting.
Average Info
Notes Per Post
2K
Likes Per Post
2K
Reblog Per Post
746
Reply Per Post
39
Time Between Posts
28 days
Number of Posts By Type
Text
17
Last Seen Tumblr Blogs


Fun Fact
Tumblr has a low social media market share in South America.
Text


Not me buying yet another small loom to put a new project on instead of a) saving money or b) finishing stuff on any of the other fiber tools that are tied up with WIPs now
This loom was designed by Celticjujusbag on Etsy and is specifically made so that you can tablet weave any pattern without worrying about twist build up. I decided to put an all-forward pattern on it and it's working really well!
222 notes
·
View notes
Text
Fellowship Cloak Weaving Draft
Hi all! I've been kind of quiet on this blog, but I have something really exciting to share today: after six years, I FINALLY figured out the weaving draft for the Fellowship cloaks from Lord of the Rings.
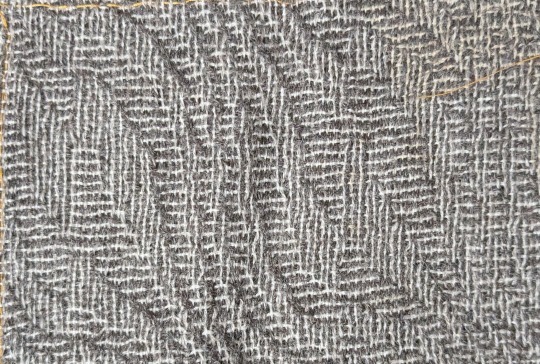
This is a problem I've been trying to figure out since shortly after I made my Legolas cosplay in 2018. The cloaks that the nine members of the Fellowship receive in Lothlórien look like a nondescript gray fabric from far away, but zoom in and you'll see a very complex pattern of horizontal and vertical bars of dark gray and white.
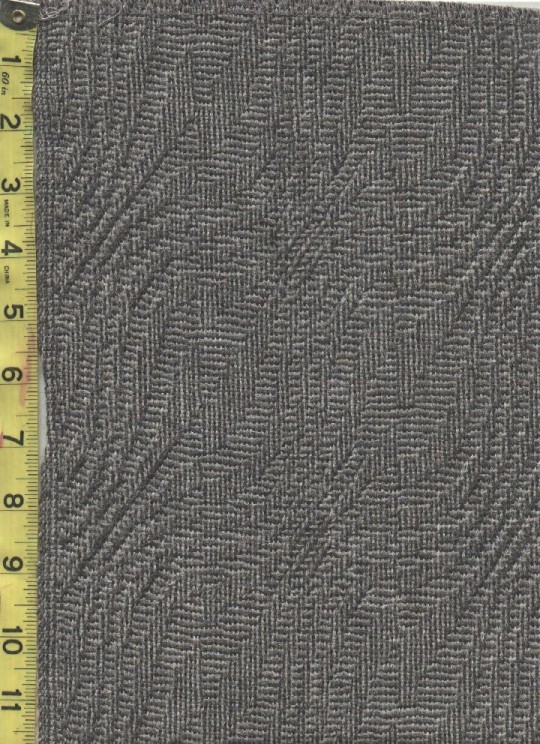
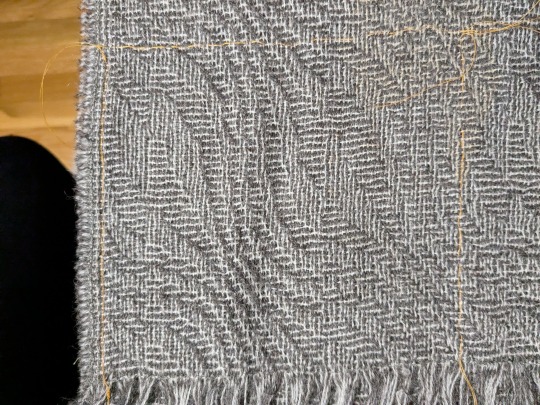
(First image from Alleycatscratch, second is a photo of the scarf of the same fabric I bought from Stansborough where I was attempting to trace the pattern repeat with orange thread)
This is going to be a long post, so I'm just going to lead with the completed draft:

Imagine me Will Smith wife posing at this for the last 24 hours.
It's got the correct size of pattern repeat! It's got the five individual ripples! It's got that dumb little pattern break in the middle that breaks up the center of the leaf motif! I am OVER THE MOON about figuring this out, especially starting out with very little knowledge about weaving drafts in general. More ramblings about this type of draft and my thought process below:
This particular pattern is known as "shadow weave," a subset of color-and-weave where the pattern is created from the interplay of different warp and weft colors plus the weaving draft itself. To get an idea of how that works, let's start by looking at plain weave in one color:

The solid purple bar at the top indicates the color of the warp threads, and the solid purple bar at the right indicates the color of the weft threads. So far we've got our basic under-over-under-over pattern in a single, solid color (purple). But what if we add an additional color (green) to the warp, and alternate those colors? Then we'd get a speckled fabric like this:

The visual effect looks pretty much identical regardless of if you start with green or purple. However, if you also alternate purple and green in the weft, it produces a very different effect depending on if you start with purple or green (note the differences in the bar on the right):


So cool, now we can make either vertical or horizontal stripes! If you double up on the colored threads in some areas, you can even flip between the two and start dividing the fabric into "blocks," like so:


Note that with all these changes, the only thing we've been doing is changing the order of the colors in the warp and weft. The actual weave structure itself is still just regular ol' plain weave. The pattern that we've created in the pictures above is called "log cabin," which you can read about here. But similar effects can be created by skipping shafts/picks in the weaving draft as well. So how do we get from log cabin into the more complicated and general category of shadow weave?
It's weird to describe how to convert a given pattern into shadow weave. There are multiple very good books with chapters on shadow weave as well as books entirely dedicated to it. Despite my best efforts, all these explanations still got so technical so fast it feels like, to me at least, asking a 6 year old to recite an entire Shakespeare play verbatim immediately after confirming that they can, in fact, sing the alphabet song. So I'm going to give my best shot at explaining it, and if it doesn't make sense, just blame it on me and check out some of the linked books above if you're really curious.
Think of shadow weave as a beauty filter for a black and white drawing. If you create a pattern out of black and white blocks/pixels/whatever, the shadow weave "filter" can be applied to it to create a similar pattern that preserves the shapes in the original, but makes them out of vertical/horizontal lines instead of solid color blocks. So in some of these books you'll find mention of converting a twill or an overshot pattern into shadow weave - that's what this is referencing. The original pattern (usually designated with light yarn) gets a secondary shadow pattern (in dark yarn) inserted into in between every other thread (also called an "end" when referencing warp yarns).
I got stuck at this point for literal years. I could find examples of weaving drafts using shadow weave, but couldn't figure out how to generate ones of my own. I imported some of the drafts I found in books into weaving software and poked around to see if I could push the patterns in the direction I wanted by changing individual elements. My experiments in changing individual warp ends and weft picks always ended up looking like stretched or compressed versions of the original pattern (when I was being careful), or incomprehensible garbage (when I was being daring). I even bought a sample of the fabric from Stansborough in the form of a scarf, thinking I could brute force it by using a magnifying glass to figure out the interlacements. I was able to figure out how large the pattern repeat was (approximately 160 x 80 ends), but otherwise I got nothing but eye strain. I ended up tabling the project and coming back to it every couple years, banging my head against it until I gave up.
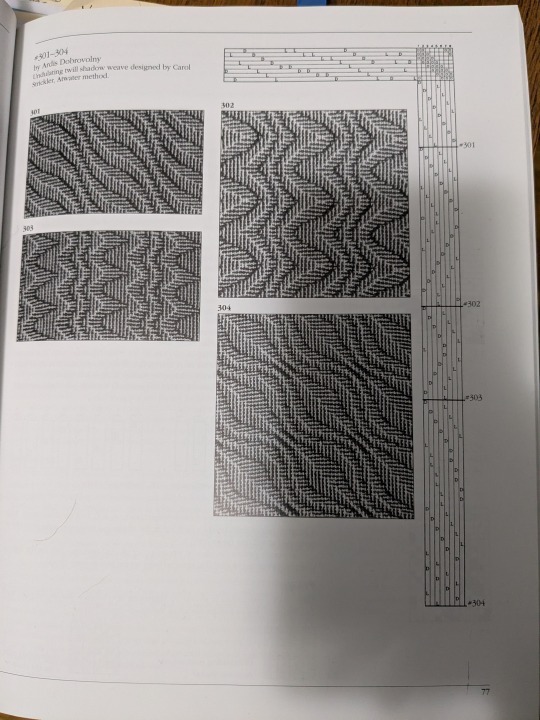
Until one day last week when I was flipping through the Strickler book and saw this page:
And I was like

HOLD UP
IT'S HER
...or at least a close cousin of her. BUT IT WAS A START.
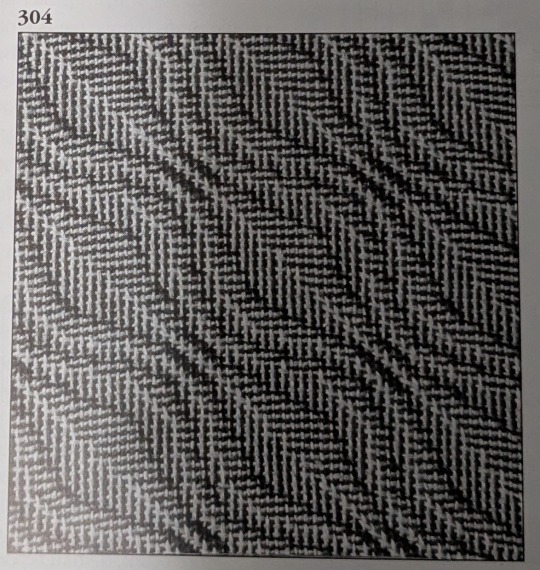
So the first step was to identify what about this pattern needed to change in order to make this look like the Fellowship cloak. Overall, the main differences were:
Pattern repeat on Strickler 304 was too small - it was 42 x 42 ends and I needed it to be somewhere in the ballpark of 80 x 80 before altering the repeat.
The Fellowship pattern has a weird vertical dividing line that runs down the middle of the leaf motif, effectively doubling the width of the repeat by creating two similar looking but different leaves. This was the change I was least concerned about, as flipping between vertical and horizontal lines is pretty a straightforward process as shown above with the log cabin draft.
Strickler 304 also has a different number of waves (peaks and valleys, or whatever you want to call them) compared to the Fellowship pattern. There are 3 waves in Strickler and 5 in Fellowship. Figuring out how to add these extra waves was the biggest obstacle for me to address.
And finally, a couple of things I didn't need to care about for the weaving draft: 1) the Fellowship pattern is elongated in the warp direction, but this has more to do with a little extra spacing between weft picks as compared to the warp threads. When weaving this you'd just need to make sure you don't beat it very hard and you'll get that tall rectangle shape instead of a square repeat. 2) Both patterns have mirrored symmetry around a diagonal line drawn through the center, meaning that for treadling I could "tromp as writ" or basically just mirror the threading diagram to get the treadling instructions. For reasons I can't figure out, the Strickler pattern isn't exactly tromp as writ but looks close enough to it that the effect is still there. But I don't really care enough to figure out why - the important thing is that it gives us a threading diagram to start with!
So to start with, here's what Strickler 304 looks like in my weaving software:

(By the way, this is Fiberworks PCW Bronze. The trial version is free, and the only difference between that and the paid version is that the save/print options are disabled. I'm not sure they know about screenshots, bless their hearts.)
This is a design for 8 shafts and 8 treadles, thus the 8x8 square in the upper right corner. And you can see in the threading diagram (upper horizontal bar) and treadling diagram (right bar) that the curvature of the waves takes a similar shape to the curves of the final pattern. We just have to figure out why. And since I had already tried changing individual warp ends and treadling patterns without much success, I needed to approach in a different way.
What ended up helping me see the forest for the trees was de-shadowifying the pattern. It's relatively easy to get the black-and-white version of the pattern from the threading draft - you just need to delete the shadow, which means removing every other warp end. This is what deleting all the dark ends from the warp and light ends from the weft looks like:

We can also see with a little more detail how the threading diagram is similar to the curve in the pattern. The pattern is 21 pixels tall, but it's been chopped up to repeat over 8 shafts, like so:

OKAY COOL COOL COOL. EVERYTHING'S COMIN' UP MILHOUSE IVORIVET. From this green squiggly line we know two things:
The final number of warp ends in the shadow weave pattern is double whatever the height of the squiggle is. In the case of the Strickler pattern, we're going from 21 to 42. Since we know that we need our final height for the Fellowship pattern needs to be 80, the squiggle for that pattern needs to be around 40 pixels tall.
We needed to stitch three repeats of the Strickler threading diagram together in order to see the full squiggle. How many waves does the Strickler pattern have? Three. How many waves does the Fellowship pattern need? Five. How many shafts do we have to work on? Eight. What is 5 x 8? 40!!!

So how about we make a NEW squiggle, only 40 pixels high instead of 21? (We're gonna drop the pixels in blue, since threading diagrams won't work if you put a single end through two shafts.)


Next, we're going to chop up that squiggle and use it to create a new threading diagram in Fiberworks. I'm also using "tromp as writ" here to create the treadling pattern.

LOOK AT THAT. IT'S GOT MORE WAVES!! FIVE OF THEM!
And then we add back in the shadow by creating a space for a new end between each existing end:


And then add in the shadow. I'm using 4 as my number for the shadow offset since we're using 8 shafts. So shaft 1 shadows to shaft 5, shaft 2 shadows to shaft 6, etc.

And we're going to apply tromp as writ again to get:

AYYYYYY WE'RE GETTING CLOSE! I'm fairly certain that the reason why the Strickler treadling wasn't exactly tromp as writ had something to do with centering the pattern repeat a little more than this, but I don't really care about that so I'm going to leave this treadling the way that it is.
From here out, we need at add that weird vertical dividing line that chops up the center of the leaves. So we double the pattern repeat along the horizontal axis, and offset a 40 pixel section in the middle of the threading diagram by 1 pixel. I've also colored in the differences between the dark and light ends to help differentiate the original and shadowed curves a little bit more. (I also tried offsetting the colors of the warp ends by 1 as well like what we did in the log cabin example, but I ended up liking the way that this looked more.)
THERE SHE IS!!! MY PRECIOUS!!

From here on out, there is still a ton of work I need to do if I actually want to weave this cloak from scratch. I did buy roving in quantities that could be used to spin both the dark and light yarn (dark gray Gotland for the dark yarn, and dove gray merino + white alpaca for the light yarn), but there's still the matter of, like, handspinning a cloak's quantity of extremely fine yarn. I did start spinning the Gotland several years ago as fine as I could possibly manage, and got through maybe 20 ounces of it. However, I'm a much better spinner now and I'm not sure if the my skeins from several years ago would be suitable for weaving, or if it would be worth replicating what I did back then vs. just starting over with a new standard. There's also the possibility of just... buying weaving yarn if I want to skip that step, which would definitely save me a significant amount of time.
Anyway, thanks for reading this far and I hope it helped break down why this was so exciting for me!
#lord of the rings#lotr#weaving#lotr cosplay#shadow weave#handweaving#hand weaving#cosplay#fiber arts
928 notes
·
View notes
Text

Block weave is the last of the four projects I have to do to get credit for the online class I'm doing. It's an 8 shaft pattern using two alternative blocks of 3-1 and 1-3 twill.
This is the second square of four and mannnn is it a slog. Unlike the other three projects which had a finished purpose (tablecloth, towel, blanket), these are just kinda squares?? I guess they could be big napkins or hankies or something. But I'm kinda checked out mentally on them and just kinda want them off my loom at this point. I'm sure it'd be more fun with treadles but I'm still on my table loom with the little hand levers.
31 notes
·
View notes
Text
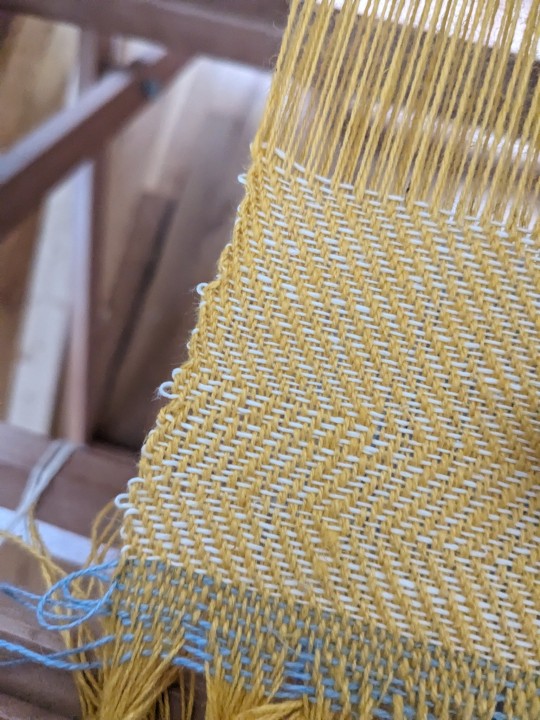
Some updates on the weaving progress for my Vävstuga class!
- Towels: 4 out of 4 woven and off the loom, not finished. They need a narrow woven band for a hanging loop which I haven't warped up yet.

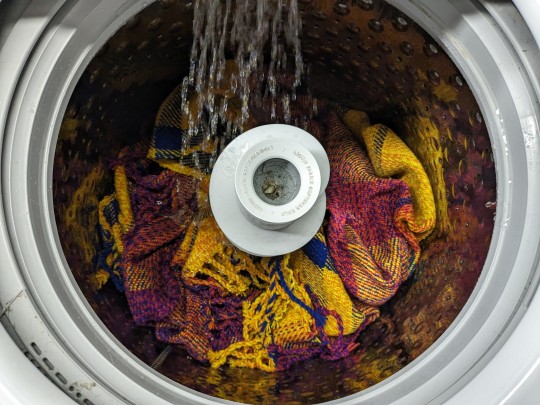
- Blankets: 2 out of 2 woven, fringed, and fulled BABY. 👌 Completely done and they are so wonderfully squishy. The weaving took about half the time as getting the loom warped! I was kind of nervous about chucking them in the washing machine and dryer to fill them but I'm so glad I did.
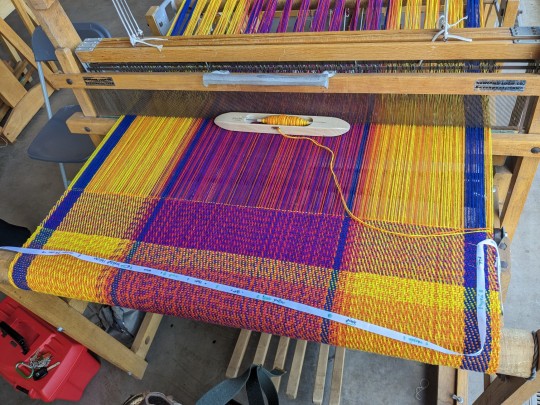
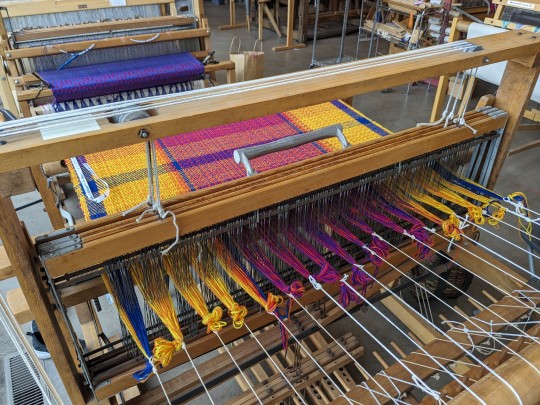

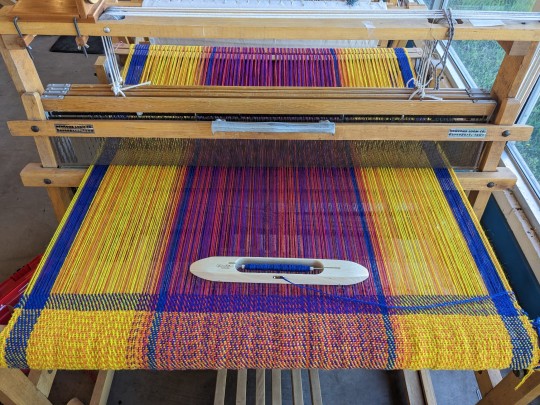
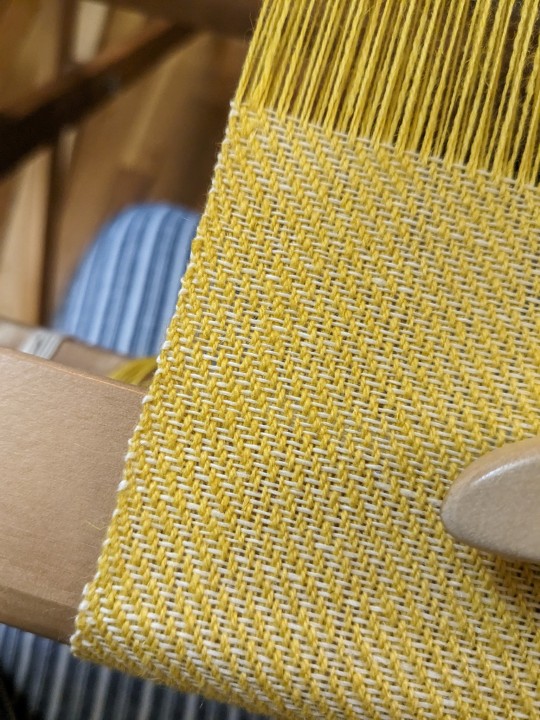
- Tablecloths: Warped up on the table loom at home today, and about 90% of the first one of four is done. These are going pretty fast because of the plain weave. It's my first time using a temple (the wooden stretcher device that helps prevent draw-in from the weft) and ngl I am mad it took me this long to shell out for one.
I'm not 100% sure I love the color combo on this one. I would have liked the yellow stripes to pop a little more to compete with the blue, so I may change the colors up a bit on the other tablecloths.

Block weave damask squares: we are saving this 100% linen nightmare until the end because I don't want to deal with it right now
I'm aiming to get as much done of these as I possibly can before this coming Saturday. Not sure if I'll get the block weave done but I think I'll be able to get it warped and make at least one or two of the squares before I have to go to the live class.
105 notes
·
View notes
Text
nyoooooom!!
60 notes
·
View notes
Text
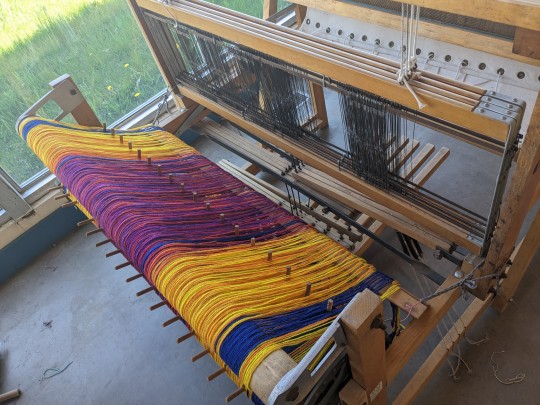
Yesterday I got the big wool blankets warped up on the loom at the studio. It looks like Lisa Frank barf and I love it. It took almost the whole weekend to warp and I only got about 20 minutes of actual weaving in before I had to leave. I wanna go back!!


444 notes
·
View notes
Text
There was some interest in a previous post on how I've been doing my selvedges on my towels. This is my first project using a 100% linen warp so I am very much not an expert, but here's a little video about what I've been doing!
A couple of things:
- This is a cottolin warp and tow linen weft. Linen yarn has almost no elasticity and has a reputation for being a really fussy warp - the cotton/linen blend gives is just a little bit of stretch and so far it's behaved beautifully. I have the tension on the warp cranked up about as high as it can go on my table loom.
- Tbh once I got used to it, I honestly really love 100% linen as a weft. It's so wiry it has virtually no draw-in, which means my woven width is essentially the same as what I have threaded through the reed, even without using a temple. Once the towel is woven and wet finished, the linen will soften a lot. Right now the fabric feels VERY starched, which is great because that structure is helping me out.
- I had to chop this down a little bit to fit Tumblr's size requirements but I'm not really saying anything useful at the cut off end. 😅
#weaving#handweaving#linen#featuring the tippy taps of my dog and the whines of my cat who doesn't want to be near my dog
102 notes
·
View notes
Text
I've made some towel progress but all my photos pretty much look the same because of how they roll into the front bar. But I have allllmost 2 out of 4 towels done. I didn't expect my last post about the selvedges to take off like it did but I will try to record a little video for those who asked!
Meanwhile I'm working on getting the wool blankets warped up on a wider loom at the weaving studio. I got the heddles threaded but didn't have enough time to check for any errors or get the reed sleyed. The sectional warping beam (with the pegs) was a bit weird for me but it seems to be working okay!

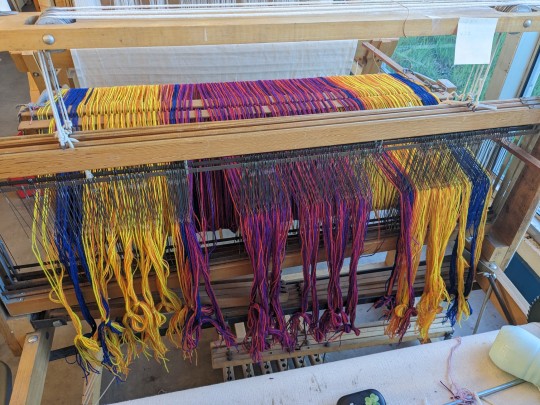
I'm going back tomorrow for a couple hours and really hoping that these blankets will weave up quickly. It's about a 5 yard warp for two blankets, using chunky yarn for the warp and the same yarn doubled up yarn for the weft.
14 notes
·
View notes
Text
I started the towels today!
And holy moly I know my weaving isn't perfect but I am so excited about how much my selvedges have improved after only a short bit of mucking around. I got some really good advice on a fiber arts discord server and I am so!! excited!!! 😭
238 notes
·
View notes
Text
Moooooore warping today. I took a day off to watch the eclipse so I didn't get a ton done. But I did pre-sley the reed for the hand towel project:

Then you flip the reed over and do some ninja stuff to transfer the lease sticks over to the other side of the reed:


And the last step I got to was tidying up the back loops and moving the reed to the front of the loom inside the beater bar. I didn't want to mess with winding it on because the tension on the threads seems to get thrown off fairly easily.

Here's a photo of the pre-sleyed reed at the front of the loom. I've got 4 ends in every other dent and my final sett for the actual weaving will be 2 ends per dent. It's interesting doing this with a reed instead of a raddle - it's a bit slow for me right now but it feels more secure and accident-proof this way. Tomorrow I'll bug my partner to help tension this thing as I wind it on.
18 notes
·
View notes
Text

Towel warp is done today! I had a little bit of time to start warping my home loom as well. One of the techniques I'm learning from the class is to use a pre-sley reed, wind the warp on the back beam as it passes through the reed, then after the warp is wound on with the correct spacing you re-sley the reed with the appropriate pattern for weaving. The reed takes the place of a raddle, which I've always used when warping on this loom before. It's proving to be interesting so far!

25 notes
·
View notes
Text
I'm taking an online basic weaving class with the goal of having most of the projects done by the end of April, when I'm scheduled to go take a live class from the same instructor. The basic class isn't a requirement but I'd like to have it done regardless. There are four projects:
- tablecloths (really more like square placemats) in cotton and cottolin x4
- hand towels in cottolin and tow linen x4
- throw blankets in wool x2
- some kind of damask block weave square in line linen x4, which I am saving for the end because I'm sure it will be a hateful little bastard
My materials for this arrived on Thursday so I've been prepping my warps so far. My loom at home is wide enough to do all the projects except the blanket, but by some extremely good luck there is actually a weaving studio very close by that will rent me some time on a wider loom. So the goal is to work on the blankets when I can get to the studio, and try to take care of the rest of the stuff at home.
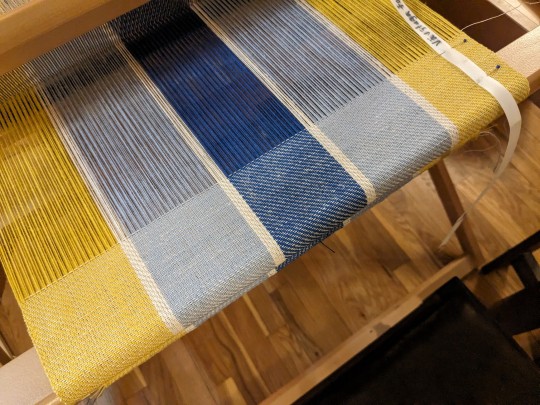
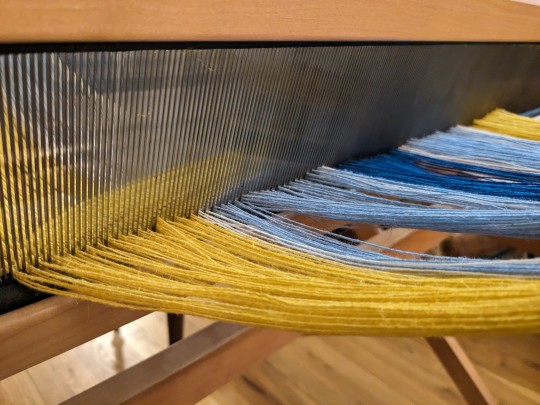
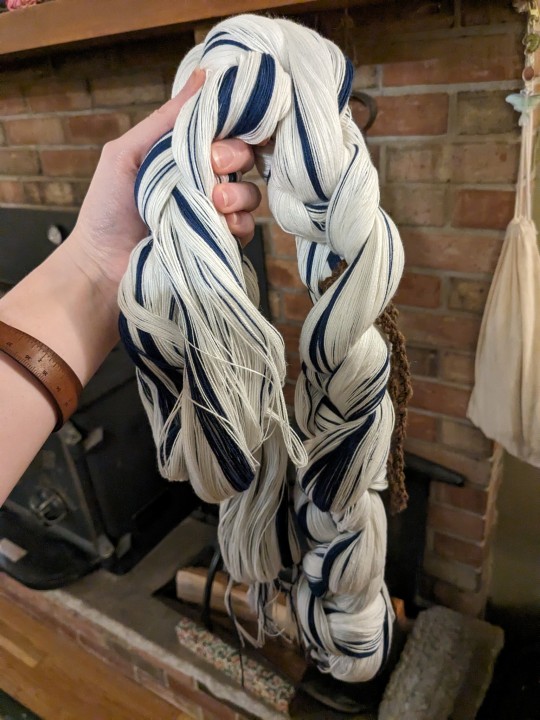
I've got the warp done for the tablecloths, which will be white with blue stripes in the warp:

And the warp done for the damask squares, which theoretically should have been the easiest but also somehow wasn't and probably gave me a splinter while I was winding it?? LINEN.

And finally the warp for the blankets, which has to be done in two chains. It is DELIGHTFULLY squishy.


I'm hoping to get the towel warp measured out tomorrow and then I'll have everything ready to start going on looms.
74 notes
·
View notes
Text
Book related yarn crimes!!
I will be in a Circle of Magic cosplay group with @pearlybae @knitfreakcosplay and aka.s.mel soon and because I am actively listening to the audiobooks and have no chill about spinning I wanted to make some props for us!
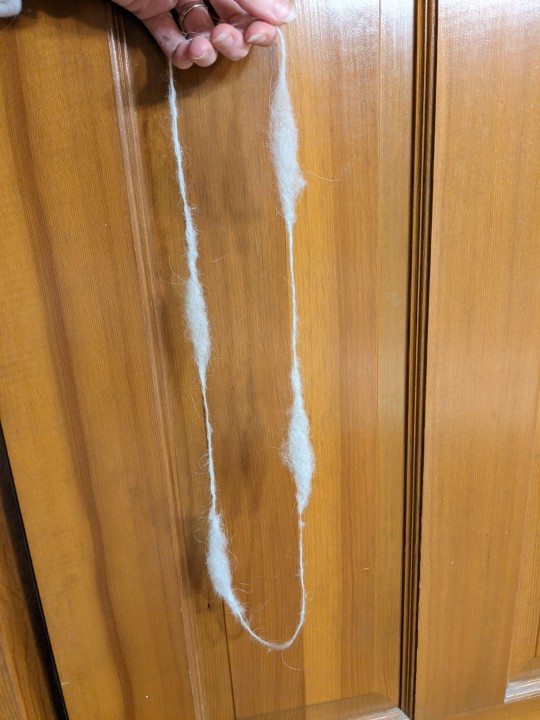
First is Sandry's yarn circle, which is described as being a beginner's first lumpy yarn with four distinct lumps, and also looped back on itself so you can't tell where the beginning is. Drafting huge lumps was a big pain in the butt because the size differential I wanted between the fat and skinny sections of the yarn meant that virtually no twist would get into the lumpy bits. (Could have made them smaller, but I feel like it would have made for a boring prop.) So when I started trying to join the ends of the yarn and even out the spacing between the lumps, the stupid lumps kept drafting out because that's how fiber behaves and the loop kept getting bigger and bigger. To get the loop to hang loosely without plying back on itself, I finger-felted the skinny parts with soap and water and then fried it with a flatiron for good measure.
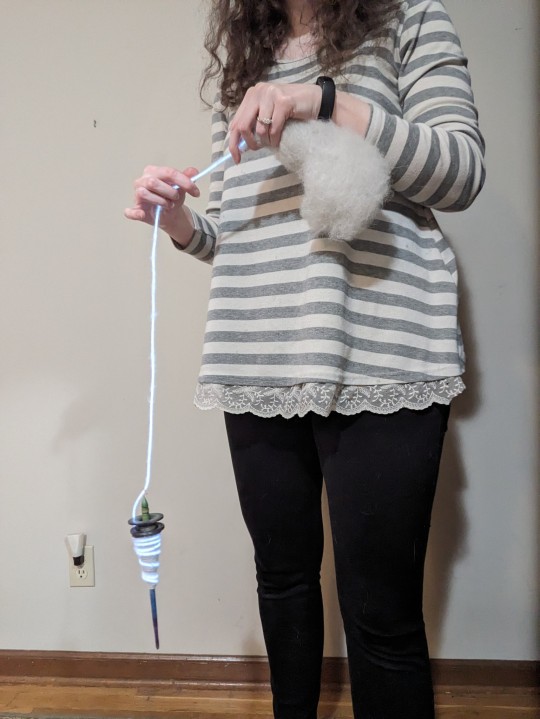
The other prop is a spindle with some light-up yarn. It's just wool wrapped around some EL wire but I'm pretty pleased at how it turned out. And I got to use up some of the mountain of Icelandic thel wool I have to find something to make with, so win-win!
85 notes
·
View notes
Text
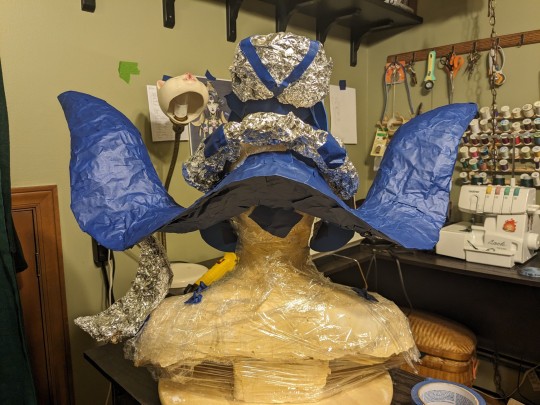
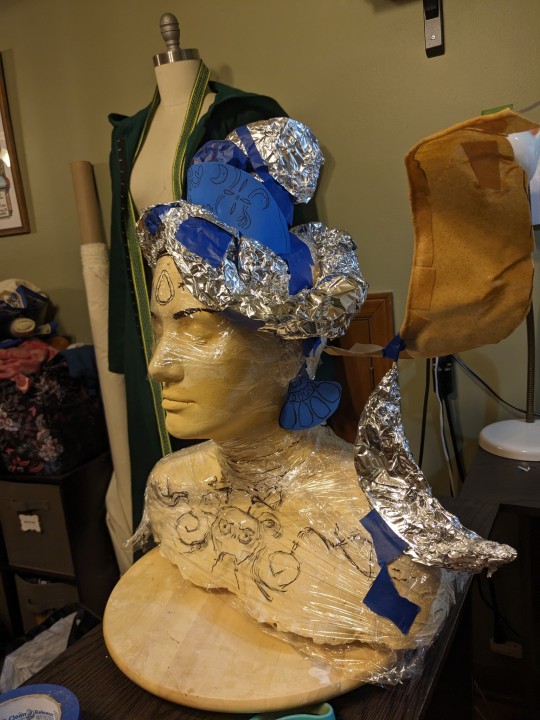
More Nyx progress today! I detached her head wings from the head cast and added some parting lines with more foil. My hope is to use expanding foam to create a mold/shell, then split it apart along the parting lines and remove enough of the foil/tape sculpt to stick a couple layers of kobracast and more expanding foam inside to make a much lighter and resilient duplicate. I've made a lot of wig accessories with expanding foam but this is my first time using it as a mold - a lot of the other mold materials I have access to would be too heavy/expensive and might distort the sculpt if I layered them on too thick. I underestimated the amount of foam I need but it's not the worst thing in the world to let it cure for a day or two before I go to the store and buy more.

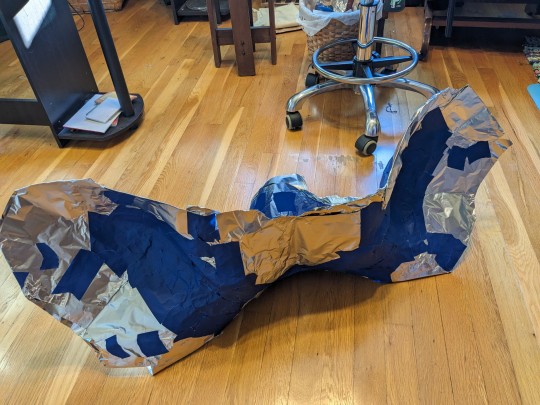
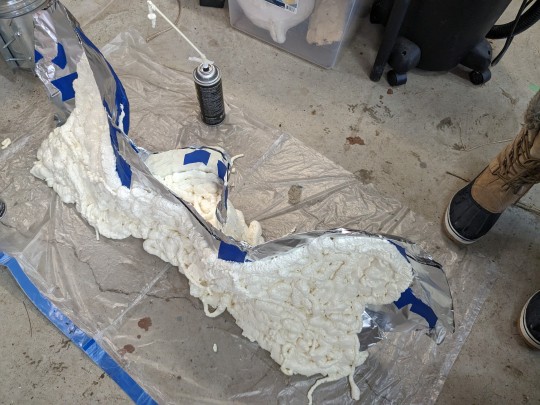
I also refined her top knot and shoulder moon a little bit, and started roughing out templates for her left glove and itty bitty bat wing. I'd like to make the base of her top knot out of expanding foam as well, as long as the thing I'm doing with the head wings pans out.
11 notes
·
View notes
Text
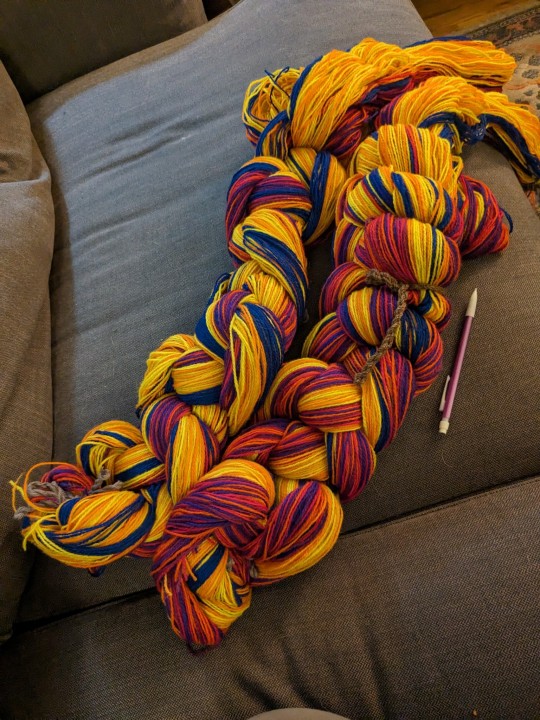
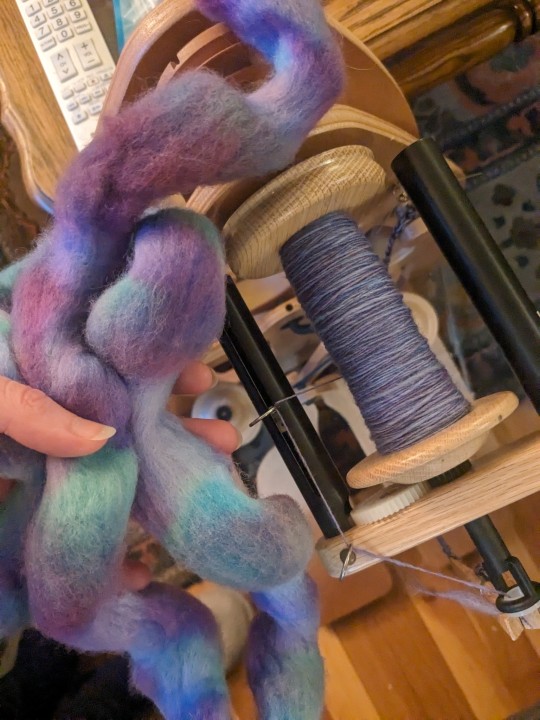
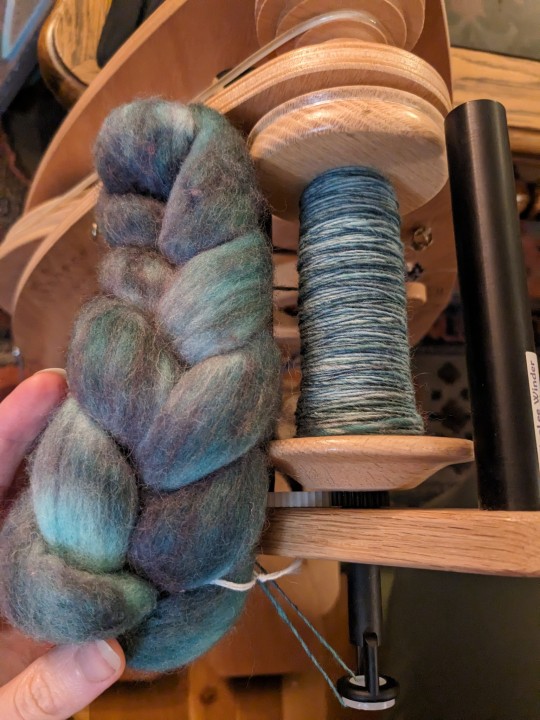
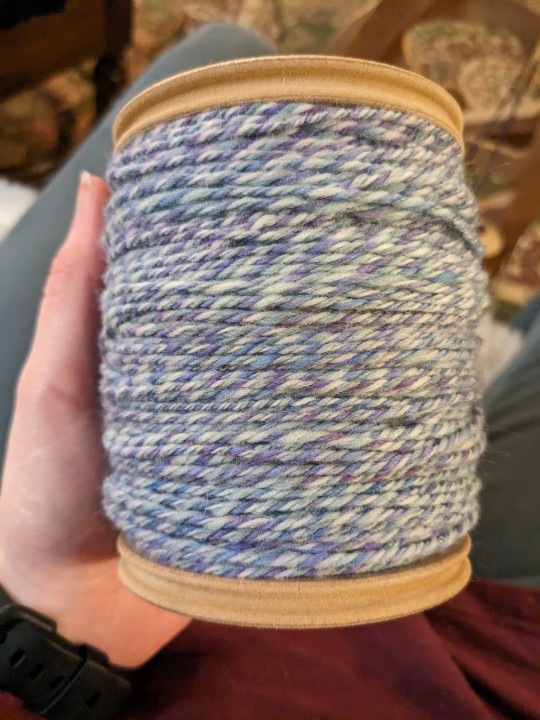
Over in yarn land, I finished spinning some hand dyed merino from a local yarn store. They sold these teeny little 1 oz braids and I found three colorways that I thought would look good together in a 3-ply, so I got 2 of each. I neglected to take a photo of what the braids looked like before, but I did get pics of two of the three as they were being spun.
Tbh, I'm not as thrilled with the way they turned out as I expected? This particular dye method really smooshed out and blended the pops of color I saw on the braids a lot more than I expected during spinning. It's still fairly cohesive-looking yarn, but the process wasn't really as much fun as I expected and I was mostly just looking forward to getting this done and off my bobbins so I could make room for something else. I tried drafting thicker than my default yarn for this as well and was a little less worried about consistency. I don't really find merino the most engaging spin and the dye job on this probably made it harder to draft smoothly, so my hands cramped a lot more than they usually do.
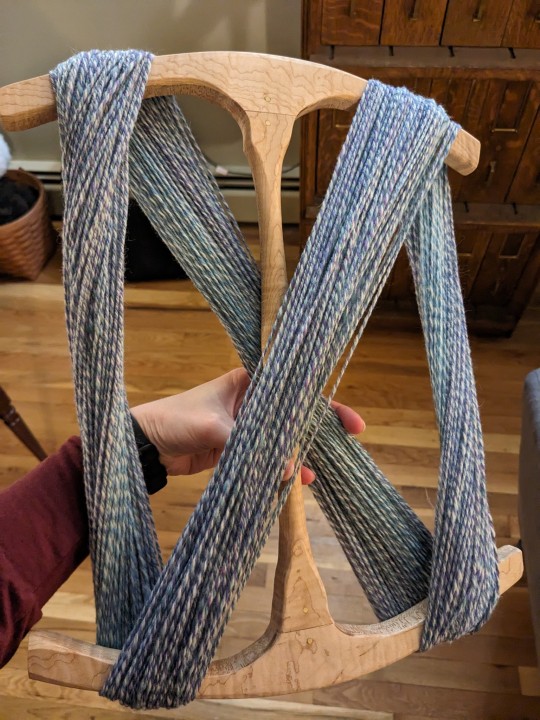
Still, the skein looks pretty cool and I ended up getting about 220 yards and 5.5 oz out of it (lost some of the 6 to uneven plying). Maybe I'll get some interesting color patterns once it actually gets used in a project, whenever that may be.


18 notes
·
View notes
Text

I've been trying really hard to get these wings symmetrical. They're not quite there but I think it's close enough I'm probably going to move on to the next step soon.
13 notes
·
View notes
Text
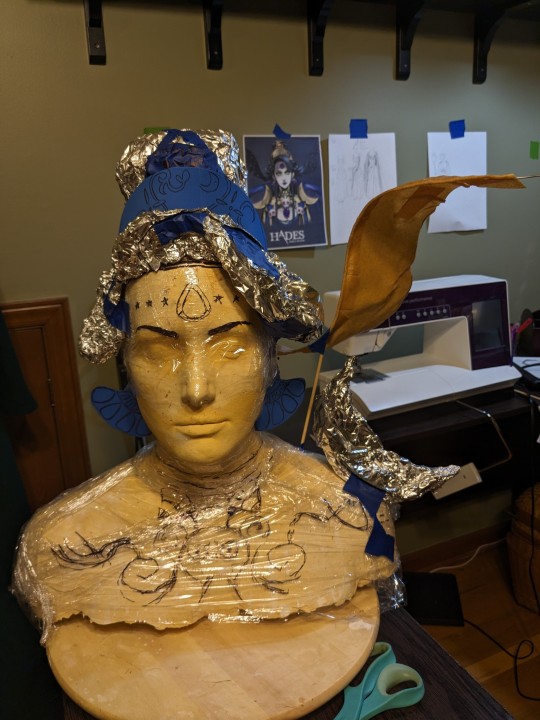

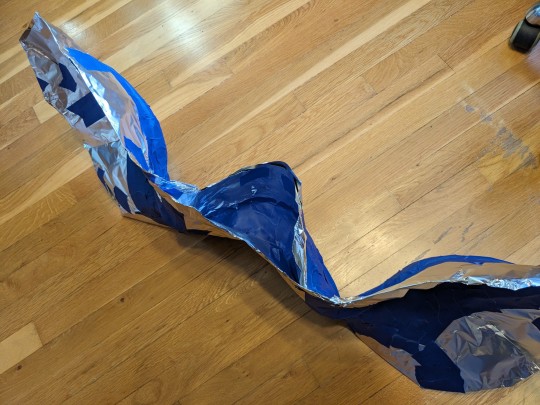
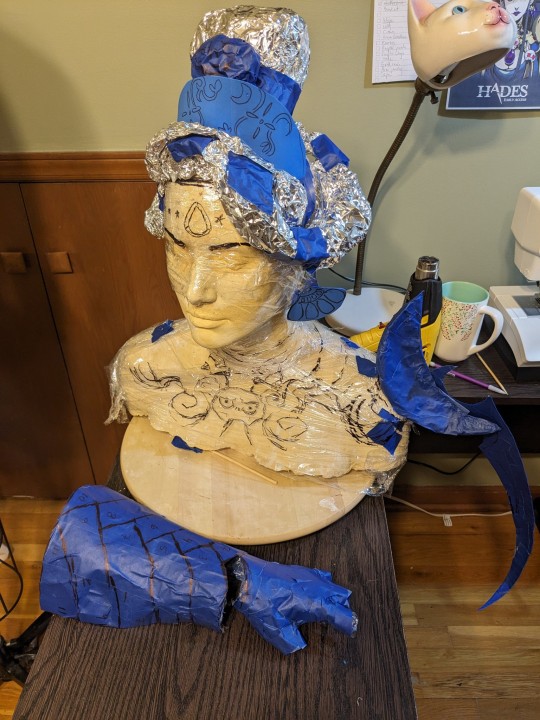
Nyx has been on my cosplay list since 2020 and I have been gleefully swatching and buying supplies since then, but dreading actually starting the project. :( Her giant armor and wig are such a cool design, but are otherwise a really big logistical problem. How do I travel with a wig like this, how far will I be able to turn my head, how long will I be able to have this on my body before I hate it? I don't even really feel comfortable talking about it in more than hypotheticals because I'm genuinely not sure if it's gonna get done.
I spent a couple hours tonight roughing out the general shape of her wig and headgear. I'm really really grateful that my friends helped me do a head cast a few years ago, because trying this stuff on my own body would be too much to bother with. I was hoping I could use some old worbla scraps to help rough out her head wings, but in working with it again I'm remembering why I don't really like it that much. I'll probably replace it with more aluminum foil to get the general shape nailed down before I start breaking the wig down into modular pieces.
23 notes
·
View notes