
Statistics
We looked inside some of the posts by leanni and here's what we found interesting.
Average Info
Notes Per Post
15
Likes Per Post
14
Reblog Per Post
1
Reply Per Post
0
Time Between Posts
10 days
Number of Posts By Type
Photo
15
Text
2
Last Seen Tumblr Blogs


Fun Fact
After the announcement of the deal with Yahoo!, there were 170K signatures of unhappy Tumblr users petitioning to prevent the sale in 2013.
Photo


FMP: Road to 3D Illustration
Four stylised renders! And the pic below shows all the matcaps used for each render + my watercolour painting of the bunny with the camera :) 1st render: following my watercolour painting style 2nd render: moebius style, toon shader-ish (https://www.moebius.fr/) 3rd render: gradients 4th render: abstract/loose shapes
This was fun to do! The only struggles was that the matcaps don’t show up well on hard surface things like my camera... I know why it doesn’t work but its still a shame :/
5 notes
·
View notes
Photo


FMP - Road to 3D Illustration - Development pt.3
Pic1) Tried to “cheat” my way to create an outline via flipping normals+backface culling but when I rendered a turnaround of my model, it was... ugly. It just overtook the matcap and made the models a solid colour... yikes...
Pic2+3) Then I noticed that B2.7 actually doesn’t read my matcap drawing as it is..??? Best thing to do is mess with the size and get the right values until it works. This was my next method on cheating to make an outline, just draw an “outline” on the matcap and it does the job decently lolol
Pic4) Development for my 2nd render! I tried out Moebius’s art style for my matcaps! It’s pretty much a basic toon shader look, an outline on top of any shading - very simple. The hardest part thing to texture is the bunny’s white belly tbh... The matcap doesn’t work like I thought it would so I have to work around that :/
Pic5) Experimented with different styles and they ended in failure...
Pic6) It’s hard to come up with different designs for lens matcap because its just circles upon circles... I needed a change aaand ended up with that :D The top matcap was the original but I wanted the colours to pop, so I did some editing and got the matcap on the bottom
Pic7) Here are all the matcaps I made... Trial and error for daaaays lol
0 notes
Photo


FMP - Road to 3D Illustration - Development pt.2
A screenshot showing most of the development I went through, I’ll only talk about the highlights though :) It all started when I found my old watercolour painting of a bunny with a camera and really wanted that to be in 3D...
Modelled everything in Maya. The camera and tripod were easy except for boolean because it gave me jagged edges a lot of times but having more polys solves that problem yay. The bunny was a bit hard to model because... its Maya but I think I did alright in the end. Using the lattice to move the ears helped to give them more shape :D The bunny’s belly is white sooo I had to find a way to separate that from the main body so that it can have a different texture. Best way I thought of was to use the Multi-Cut tool, Detach and Separate. Worked well in my favour :)
Tested if matcap would work in zbrush and... it wasn’t the best :/ so I ran to Blender and it INSTANTLY worked (The purple-y matcap is Emma Koch’s, I used it for testing reasons) I then wipped up a quick matcap (the pink-peach one), tested it on my models and found out that even if they’re separate meshes... Blender 2.8 can only render with one matcap... I’m sure there’s a way around it but that’s for another day. Anyways, the problem was solved with using Blender 2.7. B2.7 renders slightly different from B2.8 but the result is close enough
0 notes
Photo


FMP: Road to 3D Illustration - Development pt.1
Sooo after lotsa digging around, I found a playlist for stylised rendering (click HERE) it goes through Lightcaps, Matcaps, Photoshopping to make your matcap, Quadshader and postprocessing... It was a big lesson indeed and that was the most I’ve ever been interested in Zbrush ever XD I noted everything down in miro just to help me remember the stuff
The 5 screenshots are just some experiments while I went through the tutorials.
These 2 renders I did were from using lightcaps and LOTS of post processing. I aimed for a happy bright-ish feel for the first render and the second render was going for a dangerous feel. Two sides of the same coin :)
It’s super cool to get quick results like that which is very good for someone like me who is impatient :)))))))) I like this scummy way of “texturing” and I’d die on this hill
0 notes
Photo


FMP: Road to 3D Illustration - Research
Always wanted to do something that felt... arty to me soo this was a good chance :D (from now on, all text in bold are links)
Started off gathering inspiration and mindmapped it. The Soaked Girl is a big icon for me since... its so cool, it looks 2D but its 3D o_o Same goes for the Jacket Girl and Zale’s art
Then I saw Emma Koch’s art and that’s where I finally found square 1. She uses matcaps to create her stuff and its pretty cool how it “moves” with the camera :0 I say “moves” because there’s some maths behind it .__.
0 notes
Photo


FMP: BALD CAT Other than my art directing duties, I did other stuff for the group :D I modelled and UVed kitchen stuff. I started getting references on a miro board and pretty much eyeballed it from that in Maya. The lowpoly male model helped for scale reference as well. The texturing part was left up to Besjan :)
Azhar made snow particles in the game but it was with normal simple circles. He asked for someone to draw actual snowflakes so I took up that job. I used the symmetry tool in Clip Studio Paint and took inspiration from a quick google search of “Snowflakes Clipart”. I chose clipart pics specifically because they usually have simple shapes :)
My other task was to use Fuse recommended by Azhar because its an easy-to-use software to make characters. It’s similar to character customisation in games so I got the hang of it pretty quickly. I made 5 males and 5 females, 10 in total.
0 notes
Photo


FMP : BALD CAT
Got roped into this group as an “art director”! It started when I gave some valuable feedback during our FMP pitches and hit it off there I guess. I remember they said they wanted a stylised game so I told them to have coloured lighting to help set the stylised feel, especially since they have a day/night cycle.
Unfortunately most of my “art directing” progress was in our discord meeting calls so I do not have much to show here.
Azhar wanted feedback on the game so far and I advised to follow LOZ:BOTW’s pause/controls menu just to neaten up on presentation.
Mariana wanted feedback for the cat in zbrush so our group did so. My feedback was that the head looks “square-y” so she should make it longer to get a feline structure going on :)
#FMP#i say quote art directing quote bc i feel like its just normal feedback or advice lol#ue4#zbrush#BALD CAT#y3
0 notes
Photo


FMP: Neon Castle - Quill Tests! (Update: Coronavirus has now made this a dead project... D: We will no longer work on this anymore)
More practice draws, getting used to the shortcuts and other stuff :DD
Its a faraway island of the undead cyclops dragon????? Can’t really see from the pics but I tried to show lighting without the Colourise Tool through using the Line tool with light/dark colours. (Colourise tool is just very annoying to use for lighting purposes D: ) Example: the fence has light pink to show highlight from the tree (because its supposed to be a glowing light source) and the back of the fence has dark brown lines
This was pretty much me experimenting with/learnt more about lighting + opacity which would’ve helped me out when I’d draw in the actual neon castle scene
1 note
·
View note
Text


FMP: Neon Noir Castle - Quill Tests! (Update: Coronavirus has now made this a dead project... D: We will no longer work on this anymore)
Wolf sketch, still getting used to Quill :ooo Practising to draw solid shapes instead of drawing coils for form

2 notes
·
View notes
Text
FMP: Neon Castle Project - Quill tests! (Update: Coronavirus has now made this a dead project... D: We will no longer work on this anymore)
While the 2nd years got to work, I started to crack down on learning Quill! Ugly long neck horse is my first Quill baby :’D Basically making form through drawing coils


After watching tutorials, I messed around with him to make him look better :D Learnt Quill stuff from: Animbrush Academy Quill tutorials and I wrote up lots of notes... Quill has a LOT of stuff....


2 notes
·
View notes
Photo


FMP: Neon Castle Project - Welcoming the 2nd years (Update: Coronavirus has now made this a dead project... D: We will no longer work on this anymore)
Sorted an asset list and the miro board out for the 2nd years. Not the prettiest asset list but it still works :D The Miro board has reference pics for the 2nd years so that they don’t need to do that their selves :) They made really cool stuff, I’m happy with it and them! It doesn’t look like a lot of assets (and they’re not to-scale in the pic, its just for clarity purposes) but when this gets imported into Quill, me and Toree would duplicate them and build up the scene in Quill. We would draw over them too for a stylised look
We kept updated with each other through discord calls and chat so our communication was fine :D
0 notes
Photo


FMP: Neon Castle Project Development (Update: Coronavirus has now made this a dead project... D: We will no longer work on this anymore)
Me and Toree paired up for the first time! We were both interested in Quill (a VR drawing software) and knew about Goro Fujita, a well known VR artist (click HERE to see his work!)
We started to think about recreating the meaning of castles and this lead us towards Neon Noir aesthetics. We were set on the idea of a medieval castle overtaken by modern aesthetics especially to do with neon lights + a bustling live scenery. The people would have TVs and plugs for heads to match the vibe we want :D (Another major inspiration for us: VR Animation | Alex's Sci-Fi World | Phase 3)
Our Miro is MESSY and full of ideas, Moses has contributed to the project too :DD 1st pic shows our main inspirations. 2nd + 3rd pic is the foundations of our 3D blockout. Moses drew up silhouettes which I frankenstein-ed and drew on top of it but I had trouble visualising that in 3D... so i gave up quickly. Ran over to Maya to build it in 3D which was still a bit troublesome even with all the references and drawings we’ve done. Probably because castles just aren’t my kinda thing so it was hard for me to work with. Also felt like I was making blueprints for a whole castle which doesn’t sit well with me :(
4th pic shows all the sketches we’ve done, most of them aren’t 100% rendered because we prioritised quick fire ideas since there will be lots of people in the scene so we can’t spend time on every single person... 5th pic shows Quill tests where I imported the castle’s 3D block out into Quill. (Found out vertex colours or materials do not work in Quill btw which is kinda annoying...) Our second year assistant, Robin, asked if the castle would have weathering so I tried to draw that in Quill. It’s not bad... but we decided that if our second years have time to go into zbrush and model weathering in Zbrush, then that would be a great help :)
0 notes
Photo


Game Pitch Project - 3D Modelling things
My first gig here in Maya was to polish up Tessy’s Maya set (credits goes to her for going at it first tbh). I pretty much made it look more clean :D
I made 3D Icarus! It was pretty fun to make him but I didnt get round to texturing him :/
(Tess rigged him too, he’s animated and everything... it was magical to see him alive in the flesh :o)
1 note
·
View note
Photo


Game Pitch Project - Character Artworks/Style Frames Painty art style for the game because its coool :DDDD
3rd painting is a style frame with the player UI. It’s showing when the game is in its dark phase and Icarus’ wings are the only source of light to let the player see where they’re going. The UI is basically a Mana bar. Its showing how much flight power the player has. Its dependant on the amount of feathers the player collects in the game. I didn’t want a simple bar for the UI so I designed it with the feathers in mind :D
I painted the logo too! I wanted to keep the Icarus motif going. I changed it up just to match it with the overall painty art style that we were going for.
I used references (credits to Tess, she sent cool pics tyvm) for the top 2 paintings and it came out sooooo good. (Very happy about this since I usually don’t do full coloured artworks.) Especially comparing those 2 with this:

^ that was done about 7 weeks before the final paintings. THANK GOD FOR THIS GLOW UP
1 note
·
View note
Photo

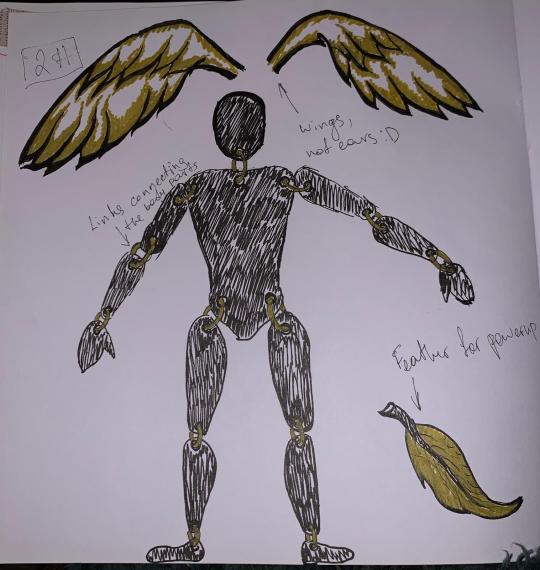

Game Pitch Project - Character (Icarus)
Meet Icarus: wings for arms mannequin man :D
At first, we didn’t have much direction for how we wanted the character to look like... sooo that’s why the third pic shows my concept art for Icarus being a small friendly lil boy. Tessy gave a direction for the character (2nd pic) and I went along with it (1st pic). I wanted to put emphasis on the wings to be the core feature since he’s Icarus and all. The jester shoes were referencing the circus setting of our game and I didn’t want him to have plain looking feet lol
1 note
·
View note
Photo

Game Pitch Project
Pitch PowerPoint/Slides: https://docs.google.com/presentation/d/1tllJPjwylTh6C0xf6hGkRSalHh2XTbAHq8cFtfDT-Ts/edit?usp=sharing
Pitch Document: https://docs.google.com/presentation/d/1TZuHzJ_1788hGW7DZhRhuzP2ojDh2jntBuZU4oShMtY/edit?usp=sharing
+ Sound recording: https://drive.google.com/open?id=1hXTmYrJv2b6wnPUL47Z1CQG2W_ZFRPQ6 (Credits: Tess, me and Jeremy. We wanted the game to be VERY experimental :’) haha bless our souls)
We really went into crunch time but it was VERY stressful :))))
0 notes
Photo


Specialist Pathway - Renders (bottom 2 pics difference is that they have my handpainted texturesss)
hmmm next time I’ll do a scene in a concentrated environment
2 notes
·
View notes