xey/xem French Don't be fooled, I'm a platypus, I don't much stuff (art side account)
Don't wanna be here? Send us removal request.
Text
This has been a topic in one of my discord groups today and I’m so curious what everyone’s approach is as a writer.
Writing linearly means starting at the beginning of the story and writing each scene in chronological order from beginning to end.
Writing non-linearly means you might start midway through the story and write the beginning later, or you might write scenes at random and join them up later, or you add in placeholders as you write to go back to later (like “add action scene here”).
Outlining means coming up with a sequence of plot points to guide the story - i.e. planning/mapping out what the main story beats will be throughout it.
Personally I’m a linear writer, and I don’t outline. I have a loose idea of where the story is going to go, but that’s it. And I can’t skip scenes or use placeholder text — my brain starts shrieking at me lmao.
#pal.. I JUST GO AT IT#WHAT HAPPENS HAPPENS#but also sometimes I have more ideas so it can break a bit the linear stream
4K notes
·
View notes
Text
The issue with not being english and yet writing in it is that there's some way to write that pertain only to french and that I can't properly convey in english....
0 notes
Text
bots on SWA uuurgh
this means that I'll also block my work over there, sorry.
0 notes
Text
Did I just spent like... 20 minutes to answer a comment on a fic in Spanish just because 1. nicer for the commenter and 2. like that I can practice a little ?
Yes, absolutely lmaoooo.
#If you comment on my stuff in french spanish or norwegian. I WILL answer in that language#It most likely will be wonky though#If it's in german... I... might answer in german if I'm motivated...
1 note
·
View note
Text
Melting in the crew
The crew slowly starts noticing an interesting detail with Jimbei, while Jimbei slowly feels accepted by the crew.
AO3
SWA
Chapter: 8/8
Words: 10 930
Language: English
Fandom: One Piece (Anime & Manga)
Rating: General Audiences
Warnings: No Archive Warnings Applies
Relationships: Jimbei & Straw Hat Crew
Characters: Jimbei (One Piece), Roronoa Zoro, Usopp (One Piece), Black Leg Sanji, Tony Tony Chopper, Nami (One Piece), Brook (One Piece), Nico Robin, Franky (One Piece), Monkey D. Luffy
0 notes
Text
"you should be at the club" I should be working on my fanfic
81K notes
·
View notes
Text
fanfic writers what font do you write in
i know on ao3 it's all in verdana but when you're drafting the fic in word or docs or whatever
13K notes
·
View notes
Text
Contrary to popular belief the biggest beginner's roadblock to art isn't even technical skill it's frustration tolerance, especially in the age of social media. It hurts and the frustration is endless but you must build the frustration tolerance equivalent to a roach's capacity to survive a nuclear explosion. That's how you build on the technical skill. Throw that "won't even start because I'm afraid it won't be perfect" shit out the window. Just do it. Just start. Good luck.
67K notes
·
View notes
Text
I have recently received another ask about my canvas pulling and since I've been thinking about making a serious tutorial for a while now, I took the opportunity to take some pics and vids while finishing the tree. Do please enjoy :3
1. Why pulling out canvas at all?
Primarily, this is a fantastic technique to apply cross stitch patterns directly to the item you want OR to make patches from old jeans, like this one:
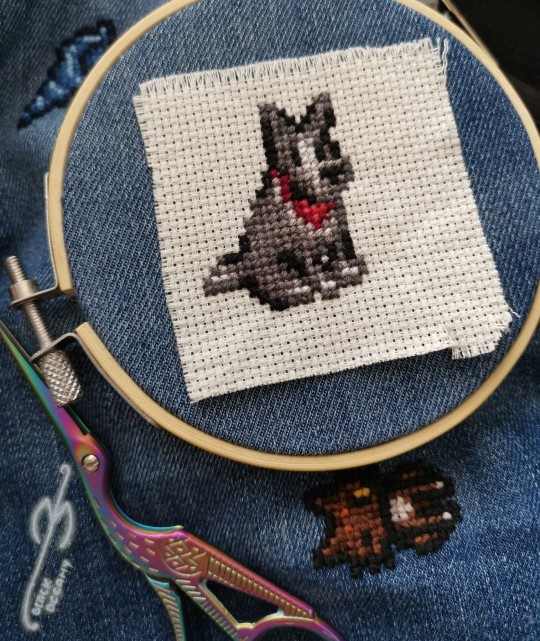
With small patterns I usually don't bother to sew the canvas prior to embroidering, like with the pupper above. In case of the bigger patterns, I usually sew it lightly on the edges just to keep the canvas in one place. The more stretchy the material type is, the more important it's going to be to keep it in place.
2. Why not use a soluble canvas?
I'm sure you can and that they'll be as successful as the regular one 😁 However, as I mentioned in my previous posts here and here, I prefer to err on the side of cheaper, hence the tutorial.
3. Okay. I'm convinced - I even have a pattern embroidered on! What's next?
With small patterns (like the doggo earlier) it's going to be pretty easy. You just pull the threads one by one - preferably starting on the thinnest part of the pattern - and you may not even need the pliers. The fun (?) is with the large pieces, because the canvas has on average quite fragile threads and they like to break. Note - the canvas I'm using and I suppose most of the existing canvas types, will have four threads per one embroidery row. It's usually easier to pull one first and then the other three, bit that may vary when, for example, you managed to pierce the thread during stitching phase earlier 😉
If you were already careful during the stitching, you paid extra attention to embroider EXACTLY between the canvas threads and avoid piercing them at all. There are two benefits to that being extra careful: one, it's easier to pull it out later; two, the stitching gains an extra precision to it (and it looks great!). I recently discover that the round tip needle is making it much easier and if you're interested, there's a separate post about it as well!
On to the process! You can see from the pictures how I started with cutting out a piece of canvas that I can later reuse for something small (recycling is my hobby 🤷🏻♀️). I also pulled loose threads from around the tree:
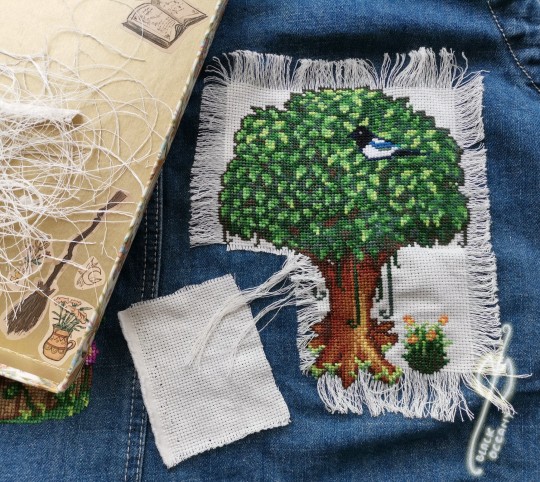
Next part was to clean up the trunk and the grass on the right:

I then cut off the excess to avoid the threads tangling and slowly moved to the sides of the leaves on right and left:
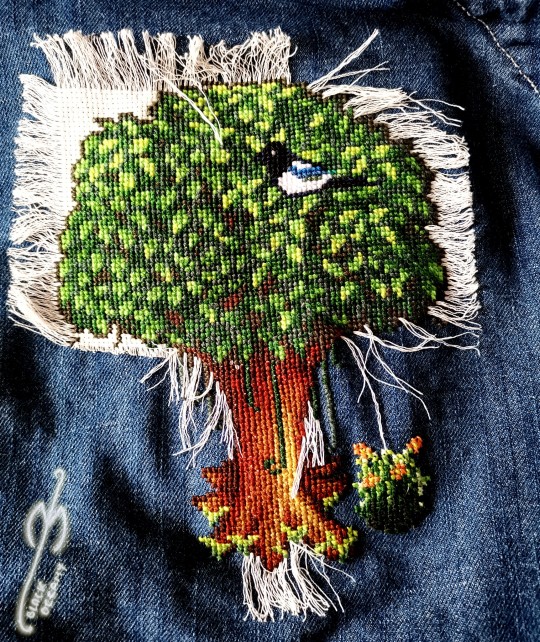

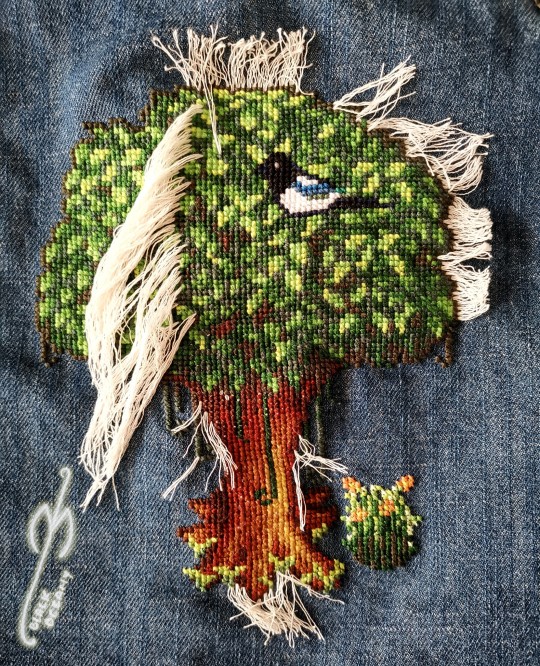
You'll notice that the last photo has the thread pulled halfway through the pattern. That's because on this stage it's usually impossible to simply pull the thread out - even with the pliers it is just going to break off. I use a needle to pluck it from between the embroidery like this:
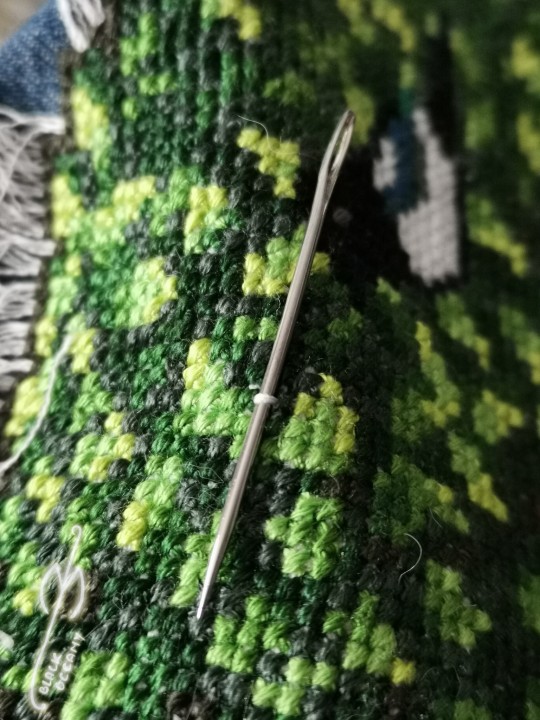
If you're more of the visual learner, I made this vid that I hope explains the process in more detail. You'll notice that I'm using my fingers and not the pliers here, because it's faster than to switch between tools.
And finally, when you're left with single direction threads like these, it's just a matter of pulling them out one by one.
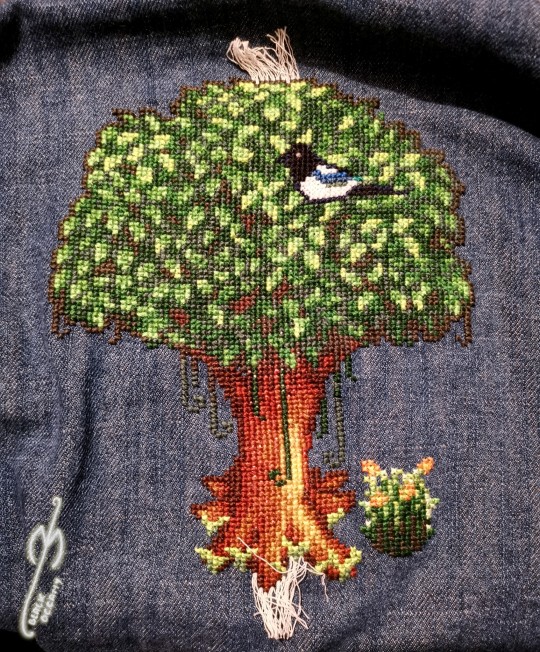
And that's it! The final product looks clean and neat, AND you will notice that without the canvas beneath it's also getting a bit of volume that looks cool (and helps even out small mistakes you may have made along the way).
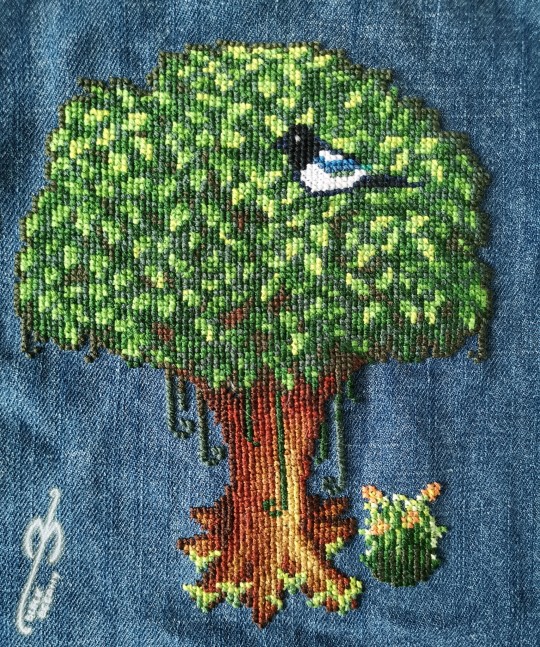
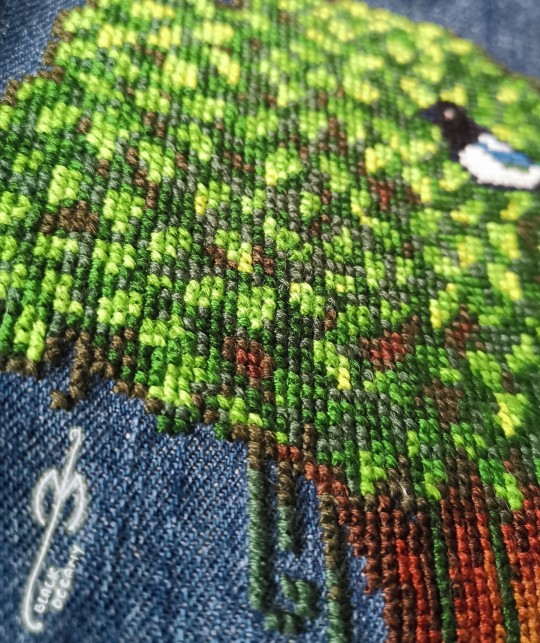
Thanks for reading this far! Let me know if there's something else I forgot to explain 😊
2K notes
·
View notes
Text
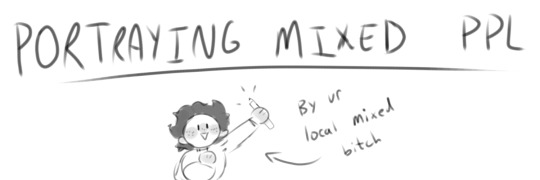
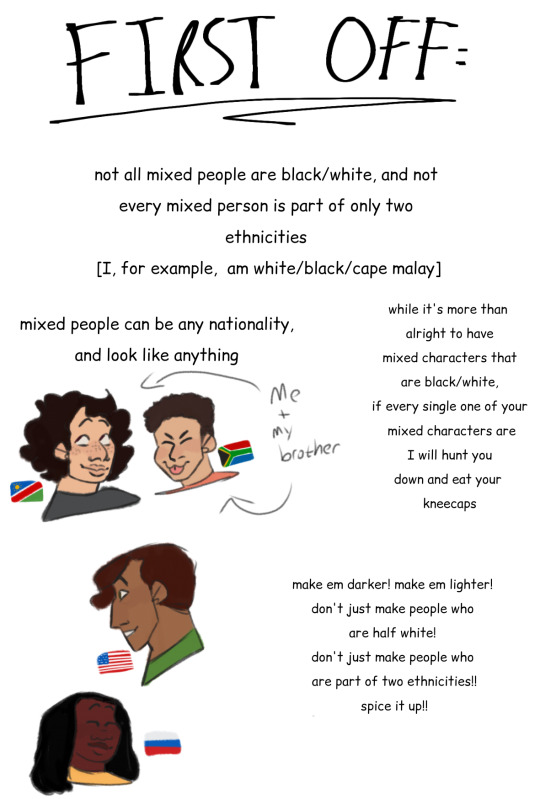


Hi there this is a psa by your local mixed kid
Mixed rep in the media as a whole is kinda a fucking disaster so I'm definitely encouraging people to write more diverse mixed race characters!!! That being said give this handy dandy little guide a read to make sure you have a basic idea of what you're doing. And also. Y'know. Maybe dont make your mixed characters nonhuman. Just a thought
EDIT: I put latina instead of Filipina for Vanessa Hudgens, that's my mistake and I'm truly sorry about it. PLEASE reblog this fixed version instead
43K notes
·
View notes
Text
reminder to worldbuilders: don't get caught up in things that aren't important to the story you're writing, like plot and characters! instead, try to focus on what readers actually care about: detailed plate tectonics
148K notes
·
View notes
Text
I think I wrote the first Norwegian fanwork on SquidgeWorld? The language wasn't listed...
#Yes it's my DaForge idea from uni#So it's like two-three year old? But I finally wrote it#Next is or another drabble for them or one for Kaptein Sabeltann
1 note
·
View note
Text
My Krita brushes are out next week!
Releasing Officially on the 4th of April..... My first Krita brushpack will be available for free on my ko-fi! The pack includes 18 unique brushes for sketching, rendering, and lining.

230 notes
·
View notes
Photo


Weekly art tip: Drawing folds!
Hope you guys enjoy it I’ve put a lot work to make this ^^
I tried to make it as simple as possible :)
15K notes
·
View notes
Photo
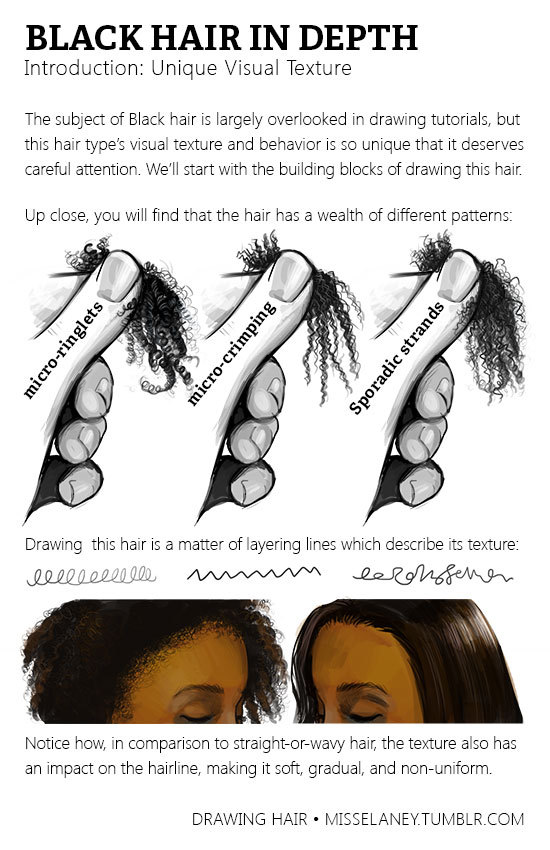
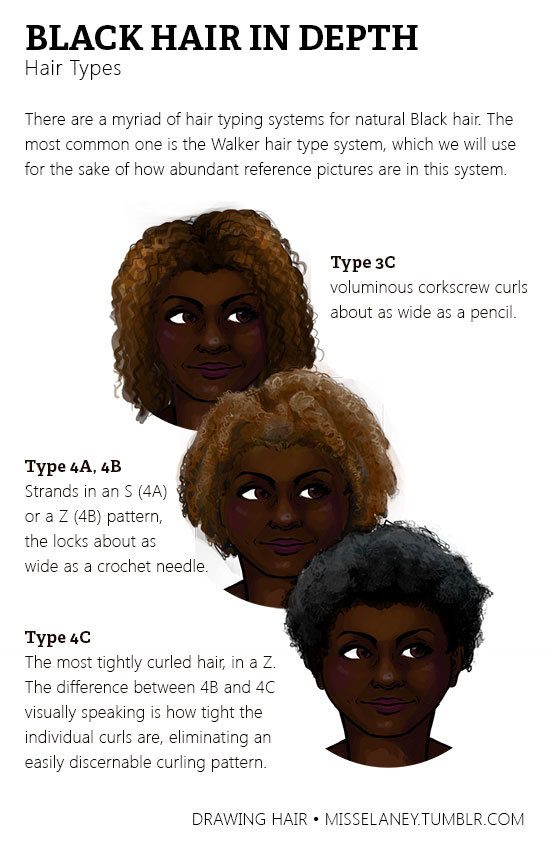
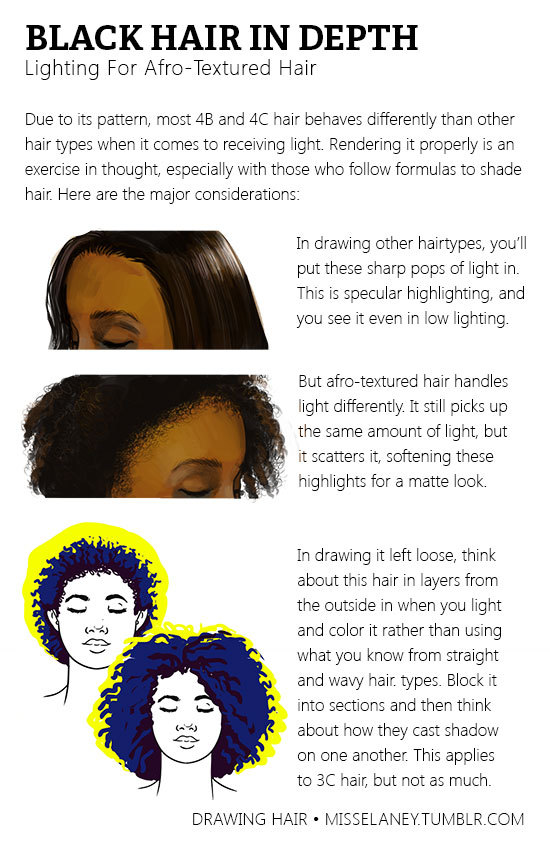
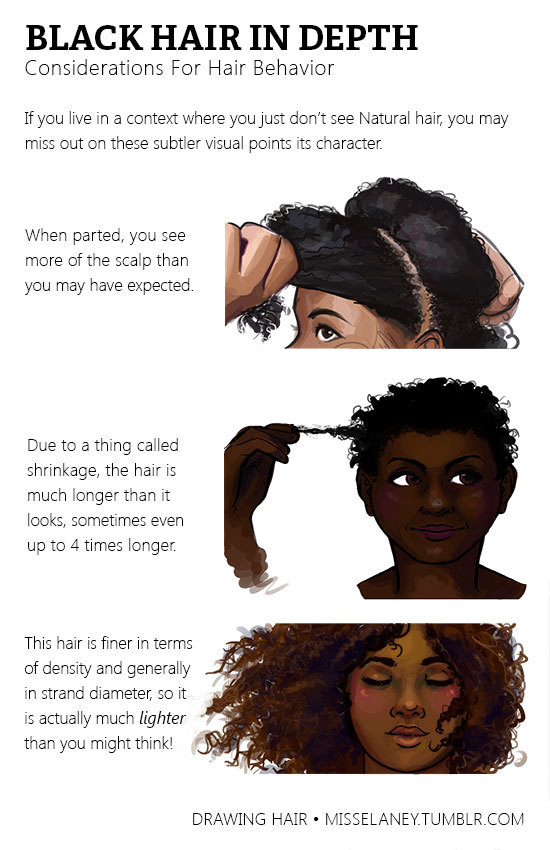
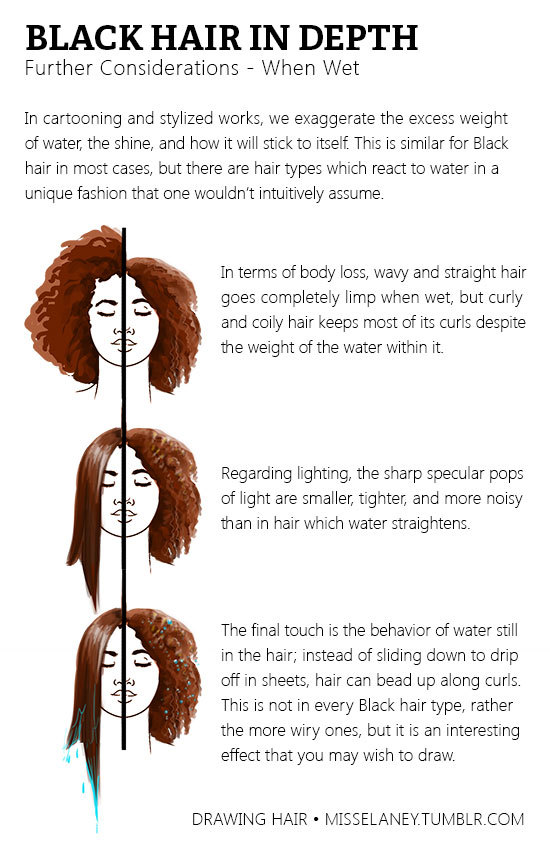
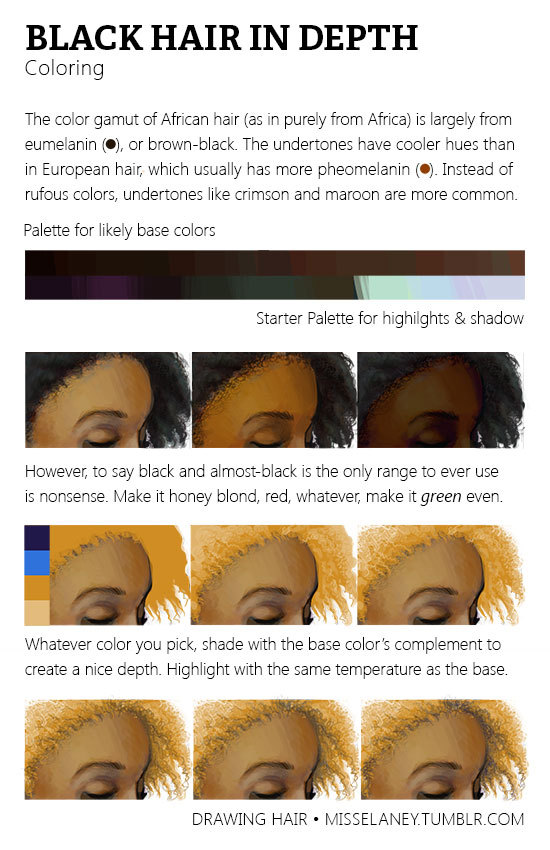
Natural Black Hair Tutorial! Usually Black hair is excluded in the hair tutorials which I have seen so I have gone through it in depth because it’s really not enough to tell someone simply, “Black hair is really curly, draw it really curly.”
The next part of Black Hair In Depth will feature styles and ideas for designing characters and I will release it around February. If you would like to see certain styles, please shoot me a message!
271K notes
·
View notes
Text
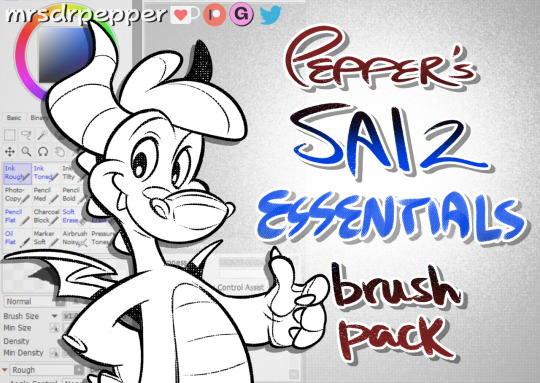
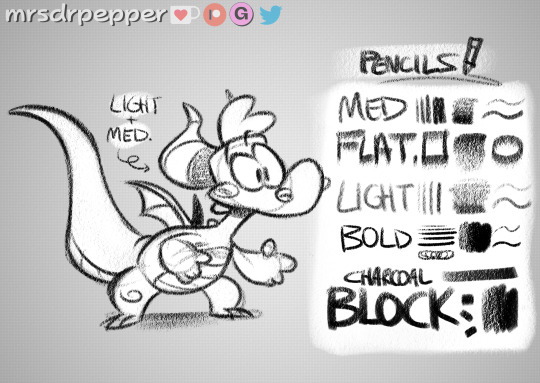


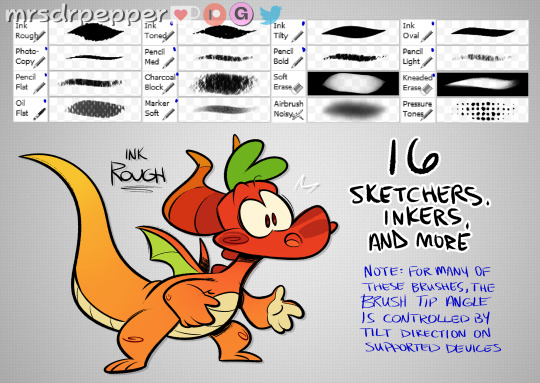
i made some custom brushes for PaintToolSAI ver.2 and put them up for grabs 👀 any sai2 mains?
if you like what you see and want to try these for yourself, feel free to chuck $5 at me on either my ko-fi shop or gumroad! enjoy!
(procreate or CSP user instead? i have other brushes for both on my gumroad as well)
157 notes
·
View notes
Text
Editing Checklist
Editing Software:
StyleWriter 4 is fantastic. It’s an add-on for Microsoft word and has a 14-day trial period. It goes through your text, picks out “glue words”, misspellings, long sentences, homonyms, passive tense, shows your reading grade level, and more.
Editminion *FREE* checks for adverbs, weak words, passive voice, cliches, and homonyms among other things.
Pro Writing Aid is another online editor. It is mostly free, but offers more features if you pay.
AutoCrit offers free analysis for under 500 words, otherwise you have to pay for more text and more editing features.
Paper Rater offers a free service for editing, but it is designed for essays.
Formatting Checklist: This follows the general guide of formatting a manuscript in Microsoft word. However, some literary agents and editors have their own requirements.
Under the paragraph option, change the special indentation to first line at .5”. Change to document to double spaced.
There should be no spaces between paragraphs.
When showing a scene break, center # on a blank line.
Font should be easy to read. Courier New and Times New Roman are preferred at size 12.
All margins should be 1”.
Start chapters on a new page and put the chapter title 1/3 down the page. Write the chapter like so: CHAPTER ONE - CHAPTER TITLE. Press return 4 - 6 times before starting the text of the chapter.
For the header, put YOUR NAME/BOOK TITLE/PAGE NUMBER in the upper right-hand corner. Start this header on the first page of the first chapter.
The cover page of your manuscript should have your name, word count, and contact information in the upper left-hand corner.
The title on the cover page should be in all caps. Your name should be underneath in all caps. If you use a pen name, write YOUR REAL NAME (WRITING AS PEN NAME).
At the end of the manuscript, start a new page and write END.
Self-Editing Checklist:
Spelling:
If you are using Microsoft word for your word processor, use the spell check. After that, go through the manuscript line by line to make sure everything is spelled right. You may have used “form” instead of “from” and skipped it because Microsoft word did not see it as misspelled.
Printing out your work or viewing it in another way (such as a pdf on an ereader) helps find these mistakes.
Beta readers can find what you missed as well.
Use editing software to check homonyms or look up a list of homonyms and find them in your document using ctrl + f. Check these words to make sure you used the right spelling.
Grammar and Style:
First use Microsoft word’s grammar checker, but be aware that it is not always right. Check grammar girl if you are unsure.
For dialogue, you can always pick up a professionally published book and look at how the dialogue tags are used, where commas are placed, and when other punctuation is used.
If you’re in school and your English teacher isn’t too busy, have them take a look at it.
Look out for prepositions. Most of the time, you can omit these words and the sentence will still make sense. Beginner writers use a lot of these in their writing and it slows the flow.
Check for adverbs. You’d be surprised at how many you use in your writing, sometimes up to five a page. Using a few in narration is okay, but only a few. Delete adverbs you find, especially those that end in “-ly”, and rewrite the sentences in necessary.
Delete gerunds and forms of “to be” if writing in past tense. Instead of “were running”, write “ran”.
Check subject-verb agreement.
Use correct dialogue tags. People don’t bark their words. They shout.
Two digit numbers should be written as words (twenty-seven) while numbers with more than two digits should be written with numbers (123).
Avoid passive verbs.
Vary sentence length.
Show with the five senses rather than telling.
Most of the time, you can delete the word “that”.
Avoid using “unique” or “significant” words too often.
Consistency:
Make sure all your font is the same size and type.
Make sure you have no plot holes. Use the comment feature in Microsoft Word to track these plots.
Make sure your time line is consistent.
The tone should fit the scene.
There should be one POV per scene. Unless you’re a brilliant writer and can pull off third person omniscient.
Verb tense should be consistent.
Keep track of the details you release of people, places, and things. The reader will remember if in one chapter you say your protagonist has blue eyes and in another you say green.
Pacing:
The whole book should flow in and out of fast paced scenes to keep your reader interested and slow scenes to give them a break.
The middle should not “sag”.
Sentences should flow smoothly.
Plot:
Keep track of all your plots and sub-plots. Readers will remember them.
There should be a beginning, middle, and end.
Is the initial problem at the beginning of the manuscript?
There should be at least one antagonist. This does no have to be a person.
Is there enough conflict?
There should be a resolution.
All scenes should have something to do with plot.
The climax should be the most exciting part.
Character:
The protagonist should change by the end of the book.
Make sure all characters who come in contact with one another have some kind of relationship, whether good or bad.
Characters must have motivation for everything.
The protagonist must want something right from the start of the conflict.
The protagonist needs to be captivating. The readers wants to root for the protagonist. This does not mean the protagonist needs to be likable all the time.
The readers likes to relate to characters. Make sure your characters are diverse enough that readers can identify with one.
Know who your protagonist is. The main character is not always the same. For example, Nick in The Great Gatsby is the main character, but Jay Gatsby is the protagonist. This is important to know while writing your query letter.
If you can delete a minor character from a scene and nothing changes, then delete that character.
Sometimes you can make two minor characters one without losing any essential parts of the story. If you can, do this.
All characters react and act.
Each character has his or her own life.
Dialogue:
Dialogue should be believable. Read it out loud.
Don’t go overboard with phonetic spelling if a character has an accent.
Dialogue should be informal and natural. It does not have to be grammatically correct.
Prose:
Avoid purple prose. I’ve never met anyone with “emerald eyes” or “hair of fire” (except for the Flame Princess).
Don’t use too many adjectives.
Avoid cliches.
Other:
Don’t info dump. Pace information through dialogue and narration.
The first sentence should spark interest, or at least the first three. If it does, the first paragraph should be the same. And the first 250 words. The goal is to get the reader past the first page.
Let your story rest. When you’re ready to edit, start at the end. Writers tend to get lazy at the end of their story whether they are writing it for the first time or revising it after revising the rest of the story.
Make sure your manuscript is within range for your genre’s word count.
11K notes
·
View notes