
Don't wanna be here? Send us removal request.
Statistics
We looked inside some of the posts by nicerecipes-net and here's what we found interesting.
Average Info
Notes Per Post
1
Likes Per Post
1
Reblog Per Post
0
Reply Per Post
0
Time Between Posts
2 days
Number of Posts By Type
Text
17
Last Seen Tumblr Blogs


Fun Fact
Forty percent of Tumblr users are between the ages of 18 to 25.
Text

French toast recipe
Who said the perfect breakfast doesn't exist? 😍 Look at this stack of perfectly golden French toast (four slices, please!), generously topped with fresh strawberries and blueberries, dusted with powdered sugar, and drizzled with that irresistible stream of maple syrup... 🍓🫐🥞 The morning light, a cup of coffee nearby... It's the ultimate comfort food to start the day or enjoy the weekend! Who's dreaming of sitting down to this right now? Tell us your favorite topping in the comments! 👇 #FrenchToast #Breakfast #Brunch #Foodie #FoodLover #WeekendVibes #MapleSyrup #FreshFruit #ComfortFood #BreakfastGoals
0 notes
Text


chocolate covered strawberries
Ingredients:
1 pound (about 500g) fresh strawberries
8 ounces (about 225g) semi-sweet chocolate chips or a chopped chocolate bar
Equipment:
Baking sheet or large plate
Wax paper or parchment paper
Paper towels
A saucepan and a heatproof bowl (for double boiler) OR a microwave-safe bowl
Spatula or spoon
Instructions:
Prepare the Strawberries:
Gently wash the strawberries under cool water.
Dry them VERY thoroughly with paper towels. Make sure there is no water left on them, as water will ruin the chocolate.
Line the baking sheet or plate with wax paper or parchment paper.
Melt the Chocolate:
Using a Double Boiler: Put about an inch or two of water in the saucepan and bring it to a simmer (not a rolling boil). Place the chocolate in the heatproof bowl and set the bowl over the simmering water (the bottom of the bowl should not touch the water). Stir occasionally until the chocolate is completely melted and smooth. Remove the bowl from the heat carefully.
Using a Microwave: Place the chocolate in a microwave-safe bowl. Microwave on medium power (50%) for 30 seconds. Stir well. Continue microwaving in 15-20 second intervals, stirring well after each time, until the chocolate is melted and smooth. Be careful not to overheat it.
Dip the Strawberries:
Hold a strawberry by its green stem/leaves.
Dip the strawberry into the melted chocolate, turning it slightly to coat most of it, leaving a little red showing near the stem.
Lift the strawberry out of the chocolate and let any excess chocolate drip back into the bowl.
Carefully place the chocolate-covered strawberry onto the lined baking sheet.
Chill to Set:
Repeat the dipping process with the remaining strawberries.
Place the baking sheet with the strawberries into the refrigerator for about 15-30 minutes, or until the chocolate coating is completely firm and hardened.
Enjoy! These are best eaten the same day they are made.
0 notes
Text

Chicken Salad Delight – Creamy & Crunchy
A burst of flavor in every bite! This creamy chicken salad combines tender chicken chunks, crunchy bell peppers, red onions, juicy tomatoes, and fresh herbs—all tossed in a rich, tangy dressing (yogurt or mayo-based).
🧄 Perfectly seasoned and served with crispy toasted bread and a trio of sauces: honey, balsamic vinegar, or spicy—customize it your way!
☀️ Ideal for a light lunch, a cozy brunch, or a refreshing appetizer. 📸 A feast for the eyes... and even better for the taste buds!
✅ Ingredients (Serves 4):
2 cooked chicken breasts, diced
½ red bell pepper, finely diced
½ green bell pepper, finely diced
½ red onion, finely chopped
6 to 8 cherry tomatoes, halved
1 celery stalk (optional), finely sliced
2 tbsp fresh chives or parsley, chopped
4 tbsp mayonnaise (or Greek yogurt for a lighter version)
1 tsp mustard (optional)
Salt and pepper to taste
A squeeze of lemon juice
🥄 Suggested Sides:
Small slices of toasted bread
Olive oil, balsamic vinegar, hot sauce (served in small cups)
👩🍳 Preparation Steps:
Cook the chicken (if not already done): Poach, grill, or roast it, then let it cool completely before dicing into small cubes.
Prepare the vegetables: Finely dice the bell peppers and onion, halve the cherry tomatoes, and finely slice the celery if using.
Mix the base: In a large bowl, combine the diced chicken, prepared vegetables, and fresh herbs.
Add the dressing: Stir in the mayonnaise (or yogurt), mustard (if using), and a squeeze of lemon juice. Season with salt and pepper to your taste.
Mix gently until everything is well combined and the mixture is creamy.
Chill: Cover and refrigerate for at least 30 minutes to allow the flavors to meld together.
Serve: Serve well chilled with slices of toasted bread and your choice of sauces presented on the side in small cups.
0 notes
Text

🍀 Learn how to make tender, juicy Corned Beef and Cabbage in the Instant Pot! Perfect for St. Patrick’s Day or any time you crave a hearty, comforting meal. This easy step-by-step recipe uses simple ingredients and cooks in a fraction of the time thanks to the Instant Pot.
Ingredients:
1 (3 to 4 pounds) corned beef brisket (with spice packet)
4 cups beef broth (or water)
1 onion, quartered
3 cloves garlic, minced
1 pound baby potatoes (or regular, cut in half)
4 large carrots, peeled and cut into chunks
1 small cabbage, cut into large wedges
Instructions:
Place the corned beef in the Instant Pot. Add the beef broth (or water), onion, garlic, and the spice packet.
Seal the lid. Cook on High Pressure for 90 minutes.
Once done, allow a natural release for 15 minutes, then quick release the remaining pressure.
Remove the beef, cover it with foil to keep warm.
Add the potatoes, carrots, and cabbage into the broth.
Cook on High Pressure for 5 minutes.
Quick release the pressure. Slice the corned beef and serve with the vegetables.
🔔 Don't forget to like, comment, and subscribe for more delicious recipes!
0 notes
Text

Chicken Fried Steak tonight? 🤔 Our easy and delicious recipe is waiting for you! Homemade white gravy included. 😉
🥩 Ingredients (Serves 4)
For the steak:
4 thin beef steaks (like cube steak or tenderized round steak)
1 cup (120 g) all-purpose flour
1 tsp paprika
1/2 tsp garlic powder
1/2 tsp onion powder
1/2 tsp black pepper
1/2 tsp salt
2 eggs
1/2 cup (120 ml) milk or buttermilk
Oil for frying (vegetable, sunflower, or peanut oil)
For the white gravy:
2 tbsp butter
2 tbsp flour
2 cups (500 ml) milk
Salt & pepper to taste
👩🍳 Instructions
1. Prepare the steaks:
If needed, pound the steaks to tenderize and ensure even thickness.
In a shallow dish, combine the flour, paprika, garlic powder, onion powder, salt, and pepper.
In another bowl, whisk together the eggs and milk (or buttermilk).
Dredge each steak:
First in the seasoned flour (shake off excess)
Then dip into the egg/milk mixture
Finally, coat again in the flour for that extra crispy crust.
💡 Tip: Press the flour firmly onto the steak during each coating step for better adhesion.
2. Fry the steaks:
Heat about 1/2 inch (1–2 cm) of oil in a large skillet over medium heat.
Once the oil is hot (a small pinch of flour should sizzle), carefully add the steaks.
Fry for about 3–4 minutes per side until golden brown and crispy.
Remove the steaks and place them on a paper towel-lined plate to drain excess oil.
3. Make the white gravy:
Carefully drain most of the oil from the pan, leaving about 1–2 tablespoons along with the browned bits (for extra flavor!).
Add the butter and let it melt.
Whisk in the flour and cook for 1–2 minutes to form a roux.
Gradually pour in the milk while whisking continuously to avoid lumps.
Cook until the gravy thickens (about 5 minutes). Season with salt and pepper to taste.
🍽️ Serving suggestion
Plate the chicken fried steak and generously pour the creamy gravy over the top. Serve with:
Mashed potatoes
Green beans or corn
A light side salad for some freshness
🔄 Optional:
Want a lighter version? You can bake the breaded steaks in the oven or use an air fryer for a crispy finish without deep frying!
0 notes
Text
Green Tea Shot – no alcohol, all the flavor!
A refreshing mocktail with peach juice, green tea, and lime. Healthy, tasty, and super chill
Ingredients (for 1 shot or small glass):
0.5 oz peach juice (or peach nectar)
0.5 oz cold green tea (brewed and chilled)
0.25 oz fresh lime or lemon juice
Dash of simple syrup or honey, to taste
Splash of lemon-lime soda (like Sprite or 7Up) or sparkling water – optional for fizz
Instructions:
Add peach juice, green tea, citrus juice, and sweetener to a shaker with ice.
Shake well until chilled.
Strain into a small glass or shot glass.
Add a splash of soda if you want it fizzy.
Serve immediately and enjoy cold!
Let me know if you want a large drink version or a pitcher for a party!
#GreenTeaShot #Mocktail #AlcoholFree #HealthyDrink #Refreshment
0 notes
Text

🍨 Ice Cream Cake – Triple Layer Delight
A dreamy ice cream cake with layers of vanilla, strawberry, and chocolate, topped with whipped cream, berries, and a rich chocolate ganache. Perfect for summer celebrations or a sweet family treat!
🧁 Ingredients:
1 liter halal vanilla ice cream
1 liter halal chocolate ice cream
1 liter halal strawberry ice cream (or vanilla with fresh strawberries)
Fresh strawberries, raspberries, blueberries
Halal whipped cream (from a can or homemade)
Chocolate ganache (made from halal dark chocolate + cream)
Sprinkles (halal-certified, no gelatin or insect-based coloring)
Chocolate sponge cake or halal biscuit crust for the base
👩🍳 Instructions:
Line a cake pan (preferably springform) with parchment paper or plastic wrap.
Layer 1 – Vanilla: Let vanilla ice cream soften slightly. Spread evenly into the pan. Freeze for 20–30 minutes.
Layer 2 – Strawberry: Add chopped fresh strawberries. Spread strawberry ice cream on top. Freeze again.
Layer 3 – Chocolate: Spread chocolate ice cream and press a layer of chocolate sponge cake or biscuit base on top. Freeze for at least 3–4 hours or overnight.
Decorate: Remove from pan, pour warm chocolate ganache over the top, letting it drip. Pipe whipped cream swirls. Add berries and sprinkles.
Serve frozen with love 🥰
0 notes
Text
Salmon Roe - Topped Blini with Crème Fraîche
Discover the elegance of a timeless appetizer: soft, golden mini blini topped with rich crème fraîche, vibrant salmon roe, and a delicate touch of fresh dill.
Perfect for special occasions, festive gatherings, or a luxurious brunch, this recipe blends silky, briny, and buttery notes in one exquisite bite.
📌 In this recipe you'll learn: – How to make fluffy, golden blini from scratch – The perfect way to layer crème fraîche and salmon roe – Elegant plating for a fine dining presentation
Serve chilled or at room temperature.
Perfect for festive gatherings, elegant brunches, or as a refined starter for any occasion. Pair with sparkling water, infused herbal drinks, or a refreshing citrus mocktail.
.
0 notes
Text
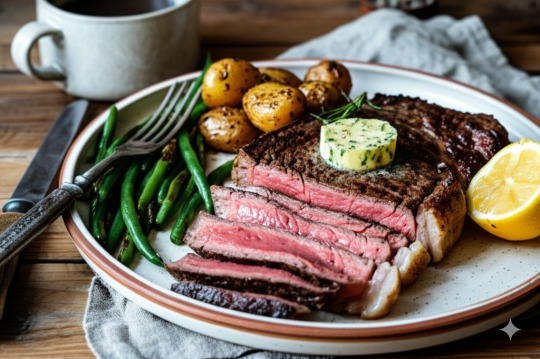
🥩 flank steak on stove
🍽️ A simple pan, a beautiful cut of meat, and a few well-chosen ingredients: butter, garlic, rosemary.
No need for complex techniques to create a memorable taste experience. The magic lies in mastering the cooking and the simplicity of the flavors.
This home-cooked steak, perfectly seared and basted with fragrant butter, proves you can cook like a chef with simple, quality ingredients.
Ingredients:
1 nice flank steak
1 tbsp olive oil
1 knob of butter
1 garlic clove, cut in half
1 sprig of rosemary
Salt, freshly ground black pepper
Preparation:
Take the meat out of the fridge 20 min before cooking.
Season generously with salt and pepper on both sides.
Heat the oil in a cast-iron skillet over high heat.
Sear the meat for 2 to 3 min per side (or longer depending on desired doneness).
Add the butter, garlic, and rosemary. Baste the meat with the melted butter for 1 to 2 min.
Let rest for 5 min before slicing and serving.
Optional: Serve with roasted potatoes and grilled green beans.
0 notes
Text
Deviled Eggs – Step by Step!
Take a peek behind the scenes of this classic bite-sized favorite with this 4-step visual guide: 1️⃣ Boiled and halved eggs 2️⃣ Mashed yolks mixed with mayo & mustard 3️⃣ Creamy filling ready to go 4️⃣ Beautifully piped and ready to serve!
Perfect for brunches, picnics, or party platters 🍽️ ➡️ Which step do you find the most satisfying? Let us know in the comments 👇
#easyrecipe #deviledeggs #homemadegoodness
0 notes
Text


Classic Deviled Eggs Recipe
This simple and delicious recipe is always a crowd-pleaser!
Yields: 12 deviled egg halves (6 whole eggs) Prep time: 15 minutes Cook time: 15 minutes
Ingredients:
6 large eggs
1/4 cup mayonnaise (more to taste)
1 tablespoon yellow mustard (or Dijon for a slightly different flavor)
1 teaspoon white vinegar (or apple cider vinegar)
Salt and freshly ground black pepper to taste
Paprika, for garnish
Fresh parsley, chopped (optional, for garnish)
Instructions:
Hard-Boil the Eggs: Place the eggs in a single layer in a saucepan. Cover them with cold water by about an inch. Bring the water to a rolling boil over medium-high heat. Once boiling, remove the pan from the heat, cover it, and let the eggs stand for 12-15 minutes.
Cool the Eggs: Immediately transfer the cooked eggs to a bowl of ice water. Let them cool completely (about 10-15 minutes). This makes them easier to peel.
Peel the Eggs: Gently tap each egg on a hard surface and then peel off the shell and the membrane.
Halve the Eggs: Carefully slice each egg lengthwise in half.
Remove the Yolks: Gently scoop out the yolks from each half and place them in a medium-sized bowl. Arrange the empty egg white halves on a serving platter.
Mash the Yolks: Use a fork to mash the yolks until they are smooth and crumbly.
Add the Remaining Ingredients: Add the mayonnaise, mustard, and vinegar to the mashed yolks. Stir everything together until the mixture is smooth and creamy.
Season to Taste: Season the yolk mixture with salt and freshly ground black pepper to your liking. Taste and adjust the seasonings as needed.
Fill the Egg Whites: You have a few options for filling the egg whites:
Spoon: Use a spoon to carefully fill each egg white cavity with the yolk mixture.
Piping Bag: For a more decorative look, transfer the yolk mixture to a piping bag fitted with a star tip. Pipe the mixture into each egg white.
Garnish: Sprinkle the filled deviled eggs generously with paprika. If desired, garnish with a small sprig of fresh parsley.
Chill (Optional): For the best flavor, cover the deviled eggs loosely with plastic wrap and chill them in the refrigerator for at least 30 minutes before serving.
Serve: Arrange the deviled eggs on a serving platter and enjoy!
Tips and Variations:
For extra flavor: Try adding a pinch of cayenne pepper, a dash of hot sauce, a little sweet pickle relish, or some finely chopped chives or dill to the yolk mixture.
Make ahead: You can hard-boil and peel the eggs a day in advance. Store them in the refrigerator. Prepare the yolk mixture a few hours before serving and keep it covered in the refrigerator. Fill the egg whites just before serving.
Presentation: Get creative with your garnishes! Besides paprika and parsley, you can use chopped olives, capers, or a sprinkle of everything bagel seasoning.
Enjoy your delicious homemade Deviled Eggs!
You can copy and paste this entire recipe directly onto your social media platforms. Feel free to add a personal note or a photo of your own deviled eggs!
0 notes
Text
Classic Comforting Beef Tips & Rice
This recipe delivers tender beef tips smothered in a rich, savory brown gravy, served over perfectly fluffy rice. It's a hearty, satisfying meal perfect for any night of the week.
Yields: 4-6 servings Prep time: 20 minutes Cook time: 1.5 - 2.5 hours (depending on beef tenderness)
Ingredients:
For the Beef Tips & Gravy:
1.5 - 2 lbs Beef Sirloin Tips, Chuck Roast, or Stew Meat, cut into 1-inch cubes
2 tbsp All-Purpose Flour (for coating beef)
1 tsp Salt (or to taste)
1/2 tsp Black Pepper (or to taste)
1/2 tsp Garlic Powder
1/2 tsp Onion Powder
2 tbsp Olive Oil or Vegetable Oil (divided)
1 large Yellow Onion, chopped
2-3 cloves Garlic, minced
3-4 cups Beef Broth (low sodium recommended)
1 tbsp Worcestershire Sauce
1 tbsp Soy Sauce (optional, for deeper umami)
1 Bay Leaf (optional)
1 sprig Fresh Thyme (optional)
1-2 tbsp Cornstarch mixed with 2-3 tbsp cold water (slurry, for thickening if needed)
Salt and Pepper to taste (for final gravy adjustment)
For the Fluffy White Rice:
1.5 cups Long-Grain White Rice
3 cups Water (or follow package directions)
1 tbsp Butter (optional)
1/2 tsp Salt (optional)
For Garnish:
2-3 Green Onions, thinly sliced
Equipment:
Large heavy-bottomed pot or Dutch oven with a lid
Medium saucepan with a lid (for rice)
Mixing bowls
Whisk
Instructions:
1. Prepare the Beef:* Pat the beef cubes dry with paper towels (this helps with searing). * In a medium bowl, combine the 2 tbsp flour, 1 tsp salt, 1/2 tsp black pepper, garlic powder, and onion powder. * Add the beef cubes and toss until evenly coated with the seasoned flour mixture.
2. Sear the Beef:* Heat 1 tbsp of oil in the Dutch oven over medium-high heat. * Working in batches to avoid overcrowding the pot, sear the beef cubes on all sides until deeply browned. Don't cook them through, just get a good crust. * Remove the seared beef from the pot and set aside on a plate. Add the remaining 1 tbsp of oil if the pot looks dry.
3. Sauté Aromatics:* Reduce heat to medium. Add the chopped onion to the pot and cook, stirring occasionally, until softened and lightly golden (about 5-7 minutes). * Add the minced garlic and cook for another minute until fragrant, stirring constantly to prevent burning.
4. Build the Gravy & Simmer:* Pour in about 1/2 cup of the beef broth and scrape the bottom of the pot with a wooden spoon to release any browned bits (fond) – this adds lots of flavor! * Return the seared beef (and any accumulated juices) to the pot. * Add the remaining beef broth, Worcestershire sauce, soy sauce (if using), bay leaf, and thyme sprig. Stir everything together. * Bring the liquid to a gentle simmer.
5. Cook Until Tender:* Once simmering, reduce the heat to low, cover the pot tightly with the lid. * Let the beef tips simmer gently for 1.5 to 2.5 hours, or until the beef is fork-tender. Check occasionally and add a splash more broth if the liquid reduces too much.
6. Cook the Rice:* About 20-25 minutes before the beef is expected to be done, prepare the rice. * Rinse the rice under cold water until the water runs mostly clear. * In the medium saucepan, combine the rinsed rice, water, butter (if using), and salt (if using). * Bring to a boil, then immediately reduce heat to the lowest setting, cover tightly, and simmer for 15-20 minutes (or according to package directions) until the water is absorbed and the rice is tender. * Remove from heat and let it sit, covered, for 5-10 minutes. Fluff with a fork before serving.
7. Finish the Gravy:* Once the beef is tender, remove the bay leaf and thyme sprig (if used). * Taste the gravy. If it's not thick enough for your liking, slowly whisk in the cornstarch slurry while the gravy is simmering gently. Cook for 1-2 minutes more until thickened to your desired consistency. * Adjust seasoning with salt and pepper if needed.
8. Serve:* Spoon a generous amount of fluffy white rice onto plates or into shallow bowls. * Ladle the tender beef tips and rich gravy over the rice. * Garnish generously with sliced green onions.
Enjoy your comforting, homemade Beef Tips & Rice!
0 notes
Text

Comforting Beef Tips & Rice
Dive into the ultimate comfort food experience with these classic Beef Tips & Rice, a true ode to simple and savory home cooking. Imagine ultra-tender pieces of beef, carefully selected and patiently simmered for hours until they become incredibly melt-in-your-mouth tender. Each bite is delicately coated in a rich, smooth brown gravy, whose complex aromas speak of slow, masterful cooking.
Served hot and steaming (as the steam in image 2 suggests), these beef treasures rest generously atop a bed of perfectly cooked white rice. The grains, both light and fluffy, provide the perfect canvas, ready to greedily soak up that rich and savory brown gravy. To top it all off, a garnish of fresh, finely chopped green onions brings not only a touch of vibrant color but also a note of sharp freshness that contrasts pleasantly with the richness of the dish.
It's the very definition of comfort food: simple in concept, but deep in flavor and satisfaction. A timeless classic that evokes the warmth of home, shared meals, and the simple pleasure of a dish done well. Perfect for warming up a cool evening or simply to satisfy a craving for authentic and satisfying flavors.
1 note
·
View note
Text
Alcohol-free Charoset for Passover! 🍎🍇 A fresh mix of apples, dates, walnuts, cinnamon, and grape juice. Sweet, traditional, and perfect for the whole family.
0 notes
Text
Coffee's Sweet Secret? Meet the Banana Latte!
A warm and comforting hot latte blending rich espresso, creamy steamed milk, and sweet banana syrup. Garnished with fresh banana slices, it's the perfect cozy treat.
0 notes
Text
Coffee's Sweet Secret? Meet the Banana Latte!
For more visite:
www.nicerecipes.net

Banana Latte: Would you dare? 🤔🍌 We think it looks incredibly delicious and perfect for warming up! Let us know in the comments: are you Team Classic or Team Original Flavors when it comes to coffee? 👇
0 notes
Text
Discover this delicious orange chicken, coated in a sweet and savory caramelized sauce, enhanced with orange zest and a touch of sesame. Served hot with fragrant rice, this comforting dish combines crunchiness, tenderness, and an explosion of flavors. A revamped Asian classic to delight your taste buds!
0 notes