my cosplay/craft/art blog (split off from onyx-mindspace) costume and craft spam commencing... common tags: #cosplay #cosplay tutorials #cosplay reference
Don't wanna be here? Send us removal request.
Statistics
We looked inside some of the posts by onyx-closetspace and here's what we found interesting.
Average Info
Notes Per Post
250K
Likes Per Post
145K
Reblog Per Post
105K
Reply Per Post
15
Time Between Posts
28 days
Number of Posts By Type
Text
5
Photo
10
Link
1
Note
1
Last Seen Tumblr Blogs


Fun Fact
Tumblr was the first site to host the blog for President Barack Obama in 2011.
Text

Corsets in cosplay are awesome, so we wanted to make a crash course tutorial! There’s several reasons you may want to incorporate a corset or waist cincher (otherwise known as an underbust corset) into your next costume:
They help keep fitted bodices from buckling or wrinkling
They’re prevalent throughout much of history, and so often necessary when cosplaying certain characters
Costumes from different eras require different silhouettes, which historically accurate corsets can help achieve.
Many modern-era characters wear them (Mami, Elizabeth, etc)
They’re flattering! Corsets are designed to reduce the waist and support the bust, and for anyone not gifted with a natural hourglass figure, they’re a great cheat.
(Note: Corsetry construction is very personal and many people have different methods of construction. This is how I make all our corsets; however there’s many other “right” ways of doing it. If you’re interested in more info check out foundationsrevealed.com) To get started, you’ll need the following:

Keep reading
6K notes
·
View notes
Photo


Worbla sealing technique
I’ve been asked many times how I sealed the Worbla on my Wrathion costume for it to look this smooth. I don’t have progress pictures but I can explain since it’s pretty straightforward. This technique not only allows you to have a smooth surface, it gives you the chance to refine the shape and erase seams if, like me, you’re unable to form Worbla perfectly. Also, if you use a flexible paint and varnish on top, your piece will remain bendable without cracking.
Keep reading
4K notes
·
View notes
Photo


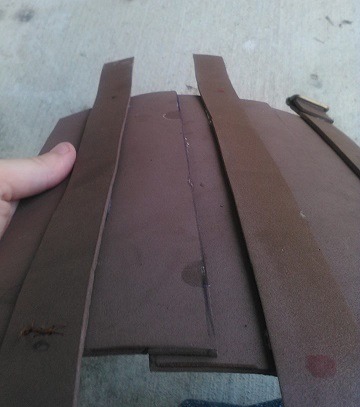
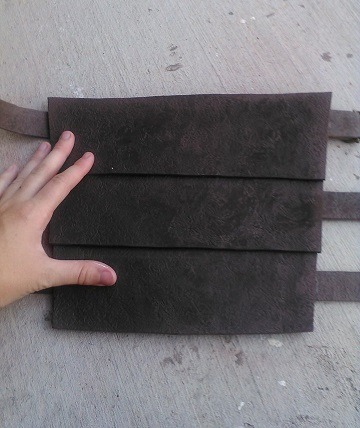
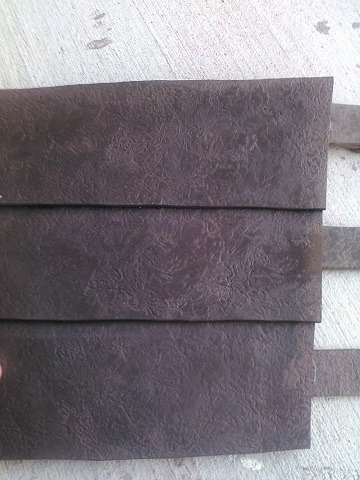
Compression Piped Leather
(As with all leather, remember to use a teflon presser foot and leather needles.)
1. Stretch spandex around a frame. Stretch only in 1 direction and pull as tightly as possible. Nail securely to frame. Check that frame fits between sewing machine’s presser foot and bobbin case.
2. Lay leather in frame and stitch. Distance between stitches determines the size of piping. I used ½" and my pipes are about ¼".
3. The bulk if the frame will make it impossible for stitches to run the full length and width if the fabric. Remove the fabric from the frame and pull it until it lies flat to do additional seams. I was able to sew about 2/3 of the fabric with a gap in the center from where my frame hit the inner wall of my machine.
4. Cut to pattern shape and sew into garment. I recommend basting around the edges before cutting.
730 notes
·
View notes
Note
Oh, that wasn’t me :), but it sounds like I have some who feel the same as I do *wink*
did you ever propose to Hiccup?!?!?!!??
Valka, is that you? What happens between me and Hiccup is our business, not yours.
17 notes
·
View notes
Photo
I’m glad it got to you on-time, you just never know with international shipping :)

Thank you dear secret odin! @onyx-closetspace I’ll see how i get it a little bit smaller(because im sooooo tiny xD) but its really amazing! Thx
3 notes
·
View notes
Text
Tutorials!
I don’t know if anyone on tumblr knows or cares about my tutorials (and miscellaneous other resources)
These are the ones I’ve done so far:
-Spats -Shield backpack -Barn owl plush -Patterning tutorials- draping, sleeves -Buckram hats -Belts and straps without turning -Patterning a basic standing animal plush
And I’m currently taking tutorial requests! These are the ones I’ve had so far:
-Welt pockets and perfect shoulders on vests* (only with pictures this time) -Altering patterns -Jackets and lining -Advanced sleeve patterning
If you’d like to add any requests to that list, now’s your chance!
On that note… Is anyone interested in commissioning a jacket from me? Original designs only, NO cosplay commissions- I’ll give you a 10% discount if you want me to design it for you, too! I’ve been wanting to work more on my original designs, so please feel free to contact me at animus.panthera [at] gmail.com if you’re interested. There will only be one slot available!
*P.S. Cosplay Tip Tuesdays will pretty much only happen if someone asks me a question, on account of because I always think of a great tip and then forget it before I have a chance to write it down anywhere. But if you have any questions you think I could answer feel free to run them by me! I have 10+ years of experience costuming and prop making so I can probably help. ^_^
13 notes
·
View notes
Photo

How to Make Pom Poms from Mollie Makes.
DIY Giant Pom Pom Tutorial from Mollie Makes here.
DIY Mini Pom Pom Tutorial from Mollie Makes here.
I like pom pom DIYs because all you need is scrap yarn, cardboard or a fork. For more pompom DIYs from flowers to eyeballs go here: truebluemeandyou.tumblr.com/tagged/pompoms
What can you make with pom poms?
DIY Large Pom Pom Edged Blanket from A Beautiful Mess here.

DIY Pom Pom Bookmarks from Design Mom here.

DIY Cherry Pom Pom Wrapping Paper from Love.Luck.Kisses&Cake here.

DIY Solar System Pom Pom Mobile from We Are Scout here.

DIY Giant Pom Pom Scarf by Style-Diaries at Cut Out + Keep here.

DIY Pom Poms from Mr Printables: Town Pom Poms here, Halloween Pom Poms here, and Animal Pom Poms here.

DIY Knit Dog Scarf with a Pom Pom from A Pair of Pears here.

DIY Goodbye Stinky Shoes Pom Pom Sachets from Small Good Things here.

DIY Colorful Mini Pom Pom Collar Necklace from Rags to Couture here.

2K notes
·
View notes
Text
COSPLAY MAKEUP AND SPECIAL EFFECTS MASTERPOST
Makeup and Beauty:
Basic Cosplay Makeup 1
Basic Cosplay Makeup 2
Basic Cosplay Makeup for Male Characters 1
Basic Cosplay Makeup for Male Characters 2
How to Apply False Eyelashes
All About Fake Eyelashes: Tips, Tricks, Tutorial
Painless Way of Removing Facial Hair
Sugar Scrub Shaving Technique
9 Different Eyeliner Looks
Perfect Winged Eyeliner Tutorial
Dolly Eyed Makeup Tutorial
Acne Coverage Routine 1
Acne Coverage Routine 2
Get Rid of Blackheads
“Anime” Lips Makeup Tutorial
Lipstick Using Crayons Tutorial
Fake Freckles Using Makeup Tutorial
Coloring Your Eyebrows for Cosplay
The Perfect Eyebrow Tutorial
All About Circle Lenses
How to Make Your Eyes Look Bigger
Battle Hardened Makeup Tutorial
Cosplay Cleavage Tutorial
Cover Up Tattoos (Could work for scars possibly?)
Special Effects Makeup: (Warning: some videos are graphic!)
Fake Blood Recipe (Graphic)
“Claw Wound” Tutorial (Graphic)
“Bite Wound” Tutorial (Graphic)
“Scars” Tutorial
Walking Dead/Zombie Makeup by Greg Nicotero (Graphic)
Pointy Teeth Tutorial
How to Apply Latex Elf Ears
How to Make Blood Appear “Fresh” for Props
Really Cool Makeup Channels on Youtube:
Michelle Phan
goldiestarling
dope2111
Charisma Star (she has lots of Disney stuff!)
Mortem3r
Non-makeup/extra:
How to get Cosplay Photos That Don’t Suck (In 3 Parts)
Con Survival Kit
How to Wash a Cosplay Wig (With Pictures)
if any links are not working, please let me know! i’ll try to fix them!

13K notes
·
View notes
Photo


Just got back some photos from our Last of Us photoshoot at Murphy’s ranch just in time for Halloween!
clicker: me
runner/corpse: @airalos
Ellie: @ruffleshuffle
Joel: @thehandsomestbob
Tess: @unauthorized--cashews
photographer: https://www.facebook.com/thebooradlus?fref=ts
#last of us#LoU#clickers#cosplay photoshoot#scarey cosplay#fx make-up#joel#tess#ellie#runner#murphy's ranch#fungus zombies#cosplay
115 notes
·
View notes
Photo


Mermaids and the hobby of Mermaiding are currently experiencing a resurgence in popularity. A few months ago we posted about Mertailor, a business devoted to creating stunning custom mermaid tails. Today we learned about an awesome DIY alternative: Instructables contributor and avid tailmaker Rogue Siren created a fantastic tutorial for how to make your very own Silicone Mermaid Tail.
“When I was a kid, I wanted to be a mermaid because I thought they were beautiful, amazing creatures. Of course, when I got older, cold hard reality ruined everything. Maybe you can’t be a real mermaid, but you can definitely pretend in a very realistic way. There’s even a hobby called Mermaiding, and one part of that hobby is all about tailmaking. This silicone tail tutorial gives you an idea of just what goes into tailmaking and it’s pretty impressive! Tails can weigh 35lbs or more and custom tails can run into the thousands of dollars. But a skillfully crafted tail is definitely beautiful.”
This tutorial is complex and the materials are on the spendy side, but the end result is a gorgeous mermaid tail made just for you.
Click here to check out the complete tailmaking tutorial.
Visit Rogue Siren Studios on Facebook for additional photos of the mermaid tails and (and some lovely matching tops) that Rogue Siren has made.

[via Fashionably Geek]
3K notes
·
View notes
Photo
Looking amazing so far!


Current chain mail weight - 8.4 lbs!
Added the last row last night, and the side/front splits today. Because I can’t use pins or chalk like I would on cloth, I used a bunch of scrap trim and laces to indicate the centerline down the front, my waist line, and which rows were being removed.
14 notes
·
View notes
Photo


THE Snoggletog 2015 Party!
Snoggletog is again soon approaching, and I, your Chief (lol) will be hosting a huge party for all of you hooligans out there on tumblr! If any of you were around for the Dragons chat Party, this will be very similar, but let’s look below at the details!
About the party: Come and hang out with Hiccup and the gang while we celebrate Snoggletog 2015! There will be laughter, games, gifts, cookies, food, yaknogg and of course a SECRET ODIN! So get your helmets ready because 20 people have the chance at participating in this years Snoggletog Secret Odin event!
Read more to see rules and info on the public Secret Odin events! Also additional chat info.
Keep reading
190 notes
·
View notes
Photo
yay more pictures!


Cleaning off my desk today means going through the pile of cards I have stacked up next to my monitor - ended up finding some cosplay pictures!
Photographer: Turn the Right Corner, Instagram, Twitter
Luigi: https://www.facebook.com/KatsumiyoCosplay?__mref=message_bubble Mario: BlossomBerry Toad: http://phavorianne.deviantart.com/ King Boo: thehandsomestbob DonkeyKong: gowachan Bowser: raevenote Wario: justineandrade Waluigi: onyx-closetspace
#wario#waluigi#king boo#luigi#donkey kong#mario#bowser#toad#genderbend#mario bros#cosplay#mario kart
8 notes
·
View notes
Photo


I picked up this cool special effect makeup book and thought I should scanned some of the cool stuff in it. Sorry if you can’t read the text. just let me know and I can just type out what it say.
147K notes
·
View notes
Text
ATTENTION COSPLAYERS
are your wigs too heavy? awkwardly shaped? won’t stop slipping up or down? bobby pins won’t hold them in? WELL HERE IS YOUR SOLUTION

handy dandy wig clips!
thee holes above the spikes are to sew them in with, and you just pop them open and stick them into your head, and bam they do magic
they sell them at lots of wig stoes, hair care stores (like sally’s) and also online (amazon has them in three different colors for about $4 for 20, which will get you 3-7 wigs, depending how many you need to use on each wig)
get some polyester thread the same color as your wig, some scissors, a regular sewing needle, the clips, and your wig and get ready (tutorial pictures from arda.com)
put about three in at the front hairline of your wig, one center, and two more about and inch or two away from it. place about ¼ inch between the hairline and where the top of the clip is. that way you aren’t able to see the clip or the hair it is attached to when you sew it in


NOW MAKE SURE THE CLIPS TEETH ARE FACING INWARD! they must be on top and facing the inside of the wig for this to work
now sew these things in. do one hole at a time, and be sure to move the wig hair out of the way on the other side so you don’t get it all tangled up. loop it through the hole about 4 times, then tie the thread off. when cutting them off, make sure you don’t cut the wig hair. sew all the holes to the cap and BAM. it’s ready to put on
put on your wig cap and wig as normal, just this time pull the wig forward slightly so that you can hook the clips to the hair under the cap (make sure they get the hair, not just the cap).
BOOM. EASY FIX. it isn’t perfect, but it is a lot easier than bobby pins and can be done in the back of wigs as well to get them from coming up. (for a more indepth tutorial, the one i referenced, go here)
6K notes
·
View notes
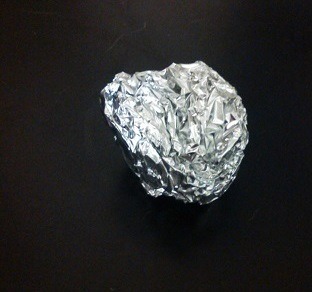
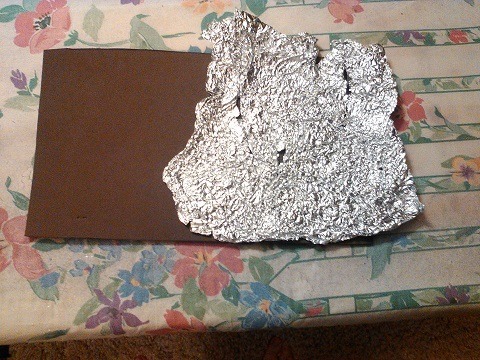
Text
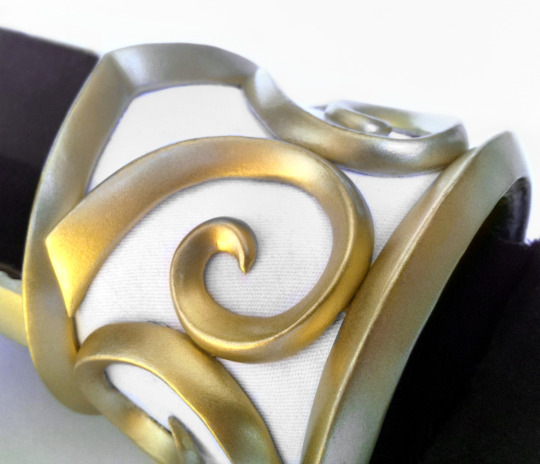
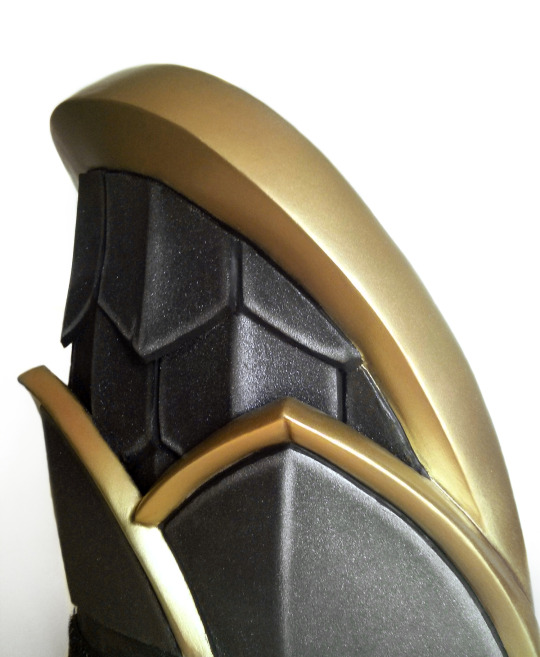
Foam to Leather (Tutorial)
Things you’ll need:
Brown craft foam
Aluminum foil
Clothes iron
Ironing board
Black paint
Brown paint (lighter than your foam)
Paint brush
Paper towel
Grab some aluminum foil and crumble it into a ball. Not too tight of a ball though! The next step is almost impossible if you do.
Next, un-crumple the ball. Flatten it out into one layer. It’s fine if there are a few holes.

Place it on top of your foam.
Take your iron and firmly press it on the foam and aluminum. My iron was set to 3 (polyester) but the correct temperature may be different for other irons. Just remember not to use steam! Before doing this on a large piece, be sure to experiment and figure out what the best temperature and what the best pressure is. On larger pieces, you’ll have to move the aluminum around a lot. It’s not a quick process.
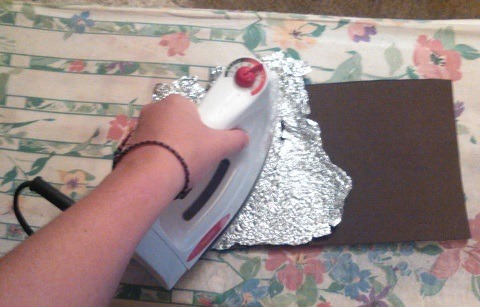
Now you’ve got this crinkly affect on the foam. Next is painting!
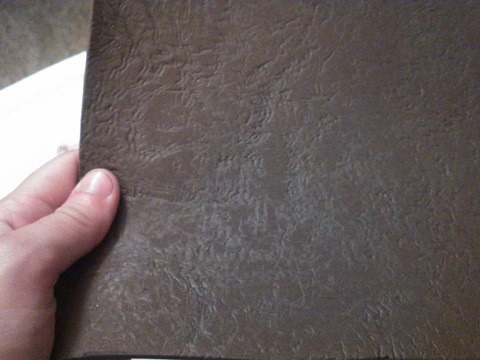
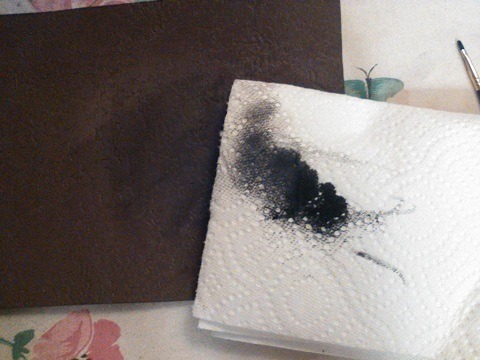
Grab you’re brush, black paint, and a dish with some water. The idea is to dilute the black paint enough so that when you apply it the paint will seep into the divets the aluminum created.
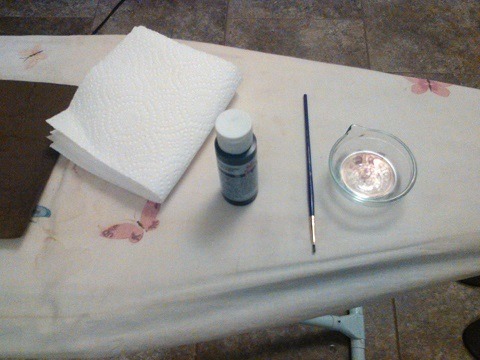
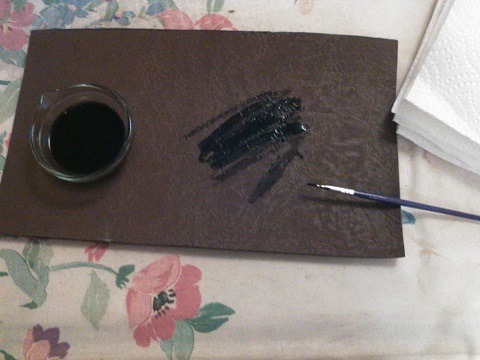
Once the watery paint is applied, wipe it off with a paper towel. Continue to do this for your whole piece of foam.
Now here’s an optional step (of which I haven’t done myself but I’ve known others who have):
Grab the light brown paint and, without diluting it, paint it on. It’s best to use a coarse brush in this case and to try to keep it out of the divets. Wipe some of the paint off.
Remember, imperfections are always good! Uneven paint isn’t necessarily bad so just experiment with it.
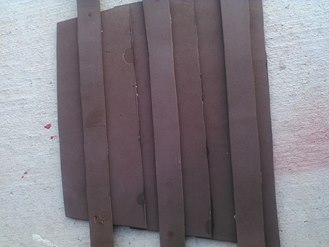
Here’s an example of a bracer I did with this method. The first two pictures are an example of the foam I began with and the rest show the end result. I hope this helps you guys out!

69K notes
·
View notes