Will reblog some things here about Art and probably show you a lot of pictures of my dog Xenos :D like.. everything that's not directly aywas related
Don't wanna be here? Send us removal request.
Statistics
We looked inside some of the posts by sindoesstuff and here's what we found interesting.
Average Info
Notes Per Post
2M
Likes Per Post
985K
Reblog Per Post
1M
Reply Per Post
60
Time Between Posts
6 months
Number of Posts By Type
Text
13
Photo
4
Last Seen Tumblr Blogs


Fun Fact
In Q3 of 2020, 31% of US users access the Tumblr app daily.
Text
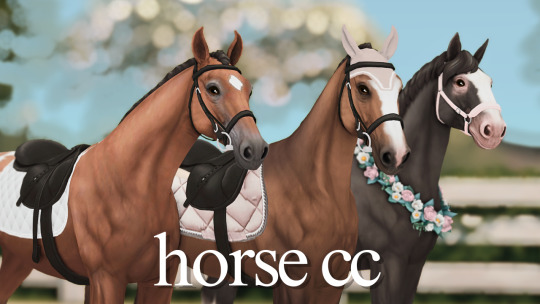
Sims Horse CC Finds September 6th
I've been too busy the last few weeks to put together a list and test most of these items.
If you haven't yet, I really recommend checking out @objucts roundups of Horse CC finds! There are probably things I have missed :)
Hairs
Flower Tail
Flower Mane
Breeze Tail
Fjord Manes 2 new ones
More Feather colors
EA Hair Recolors Manes, Tails, Forelocks, Feathers - Adult & Foals
Even More Recolors Ties and Ribbons
Recolors on Objuct's Short Tail
Roached Mane SSO Conversion
Unicorn Hair Colors (and Hooves)
Pintopalooza Multicolored Mane
Jumper Tail
Longer Mane
Crystal Ripple Tail Shiny, curly tail
Vintage Trip Tails in different lengths
Accessories
Halter Recolors - Leather, LeMieux, Emelie
Basic Rope Halter
Dressage Saddle w Sheepskin
Jumping Saddle w Sheepskin
EA Western Saddle w/o Bags
English Breastplate for EA English Saddle
Western Set recolors (Saddle, Bridle, Saddle Pad)
SaddlePad
EA Recolors Halters, Saddles, Pads
Saddle Blanket
Chester Bridle
Simple Nylon Halter
Nylon Halter with Stripes
Tack with Numbers e.g. for eventing
Eventing Saddle with Sheepskin
Exercise Rug
Objuct Turnout Set update
Front Tendon Boots
Pastel Western Tack Set
Stencils
Shine Stencil v2 (another creator)
Star & Snip 1 | Star & Snip 2
Blaze 1 | Blaze 2 | Blaze 3 | Blaze 4 | Blaze 5
Leg Markings
Tabiano
Bald
Splash
Badger
Overo
Other CAS
Realistic Hoof Recolors
Shine (3 variations) Accessorie Slot - not a stencil, makes saddlepads also shiny
SSO Eyes
Horse Skin/Shading - this might also add a shine to some saddles
Helmet for Sims which allows hair
Equestrian Clothing
Separated EA Equestrian Set found under male
Slightly adjusted Horse Mesh read notes on how it works with poses and saddles
Glorious Striped Hooves
Dream Horse Eyes
Default Replacement Hooves options with Shoes
Really Unnatural Horse Eyes
Build/Buy
Special Paddock Gate updated
Washbay Divider (NOT MaxisMatch)
Stable Decor
Invisible Horse Jump to make custom jumps
Leadrope Clutter
Helmet Clutter
Dressage Saddle and Pad Decor
Mobile Tack Trunk
Other
Lead Horse XML Mod
Better Horse Breeding CurseForge only allows one version to be installed, sadly in this case it means you can only have one of the improvements but you can download the other files via the browser
Selectable Pets Always
Equestrian Center always open
#sims 4 horses#sims 4 custom content#ts4 horse cc#sims 4 horse cc#ts4 cc#sims 4 horse ranch#the sims 4 horses#ts4 horse cc roundup
104 notes
·
View notes
Text
Sims 4 Horse Ranch Animation List

This is literally just a random pic I took in game
So a list I've found useful before is the list of EA animations provided on the page for Pose Player. However, that list (afaik) has not been updated in a while and so I went through and manually copied EVERY SINGLE animation name from the SIms 4 Horse Ranch for your needs. It took me many many hours but I can share this list with you for your convenience
This is not cc, this is to be used with pose player.
Download: Google Drive
39 notes
·
View notes
Text
Recent Sims 4 Horse CC Finds
Maybe I should add dates to these so it's easier to keep track? hmmm - today is August 24 :D
All White Saddles
Equestrian Sereis (Manes, Tails, Forelocks)
Longer Wavy Mane
Riding Helmet
Recolors of Objucts Rugs
Zorela's Horse CC (Saddles, Saddlepads, etc)
Fjord Manes and Forelocks
Dressage Letter Posts (Simlish)
Decorative Jumps
Bareback Pad
Western Saddle with Sheepskin
Jumping Saddle
41 notes
·
View notes
Text
Multicolored Mane progress
I was sick for a while so haven't gotten around to playing with the mane WIP until today. I made it more realistic and I think I like it better now.
Imported all of the colors into the package and noticed one of the colored strands doesn't follow the shadow correctly... I might decide to not care about it so I can skip the resaving/importing of all the colors... (Photoshop would be neat right about now)


The black is supposed to be the same color as the forelock but it looks slightly different. Not sure why. I used the exported mane diffuse layer for my mane :/
Anyone know why that is? I also feel like I need to figure out why the texture looks a bit blurry/pixelated compared to the originals.
18 notes
·
View notes
Text
CC Finds
Unicorn Trait can give Sims +1 day of life
Many awesome stencils check their account @maeveywaevey!
Dressage Arena Fence
Wall Mounted Dressage Letters
Dressage Cones
Metal Saddle Wall Holder
Show Plaid Mane
Super colorful Manes & Tails
Hitching Post
Barn Board Decoration
Another Barn Board
Bareback Pad
Turnout Set
Not Horses exactly:
4 Sims Rider Outfits
Horse Coffee Table Book
20 notes
·
View notes
Text
Recent Sims Horse CC Finds
Arena Decorations
Stencils: Horse Shine Stencil | Pixel Pony Shader | Leg Marking Stencil
LeMieux Saddlepads Part 1+2
EA Saddle with Sheepskin
Bridles: Loose Ring Snaffle | D-Ring Snaffle+Loose Ring Snaffles | Double Bridle (and other Dressage CAS)
Wings: Open Wings | Open Wings 2 | Closed Wings
Hay Bed
Not 100% horse specific:
CAS Background Stable (TS3)
Functional Well Pump Horse EP
12 notes
·
View notes
Text
another amazing list of CC
60+ Links Must Have Horse CC, Default Overrides & Mods
Watch Video here
Defaults & Overrides
Realistic Coat
Eye Replacements
Smaller Eyes
More Sideway Eyes
Custom Content Tack & Accessories (Gear)
Bareback Horse Riding
Western Saddle Recolors
Jumping Saddle Pads
Quilted Saddle Pad
Hermes Blanket
Medieval/Western Saddle Pad
Saddle Pad with Sheepskin
Saddle Pad & Bridal Recolors
Ribbon Recolor
Saddle With Half Pad
Saddle With Sheepskin Pad
Simple Snaffle Bridle
D-Ring + Two Loose Ring Snaffles
Halters
Halter Recolor
Halter & Accessories
Dressage Saddle & Pad
Ombre Saddle Pads
Dressage Set
LeMieux Saddle Pads, Ear Bonnets & Leg Wraps
Better Leg Wraps
More Elegant Unicorn Horn
One Ear Headstall
Solid Western Blankets
Manes/Tails & Other CAS CC
Short Tail
Mirrored Manes
Flickers Manes
Short Mane
Retextured Mane & Tail
Longer Mane & Forelock
Longer Mane & Forelock Version 2 & 3
Wavy Mane & Tail Recolor
Fjord Horse Mane
Subtle Feathers
Warmblood Brand Stamps
Warmblood Brand Stamps Nr. 2
Champagne Delight Shine Stencil
Pixel Pony Shine Stencil
Gallery Creators For Horses
camthecowboyman
lala82648
CrazyDoves
Download Horses/Coats
Palomino
Seal Bay
Chestnut
Cremello
Arabian Mare
Grey Thoroughbred
Norwegian Fjord
Best Creators For Both CAS & Build/Buy Horse CC
@objuct
@domaine-du-fleau
@studiosweetpeacc
@minervamagicka
@horsesimblr
@buckarooranch
Sass and Freckles
Poses
20+ Best Horse Poses List
Conformation
Pasture Poses
Horse Whisperer
Bareback Mounting
Jumping
Standing
Training Routine
Work With Young Horse
Horses And Dogs
Dressage
Horsing Around
Join equiliberty's discord server here. ♥
2K notes
·
View notes
Text
Recent Sims 4 Horse Custom Finds
I really enjoy and appreciate when someone else makes these lists of recent CC finds like e.g. @objuct (find their latest roundup here: https://www.patreon.com/posts/cc-finds-roundup-87304529 ) ! It's just so nice to be able to click through a list of links and grab all the shiny new CC.
Soooo I figured I'll make one myself and might help someone else out c:
@buckarooranch - lots of multicolored manes/tails (foals too!) and other great CC
Kebbe - also has great stencils for horses!
The BoseeladyTV - Potentially helpful mod for Ranch Hands
@kalino-thesims - lots of amazing mods, especially things to turn horses into other animals (deer, zebra, dromdar?!)
Emelie - custom jumps, halters (even with leadrope), and more!
@awesimsimmer-girl - these jumps without white markers are just amazing
@maeveywaevey - many custom coat stencils and brushes !
Illusion EQ Custom Content - They're also working on a rustic stable set which looks great!
21 notes
·
View notes
Text
Sims 4 horse stencil painting in photoshop 3D
Howdy!
Today I'll show you how to use the 3D horse model @minervamagicka extracted to paint your own markings for Sims 4 horses in photoshop. My photoshop is in german but this tutorial is super easy and I marked everything you need. If you have any trouble I'm happy to help!
What you need:
a Photoshop version that's capable of doing 3D stuff
the Sims 4 horse model I edited so the textures work for making markings - get it here
Step 1
Open the sims4horse.psb. You can rotate your horse with the move tool marked in the first screenshot. In the layer window you see three textures (hooves, body and head). If you double click them they open up separately. You can see that in the second screenshot.


Step 2
Now we paint. Grab your brush tool and paint directly on the 3D model. Make sure the layer of the horse is not locked or fixed and is active. If you're not sure just click on it to make sure it's active.
You can also paint the texture file we opened in Step 1. To update your textures you might need to refresh the texture by toggling the visibility of the texture off and on by clicking on the eyes next to the texture names in the layer window of the .psb file. But most of the times it should update simultaneously.
You can add layers in the texture files if you need it. For this tutorial I chose to keep it simple.


Step 3
If you painted the head and body you will see that the texture files are separate. We need to merge them together to create stencils for the game. Open the head and body texture, if you haven't already, by double clicking them in the layers window of the .psb file.


Step 4
Copy either the head or body texture and paste it on top of the other one. I copied the head texture to the body texture. To merge them I made a layer mask. You can now save the image.

Step 5
You've done it! For stencil making you want to keep in mind that everything that's black will be invisible and everything white is visible. The stencils ingame work like masks in photoshop.
Please follow @h-emera's tutorials for stencil making to move on from here.
88 notes
·
View notes
Text
Learning how to do custom content
The horse EP somehow really tickled me to try my hands at CC again... I only ever tried it breifly when Sims 2 came out with some clothing recolors.

It's pretty fun and I'm quite happy with the mane :D but I feel like the style is probably a bit too cartoony?
I had it more realistic in the beginning but then thought it needed to be more cartoony :/
I'll probably make another version of it and see how that goes. Learnt a ton already doing this though :D
14 notes
·
View notes
Text
Custom Coats for Breeds WIP
Together with @h-emera we found a way to add custom coats to the actual breeds! Her guide for the custom coats got me into this, and it took a few hours of digging into files with her. This is super exciting :D

Custom Coat pattern for Galineers Cob in Breed selection

Custom Coat pattern for Galineers Cob
However, we've not managed to make the custom coats show up as a breeding option. I was hoping the carbon copies are happening because the breeds/coats only have one swatch.
I really want to find a way to make breeding horses nicer and less copy-y. Sadly it looks like this might just be either a bug or the way The Sims has handled hrose breeding. So far it only considers the parents exact coats. Dogs (and probably cats) select from all coats tagged for the breed when breeding. INCLUDING custom coats made following @h-emera's guide (yes it works for other pets too!)
Will keep digging :)
9 notes
·
View notes
Text

Looks like the horse breeds may be lacking descriptions? Actually not sure where one would see those in the game... Dogs have them it looks like :D
2 notes
·
View notes
Text
This is an amazing find and guide ! I just started looking into creating custom content a few days ago and this gave me a lot of insight.
Spent all evening playing around with it and tried to figure out if it is possible to get the coats via breeding - aka. find out if they are attached to the breed (like cats and dogs).
No success with the horses but I tried it with an Australien Shepard and it worked there :O

Basically I created a coat pattern for the Australien Shepard, I think the same way I did it for the Appaloosa (following the tutorial), and it is one of the breed's coat options for breeding!! :D
Now the horses all only have one swatch for the breeds, so I am hoping there is some way to attach the custom swatches in the same way as with the dogs...
Any tips very welcome.
Guide on making custom coat presets. (Allows for better quality custom coats)
Okay, I decided to throw this together. There's some things I can't figure out still, but oh well, we're just getting through this as we go.
To clarify what I mean - this is not a stencil or a brush.
This will appear here:
To preface this guide though, I cannot, for the life of me, figure out how to make it appear as an individual option in-game, so, these are considered SWATCHES of the original coats.
Okay, with that out of the way.
Things you'll need:
Sims 4 Studio
GIMP
Probably Notepad, but it's optional on how easy it is for you to track things.
Guide:
These are the tools we'll be using in S4S.
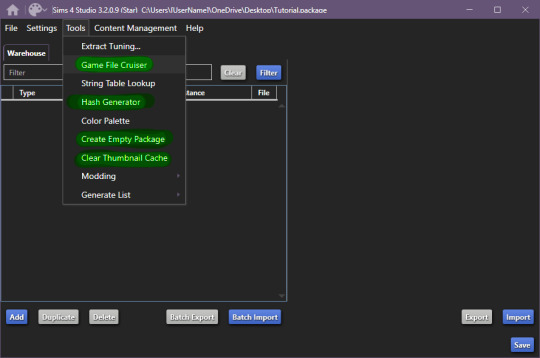
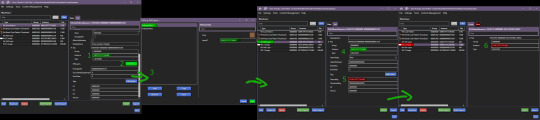
Start by creating your empty package, once you're done, open up Game File Cruiser:
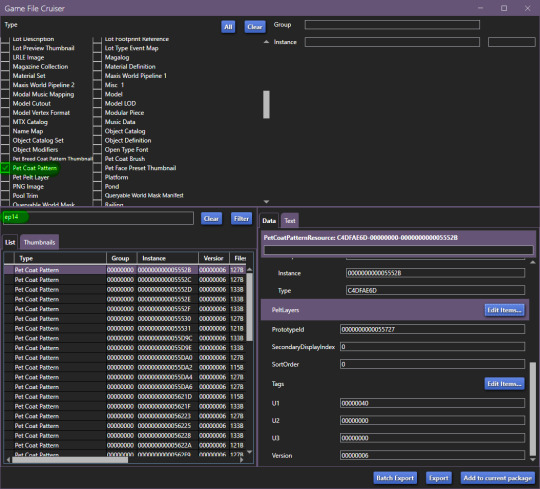
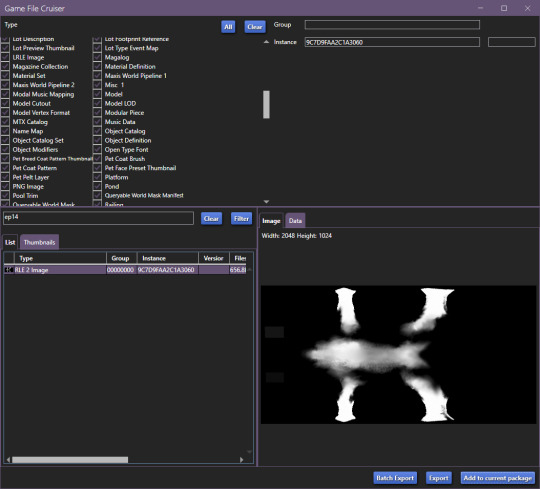
before you do ANYTHING, make absolutely sure that the search bar below the file list has "EP14" in it, otherwise you will 100% end up editing a cat or a dog coat pattern and that's now what we want, at all.
Add the first horse file to your package
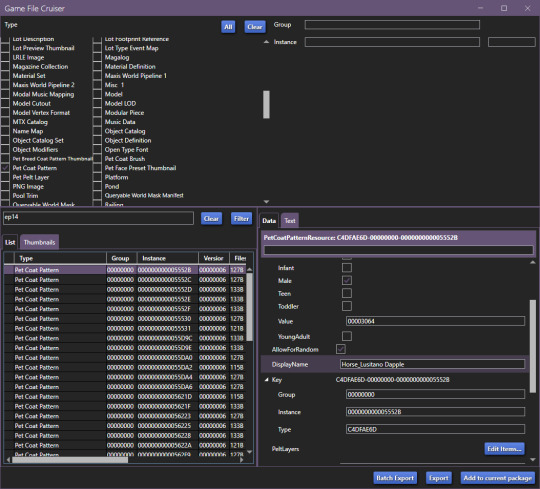
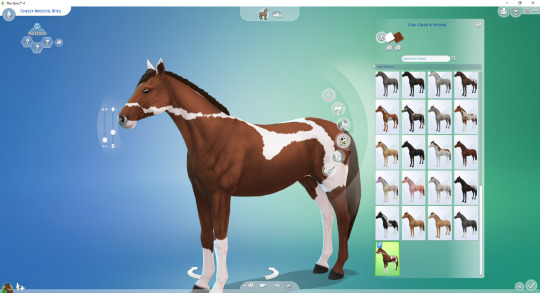
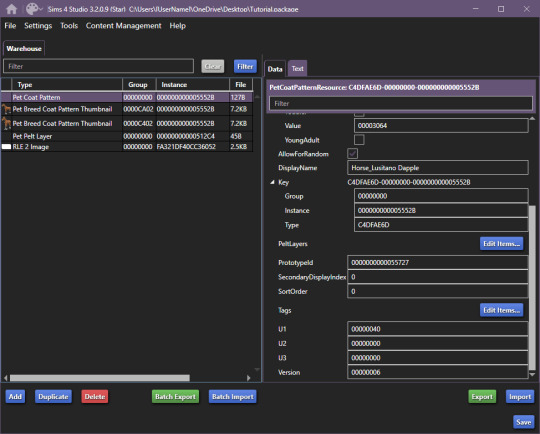
In our case, it's the Lusitano Dapple coat, don't worry, if you're making a breed-specific coat, you can change this later.
Now that it's been added to our package file, it should look like this:

We now have two options, I'll explain this to those who don't care about creating a game-generated thumbnail and want to find it easier.
To make your "test" thumbnail, you'll want to copy the instance ID of the file we just added to our package:
It should look like this, the instance ID should be in 2nd from the top search bar, then, select all and click filter (it just makes life easier than finding the specific file type).

These are the current, in-game CAS thumbnails. We'll add both of them to the package, they're for ponies and adult horses.
Now you can export these two pictures (They need to be saved as .png's), edit them as you'd like and then import them back into the package.
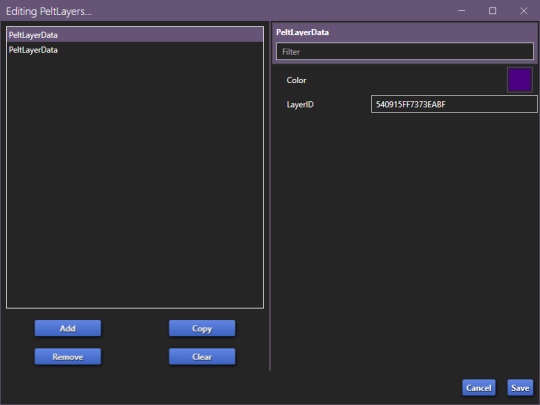
Now, you CAN add up to 5 different pelt layers that can be easily recoloured in-game, however, we'll only be working with two pelt layers in this tutorial, because it's a tutorial and you'll learn how to make more of them anyway.
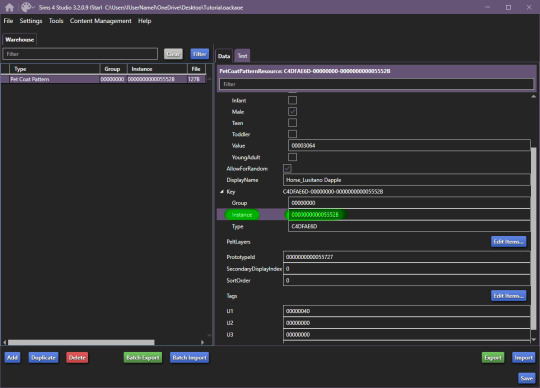
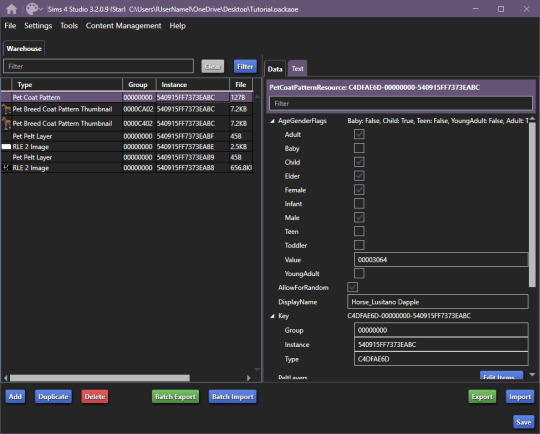
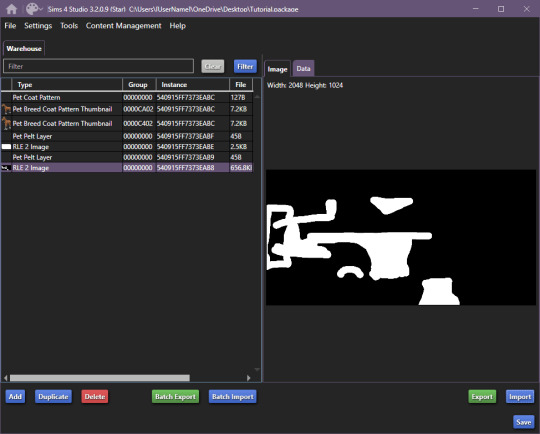
Click on "Pet Coat Pattern" and then look over the data:

From there, Click on "PetPeltLayers":
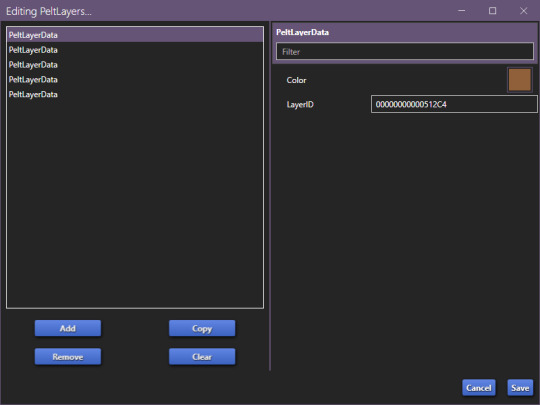
The first pelt layer is ALWAYS a solid colour, we'll begin by copying the LayerID (Instance ID) and going back to game file cruiser.
Just like previously, you should keep EP14 in the search bar and just use the instance ID bar to find things, as that's all we'll be doing.

Add the Pet Pelt Layer to your package file, then, copy the "texture key" from the Pet Pelt Layer:
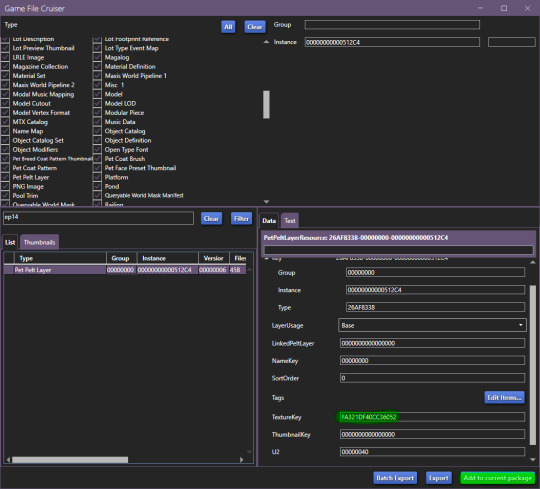
Then find the Texture Key:
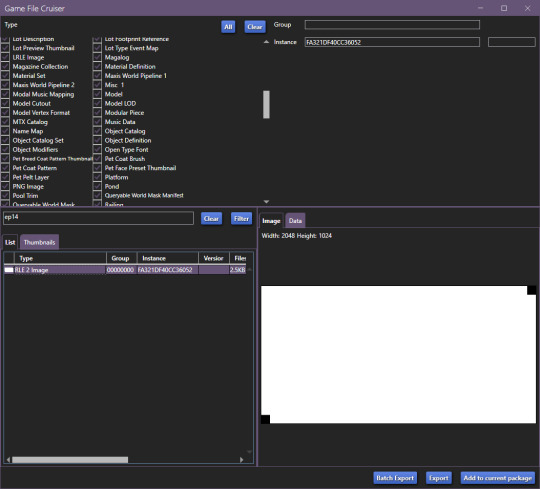
This is the solid colour layer, it HAS to be there as this is what will help you edit your base colour. Add this to your package file.
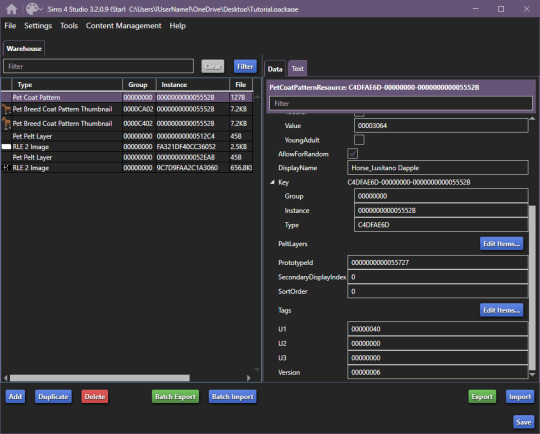
Now, our package file will look like this:
Unfortunately, we're not done, just yet, we'll want to grab at least the second PetPeltLayer:

Just like before, we're going to copy the ID and find the Pet Pelt Layer + the Texture for this layer:

Now, our package file will look like this:
You can now go ahead and close the Game File Cruiser, we won't be using it anymore.
Right now, this is our package file and we need to do some cleanup first.
We'll be opening up the PetPeltLayers once more and we'll remove the last 3 entries:
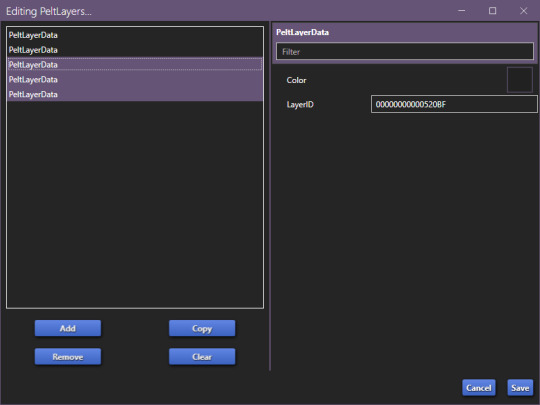
You should be left with only two entries, as that is what we'll be editing (leaving the other 3 will break the preset).
Now, we'll start generating new hash codes for everything:
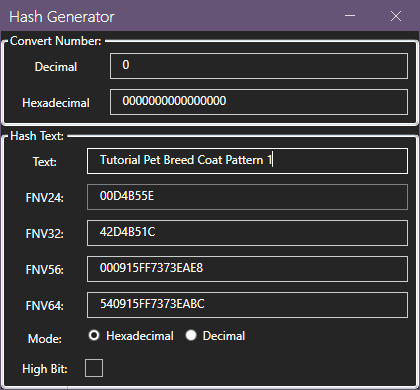
As in my previous guides, be descriptive with what you're typing there and then just change the last number.
The process is annoying and slow, so bear with the images, and follow along.
The TextureKey coloured in red is the 3rd ID you'll generate, it's what links the texture to the Pet Pelt Layer, which links it to the Pattern we're creating. (Sorry for the squished thumbnail, open it in your browser, I was running out of picture space for the rest of the tutorial lol).
And now we repeat this for the second Pet Pelt Layer.
Now, if you want the game to just generate the thumbnail for you, you can skip this step, if you want to make a custom thumbnail, then copy the Pet Coat Pattern Instance ID into the two Thumbnails we've added to our package file:
This is what the package file has to look like at this point.
Now is the relatively easy part, editing the second RLE 2 Image. We won't touch the base, because it's not necessary.
I recommend using the Horse Diffuse Map as a base when you're drawing your pattern. It'll be easier to see what you're doing. You can download it here: Horse Diffuse Map.
Remember, that your pattern HAS to be white, black space is IGNORED by the game and considered a "transparent" layer, so that you can see the layer beneath the you're working on.
This is my quick, and lazy test one I've made, I use a PNG of the Diffuse Map as a base and on a separate layer I draw with white coloured brushes:
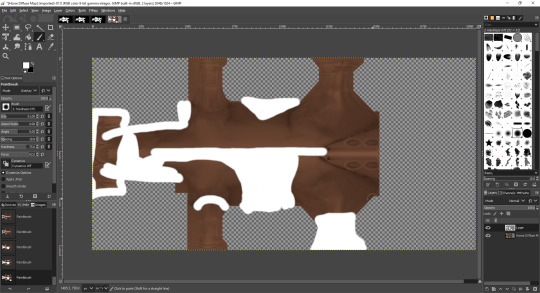
You may notice the very straight lines on the diffuse map - make sure to colour OVER them as if you do not, it will appear in-game because those are the seams where the mesh "meets"
Once you're satisfied with your pattern, you can go to export, just make sure that the white pattern is on a separate layer to the diffuse map. At this point you can add a black background underneath the white and export.
All you have to do is export the RLE2 Image you've edited as a DDS image in the L8 format:
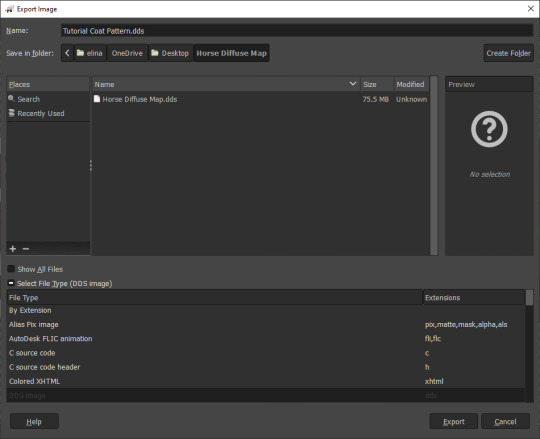

Then, we're going to import it into our package and save our package:
Remember to not touch the completely white base coat!
Now that this is over, we'll go back to Pet Coat Pattern and edit some settings.
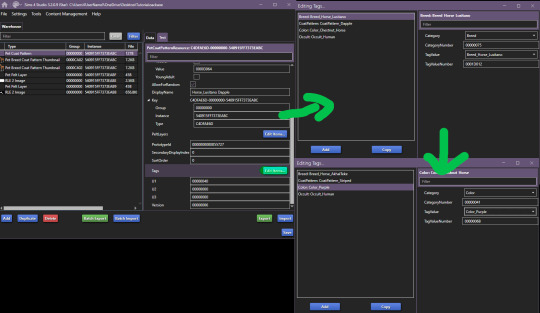
The first three settings is what I recommend changing around. The first setting changes the breed, the second setting changes how the coat pattern is labeled and the third setting changes the colour it's tagged under.
Only change "TagValue" - it will give you a dropdown menu, don't change anything else. The TagValueNumber changes automatically, so don't worry about it.
EDITED TO ADD:
Additionally, don't forget to go into "PetPeltLayer" and change the colours, this is what will show up as "base" colour that you can change in-game. You can change them for every PeltLayerData file you have.
Now, save and go test it out in game:

Bada bing, bada boom we've got our "custom" coat preset.
If I've forgotten anything, let me know. This took me 2 hours to write, so forgive my typos. If anything is unclear, let me know. I ran into a struggle with the picture limit on Tumblr (found out that it's 30, I should move my guides somewhere else, but where?)
146 notes
·
View notes
Photo

Shamchat.com - like Omegle, except you pretend to be someone you’re not. Might be a fun way to roleplay, mess around with character types, archetypes, etc. Enjoy!
248K notes
·
View notes