#sims 4 custom content guide
Explore tagged Tumblr posts
Visit Tumblr Blog
Explore Tumblr blogs with no restrictions, modern design and the best experience.
Last Seen Tumblr Blogs


Fun Fact
Tumblr is used by 21% of adults online aged 18-29 years.
Text
Guide on making custom coat presets. (Allows for better quality custom coats)
31/08/2023: The guide has been updated to reflect a step I missed - when exporting your custom textures, make sure to select "generate mipmaps", the step is reflected in more detail under the appropriate part. Ctrl+f and enter "mipmaps" to skip to it.
16/10/2023: Updated to add more info re: generating hash ID's.
Okay, I decided to throw this together. There's some things I can't figure out still, but oh well, we're just getting through this as we go.
To clarify what I mean - this is not a stencil or a brush.
This will appear here:
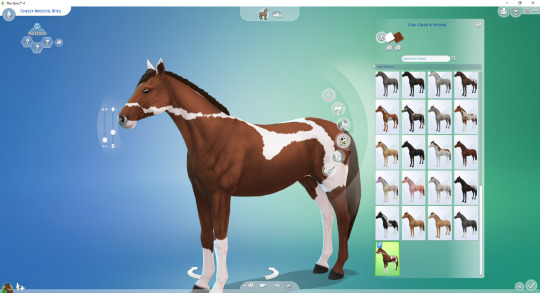
To preface this guide though, I cannot, for the life of me, figure out how to make it appear as an individual option in-game, so, these are considered SWATCHES of the original coats.
Okay, with that out of the way.
Things you'll need:
Sims 4 Studio
GIMP
Probably Notepad, but it's optional on how easy it is for you to track things.
Guide:
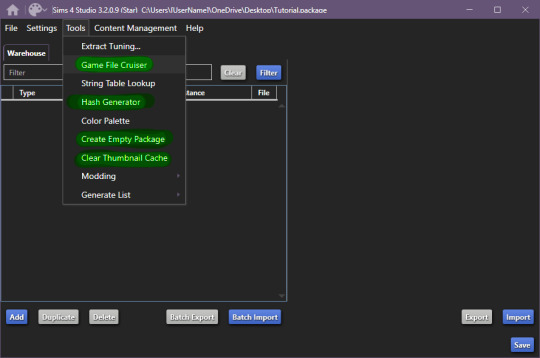
These are the tools we'll be using in S4S.
Start by creating your empty package, once you're done, open up Game File Cruiser:
before you do ANYTHING, make absolutely sure that the search bar below the file list has "EP14" in it, otherwise you will 100% end up editing a cat or a dog coat pattern and that's now what we want, at all.
Add the first horse file to your package
In our case, it's the Lusitano Dapple coat, don't worry, if you're making a breed-specific coat, you can change this later.
Now that it's been added to our package file, it should look like this:

We now have two options, I'll explain this to those who don't care about creating a game-generated thumbnail and want to find it easier.
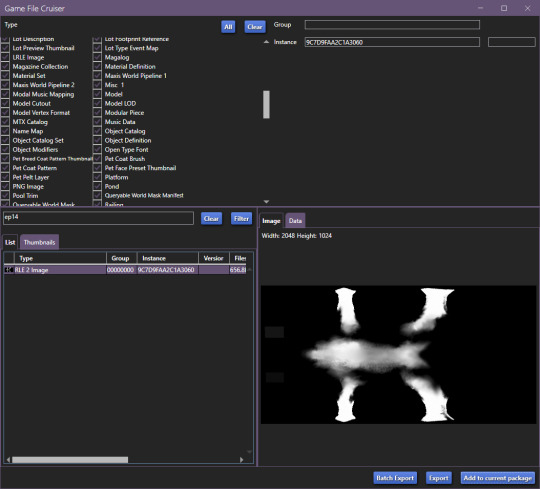
To make your "test" thumbnail, you'll want to copy the instance ID of the file we just added to our package:
It should look like this, the instance ID should be in 2nd from the top search bar, then, select all and click filter (it just makes life easier than finding the specific file type).

These are the current, in-game CAS thumbnails. We'll add both of them to the package, they're for ponies and adult horses.
Now you can export these two pictures (They need to be saved as .png's), edit them as you'd like and then import them back into the package.
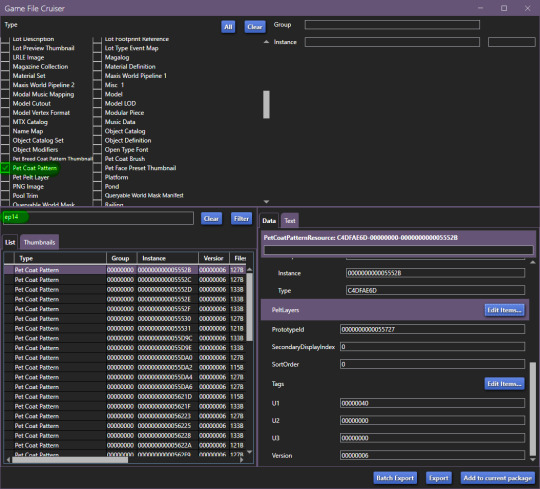
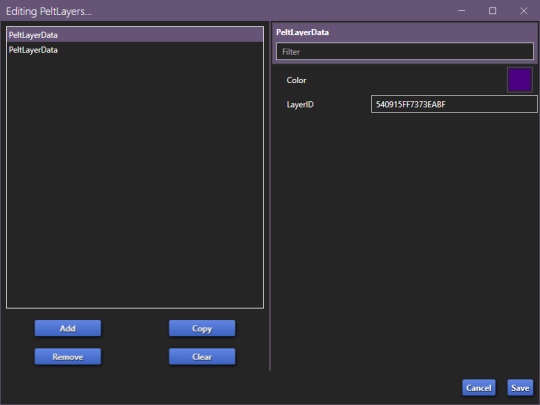
Now, you CAN add up to 5 different pelt layers that can be easily recoloured in-game, however, we'll only be working with two pelt layers in this tutorial, because it's a tutorial and you'll learn how to make more of them anyway.
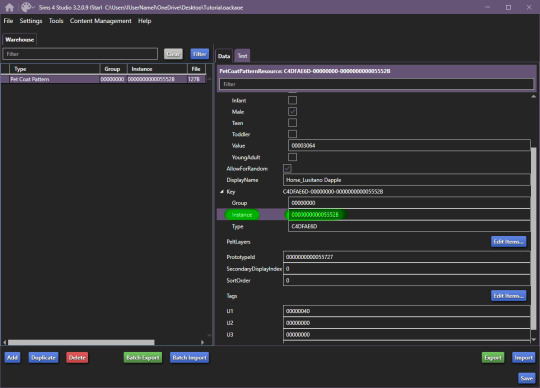
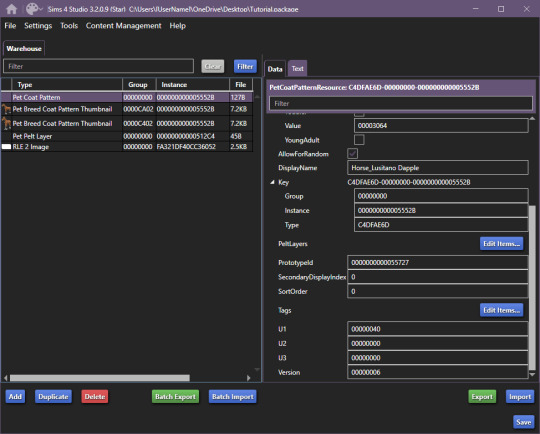
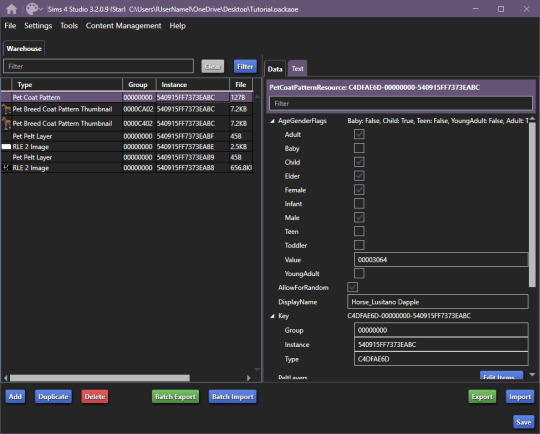
Click on "Pet Coat Pattern" and then look over the data:

From there, Click on "PetPeltLayers":
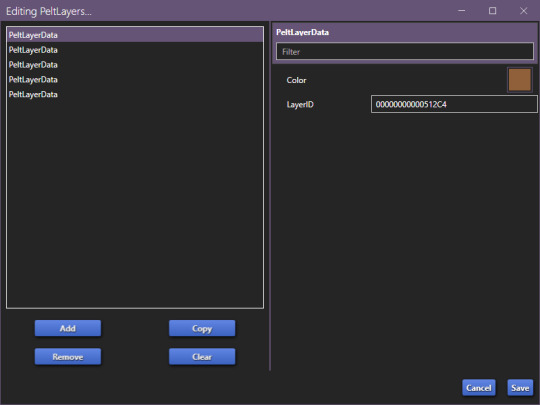
The first pelt layer is ALWAYS a solid colour, we'll begin by copying the LayerID (Instance ID) and going back to game file cruiser.
Just like previously, you should keep EP14 in the search bar and just use the instance ID bar to find things, as that's all we'll be doing.

Add the Pet Pelt Layer to your package file, then, copy the "texture key" from the Pet Pelt Layer:
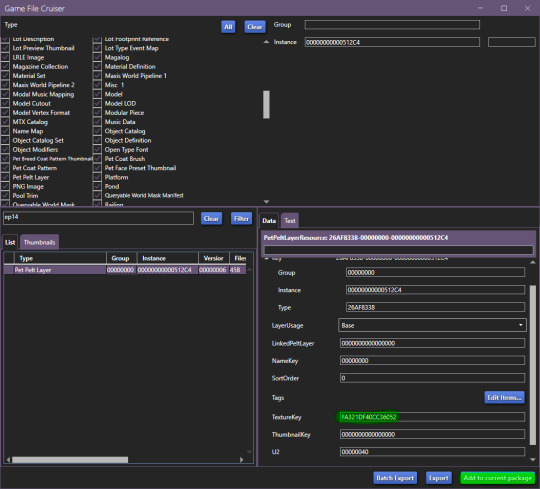
Then find the Texture Key:
This is the solid colour layer, it HAS to be there as this is what will help you edit your base colour. Add this to your package file.
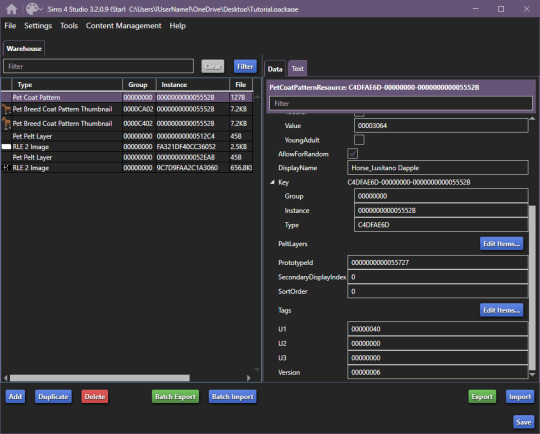
Now, our package file will look like this:
Unfortunately, we're not done, just yet, we'll want to grab at least the second PetPeltLayer:

Just like before, we're going to copy the ID and find the Pet Pelt Layer + the Texture for this layer:

Now, our package file will look like this:
You can now go ahead and close the Game File Cruiser, we won't be using it anymore.
Right now, this is our package file and we need to do some cleanup first.
We'll be opening up the PetPeltLayers once more and we'll remove the last 3 entries:
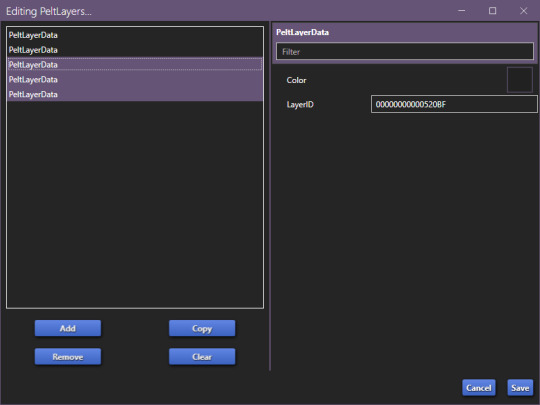
You should be left with only two entries, as that is what we'll be editing (leaving the other 3 will break the preset).
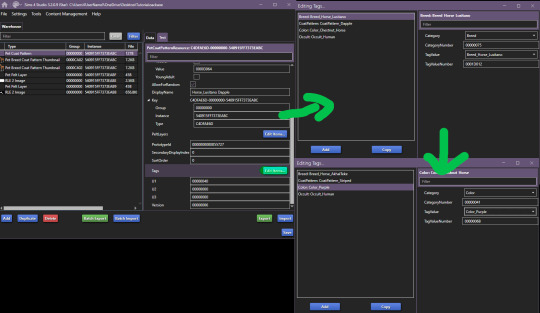
Now, we'll start generating new hash codes for everything:
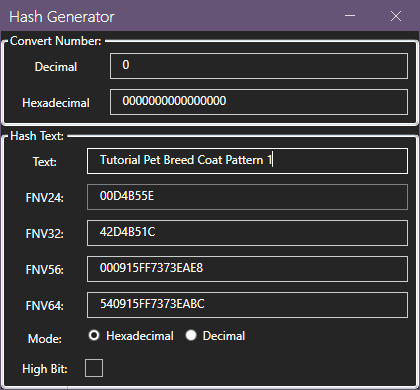
Edited 16/10/2023: When generating your hash ID's, please use your creator name ie.: "[YourCreatorName/Blogname]TutorialPetBreedCoatPattern11", this will give you a more unique hash code than hoping to be as descriptive as possible when generating the hashes (in this case instance ID's).
Thanks to Mizore Yukii for this advice, from Creator's Musings discord.
As in my previous guides, be descriptive with what you're typing there and then just change the last number.
The process is annoying and slow, so bear with the images, and follow along.
The TextureKey coloured in red is the 3rd ID you'll generate, it's what links the texture to the Pet Pelt Layer, which links it to the Pattern we're creating. (Sorry for the squished thumbnail, open it in your browser, I was running out of picture space for the rest of the tutorial lol).
And now we repeat this for the second Pet Pelt Layer.
Now, if you want the game to just generate the thumbnail for you, you can skip this step, if you want to make a custom thumbnail, then copy the Pet Coat Pattern Instance ID into the two Thumbnails we've added to our package file:
This is what the package file has to look like at this point.
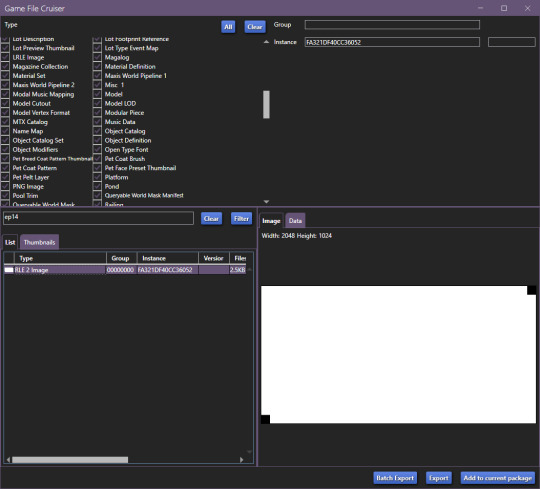
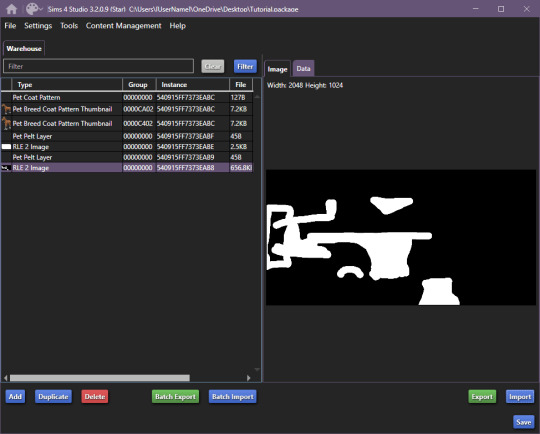
Now is the relatively easy part, editing the second RLE 2 Image. We won't touch the base, because it's not necessary.
I recommend using the Horse Diffuse Map as a base when you're drawing your pattern. It'll be easier to see what you're doing. You can download it here: Horse Diffuse Map.
Remember, that your pattern HAS to be white, black space is IGNORED by the game and considered a "transparent" layer, so that you can see the layer beneath the you're working on.
This is my quick, and lazy test one I've made, I use a PNG of the Diffuse Map as a base and on a separate layer I draw with white coloured brushes:
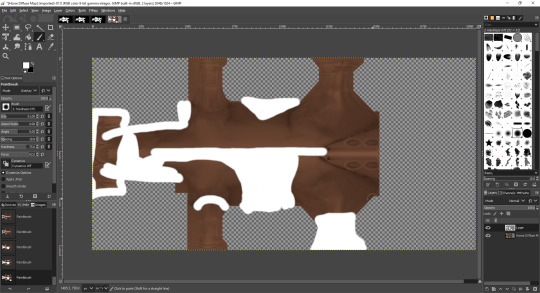
You may notice the very straight lines on the diffuse map - make sure to colour OVER them as if you do not, it will appear in-game because those are the seams where the mesh "meets"
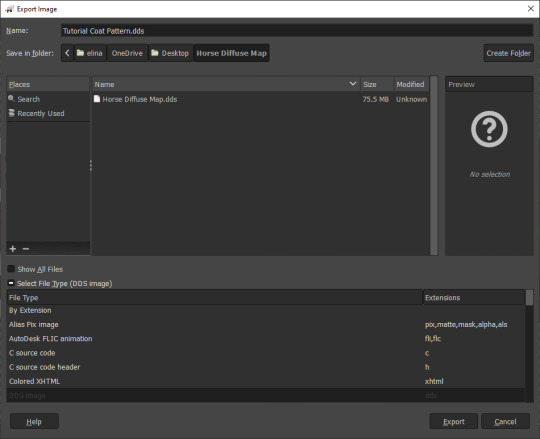
Once you're satisfied with your pattern, you can go to export, just make sure that the white pattern is on a separate layer to the diffuse map. At this point you can add a black background underneath the white and export.
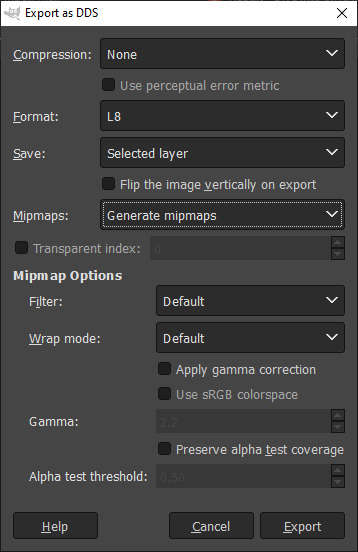
All you have to do is export the RLE2 Image you've edited as a DDS image in the L8 format and (edited 31/08/2023) select "Generate mipmaps" otherwise you will experience a glitch in-game where the coat disappears. You can leave the mipmap options as default, it should work correctly.
Then, we're going to import it into our package and save our package:
Remember to not touch the completely white base coat!
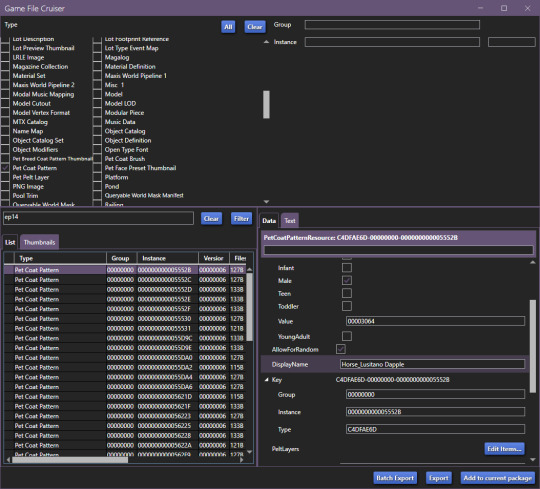
Now that this is over, we'll go back to Pet Coat Pattern and edit some settings.
The first three settings is what I recommend changing around. The first setting changes the breed, the second setting changes how the coat pattern is labeled and the third setting changes the colour it's tagged under.
Only change "TagValue" - it will give you a dropdown menu, don't change anything else. The TagValueNumber changes automatically, so don't worry about it.
EDITED TO ADD:
Additionally, don't forget to go into "PetPeltLayer" and change the colours, this is what will show up as "base" colour that you can change in-game. You can change them for every PeltLayerData file you have.
Now, save and go test it out in game:

Bada bing, bada boom we've got our "custom" coat preset.
If I've forgotten anything, let me know. This took me 2 hours to write, so forgive my typos. If anything is unclear, let me know. I ran into a struggle with the picture limit on Tumblr (found out that it's 30, I should move my guides somewhere else, but where?)
#The Sims 4#Sims 4#The Sims 4 Horses#The Sims 4 Pets#the sims 4 horse ranch#the sims 4 guide#sims 4 guide#sims 4 custom content guide#sims 4 horses guide
146 notes
·
View notes
Text

Quick Guide: Stay Safe While Downloading Sims 4 CC & Mods
I just published a quick guide to help you download Sims 4 CC & mods safely. ⚠️ From trusted sources to spotting red flags. Keep your game clean and secure! 😊
Read it now
#avoid malware in sims 4 mods#how to avoid malware sims 4 mods#how to download mods safely sims 4#patreon sims 4 cc download#safe sims 4 cc creators#safe sims 4 download sites#sims 4 cc best practices#sims 4 cc community guide#sims 4 cc download checklist#sims 4 cc education#sims 4 cc folder structure#sims 4 cc mod manager#sims 4 cc mod security tips#sims 4 cc mods support guide#sims 4 cc protection#sims 4 cc safe download#sims 4 cc safe hosting platforms#sims 4 cc safety guide#sims 4 cc safety tutorial#sims 4 cc virus warning#sims 4 cc zip file tips#sims 4 custom content security#sims 4 custom content tips#sims 4 mod folder organization#sims 4 mod malware prevention#sims 4 mod safety#sims 4 mod safety checklist#sims 4 modding guide#sims 4 mods antivirus#sims 4 script mod warning
289 notes
·
View notes
Text
Ultimate skin details guide!!!


Letters are italic slanted = I use it on almost every sim I make
Skin overlays:
Northern siberia winds Soft rose skinblend A
Obscurus skin overlay N25 A and B
Billy skinblend by Vikai
MsBlue Abriana skin v1
MsBlue Abriana skin v2
DFJ kellyhb5 Afterglow skin
Gunthermunch sorceress skinblend
Pralinesims skin Lychee (overlay) F
Googoo overlay by sims3melancholic
Madmono Knight non default
GPME gold overlay face skin v1
GPME gold skintones s1
Papillon skin non default
Huckleberry skinblend simbience
Other:
RemusSirion lips 147 teeth for lipsticks merged
Glitchsyndrome chisamiblush
Squeamishsims booboo blush
Edited booboo blush on another layer
GPME gold hairline G7
GPME gold hairline G6
Obscurus hairline n1
Obscurusxmelancholix nosemask Irle overlay
Obscurus nosemask overlay set N2
PS mouthcorners N01
PS mouthcorners N02
PS mouthcorners N03
GPME gold eyelids G1
GPME gold eyelid CC01
Catchlights overlays 2t4 Pyxis
GPME gold eyes G11
Freckles and moles:
PS freckles N09
Cerberus freckles
MSQSims freckles NB02
Hollowsprings honeyfreckles
GPME gold moleset 1
Cosimetic N59 mole
Lashes:
All lashes by Kijiko
All lashes by MMsims
Enjoy!
Lii <3
Thank you to all the CC creators:
@northernsiberiawinds @obscurus-sims @imvikai MsBlue on tsr @dangerouslyfreejellyfish @gunthermunch @pralinesims @sims3melancholic @goppolsme @viiavi @simbience @remussirion @squeamishsims @squea @glitchsyndrome @pyxiidis @msqsimscreations @hollowsprings @cosimetic @kijiko-sims @mmsims
#simblr#sims 4#sims 4 cc#sims4#the sims 4#sims 4 custom content#sims 4 simblr#sims community#the sims community#ts4#sims skin#Sims skindetails#sims download#simmer#sims custom content#sims skin details#sims cc#the sims cc#sims 4 cas#sims4cc#Sims cc guide#the sims 4 custom content#sims 4 download#sims 4 maxis match#sims alpha#sims alpha cc#sims alpha skin#the sims 4 community#tsr#the sims
25 notes
·
View notes
Text

holiday gift guide: gaming edition 🎮
1 gaming chair
2 desk
3 ring light
4 monitor (includes mouse + keyboard)
5 gaming pc
6 vertical monitor
part five of my holiday gift guide! thank you to the cc creators! ♡ @vixonspixels and nickname_sims4 on tsr!
#simsplymaddy#holiday gift guide#the sims 4#ts4#cc recs#cc finds#ts4 custom content#sims 4 simblr#sims 4 maxis match#sims 4 cc#the sims cc#ts4 simblr#sims#the sims community#ts4 maxis cc#ts4cc#sims 4#simblr#sims community#sims 4 custom content#custom content#ts4 cc#the sims 4 cc#the sims 4 simblr#ts4 screenshots
79 notes
·
View notes
Text
Raewyn Daefaren- Sim Download
This is another sim based on a book character and this sim is based on Raewyn Daefaren from a Soul to Guide, the 4th book in the Duskwalker Brides series, by Opal Reyne! I really loved this character because of the representation and how well she was written, Raewyn is a black and blind Elf.
DL


#sims 4 cc#sims 4#blender render#the sims 4#blender#the sims#ts4 cc#sims 4 custom content#blender sims#sims#create a sim#ts4 sim download#sim download#sim 4#sims 4 gameplay#a soul to guide#duskwalker brides#opal reyne#book character#books#book recommendations#booklr
60 notes
·
View notes
Photo

Organize Sims 4 Mods Folder
Drowning in a sea of loose mods and CC? Get your Sims 4 Mods folder in order, and banish game lag, freezes, and missing content for good. Dive into our step-by-step guide to streamline your Sims experience. Check it out and chat with us in the comments! Read More At MustHaveMods.com
#sims 4 mods folder#organizing sims 4 mods#ts4 custom content#organize sims 4 cc#sims 4 cc management#sims 4 content management#sims 4 cc organization#sims 4 mods organization#keep sims 4 organized#ts4 mods folder organization#sims 4 mods folder tips#ts4 custom content management#sims 4 cc sorting#ts4 mods folder guide#sims 4 cc guide
2 notes
·
View notes
Video
youtube
30+ Maxis Match Hair + CC Links (Male, Female, & Child)| The Sims 4 CC Haul
1 2 3 4 5 6 7 8 9 10 11 12 13 14 15 16 17 18 19 20 21 22 23 24 25 26 27 28 29 30
#youtube#sims 4#sims#sims 4 cas#thesims4#sims4cc#sims 4 custom content#sims 4 cc hair#sims 4 cc haul#cc guides#ts4 cas#ts4 simblr#the sims 4 simblr#simblr#sims 4 maxis cc#sims 4 maxis match#sims 4 male cc#sims 4 child cc#sims 4 female cc
28 notes
·
View notes
Text
A quick-ish guide to the culture of The Sims 2 modding community.
Are you new to The Sims 2 community? Are you coming from more modern games, either in The Sims franchise itself or other contemporary games? Are you excited to start your #brand and become a #simfluencer and post your #earlyaccesscontent to support your #sidehustle?
Have a seat, then! Let's chat.
Hello, friend! My name's Pooklet. I've been playing since 2004 and creating since 2007. I'm by no means an expert in most forms of content creation itself, but I've been around since the heyday of The Sims 2, I've watched how community opinions have shifted (or not) since practically the beginning, and I'm hoping to give you a basic outline of the community culture that you can expect to encounter as a newcomer.
A very brief history of Sims 2 content monetization:
People have been trying to monetize content since there has been content to monetize, all the way back in the days of The Sims 1. We tend to call them "pay creators" and their websites "paysites." Some big names in this arena include The Sims Resource (their free-with-ads model is a relatively recent development, which is why you will find people to this day calling them T$R), PeggySims, Newsea, and many others that you can find on this handy website:
Paysites Must Be Destroyed
Now, if you have a glance at that website, you might be saying to yourself:
"But, that's illegal! I own the copyright to my custom content!"
Alas, no! Due to the wording of the End User License Agreement for The Sims 2, no custom content creator owns their creations for this game (or The Sims 1, or 3, or 4, for that matter, but we're talking about 2 right now). It all belongs to EA at the end of the day, and by installing and playing the game, you have agreed to these terms. Which means you have no individual, protected copyright, and it is perfectly legal for someone to download your paywalled content and then reupload it for free for others to enjoy. And they will!
Furthermore,
You are not making anything alone.
Everything from modding resources, to tutorials, to the mods required to fix disastrous glitches in the game code and make it playable at all, to the third party programs used to make any and all custom content, such as SimPE—all of these have been provided to you for free by other creators, many of whom have a usage policy that asks that people not use their freely-provided tools to make a profit. Although no one can be forced to follow a creator's policy, it is generally considered good manners to not try to make a profit off of someone else's free work. And if you are using these tools to make paywalled content, that's exactly what you're doing.
Pay creators have been ignoring these policies since the beginning of time, and so free creators likewise ignore their policies against sharing their paywalled content. Pay creators have also tried lots of different ways to keep their content exclusive, everything from trying to track leaks with slightly altered files to actively filling their content with malicious code. It has never worked.
Free creators have always found a way around these barriers. In fact, it's taken as something of a challenge to undermine monetization efforts. As you can see from Paysites Must Be Destroyed, there are entire teams of players devoted to reuploading paywalled content for free.
A culture of sharing.
The Sims 2 is something of a time capsule. At 20 years old, it predates a lot of the hyper-capitalist hustle culture that has infested every creative hobby. It is from a time when monetization was an outlier rather than the norm, and a much maligned outlier at that. This attitude has persisted for 20 years. Believe me when I say, you won't be the combo breaker. Especially now, given that The Sims 2 is not the most contemporary in the series and the community has shrunk considerably, down to the people who have either been here for a very long time, or newcomers that understand the community culture.
Also, it's just kind of not a great idea in general to try to make money off of a 20-year-old game with a pretty small community?
Like, I get that The Sims 4 is really saturated with pay creators and it's hard to get a foot in the door. I get that you might look at The Sims 2 and think that the small pond will give you room to be a big fish. It won't. You might get a handful of people willing to pay for your content, but at least one of those people will be resharing it for free.
Paywalls vs. optional donations.
Okay, so hopefully you now understand why people don't like it when you put content behind a paywall. But what about those Ko-fi and Paypal donation links you sometimes see at the bottom of people's downloads? Why is that okay, but a locked Patreon tier isn't? Well, because they're voluntary. No one is obligated to pay for that content to be able to download and use it. It's just a way for someone who does have a little extra cash to basically "tip" a creator whose content they like. You have no way of knowing whether the person who posts those links is actually receiving any donations. And that's kind of the point. Whether or not they receive any donations, they are still sharing their content, because they enjoy the hobby of making and sharing content.
"I can't make a living off of that!"
No, you can't. Because that's not what we do here. That is not part of our community culture for all the above reasons. If you want to make a reliable income off of your hobby, you're going to need to get a different hobby. Try Second Life! That is a community that actively encourages monetization. The Sims 4 allows for "early access" monetization. There's options out there for you, if what you want is to make a profit off of your creations for a game.
"Fine, what about monetized link forwarding services?"
Link forwarding services historically have malicious trackers or viruses embedded. People will also strip those and provide direct links to each other. Or they just won't download your content.
"What if I want to make YouTube videos of someone else's written tutorials and I enable ad revenue on them?"
Personally, I still think that's a dick move. I love video tutorials, I'm a very visual learner myself, and although you might feel entitled to compensation for reciting the steps of someone else's tutorial into a microphone and then editing and uploading the video, you're still monetizing someone else's freely-provided content. I would consider this an 'ask permission' scenario, one in which you tell the person, explicitly, that you will be making ad revenue off their work. If they're fine with that, then you're good! (For the record, I'm not fine with that.)
edit: more of of my thoughts on monetized youtube videos over here.
"What if—"
Look, no one can stop you from trying to monetize your content, or worse, someone else's content. But you will have the exact same arc as every pay creator who came before you: your efforts will be undermined at every turn, your reception in the greater community will be chilly at best, and it will become a battle between you and the folks resharing free reuploads of your content until any fun you initially had making content is gone.
"The steady erosion of every known social safety net beneath the crippling weight of end-stage, line-goes-up capitalism and the yawning abyss of poverty over which I am dangling has imbued me with such anxiety that I cannot engage with a hobby that precludes monetization. I am exhausted. I know no other way."
I get it, friend! I have lived in poverty all my life. I do not begrudge the impulse to find a way to make passive income off of your every waking moment. Increasingly, it seems like that is the only way to survive! Unfortunately, you will not be able to do that with this specific community. We know that we have something special here, having resisted monetization's encroach for so long, which makes us fight all the more viciously to maintain it. You are entitled to try to find ways to supplement your income, just not here. Personally, I consider that a feature, not a bug.
Bonus Round: Remember, That's Not Just Yours!
I said it earlier, but I want to reiterate: you are not making any TS2 CC alone. You are making it with tools, resources, knowledge and code that people have provided on the condition that they not be used for pay content.
To use myself as an example, "my" hair textures are a blend of resources provided by other creators. Namely, Nouk's original hair texture was edited by Vintage D, which I then further edited over the years, using parts by the creators Ephemera and Helga. It would be extremely shit of me to say "well, I think that the time that I put into my edit is worth money, so I'm charging for it" when the edits that I made would not exist without the work of those people. And it continues on down the line with edits that other people have made of my texture blends and color actions, and the content they make with them.
(If you see someone charging for these, btw, lemme know. I'd love to have a talk with them.)
In closing,
The knowledge base, the resources, the coding required to make any and all working content for The Sims 2 has been compiled for 20 years. Please understand, I'm not trying to denigrate anyone's creativity when I say: you cannot bring anything wholly "new" to TS2 CC-making, something that uses no one else's resources or programs, something you can point to and say "no one helped me with that. I did it all on my own. It is my property." Nor should you aspire to! The fun of The Sims 2 community is to share and share alike, to credit each other for our contributions, to hype each other up and iterate on shared works and resources. We've been doing it for 20 years, and hopefully we'll be doing it for many more! Wanting to be a #simfluencer is utterly antithetical to the community culture. No one is influencing anyone else. You need to leave that shit at the door if you want to be invited in.
TL;DR:
Don't show up to the commie circle-jerk trying to charge for handjobs. We're already giving them to each other for free, and nothing about your wrist technique is special enough to justify the cost.
edit: a follow-up for those who are feeling personally attacked by this post.
#sims 2#the sims 2#ts2#long post#like yes this post did come from a place of frustration but i do hope it is genuinely helpful to folks who are new to ts2#and maybe don't quite understand how we operate as a community.
713 notes
·
View notes
Text
TS4-to-TS2: 140 Traits (Sims 2)

Published: 2-15-2025 | Updated: N/A SUMMARY Here are 140-ish traits converted from Sims 4 to Sims 2. While there are hundreds of traits in Sims 4, many redundant items were eliminated for this project, and some were edited for clarity. Certain supernatural, health, and death-related traits will be made available in separate downloads. Find other trait-related content on this site under the #co2traits tag. At the time of this post, these are for storytelling/completion purposes only. These are TOKENS ONLY – they do not alter sims/gameplay on their own. If/when they are incorporated in mods, their custom function(s) will depend on the mods in question.

DETAILS Requires all EPs/SPs (may also depend on mods). §0 | Collection Only The collection file is REQUIRED to access the traits in-game – remember to delete your old one! Traits taken from Sims 4 have a blue background. Youth traits have a rainbow in the top corner. ITEMS Download a list of traits and their GUIDs below.


DOWNLOAD (choose one) ADULT TRAITS from SFS | MEGA YOUTH TRAITS from SFS | MEGA 4t2 TRAITS GUID LIST from SFS | MEGA Items with an “X” in place of the GUID were omitted from this set since they’ve already been made in some form. REQUIRED: COLLECTION FILE from SFS | from MEGA This file includes 3t2, 4t2, historical/medieval, fantasy, color, music, hobby, and other CC traits for Sims 2 (and some randomizers). Only visible trait tokens are included, and this file should REPLACE the original “Traits_Collection” file. CREDITS Thanks: @atomtanned; Simmers and Sims Trait Modders. Sources: 3t2 Traits Project (Hexagonal-Bipyramid, 2019), Any Color You Like (CuriousB, 2010), Beyno (Korn via BBFonts), CupidJuice (2023), EA/Maxis, Offuturistic Infographic (Freepik), Flat Icon.
528 notes
·
View notes
Text

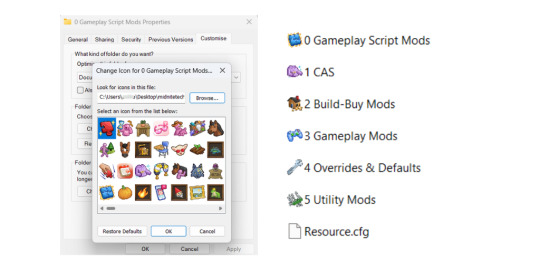
Sims 4 Mod Folder Organizer + Icon DLL (Downloadable Folder Template Included!)
Hey Simmers! 💛
I’m excited to share something a little different today — not new custom content (CC), but a downloadable folder setup and icon system to help you organize all the Sims 4 CC and mods you already have.
✨ What’s Included
✅ A clean, pre-built folder template to keep your Mods folder tidy and script-friendly ✅ A custom-made icon DLL file with over 900 Sims 4 folder icons, so you can apply cute, matching icons to each folder on your computer (Windows) ✅ A detailed guide on organizing, troubleshooting, and clear instructions
💡 Important: This is NOT CC or Gameplay Mods!
You’re not downloading any Sims 4 content itself — this is just an external tool to help you organize your existing CC and mods on your computer more easily.
📁 Folder Template Categories
The folder template includes suggested categories like:
CAS Mods
Build/Buy Mods
Script Mods
Utilities
Gameplay Mods
Visual & UI Tweaks
…and more! You can adjust or expand them however you like to fit your own collection.
🛠 How to Use
1️⃣ Download and unzip the folder template. 2️⃣ Move your existing CC and mods into the matching folders. 3️⃣ Use the included .dll to apply cute folder icons (Windows only). 4️⃣ Keep your Mods folder cleaner, easier to manage, and easier to update!

⚠ Reminder The .dll file doesn’t go inside your Sims 4 Mods folder or into the game — it’s used outside the game on your computer folders, like your Sims 4 Mods folder or any other folders you want to decorate.
You can store the .dll anywhere on your computer — but if you move or delete it later, the folder icons you’ve applied will stop displaying. So be sure to keep it in a permanent, safe location.
✅ The download also includes a detailed guide with:
Step-by-step instructions for applying the folder icons using the .dll
A troubleshooting section if anything isn’t working as expected
Tips and recommendations for organizing your custom content (CC) and mods for easier management
📥 Note on Downloading
When you download the folder template and .dll, make sure to extract the zip to a new, separate folder — I recommend creating a fresh folder just for this setup. That way, you can organize your mods and CC cleanly without accidentally mixing the template folders into your existing Mods folder. Once you’ve organized everything, you can move your files into your actual Sims 4 Mods folder as needed.
Thank you so much for supporting me — I hope this helps you keep your Sims 4 setup tidy and stress-free. 💛
PATREON (✅ (free for all members)
122 notes
·
View notes
Text
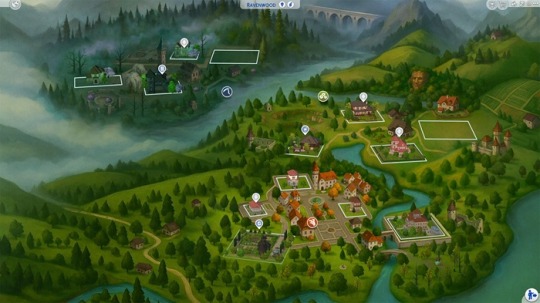
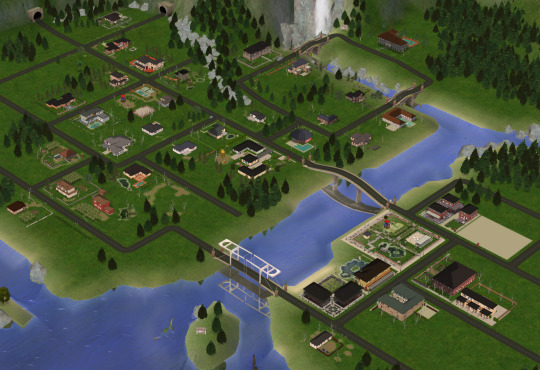
Best Sims 4 Map Replacements: Where to Find and How to Install
Custom maps make Sims 4 even more fun, and, of course, more beautiful! In this article, we’ll tell you where to find really high-quality and unique maps, or how to change up your world’s look yourself. Try picking out a style that suits you, or use these ideas to inspire your own creativity.

For those who don’t want to radically change the game’s style but dream of more clarity and quality, the Enhanced World Maps mod by @simmattically is a great fit. With this add-on, the maps you already know will become much more detailed and easy on the eyes – while the overall vibe stays just as familiar.

If the ready-made options from creators aren’t your thing, check out a detailed map-making guide by @alistu for those who want to transform the game’s visuals themselves (by the way, this author also made an awesome Windenburg map).

How do you add map replacements to the game?
1. If you downloaded the replacements as a zip, unzip the files.
2. Put them in your Mods folder (Documents > Electronic Arts > The Sims 4 > Mods).
3. Don’t forget to enable custom content and mods in your game settings.
Important! For proper display, you can only have one replacement per world in your Mods folder.
Right now, there aren’t that many creators who regularly release high-quality maps for Sims 4 – in fact, only five are really active with this. So we’ll focus on them and tell you more about each author. Most importantly, we’ll show you the map options from these creators that we found the most interesting.
filipesims is a brand new creator who’s been putting out some seriously impressive map replacements. His maps, which look a bit like watercolor paintings, have a distinct and recognizable style and will definitely bring more beauty and coziness into your game.
20th Century Plumbob makes detailed and incredibly atmospheric maps in a style close to the original. The main difference is maximum accuracy: each map is built using real screenshots, mirroring the world you see as you explore the game’s towns. Because of this, 20th Century Plumbob’s work looks way more interesting and believable than the default Sims 4 maps, which can sometimes be pretty different from the actual architecture and layout of the game world.
Maps by Mama-Llama are a real gem for fans of realistic visuals. The creator goes all in on realism: these maps are definitely not about the classic Sims style. They’re no longer cartoony or sketchy, and the quality and attention to detail are amazing. The lighting alone deserves a round of applause.
DerShayan calls their maps fanart – and it makes sense. New releases don’t come out too often, but the sims worlds in them are dipped into a truly special fairy tale. Every time you open a town map, it’s pure pleasure.
MissChipsa (Estrella | Estele) specializes in reimagining maps in the spirit of different historic periods. In Chipsa’s portfolio, you’ll find medieval maps and versions inspired by prehistoric times. It’s easy to get sucked in, checking out all the creative ideas – ships, castles, landscapes, and much more.
Now let’s get to the collection itself!
@noirsims18
All map replacements by this creator can be found at the link
San Sequoia Map Replacement

Download ↑
Batuu Map Replacement

Download ↑
Tartosa Map Replacement

Download ↑
Newcrest Map Replacement (+lite version)

Download ↑
20th Century Plumbob
All map replacements by this creator can be found at the link
Nordhaven Map Replacement

Download ↑
Selvadorada Map Replacement

Download ↑
Glimmerbrook: Dawn Map Replacement

Download ↑
Batuu Map Replacement

Download ↑
Oasis Springs Map Replacement

Download ↑
StrangerVille Map Replacement

Download ↑
Copperdale Map Replacement

Download ↑
DerShayan
All map replacements by this creator can be found at the link
Mt. Komorebi Fanart Map

Download ↑
Ravenwood Fanart Map
Download ↑
Moonwood Mill Fanart Map
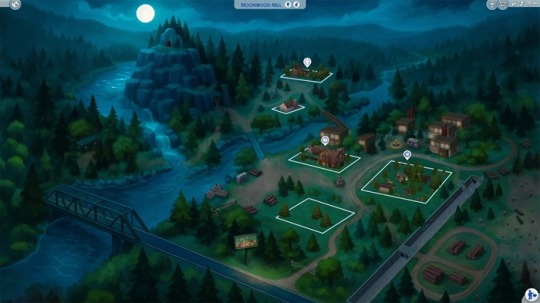
Download ↑
Mama-Llama
All map replacements by this creator can be found at the link
Sulani "Sunrise" realistic map replacement

Download ↑
Ciudad Enamorada realistic map replacement

Download ↑
San Myshuno "Luxury" realistic map replacement

Download ↑
Forgotten Hollow "Mystic" realistic map replacement

Download ↑
Willow Creek realistic map replacement

Download ↑
@estrellka-chipsa (Estrella | Estele)
All map replacements by this creator can be found at the link
Oasis Springs Map Replacement

Download ↑
Magnolia Promenade Map Replacement

Download ↑
Willow Creek Medieval Map Replacement

Download ↑
Fantasy Granite Falls Map Replacement

Download ↑
Winter in NewCrest Medieval Map Replacement

Download ↑
San Mishuno Medieval Map Replacement

Download ↑
Prehistoric Granite Falls Map Replacement

Download ↑
Forgotten Hollow Map Replacement

Download ↑
🌱 Create your family tree with TheSimsTree
❓ Support 🌸 Our Blog
#TheSimsTree#simslegacy#legacychallenge#sims 4#sims2#sims3#simsfamily#simstree#sims#sims4legacy#sims4roleplay#sims4stories#thesims4#ts4#ts4cc#plumtreeapp#simsta#simstagram#sims map#ts4 mods#sims 4 fix#sims override#sims aesthetic
73 notes
·
View notes
Text
very important:
A GUIDE ON HOW TO REDUCE YOU CC FOLDER'S SIZE by @freezerbnuuy
i've seen alot of people talking about deleting their cc to reduce their folder's size but this is another way to do so thank you bnuuy! im gonna do this now actually
121 notes
·
View notes
Text
📥 How to install everything ?! 🗂️
It's a very big project ! Between the lots and the sims, you have to be very sure of what you are doing. However, this post is there to guide you through the steps of installing everything.


🟪 Phase one - The "Lot Master Meshes Post" 🏗️ (for the unpopulated neighborhood) : This post contains links for custom content (Building and Buying Mode) needed that does not install itself with the packaged files and needs to be installed for lots to display properly. Not downloading those things can cause bug, especially food/shop displays. 🟥 Phase two - The "Chapters" posts : install the lots 🏡 These posts contain links to big downloads or entire download sub-folders containing the lots.packages (Neighborhood, Downtown, MagicTown etc.). Each lot.package file must be installed for every lot to display properly in the neighborhood with The Sims 2 Clean Pack Installer by Mootilda. For the lots, every CC is needed. The CC presentation in the lots posts (between pictures) serves to illustrate (or to show you an alternative or to thank a creator) and is included in the packaged file or the lot master-meshes post. The lots post where only to show what you are downloading, and for the ones who just want to pick and choose a particular lot for their own game. 🟧 Phase three - The Neighborhood 🏘️ The "Chapter 5" post includes every neighborhood decoration CC you need for the neighborhoods, after you installed every lot packaged file. When, you passed the check-list, you can choose what to download between all the options presented to you. 🟨 Phase four - The CAS Master Meshes Posts 1 and 2 A lot of CC presented in those posts are not strictly necessary. If you don't install a default replacement, you will end up with the maxis content. If you don't load a custom hairstyle or clothing, you can have a display bug, but that is quickly corrected with the "change appearance" option. Big bugs can occur when an eye or skin color is missing, so I deliberately build my sims with the Maxis eye/skin options. These posts are for the ones who want to install my populated neighborhood. For those who only want to choose a few sims from the families, each sim in each family post has their own content listed. 🟩 Phase five - Download & install the TS1 families Subhood 🧑🤝🧑 I'm working on making one big neighborhood, but the issue with main hoods is unwanted sims spawning, especially custom PT and NPCs. And then potential corruption when you try to clean that freaking mess. The Main (completely unpopulated) hood with the populated subhood is the best option to have a "Fresh Start" clean neighborhood. After deleting the subhood, you have to move the family in houses. The Sims 1 has a big family bin. Choosing who is going where is part of the game, it doesn't seem right to choose for you. 🟦 Phase six - Passed the check list 🎮 You chose, you installed, you PLAY ! (veni, vedi, vici...)


⚠️ I'm not going to lie to you. It's a big project. I tried by the past to handle that kind of installation and here is my advice, good or bad, I don't know :
1 - Install every master-meshes, well organized in your files. 2 - Install every CC included in lot packages in one dedicated "messy" folder, to make the duplicate replacing themselves (there are a lot since I use a lot of time the same items... logic). 3 - Install the neighborhood deco nicely organized in your folders. 4 - Test the lots/neighborhoods, see if everything works. 5 - Exit your game and Run a program to search for duplicates (like this one for exemple), and suppress all duplicates files from the "lots packaged file CC folder" (suppress where it's still messy) 6 - If you want to organize the "messy" folder, you can run a program like the great Delphy Download Organizer to efficiently re-dispatch files according to your own classification. However, I strongly advise against using this software to locate duplicates. It has the option, but it doesn't work well.
💡To go faster ? - The "Navigation" page on my Simblr !


#sims 2#sims 2 download#ts2 simblr#ts2#1t2#the sims 1#sims nostalgia#sims 1#the sims 2#ts1#ts1t2 families#ts1t2 neighborhood download#ts1t2 neighborhood project#ts1 to ts2#FAQ
65 notes
·
View notes
Text
17 notes
·
View notes
Text
youtube
in this video, i invite you beauties into my creative process & show you all how i create alpha hairs for the sims 4.
𝙧𝙚𝙨𝙤𝙪𝙧𝙘𝙚𝙨
(warm up & prep)
guided meditation & breath work for artists (spiritual): https://www.youtube.com/watch?v=TgyHpWADxTUhttps://www.youtube.com/watch?v=phskp62LPVc
how to draw shadows and create form: https://www.youtube.com/watch?v=FIC26ZM0eYQ&t=1s
how to navigate blender: https://www.youtube.com/watch?v=tH46sGwAFfo
how to use Sims 4 Studio: https://www.youtube.com/watch?v=QXyCj-QtYgE
how to create recolors in Sims 4 : https://sims4studio.com/thread/397/create-standalone-recolor-custom-content
necessities
drawing pad: https://www.amazon.com/shop/kikovanitysimmer
hair brushes:
other 𝙧𝙚𝙨𝙤𝙪𝙧𝙘𝙚𝙨
general art videos: https://www.youtube.com/@emhuesart
how to use a drawing tablet: https://www.youtube.com/watch?v=Sb8FtNJOGS4
inspo : https://www.youtube.com/watch?v=02i3ICQOd8o&t=82s
more inspo: https://www.youtube.com/@pateseich
ART HISTORY:https://www.youtube.com/watch?v=t6Wc7OMks4U
thank you for watching and good luck!
download the hair I created in the video: 🌸
download sims hair creation essentials: 🌸
95 notes
·
View notes