
Welcome to Smackcoders! We are experts at turning your ideas into digital reality through the development of websites, mobile apps, CRM extensions, and plugins. Innovation is our passion, and your success is our goal. Join us to collaborate on a vibrant digital future!
Don't wanna be here? Send us removal request.
Statistics
We looked inside some of the posts by smackcoders and here's what we found interesting.
Average Info
Notes Per Post
1
Likes Per Post
1
Reblog Per Post
0
Reply Per Post
0
Time Between Posts
9 days
Number of Posts By Type
Text
17
Last Seen Tumblr Blogs


Fun Fact
70% of Tumblr users say the Dashboard is their favorite place to spend time online.
Text
Step-by-Step Tutorial: Migrating Translated Posts and Custom Posts in Multilingual Site with Polylang Using CSV Importer

Introduction
Multilingual websites are becoming increasingly common as businesses and individuals aim to reach a global audience. Polylang is a popular WordPress plugin that facilitates the creation of multilingual websites. In this guide, we’ll explore the process of Polylang import translations for various content types, including posts, pages, custom posts, and custom fields.
What is Polylang?
Before diving into the import process, it’s essential to have a basic understanding of how Polylang works. Polylang allows you to create and manage multilingual content by associating different language versions of a post, page, or custom post type. It also supports translations for custom fields.
For efficient content translations install and activate the Polylang plugin in your WordPress website.
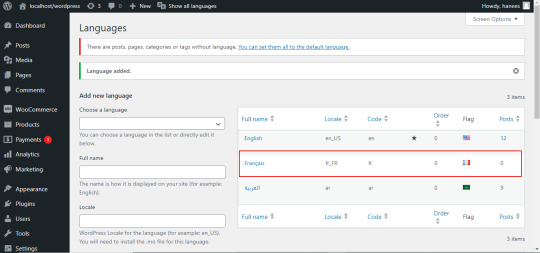
How do you set up languages on a WordPress site using Polylang?
Once you install the Polylang plugin, it is time to set up the language to translate your WordPress site content into your preferred languages.
To set up languages in Polylang,
Login to your WordPress website and navigate to the Language tab from the left-side menu

Choose the language from the drop-down menu. Once you select the language, all the other fields like the Full name, locale, and language code have been updated automatically.
Then click on Add Language.

Now your language has been updated in the right side table.
How to Import Polylang translated content in your Multilingual Websites?
Before Importing the Translated content of Polylang, let us understand the basic reasons and benefits of importing translated content in WordPress.
Key reasons to import translated content in WordPress
Importing translated content into WordPress can be essential for several reasons, particularly when managing a multilingual website. Here are some key reasons why importing translated content is crucial:
Global Reach and Audience Engagement: Importing translated content allows you to reach a wider global audience. By offering your website in multiple languages, you increase accessibility and engage users who prefer to consume content in their native language.
Enhanced User Experience: Providing content in the user’s preferred language enhances the overall user experience. Visitors are more likely to stay on your site and explore its offerings when they can easily understand and navigate the content.
SEO Benefits: Translating content helps improve your website’s search engine optimization (SEO). Search engines recognize and index content in different languages, making it more likely for your site to appear in search results for users searching in those languages.
Catering to Diverse Markets: If your business operates in or targets diverse markets, importing translated content is crucial for effectively communicating with customers from different linguistic backgrounds. It demonstrates cultural sensitivity and a commitment to serving a global clientele.
Compliance with Local Regulations: In some regions, there may be legal requirements or industry standards that mandate providing information in specific languages. Importing translated content ensures compliance with such regulations and helps you avoid legal issues.
Multilingual Content Management: WordPress plugins like Polylang make it easier to manage multilingual content. Importing translations allows you to efficiently handle posts, pages, custom posts, and custom fields in multiple languages within a unified content management system.
Consistency Across Languages: Importing translations helps maintain consistency in messaging and branding across different language versions of your website. It ensures that the translated content aligns with the original message and intent.
Efficient Content Localization: Instead of manually translating and inputting content for each language, importing translations streamlines the localization process. It saves time and resources, allowing you to focus on creating high-quality content rather than duplicating efforts for each language.
Adaptation to Regional Preferences: Different regions may have specific language nuances or preferences. Importing translated content enables you to tailor your messaging to resonate better with audiences in various geographic locations.
Facilitates Regular Updates: As your website evolves, regularly importing translated content ensures that the latest updates and changes are reflected across all language versions. This is crucial for keeping the information current and relevant for all users.
CSV Importer for Polylang- WP Ultimate CSV Importer Plugin
The WP Ultimate CSV importer is an all-in-one import tool that helps to import, update, and export your WordPress content in their desired file format.
With WP CSV importer, it is easy to import the Polylang translations with few clicks. The translated content will be imported into your WordPress Website in the languages that we have set up in the Languages section.
In this blog, we will have step-by-step instructions on how to import posts, pages, custom posts, and custom fields in Multiple languages.
How to prepare a CSV to import the content of Polylang translations?
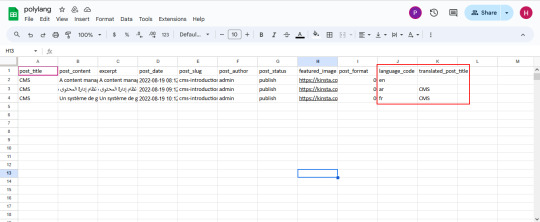
Every content import includes the CSV files with the translated content. Whether it is posts, pages, custom post types, etc it is important to prepare a csv file with the original content and the translated content
To import the content into the Multilingual website, add two additional columns in the csv file called language_code, and translated_post_title.
Provide the language code with respect to its related content.
Leave the translated_post_title field of the original content as empty.
Enter the post title of the original content in the translated_post_title fields of the translated content
Save and download the CSV file
How to Import Posts, and Pages in Polylang Translation?
The WP CSV importer plugin will make the job easy to import the posts, and pages in the polylang translations.
To import translated posts, and pages in Multilingual Website,
Navigate to the WP CSV importer Plugin from the left side menu.
Click on Import/Update from the top sidebar

Browse the prepared CSV (posts, or pages) from your downloads.

Select the content type that you want to import in the “Import each record as” field
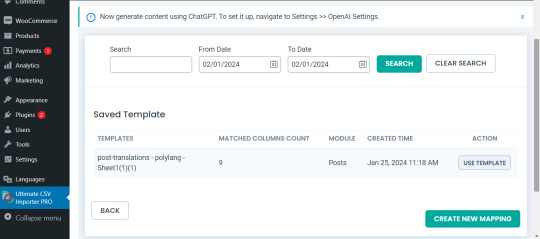
Then click on continue for mapping.

Now click on Create New Mapping. Or If you want to use the existing mapping template, you can click on the saved templates.
In the mapping section, you can map the CSV header field with its related WP fields by means of the drag-and-drop method or advanced method( Mapping the fields by means of selecting the desired field from the drop-down)

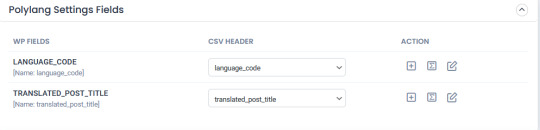
Verify the mapping of the polylang settings field. That is language_code and translated_post_title.
You can also add mapping for the custom fields. Once done with the mapping save the mapping template with the unique name.

Click on Continue for featured media handling.
Here you can enable the desired field for handling media files.
Here you can have all the options to import your featured image based on your business needs.
You can enable the download of external images to media while importing the posts
Also, you can select your desired image handling and image size.
You can map the media SEO and Advanced Options
Click on Continue

Then configure the Import configuration settings and Click on Import.
Now your post/page has been successfully imported in the desired languages that have been set on polylang.

You can click on the view log to view the successful post/page import on Multiple languages

This is how your translated post content mentioned on your csv has been imported into Multilingual Websites.

How to import Custom Post types and custom fields in Multilingual Websites?
Before diving into the topic of how to import custom post types and custom fields in polylang translation, let us have a basic understanding of What custom post types (CPT) and Custom fields are.
What are Custom Post Types and Custom fields?
WordPress comes with two primary content types: posts and pages. However, in many cases, websites require additional content types that may have distinct characteristics and purposes. This is where custom post types come into play. Whereas custom fields provide a way to store and display specific information related to the content.
For example, if you are building a real estate website, you might create a custom post type for “Properties” with specific custom fields such as price, location, and number of bedrooms. This ensures that the content is structured in a way that suits the website’s needs.
Things to remember before importing custom posts and custom fields
Ensure that you have created your custom post types and have assigned the custom fields to the desired post types.
Ensure you have prepared a csv for the custom post types and all the fields included in that custom post type have been properly assigned to the respective post type.
Ensure you have included the language_code and translated_post_title in the prepared CSV.
Steps to import Custom post types in Polylang translations
Importing translated custom post types is now efficient and effective with WP CSV Importer Pro. You can easily import the translated custom post types of any third-party plugins such as ACF, Jet engine, Metabox, etc.
However, the WP CSV importer Pro will provide support to all the ACF custom fields except that of the layouts sections.
The supported ACF fields for Translated custom field Import are listed below:
Basic: Text, Text area, Number, Range, Email, URL, Password
Content: Image, File, WYSIWYG Editor, oEmbed, Gallery.
Choice: Select, CheckBoxes, Radio Button, Button Group, True/False.
Relational: Link, Post object, Page Link, Relationships, Taxonomy, User.
Advanced: Google Maps, Date Picker, Date Time Picker, Time Picker, Color Picker
The Import steps are the same for all the content types in the WP CSV importer Pro plugin.
Prepare the CSV File:

Importing Translations:
Now that you have a CSV file containing your Polylang translations, it’s time to import them back into your WordPress site. Follow these steps:
Navigate to “WP Ultimate CSV Importer Pro” in the WordPress dashboard and select “Import/Update”
Upload the CSV file you prepared earlier and follow the on-screen instructions.
Choose the content type you want to import translations for. On the ”Import Each record as” field all the custom post types of ACF, Jet engine, Metabox or any plugin and the ACF custom fields are displayed on the drop-down.
All your custom post types and the ACF custom fields have been listed in the drop-down

Select the desired Custom Post types or custom field that you would like to import
Click on Continue. Map the WP fields with respect to their corresponding CSV headers.
Importing translations for custom fields might require additional steps. If your CSV file includes custom field translations, you may need to ensure that the custom field names match those in your WordPress setup.
Map the Custom field Suite and all the desired fields.

You can also add Mapping for the custom fields by simply clicking on the Add Custom Fields.
Ensure that the Polylang settings field is mapped correctly.
Save the mapping template with the unique name and click on continue
Enable the desired field in the Feature Image Media Handling section, and click on Continue.
Configure the Import Section and click on Import.
Now your CPT/ custom fields have been successfully imported into the Multilingual Website.

You can also view the log by clicking on View log-> admin view to verify the imported posts.

How to import taxonomies in Polylang translations?
Importing polylang translations with WP Ultimate CSV importer includes the same steps for all the content types. You can refer to the Importing steps explained above to import your taxonomies into Multilingual Websites.
WP CSV importer has smartly designed to import your translated post/page along with its taxonomies. That is if you import a post, then its related taxonomies like post_categories and post_tag (need to be included in the csv) have been imported with the post itself.
However, you can also provided with an option to import taxonomies alone without a post.
Steps to Import translated Post categories and Post tags
Prepare a csv with the translated content of (post_categories/ post_tags)
Add language_code and translated_post_title.
Navigate to CSV importer -> Import/update-> Browse the CSV
Select the content type as categories or tags
Map all the desired fields like post_categories/ post_tags.

Ensure the polylang settings field is mapped correctly
Save the Mapping template
Configure the Import process and click on Import.
Now the categories has been imported into the Multiple languages
Post Importing Steps
Once you successfully imported your polylang translations, there are few things to consider. That are listed below:
Verification and Troubleshooting
After the import process is complete, it’s crucial to verify that the translations have been applied correctly.
Regular Maintenance
Keep in mind that website content evolves over time. Periodically export and import translations as you update your content. This ensures that your multilingual website remains up-to-date and provides a seamless experience for users across different language preferences.
How to export translated content in WP Ultimate CSV Importer?
Like importing, the export process of Polylang translation is quiet easy with WP ultimate CSV importer plugin. Moreover, this plugin is an all-in-one tool that smartly import and export your translated content from/to the multilingual websites.
The export process is same for all the content types. Let see an example of how to export pages in Multiple languages.
For that, navigate to WP ultimate CSV importer
Select Export from the top side menu and choose the content type that you want to export
Here I select pages. It displays the number of pages including the polylang translation has been displayed. Now click on continue

Provide the File name and File type. Here I select CSV.
You can also Export your translated content with advanced filters.
Now click on Export.

Your WordPress pages with polylang translations has been exported. Now click on download to download the exported file in your local computer.
The exported pages with polylang translation will now be downloaded as desired file type.
Conclusion
Importing and Exporting Polylang translations for posts, pages, custom posts, and custom fields is a crucial step in maintaining a dynamic and effective multilingual website. By following the steps outlined in this guide, you can streamline the translation import & export process and provide a seamless experience for your global audience.
Refer to our user guide for step-by-step instruction to migrate Polylang Translations for WooCommerce Products, Variations and Orders
#wordpress#cms#wordpress tutorial#plugins#polylang#csv importer#custom post type#posts#import export data
0 notes
Text
How to import CSV files in WordPress without a plugin
If you’re planning to transfer content to your WordPress site and wondering if it’s possible to do so without a plugin, then the answer is a resounding yes!
Fortunately, WordPress offers several built-in options that allow you to import without relying on a third-party plugin. Moreover, it also supports various file types that cater to your specific needs.
In this tutorial, we’ll guide you through the step-by-step process of importing programmatically to WordPress without the use of a third-party plugin.
Warning 1: Backup Before You Proceed
It is always important to backup your data regularly before you do something that updated the database whether you use a plugin or not. This ensures that you have a safe backup copy of your website’s content and database so that you can always rollback to a previous version in case of any issues, data loss or corruption.
Warning 2: Potential Risks Involved
Importing content without a plugin can potentially cause issues with theme or other plugins, and break the functionality or design issues. It is also increase the risk of security vulnerabilities if the content with malicious code or scripts get injected while importing.
How to use WordPress functions
Do you want to import a bunch of posts into your site but don’t want to do it manually one by one? Well, you’re in luck because I have a solution for you!
One way to import posts as CSV is by using the built-in wp function called wp_insert_post(). This function allows you to programmatically create and insert them into the database.
Here’s how you can use this function:
First, make sure your file is uploaded to your server or host through ssh, cpanel, ftp or sftp, for example in the directory /var/www/html/wp-content/uploads/posts.csv.
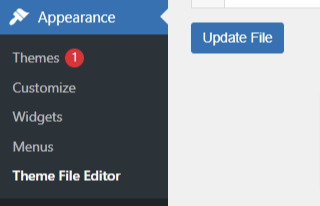
Next, add the following code snippet to your theme’s functions.php file e.g: \wp-content\themes\twentytwentythree\functions.phpif (($handle = fopen("/var/www/html/feb/wordpress/wp-content/uploads/smack_uci_uploads/imports/d107020a28796c63d6984ad91f0fcab5/post.csv", "r")) !== FALSE) { // Read the CSV file line by line while (($data = fgetcsv($handle, 1000, ",")) !== FALSE) { // Create a new post object and set its properties $post = array( 'post_title' => $data[0], 'post_content' => $data[1], 'post_status' => 'publish', 'post_type' => 'post', ); // Insert the post into the database $post_id = wp_insert_post($post); // Check if the post was inserted successfully if ($post_id > 0) { // Post was inserted successfully, do something else if needed } else { // Post was not inserted, handle the error if needed } } fclose($handle); }
Save the changes to your functions.php file.
You can also edit the theme file from Appearance > Theme File Editor
That’s it! You are done now. .
Keep in mind that this is just a basic example, and you can modify the code to suit your specific needs. For example, you can add additional code to handle custom post types, taxonomies, or other properties.
Also, you can customize to use the code snippet in any filter or action hooks based on your trigger function.
If you need more help or would like to see more use cases, additional examples and code snippets, do not hesitate to reach out to us! You can leave a comment below or use the contact form, and we’ll be happy to update the tutorial with more information to help you out.
How to use the wp-cli method
Another method to import users as CSV into WordPress is by using wp-cli. This method is pretty straightforward and easy to follow. First, you need to prepare a the file in a specific format, which should look something like this:user_login,user_email,display_name,role,authors_parameter Johndoe,[email protected],John Doe,contributor,create smacksupport,[email protected],smackcoders,administrator,create jiju2fabio,[email protected],jiju2fabio,author,create
You can create or update your user CSV file to match this structure. If you want to use the same sample that we’ve used in this tutorial, you can download it for training purposes. Once you have your file ready, upload it to your uploads folder, and the path to the file should be /var/www/html/wp-content/uploads/users.csv.
Assuming you have already installed wp-cli, you can use the following WP-CLI command:
wp user import-csv /var/www/html/wp-content/uploads/users.csv
And that’s it! Your users should be imported now. Note that you can also upload the file from a remote URLs using this method.
However, it’s important to note that this method is only useful for users as CSV. If you’re looking to import posts from CSV, the wp function method is the better option. The wp-cli method is only compatible with WXR files, which can be complicated. So, if you want to import posts, it’s best to stick with the first method we discussed.
How to use the Built-in Options
First, log in to your wp-admin dashboard and go to the Import section under Tools. Scroll down until you see the WordPress option and click “Install now”. Once it’s installed, you’ll see a new option called “Run Importer”. Click on that to start the process.
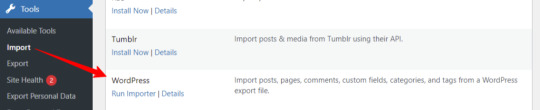
Next, you’ll be prompted to upload the WXR (.xml) file. This is the file that contains all the content you want to bring to your site.

Once you’ve uploaded the file, you’ll see the “Assign Authors” section. Here, you can choose how to handle author information. You can import authors, create new users, or assign them to already available users. Make sure to review and adjust the settings as needed. You can also choose to download any attachments that are included in the file.
Once you’ve configured all the settings, click “Submit” to start the process. The tool will process the WXR file and import the content. If any errors occur during the process, you’ll be notified so you can address them.
And that’s it! With this built-in tool, importing content has never been easier. No need for other plugins or custom code.
Know about Built-in WordPress All Import Options
Well, did you know that WordPress has other built-in options that you can use for this purpose?
To access these built-in tools, all you need to do is go to your WP-Admin dashboard, click on “Tools,” and then select “Import.” From there, you’ll see a table with different options available.
Depending on your needs, you can choose the option that suits you best. For example, if you want to migrate from a Blogger blog, you can use the Blogger option. If you want to import from an RSS feed, you can use the RSS option. And if you want to transfer from an export file in WXR format, which supports posts, pages, comments, custom fields, categories, and tags, you can choose the WordPress run importer option.
However, keep in mind that these default tools have some limitations. You can only use them for a one-time process, and you cannot automate or schedule the process. Also, filters and partial imports may not work correctly, and there is no proper support or fixes available.
But don’t worry, if you need more robust and reliable tools, there are third-party plugins like WP Ultimate CSV Importer available that can help you out.
Here are some plugins you can try
https://wordpress.org/plugins/one-click-demo-import/
https://wordpress.org/plugins/advanced-import/
https://wordpress.org/plugins/import-facebook-events
How to plan a simple migration
If you’re planning to import your data, it’s essential to plan well before getting started. Let’s discuss some takeaways that can help you choose the right option.
Firstly, if you want to import user metadata as CSV, you can do it programmatically using wp-cli without the need for any plugin. Secondly, you can use the WP function method by customizing the shared code to your specific needs. And if you have WooCommerce installed and active, you can import products and tax details as CSV without needing another plugin.
If you’re planning to use WXR, you can use the wp-cli method, but it requires more effort and time. The easiest way is to use the default importer option.
Moreover, there are other options available for bloggers, Tumblr, LiveJournal, Movable Type, TypePad, etc., and from an RSS feed as well. Understanding each option’s capabilities and limitations can help you choose the right option for your needs.
Also, It’s important to know about each file type that WordPress supports. Let me explain each file type in detail so that you can understand it better.
WXR: It stands for WordPress eXtended RSS. It is an XML-based file format that contains content, categories, and tags. It is the most common file format used for import export data.
XML: It stands for eXtensible Markup Language. It is a file format that is used to store and transport data. WordPress uses XML to export and import content.
CSV: It stands for Comma Separated Values. It is a file format that stores data in a tabular form where each column is separated by a comma. CSV files are commonly used to store data like product information, user data, and more.
RSS: It stands for Really Simple Syndication. It is a file format used to publish frequently updated content. It also allows you to import RSS feeds into your site.
JSON: It stands for JavaScript Object Notation. It is a file format used to store and exchange data. So, those are the file types supported. It’s important to choose the right file format based on your data and requirements.
I hope this information helps you. Some useful References:
If you want to learn more about the WP-CLI method, you can visit the WP-CLI website.
For using the WP function method, you can use the wp_insert_post() function. This function allows you to programmatically insert data into your WordPress site. You can learn more about it from wp developer reference.
Lastly, if you want to use the WordPress default options , you can find it in the plugin repository. In conclusion, importing content can be made easy with the right tools and an understanding of the available options and knowing the limitations and capabilities of each option.
With these tips in mind, you can transfer your content seamlessly and focus on creating quality content for your website.
#cms#wordpress#wordpress plugins#wordpress tutorial#plugins#website development#wordpresswebsite#import#blog post#csvimporter#importdata
0 notes
Text
How to Choose the Best CRM for Your Business?

Are you looking for the best CRM for your business? Choosing the right CRM is an important decision. That can have a major impact on the success of your business. Whether you’re just starting or have been in business for a while. The right CRM can help you streamline processes. It increases efficiency and improves customer satisfaction. In this blog, we’ll provide the factors to consider when choosing a CRM. As well as tips on how to make the best selection for your business.
Importance of CRM in Modern Business
Goodbye to manual data entry
The primary benefit of CRM is that it automates the entry of potential leads. As a result, you can avoid having to manually enter data into spreadsheets. And increase the productivity and efficiency of your company.
Quicker answers to client inquiries
The majority of CRM software offers autoresponders that address fast on FAQs
Interacting with current clients
The best CRM enables you to interact with your current clients more effectively. You can inform them about your new services and offers by sending them emails and newsletters.
Incorporating various channels
CRM programs assist in tracking consumer inquiries through various channels. It includes social media and notifying your sales staff of inquiries.
Updating profiles
When a customer’s profile needs to significantly alter, CRM becomes necessary. With the use of CRM software, all information is centrally located. And it is easily accessible (only by authorized personnel).
Marketing and sales insights
The value of CRM may be appreciated by the fact that it offers insightful data on the effectiveness of your marketing activities, consumer behavior, and areas for development.
Monitoring marketing tactics
Your business can check customer engagement channels. And can produce in-depth reports. Evaluate consumer behavior with the use of CRM systems.
Inventory management
You can learn about the most popular products and their current stock availability in retail by using CRM. This makes it easier for you to replenish them when their quantity reaches a crucial level.
After-sale assistance
When dealing with customer concerns about specific orders, the true value of CRM becomes clear. CRM software enables you to address consumer complaints in an efficient manner. Thus in a way, they contribute to increasing customer loyalty to your brand.
Types of CRM available in the Market
The three main categories of CRM systems are operational, analytical, and collaborative.
Operational CRM
Businesses can increase the effectiveness of their customer relationship management procedures with the use of operational CRMs.
Even when there are several touchpoints, they give the ability to visualize and manage the complete client experience.
Beginning with their earliest interactions with the website of your business. Moving through the complete lead management procedure as they progress through the sales pipeline. And terminating their activities after they become customers. Here is how you may influence them.
Automation features are often offered by operational CRM systems. Automated marketing, sales, and service offload the work. That would otherwise be done by your people.
This frees up their schedule to focus on the more imaginative and introspective facets of their work. Tasks that need a human touch.
It is easy for expanding businesses to keep offering first-rate services at scale.
Operational CRM: How it works?
Still, operational CRMs also include capabilities that focus more on monitoring. And also on regulating, and improving the entire customer lifecycle. Operational CRMs often have the same features as collaborative CRMs.
Operational CRMs are equally as concerned with how people initially discover your business. And all the processes that lead up to being a customer as collaborative CRMs. Which are a little more centered on keeping consumers satisfied and coming back.
Automation elements begin to be used more frequently in operational CRMs. Operational CRMs usually integrate tools for sales automation, marketing automation, and service automation. It increases the efficiency of all the operations involved in managing customer relationships.
Operational CRMs are well suited for:
Companies seek better use of their customer information while improving employee productivity.
Businesses that want to gain a high-level view of the entire customer lifecycle. And find ways to make their processes across customer-facing departments better.
Collaborative CRM
Silos need to be broken down, and collaborative CRM solutions rank this. The sales team, customer care team, and marketing team frequently operate in siloed departments with poor communication.
Each of those departments is further divided into larger organizations. It is based on things like geographic locations, the channels they service, the items they concentrate on, or skill specializations.
If you want to provide a seamless customer experience throughout the client’s journey?. You need a system that allows information to be exchanged immediately throughout the entire firm.
Collaborative CRMs ensure that all teams have access to the updated customer data. Regardless of the division or channel they work in.
Customers don’t have to repeat themselves every time they speak to a new contact. It is because of the connection between departments and channels. Each employee they engage with has quick and simple access to a record. It is the record of all prior encounters with the customers. Which they may check to get any pertinent information.
Collaborative CRM: How it works?
The primary features of collaborative CRMs are split into two categories:
Distributing current information to all users. It is via a single platform, across departments and places.
Ensuring that people may easily access the information. They get it when they need it.
There are a few key characteristics of collaborative CRM.
1. Managing interactions
A collaborative CRM makes it simple to keep track of every interaction a customer or prospect has with your company. Regardless of the channel.
The information in the product is updated. Regardless of how a customer contacts a business. It may be by phone, email, social media, messaging services, or even an in-person meeting.
The topic of the chat, how it was resolved, and other relevant details that would be helpful for a subsequent conversation.
2. Managing channel
Consumers today demand that brands be accessible through several media. Knowing which channels your customers prefer can help you choose them more effectively.
Make sure you’re available when and where your customers need you. Collaborative CRMs keep track of the channels they use for various forms of communication.
3. Managing documents
Businesses may streamline where they maintain important customer papers with the help of collaborative CRMs.
If staff members need access to a customer contract? or proposal while servicing a customer? this functionality may be helpful.
Collaborative CRM is useful for
Companies with many departments are currently having trouble maintaining consistency. That includes businesses with many locations and omnichannel assistance. A collaborative CRM is something to think about if your customers have ever complained about having to repeat themselves after being moved from one department to another.
Analytical CRM
Analytical CRMs’ main aim is to help you analyze your customer data. And uncover the most important information.
Digital technologies and platforms have now made it easy to get large amounts of data.
Data analysis is the process necessary to transform data into something usable for your business. Yet, it is a challenging task.
But, studies suggest that more than half of the data that businesses collect never finds any use.
Your consumer information is worth too much for that.
With the use of analytical CRM tools, you may analyze your data. And can identify patterns in your customers' behavior.
With that knowledge, you may more clearly identify the processes that result in sales. And understands which boosts client retention and which client issues are most prevalent
Analytical CRM: How it works?
Analytical CRMs are better for high-level strategizing. While the other two CRM kinds are more likely to be utilized regularly by staff that deals with leads and clients daily.
Analytical CRM provides choices for reporting that are simpler to understand:
Which marketing initiatives generate the most leads?
Which leads have the highest chance of becoming customers?
Which kinds of sales strategies result in a transaction?
Which client types have the most lifetime value?
What issues do customers most frequently contact customer service about?
The most common customer complaints
Customers' favorite and most-used features and resources
How well your customer service team takes care of consumer issues
How soon do your representatives resolve a situation?
The solutions to questions like these are crucial for seeing flaws in your existing strategy. And deciding what adjustments to make for improved outcomes. They use data mining. A methodological procedure for examining huge datasets to uncover trends within them. Thus Analytical CRMs are helpful in this step. Technology is much better at it than humans are, especially as the amount of data you collect grows.
Analytical CRM is useful for
Companies that lack the skills to efficiently exploit their large amounts of client data.
Do you think all three CRMs necessary?
Depending on your specific business needs, you may need one of the three types of CRM or all three.
An analytical CRM could be excessive if your company is fresh. And hasn't gathered much client data yet.
When you need a productive. And to keep everyone on the same page across many departments. And/or locations of your business. Then the need for a collaborative CRM becomes most apparent.
Additionally, businesses looking to automate activities to increase efficiency. Are you looking to optimize the customer lifecycle as a whole? Then you should focus on having an operational CRM.
Also, many of the widely used CRM systems on the market will share some of the same functions with different types.
List of Top CRMs
Have a grasp of these top CRM lists which suites your business needs.
To view the General comparison of Top CRMs, refer What is CRM Software: The Complete Beginner’s Guide
PipeDrive
Salesforce CRM
Zoho CRM
CRM Hubspot
SuiteCRM
Insightly
Vtiger CRM
Factors to consider when selecting CRM Software
The kind of CRM system you select for your company will rely on the extra features and functionality you need.
You must go through what is known as a request for proposal (RFP) process while assessing CRM systems. You will have the chance to learn more about the platform in-depth during this phase. And also request demos so you can check your options side by side.
The first decision you’ll need to make when selecting a CRM solution for your company is
Whether to use on-premise or cloud CRM software.
Let’s quickly examine the benefits and drawbacks of both options before you make your decision.
Cloud CRM
Cloud CRM software is created and maintained by the service provider on their servers.
Because the service is accessible online via a browser, you can use it without installing any software on the computers in your business.
It is simple to access from any location at any time.
You can test Cloud CRM’s products for free using the free trial and determine if they match your needs. A pay-as-you-go plan enables you to pay an upfront subscription cost monthly. Or select annually for your whole customer base.
Customization possibilities differ depending on the suppliers. But are easily accessible and quickly deployed.
Using APIs, corporate apps may be integrated with ease.
To guarantee the integrity and safety of your data, security vendors are committed. They offer strong security measures and access control.
On-premise CRM
To use on-premise CRM, you need to install the program on all necessary devices on your local network. And set up servers in your office. As a result, maintenance, customization, and upgrades will all fall under the purview of your IT personnel.
Only devices connected to your local network can access your data. And this is stored on regional servers.
Spending more time and money is necessary when developing mobile applications.
The infrastructure is required to execute the program in the first place. And there is no trial period available.
A hefty up-front expense for the server. And also for software installation, as well as ongoing software licensing costs.
The deployment process takes longer and requires more work.
Depending on the vendor, but necessitates specialist knowledge and extra expense.
You and your company will be in charge of keeping an eye on and safeguarding user data. Maintaining your security and privacy protections will need a dedicated team and significant resources.
What to choose? Cloud CRM Or On-premise CRM?
Ten years ago, 88% of purchasers preferred on-premise CRM software to cloud CRM software. Making on-premise CRMs the preferred option for enterprises.
But, the tide has changed. With 87% of organizations choosing a cloud-based CRM application over an on-premises one.
If you want your data to be available at all times? And the freedom to scale up or down with ease? cloud CRM software is the way to go.
Also, it’s simpler for small firms to implement a cloud CRM. And it increases productivity without breaking the bank.
Here are the top queries to ask while choosing CRM:
Is the CRM user-friendly?
CRM is useless if it’s difficult to use and creating reports is a frustrating experience.
You can refine your plan using data-based insights. Thanks to analytics that your team can truly understand.
You can identify the patterns and insights in your CRM with the use of reporting options. They are both robust and simple to use.
Make sure your CRM is straightforward, user-friendly, and generally uncomplicated.
Can the CRM program assist you in being more organized?
Collaboration between sales, marketing, and customer service is crucial when establishing a long-term partnership.
If you want all your customer-facing employees to have access to the most recent customer information whenever they interact with a client. Then you need a CRM that connects everyone through a single portal.
The tool should maintain data consistency and channel-wide updates. While making it simple to access information from any location, at any time, on any device.
Does the CRM vendor provide training?
Certain CRM systems might be challenging to install and set up. You might even need to pay someone to manage some of them on a continuing basis. It won’t be cost-effective for a small business to invest in something that its staff would never have the opportunity to learn. Yet, even huge businesses will do better to find something they can implement quickly. —And that staff members can use it right away without extra training.
You should have lots of possibilities for training on your chosen tool. That is whether you’re utilizing a CRM for the first time or trying to advance your use of the program.
Does it integrate with the other applications you use?
Native connectors are built into modern cloud-based CRM products. It makes it simple and quick to seamlessly import data from your email system, accounting software, appointment calendar, and other sources.
You should make sure to request client samples from businesses in your sector in the RFP. Better still, request the contact information from the CRM provider for those companies. So you may call them and ask them directly what they like or dislike about the service.
Your top products should already be pre-integrated with CRM. So you won’t have to waste time manually integrating them.
Is it have Security Features?
Customer information is delicate. Although it is important to you, if it ends up in the wrong hands, it might quickly become a problem.
Any CRM you use must offer the highest level of security to safeguard your data and keep your client’s trust.
What Payment Method does your CRM follow?
The most often used options are CRMs that operate in the cloud and are billed monthly.
But, you can also come across on-premise CRM products that you could buy once for a certain number of users. And then download it to your local computers or other devices.
The second option can seem more affordable, but it limits your ability to get software upgrades. And makes it harder for your CRM to expand along with your company as you add more staff.
Whatever CRM you choose, make sure you understand the pricing model. And also how it will impact your budget.
Is it Scalable?
If you expect that your company will expand over the next months and years. Then you should start considering how well the CRM you select will scale right away.
How easy will it be to add new customers or employees?
How simple will it be to link new tech products to your CRM as you gradually integrate them into your workflow?
Avoid having to start over from scratch. Because you outgrew the CRM you selected, think about your future requirements now.
Recommendations for using CRM software in Modern Business
The way we operate, handle connections, and interact with clients is always evolving thanks to the development of new technology. This necessitates that we look beyond CRM’s conventional functionality. Because they are considerably more adaptable than their desktop and server counterparts. And also can be upgraded when new technology becomes the norm. Cloud-based CRM solutions shine in this new world. Just two of these instances are the development of smartphones and social media.
Mobile-capable
Your customer information must be as current and easy to obtain as is practical.
Because of this, some CRM systems now provide mobile CRM.
This allows salespeople to update crucial information. While they are still out in the field right after a meeting. And also access it from anywhere. Giving their colleagues the most up-to-date information possible before the competition.
With mobile CRM, you can manage every aspect of your organization without being confined to a desk. It includes deal closure, customer service, and even 1:1 marketing campaigns.
Social Media Awarness:
The way that many businesses connect with their consumers is greatly impacted by social media. They must now rely more than ever on Tweets, Facebook posts, LinkedIn discussions, and other forms of online communication.
Sounds noticeable?
If so, you’ll require a platform. That enables you to utilize social media as a source of fresh leads, prospect data, and information for customer care representatives.
It should go without saying that the greatest solution for businesses of all sizes is cloud-based CRM.
And when it comes to selecting a certain solution, ensure the below requirements to choose the CRM that fits your business needs:
User-friendly
Your CRM should be as user-friendly as the websites you frequently visit. You can view and edit client data, and collaborate with your coworkers anytime you want. And access your account from anywhere.
Fully equipped
With your CRM, you can able to handle business from any location at any time using any device. Your CRM should have real-time dashboards. It is to monitor your growth and surpass your goals. You may maintain a single, company-wide customer profile. And be sure that both service and marketing are looking at the most recent contact information.
Automation
With CRM you should be able to create workflows, add fields, and create a sales process with a few clicks.
Final Thought
You must pick a CRM that has the functionality your company needs today. And that can expand with you as your company grows if you want to enjoy it.
Before investing in a CRM platform, take into account the long- and short-term needs of your business. As well as your company’s growth objectives.
Bear in mind that a CRM requires your sales and marketing team to devote time as well as money.
As your business expands and scales, choosing the correct technology, putting it in place, and enforcing best practices surrounding its use will pay you.
#crm#crm software#best crm software#best crm for small business#bestcrm#zohocrm#vtigercrm#suitecrm#blog post#crm services
0 notes
Text
A Complete Guide for Seamless Migration from Vtiger CRM to Zoho CRM

Are you looking for a way to migrate from Vtiger to Zoho CRM for your business needs? With Zoho CRM’s robust feature set and intuitive UI, you can quickly and easily transition from Vtiger to Zoho CRM, with the assurance that all your data will be securely migrated. With Zoho CRM, you can access the latest features and tools that will enable your business to stay competitive in the ever-changing business landscape. Make the switch to Zoho CRM today and take advantage of all the features and benefits it offers.
Begin with the plan: Pre-Migration Process
There should always be a plan before implementing any tedious process to make it successful. Migrating customer records from one CRM to another is not an easy task.
Follow the pre-migration steps given below for safe data migration.
Analyze Your Data
Before beginning the migration process, carefully analyze your current Vtiger data. Make sure all data is up-to-date and organized in an easy-to-understand format. Pay special attention to customer data, as this is the most critical piece of information that needs to be migrated.
Clean up outdated and error records
You should check all the records once or twice for outdated or error records. Be sure not even a single record is outdated or incorrect and delete it before migrating it to your new CRM. Deleting unwanted records will save most of your precious time while on migration. For example, if there are records owned by staff who are no longer employed with the organization, you can either assign those records to active employees or update the .csv with the current employees’ email addresses. Additionally, if you want to attach notes to the Contact records and the parent ID is not the same as in Zoho, you can take advantage of vLookup in Excel to supply the correct parent ID. These changes should be made beforehand to ensure a successful migration. In some cases, it may not be necessary to rework the data and you can simply migrate after you have exported it from your system.
Create a Backup of Your Data
Before making any changes to your Vtiger system, be sure to create a backup of your data. In case something goes wrong during the migration process, this will guarantee that you have a copy of all of your data.
Choose the Migration Tool
Once you have analyzed your data and created a backup, it is time to choose a migration tool. There are several options available, so it is important to plan how you migrate your CRM record from Vtiger CRM to Zoho CRM.
There are two methods for data migration.
Import/Export(.CSV files)- Time Consuming. Saves Money
Third-party integration- Saves Time and Effort
Map your CRM data
The process of data mapping is crucial when switching between CRM platforms.
Knowing where your data should reside once it has been migrated is crucial, and the pre-migration process is the ideal time to assess your present data library and make any necessary changes so that you can use your data more effectively.
Simplifying the Complexity of Migration with Checklists
Don’t miss a thing. Check all the checklists to ensure that you are ready to go for the safe data migration from Vtiger to Zoho CRM.
File Format: Only the file in .csv format will be imported into the Zoho CRM.
File Size: The file size of your imported files can be a maximum of 8 GB. You can migrate up to 200 records at one time.
Structure of your Zip file: On opening your .zip file there should only be your .csv file. There should not be any folders there. If any folders exist it will show an error while inserting the file.
Restricted characters for import: The exported files with the following characters are not allowed for importing records in Zoho CRM.Vertical bar (|)Angle brackets (<>)Double quotation marks (“)
Field Names: Ensure that the first row of data in the source file contains the column headings, also known as field names, instead of the actual data values. This will help to identify the data when mapping it to the existing fields in Zoho CRM. The column names and the field names should be the same.
User’s Data: When transferring user information to Zoho CRM, you need to ensure the Owner ID field from the file is matched with the corresponding field in the CRM. For instance, when migrating leads, the Lead Owner ID should be mapped to the related field in Zoho CRM.
Update Mandatory fields: You must ensure that your lead import file includes data for all the mandatory fields in Zoho CRM. For example, the “Last Name” field is mandatory, so you must make sure the “Last Name” column in the import file has values, even if the data is “not provided” or “none”. If there are any records that lack values for the mandatory fields, they will be ignored when imported. You will have the option to fill in the missing mandatory values during the migration process.
Multi-select fields in picklists: The values of the import files should be separated by the semi-colons.
Checkbox type fields: The checkbox type field has two values: enable or disable. It could be converted in Zoho as below:If the checkbox is selected, then it is True or 1. If the checkbox is not selected then it is False or 0.
Drop-down lists: There must be a match between the dropdown lists’ presented data values and the associated Zoho CRM fields. For example, if you want to import account information that includes a value for the Industry Type drop-down list, be sure that the drop-down list already has all the industry values from the source file before importing the account information. If the values are missing, you must either change the values in the source file to correspond to the values already present in Zoho CRM or request your administrator to add the missing values. Even if the values are missing, they still can be added.
Blank rows in the imported files: If there are more than ten blank rows in the file, the file may have reached its conclusion. Data after the empty rows will not be imported. Make sure there are no empty rows between the data rows.
Migrating Users: The user with a separate Zoho CRM account cannot be migrated. The user will be added to the company’s account only when he closes the separate account.
Migrating Tags: Only 10 tags of the imported records will be migrated to the Zoho CRM. If there exist more than 10 tags, then it will migrate the first ten tags of the imported record files. The tags in the imported files should be in .csv format.
Data duplicates: It is hard to check for data duplicates while on migration. So you can skip or overwrite records in CRM. And the record will be migrated as it is.
Map the Mandatory fields: The table below lists the modules and the Zoho-defined required fields for each. When you import, please make sure you map these fields. Each module might have more mandatory fields, yet, you can always alter and mark the fields as optional if necessary.
Modules
Mandatory Fields
Leads
Last Name
Contacts
Last Name
Accounts
Account Name
Events
Title
Tasks
Subject
Deals
Deal Name
Closing date
Stage
Invoices, Quotes, Sales Order
Subject
Purchase Order
Subject
Vendor name
Price books
Price book name
Vendor
Vendor Name
Campaigns
Campaign Name
Calls
Subject
Call type
Products
Products name
Cases
Case origin
Subject
Status
Solutions
Solution title
Step by Step instructions to Migrate your records from Vtiger to Zoho CRM
Smoothly transition your data and migrate records from Vtiger to Zoho CRM in just a few simple steps.
Export all the records in the essential modules of Vtiger CRM
Step 1:Login to your Vtiger account
Step 2: Navigate to the module you want to migrate those records. You can select any number of records or select all records based on your business needs.
Step 3: First I have selected the contact module.
Step 4: On the List view click on the More option.

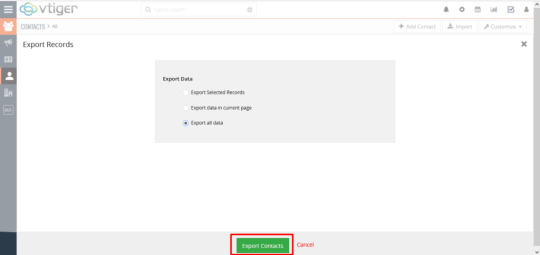
Step 5: Select the Export option from the drop-down.
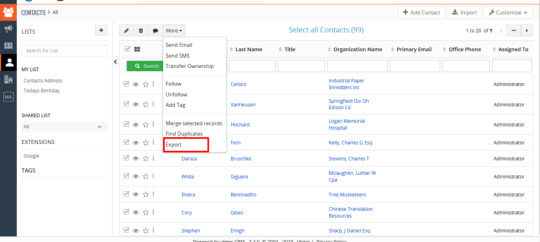
Step 6: Choose any one of the below options based on your business needs
Export Selected records
Export data on the current page
Export all data
Step 7: Finally click on Export Contacts.
Now all your Vtiger contacts have been exported in a .csv format. Follow the steps explained above to export all the records from all the modules in Vtiger CRM.
Once done with exporting all the required modules, we now move on to the migration process.
Note:
If you are exporting a record in which organization and deals are related then it will be prefixed as accounts in the exported .csv file. For example, all my contacts are related to the organization name. In the exported .csv of my contacts module, the organization name is prefixed with the term Accounts.
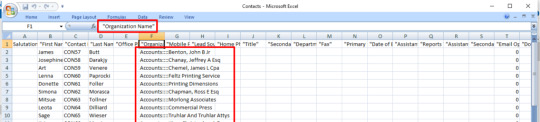
Here the term Accounts refers to the Organisation whereas the term Deals refers to the Potentials.
Let’s Import all the exported Vtiger records into your Zoho CRM
In Vtiger CRM you need to export each module one by one. But in the Zoho CRM, we have a migration wizard where we can import all the modules at once.
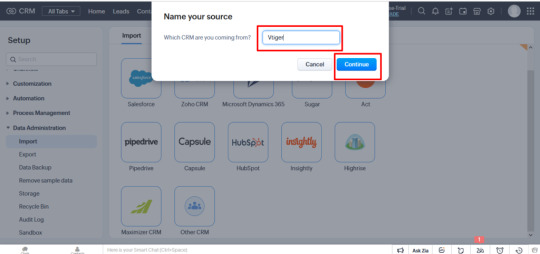
Step 1: Sign in your Zoho account
Step 2: Migration Wizard
Navigate to Settings and select Import on the Data Administration.
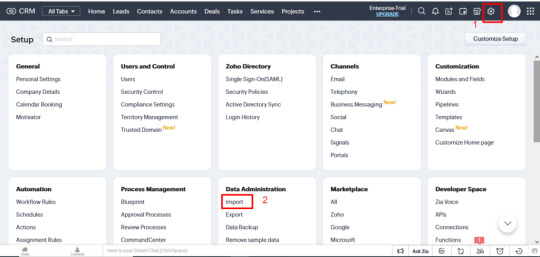
You will be landed on the Zoho Migration Wizard.
As Vtiger CRM is not listed, select “Other CRM”.
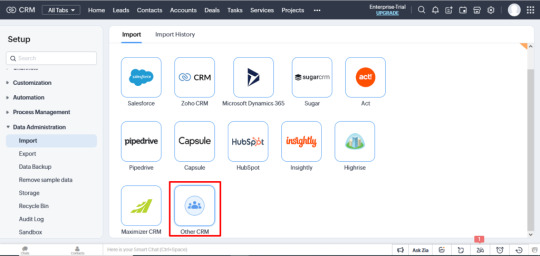
Now enter the name of your source as Vtiger. And Click on Continue
Step 3: Now it’s time to upload all the exported files from Vtiger
You can drag and drop or browse the exported Vtiger files.
Here only .csv files are supported.
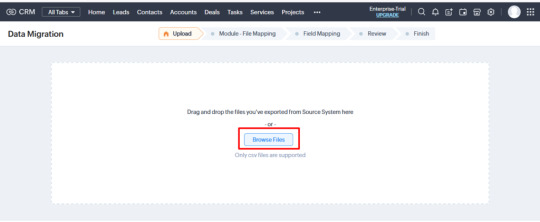
Browse all the CSV exported files of all the Vtiger modules one by one.
Once finish uploading files of all the modules, click on Next.
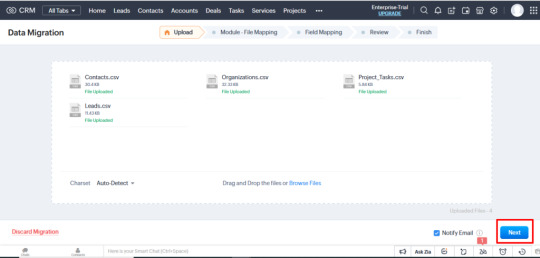
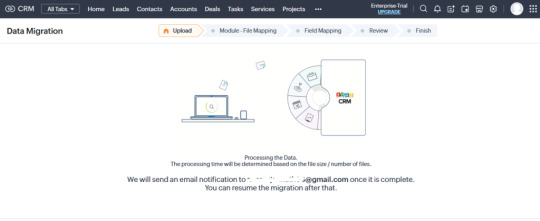
Now Zoho CRM will process your data. The processing time will depend on the file size /number of files.
Step 4: Module- File Mapping
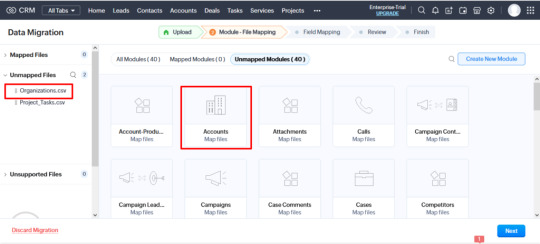
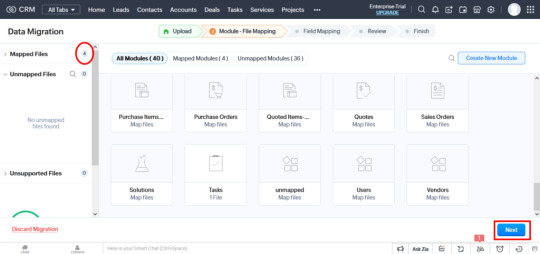
After processing all the files, it will lead to the tab Module- File Mapping. Here all the mapped files and unmapped files are displayed.
Based on the file names in Zoho CRM, the majority of Standard modules will automatically become associated with the system.
You can map all the unmapped fields with their related Zoho fields in the module widget. (For example, the Organization Module in Vtiger CRM is referred to as Accounts in Zoho CRM. And Project Tasks are referred to as Tasks).
Once you map all the fields, click on Next.
Note:
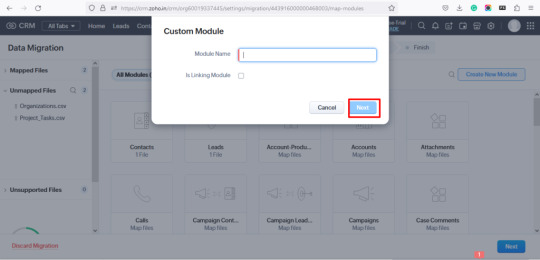
Creating Custom Modules: In case you are having files that are unmapped, then create a folder by clicking on the Create New Module button and add the appropriate files to that module.
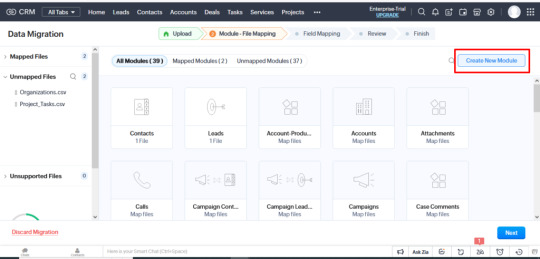
If you have to map your custom modules then you are provided with two options:
Your file will move to the unmapped section and ask for the suggestion. When you click OK, your custom module will be created.
Based on your custom file, you can also create a custom module from unmapped.
Now click on Next.
Step 5: Field Mapping
Map all the fields of mapped modules one by one with the related Zoho Fields.
Refer to the table above for the mandatory fields of all the modules. All the mandatory fields should be mapped for the succeeding action.
Once you mapped all the fields of all the mapped modules click on the Save and Next button.
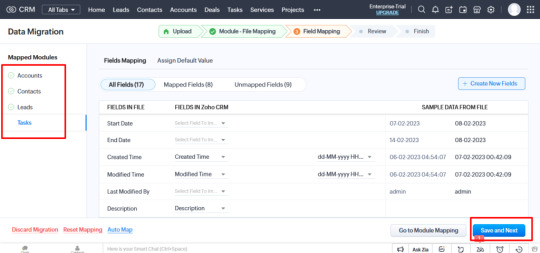
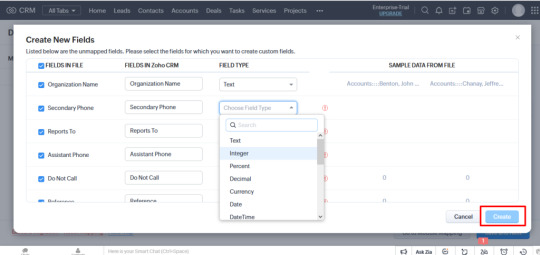
You can also add new fields for your essential modules or custom module by clicking on Create New Fields.

Now you can select the fields for which you want to create the custom fields.
Map all the fields and choose the appropriate Field type from the drop-down corresponding to the desired field.
Once selected all the field types, click on Create.
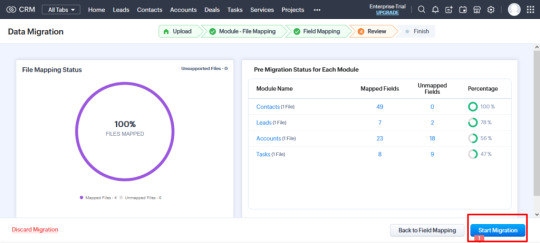
Step 6: Review your files
The Review tab displays all the modules that are going to migrate, the Number of Mapped fields, number of unmapped fields. You can easily review from here whether all the modules are included properly, the number of files, mapped fields, and unmapped fields.
If you find anything went wrong, then move back to the process, make the changes you need, and come back to the migration.
When you are done with all the data provided click on Start Migration.
Step 7: Finish Migration
The Data Migration Process will start. It will display all the module names, the Status of migration related to the particular module, the number of records added and skipped, and the total records of each module.
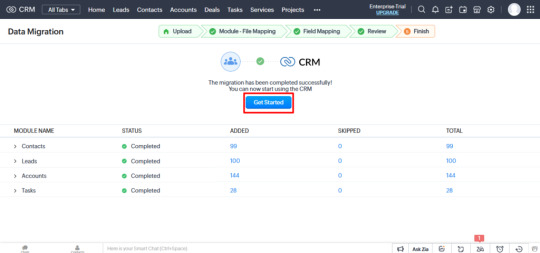
That’s it. Your records are safely migrated to the Zoho CRM. Now you can get started with your business activities with the new Zoho CRM.
Post-Migration- Double-check the migrated records
After you’ve taken the time and effort to migrate your data, make sure to take the extra step of verifying that everything went as expected. Going through the process of examining the data for any irregularities or inconsistencies helps you ensure a smooth transition and can save you from headaches down the road. Don’t trust the migration process blindly, double-check it! Make sure the data looks exactly as it should, that all addresses, names, and dates are correct, and that there are no formatting issues. With this extra bit of diligence, you can rest assured that your data has been successfully transferred.
Summing Up
Migrating from Vtiger CRM to Zoho CRM can be a daunting task, but it doesn’t have to be. With the right tools, support, and guidance, you can easily and quickly transition your data from Vtiger CRM to Zoho CRM. Not only will you enjoy Zoho’s advanced features and integrations, but you’ll also be able to stay organized and up-to-date with the latest technologies.
Though you can manually migrate all records from Vtiger CRM to Zoho CRM, it takes a lot more time, effort and resources to plan, manage, review, and follow up the migration process. It is ok to migrate manually if you have limited files. But in the case of migrating huge files, it is hard to analyze and review “Whether all the records have migrated safely”. There’s room for confusion here.
If you’re looking to migrate from Vtiger to Zoho CRM without losing data? Look no further! We offer a safe and secure migration service that ensures no data loss during the transition. Our team of experts will help you make the switch quickly and easily, so you can focus on what matters most – growing your business. We understand that data loss is a major concern for businesses, so we have developed a secure and reliable migration process that guarantees no data will be lost during the transition.
If you need the best customization and migration of Zoho CRM? You can contact us at [email protected] We provide efficient technical support for migrating your bulk data. We are responsible for the efficient data transfer from your Vtiger CRM to Zoho CRM.
Don’t wait any longer – make the switch to Zoho CRM today with our no-data-loss migration service!
#zohocrm#vtigercrm#crm#crmintegration#migration#crm software#crmdata#crmmigration#crm extensions#crm integration#blog post#tumblog
0 notes
Text
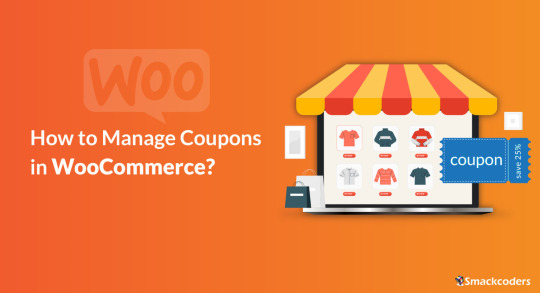
How to Manage Coupons in WooCommerce? – An Ultimate Guide
The best way to increase sales for your business is by offering exciting coupons to customers. If you’re using WordPress, then you might know about WooCommerce Plugin. WooCommerce helps you to build an online store in WordPress. WooCommerce provides many many features to build and maintain a complete eCommerce store. WooCommerce’s Coupons Management is one of the best features. You can create coupons for any specific products in your store to boost store sales and attain more revenue. The created coupons are useful for your store visitors or customers to buy your products at discounts. You can share the coupons with your existing customers and encourage them to buy more from your website.
The coupons are easily customizable to your needs. When creating coupons, you need to set the coupon expiration date, assign the coupon code for any particular product in your store, and configure a minimum or maximum cart total to be eligible for the discount. If you want to provide the coupon only for some specific customers you can do that simply by mentioning their email IDs.
Boost sales with WooCommerce Coupons
Here are some simple tips to increase your sales by providing coupons.
Primarily mention the coupon offer on top of your website as a banner or create pop-up banners which may show after a few seconds the visitor landed on your website.
Promote the coupons on social media platform like Facebook, Twitter, or any other platforms where your target audience spends time.
The coupons must be eye-catching and visible to the user. It can be short to make it easy for them to apply at checkout. Make sure it creates some urgency to make them take action soon. Provide texts like ‘only for a limited time’ or mention the coupon expiry date. Create personalized coupons by adding the customer’s name or their business name. It makes your customers feel more special and also increases sales.
Now let’s see the steps to create WooCommerce coupons.
Steps to create a coupon with WooCommerce
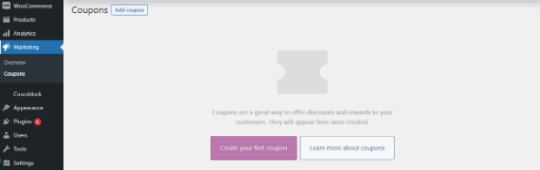
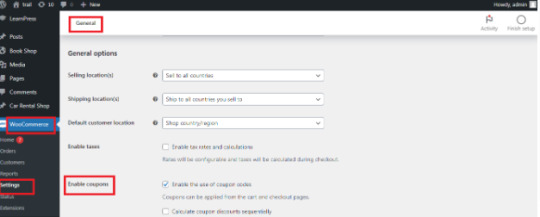
1. Install WooCommerce in your WordPress instance and activate it. Once it is done make sure that Enable Coupons is checked under the General tab in WooCommerce Settings menu. If not, enable it and click Save Changes.
2. Go to Marketing → Coupon → Add Coupon. Click Add Coupon to start creating a new one or hover and click edit of any one to change the existing coupon.
3. Enter your Coupon code. You can use the code to share it with your customers. The code must be unique. Add description for internal reference.
Code of your choice – Any alphanumeric code is valid and Coupons are case-insensitive.
Generate Code – By clicking this button WooCommerce will auto-create and generate code via algorithm.

4. Next, let’s see the Coupon data widget. There are three sections within the widget: General, Usage restrictions, and Usage limits.
General
WooCommerce coupons offer three different discount types.
Percentage discountThe discount in percentage is applied to the total value in the cart.
Fixed product discountIt applies a fixed discount for each selected product in the cart.
Fixed Cart discountIt provides a fixed amount of discount to the total entire cart.
Coupon Amount – Upon choosing the discount type, enter the Coupon Amount you are going to offer. Enter the number and it will automatically add the percent sign or currency unit.
Allow free shipping – Enable free shipping to remove the cost of shipping when using a coupon.
Coupon expiry date – Select the date for the coupon to expire. An expiration usually occurs at 12 a.m. or 00 a.m. on the specified date. Note that the time will be calculated based on the time zone of your site.
Usage Restrictions
The Conditions are usually set here in this section for the coupon code applied. This section contains a set of 9 fields. Using these you can control the coupon you are generating.
Field
Description
Minimum spend
A coupon code is only valid if one spends the minimum amount set by the store owner on the product. The minimum amount includes subtotal + tax.
Maximum spend
To use a coupon code, you must spend a maximum amount set by the store owner.
Individual use only
The coupon can only be applied to a single item, and cannot be combined with other coupons.
Exclude sale items
Enable to exclude sale items from a WooCommerce coupon
Products
Select the product to which you would like to offer a discount.
Exclude products
Select the product that you don’t want to offer any discount.
Product categories
You can give a discount on products from a certain category.
Exclude categories
This can be useful if you want to offer a discount on everything except products of a particular category.
Allowed Emails/Email restrictions
You can specify which email addresses are allowed to use the coupon. This is useful if you want to limit the use of a coupon to specific customers.
Usage Limits
With Usage limits, store owners can set limits to the coupon which is the total number of times the coupon can be used. This will ensure that the coupon cannot be overused. It is totally optional so that store owners can decide whether they need it or not.
Usage Limit per coupon: Set here how many times the coupon can be used before it becomes invalid.
Usage limit per user: It lets you set how many times a user can use the coupon.
Limit usage to X items: Enter the maximum number of items for the coupon that may be applied.
Limitations of coupons
Even Though we have a lot of advantages in using coupons, there are some limitations. Using a coupon will definitely bring traffic to your store and boost your sales. However, it will reduce the margin amount of the product which means a lower amount in your account. In some cases, coupons can be misused, resulting in a reduction in revenue. Over Reliance on coupons can lead to a situation where customers only make purchases when there is an active coupon or promotion, which can hurt long-term sales and customer retention.
Ultimate CSV Importer with WooCommerce Coupons
Ultimate CSV Importer is a simple yet powerful plugin. Here is how the Ultimate CSV Importer plugin will help you to import/export WooCommerce Coupons data. You quickly import your WooCommerce coupons using a CSV/XML file. Just upload your file and map the header fields and click import to finish the process. Let’s see how to import WooCommerce Coupons data to WordPress site along with how to add the values to your CSV file to properly import WooCommerce Coupons.
Steps to import WooCommerce Coupons
Upload your CSV or XML file.
With the plugin, you can upload the file in three different formats. Upload from desktop or FTP/SFTP or URL. Upload the data in your Google sheets using the Upload from URL option.

Choose WooCommerce Coupons from the dropdown. Select “New Item” to import new coupons data and “Existing Item” to modify the old data.

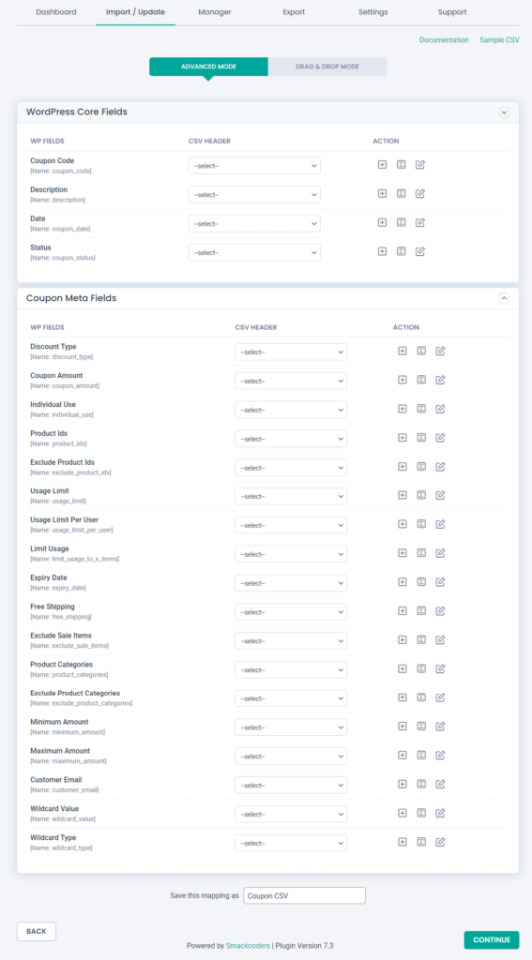
Click Continue and the Mapping section will be displayed. If the headers in the CSV file are the same as the WordPress fields, they will be mapped automatically. If they don’t match, you can choose the corresponding field from the dropdown.
How to Add Values in your CSV/XML WordPress Core Fields
Coupon Code – Provide the name of the coupon code in your CSV that can be applied at checkout to avail the discount.
Description – Specify the description for the coupon.
Coupon date – Specify the coupon date to publish.
Coupon status – Mention the status here. For example: publish.
Coupon Meta Fields
Discount Type – Mention any one coupon type. Percentage as Percent, Fixed cart discount as fixed_cart and Fixed Product Discount as fixed_product.
Coupon Amount – Specify the amount in numerical values.
Individual_use – Specify yes in your CSV to select it.
Product_ids – Specify the ID of the product for applying coupon. To mention multiple values use comma separator(,)
Exclude_product_ids – Specify the ID of the product to exclude from applying the coupon. Mention multiple values using a comma separator.
Usage_limit,Usage_limit_per_user, limit_usage_to_x_items – Specifies the value in numerical form.
Expiry_date – Mention the date format in YYYY-MM-DD
Free_shipping – To enable this field mention yes.
Exclude_sale_items – Mention yes in your CSV/XML to enable this field
Product_categories, Exclude_product_categories – Mention the ID of the categories
Minimum_amount, Maximum_amount – Enter the amount in Numerical Value
Customer_email – Mention multiple email addresses using comma separator
After mapping, all the fields save the mapping as a template to use this mapping later. For this, enter a template name in ‘Save this mapping as’ textbox provided in the bottom of the mapping section page. Click Continue and skip the Featured Image Media Handling section if you don’t want to upload any external url images. This section is enabled automatically. So you don’t need to worry about it.
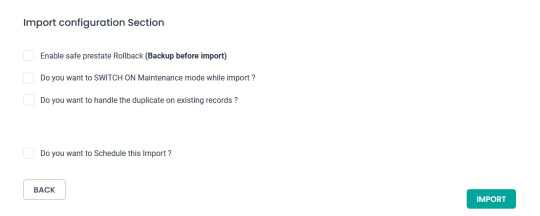
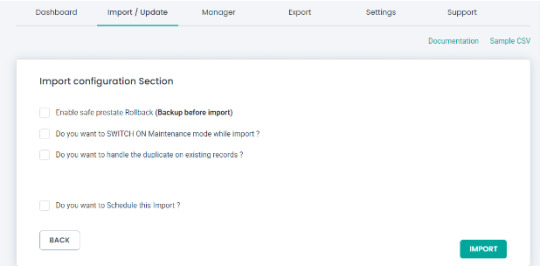
And finally you will be landed in the Import Configuration Section. There are 4 different steps to import your data safely.
Enable safe prestate Rollback – Before proceed to import, check the box to take a safe backup of your old data. If any problem arises while importing, the previous version will be restored.
Do you want to SWITCH ON Maintenance mode while import? – Notifies the visitors that your website is under maintenance if the option is enabled.
Do you want to handle the duplicate on existing records? – Imports the data by truncating the duplicate records.
Do you want to schedule the import? – Configure to Import your data at your convenient time.
Now click the Import button and all your data will get imported.
Export WooCommerce Coupons with Ultimate CSV Importer
You can easily export the WooCommerce Coupons data. The plugin lets you export the data in different file formats such as CSV/XLS/XML/JSON. The advanced filter option is also available to export only the data that you want in your hand.
Steps to export WooCommerce Coupons
1. Click on the “Export” tab in Ultimate CSV Importer.
2. Select the “WooCommerce Coupons” module and move to the next step.
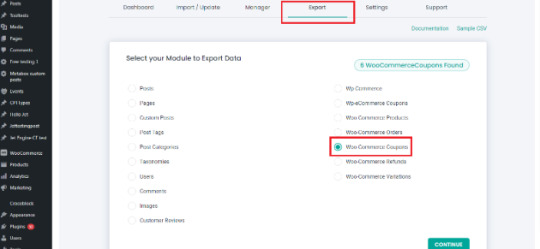
3. Give the export file name and select the type of file you want to export. The export option has a range of filtering options. That allows you to customize the export output. Here’s the list of filters available.
Export data with auto delimiters
Export data for the specific period
Export data based on specific Inclusions
Do you want to Schedule this Export
Check our documentation to know more about how to an apply export filter.
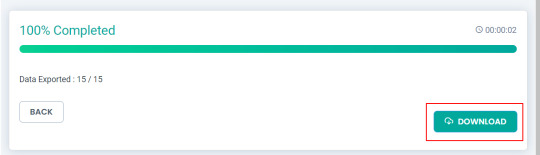
4. You can export your data now by clicking “Export”. On the next page, the export file will be prepared and ready to download. Click download and get your Coupons data file.
Import/export all WooCommerce coupons using the WP Ultimate CSV Importer Premium. Check out our Demo now to see how it works. Have any questions or need any assistance? Write to us now at [email protected]
#cms#wordpress#wordpress plugins#wordpress tutorial#plugins#website development#blog post#wordpresswebsite#import#csvimporter#woocommerce website#woocommerce#woocommercestore#woocommerce plugins#woocommerce coupons
0 notes
Text
A Comprehensive Guide for Migrating from Zoho CRM to Vtiger CRM
Are you already in the process of migrating from Zoho to Vtiger? Or just considering starting it, we’re thrilled to have you here on our blog. If you are looking for a cost-effective and reliable solution to move your business data from Zoho CRM to Vtiger CRM you have landed in the right place. Here we provide you with an easy-to-follow guide. So, no matter your level of CRM experience or just getting started, this blog has something for you.
We will provide expert advice and step-by-step instructions on how to migrate your data from Zoho to Vtiger. We will also discuss the advantages of using Vtiger and the potential pitfalls you may encounter. So, if you are ready to make the switch, let’s get started!
Pre-Migration Checklists
Before Migrating your records to Vtiger CRM make sure your exported file records satisfy the below condition.
File Size: The file size of your exported file should not exceed 50 MB.
File Format: The exported file should be in one of the following formats for importing.
CSV (Comma-Separated Values) – All records will be imported/exported into any CRM module only using the CSV files.
VCF (Virtual Contact File)- Only contacts will be imported using the VCF file.
ICS (iCalendar File)- Only the tasks and events of the calendar will be imported using the ICS file.
Mandatory fields: The exported file should have all the mandatory fields to fill in Vtiger CRM. If your exported file is not provided with the mandatory fields, then the default value will be used. You can set your default values by navigating to Settings>>Module management>>Module Layouts and Fields.
Map all the mandatory fields
Ensure all the Mandatory fields are mapped with your CRM fields. A warning will be displayed if the mandatory fields are not mapped properly.
If your exported file does not provide a value for a mandatory field, then the default layout value of the field is used.
Records cannot be imported simultaneously into two different modules. Additionally, you cannot import records into the same module at the same time as another user.
Export records from Zoho CRM
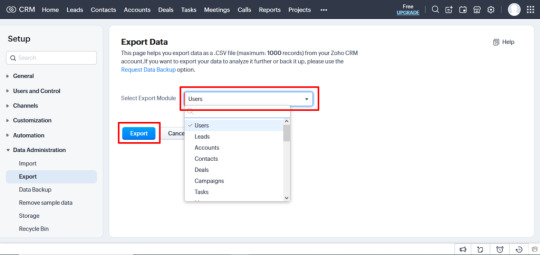
Before exporting the records it is important to note that Zoho CRM can export a maximum of 3000 records from the module in CSV format.
Unlike import, you cannot export records of all the modules at a time. You can only export records from one module at a time.
Steps to export records from Zoho CRM
Step 1: Navigate to the Settings<<Data administration tools<< Export.
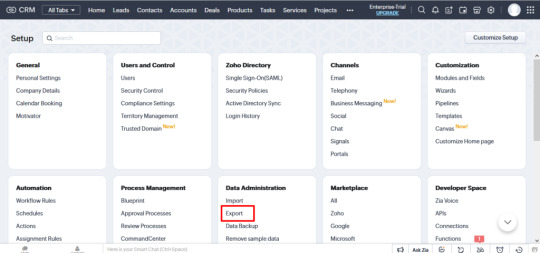
Step 2: Select the module from the drop-down from which you want to export records.
Step 3: Click on Export. Now the records of the selected module will be exported as .csv files.
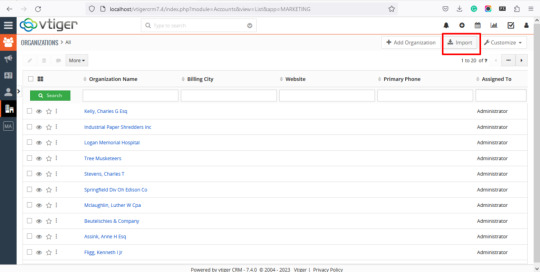
Import Records to Vtiger CRM
Once you export all the modules from Zoho CRM, it is time to import all your .csv files into the Vtiger CRM.
Steps to import records in Vtiger CRM
Step 1: Log in to your Vtiger CRM account.
Step 2: Navigate to the modules one by one which you want to import into your Vtiger CRM.
Step 3: Click on the Import icon at the top of the Module’s list view.
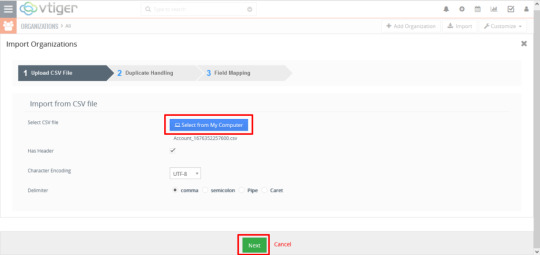
Step 4: On the Import Wizard, there you need to execute three processes for the successful migration of records.
Upload your CSV– Click on Select from my Computer and upload the desired .csv files of that module.
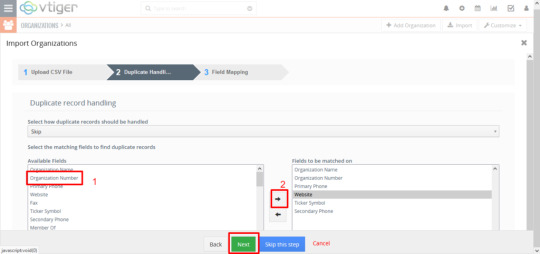
Step 5: Duplicate Handling– First you have to select how the duplicate records are handled from the drop-down.
You can Skip the duplicate records
Overwrite the duplicate records with the original data
Merge duplicate records with the original and comprise a single record.
Step 6: Field Mapping.
In field mapping, map all the mandatory fields and the appropriate fields based on your business needs.
Note:
The organization, potentials, and project tasks of Vtiger CRM are referred to as Accounts, deals, and tasks in Zoho CRM respectively.
Carefully map all the required fields and click on Import.
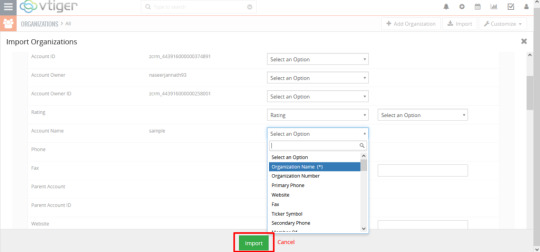
Step 7: Review Import Summary
Now all your Zoho records are successfully imported into your Vtiger CRM.
The import displays the
Total number of records scanned
Number of records successfully imported
Number of records created
Number of records overwritten, skipped, and merged
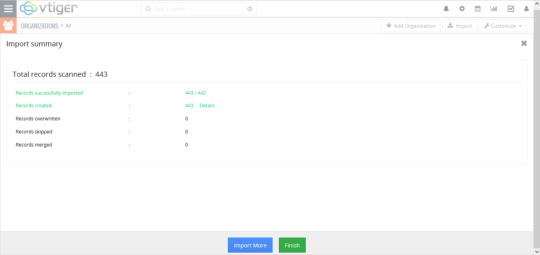
Likewise, you can export all the modules of your Zoho CRM one by one and Import them into the corresponding Vtiger CRM modules.
Choose the Safest Data Migration
Though the migration from Zoho CRM to Vtiger CRM is an intimidating task, with the right tools and knowledge, it can be relatively done with much patience and concentration. And of course, it is too time-consuming.
You can easily migrate your records without any data loss through our efficient migration service. Our technical experts carefully handle your records and take care of the smooth migration from Zoho CRM to Vtiger CRM. You can easily contact us for the data migration at [email protected]. The transition can be an exciting one and with the right guidance and support, the migration process can be completed quickly and seamlessly.
With Vtiger’s powerful CRM options and Zoho’s robust collaboration features, this migration can be a great opportunity to take your business to the next level. With the help of migration tools and the right knowledge, you can make the transition with minimal disruption to your operations. Start your Zoho to Vtiger migration today and take your business to the next level!
1 note
·
View note
Text
How to Import and Export WordPress Users to CSV with Ultimate CSV Importer
When migrating your website content, it’s important to know that users data is just as significant as Posts, Pages, and Custom Posts data. Migrating all data is simply done using an Import/Export plugin such as WP Ultimate CSV Importer. This plugin can import and export your users/WooCommerce customers data along with their billing and shipping information. It can also let you update existing users’ data.
Using WP Ultimate CSV Importer, you can easily manage the users information without manual entries. It offers a wide range of filters to export only the data you require. Adding to that, you can export and import users with metadata. To create meta fields in the users, you can use third-party add-ons like WP-Members, Members, Ultimate Member and ACF, Toolset, JetEngine, and more.

Is it significant to take a backup of your WordPress site?
Any reasons like hardware or software failure, human error, or server crashes may result in the loss of necessary site data. Taking a backup can protect you from such data loss and help you restore the site data quickly. So you wouldn’t lose your data. Using Ultimate CSV Importer you can take a safe backup of all your content including Posts, Pages, Comments, Categories, WooCommerce data, and more. Here in this blog, we’ll see the complete features of User export using the Ultimate CSV Importer plugin.
How to Export WordPress Users?
Exporting users data is indispensable if you’re about to migrate your site or need to take a backup of all your necessary data. You can export user information, their passwords, WooCommerce plugin-generated fields like billing/shipping information, and other data. Here we will see how to export users with the metadata using Ultimate CSV Importer.
Navigate to the Ultimate CSV Importer (Pro) plugin in your WordPress instance and click the Exporter tab.

Select users and click continue.
The next step is “To export data based on the filters”.
1. Export File Name - Give a name to the export file.
2. Export Type - Here are the four different types of file formats you can export: CSV, XML, XLS, and JSON. Choose anyone.
3. Split the Record - Allows splitting and exporting records. If you have many records to export you can use this option. For example, you give the value 100 after enabling the checkbox and have chosen the CSV file type to export. It will download the files as a zip. Inside the zip file, you can see CSV files. The first exported CSV will contain the first 100 records and the second CSV contains the next hundred records and so on.
4. Using advanced filters, you can export any specific data from WordPress you need. Export data with auto delimiters, specific periods, and specific Inclusions(specific fields selection to export).
5. To schedule your export, just enable the "Do you want to schedule this export" and fill out the details: schedule date, time, frequency, and time zone then click Schedule Export.

If you haven’t used the scheduling option. Click the Export button to export your data and then Download. Now the files will be downloaded locally that contain all the User details and meta fields in your CSV.

Exported CSV

How to Export Users with Metadata?
To begin with, let’s see why users should have custom fields. Custom fields are helpful to collect more information about website users. You can use third-party add-ons to create these additional fields.
If you have created metadata(custom fields) using plugins like ACF, JetEngine, Toolset, Metabox, etc., You can export users data along with its metadata using the Ultimate CSV Importer plugin.
We have the aforementioned export steps. To export specific users fields with metadata follow the below steps
1. If you only want to export metadata and some specific user fields, navigate to the Ultimate CSV Importer Pro plugin. Click Export and select the module “Users” and then click Continue.
2. On the next page click “Export Based on Specific Inclusion”. Here you can select the meta fields and default user fields you want to export.
3. At last, click export and download.
The below picture shows the custom fields assigned for users that were created using ACF, Toolset Types, and MetaBox plugins.

How to Export WooCommerce Customers along with Membership plugin information
In WordPress, the customer who visits and makes a purchase on your WooCommerce store will automatically become a User. This will include some additional fields in the users like Billing and Shipping Information. Ultimate CSV Importer will export all the User details along with Billing and Shipping information.
It also supports membership plugins like WP Member, Ultimate Member, and Members. For example, I have created meta fields using Ultimate Member, and WP Member plugins and assigned them to users. You can see that in the below screenshot.

To export WooCommerce customers with metadata follow the above steps explained to export the User with all the details. And if you want to export only some fields with WooCommerce User information, navigate to the Ultimate CSV Importer plugin >> click Exporter Tab. Select Users >> then click Continue.
Choose “Export Based on Specific Inclusion”. There you can see Billing and Shipping Information and Custom Fields of Membership plugins widgets. Click and select the fields you want to export.

Import WordPress Users using WP Ultimate CSV Importer
Creating large numbers of users or updating existing users or adding new roles, etc manually sucks your time. Ultimate CSV Importer makes the process simple and easy with just a few clicks. You can import Customer Billing Shipping information and metadata using the plugin. Let’s see how to do it.
Click on the Ultimate CSV Importer(Pro) plugin in your WordPress dashboard. It will open up the Import tab. Upload your CSV/XML file. If you don’t have any, download a sample CSV/XML file for reference. Then prepare your own and upload it.

After uploading, select users from Import each record dropdown. Continue with New Item to import the new users or choose Existing Items to update the old users data. All the file header fields must be mapped to WordPress field headers. User Login, User Email, and Language are mandatory fields. Skip the media handling section. In the Import configuration section, there are 4 different options available to configure your import. Enable safe prestate Rollback (Backup before import) - Import can be reverted to the previous state if any issues arise. Do you want to SWITCH ON Maintenance mode while import? - To notify the visitors that the site is under maintenance mode. Do you want to handle the duplicate on existing records? - Enable this to truncate the duplicate records.
Do you want to Schedule this Import? - Fill out all the details necessary to run the data import at a particular time.
Click Import to finish the process.
You can verify the status in Admin View/Web View by clicking the “View Log” button.
How to Import Users with Metadata?
Follow the above steps to import the User. If you have to add additional columns in your CSV that are the meta fields. At the time of configuring import, in the mapping section, a new widget will appear for mapping custom fields so you have to map the CSV headers with WordPress fields.
As mentioned above, the Ultimate CSV Importer plugin supports meta fields created with plugins like JetEngine, ACF, toolset, Meta Box, etc., Know the compatible plugins listed here.
For instance, I created an ACF and Types fields and assigned them to the User. In the mapping section, new widgets with naming ACF Pro Fields and Types Custom Fields will appear. You can see that in the below screenshot.

How to Import WooCommerce Users and Membership plugin information
Not only exporting, but Ultimate CSV Importer also supports importing data into Membership plugins like WP Member, Ultimate Member, and Members plugins. Furthermore, you can import the WooCommerce Billing and Shipping Information of the User.
1. After you upload your file inside the plugin, choose "Users" from the drop-down menu.
2. Then in the Mapping section, along with the default user field, the WooCommerce Billing Shipping Information widget and Membership custom field widget will appear.
3. Map all the fields and next continue to Import.
How does it work with Passwords?
In the plugin page, go to Settings >> General Settings >> Send password to user. Enable the “Send password to user” toggle to send passwords via email.

To provide customized passwords to the users, prepare your CSV with the password assigned to users and import it. Otherwise, the plugin will automatically generate the password and share it with the users via email.
Note: To send passwords via email, make sure you have enabled and configured Easy WP SMTP in your WordPress.
How to update WordPress Users?
When you decide to update existing User data, begin to export the users data from your WordPress and make all necessary changes to the exported CSV file, and save it. Then import the file with our plugin.
Let’s explore how we can accomplish this using the Ultimate CSV Importer plugin.
Updating is just as same as importing, only a few steps will differ.
Likewise, import, and upload the CSV file. Next to that, you have to select Existing Items and map all the fields required to update data.
Select a field from the ‘Update records based on’ dropdown in the Import section, to update existing records based on the selected User Email/ID/Login field. That’s all you need to do.

Tips for successful User Import and Export
File Format: When you are ready to import, make sure your CSV/XML is in a valid format. Use a file validator to check the files before uploading.
Duplicate Checking: Check if there are any duplicate records in your CSV or else enable “Do you want to handle the duplicate on existing records?” in the Import configuration section to restrict the duplicates entering your website.
Trial Import: Try a test import with the User CSV to ensure it is error-free and successfully import. Download CSV & XML file samples here to know how to give or include values to the files.
Backup your WordPress site: Before importing any data it is necessary to keep a safe backup to revert the website data in case of any error occurs in the import process. Use the “Enable safe prestate Rollback (Backup before import)” in the Ultimate CSV Importer plugin to keep a backup before import.
Frequently Asked Questions for WordPress Users Import & Export
1. How do I export my WordPress users to another site?
To get started, install and activate the Ultimate CSV Importer plugin on your WordPress site. Go to the plugin’s Export tab and click on users. Provide a filename and choose a file type. Then click the Export button. After the file is exported, make changes to that file as needed and prepare it for re-import into your new website.
2. Can I export/import WordPress users with their passwords?
Yes, you can. Ultimate CSV Importer plugin exports users data along with their password. You can import users and their passwords, if the password fields are empty the plugin will send auto-generated passwords to the appropriate user email id.
3. I have a specific scenario where I have two user profiles with the same name. How can I change/update the record in this situation?
Yes. Even though the users have the same name they differ in their Email IDs. So you can easily update the users record based on Email ID.
4. Can I import Zip Code with user data?
Yes, it is possible to import Billing and Shipping Information(including Zip Codes) to the users module. Prepare the CSV, with all the details and import the data.
5. Is there a plugin for automated User Import and Export?
There are many plugins available to Import & Export users. Here are a few suggestions:
WP Ultimate CSV Importer
WP All Import
User Meta Pro
Export User Data
When choosing a plugin do detailed research and select the best plugin that fits your needs.
We hope that this article is helpful to you. Please don’t hesitate to reach out to us at [email protected] if you have any inquiries.
#wordpress#wordpress plugins#wordpress tutorial#cms#website development#plugins#blog post#import#wordpresswebsite#csvimporter#users#import export data#wordpress users
0 notes
Text
How to Build an LMS Website using MasterStudy & CSV Importer

Have you ever thought about sharing your knowledge online? If you do then you need an LMS website. Or if you already have a WordPress website and want to make it a learning website, there are many plugins available. MasterStudy LMS is a WordPress plugin that lets you change your normal WordPress website into a learning portal. We will discuss here in this article how you can create a new LMS website fastly with MasterStudy and Ultimate CSV Importer plugins.
A deep look into MasterStudy LMS
MasterStudy LMS plugin is a complete package for all your e-learning business needs. It is the affordable and best solution if you want to create courses similar to websites such as udemy. You can manage courses, lessons, quizzes, and educational content using it. You can customize the website based on your needs and include content in formats like videos, images, graphs, slides, and more. It makes it easier for instructors to add courses, and lessons and communicate with students.
The plugin is targeted at audiences like tutors, coaches, schools, universities, and marketplaces. It comes up with a variety of features and handles subscriptions, grading quizzes, payments, student management, etc., effectively.
It offers unlimited course management. You can create and manage lessons in various types like texts, videos, online streams, and slideshows. Supports video types such as HTML, Youtube, Vimeo, external link, etc.,
You can get more features in its free version. If you want to go beyond, try the premium version of the plugin to get features like certificate builder, course importer, prerequisites, quizzes, course bundle, email template manager, google classroom, and more variety of extensions.
How to quickly build a new LMS website - WP Ultimate CSV Importer + MasterStudy LMS integration
To quickly build an LMS website, the import and export plugin can help you update content in a faster way. WP Ultimate CSV Importer integration with the MasterStudy LMS plugin lets you import and export courses, lessons, quizzes, questions, and orders. In the following, you will learn how to export and import the courses, lessons, quizzes, questions, and order data with ease.
How to Export MasterStudy LMS Courses, Lessons, Quizzes, Questions, and Orders
Importing is useful if you decide to migrate to a new website and want to extract content from the old one. Exporting steps are common for Courses, Lessons, Quizzes, Questions, and Orders. But the module selection only varies. Follow the below simple steps to get your data in your hands.
Step 1: Find the Ultimate CSV Importer Plugin installed in your WordPress and visit the Export tab of the plugin page.
Step 2: Choose the Custom Posts module and select any one option to export from the dropdown. The options you can choose are stm-courses, stm-lessons, stm-quizzes, stm-questions, and stm-orders.
Step 3: On the next page, start by giving a filename, and select one file type. The file types given to export are CSV, XML, XLS, and JSON.
Step 4: You can export particular records from the module. For that, you need to apply the advanced filters. You can export data from a specific period and data created by a specific author.
Step 5: Click Export and download the file. Check if the data is properly exported. You can also modify the data before importing them into your new website if needed.
How to Import Courses, Lessons, Quizzes, Questions, and Orders of MasterStudy LMS plugin
You can import the exported file of courses, lessons, quizzes, questions, and orders. Note that you can import or export one module at a time. But there are no limitations for importing or exporting record counts. And you can only import in CSV or XML files.
To import your prepared file data,
Step 1: Install the WP Ultimate CSV Importer plugin on your new website and visit the plugin page.
Step 2: Upload the file using any of the provided options(upload from desktop/ftp/sftp/url)
Step 3: Like export, choosing post type is what makes the difference in import. You can choose post types like stm-courses, stm-lessons, stm-quizzes, stm-questions, or stm-orders. For example, if you are importing courses, select ‘stm-courses’ from the dropdown.
Step 4: This mapping section is to be done carefully so that all the data is imported according to the matched fields. So map the CSV/XML headers with the related WP field headers.
Step 5: At the end of the mapping page, provide a name for saving the mapping and move to the next step.
Step 6: Enable downloading external images to your media option to import any external url images in your WordPress that you have specified in your import file.
Step 7: Click Start Import to run the import and wait for the import to complete. Once complete, check the view log in either admin view or web view to make sure the import is completed.
You are all set now!
Summing Up
Importing bulk data in CSV/XML files to your new LMS website can help you build a website within minutes. It saves your day and effort. WP Ultimate CSV Importer can assist you with this process. Hope this tutorial helps. Write us for more info about the product at [email protected]
#wordpress#wordpress plugins#wordpress tutorial#cms#website development#plugins#blog post#wordpresswebsite#master study#lms#csv importer
0 notes
Text
Boost Sales + Customer Relations with WooCommerce and Vtiger

Are you using WooCommerce as your online store? Are you looking for an effective tool that manages your customer and business data captured from your online store?
Then we have good news for you. We are introducing a new extension called WooTiger that integrates WooCommerce with Vtiger. WooCommerce is the WordPress plugin that makes it easy to create and manage an online store, while Vtiger CRM offers a wide range of features to help you better manage your customer relationships.
What the WooTiger is?
Vtiger and WooCommerce work together to provide a comprehensive solution for managing customer relationships. With the integration of the two systems, you can seamlessly manage customer data, generate sales reports, track customer activity, and more.
How Does the WooTiger Works?
WooTiger is a module for Vtiger and a WordPress plugin that transfers data from your WooCommerce store to your CRM every time a new order is placed.
WooTiger enables you to have an integrated view of your customer data, from the moment a customer visits your online store to the moment they purchase a product. With integrated customer data, you can better understand customer behavior, segment customers by purchase history, and create targeted marketing campaigns.
Modules that WooTiger supports:
Contacts
Products
Sales order
The Way Your Record Sync in Both Systems
Below are the ways, in which the modules of your Vtiger CRM are related to the modules of your WooCommerce.
Contact
Every contact created in Vtiger CRM will be transferred as your customer in your WooCommerce store and as a user in WordPress and Vice versa.
Product
Every Product created in Vtiger CRM will be synced as the product in WooCommerce and Vice-versa.
Sales Order
The sales order of your Vtiger CRM will be synced as orders in WooCommerce Store.
Best Features of WooTiger
Here are some best features of WooTiger to effectively manage records of WooCommerce and Vtiger CRM.
Default Field Mapping
For efficient data transfer between two systems, Map fields between WooCommerce and Vtiger to ensure a smooth sync. WooTiger provides the default mapping of Vtiger fields with WooCommerce fields. It can also allow custom field mapping by mapping the Vtiger field with the appropriate WooCommerce field from the drop-down.
Record Synchronisation
Enable two-way synchronization between WooCommerce business contacts, products, and sales order records and Vtiger CRM.
The record will sync uni/bi-direction
The three types of record sync include,
Instant/Onsave Sync: It will sync records instantly from Vtiger to WooCommerce at the moment the record was created.
Historical Sync: It will sync records bidirectionally between any specified period. The records between the pre-determined intervals will be synced from Vtiger to Woocommerce and Vice-versa.
Automatic Sync: It will sync records automatically at regular time intervals from Woocommerce to Vtiger CRM.
Effective Log History
The Audit history is used to track the success/failure statuses of the record sync. WooTiger is enabled with a sync log providing the date & time, record, and module details.
Benefits of Integrating WooCommerce with Vtiger CRM
Avoid double data entry and streamline processes with a centralized source of information.
Reduce the amount of time spent on administrative duties by managing contacts, products, and sales orders from one application.
Ensure all data is up to date by implementing field mapping.
Enhance customer relations by studying their buying behavior in the CRM.
Utilize Vtiger Email Marketing to engage website leads and contacts.
Bottom line
By integrating Woocommerce with vTiger CRM, you can significantly improve the customer experience and increase sales. With the right setup and plugins, you can maximize the benefits of the integration and make the most of your online store. WooTiger can be a great way to streamline your e-commerce business. With the integration, you can manage customer data, track orders, manage inventory, and more all in one place. This integration makes it easier to keep track of all your customers and their purchases and allows you to make informed decisions about your business. This can lead to more efficient operations and better customer service, ultimately resulting in increased sales and profits.
#woocommerce#woocommercestore#Woocommerce website#woocommerce plugins#cms#plugins#blog post#crm#vtigercrm
0 notes
Text
How to use Google Sheets for WordPress schedule import and update
Are you looking to streamline your WordPress content management with ease? If so, the WP Ultimate CSV Importer plugin is a powerful tool at your disposal. This plugin allows you to import, update, and schedule data effortlessly on your WordPress site. In this guide, we’ll show you how to use Google Sheets effectively in conjunction with WP Ultimate CSV Importer for a more efficient and automated workflow.
Why Use Google Sheets with WP Ultimate CSV Importer?
Before we dive into the specifics, let’s understand why combining Google Sheets with WP Ultimate CSV Importer is a smart move:
User-Friendly Collaboration: Google Sheets is a widely-used online spreadsheet tool that allows multiple users to collaborate in real time. By creating and managing your data in Google Sheets, your team can work together seamlessly.
Data Validation and Cleanup: Google Sheets provides robust data validation and cleanup features. You can easily spot and correct errors, ensuring that your data is clean and ready for import.
Automatic Updates: With Google Sheets, you can schedule automatic updates to your data. When used with WP Ultimate CSV Importer, this means your WordPress site can stay up-to-date without manual intervention.
How to Ensure Google Sheet Publicly Accessible URL
In the WP Ultimate CSV Importer, the user needs to provide a publicly accessible downloadable URL for the data import, updates, and scheduling to occur. So we initially need to generate a publicly accessible URL from google sheet.
How to Get the Publicly Accessible URL
Following the steps given below to create a publicly accessible URL on Google Sheets:
Open the google sheet you want to publish.
Click the on File menu > Share > and select Publish to web.
The publish to web window will pop up. In the link tab, select the required sheet name from the first dropdown and choose one file type from the second dropdown.
In this case, let’s choose the CSV format.
Click Publish, it will generate a shareable CSV link to share with others.
Copy the link. to use it for our import process.
Watch the below video tutorial for how to generate a CSV link from Google Sheets:
youtube
How to import/update data from Google Sheets to WordPress?
Importing data from Google Sheets to WordPress becomes seamless with the utilization of the Importer plugin. This plugin streamlines the process, allowing you to transfer data and content effortlessly. Once you provide the link, WP Ultimate CSV Importer will automatically fetch the data added in Google Sheets and import it into WordPress based on mapping settings. Let’s see how we can import first.
Set Up Your Google Sheets Document
Initially, create a Google Sheets document. If you don’t already have one, create a Google Sheets document and input your data. This can be content, product listings, user information, or any data you want to manage on your WordPress site.
Ensure that your data is organized in rows and columns. Each row typically represents an individual item, while columns represent attributes like titles, descriptions, categories, and more.
Share the Google Sheets document with your team members or collaborators so they can work on it simultaneously.
Configure Import Settings
Access the Ultimate CSV Importer plugin in your WordPress dashboard. There visit the upload from the URL tab present inside the import/update menu and paste the copied generated CSV link.
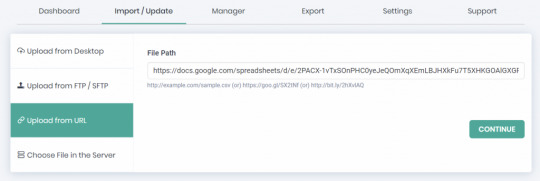
To initiate the import process, you can import new items or update existing posts/pages/custom posts/Woo-Products, using title, ID, slug, and SKU. You can choose an existing item from the options shown below to set up a schedule:
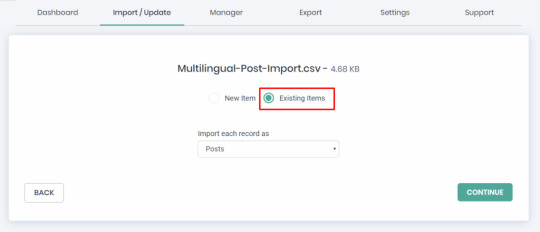
Ensure to choose the right post type.
Mapping Data
Mapping data fields contributes a lot to successful import. So carefully choose and map all the header fields in your Google Sheets to the corresponding fields in WordPress. This step ensures that your data is imported correctly. Some fields are mapped automatically or else you need to drag and map or use the dropdown and map. At the end of the page, ensure that you save the mapping templates with a name, as they are crucial for successful scheduled import or update.
Handling Images
The handling of images during the import process involves several options:
Select the first option when utilizing existing images and new ones.
Enable the second radio button if there is a need to overwrite existing images with new images.
When introducing new image URLs from external sources, activate the third radio button.
You can configure the image sizes and map the images’ SEO fields here.
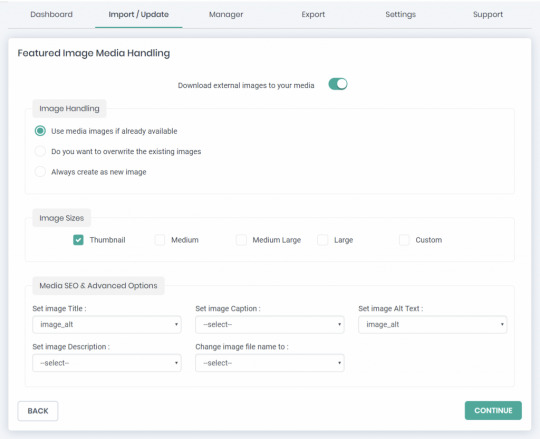
Scheduling the Process
WP Ultimate CSV Importer offers a scheduling feature that allows you to schedule imports and updates according to your preferred UTC time zone. This convenient scheduling process is easy to set up:
In the final stage of your import, simply choose “Do you want to Schedule this import?”
Next, provide the Date, Frequency(choose how often you want the updates to occur, whether it’s daily, weekly, or at custom intervals), UTC Time, and Time Zone that aligns with your requirements.
Confirm your settings by clicking the “Schedule” button.
Once scheduled, your import will run automatically at the designated date and time, saving you time and effort.
Please refer to the image below for a visual guide and step-by-step instructions.
After scheduling, monitor the import runs through the “Manager” section’s >> “Scheduled Imports” page. This feature cancels out the need for repeated rescheduling when performing new imports or updates. That is, you can add new records conveniently row by row in Google Sheets, while already imported documents can be modified directly in the sheets. This approach ensures the automatic import of new data and seamless updating of existing content from Google Sheets to the WordPress system.
Conclusion
Using Google Sheets for data import to WordPress with the WP Ultimate CSV Importer plugin empowers you to manage and update your WordPress content more efficiently. It allows for seamless collaboration, data validation, and automated updates, reducing manual effort and potential errors.
By following the step-by-step guide outlined in this article, you can harness the full potential of these tools, ensuring that your WordPress site remains up-to-date with minimal effort. Say goodbye to manual data entry and hello to a more streamlined content management process!
FAQs
1. How can I import a Google Sheet into my website? You can import a Google Sheet into your website using various methods, including embedding, Google Sheets API, or third-party tools. The choice depends on your specific needs and technical expertise.
2. Is it possible to import and update custom post types and taxonomies using Google Sheets? Yes, our WP Ultimate CSV Importer plugin supports custom post types, taxonomies import, and updates via Google Sheets. Ensure that your Google Sheet reflects the structure of your custom content.
3. Can I automate the import process with Google Sheets and WordPress? Yes, you can automate the process by using the WP Ultimate CSV Importer plugin for importing and updating data from Google Sheets.
4. How do I import a Google Sheet into WooCommerce? You can import Google Sheets data to your WooCommerce Products, Orders, Coupons, and more with the steps explained in this article using Ultimate CSV Importer.
#wordpress#wordpress plugins#wordpress tutorial#cms#website development#plugins#blog post#import#wordpresswebsite#csvimporter#google#google sheets#Youtube
0 notes
Text
How to Update WordPress plugins
WordPress plugins are software extensions that add new functionality to your WordPress website. They are like apps for your website, allowing you to customize and enhance its features without having to write any code. With over 55,000 plugins available in the official WordPress Plugin Directory, there’s a plugin for practically every need.

Why is it Important to Update WordPress Plugins?
Keeping your WordPress plugins up to date is crucial for several reasons. First and foremost, updates often contain bug fixes and security patches that address vulnerabilities discovered in previous versions. By updating your plugins, you ensure that your website remains protected against potential attacks.
Additionally, updates can introduce new features, improve performance, and enhance compatibility with the latest version of WordPress. By regularly updating your plugins, you can take advantage of these improvements and ensure that your website runs smoothly.
How to Check for Plugin Updates
Before we dive into the update process, it’s important to know how to check for plugin updates. Fortunately, WordPress makes it easy. Here’s how:
1. Login to your WordPress dashboard: Visit your website’s admin area and enter your login credentials.
2. Navigate to the Plugins page: From the sidebar, click on “Plugins” to access the list of installed plugins.

3. Check for updates: On the Plugins page, you’ll see a notification if any updates are available. Look for the number in a red circle next to “Plugins”.
4. Update individual plugins: To update a specific plugin, click on the “Update Now” link beneath its name. The latest version will be downloaded and installed by WordPress automatically.
5. Update all plugins: If you prefer to update all plugins at once, click on the “Update Available” link at the top of the page. WordPress will update all plugins that have pending updates.
Manual Update Process for WordPress Plugins
While updating plugins manually is not the most convenient option, it still provides you with greater control over the process. Here’s how to manually update WordPress plugins:
Secure your website: Before implementing any updates, it’s advisable to generate a backup of your website. This precautionary step ensures that should any issues arise during the update process, you can effortlessly revert your website to its previous state.
Download the latest version: Visit the plugin’s website or the official WordPress Plugin Directory to download the latest version of the plugin you want to update.
Deactivate the old version: In your WordPress dashboard, navigate to the Plugins page and deactivate the plugin you wish to update.
Delete the old version: Once the plugin is deactivated, click on the “Delete” link beneath its name to remove the old version from your website.
Upload and activate the new version: On the Plugins page, click on the “Add New” button at the top. Choose the downloaded plugin file from your computer and click “Install Now”. Finally, click on “Activate” to enable the updated plugin.
Pros and Cons of Manually Updating Plugins
While manual updates give you more control, they also come with their own set of pros and cons.
Pros:
Greater control over the update process.
Ability to thoroughly test the updated plugin before activating it.
No reliance on automatic updates, which can sometimes cause compatibility issues.
Cons:
Requires manual effort and time investment.
Higher risk of human error during the update process.
It might pose a greater challenge for users who are not familiar with technical concepts.
How to Update WordPress Plugins Automatically
If you prefer a more hands-off approach, you can enable automatic updates for your WordPress plugins. Automatic updates ensure that your plugins are always up to date without requiring any manual intervention. Here’s how to enable automatic plugin updates:
Install a plugin for automatic updates: There are several plugins available that can handle automatic updates for you. A well-liked choice is the “Easy Updates Manager” plugin, which can be installed and activated directly from the WordPress Plugin Directory.
Configure automatic updates: Once the plugin is activated, navigate to its settings page. Here, you can specify which plugins you want to update automatically and choose the update frequency.
Save your settings: After configuring the automatic update settings, make sure to save your changes.
Benefits of Using Automatic Plugin Updates
Automatic plugin updates can offer several advantages for website owners:
Improved security: With automatic updates, you can ensure that your plugins are always up to date with the latest security patches, minimizing the risk of potential vulnerabilities.
Time-saving: Automatic updates eliminate the need for manual intervention, saving you time and effort that can be better spent on other website management tasks.
Enhanced performance: By regularly updating your plugins, you can take advantage of performance improvements and bug fixes, ensuring your website runs smoothly.
Compatibility: Automatic updates help ensure that your plugins remain compatible with the latest version of WordPress, preventing any compatibility issues that may arise from using outdated plugins.
Best Practices for Updating WordPress Plugins
To ensure a smooth update process and maintain the security and functionality of your website, follow these best practices:
Backup your website: Before updating any plugins, always create a backup of your website. This allows you to restore your website in case anything goes wrong during the update process.
Update one plugin at a time: To minimize the risk of conflicts or compatibility issues, update one plugin at a time and thoroughly test your website after each update.
Keep track of plugin updates: Regularly check for plugin updates and stay informed about any new features, bug fixes, or security patches. This helps you make informed decisions about which plugins to update.
Read release notes and changelogs: Before updating a plugin, read the release notes or changelogs provided by the plugin developer. This gives you valuable insights into what changes are included in the update and any potential impact on your website.
Test after updating: After updating a plugin, thoroughly test your website to ensure that everything is functioning correctly. Pay special attention to any areas or features that are directly affected by the updated plugin.
Common Issues and Troubleshooting Tips When Updating Plugins
While updating WordPress plugins usually goes smoothly, occasionally, issues may arise. Below, you’ll find a list of common issues along with troubleshooting tips:
White screen of death: If your website displays a blank white screen after updating a plugin, it may indicate a compatibility issue. Try deactivating the recently updated plugin and see if the issue resolves. If it does, contact the plugin developer for further assistance.
Plugin conflicts: Sometimes, updating a plugin can cause conflicts with other plugins or themes. If you notice any unexpected behavior after an update, deactivate other plugins one by one to identify the conflicting plugin. Once identified, contact the plugin developer for a possible solution.
Missing or broken features: If a plugin update results in missing or broken features, ensure that you have followed the update process correctly. If the issue persists, reach out to the plugin developer for guidance, or consider rolling back to the previous version of the plugin.
Slow website performance: Occasionally, a plugin update may negatively impact your website’s performance. To address this, check if the updated plugin has any new settings that could affect performance. If necessary, revert to the previous version or consider alternative plugins.
Importance of Keeping Plugins Updated for Website Security
Keeping your WordPress plugins updated is crucial for maintaining the security of your website. Outdated plugins can become a prime target for hackers looking to exploit vulnerabilities and gain unauthorized access to your website.
By regularly updating your plugins, you ensure that any security vulnerabilities discovered in previous versions are patched. This significantly reduces the risk of your website being compromised.
Additionally, outdated plugins can also pose compatibility issues, leading to website malfunctions or conflicts with other plugins or themes. By keeping your plugins up to date, you minimize the chances of these compatibility issues and ensure a smooth user experience.
Conclusion
Updating your WordPress plugins is a vital part of website maintenance. It not only improves security but also enhances performance and compatibility. Whether you choose to update your plugins manually or enable automatic updates, following best practices and staying vigilant ensures that your website remains secure and up to date.
By regularly checking for updates, testing after each update, and addressing any issues promptly, you can keep your website running smoothly and provide a seamless experience for your visitors.
Don’t neglect the importance of updating your WordPress plugins. By staying proactive, you can safeguard your website and leverage the latest features and improvements offered by plugin developers.
Remember, your website’s security and functionality depend on regular plugin updates. Stay informed, stay updated, and keep your website in top shape.
Stay ahead of the curve. Update your WordPress plugins today!
#wordpress#wordpress plugins#wordpress tutorial#cms#website development#plugins#blog post#import#wordpresswebsite#csvimporter#Wordpressplugindata
0 notes
Text
How to Create and Import Custom Post Types in WordPress
In this blog post, we will explore the process of creating and importing custom post types in WordPress. Whether you are a seasoned WordPress developer or just starting, this guide will provide you with a step-by-step tutorial on how to create and import custom post types to your WordPress website. We will cover the basics of custom post types, including what they are, why you might need them, and how to create them using plugins. Also, we will discuss how to import custom post types from other sources, such as a CSV file. By the end of this tutorial, you will have a clear understanding of how to create and import custom post types in WordPress, and you will be able to take your website to the next level by offering unique content types to your users.
What is Custom Post Type in WordPress?
Let’s begin with understanding what a custom post is. In WordPress, custom post types are content types that you can create and customize to your specific needs. It can be created using custom code or a third-party add-on. In this article, we will see how to create custom posts using third-party plugins. By default, WordPress comes with five post types: Posts, Pages, Attachments, Revisions, and Menus. Custom post types allow you to add additional content types beyond defaults.
Why do we need Custom Post Types?
If you are planning to build a Real Estate website, the default Post/Page won’t be sufficient because we want a Post Type to have a Product Image, Custom Fields related to the Post we are building here are some sample fields we need – Number of bedrooms, bathrooms, Pools and Minimum Price, and Type of Property either an apartment or Building or Bangalow, etc., so definitely we need a custom post to achieve our needs.
Most Popular Third-party Plugin for Custom Post Types
There are several third-party plugins available to create custom Posts but here I’m listing the most popular ones,
Toolset
JetEngine
PODS
Metabox
As a whole, these are the most popular plugins. Each has several features and depending on your specific needs and preferences, you can select any for your website.
In this article let us see how to create Custom Post using the above addon and how to import it using the Ultimate CSV Importer Plugin.
How to create Custom Post Types using Toolset?
Toolset is a powerful plugin that allows you to create Custom Posts, Custom Fields, and Taxonomies without coding knowledge in simple steps. Toolset also includes other features, such as views, forms, and templates. These features enable you to create highly customized WordPress websites and applications.
Install and activate the Toolset Types plugin in your WordPress instance.
Go to the Toolset -> Post Types in your WordPress dashboard.

Click on the Add New button to create a new custom post.
In Post Type Name enter the Custom Post name and in the description field, enter the short description of the post. Under “Options,” select the settings you want for your custom post type. This includes the post-type label, menu icon, and capabilities. And fill in all the necessary fields and click Save Post
Once you have created a custom post, your newly created custom post will appear in your WordPress instance.
Add new custom fields to your custom post in two ways. By clicking Dashboard under the Toolset menu, you will see a newly created custom post. Then click Add Custom Fields, and Add Custom Taxonomy, to create custom fields and taxonomies for the custom post. You can also click on Custom Fields under the Toolset menu to create custom fields and Taxonomies to create custom Taxonomy.


How to create Custom Post Types using PODS?
PODS is a popular plugin that allows you to create custom Posts, Custom Fields, and Custom Taxonomies. Overall, PODS is a powerful plugin that offers a lot of flexibility for customizing WordPress sites.
We will see how to create Custom Post,
Install and activate the PODS plugin in your WordPress Instance.
In your WordPress dashboard, Click PODS Admin -> Add New -> Create New.
Select Custom Post Type in the dropdown menu to create Custom Post, Custom Taxonomy to create a custom category and tag.
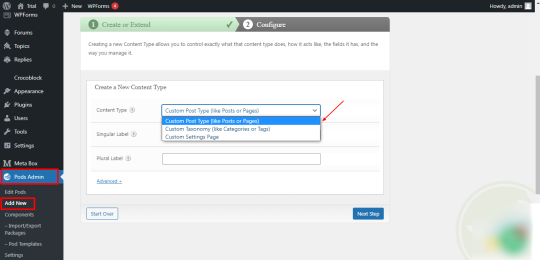
Provide the CPT name in the Label field and click Save Pod, then new CPT will be created and it is displayed in your WordPress dashboard.
To create Custom Fields, Click on Edit Pods in the WordPress dashboard ->Select your Custom Post (To add custom fields) -> Fields ->Add field group name and fields for the post -> Save Pods.
That’s it! With PODS, you can easily create custom post types and custom fields for your WordPress site without writing any code.
How to create Custom Post Types using MetaBox?
Metabox is a powerful and flexible plugin that lets you easily create Custom Posts, Custom Fields, and Custom Taxonomies for your WordPress posts, pages, and custom post types. Whether you’re a developer building custom themes or plugins, or a content creator looking to add more information to your posts, MetaBox is worth checking out.
Install and Activate the MetaBox to create Custom Fields and MB Custom Post Types & Custom Taxonomies in your WordPress instance.
Once the plugin is activated you can see the new MetaBox menu in your WordPress dashboard.
In your WordPress dashboard, go to MetaBox > Custom Post Types and Click the “Add New” button to create a new custom post type.
Fill in all required fields such as name, and slug for your Custom Post. You can also select the post type’s capabilities, menu icon, and taxonomies and click Publish and now your Custom Post will be created.
Under MetaBox -> Custom Fields, you can add custom fields to your custom post type or existing post. You can choose from various field types such as text, textarea, select, checkbox, and more. Fill in all necessary details like field name and Field location etc and click Publish to see your Custom Fields displayed in the desired location.
That’s it! You have now created a custom post type and custom fields using the MetaBox plugin’s user interface, without writing a single line of code.
How to create Custom Post Types using JetEngine?
JetEngine is a powerful plugin that allows you to create custom post types, custom fields, and custom taxonomies without any coding. For storing additional information to your post you can create custom fields using the plugin. Now, we will walk you through the process of creating custom post types and fields with JetEngine.
Install and Activate the JetEngine plugin in your instance.
Once it is activated, JetEngine Menu will be displayed in your WordPress dashboard.
Click JetEngine ->Post Type -> Add New.
Add your Post Name, Slug, and fill in all necessary details. Customize your Custom Post by adding Custom Fields and taxonomies by clicking the Add Meta Field button under Meta Fields. Choose the field type you want to add, such as “Text”, “Number”, “Checkbox”, or “Image”. Fill out the field settings, such as the field label, meta key, and default value.
And click “Add Post Type” to create Custom Post with Metadata.
Ultimate CSV Importer - To Import Custom Post Types
It’s always nice to be in trend, isn’t it? Not only for lifestyle but also for business. The Ultimate CSV Importer always keeps up with the latest market developments. Interesting right, then try our demo now. So let us see how to import data into a Custom Post using the plugin.
This involves a few steps,
Import File Preparation,
Upload File
Field Mapping
Media Handling Section
Import Configuration Section
File Preparation
Ultimate CSV Importer will import both CSV and XML file formats. Ensure your CSV file is formatted correctly, with each column representing a different field in your custom post type. Also, we have provided a Sample CSV/XML for your reference. If you are unclear, you can look for clarification.
Upload File
Install and Activate WP Ultimate CSV Importer in your WordPress instance. Click the Ultimate CSV Importer plugin and navigate to the Import tab and upload your CSV/XML and select the post type you want to import in the dropdown menu. Select New Items to import New data or Existing Items to update the old data.
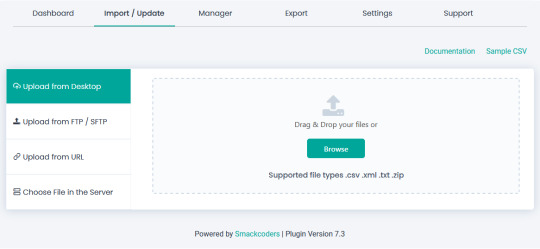
Field Mapping
Field mapping in the Ultimate CSV Importer plugin allows you to map the columns in your CSV file to specific fields in your WordPress database, such as post title, post content, post meta fields, custom fields, and taxonomy terms. Field mapping is essential because it tells the plugin where to place the data from each column in your CSV file. Once it is done you can save the mapping as a template so you can use the same mapping in the future use.
Media Handling Section
Download external images to your media – You can decide whether the image (Inline Image/Featured Image/Gallery Image) imported with your Post should be in the Media Library or not in this section.
Image Handling – Ultimate CSV Importer will handle your images perfectly by not allowing duplicate images inside the Media library. If the images are already present inside the Media and you want to keep them, you can do it or delete the old ones by overwriting the existing images or always creating fresh ones during the import process. Select anyone based on your needs.
Post Content Image Option – Enable to download the Post content image to the Media Library
Image Sizes – The image can be imported in different sizes such as thumbnails, medium, medium large, and large. If you need any custom size you can do it by specifying the image width and height.
Media SEO & Advanced Options – You can import images along with the SEO fields like Image Name, Description, ALT text, and Caption. Map the desired CSV header to the fields. And click Continue to proceed with the import process.
Import Configuration Section
In this section, you can take a safe back backup before importing. Also, you can notify your visitors that the site is under Maintenance mode. Then Kickoff the duplicates while importing the data based on Title/name. Schedule your import at your own time in this section. Once it is done click Import to import all your data into the WordPress instance.
How to Export Custom Post Types using Ultimate CSV Importer?
Click on Ultimate CSV Importer and navigate to the Export Tab and Click Custom Posts. Now the created custom post will be listed in the dropdown, select the desired post and Click Continue.
Give the name of the file to be exported and download the file in the format you need like CSV/XLS/XML/JSON. And the advanced filters allow exporting the data you need. (Refer to Ultimate Exporter documentation for more details)
Update your data using Ultimate CSV Importer
Both import and update are the same processes and it only differs in two steps. In the first step select Existing Items and upload your CSV and map all the necessary fields and click continue.
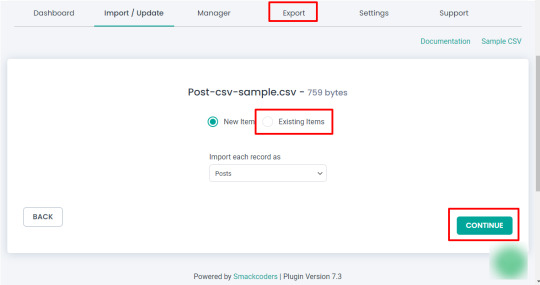
And in the Final Step select Update based on Field to update the record based on the title/slug/ID.
#wordpress#wordpress plugins#wordpress tutorial#cms#website development#plugins#blog post#custom post#custom post type#import#csvimporter#custom field
0 notes
Text
How to Create or Edit CSV and XML Files to Import into WordPress
CSV (Comma Separated Values) and XML (Extensible Markup Language) are two commonly used file formats for data storage and exchange. CSV files store data in a tabular format where values are separated by commas. XML files, on the other hand, use a hierarchical structure to organize data with tags and elements. In this article, we will explore how to create and also edit CSV and XML files for importing into WordPress.
CSV and XML File Characters
CSV files primarily use characters like commas, double quotes, and line breaks to separate and format data. The comma acts as a delimiter between each value, while double quotes enclose values containing special characters or spaces. Line breaks indicate the end of a record or row. XML files use tags enclosed in angle brackets (<>) to define elements and their content. These tags provide structure and hierarchy to the data.
How do CSV files help in Your Business?
More or less all commercial platforms are using CSV files to import and export their ecommerce data to and from the database. CSV files are generally faster and consume less memory space when compared to the Spreadsheet. CSV files are handled by various businesses to save posts, products, and other requisite data.
Benefits of CSV Import
It is effortless to Install and child’s play to resolve any changes. Faster to handle the data. It runs in no time to import and export the file.
How to Open a CSV File
To open a CSV file, you can use various text editors or spreadsheet applications. Here are a few popular options:
Using Notepad
Launch Notepad, a basic text editor that comes pre-installed on most Windows computers.
Go to the File menu and select Open. Navigate to the location of your CSV file, select it, and click Open. The CSV file will open in Notepad, displaying the data in plain text format.
Using Notepad++
Download and install Notepad++, a free source code editor and launch Notepad++.
Go to the File menu and choose Open. Find your CSV file, choose it, and press the Open button. Notepad++ will display the CSV file with syntax highlighting and better readability.
Using MS Excel
Open Microsoft Excel, a widely-used spreadsheet application. Click on the File tab >> Open.
Browse to the location of your CSV file, select it, and click Open. Excel will automatically detect the CSV format and present the data in a spreadsheet view.
Using Google Sheets
Open a web browser and navigate to Google Sheets. Sign in with your account or create one.
Click on the File menu and select Import. Choose Upload and select your CSV file from your computer. Google Sheets will import the CSV file and display it in a spreadsheet format.
Using LibreOffice
Launch LibreOffice, a powerful open-source office suite. Click on the Calc option to open the spreadsheet application.
Go to the File >> Open. Navigate to the location of your CSV file, select it, and click Open. LibreOffice Calc will automatically detect the CSV format and present the data in a spreadsheet view.
Using OpenOffice Calc
Start OpenOffice, another popular open-source office suite. Select Calc from the available applications to open the spreadsheet component.
Click on the File menu >> choose Open. Find your file location and open it.
How to Prepare a CSV file using Notepad++?
Open Notepad++ for Windows and text editor for Mac. On the new file, start to create field names separated by comma values. Add field headers in the first row. Beneath the headers, add the field values.
Save the file with .csv extension by visiting File > Save as > Name.csv
Likewise, you can create your preferred CSV file with various text editors and save it in the .csv extension.
Using Notepad
Launch Notepad, a basic text editor available on most Windows computers.
Start by opening a new blank document. Type or copy and paste your data, ensuring each value is separated by a comma. To indicate a new row, press the Enter key after entering each set of values. Save the file with a .csv extension, ensuring the “Save as type” field is set to “All Files” in the save dialog box.
Using MS Excel
Open Microsoft Excel and enter your data into the cells, with each value in its respective column.
Save the file as a CSV by visiting the File menu, selecting Save As, and choosing CSV (Comma delimited) as the file format.
Using Google Sheets
Open a web browser and navigate to Google Sheets. Create a new sheet by clicking on the “+” icon or open an existing one. Enter your data into the cells, following the desired table structure.
To save the sheet as a CSV file, go to the “File” menu, select “Download,” and choose Comma-separated values (.csv, current sheet).
Using LibreOffice
Launch LibreOffice, a free and open-source office suite. Open Calc, the spreadsheet program in LibreOffice. Enter your data into the cells, organizing it into columns and rows.
Move to File >> Save As. Select CSV from “Save as type” and click Save.
Using OpenOffice Calc
Open OpenOffice Calc and enter your data into the cells, ensuring proper column and row alignment.
Select the File menu and choose Save As. Specify the CSV format in the Save as type field and click Save.
Downloading and Opening a Sample CSV File for Importing
To practice importing CSV files into WordPress, you can download sample CSV files from our website. Get access to the collection of sample CSV files. Download the desired file and save it to your computer. Then, follow the previous steps to open the downloaded CSV file in your preferred editor. You can also get sample XMLs by visiting the above link.
How to Edit a CSV File
Editing a .csv (Comma-Separated Values) file is a straightforward process that can be done using a variety of software applications. Here’s a step-by-step guide on how to edit a .csv file.
Open the .csv File
Launch a spreadsheet software application like Microsoft Excel, Google Sheets, or a text editor capable of handling .csv files. Navigate to the file location and open the .csv file in the chosen application.
Review the Data
Take a moment to review the data within the .csv file. Familiarize yourself with the columns, rows, and the overall structure of the data. This step will help you understand the information you’re working with and plan your edits accordingly.
Make Changes to the Data
To edit a cell
Locate the cell you want to modify and click on it. Then, simply type the desired changes directly into the cell.
To insert a new row or column
Right-click on an existing row or column, and choose the “Insert” option. This will add a new row or column where you can enter your data.
To delete a row or column
Select the row or column you want to remove, right-click, and choose the “Delete” option. Confirm the deletion if prompted.
Format the Data
If needed, you can apply formatting options to enhance the appearance of the data. This may include changing font styles, adjusting column widths, setting date or number formats, or applying conditional formatting to highlight specific data points.
Save the Edited File
Once you have made the necessary changes, save the edited .csv file. Use the “Save” or “Save As” option in your software application to overwrite the existing file or create a new file with the modifications. Choose the .csv file format when saving to ensure the data remains in the proper format.
Validate the Edited Data
After saving the edited .csv file, it’s a good practice to validate the changes you made. Check the data to ensure that the edits are accurately reflected and that the file still maintains its integrity.
Test Import/Export Operations
If you plan to import or export the .csv file into another system or application, perform a test operation to verify that the edited file functions as intended. This step helps ensure that the data is correctly processed in the target system.
Remember to back up your original .csv file before making any edits to avoid permanent data loss. Additionally, consider documenting your changes or keeping a record of the editing process for future reference.
By following these steps, you can confidently edit a .csv file, modify the data within it, and save the changes for further use or analysis.
How to fix all my CSV data appears in the first column
If you are experiencing the issue of all your CSV data appearing in the first column when opening the file in spreadsheet software, here are some steps to help you fix this problem:
Open the CSV File
Open any preferred spreadsheet software. Navigate to the location where your CSV file is stored and open it within the application.
Check the File Format
Make sure the CSV format is right and also the extension is saved as ‘.csv’ and not in another file extension.
Use the Text Import Wizard
Most spreadsheet software offers a Text Import Wizard or a similar feature to handle CSV files with specific settings. Look for an option like “Import” or “Text to Columns” within the software.
Specify the Delimiter
In the Text Import Wizard, you will be prompted to specify the delimiter used in the CSV file. Common delimiters include commas (“,”), semicolons (“;”), tabs (“\t”), or spaces. Select the appropriate delimiter that separates the fields in your CSV file.
Choose the Correct Data Format
If your CSV file contains numerical data or dates, you may need to specify the appropriate format for each column. For example, you can select “General” for text, “Number” for numerical values, or “Date” for date fields.
Adjust Column Widths
After importing the CSV file, check if the column widths need adjustment. Sometimes, when all the data appears in the first column, it might be due to narrow column widths that are not automatically adjusted by the software. Double-click on the column separators or use the “AutoFit Column Width” option to ensure the data is properly displayed.
Review the Data
Take a moment to review the CSV file’s content and verify that the data is now correctly distributed across multiple columns. Ensure that each field is in its appropriate column and that the rows and columns align as expected.
Save the Corrected CSV File
If the data is now displayed correctly in the spreadsheet software, save the file with the corrected formatting. Use the “Save” or “Save As” option to overwrite the original file or create a new file with the corrected data.
By following these steps, you should be able to resolve the issue of CSV data appearing in the first column. The Text Import Wizard helps you specify the delimiter and format settings, ensuring that the data is properly separated and distributed across the respective columns within the spreadsheet software.
How do XML files help in Business?
XML lets you extend data when it is needed. What’s more beneficial about XML files for your business, it supports Multilingual.
Benefits of XML File Import
It is faster than any other file format and can store a lot of customized data. XML data can be sent via the Internet. So that it can get access from anywhere.
How to Open an XML File
To open an XML file, you can use various text editors that support XML syntax highlighting and editing. Here’s how to open an XML file:
Using Notepad++
Launch Notepad++ if you have it installed on your computer. Go to the “File” menu and select “Open.”
Navigate to the location of your XML file, select it, and click “Open.” Notepad++ will display the XML file, providing syntax highlighting and improved readability.
Using Code Browser
Launch Code Browser, a versatile code editor with XML support. Navigate to the “File” menu and select “Open” or use the shortcut Ctrl+O. Find and visit the XML file and open it.
Code Browser will display the XML file, providing syntax highlighting and an organized view of the XML structure.
Using Atom
Open Atom and click on the “File” menu. Select “Open” or press Ctrl+O.
Browse your XML file and open it. Atom will load the XML file, providing syntax highlighting and a user-friendly environment for viewing and editing XML content.
Using Edit Plus
Launch Edit Plus, a powerful text editor with XML support and a range of features for efficient editing. Visit the File menu and open the desired file.
Edit Plus will open the XML file, displaying the content with syntax highlighting and customizable editing options.
Using other editors
If you prefer to use a different text editor, ensure that it supports XML file editing. Examples of popular XML editors include Sublime Text, Visual Studio Code, and Atom.
Open your preferred editor and use the file navigation options to locate and open the XML file.
How to Prepare an XML File
To prepare an XML file for importing into WordPress, you can follow these steps:
Using Notepad++
Launch Notepad++ if it’s installed on your computer. Go to the “File” menu and select “New” to create a new blank document. In the new document, start defining the structure of your XML file by adding opening and closing tags.
Add elements, attributes, and content within the tags to represent your data. Continue adding tags and nesting them as needed to organize your XML structure. Save the file with a .xml extension, giving it an appropriate name.
Using Code Browser
Open Code Browser, an XML-specific editor that provides features for easier XML file creation. Click on the “File” menu and choose “New” to create a new XML document. Use the editor’s interface to define the structure of your XML file. Add elements, attributes, and content as necessary. Save the file with a .xml extension, providing a relevant name.
Using Atom
Create a new file by going to the “File” menu and selecting “New File.” Begin constructing the XML structure by adding opening and closing tags.
Fill in the tags with elements, attributes, and content based on your XML requirements. Save the file with a .xml extension, choosing an appropriate name.
Using Edit Plus
Start a new document by selecting “New” from the “File” menu. Begin building your XML file structure by adding the opening and closing tags. Populate the tags with elements, attributes, and content specific to your XML data. Save the file with a .xml extension, naming it suitably.
Using other editors
If you prefer to use a different text editor, ensure that it supports XML file creation and editing. Open your chosen editor and create a new document. Follow the XML syntax rules to define the structure and elements of your XML file. Add attributes and content as needed, keeping in mind the hierarchical structure of XML. Save the file with a .xml extension and an appropriate name.
How to edit it?
Open the XML file in Notepad++ or any other XML editor. Review the file’s structure and hierarchy, making sure it adheres to the XML specifications. Ensure that each element is properly enclosed within opening and closing tags (<element>…</element>). Validate the XML file using an XML validation tool or online XML validator to ensure it is well-formed.
How to re-update Data into WordPress?
Export your desired content in XML format. Then edit the data on your exported file. Again import the same file into WordPress.
Bulk Import - What is it?
Bulk import is importing a large amount of data into WordPress. For example, importing more than 1000 records into WordPress.
How to Prepare Bulk Import Files in CSV?
For illustration, the product list has various products with its specification.
To store and update those products listed on the website, you can create 1000’s products in an Excel sheet and save that file in CSV format, and import that CSV file using WP Ultimate CSV Importer.
Conclusion
Creating and editing CSV and XML files for importing into WordPress requires careful attention to formatting, structure, and compatibility. Try to follow the above-explained steps. You can successfully create and edit the CSV and XML files. Remember to validate the file structure, handle special characters appropriately, and use compatible software to open and edit the files. With these skills, you’ll be able to seamlessly manage data imports in WordPress and enhance the functionality of your website. If you want a bulk import and export plugin for WordPress, try the WP Ultimate CSV Importer plugin. The popular Import Export WordPress plugin with many satisfying features.
#wordpress#wordpress plugins#wordpress tutorial#cms#website development#plugins#blog post#csv#xml#import#csvimporter
0 notes
Text
Creating Custom Taxonomies Using the ACF Plugin: A Step-by-Step Guide

Taxonomies play a crucial role in organizing and categorizing content on your website. Luckily, with the ACF plugin, you have the ability to create and assign custom taxonomies to any post type. In this blog post, we will walk you through the process of creating a custom taxonomy in ACF, assigning a custom field group to it, and importing values for your taxonomy.
The Importance of Custom Taxonomies
Before we dive into the steps for creating custom taxonomies with the ACF plugin, let’s take a moment to understand why custom taxonomies are valuable for your website. While WordPress offers built-in taxonomies like categories and tags, these might not always align with your specific requirements.
In such cases, custom taxonomies allow you to classify your content in a way that better suits your needs. They provide a structured organization system and offer flexibility in categorizing your content based on your unique requirements.
How to Create Custom Taxonomies
To begin creating custom taxonomies with ACF, make sure you have the plugin installed on your website. Once installed, you will see the ACF menu listed in the sidebar. Follow the steps below to get started:
Navigate to ACF >> Taxonomies and click on “Add New.” This will take you to the “Add New Taxonomy” page.
Fill in the required fields to configure the basic settings. Provide the plural label, singular label, and taxonomy key. The taxonomy key field is automatically generated based on the singular label, but you can edit it if desired.
From the “Post Types” field, select the post types to which you want to assign this custom taxonomy. You can choose multiple post types.
By default, the taxonomy will be visible on the front end. If you want the taxonomy to have hierarchical descendants, enable the “Hierarchical” toggle button.
Additional Settings Configuration
ACF simplifies the configuration process with additional settings that you can access by toggling the bar. Here’s a brief overview of the available tabs:
General: Enable the “Sort Terms” option to sort the taxonomy terms. If you have the default term enabled, provide the term name (mandatory), term slug, and term description. You can also provide a general description for the taxonomy. The “Active” toggle is enabled by default, but you can deactivate the taxonomy without deleting it.
Labels: Define the labels for the taxonomy, which will be used throughout the admin dashboard. The labels are automatically generated based on the singular and plural labels you configured in the basic settings, but you can edit them if necessary.
Visibility: Control the visibility of the taxonomies on the front and admin dashboards.
URLs, Permissions, and REST API: These settings are preconfigured, but you can make changes based on your specific needs. For more detailed information, refer to the ACF official documentation on Custom Taxonomy.
Once you have configured the settings, click “Save Changes” to save the custom taxonomy in ACF.
Adding Values to Custom Taxonomies
There are multiple ways to add values to a custom taxonomy. One option is to visit the “Add New” or “Edit” page of any record in the post type to which you assigned the custom taxonomy. You will find the custom taxonomy listed as a submenu below the post type’s sub-menus. For instance, if you assigned “CTax1” to the “Posts” post type, you will find a “Ctax1” submenu listed below the “Posts” sub-menus. From there, you can create custom taxonomies.
Assigning Custom Fields to Custom Taxonomies
You can also assign a custom field group to your custom taxonomy. To do this, follow these steps
Go to ACF >> Field Groups and click on “Add New.”
Provide a title for your field group.
Add field types by selecting them from the dropdown menu. Enter the field label, field name, and default value.
In the “Settings” section, choose “Taxonomy” >> “is equal to” >> “your_taxonomy” from the dropdown menus.
Click “Save Changes.”
Now, the custom fields you created will be assigned to your custom taxonomy, enhancing the flexibility and functionality of your website.
Conclusion
Creating custom taxonomies with the ACF plugin allows you to organize and categorize your website’s content according to your specific needs. By following the steps outlined in this guide, you can create custom taxonomies, assign field groups, and import values, providing a structured and efficient content management system for your WordPress site. Additionally, if you want to import and export ACF Custom Taxonomy values, check out the CSV importer plugin here.
#wordpress#wordpress plugins#wordpress tutorial#cms#plugins#website development#custom post#acf#custom taxanomies#wordpresswebsite
0 notes
Text
SuiteCRM Google Calendar Sync for Smart Scheduling

Gone are the days of manually entering your appointments into both Google calendar and Suite CRM. And crossing your fingers that you don’t forget to show up on time. Now, with SuiteCRM’s Google Calendar integration, users can seamlessly integrate their Google Calendar into their SuiteCRM account. This allows them to easily keep track of their appointments, meetings, and events all in one centralized place.
Integrate Your Google Calendar with SuiteCRM: Why?
Nowadays, Business meetings play a vital role in sales development and business management. Most of all the meetings are scheduled in a Google calendar and it is effectively shared with the invitees.
Most often we have all our contacts in our CRM. Right?
We need to update all events and tasks in our SuiteCRM too. Managing events and tasks in both calendars and Juggling between two apps is a tricky task here. And time-consuming too.
No more juggling: Let’s take a Smart Move
No longer do you have to jump back and forth between tabs to stay organized. With Google Calendar, you can easily access your CRM data while scheduling tasks and calls. All in one convenient place, your workflow is smoother than ever before. It’s time to move on to the smartest way of handling two calendars with ease. Yes. With SuiteCRM google calendar integration, all your events and tasks in your Google calendar will be synced to your SuiteCRM and Vice-versa. This Bidirectional event sync will efficiently manage all your events in both locations. And make it easy for you to access one calendar with all the updated meetings that are planned for months, events, and tasks.
Connect your Google Calendar and Suite CRM: Get your Google API
The configuration of app settings matters the most in accessing the extension.
The app settings can be easily configured by getting Google API Key, Client ID, and Client secret.
Here are some simple steps to get these credentials(Developer key, Client ID, and Client secret)
Browse Google Developer Console on your web browser
Select the Project on Google cloud console if you have one. If you don’t have any project yet, then create one by clicking on a New project
Navigate to Credentials<< Create Credentials
Select the API key from the drop-down to get your Developer key
Select OAuth Client from the drop-down to get your Client ID and Client Secret.
That’s it. Copy the developer key, OAuth client Id and client secret from your Google developer console and paste it into your App settings of SuiteCRM Google Calendar Integration.
Now you have made a safe and secure sync with Google API configuration.
Tailor Your Settings - Make It Your Way
With SuiteCRM google calendar integration you can customize your settings based on your own business needs. You can get the setup you want.
Enable Sync– Flexible to Enable/Disable the checkbox to allow/avoid sync between Google calendar and Suite CRM
Onsave Sync– Easy to select/deselect when the event/task is to sync Onsave (instantly when the event is created) or not.
CRON Sync– Enable if you prefer automatic sync based on the CRON time without any manual intervention
Event type– Sync the event type (call, meetings, and task) that you have selected in one calendar will also be reflected on the other.
Event Status– Sync the event status(Planned, Held, and not held) of the Google calendar will be automatically updated to SuiteCRM
Start date for Sync From Google– Sync Events/Tasks from Google Calendar to Suite CRM at a specified date and time
Start date for Sync to Google– Sync Event/Tasks from Suite CRM to Google Calendar at a specified date and time.
Authorize your Google Account
Authorization is nothing but connecting your Google account to your Suite CRM. And it is easy to authorize your Google account with SuiteCRM in a single click. Just select your Google Account and connect it with your SuiteCRM.
Sync Your Calendar Events in Any Way You Can Imagine
Syncing events/ tasks in SuiteCRM Google Calendar integration is not restricted to syncing in a single way. It allows the user to sync their calendar events in Multiple ways based on their business requirements.
You can sync manually(Historical Sync)
Sync your Calendar activities manually from the Google Sync option.
You can easily sync all the events/ tasks with a single click on
Sync From Google (Google Calendar to SuiteCRM)
Or
Sync To Google (Suite CRM to Google Calendar)
You can also sync any events/ tasks at a particular date/time by selecting the Start date on the Configuration settings.
You can sync instantly(On Save)
Whenever a new event/task is created/updated in any one of the calendars (Google Calendar and SuiteCRM Calendar )then it will be reflected the same in another calendar instantly upon saving the event.
You can sync Automatically(CRON sync)
The CRON scheduler runs at the preferred CRON time. Just set up your Cron time on the CRONtab and enjoy the automatic event/task sync between Google calendar and Suite CRM. Let not a single event be missed from your activities with the updated calendar.
Track every Sync in a Single Page
With this integration you can keep updated on every event and their Sync statuses. You don’t need to be confused about whether any of the events were missed from sync. A glance at the Logs page describes all the Success/ and Failure statuses of the sync and helps in tracking every sync with ease.
Benefits of SuiteCRM Google Calendar Integration
Speed up relationship building with the right connection. You no longer need to manually add contacts into your CRM one by one. With SuiteCRM Google Calendar integration, it’s easy to foster relationships with new meeting participants. All you need to do is open the meeting invitation from Google Calendar, and you can quickly add everyone who attended to your SuiteCRM. With a few clicks, you can expand your contact base with ease.
Stay on track with Keep Deals Moving- After a call or meeting, it can be difficult to keep up the momentum. With the help of a CRM that integrates with Google Calendar and Gmail, however, you can easily add notes and details without ever having to leave the app. This helps you to stay on track and continue to work on deals without interruption.
Easily access all your appointments and meetings in one place. You’ll also be able to easily track who is attending meetings and when they’re scheduled, as well as quickly add any new meetings and appointments.
Easier to stay on top of tasks and deadlines. With the ability to view upcoming tasks and deadlines on your calendar, you’ll be able to plan ahead and make sure you’re on top of all your commitments. This helps to ensure that you don’t miss any important deadlines, and it also gives you a better overview of your workload.
Allows you to easily share your calendar with others. By sharing your calendar, you can keep your team on the same page and make sure everyone is aware of upcoming tasks and deadlines. This can help to keep everyone on the same page and ensure that nothing falls through the cracks. Get the exclusive Suite CRM Google Calendar Integration for streamlined scheduling
Epilogue
This integration makes life easier for busy professionals who need to keep track of their schedules. Overall, SuiteCRM’s Google Calendar integration is an incredibly useful tool that can help you stay organized and on top of your schedule. With the ability to view, manage, and share your calendar in one place, you’ll be able to easily keep track of all your appointments, tasks, and deadlines. Make sure to take advantage of this helpful integration and make your life a little bit easier.
0 notes
Text
Migrating Your Content from Squarespace to WordPress In 2023

Squarespace is a famous all-in-one website building and hosting platform. It enables users to create and publish websites and online stores with ease. Squarespace was founded in 2003. It has become a top choice for individuals, businesses, and organizations of all sizes for those seeking to establish a striking and sophisticated online presence.
The platform provides users with a wide range of customizable templates, intuitive drag-and-drop editing tools, integrated marketing, and analytics features to help them build and grow their online businesses.
It also offers built-in search engine optimization tools, mobile optimization, and 24/7 customer support to ensure that users have everything they need to succeed online. So with its user-friendly interface and powerful features, Squarespace is a popular choice for anyone looking to build a high-quality website or online store quickly.
Migrating from Squarespace to WordPress
Squarespace is a closed system. This means that you have limited control over the code and functionality of your website. As it is a popular website builder it offers an all-in-one solution for creating a website. The decision to choose between Squarespace and WordPress ultimately boils down to your individual needs and preferences.
If you want a user-friendly platform that allows you to generate a professional-looking website easily, Squarespace may be the better option. But, if you want more control over the code and functionality of your website, and don’t mind spending more time learning the platform, then WordPress may be a better fit.
So If you’re looking to move your website from Squarespace to WordPress, it’s important to have a plan in place to ensure a smooth conversion. Migrating your content from one platform to another can be a daunting task. But with the right tools and guidance, you can make the process as seamless as possible.
Before knowing the Migration process you have to know why you should acknowledge moving from Squarespace to WordPress.
You’re not alone if you feel unsatisfied with your Squarespace website. Luckily, it’s simple to transfer your website to WordPress. WordPress is always a preferable platform. If you’re still hesitant, let us clarify why migrating to a better platform would benefit your website.
The Top 5 Reasons You Should Consider Moving From Squarespace
Renowned for its stunning templates and easy-to-use interface, Squarespace is a favored website builder amongst many. But, if you’re looking for more resilience and control over your website, you may want to consider moving to WordPress. Here are some reasons why:
WordPress is an open-source platform. You are in complete control of your website’s code and functionality. This level of control is not available with Squarespace, which is a closed system.
With WordPress, you can customize your website to suit your specific needs and preferences. Also, you can advance your plugins and themes. It offers a vast library of themes and plugins that can be used to generate a custom website. These themes and plugins offer more customization options than Squarespace. It allows you to create a unique website. Besides, WordPress has a larger community of developers and designers who often create new themes and plugins. So you can access the latest tools and their features.
Moreover, WordPress is highly scalable, which means that it can grow with your business. With WordPress, you can add new pages, features, and functionality as your business grows, without having to start from scratch. WordPress allows you to customize your website’s meta descriptions, titles, and keywords, which can make it easier for search engines to crawl and index your site.
Squarespace has a monthly subscription fee. Also, WordPress is a cost-effective solution for website owners and it is free to use. All you need is a hosting provider and a domain name, which are both inexpensive. Squarespace lets you build beautiful websites. However, it may not offer the flexibility and control that some website owners need. Well, these are some of the reasons for migrating your content from Squarespace to WordPress.
Smooth Transition from Squarespace to WordPress with Some Key Factors
Setting up a website can be overwhelming. But with the right web hosting provider, you can bring your vision to life in no time. Before you start building your dream website, the first step is finding the perfect web hosting plan. With countless options available, it’s important to do your research and select a provider that meets your needs.
When choosing a web hosting provider, you have to examine the following factors:
Affordability: Look for a provider that extends competitive pricing without sacrificing performance.
Speed: Choose a provider with fast loading times to ensure that your website loads quickly and provides a smooth user experience.
Uptime: Opt for a provider with high server uptime to ensure that your website is always accessible to visitors.
Security: You should conside website’s security a top priority. Choose a provider that offers optimal security measures to protect your website and its visitors from potential threats.
By selecting a web hosting provider that meets these criteria, you can ensure that your website is fast, reliable, and secure. So, don’t settle for anything less than the best – choose a hosting provider that sets you up for success.
Choosing the perfect domain name is necessary when it comes to establishing your online presence. Before migrating your website, take the time to select a domain that represents your brand and is easy for users to remember. You have the option to buy a domain name from a domain registrar or your hosting provider. you can choose whatever it may be, but make sure it aligns with your website’s goals and overall vision. Now let’s proceed to the next step.
7 Simple Steps to Migrate Your Content from Squarespace to WordPress In 2023
If you’re looking to move your website from Squarespace to WordPress, then this blog post will help you to migrate your Squarespace content to WordPress. And it’s important to have a plan in place to ensure a smooth transition. Migrating your content from one platform to another can be a daunting task, but with the right tools and guidance, you can make the process as perfect as possible.
Step 1: Set Up your WordPress Site
Before importing your Squarespace content into WordPress, you’ll need to set up your WordPress site. This requires choosing a hosting provider, installing WordPress, and finally setting up your website.
Many hosting providers offer WordPress hosting, so be sure to choose one that fits your needs and budget. Once you’ve chosen a hosting provider, you can install WordPress using the provider’s one-click installation process.
Once WordPress is installed, you’ll need to choose a theme and customize your website. You may also want to install plugins that will help you with the migration process, such as the WP Ultimate CSV Importer plugin.
Step 2: Export Your Squarespace Content
The first step in migrating your Squarespace content to WordPress is to export your content from Squarespace. Squarespace will permit you to export your content as an XML file, which you can then import into WordPress.
To export your Squarespace content, follow these steps:
Navigate to the Settings menu in your Squarespace account.
Click on Import & Export Content.
Click Export, and choose the content you want to export.
Squarespace will generate an XML file, which you should save to your computer.
Although Squarespace offers a seamless migration process, certain elements need manual exporting. These include event, product, album, and index pages, drafts and folders, audio, video, and product blocks, style changes, custom CSS, and multiple blogs. Don’t worry – with the right guidance and tools, you can successfully export these elements to your new WordPress site. Also, you can create a smooth transition for your audience.
With these steps, you’ll be well on your way to successfully migrating your content from Squarespace to WordPress.
So, once you finish the export process, you will have the XML file that contains all your Squarespace content, ready to be imported into WordPress.
Step 3: Import Squarespace Content Into the New WordPress Site
You have exported your Squarespace content and structured your WordPress site. So it’s time to import your Squarespace content into WordPress.
Follow the steps given below to import your Squarespace content into WordPress.
Go to your WordPress dashboard, click on “Tools” and select “Import” from the drop-down menu.
Click “Install Now” from the WordPress option and then select “Run Importer”.
Upload the downloaded XML by selecting the choose file button.
Click the button “Upload file and import”.
Now you will need to assign a new or existing WordPress author for the Squarespace post or page you want to import.
If you wish to import attachments, select “Download and import file attachments”.
Then click on the Submit button.
The import will take time depending on your data size. Once it is complete you will see a success message.
You can also use a third-party plugin tool like WP Ultimate CSV Importer to import the XML file to WordPress.
Transfer the XML file that you have exported from Squarespace.
Map the Squarespace fields to the applicable WordPress fields.
Click the import button and patiently wait for the process to finish. For more information, check the Ultimate CSV Importer’s documentation.
Step 4: Transfer Your Squarespace Images to WordPress Effortlessly
When moving from Squarespace to WordPress, don’t forget to take your images with you. Instead of manually migrating each one, you can save time and hassle by using the Auto Upload Images plugin.
This helpful tool searches for image URLs in your old Squarespace website and automatically transfers them to your WordPress media library. It’s an effortless way to ensure that your posts look just as great on your new platform as they did on your old one.
Once the plugin is installed and activated, follow these simple steps to migrate your images:
By navigating to the “Posts” section, select the desired posts that need image updates.
Choose Edit from the Bulk Actions drop-down menu, then click on Apply.
A new window will pop up. Click on Update.
With just a few clicks, all your Squarespace images will be uploaded to your WordPress media library. And your posts will be updated as a matter of course.
Step 5: Check Your Content
Once the import process is complete, it’s important to check your content to make sure everything is imported correctly. Check your pages, posts, and images to ensure that everything is displaying properly.
If you notice any issues, you may need to troubleshoot the migration process. If you need assistance, you can also ask the WordPress community. Or else, you can hire a professional to assist with the migration.
Step 6: Keep Your Domain Active By Pointing it to Your New WordPress Website
Your domain name is the key to your online identity. You wouldn’t want to lose it after migrating your website from Squarespace to WordPress. To ensure that your website visitors can still access your website using the same domain name, you need to point it to your new WordPress website.
To do this, you need to change the domain’s nameservers. Nameservers act as the address book for the internet, directing traffic from your domain name to the hosting provider’s server. Since you’re moving to a new platform and hosting provider, you need to update your domain’s nameservers to keep your website accessible to your visitors.
The process of changing nameservers may vary depending on how you registered your domain name. If you registered your domain name through a domain registrar, you can access your Squarespace DNS settings and change the nameservers from the hosting panel. So, if your domain was registered through a hosting company, they’ll need to update your DNS settings from their system.
By keeping your domain name active and pointing it to your new WordPress website, you can ensure a seamless transition for your website visitors.
Step 7: Unlock the Power of WordPress and Start Creating!
Congratulations on migrating your website from Squarespace to WordPress! Now that you have made all the technical adjustments. And it’s time to make your website look charismatic to the eyes and stand out from the crowd.
Choosing the right theme is compelling to achieve a unique and visually attractive website. With so many options in the WordPress theme directory, it can be overwhelming to choose the right one.
If you have a budget, investing in a premium WordPress theme is also an excellent option. As it offers a wide range of customization options to make your website stand out.
But that’s not all! To make the most of your WordPress website, join the WordPress community. Here you can connect with WordPress enthusiasts, developers, and users. The community offers a wealth of resources and support to help you learn and grow with WordPress.
So, get started with WordPress and unleash the full potential of your website!
Conclusion
Are you prepared to elevate your website to the next level? Squarespace is a great option for beginners. It can limit your ability to customize and expand your site. That’s why we recommend making the switch to WordPress. Migrating your Squarespace content to WordPress can be a complex process. But with the right tools and guidance, you can ensure a successful migration.
0 notes
Text
Securing Your Digital Identity: Get Your Google API and OAuth Credentials Now

As of today, it is so easy to get the Google API and Client credentials with a few clicks via Google Developer Console. Before that, it is essential to know what API and Client credentials are. In this blog, we discuss the API and client credentials and when to use them. Are you searching for the Step by Step instructions to get the API key and OAuth Credentials? Then keep on reading….
Both API keys and OAuth are the different types of authentication handled by Cloud Endpoints.
These two differ most in the following ways:
The application or website performing the API call is identified by the API key.
An app or website’s user, or the person using it, is identified by an authentication token.
API keys provide project authorization
To decide which scheme is most appropriate, it’s important to understand what API keys and authentication can provide.
API keys provide
Project identification — Identify the application or the project that’s making a call to this API
Project authorization — Check whether the calling application has been granted access to call the API and has enabled the API in their project
API keys aren’t as secure as authentication tokens, but they identify the application or project that’s calling an API. They are generated on the project making the call, and you can restrict their use to an environment such as an IP address range, or an Android or iOS app.
By identifying the calling project, you can use API keys to associate usage information with that project. API keys allow the Extensible Service Proxy (ESP) to reject calls from projects that haven’t been granted access or enabled in the API.
Contrarily, authentication strategies often have two objectives:
Verify the identity of the calling user securely using user authentication.
Check the user's authorization to see if they have the right to submit this request.
A safe method of identifying the user who is calling is provided by authentication mechanisms.
In order to confirm that it has permission to call an API, endpoints also examine the authentication token.
The decision to authorize a request is made by the API server based on that authentication.
The calling project is identified by the API key, but the calling user is not.
An API key, for example, can identify the application that is making an API call if you have developed an application that is doing so.
Protection of API keys
In general, API keys is not seen to be safe because clients frequently have access to them. This will make it simple for someone to steal an API key. Unless the project owner revokes or regenerates the key, it can be used indefinitely once it has been stolen because it has no expiration date. There are better methods for authorization, even though the limitations you can place on an API key minimize this.
API Keys: When to Use?
An API may require API keys for part or all of its methods.
This makes sense to do if:
You should prevent traffic from anonymous sources.
In the event that the application developer wants to collaborate with the API producer to troubleshoot a problem or demonstrate the usage of their application, API keys identify an application's traffic for the API producer.
You wish to limit the number of API calls that are made.
You want to analyze API traffic to find usage trends.
APIs and services allow you to view application consumption.
You want to use the API key to filter logs.
API keys: When not to use?
Individual user identification – API keys are used to identify projects, not people
On secured authorization
Finding the authors of the project
Step-by-step instructions on how to get Google API and OAuth credentials using the Google developer console.
Step 1
Browse Google developer console

Step 2
Select your project or create a new project by clicking on the New project button

Step 3
Provide your project name, organization, and location, and click on create.
And That’s it. You have created a New Project.

Step 4
Navigate to the Enabled API and services at the Left sidebar and click on Credentials
Step 5
Move on to create Credentials

Here to get your API key click on the API key. Instantly you will get your API key for your Project.

To get your OAuth Credentials
Navigate to the OAuth Client ID on the Create Credentials drop-down menu.
Step 6
Here you need to create an application. A client ID is used to identify a single app to Google’s OAuth servers. If your app runs on multiple platforms, each will need its own client ID.
Step 7
Select the appropriate application type from the drop-down
The name of the client will be auto-generated. This is only to recognize the client console and does not show to the end users.
Step 8
Enter your URL for the Authorized JavaScript origins by clicking on Add URL
Provide your Authorized redirect URLs
Finally click on Create

Step 9
You will get an OAuth Client Id and Client Secret instantly.

Epilogue
Getting Google API and OAuth credentials is an important step in developing applications that interact with Google services. It allows developers to access data from Google APIs and services in a secure and reliable way. With the correct setup, developers can create powerful applications that can be used by millions of users. In summary, getting Google API and OAuth credentials is essential for any developer wishing to build web applications that interact with Google services.
#google drive#google cloud#google#blog post#Google api#oauth#oauth tutorial#oauthsecurity#google security#web developers#software development#developers
0 notes