
Don't wanna be here? Send us removal request.
Statistics
We looked inside some of the posts by sumaiya007 and here's what we found interesting.
Average Info
Notes Per Post
1M
Likes Per Post
705K
Reblog Per Post
524K
Reply Per Post
969
Time Between Posts
2 months
Number of Posts By Type
Photo
11
Text
6
Last Seen Tumblr Blogs


Fun Fact
Tumblr was named as a finalist in Lead411’s New York City Hot 125 in Aug 2010.
Photo
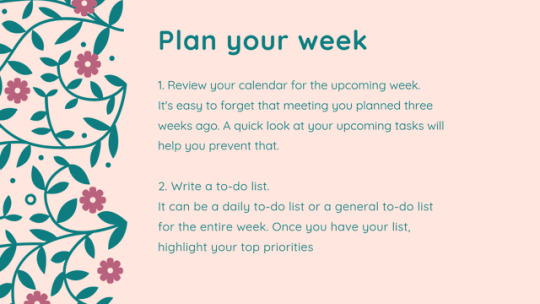
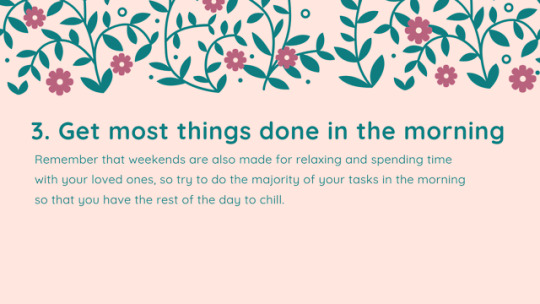
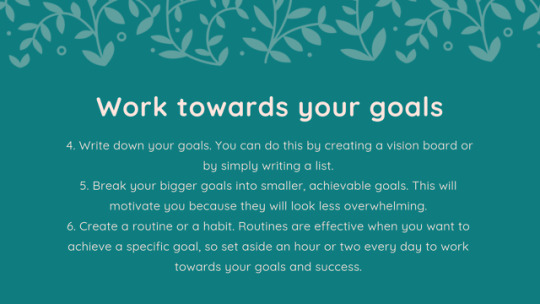

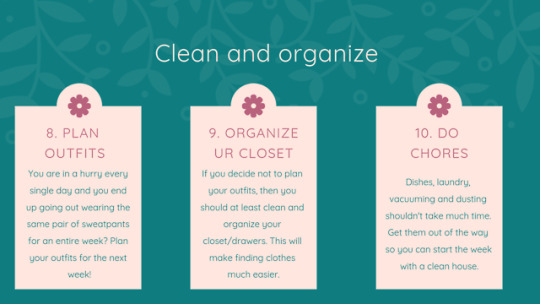
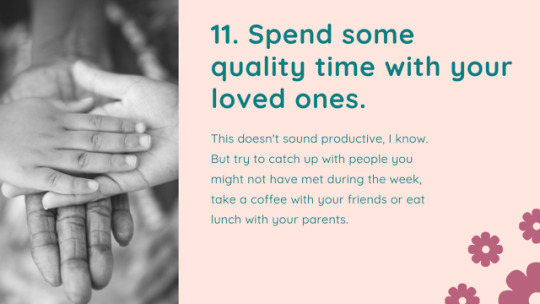
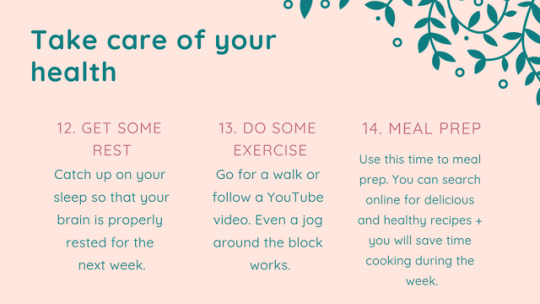
Hey guys! This is all about productive stuff you can do on Sunday to make the most out of it and have an amazing week! 🥑
Implementing some of these things in your Sunday routine, will help you not to . spend your Mondays trying to get your life together.
PS click on the pictures for better quality 🥑
6K notes
·
View notes
Text
here’s the truth about textbooks
i keep seeing posts out there saying that you need to read the textbook to succeed in class. NO. you do not need to read the textbook. at least not for many, if not most, of your classes. first of all, it’s impractical. profs can assign up to 2-3 a week, and if you’re taking around 4-5 classes, that’s a WHOLE LOT of reading. if you have time to do so, go ahead, but a lot of students don’t have that much time on their hands. so i’m suggesting that you DON’T need to read every single chapter your prof assigns. what you DO need to do is to get smarter at selecting what and when to read, as well as scanning the text effectively.
when TO read the textbook
when your profs tell you that they will not be teaching from the textbook but that the exams will cover material and/or questions from the textbook
when the material is difficult, tricky, or lengthy and you need clarification, further explanation, or examples
when you miss a class
when you HAVE TIME to prepare for lectures in advance
when you feel that you actually learn and retain information better by reading the textbook
when NOT to read the textbook
when your profs teach from the textbook pretty much line by line
when your profs tell you that they will not be assessing you based on information from the text, but from their lectures
a strong implication of this is if your profs require lecture attendance
when you feel that reading the textbook does not help you learn or retain information
when you are constantly confused by the textbook (esp when it comes to calculation-based stem classes like math or cs)
when you have absolutely no time whatsoever to read pages after pages of bad academic puns
what you can do INSTEAD of reading the textbook
look at the course syllabus/schedule to see what you will learn in lecture. have an idea of what material you’ll be covering, then do the following steps.
check the course website/resources and ask yourself: what do you have to work with? are there lecture slides? lecture notes from previous semesters? online links or readings?
if one of the above exists, read the lecture slides/notes. they are usually much less text-intensive and get straight to the point. you can zip through them pretty quickly. you will at least have a basic understanding of the material that will be introduced in class.
google terms and concepts that you don’t understand from just reading the lecture slides. again, the idea is to get you to have a basic understanding of the material and not become an expert. this will help you avoid getting lost during the lecture.
if you’re still a little confused, read selected sections from the textbook that deal with the topic you need more help with. please don’t read the entire thing.
if there are no lecture slides or external resources to help you out, scan the textbook effectively.
how to SCAN textbooks effectively
read the chapter title and section headings
read the highlighted, bolded, or italicized terms and concepts, as well as their respective definitions in the content itself, the margins, and/or the index at the back
google the terms and concepts if you’re still confused
examine any charts, graphs, or flowcharts
examples and example questions can be helpful, so pay attention to those
at the end of each chapter there should be a brief summary or main idea section. read those and do the practical problems if possible.
5K notes
·
View notes
Photo
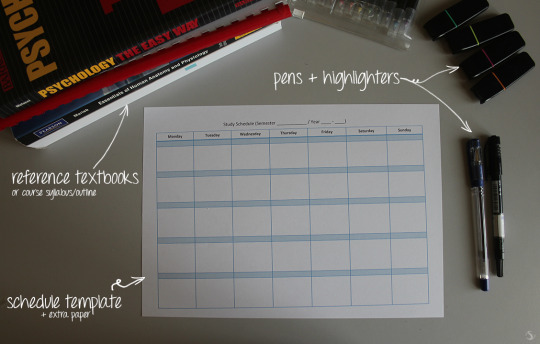
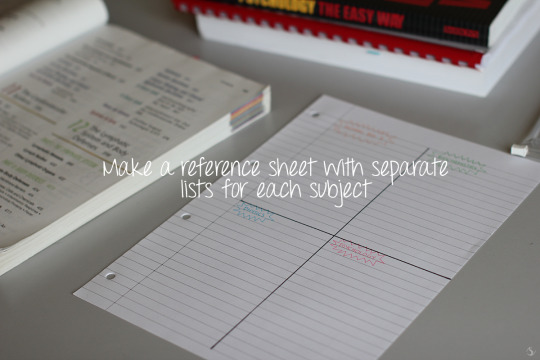
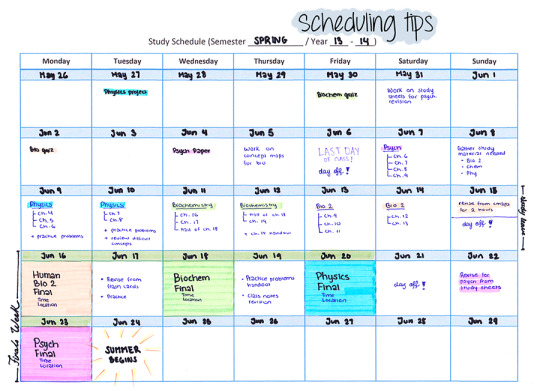
Tutorial: how to make a study schedule.
Make a reference sheet with separate lists for each subject. This reference sheet is used to orient your daily studying.
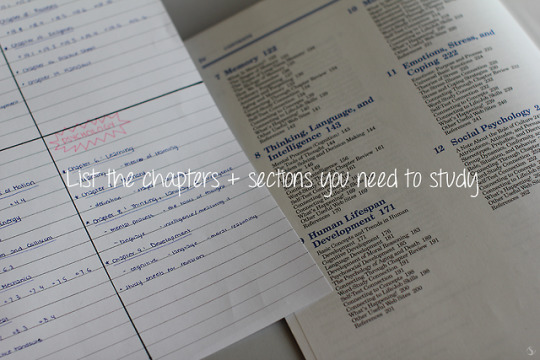
List the material you need to study for each subject. Be more specific than you would be on a study schedule and make sure you put down everything you need to go over.
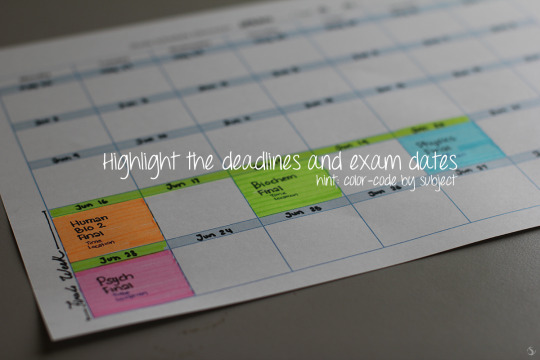
On your schedule, highlight the exam dates and deadlines and put down any relevant information. (Get the template here)
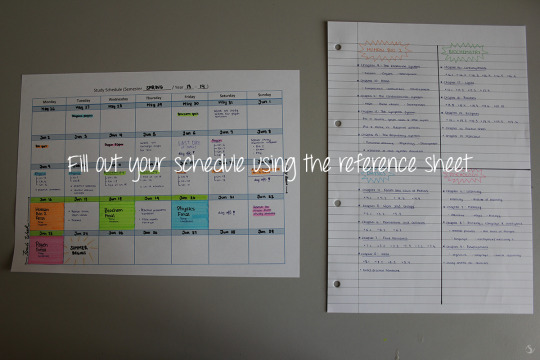
Using your reference sheet, assign certain material to go through each day.
Scheduling tips
If you haven’t been working on study material throughout the semester; schedule days before your study leave to work on study sheets for revision, flash cards, summaries, whatever you use to study.
Take a day to gather your study material before your study leave begins. Like the weekend classes end or so. This will save you a lot of time when you sit down to study every day.
Schedule your studying so that you start studying for the last final first, and the first final last. Make sure you start this early enough to give yourself time to revise for the subjects you need to.
If you have a day between each of your finals, take the night of the final off and revise for the next exam the day after. If not, take the couple of hours after your exam off then revise for the next one.
Schedule the harder/heavier material in a subject first, so that you work on that material when you have more energy.
If you’re taking subjects that you have difficulty with, or subjects with a heavy workload; schedule catch up days. However, don’t let that encourage you to slack off. Try to stick to your schedule and only rely on the catch up days if you really need to, and if you don’t; then it’s a day off!
Also, schedule days off… a day or if you can’t afford it, half a day. I can’t stress how important it is to take time for yourself, it’ll help you avoid burnout.
Disclaimer: this is the way I’ve been making study schedules since I started college. By no means am I claiming it’s perfect or that everybody should follow it.
I’m sorry I’m posting this by the end of the year when a lot of people are already done with exams, but perhaps it’ll be helpful for people taking summer courses now? And also for next year :)
79K notes
·
View notes
Text
To all my freshman babies who are panicking right now about how much your college textbooks cost: Yeah, you’re right, that’s some highway robbery. No, you don’t have to lie down and take it. You have options. Follow my advice and fly on your own debt free wings.
1. Forgoe the bookstore entirely. Sometimes you can get a good deal on something, usually a rental, but it’s usually going to be considerably more expensive to go through official channels. Outsmart them, babies.
2. Does your syllabus call for edition eight? Get edition seven. Old editions are considered worthless in the buyback trades, so they sell for dirt cheap, no matter how new they are. It’s a gamble, sure; there might be something in edition eight you desperately need, but that never happened to me. However, I’ve only ever pulled this stunt for literature/mass comm/religious studies books, so I don’t know it would work in the sciences.
3. Thriftbooks.com, especially for nonfiction and fiction. Books are usually four or five dollars unless they’re really new, and shipping is 99 cents unless you buy over 10$ in books, in which case shipping is free.
4. Bigwords.com. It will scan every textbook seller on the internet for the lowest price available, and will do the same to find the highest price when you try to sell your books back at the end of term. Timesaver, lifesaver.
5. In all probability, your library offers a service called interlibrary loan which is included in your tuition. This means if your library doesn’t carry a book you can order it for free from any library nationwide in your library’s network and it will be shipped to you in a number of days. Ask a librarian to show you how to search for materials at your library as well as though interlibrary loan; you’ll need to master this skill soon anyway. If you get lucky you can just have your required reading shipped to you a week before you need to start reading, then renew vigorously until you no longer need to item. I’m saving over 100$ on a History of Islam class this way.
You professors might side-eye you for bringing an old edition or a library copy, but you just smile right back honey, because you can pay your rent and go clubbing this month. You came here to win. So go forth and slay.
181K notes
·
View notes
Photo

a guide to bullet journals
hey guys! so i’ve been asked a couple of times what bullet journals were and how to bullet journal, so i’ve built a masterpost that’ll hopefully make things clear! (:
what’s a bullet journal anyways?
great question, friend.
so a bullet journal is a flexible, customization, all-in-one/all-for-one system! it’s where you get to combine your planner, calendar, to-do list, doodles, schedule, journal, dairy, and anything else you can think of into one!
this was originally created by Ryder Carroll, you can check out the official bullet journal website and the bullet journal video to see how bujo-ing all began.
we also affectionately call bullet journals bujos for short (like we name our ships, we’ve taken the first two letters and mashed them together!)
you basically get to mash up all your organization stuffs into one notebook/journal/dairy!
where do i start + (is there a set way i have to do things?)
to answer the last question first, absolutely not!!! there’s no set way to do things, but there’s generally basic things everyone does but other than that, the best part of having a bullet journal is the freedom to do and organize and set up any way you’d like it!
here’s where i’d begin:
start by choosing your poison (a notebook).
you can use any notebook, be it a plain notebook you picked up at targets or a fancy pants one you bought at muji or something! i’ve used both, and both are equally good to use!
but in case you were wondering, most of us use journals (either blank, lined, or dotted to allow for more freedom in setting up our bujos) that are mostly for bujos!
bujos are usually smaller (makes them portable and light), only a little bigger than your palm, but honestly, the most important part is that you like whatever notebook you’ve chosen. that’s all there is to it, honestly.
what are the notebooks i see everyone using though??
most likely the bujos you’re seeing all around are either leuchtturm or moleskine.
these are the more “official” bullet journals that are basically universally used.
next, start with the basics.
like trying to build a robot, you’ve gotta build your basic frame / layout for your bullet journal!
begin with a key or legend.
your bullet journal goes in a chronological order, like a diary. so as you work in your bujo, having a legend / key will help you organize your thoughts and help separate your tasks from dates, mark some things as important, etc.
in your legend, put symbols that’ll stand for things!
perhaps a checkbox so you can check things off as you do them? (most people put to-do lists in their bujo each day / week)
a clock to represent dates, exclamation marks for important things, etc.
you choose whatever you think will help you sort things out!
color coding (sub-point)
you can also color code your legend and bullet journal to stand for different things (green = birthdays, blue = school events, etc.)
an index
your index is your table of contents! it helps you keep track of everything you’ve got going on in case you get lost or want to check out a certain day or page that you did last month!
don’t forget to number your pages, kids.
actual spreads
there’s absolutely no set way to do things in your bullet journal, but you add everything and anything you want, basically. further below in this masterpost/guide i’ve got some different (and amazing) bullet journals and spread examples listed!!
most go with weekly spreads, some do daily spreads
but what you do on your actual spreads is
a to-do list of what you’ve got going on and what you’ve gotta to today! (on weekly spreads, people put the day of the week and a list underneath, usually)
doodles and inspiring quotes or lyrics or whatever
pretty pictures
ideas or sketches
notes from class or just a place to jot things down in
whatever you like, tbh!
the lists and stuff
sometimes, people dedicate one or two whole pages for one big big big list thing!
this deviates from the spread and is where bujo-ing is super fun, where you get a lot of freedom in how you want to set up and work with your bujo.
for example, you can have
a page for books you want to read this year, movies you’ve watched, goals for the year, habit trackers, a quote collection, etc.
all the rest
other things you can put in your bujo are
ticket stubs
calendars
photos
doodles
washi tape
habit trackers + water trackers
literally everything
ya thats about it, actually. that’s how to: bullet journal.
i know how to bullet journal now! what’s next?
you probably wanna know the things people use with their bujo, right?
washi tape
basically pretty (often paper) tape with patterns, colors, drawings, whatever
stationery
people use pencil, marker, pen, highlighters, and anything you can think of to draw or write in their bujo
any other advice, jo, you long-winded nerd?
ya definitely
don’t feel bad if you mess up or make mistakes in your bullet journal!! i do it literally all the time and it’s totally okay.
do what works for you
have lots of fun doing it!
don’t be afraid to experiment, yes!
go overboard, stay minimalistic- do whatever you like the best, basically.
finally, we’re done! that’s it, thanks for sticking with me for this long, folks!
here are the links to stuff tho (examples of bullet journals, etc.)
other masterposts and guides on bullet journalling
how to bullet journal by @study-ings
bullet journals by @hermionegoals
bullet journal masterpost by @kimching232
basics of bullet journalling by @mugglestudiesblr
guide to bullet journalling by @eruditeestudy
what the heck is a bullet journal? by @studyign
examples of bullet journal spreads / bullet journals
kou’s freaking amazing stuff (@studykouffee)
examples of my bujo lmao
maggie’s lovely uniform spreads (@studywithmaggie)
win’s bujo for the win!! (@smoinerd)
judy has the cutest coolest stuff ever?? (@focusign)
cheyenne has the most aesthetic nice stuff ever (@studyrose)
lucie’s spreads make me cry bc perfection (@journalsanctuary)
there are a ton more that i haven’t listed, but if u look at the links under ‘other mps and guides on bujoing’ there are masterposts with nothing but miles upon miles of links for your perusal)
my favorite hoomans with amazing, inspirational bullet journals
i’m probably biased but #noregrets these people are amazing and have great bullet journals
@studywithinspo
@studywithmaggie
@studypetals
@eintsein
@studybuzz
@studykouffee
@grangergrades
@emmastudies
@tomi-letters
@educatier
@studyrose
@focusign
@smoinerd
@studyquill
+ a bunch more i haven’t listed!!!
hope this helped!
love you all, joce
3K notes
·
View notes
Photo

Not all studying is made equal. There are actually two different types of learning, active and passive. This post will discuss the differences between them and explain how you can use active learning to get the most out of your study sessions.
PASSIVE LEARNING
Passive learning is when you’re merely sitting back and absorbing the information, like a sponge absorbing water. This includes:
reading a textbook
rereading/rewriting notes
highlighting
listening to a lecture
watching a documentary or demonstration
All of the above methods essentially involve just exposing yourself to the material and naïvely hoping some of it will stick. This is not effective for long-term retention or critical analysis.
Of course, quickly skimming over your notes might be helpful the morning of an exam, and it is certainly better than not studying at all. But if your tests involve writing essays, analyzing arguments, or building off of concepts to create new ones, passive studying is not recommended. Instead, you should use…
ACTIVE LEARNING
You learn best when you are forced to actively engage with the material. Active learning strategies include:
testing yourself with flashcards
answering practice problems
identifying patterns and cause/effect relationships
creating connections between topics
explaining concepts to others
formulating questions that push your learning further
revising notes (Note that this is different from rewriting, which is a passive learning technique. Turning your lecture notes into different forms, such as mind maps, sketchnotes, and summaries is an effective learning method. Copying your textbook onto lined paper and going over it with gel pens + Mildliners is not.)
discussing, debating, and challenging
These methods require you to analyze, synthesize, and evaluate information, strengthening both your memory and comprehension. That sounds a little intimidating, but active learning is easier to implement than it sounds. For example, my favorite way to study for history is to pretend I’m the teacher and explain a topic out loud to my invisible “students”. Flashcards and writing unique sentences is great for foreign languages. For math, I’ll always try to prove every formula or theorem I use instead of merely memorizing it. If you’re not used to using active learning methods, the extra effort may present a challenge at first, but I promise it’ll lead to improved understanding and better grades in the end!
THE LEARNING TRIANGLE
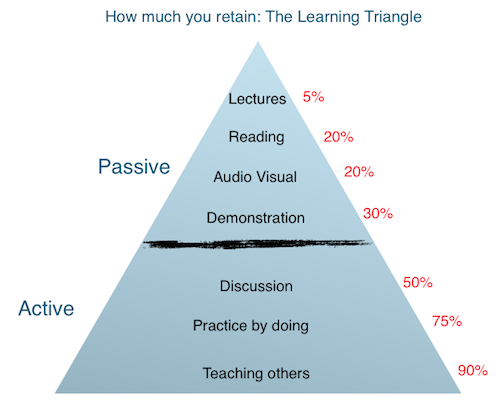
(image credit)
The learning triangle ranks learning techniques based on how much information we retain afterwords. I’m not sure I agree with all the exact percentages, but it’s safe to say that the general order and concept is correct. If you want to improve the effectiveness of your study sessions, try to use learning methods near the bottom of the triangle, as well as all the active learning strategies I mentioned earlier. Personally, I created a list of my favorite active learning strategies to hang up above my desk as a constant reminder to be an active studier.
And there you have it! Active learning will help you improve recall and comprehension in a very short amount of time. It’s one of the best ways to study smarter, not harder. Next time you sit down to study, go give those active learning methods a try!
Thanks for reading! If you have questions, feedback, or post requests, feel free to drop me an ask.
+Click here for the rest of my original reference posts!
—Sophia :)
5K notes
·
View notes
Photo

Properly managing your time is a skill that every successful student needs. In today’s post, I’ll be sharing ten of my most effective time management strategies. Let’s go!
1. DEVELOP THE RIGHT MINDSET
First things first, get rid of the “I just don’t have enough time” mindset. Managing your time starts with taking responsibility for conquering the challenges in your life instead of giving up and resigning yourself to accept less-than-ideal amounts of sleep and/or study. In the following activity, I’ll show you that there is absolutely a way to fit rigorous studying into a balanced schedule.
There are 168 hours in a week. Let’s see how that time might be spent:
40 hours at school (8 hours x 5 days) (**Post-high school students will likely only spend 12-18 hours in lectures every week!)
56 hours sleeping (8 hours x 7 days)
14 hours eating, bathing, etc (2 hours x 7 days)
21 hours socializing, extracurricular activities, etc (3 hours x 7 days)
5 hours commuting (30 minutes each way x 5 days) (**See Tip #10 to learn how you can make this time productive!)
3 hours exercising (30 minutes x 6 days)
Add all that time together and you get a maximum of 139 hours spent on all of the essential components of a healthy, balanced life– regular exercise, a full 8 hours of sleep per night, plenty of time for socialization and hobbies, and so on.
But that still leaves 29 hours of your week remaining, which is the equivalent of a part-time job! Nearly thirty hours a week is more than enough time to finish your homework and studying, guaranteed.
So recognize that there are indeed enough hours in the day to get everything done while maintaining your sanity! Developing this mindset will empower you to take control of the way you spend those remaining 29 hours. Make sure to check in with yourself often. Be mindful of how you’re spending your time, and regularly reevaluate to see if you’re on track to hit your goals.
2. PLAN THE NIGHT BEFORE
Each day, invest a few minutes in planning to save yourself hours in execution. While you don’t necessarily have to do this at night, I find that planning the next day right before I go to bed helps me to clear my mind, sleep better, and wake up with a purpose so I can hit the ground running in the morning. Pack your bag, set out tomorrow’s outfit and/or gym clothes, and make a few preparations for breakfast. Then, take a moment to assess the day you’ve just had. What went well? Where could you have made better use of your time? Were there any tasks you didn’t get to that have to be finished tomorrow? Using your mental reflection along with the rest of the tips in this post, create a schedule or a to-do list for the next day.
3. PRIORITIZE
Once you’ve made a list of everything you need/want to get done, sort them by priority to help you direct your focus towards the right tasks. For students with academic obligations, there are three main ways to prioritize tasks:
Urgency: Check the due dates for your assignments and prioritize those that are due the soonest. Study for tomorrow’s test before you practice for next week’s presentation.
Significance: Prioritize assignments that make up a higher percentage of your class grade. If your English homework is worth 5% of your grade but the essay is worth 50%, place a higher priority on the essay.
Potential consequences: Let’s say, for example, that you will most likely end up with a B in science– you have an 83% in the class, your test scores have been Bs throughout the year, and it’s unlikely you’ll score high enough on the final exam to end up with an A average. But maybe in history class, you’re hovering at the edge between a B and an A, and if you study hard for the final exam, chances are good that you can knock your class grade up to an A. In this case, any amount of effort spent on the science final will probably result in a B grade, whereas studying for the history final could put you up an entire letter grade. Therefore you should prioritize studying for your history final over studying for your science final.
4. GO STEADY
While you should knock out your prioritized tasks as soon as possible, also try to work on something that is important, but not urgent, every day. Start on an essay that’s not due for another month. Review your flashcards daily so you’re not scrambling to cram the night before the test. This also applies to activities outside of school; I, for example, make an effort to write a bit of a blog post daily in addition to completing my homework assignments.
Making steady progress on long-term projects will prevent you from getting stuck always rushing to finish urgent tasks (“putting out fires”).
5. BREAK IT UP
When writing your to-do list or creating a schedule (more on that later), break up your assignments and projects into small, actionable steps to make them more manageable. Avoid vague words such as study, work on, or practice when creating the actionable steps. Otherwise, you’ll drift aimlessly through your work with no clear guidelines as to what exactly you need to do or when to stop. Here are some examples of how you might break up your assignments:
study for trig test –> watch lecture on module 4.7, complete review problems 15-35, drill unit circle flashcards 2 times through
work on history research –> find 3 primary sources from library archives, annotate article 1, annotate article 2, annotate article 3, brainstorm possible thesis statements
practice French –> complete demonstratives lesson on Duolingo, drill Anki deck 3 times, write 10 orignal sentences using new vocab
6. EAT THAT FROG
This tip comes from author Brian Tracy, who was inspired by the following Mark Twain quote:
If it’s your job to eat a frog, it’s best to do it first thing in the morning. And if it’s your job to eat two frogs, it’s best to eat the biggest one first.
This means that you should work on your most dreaded task first, when your energy and motivation levels are highest. Your frog doesn’t necessarily have to be the hardest task, just the one you’re looking forward to the least.
Don’t sit there looking at the frog and cringing. Just eat it. Take action. If you can get the most horrible assignment out of the way first thing in the morning, the rest of your to-do list is downhill from there!
7. USE ENERGY-BASED TASK MANAGEMENT
On a similar note, it’s a good idea to plan your entire day around your energy levels, not just the frog. I call this technique energy-based task management, and it can be summarized in three simple steps:
Determine which time(s) of day you have the most energy. Are you a morning bird? A night owl? Do you hit a slump after lunch?
During your high-energy times, work on the difficult, thought-intensive tasks such as brainstorming, writing, annotating, and active studying.
During your low-energy times, take care of the menial things that have to get done but don’t require a lot of energy, attention, or skill. This includes tasks such as creating flashcards, cleaning the house, exercising, and running errands.
Energy-based task management helps you make the most out of your energy potential instead of wasting your peak productivity times on easy, mindless tasks.
Click here to read my full post on energy-based task management!
8. BOX YOUR TIME
If you’re someone who needs a bit more structure than a simple to-do list can provide, timeboxing may be exactly what you need! Timeboxing is simply allotting tasks to certain periods of time. I’d recommend using a digital task manager to do this (Plan is my tool of choice), but you can also use a table or spiraldex.
Here are some guidelines for using timeboxing to schedule your day:
Schedule your fixed times first. These are all of the events you’ve already committed to, such as appointments and rehearsals. It also includes the absolute essentials such as times for sleeping, eating, and taking breaks.
Use your priorities (Tip #3), frog (Tip #6), important-but-not-urgent task (Tip #4), and general planner/calendar to create a rough list of things you need/want to get done the next day.
Estimate how much time each task will take you. When starting out, you are likely to actually need more time for tasks than you estimated, so add some wiggle room to prevent throwing off your entire schedule. As your estimates become more accurate, try scheduling slightly less time than you think you need in order to challenge yourself to get things done more quickly.
Use energy-based task management (Tip #7) to place high- and low- energy tasks in their respective places on your schedule.
Batch tasks whenever possible. Group similar items together so you’re not constantly switching between unrelated things.
Schedule your downtime. Putting fun activities on your schedule will motivate you to stick with the plan and get your work done faster.
Timeboxing is such a big topic that I’ll most likely make an entirely separate post about how I timebox, so stay tuned for that!
9. LEARN TO SAY NO
However tempting it may be, don’t take on every opportunity that arises. Don’t let others pressure you into signing up to take all the hardest classes and joining a gazillion extracurriculars. Turn down parties and social obligations with people who are negative, draining, or simply incompatible with you. Reject activities that don’t bring you real happiness, such as TV, social media, or games on your phone. Watching your favorite show is a great way to unwind, but consider if your time spent scrolling half-heartedly through Instagram could be better spent hanging out with friends.
Know when to stop working. Particularly when it comes to organizing and other mindless tasks. Your supplies are never going to be 100% neat and your notes won’t be perfectly pretty. Let go of perfectionism. In my experience, the amount of studying required increases exponentially as your goal grade rises. While I always believe in working hard, the blunt truth is that at a certain point, straining yourself to get a certain score makes no difference. So don’t spend 10 hours studying to get a 100% if you can spend 5 hours to get a 95%. And learn to settle for “good enough.”
10. FILL THE GAPS
Look for little gaps of time throughout the day during which you can work on tiny tasks.
Take advantage of:
downtime at the end of class
breaks between classes
waiting in line/in a waiting room
workouts on a treadmill, elliptical, stationary bike, or similar
commute time (if you’re driving, please be careful to focus on the road!)
The above are great times to:
start doing homework
drill flashcards
brainstorm new goals or ideas
listen to recorded lectures
listen to an audiobook or podcast
check/edit a completed assignment
update your planner
mentally rehearse a presentation
read a bit of an easy text
You can also put some homework in a clipboard and carry it around, filling out a bit whenever you get the chance.
A few minutes here and there may not seem like much. But even doing a couple homework problems at the end of class will make it easier to finish the rest when you get home, since you’ve already started. Plus, since the time quickly adds up but seems short and spread out, you can get a lot of work done without feeling like you’ve done any.
That’s all for today! I’ve got lots more advice to share, but hopefully these ten tips will send you on your way to becoming a time-management ninja!
Thanks for reading! If you have questions, feedback, or post requests, feel free to drop me an ask.
+Click here for the rest of my original reference posts!
—Sophia :)
5K notes
·
View notes

Photo

we’ve all been in this situation for different reasons, anxiety, procrastination, work, way too many assignments in a week. but fear not my friends, hopefully, this masterpost will help you get A’s and organize your study schedule.
also please only do this every time you need to study for a test, cramming is not good for learning and pulling all-nighters frequently isn’t healthy.
study tips
cramming
how to cram for a big test by @studyign how to cram efficiently by @study-studymore-studyhard test and cramming tips how to cram the night before a test and pass 10 ways to cram successfully
all-nighters (the last resort)
how to pull an all-nighter and pass your exam all-nighter survival tips by @rookiemag how to pull and effective all-nighter stay all night without feeling sleepy: pt1 / pt2 expert-approved guide to pulling an all-nighter pull the most efficient all-nighter how to pull an all-nighter how to pull and all-nighter : from the special forces do’s and don’ts of pulling an all-nighter
really do them if it’s absolutely necessary:
is it bad for you to pull and all-nighter why you should never pull and all-nighter
the night before the exam
study the night before by @renaissence study the day before by @getstudyblr night owl study tips by @lawjournalsandwine the night before the exam by @studyspoinspo how to study the night before a test the night before the exam tips top tips for the night before and the morning of the exam how to pass an exam if you forgot to study the night before study the day before the exam 10 things you should do the night before a test 7 mistakes you make on the night before an exam you’ll never make again
i have less than a week to study
five day study plan by @brandi-studies how to study for an upcoming exam by @noteblr how to remember everything for a test in 3 days by @getstudyblr when you have a test really soon study well in short time study for exams in limited time ace an exam that’s around the corner
tips
25 study tips by @studyign how to study more efficiently fastest way to memorize by @studyign common study mistakes by @studyign tips on study last minute by @milkystudies how to get things done by @lattenotlate study smart not hard 10 tips to study smart and save time useful tips to study in short time how to study for an exam effectively prepare for a exam in a really short time study for an approaching exam the secrets to study effectively in short time nice time management advice how to study in groups how to stay focused by @elkstudies finals week masterpost 22 science based tips to study for an exam 20 study hacks to imporve your memory
exam tips
tips for during the exam
15 tips to boost your exam performance
how to answer exam questions
7 last-minute exam tips
28 top tips for exams and tests
top 10 tips for taking exams
last minute revision tips
exam prep
how to mentally prepare for a test by @eruditicn
anti procrastination masterpost by @elkstudies
beat anxiety and stress in 1 hour and start studying!
how to stop procrastination
deal with exam anxiety by @attackonstudying
scientifically the best ways to prepare for an exam
motivation
how to get motivated
my motivation tag
more masterposts
app masterpost
DIY masterpost
food masterpost
how to: group work
printable masterpost
language masterpost
music masterpost
my study methods masterpost
36K notes
·
View notes
Photo

this is a masterpost dedicated to those who want to organize themselves but are too lazy to start aka me everyday
01. organizing your schoolwork
there are so many ways to organize your papers nowadays, so it’s pretty important to find what works best for you
I personally use binders and sheet protectors for my handouts that I get at school
pros: binders keep your papers secure, you can use dividers for further organization
cons: that loud noise from opening the binder rings, can be heavy, the binder rings can mess up your papers, the plastic pockets on the inside of the binder often tears
as mentioned, to combat the tearing of papers, I use sheet protectors
if you’re not a fan of binders, a nice alternative is expandable file folders
see this video by @studyign/sareena for some more info!
pros: not as heavy as a binder, there is some organization already with the extra pockets
cons: depending on the brand, might be flimsy, the plastic pockets can tear
I currently use one of these to store all of my homework, and so far it’s worked out for me quite nicely! I would definitely recommend them
if you don’t get that many papers in class but still want to hold onto them, folders are always a nice choice
pros: are lightweight, capable of holding a lot of papers
cons: can tear, papers can fall out (unless you have the kind w/ brads)
I use both folders and binders bc sometimes I’m too lazy to open the rings of the binder oops
also, if you want to store more, it can help if you buy the folders that contain brads
psa: if you don’t keep binder clips or paper clips with you, then you should bc they’re extremely useful and will make your life easier when you’re sorting out papers
for more tips, see this masterpost by @tbhstudying/seo!
02. organizing your supplies
some of you might have a lot of stationery and pens lying around
for those that don’t, it’s totally fine and you might have it better off bc you don’t have to keep track of that many things ahahaha
it’s always nice to have a pen case or pouch to hold your supplies, it can really help you keep your supplies together
if you’re willing to make the investment, try the kipling 100 pens pencil case
here is a cheaper alternative
this website is also really nice, their products are super cute and they have a large variety of pen cases to choose from
when you’re organizing your supplies, it’s important to know what you need the most on a daily basis - it’s not helping you if you keep a complete set of staedtler triplus fineliners in your pen case when in reality you only use two colors every day
ask yourself: what do I need? will it be okay if I leave it behind?
if you choose to leave some supplies at home, be sure that you have a place to leave them hehe
03. organizing your desk space
okay so if you’re like me, you probably have a lot of papers and things that stay on your desk, such as stationery, extra paper, textbooks, etc.
to organize some of your pens/pencils, I recommend using a jar or cup of some sort to keep on your desk so that it’s within reach
for those extra packs of lined/graphed paper you might have, you can store it on your desk in a magazine file or in your drawer
going back to the magazine file: 11/10 would recommend
for me, I have a small desk, so I can’t afford to have everything being piled on my desk - the magazine files are really nice for organizing
be sure that when you’re working, you only have the things you need on your desk! anything that isn’t needed should be stored as neatly as possible
you can find different desk organizers and containers in places like target and amazon!
I hope this was helpful to you guys! I personally still struggle with organization, but over the course of my 2015-16 school year, I’m starting to find ways to keep my things and my life together. if you have any questions, feel free to drop an ask in my inbox ^-^
- soko ◟(๑•͈ᴗ•͈)◞
7K notes
·
View notes
Photo

We’ve all had to slog through pages and pages of long, boring textbooks, so I’ve compiled some tips to help make your readings more efficient and effective!
CREATE A PLAN
Break your reading into chunks. Divide the number of pages to read over the number of days you’ve been given to read it. Evaluate the difficulty of the text and your own level of concentration to make sure these chunks are manageable. For example, if your text is light and/or your focus is strong, you may want to read in 4 chunks of 15 pages. But if your text is harder and/or your focus is weaker, you may want to read in 6 chunks of 10 pages.
Schedule your reading time. Determine the exact days in the week (or even the exact hours during the day) you’re going to read, so you’re not tempted to push everything off until the last minute. When scheduling, make a reasonable estimate of how long the reading will take, leave a little wiggle room, and account for taking breaks as well. Additionally, keep in mind restrictions on your schedule, such as sports practices or social gatherings, that may prevent you from reading on certain days. Put the chunks of reading into your planner or timetable under the day or times you’re going to complete them.
GET A BIG PICTURE
If you just flip to the first page of your reading and start taking notes, you’ll have no idea what’s important or what you should be looking for. In order to identify which parts are significant enough to write down, you need to get a big picture of the entire topic. You can get that “thirty-thousand foot view” before reading by doing the following:
skim through headings, pictures, and diagrams
if your textbook has them, read the summaries, practice questions, key words, and/or learning objectives at the end of the chapter
read a brief summary online or watch a video about your topic (Crash Course is great for this!)
Those resources will help you figure out the main points the textbook author wants to get across and your teacher wants you to learn, which will allow you to speed up your note-taking process by not taking notes on unimportant things.
READ SELECTIVELY
Not all information in a textbook should be treated equally. For maximum reading efficiency, adjust your reading rate depending on the importance of the material. Introductions and filler information might be quickly skimmed, or even skipped, while you should take your time reading and processing difficult/complicated explanations.
You should also adjust your reading rate depending on the relevance of the material, which I explain in further depth here.
Disclaimer: This tip may not work for you if your textbook is concise and doesn’t contain much, if any, filler text. As a high school student, the vast majority of my textbooks are very to-the-point, so I mostly only use this trick for a few supplemental readings. However, I’ve heard that college textbooks tend to be more rambling, so I figured this advice was still worth mentioning!
PEN>HIGHLIGHTER
In my annotating literature post, I recommended using highlighting, underlining, and marking up the text as active reading strategies. However, the same advice does not apply to textbooks. Marking quotes and passages to analyze later is helpful, but for information that you have to memorize and synthesize, studies have shown that highlighting and underlining are among the least effective study strategies.
Taking notes is a much better way to ingrain what you’re reading. Note-taking requires active engagement with the text, so you’ll understand more deeply and memorize it for longer. I also find that the act of summarizing and writing things down helps keep me awake while reading long and boring texts. Use these guidelines when taking notes:
Don’t pause to take notes after every sentence. Read a paragraph or section first before taking notes on the whole thing, to get a bigger picture.
Write everything in your own words as much as possible. This is especially helpful when you have to write an essay or paper, since you can refer directly to your notes without fear of plagiarizing the textbook.
Write in bullet points and fragments instead of full sentences. I also encourage turning information into timelines, cause/effect diagrams, and pro/con tables.
Simplify the language so that a 10-year-old kid could understand it.
Use personal connections, metaphors, and analogies that help you understand topics. These don’t have to make sense to anyone else.
Ideally, your notes should allow you to test yourself for comprehension later on. A popular way to do this is by using the Cornell notes method. I also like to use the headings in my textbook to formulate questions as I go along. For example, if I’m reading and I come to a section with the title “Causes of the Civil War”, I’ll get a sheet of paper (separate from my regular textbook notes) and write “What were the causes of the Civil War?” Later when I’m studying for my test, I can simply go down the list of questions on that paper and answer them to myself, thus making sure that I know all the most important points from the textbook. If I get stuck on any of the questions, I can refer to my regular textbook notes or the book itself.
If you’re reading the textbook to prepare for a lecture on the same topic, I recommend leaving lots of space in your textbook notes to fill in during your lecture. You could either write on every other page (textbook notes on left, lecture notes on right) or skip several lines between each section. That way you don’t have to start your notes from scratch during the lecture– the bulk of the information is already there from the textbook and you just have to add in a few extra details from your professor in class.
(P.S.: Once the school year starts and I begin to take my own textbook and lecture notes, I’ll post pictures of my own notes and explain my personal system in more detail, so stay tuned for that!)
EXTRA TIPS
If you’re struggling to focus while reading, try reading the book out loud. This is admittedly more time-consuming, but it will keep you engaged and, if you’re an auditory learner, it might help you understand better.
If your readings are extremely long, stick in some Post-its or page flags with the main ideas of the sections/pages written on them as you read to allow you to quickly find what you’re looking for if you need to refer to the book again.
While reading, note any questions or areas of confusion that need to be clarified either through online research or asking your teacher.
I already told you to use the vocabulary lists and/or the practice questions at the end of the chapters to get a big picture before reading, but remember to go back to these after reading to assess your understanding.
If all else fails, try the gummy-bear-in-a-textbook-method!
Thanks for reading! If you have questions, feedback, or post requests, feel free to drop me an ask.
+Click here for the rest of my original reference posts!
—Sophia :)
3K notes
·
View notes
Photo

Learning a foreign language is intimidating to many students, so I though I’d share some of my best tips for effective language studying!
MEMORIZE SMARTLY
Be selective about vocabulary. If you’re learning a language for class, you most likely won’t have much control over the material you learn. However, if you’re self-studying and you do have a choice, invest your time and energy wisely by prioritizing vocabulary to memorize based on what is significant and relevant.
Significant words are the ones that are the most common in the language. Learning these core words and phrases will give you a bigger return by allowing you to sooner start comprehending more things. For example, studies show that 0.5% of the English language, or the 3000 most common words, makes up 95% of the content in any given conversation or written text (source). You can search online to find lists of the words that appear most frequently in your target language. I used this list of the top 1000 French words to get me started.
Relevant words are the ones that pertain to your unique needs and interests, such as vocabulary to describe yourself, your career, and/or your family members. If you’re traveling to another country, you may need phrases for introducing yourself, asking for directions, or buying things. If you’re a gourmand, you may want to learn the names of different types of food. You’ll be more likely to retain and use words that are interesting and relevant to your own life.
Use spaced repetition to memorize faster. I explain how to use the spaced repetition method in this post, although you can also achieve the same effect without using Anki.
Apply the vocabulary you’ve learned. You can engage with new vocabulary by doing the following:
Make it a goal to incorporate the word you’ve just learned into your next three conversations.
Learn phrases and idiomatic expressions that include the new word (ex: if you’ve just learned the English word green, learn green thumb and green with envy next).
Research the context the word is usually used in– is it formal? casual? vulgar? specific to one particular use or topic?
Write funny, creative sentences or stories using your new word(s) to help them better stick in your memory. This is especially important for verbs, so you can see the conjugations in action instead of merely memorizing a table of endings.
Don’t neglect memorizing correct spelling, accent marks, or the genders of new words. These often seem like trivial details to beginning language learners, but slacking off on these will come back to bite you down the road. Even small mistakes can change the entire meaning of what you want to say. Genders, especially, are hard to memorize but imperative to know for making adjectives and object pronouns agree.
AVOID TRANSLATING
Most language learners will hear/read something being spoken/written in their target language, mentally translate it to their native language and formulate a response in their native language, then translate their response back to their target language. This direct translation will slow down your rate of comprehension and expression, make you unable to speak naturally and fluently, and increase your chances of making mistakes with idiomatic expressions (ex: incorrectly writing Je suis 12 ans instead of J’ai 12 ans). Aim to avoid internally translating as much as possible.
Instead, learn to think in your target language by using the following methods:
Connect new vocabulary and phrases with images and ideas, not translations or definitions in your native language.
Draw doodles that represent new vocab words you receive. This doesn’t work for all words, but I try to draw a picture for all the words on my weekly French vocabulary list, and I’ve found it very helpful.
When making flashcards, put the new word on one side and an image to represent it (as opposed to the translation in your native language) on the other.
Look around you and describe items you see in your target language (color, size, use, etc.)
If you’re reading and you come across a word you don’t know, attempt to ascertain its meaning through context clues instead of immediately looking it up.
Once you’ve reached an intermediate/advanced level, use a monolingual dictionary so definitions for all new vocabulary will be in your target language instead of your native one.
However, don’t feel discouraged if you find yourself frequently translating in your head. The way most schools teach foreign languages focuses on translating, not thinking in the target language, so you’ll likely have some tendencies and habits that are hard to break. Practice, practice, practice, and you’ll get better!
IMMERSE YOURSELF
Obviously, the fastest way to learn a new language is to travel to a foreign country where you’ll be forced to use it. But if you don’t have the resources to take a trip, there are many ways to get the immersion effect from the comfort of your own home.
Consume a variety of written and spoken language though television, movies, music, news, blogs, poetry, comics, podcasts, audiobooks, YouTube videos, and/or children’s books.
If you’ve already completed your Duolingo course, try doing it backwards. Instead of the native language to target language course, do the target language to native language course. If you know 3+ languages, do the Language 2 to Language 3 course for an extra challenge!
Speaking of Duolingo, the immersion feature is a great way to find articles in your target language that are both appropriate to your skill level and relevant to your interests. I tend to avoid the translation aspect for reasons stated in the previous section, but I still think reading the articles is useful.
Find a pen pal who’s a native speaker. You can communicate through email or online chat, but snail mail could allow you to also send each other trinkets and souvenirs from your respective countries/cultures. HelloTalk is a great app that allows you to connect with native speakers of your target language who are learning your native language, so you can teach and help each other.
Change the language on your phone, laptop, and/or browser to your target language. You can change the language in your device settings, and I personally use the extension Language Immersion for Chrome for my browser. Just make sure you know how to change it back!
Lastly, have confidence and take risks! Make an attempt to say something even if you’re not 100% sure it’s correct. I know how embarrassing mistakes can be (I once used “un baiser” as a verb and I still cringe thinking about it. Yikes!), but ultimately it’s all part of the learning process and leaving your comfort zone is the only way to improve. Trying to learn other languages is admirable in itself, so take pride in that and don’t be afraid to put yourself out there!
Thanks for reading! If you have questions, feedback, or post requests, feel free to drop me an ask.
+Click here for the rest of my original reference posts!
—Sophia :)
2K notes
·
View notes
Text
Words to replace said, except this actually helps
I got pretty fed up with looking for words to replace said because they weren’t sorted in a way I could easily use/find them for the right time. So I did some myself.
IN RESPONSE TO Acknowledged Answered Protested
INPUT/JOIN CONVERSATION/ASK Added Implored Inquired Insisted Proposed Queried Questioned Recommended Testified
GUILTY/RELUCTANCE/SORRY Admitted Apologized Conceded Confessed Professed
FOR SOMEONE ELSE Advised Criticized Suggested
JUST CHECKING Affirmed Agreed Alleged Confirmed
LOUD Announced Chanted Crowed
LEWD/CUTE/SECRET SPY FEEL Appealed Disclosed Moaned
ANGRY FUCK OFF MATE WANNA FIGHT Argued Barked Challenged Cursed Fumed Growled Hissed Roared Swore
SMARTASS Articulated Asserted Assured Avowed Claimed Commanded Cross-examined Demanded Digressed Directed Foretold Instructed Interrupted Predicted Proclaimed Quoted Theorized
ASSHOLE Bellowed Boasted Bragged
NERVOUS TRAINWRECK Babbled Bawled Mumbled Sputtered Stammered Stuttered
SUAVE MOTHERFUCKER Bargained Divulged Disclosed Exhorted
FIRST OFF Began
LASTLY Concluded Concurred
WEAK PUSY Begged Blurted Complained Cried Faltered Fretted
HAPPY/LOL Cajoled Exclaimed Gushed Jested Joked Laughed
WEIRDLY HAPPY/EXCITED Extolled Jabbered Raved
BRUH, CHILL Cautioned Warned
ACTUALLY, YOU’RE WRONG Chided Contended Corrected Countered Debated Elaborated Objected Ranted Retorted
CHILL SAVAGE Commented Continued Observed Surmised
LISTEN BUDDY Enunciated Explained Elaborated Hinted Implied Lectured Reiterated Recited Reminded Stressed
BRUH I NEED U AND U NEED ME Confided Offered Urged
FINE Consented Decided
TOO EMO FULL OF EMOTIONS Croaked Lamented Pledged Sobbed Sympathized Wailed Whimpered
JUST SAYING Declared Decreed Mentioned Noted Pointed out Postulated Speculated Stated Told Vouched
WASN’T ME Denied Lied
EVIL SMARTASS Dictated Equivocated Ordered Reprimanded Threatened
BORED Droned Sighed
SHHHH IT’S QUIET TIME Echoed Mumbled Murmured Muttered Uttered Whispered
DRAMA QUEEN Exaggerated Panted Pleaded Prayed Preached
OH SHIT Gasped Marveled Screamed Screeched Shouted Shrieked Yelped Yelled
ANNOYED Grumbled Grunted Jeered Quipped Scolded Snapped Snarled Sneered
ANNOYING Nagged
I DON’T REALLY CARE BUT WHATEVER Guessed Ventured
I’M DRUNK OR JUST BEING WEIRDLY EXPRESSIVE FOR A POINT/SARCASM Hooted Howled Yowled
I WONDER Pondered Voiced Wondered
OH, YEAH, WHOOPS Recalled Recited Remembered
SURPRISE BITCH Revealed
IT SEEMS FAKE BUT OKAY/HA ACTUALLY FUNNY BUT I DON’T WANT TO LAUGH OUT LOUD Scoffed Snickered Snorted
BITCHY Tattled Taunted Teased
797K notes
·
View notes
Text
How to study when you are tired
Get up: make the firm decision that you are going to study and move towards you desk.
Get tea: or coffee. The preference of beverage is up to you. You just need to believe that it will help, even if its only for a little bit.
Set goals: if you are very exhausted setting mini goals like studying for an hour will be much more motivating.
Get going: once you hit your stride, you will start to feel less exhausted. The key is too push through and put tiredness at the back of your head.
15K notes
·
View notes
Photo

Here are some general tips I’ve summarized from my experience this year in dealing with a bunch of demanding classes!
Plan. Everything.
This tip is especially for my fellow procrastinators as I’ve never been able to focus completely on a huge task. Do yourself a favor and divide a daunting project into smaller portions and predict how long it will take you to complete the task (it doesn’t matter if its inaccurate). Now since you know how long each sub-task will take, you can use With this method, you’ll find yourself utilizing time much more efficiently as you’ll finish a huge task bit by bit each day.
(Personal Favorites Marked with 🌟 )
Time Management Methods, Websites, and Apps:
🌟 Schooltraq (future post coming up about this website/app!)
Bullet Journaling (masterpost by @studyign)
🌟 Momentum (a chrome extension)
Habitica (Previously HabitRPG)
MyStudyLife (there’s an app for both android and ios!!!)
myHomework (there’s an app for both android and ios!!!)
Notetaking and Studying
To be rather blunt, the majority of studyblr is focused around pretty notes that have been revised many times and most pictures of notes with a lot of notes on here have a lot of notes primarily because they are aesthetically pleasing. I’m all for pretty notes but remember that the universal goal of studyblrs is to succeed and if you have a lot of work to do, you don’t have time to color-code and rewrite everything to look neat. Even if you don’t take too long to make your notes look nice remember that every second counts!
Methods:
Taking Notes in Class/Lecture Notes by @studyquirk
Efficient Notes in Class by @hexaneandheels
Making Revision Notes by @raistudy
How to Make Study Guides by @studybudyblr
How to Revise by @youaretheairinmyalveoli
Stress Relief
Remember it isn’t always about studying! Taking a break will help you do better as well so don’t be afraid to do something fun in fear of not getting your work done!
Calming Music and Websites:
Rain Sounds
Nature Sounds Mixer
🌟 Coffee Shop Sounds (Coffitivity)
🌟 The Quiet Place
I hope this was helpful!!! also pls ignore my overuse of exclamation marks
7K notes
·
View notes
Text

Bullet Journals are a diy planning system which can be a to-do list, sketchbook, notebook, and diary. They are exteremely versatile and customisable! There’s so much examples online I’ve condensed some helpful resources into one masterpost!
Stationery
*These are only recommendations, you don’t need any of these for a bullet journal but they’re just an example of some of the stuff I use in mine!*
Notebooks
Moleskine
Leuchtturm 1917
Muji
There are many other brands but these are the most popular in the studyblr community! Also they offer dot grid, lined and square grid paper.
Pens
Uni Pin Pen Set
Staedtler Triplus Fineliner
Muji Gel Ink Pens
Zebra Brush Pen
Makers/Highlighters
Zebra Mildliners
Staedtler Triplus Colours
Miscellaneous
a ruler
glue
washi tape
colourful card
sticky notes
Page Ideas
word of the year/month
year at a glance
tv shows/movies/animes to watch
books to read
reading log
tv show season tracker
college applications
packing list
blog post ideas/youtube ideas
doodles page
pen test page
bucket list
handwriting practice
quotes of the day/month
pictures from the week/month
favourite memories log
gratitude log
grade tracker
music playlist ideas
a favourites page
food log
monthly tracker
yearly/monthly/weekly goals
things to do when you’re happy/sad
recipes
birthdays
favourite words in other languages
study/school timetable
outfits of the day
dream journal
washi/sticker swatch
online order tracker
budget/savings page
importand email addresses/phone numbers
passwords page
Fonts
Fake Cursive
Title Ideas
Easy Fonts
Whimsical Font
Hand Lettering Introduction
Fake Calligraphy
Doodle Ideas
therevisionguide
doodle ideas
border ideas
cute doodles
oodles of doodles
Inspiration
my bullet journal
Boho Berry
Tiny Ray of Sunshine
Bujo Battles by @studyign
Bullet Journal Show and Tell
The Art of Simple
Bullet Journal Flipthrough
Bullet Journal Set Up
Bullet Journal Evolution
Bullet Journal 101
Bullet Journal Hacks
I hope this was useful! If you’d like to see any other specific materposts, feel free to message me!
Check out my other posts here!
Make sure to follow my instagram: elkstudies and snapchat: elkstudies!
16K notes
·
View notes
Text
How I Learn Languages
As an aspiring polyglot, it’s important that I have a bunch of resources at my disposal for language learning. I use a variety of resources for my learning, such as books, websites, apps, T.V. shows, movies, etc. Almost all of these resources are free too! These are some of my resources!
-Websites-
1. Omniglot
This website is more for finding information about languages and finding languages to learn. It has a very comprehensive list of languages and you can find plenty of secondary resources for learning the language. You can find tutors for that language, and even songs in your target language. I can just about guarantee you that no matter what language you’re looking for, it will be documented here. It is absolutely amazing, and it is a FANTASTIC resource for the dedicated linguist. Price- Free
http://www.omniglot.com/
2. Duolingo
This is both a website AND an app, however, I tend to use the website more frequently, mainly because I’m always on my laptop anyway. The learning system that this website uses makes out very easy to stay motivated, and the lessons are organized amazingly. Currently, the website offers about 27 different language courses for English speakers, and various language courses for speakers of languages other than English. You can set goals for yourself, take multiple courses, be involved in discussions, and even do translating activities. Beware though, it gets VERY addicting. Price- Free
https://www.duolingo.com

3. Memrise
Also a website AND an app, this is my all time favorite resource for learning languages. It has SO many languages to choose from, and it even offers subjects other than languages, although foreign language learning is its primary appeal factor. Price- Free
http://www.memrise.com/home/

4. BBC Languages
Although this sector of BBC has been archived and is no longer updated, it still contains some valuable information. It includes some useful phrases, alphabet guides, and jokes in many languages. You’re bound to learn something new there, so check it out! Price- Free
http://www.bbc.co.uk/languages/
5. Foreign Service Institute (FSI)
This website offers language courses constructed by the U.S. government, and relies heavily on audio-based learning. However, many of the language courses include lessons in the form of pdf. There is a very large selection of languages to choose from, so this resource is very good for getting an excellent introduction to your target language. Price- Free
https://fsi-languages.yojik.eu/
6. Live Lingua Project
Claiming to be the internet’s largest collection of free public domain language learning materials, this website is a MUST for language learners. It contains the FSI courses, Peace Corps language learning materials, and the DLI (military) language courses. It also offers Skype sessions for language learners in several different languages! The main appeal of this website, however, is the Peace Corps language material archive. There are SO many different languages to choose from, and there are many ebooks and audio files to take advantage of here. Price- Free
https://www.livelingua.com/#project
7. Languages On the Web
This website offers texts that translate English texts into 55 other languages. It is not a translator, it merely provides reading material in foreign languages to learners. It is a very useful website, especially for analyzing how sentences are formed in other languages. Price- Free
http://www.lonweb.org/
8. Learn 101
This website is really helpful for explaining grammatical concepts and for learning general stuff about languages, such as verbs, vocabulary, nouns, adjectives, basic phrases, foods, etc. There are quite alot of languages offered on this website, so it’s a great resource! Price- Free (for certain features)
http://learn101.org/
9. Clozemaster
This website is great for learning languages through a sentence based, contextual experience. It’s a bit like Duolingo in that sense, and it requires you to fill in missing words from sentences. In my opinion, it’s better for people with a background in their target language, and they offer many different options for languages. It’s also good for speakers of a native language other than English! Price- Free
https://www.clozemaster.com/

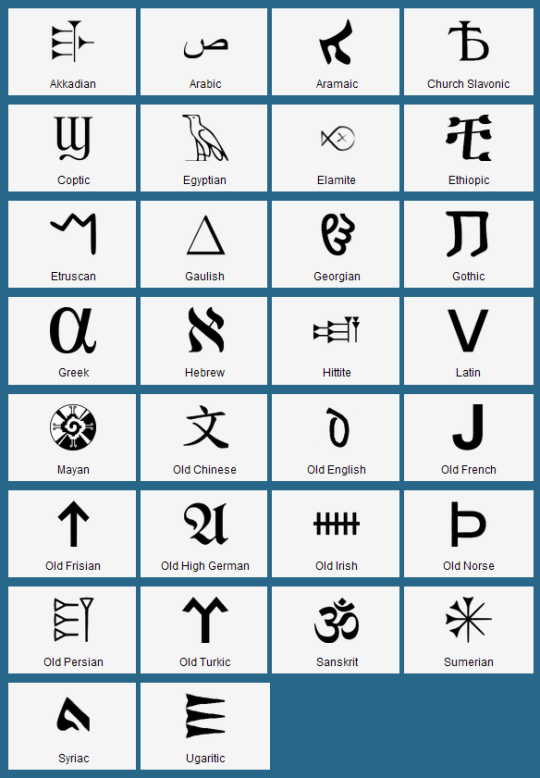
10. Lexicity
This is a great website for ancient language learners, and it provides resources for Egyptian, Mayan, Hittite, Latin, Old English, Etruscan, Gaulish, and several others. I have found the majority of resources that I have looked through helpful to my learning efforts. They have dictionaries, grammars, charts, and texts, and it is a very comprehensive resource. Price- Free
http://lexicity.com/
11. Book2
This is a good resource for learners looking for audio files to help them practice their listening. I haven’t used it all too much, but there are many language options, so you’re bound to find a language that you find interesting on here. Price- Free
http://www.goethe-verlag.com/book2/
12. Lang-8
This is a great resource for getting feedback on your writing in your target language. You can post things in your target language, and native speakers of that language will correct it, and you can do the same for other people! It’s very helpful, and is a great resource if you have to write in your target language often. Price- Free
http://lang-8.com/

13. Bilinguis
This website offers a few books to read in different languages and is good for comparing different languages of the same book. This makes for good practice for reading in your target language. Price- Free
http://bilinguis.com/
14. Udemy
There are quite a few languages courses on this website, although several of them cost money. However, there are quite a few courses that are free, and are good for introducing you to your language of choice. Price- Varies depending on the course, however, there are some free ones
https://www.udemy.com/courses/
-Apps- [For this, I can only give the price for iPhones, however, I am relatively sure that these should be the same price in the Android store]
1. Memrise
As mentioned above in the websites section, this app is so amazing for on-the-go language learning, as well as for subjects other than languages! It helps users memorize concepts with “meme” which are pictures that will remind you of what the word or concept means, and it’s such a unique and fun learning experience! It has the feel of using flashcards, but I just love using this app so much. Price- Free
2. Duolingo
Also mentioned in the websites section, this app is great for both learning new words and reviewing words that you have either memorized or have just been exposed to. There are grammar lessons available, translation activities, groups that you can join, and Duolingo makes it fun to learn a language with it’s reward system. Price- Free
3. HelloTalk
This is my absolute FAVORITE app to talk to native speakers of my target language(s). You can become language partners with people, help others with translations, video/voice call, send voice messages, and have as many partners as you want! It’s an absolutely amazing app, and I highly recommend it to everyone! Warning- If you’re a native English speaker looking for a native Chinese speaker, you will get HUNDREDS of requests. It might overwhelm you for a second. Price- Free

4. TuneIn Radio
This is really great for finding stations in your target language, and it helps with practicing both comprehension of spoken language as well as introduces you to awesome music in your target language! Price- Free
5. Tigercards
This app presents words in the form of lists, and gives you vocab so that you can review it. Not the best presentation of words and it doesn’t really offer a memorization technique like Memrise, but it’s still helpful! Price- Free
6. Busuu
This app is a bit like Duolingo, and it offers German, Spanish, Portuguese, French, English, Italian, Russian, Polish, Turkish, Japanese, and Chinese! Price- Free
7. uTalk
This app offers so many different languages, it’s pretty incredible. There are games that you can play, phrasebooks, and several other features. The interface is also really awesome and simple, so it makes learning easier than usual. Definitely a must have. Price- Free

8. Innovative Language
I haven’t used this app much, but I have heard that the lessons on this app are very good, and you can download the lessons so that you can view them offline. Price- Free
9. FlashSticks
This has been super helpful to me, in addition to the games and flashcards that it offers, it also provides an object scanner, which uses your camera to scan objects and then tells you what it’s called in your target language! Price- Free

10. Mondly
This has been an awesome resource for me since it’s a bit like Duolingo, only with more unique language options. I’m currently using it to learn Hindi, however, there are tons of other language options. The interface is awesome, and I love using it. Price- Free

11. MindSnacks
This company makes several different language apps, and currently I’m using the Mandarin, Japanese, and French ones. So far, I’ve really enjoyed these apps! Price- Free
12. Spotify
Through Spotify’s “Word” category, there are many different playlists dedicated to language learning, such as for Arabic, Mandarin, French, Spanish, German, Italian, Russian, Portuguese, and Swedish! Price- Free
13. Quizlet
This is more of a diy language learning resource. It is not an inherent language learning resource, however, if you learn best through lists and/or flashcards, then this app allows you to make cards and review vocab that way! I use it all the time for exams! Price- Free
14. FluentU
This is an awesome app for watching videos in your target language, and is really good for learning new words. Price- the app is free, but the service is $15 per month or $120 per year
-Books-
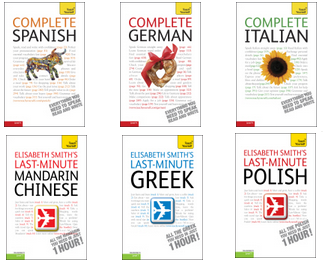
1. Teach Yourself
This series offers an astounding number of languages, and I have found them to be pretty effective in helping me learn languages. I have used the Russian, Arabic, Mandarin, and Irish ones.
2. Barron’s Grammar and Verb books
I really like the way Barron’s does language books, so far I have used their Japanese grammar book and their Russian verbs book, and I really like the layout of them, especially the grammar book!
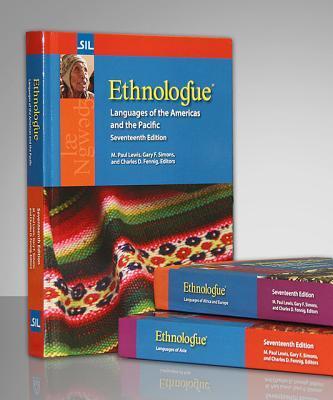
3. Dk Visual Bilingual Dictionaries
These are so helpful for me, I’ve been using the Mandarin and Japanese dictionaries for a long time, and they are so comprehensive and awesome!
4. Ethnologue
These aren’t language “learning” materials, but rather they help me find new languages to learn. These are more for the linguistic lovers, since they catalog almost every living language in the world in every country, and provide language maps and statistics. There’s really fascinating stuff in those books, so I highly recommend purchasing them.
5. The “Dirty” books
So far, I have only used the Japanese version, however, I really like what the book includes, and it’s great for learning slang in your target language, and things that traditional textbooks wouldn’t teach you.

6. Living Language
I LOVE these books so much, I’ve used the Russian, Mandarin, and French ones and I’ve found them very helpful! The layout of these are very nice, and they’re pretty comprehensive.
7. Tuttle books
Tuttle offers several different language books, and they all are very good in my opinion. I have used their books for Arabic, Korean, Mandarin, Japanese, and Hindi.
That’s all that I have right now, but if you all would like more resources than I will definitely make a second one!
54K notes
·
View notes