#𝒂𝒓𝒂 𝒊𝒏𝒕𝒆𝒓𝒂𝒄𝒕𝒔
Explore tagged Tumblr posts
Visit Tumblr Blog
Explore Tumblr blogs with no restrictions, modern design and the best experience.
Last Seen Tumblr Blogs


Fun Fact
The “We are the 99%” Tumblr blog became the slogan for the Occupy Wall Street movement.
Text

@ayeonz it seems they filmed both haseul and heejin's scenes during the moonshot tour (potentially) because both girls' hairs are similar to that era !!
10 notes
·
View notes
Note
hiiiiiiii ara 💗 could i please request a ginger bahiyyih set? 🫶
hi anna my beloved!!
here you go 🫶🥰
3 notes
·
View notes
Note
Hi! Do you think you could be able to gif them? This was the only good quality I could find. Let me know. Thank you ☺️🙂
https://youtube.com/shorts/YILxjKO_rCg?si=_9WbUgNK_K9kcc5s
hi svt anon!! i managed to capture mingyu with niki and jungwon here :)
find the set here
0 notes
Note
Hi, hi 🥰🥰🥰 red velvet anon back again. Would you be able to gif Wendy here from 3:49-4:00? She looks so cute and pretty right there. And take all the time you need, no rush!!! THANK YOU AS ALWAYS 🫠💕
https://youtu.be/Ioyq2_AL-dc?si=lNt6kl8fGBQQYmVf
hi my beloved rv anon!! thank you for this request, she's so cute in that section!! please enjoy!!
find the set here!
0 notes
Note
Hi! Not sure if you do &team as well, but if you do, would you be able to gif taki? Any part is fine with me. Let me know so if you don’t, I can most definitely do something else. Thank you!!
https://youtu.be/trfib0-nySs?si=tzIJVItHHhA6Y_mM
hi anon! thank you for sending your request in. this song is definitely peaking my interest in &team now 🙂↕️🙂↕️, i hope you enjoy the set.
you can find it here!
0 notes
Note
Hello. Do you do boy groups as well? If you do, could you do seventeen wonwoo in this interview? If you don’t, no worries! Thank you
https://youtu.be/N8Kcie3Es6I?si=9UkyjhpDNdsfr895
hi anon! thank you for the request. i do boy groups! :) you can find the gifset here !!
0 notes
Note
Hi! It’s red velvet anon again 😬. I hope you’re doing super well!!! Would you be willing to gif Wendy in this fancam? This was the only quality I was able to find. Let me know. THANK YOU AS ALWAYS 💕💕💕💕
https://youtu.be/fWwdF4tUZs4?si=C1ffbjHZMJ8o-yHA
hi nonnie!! thank you for coming back to request more of wendy 🙂↕️❤️
you can find it here !
0 notes
Note
i read your blog name all the time as Ego-Shite
lmaooo, yeah that's funny ngl
0 notes
Note
Hi! I’m the same anon who requested Wendy which I LOVED!!!! I was wondering if you be able to do another one. Let me know if this one is possible. Thank you 💜💜💜
https://youtu.be/ojYeaY5D8lk?si=FxcxkXNEZsILGM5f
hi red velvet anon!! thank you for such a lovely request 🙂↕️❤️
you can find the gifset here :)
0 notes
Note
shuhua i-dol behind the scenes gifs !!
hi anon!!! thank you for requesting my bias :)
here is the set!
0 notes
Note
Hi. Would you be able to gif Wendy from 2:12-2:23? If that’s not possible then perhaps the whole group. Thank you!
https://youtu.be/Z6QRtlzwIvA?si=5URnBS7OMxWmVTFZ

hi red velvet anon!
you can find the gifset here :)
0 notes
Note
Hello my dears! I am asking you to support my campaign to help me achieve my goal. I desperately need your support now to help my family survive and be safe. Gaza is a very dangerous place both in terms of livelihood and life. I need your financial support so that I can obtain the basic needs of my family until the Rafah crossing is reopened to transport my family to safety and peace. Please help a family survive through your small donations or through your contributions to others. Thank you very much for standing with the attendees
https://gofund.me/eb1d4499 please 🇵🇸
hello lovely! to my followers, please help this family with the link provided:
1 note
·
View note
Note
Hi sweetheart!! Could you teach how to make gifs with hd quality?
hello! i’m honoured to think that my gifsets are high quality enough to ask for a tutorial. a lot of my work has been through trial and error and a little help from sharpening actions. i’m going to base a little off chloezhao’s gifmaking beginner tutorial, except i use video to frames and not screencapping.
let’s get started!
program: adobe photoshop 2021
i find that the majority of gif makers use some form of adobe product whether that is premiere or photoshop, but i just use the most recent photoshop version adobe had to offer.
this tutorial applies for macOS and windows so don’t worry, any version of program that contains the “timeline” feature will do.
1. download HQ OR HD videos.
i find that the best gifs that come out with HD frames are 1080p quality or 1440p. anything below that might come out to look a little pixelated. at least that’s what i’ve learnt over the time that i started making gifs (a little over a month ago). for me, i can also screen record my videos if it seems like it’ll be impossible to download a high quality video but it’s only in a dire situation.
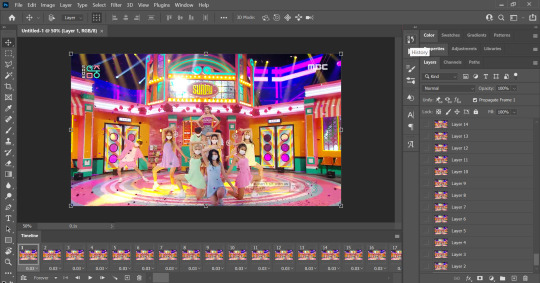
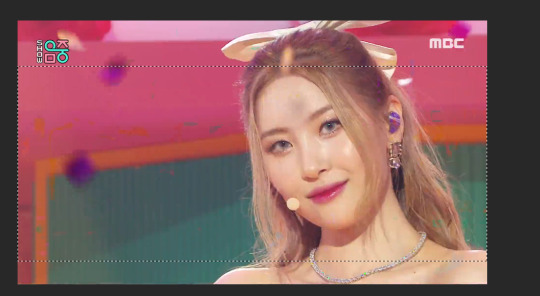
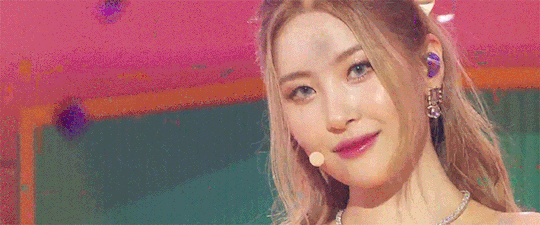
the website that i use is called savieo, and it allows you to download videos from naver, youtube and vlive. this is great especially if you’re a kpop related tumblr account like i am. this is useful as sometimes, the quality of gifs can be severely degraded if uploaded to youtube vs. naver. this has rung true for music show performances. for this gif, i’m going to take a video off naver where sunmi has done a performance on MBC’s music core for you can’t sit with us.
2. importing video to frames.
secondly, i import my video to frames. since i work with short videos (3-10 mins) instead of 2 hour movies like some gif makers on tumblr, i feel more comfortable importing my downloaded video into photoshop, clipping it to an appropriate size and converting it to frames in one program.
importing:
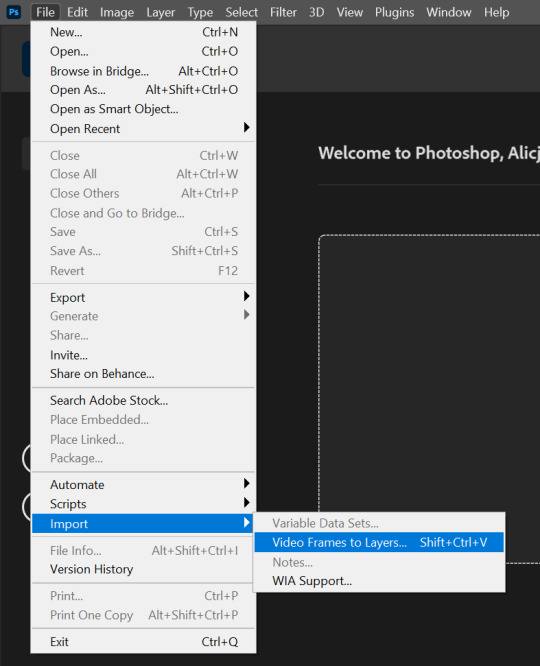
➤ after your video has downloaded, in photoshop go to file > import > video frames to layers.
➤ browse for the video. mine is usually in the downloads folder.
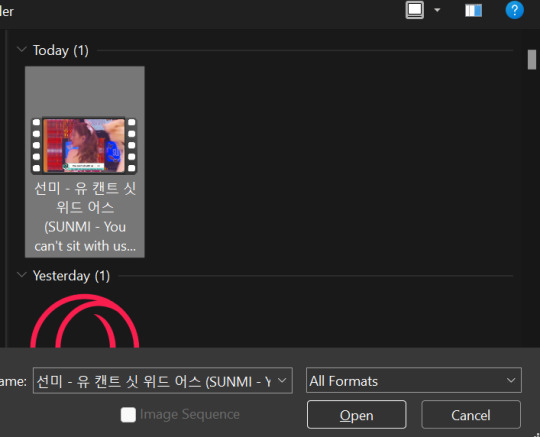
➤ once opened, you will have a window much like this. for this section of gif making, you have to select a short clip that you want to turn into a gif. for this example, i’ll do sunmi’s ending fairy section. keeping in mind that the bottom sliders select your clip!


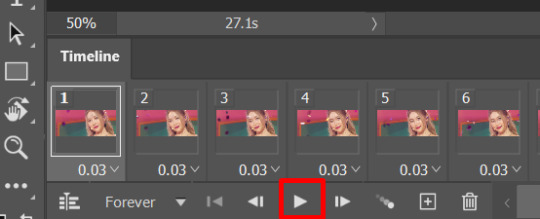
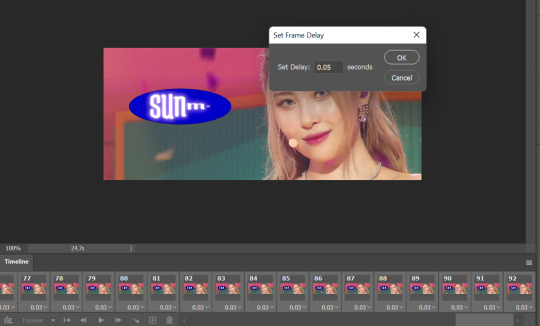
➤ this will take some time to load depending on the length of your clip but as mine is short i estimate it’ll be around 50 frames (which is the average amount you want, or else the gif file size is too big and tumblr won’t accept it).
➤ after it finishes loading it should look something like this. if you don’t have the timeline open, go to window > timeline.
3. rid of excess frames.
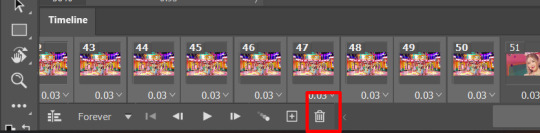
➤ i like to get rid of frames i don’t need. as you can see above, we have the ending shot but not a close up of sunmi being an ending fairy. so i simply scroll through the timeline until i find the last frame of that scene, and shift and left click on it. now we can delete it using the trashcan icon. and i do the same for excess frames on the right hand side.

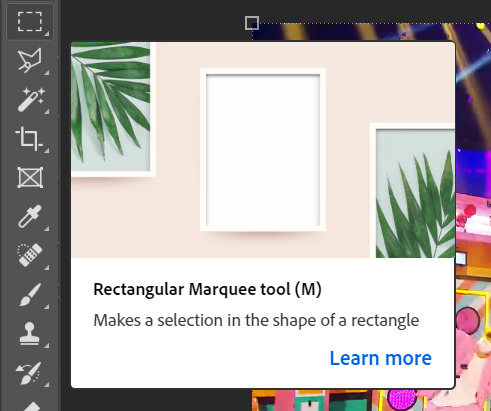
➤ now select the marquee tool. this depends on how you want the gif to look, for me i chose the dimensions 1920px x 800px.

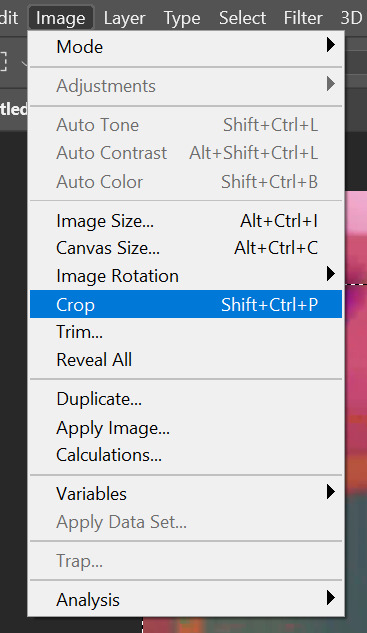
➤ once that’s been selected, you can crop! i have a short cut assigned to this already, but if you go to image > crop you will get the same effect. this will take a while if you have 90 frames like i do. but it will take less time if you have 40-50 frames.

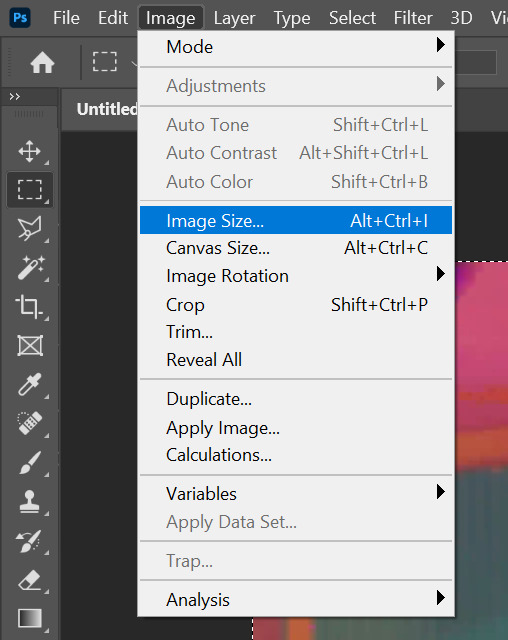
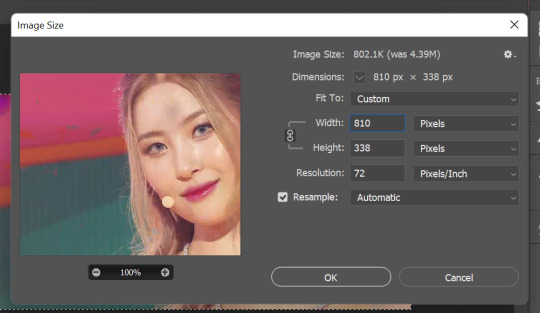
4. resizing
for all gif makers the dimensions differ depending on how they want it to look on tumblr. for me i like to make the width 810px for a nice big high quality gif, or 540px (the width of a tumblr dashboard post). to do so, go to image > image size and put in new dimensions. for this gif i’m making the width 810px. this will take some time to load!
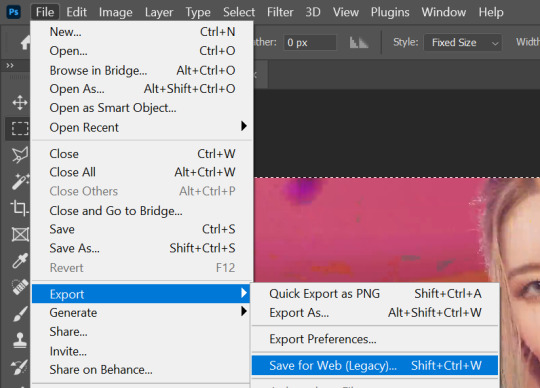
that’s how to make a basic gif with no sharpening! you can now export it if you wish, by going to file > export > save for web (legacy).
note: if you take a look at the timeline you can play the gif from frame one using the controls. also, if the play back speed bothers you when you’re exporting to save it to web, do what i show below.
reducing gif speed:
end result with no sharpening:
4. sharpening.
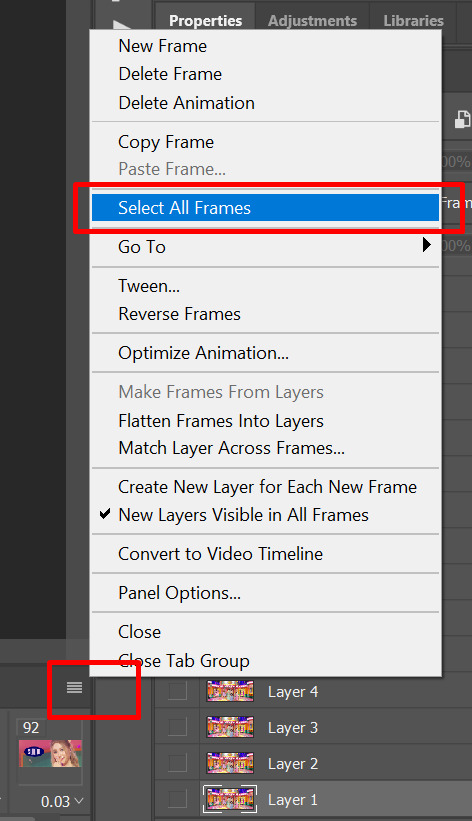
for this, we’re going to have to convert to video timeline. our current timeline is a frame animation timeline! on the right hand side of the timeline there will be 3 lines stacked on top of each other, much like an options menu. click on that and select convert to video timeline.
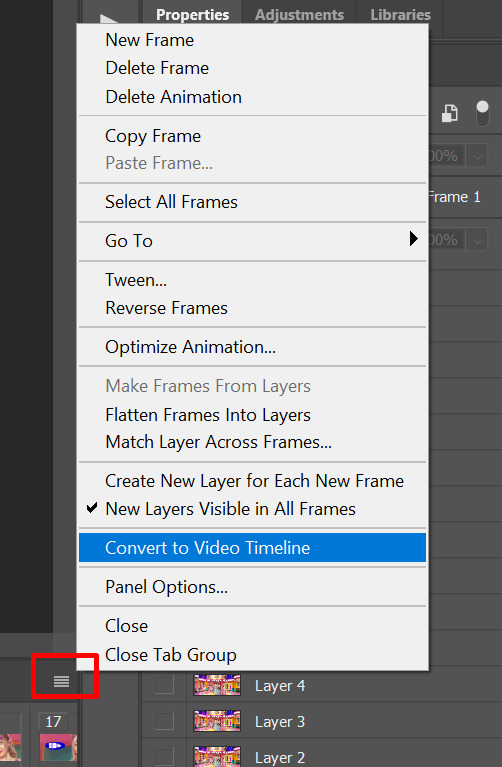
➤ the timeline will now look like this.

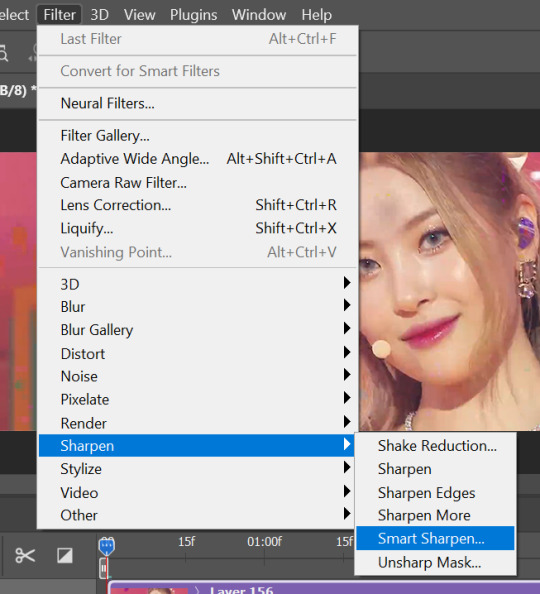
➤ go to select > all layers. the layers should then be highlighted on the right hand side.


➤ now right click on any of the highlighted layers and press convert to smart object. smart objects are essentially a new layer that contains image data of EVERY layer you have selected. so any effects you apply to the smart object will now apply to every frame layer from the gif. it will look like this:

➤ keeping the smart object selected, go to filter, then smart sharpen. i go for a singular smart sharpen but some users like to smart sharpen twice, much like chloezhao’s tutorial that i linked in the beginning of this tutorial.
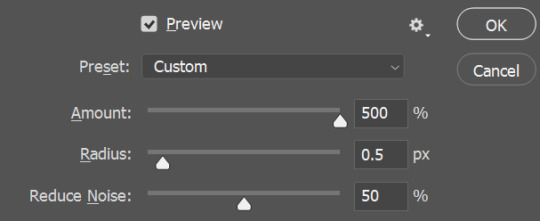
these are the settings used:
➤ and save with export to web!
5. colouring
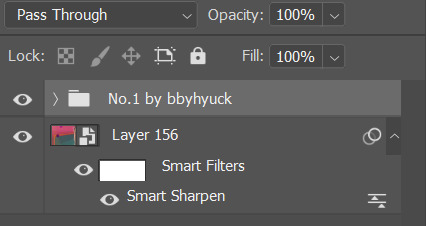
now for colouring at present i have NOT explored colouring my own gifs that much and i stick to psds from deviantart or tumblr. the one i’m using today is no. 1 psd by bbyhyuck @ deviantart. click here.
when dropping a psd onto a gif file, ENSURE THE TOP MOST LAYER IS SELECTED like so !!

to drop a colouring onto your gif, open the psd and drag it into a separate window of its own like so:
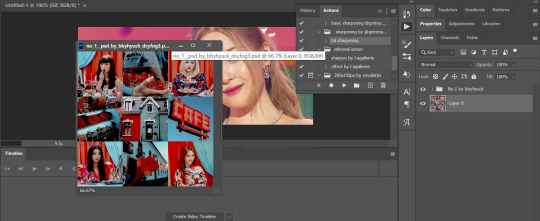
and then select the folder and drag and drop it on top of your gif preview (mine is sunmi’s face!) the folder should now be above the top most layer.
and that’s it! export it and it should now look like this.
tumblr is extremely finnicky with me uploading my gifs in a text post so click the above link to view the results (pre sharpening, post sharpening and post psd.)
24 notes
·
View notes
Text
#ARA YOU ARE LITERALLY THE SWEETEST YOU DIDNT HAVE TO DO THIS JGKLAJS <33333#ily u are the best#i still cant believe youre THIS talented at gifmaking and you just started recently
@yutaslaugh LISTEN IM NOT GREAT JKHJKGHKJ BUT I WANTED TO SHOW SOME SUPPORT FOR U!!!
2 notes
·
View notes
Text
update: i’m at university so i haven’t been creating as much content as i could. hopefully soon i’ll have a chance to upload more work :)
1 note
·
View note
Text
@barb-l : #hyejoo looked like a disney villain in that cut scene
I MEAN YOU’RE NOT WRONG THAT’S WHY I GIFFED IT
1 note
·
View note