#(like using the irregular polygon tool)
Explore tagged Tumblr posts
Visit Tumblr Blog
Explore Tumblr blogs with no restrictions, modern design and the best experience.
Last Seen Tumblr Blogs


Fun Fact
Total funding amounts to $125.3M.
Text
trying to improve my comics without any training in theory and instead just staring real hard at comics i like and trying to figure out what i like about them. probably taking away the wrong information every time
#stc has very consistent geometry to its layouts#but a lot of digital comics im seeing have irregular panels at All Times#so now im trying to make panels as polygons instead of as rectangles#(like using the irregular polygon tool)#and then i noticed most speech bubbles are round but not ovals#so now im trying to make them with the curve tool and i think it looks better? but its harder to get right#myaa
7 notes
·
View notes
Text
short tutorial on how I've recently been approaching lineless interior illustrations like these


small disclaimer: I am not a professional, this is just what's been working recently for me. this thread is aimed towards digital artists who understand the fundamentals behind perspective, but don't know how to practically use that information
step 1: look up your art program of choice's support for perspective ruler tools. if your program doesn't support these tools (cough, cough, photoshop), I would recommend downloading krita and giving their perspective tools a try. this will make life much easier

programs that have perspective rulers should also have a "snap to ruler" option somewhere that will make all of your brush strokes move in straight lines across a 3D grid. I turn this on, but for details and curves, you may want to turn it off
step 2: once I have an idea for how I want things to look, I start laying down lines to figure out 3D form and composition. the more iterations you do at this step to make your lines clean and precise, the less of a headache you'll have in later steps


step 3: fill in base colors using the polygonal lasso tool. make sure to separate every shape onto its own layer. in the first piece, I made a separate layer for every wall, the bed frame, the mattress, etc. go ahead and hide the lines, but look out for jank where edges meet


step 4: using clipping masks on the layers from step 3, build up texture and ambient occlusion (the space where two planes meet should be darker than the rest of the planes) while considering your light source, start to paint in hard and soft shadows


for brevity I won't delve into what kinds of shadows are appropriate in what contexts, but at least in digital art I find softening hard shadows to be easier than hardening soft shadows, so I would try those first if you're ever not sure
step 5: at this point, you can go where your heart takes you and start painting in details. personally, I like to apply some strange and interesting textures at this point to unify the image. this helps me get out of the "every plane is a separate object" mindset


step 6: start painting! I usually like to continue pushing the lighting at this stage using a soft brush and blend modes. paint in details and objects that have irregular shapes


for wall decorations like posters and windows, I recommend looking into photoshop's "smart objects" feature (or whatever the equivalent is in your program.) these allow you to place a flat painting in 3D space while still allowing you to edit the flat painting
and that's all! I hope this tutorial might have inspired someone to try out painting an indoor space, I know I put them off for a while because I didn't know where to start
if you have any questions, please send them my way :)
31 notes
·
View notes
Text
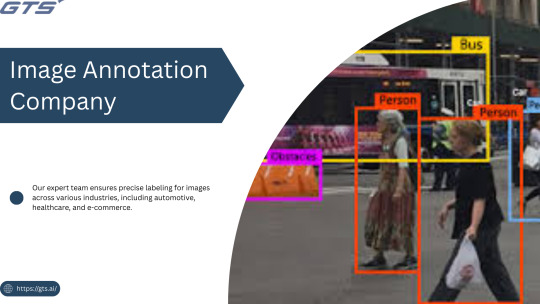
Title: Image Annotation Services Explained: Tools, Techniques & Use Cases
Introduction
In the fast-paced realm of artificial intelligence, Image Annotation Company serve as the foundation for effective computer vision models. Whether you are creating a self-driving vehicle, an AI-driven medical diagnostic application, or a retail analytics solution, the availability of high-quality annotated images is crucial for training precise and dependable machine learning models. But what precisely are image annotation services, how do they function, and what tools and methodologies are utilized? Let us explore this in detail.
What Is Image Annotation?
Image annotation refers to the practice of labeling or tagging images to facilitate the training of machine learning and deep learning models. This process includes the identification of objects, boundaries, and features within images, enabling AI systems to learn to recognize these elements in real-world applications. Typically, this task is carried out by specialized image annotation firms that employ a combination of manual and automated tools to guarantee precision, consistency, and scalability.
Common Image Annotation Techniques
The appropriate annotation method is contingent upon the specific requirements, complexity, and nature of the data involved in your project. Among the most prevalent techniques are:
Bounding Boxes:
Utilized for identifying and localizing objects by encasing them in rectangular boxes, this method is frequently applied in object detection for autonomous vehicles and security systems.
Polygon Annotation:
Best suited for objects with irregular shapes, such as trees, buildings, or road signs, this technique allows for precise delineation of object edges, which is essential for detailed recognition tasks.
Semantic Segmentation:
This approach assigns a label to every pixel in an image according to the object class, commonly employed in medical imaging, robotics, and augmented/virtual reality environments.
Instance Segmentation:
An advancement over semantic segmentation, this method distinguishes between individual objects of the same class, such as recognizing multiple individuals in a crowd.
Keypoint Annotation:
This technique involves marking specific points on objects and is often used in facial recognition, human pose estimation, and gesture tracking.
3D Cuboids:
This method enhances depth perception in annotation by creating three-dimensional representations, which is vital for applications like autonomous navigation and augmented reality.
Popular Image Annotation Tools
Image annotation can be executed utilizing a diverse array of platforms and tools. Notable examples include:
LabelImg: An open-source tool designed for bounding box annotations,
CVAT: A web-based application created by Intel for intricate tasks such as segmentation and tracking,
SuperAnnotate: A robust tool that merges annotation and collaboration functionalities,
Labelbox: A comprehensive platform featuring AI-assisted labeling, data management, and analytics,
VGG Image Annotator (VIA): A lightweight tool developed by Oxford for efficient annotations.
Prominent annotation service providers like GTS.AI frequently employ a blend of proprietary tools and enterprise solutions, seamlessly integrated with quality assurance workflows to fulfill client-specific needs.
Real-World Use Cases of Image Annotation
Image annotation services play a vital role in various sectors, including:
Autonomous Vehicles
Object detection for identifying pedestrians, vehicles, traffic signs, and road markings.
Lane detection and semantic segmentation to facilitate real-time navigation.
Healthcare
Annotating medical images such as X-rays and MRIs to identify tumors, fractures, or other abnormalities.
Training diagnostic tools to enhance early disease detection.
Retail and E-commerce:
Implementing product identification and classification for effective inventory management.
Monitoring customer behavior through in-store camera analytics.
Agriculture:
Assessing crop health, detecting pests, and identifying weeds using drone imagery.
Forecasting yield and optimizing resource allocation.
Geospatial Intelligence:
Classifying land use and mapping infrastructure.
Utilizing annotated satellite imagery for disaster response.
Why Work with a Professional Image Annotation Company?
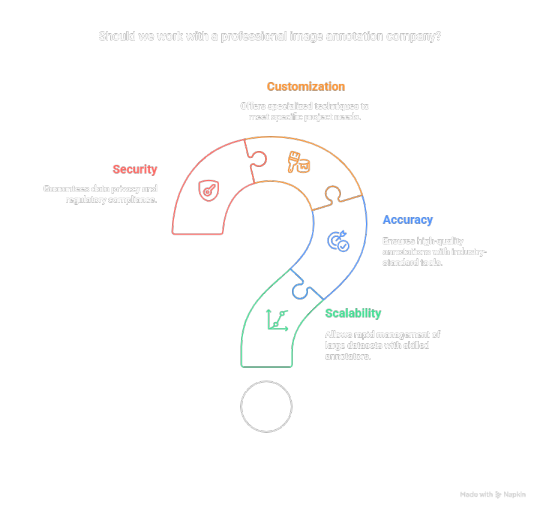
Although in-house annotation may initially appear feasible, expanding it necessitates significant time, resources, and a comprehensive quality assurance process. This is the reason businesses collaborate with providers such as GTS.AI:
Scalability : Allows for the rapid management of extensive datasets through skilled annotators;
Accuracy : Is ensured with industry-standard tools and quality assurance measures;
Customization : Coffers specialized annotation techniques to meet specific project objectives; and
Security : Guarantees adherence to data privacy regulations for sensitive data.
Final Thoughts
With the expansion of AI and computer vision applications, the necessity for high-quality annotated data has become increasingly vital. Image annotation services have evolved from being merely supportive functions to becoming strategic assets essential for developing dependable AI systems. If you aim to enhance your AI projects through professional data labeling, consider Globose Technology Solution .AI’s Image and Video Annotation Services to discover how they can effectively assist you in achieving your objectives with accuracy, efficiency, and scalability.
0 notes
Text
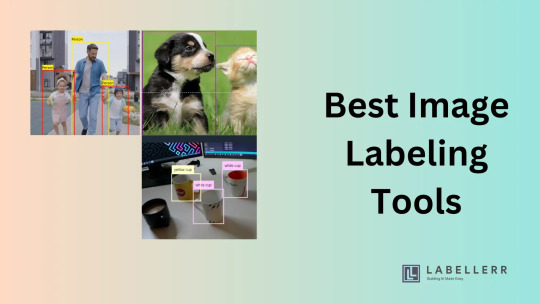
Top Image Labeling Tools for AI: How to Choose the Best One
Image labeling is a crucial step in training AI models for computer vision, medical imaging, autonomous systems, and security applications. High-quality annotations improve the accuracy of machine learning models, ensuring better object detection, classification, and segmentation.
Selecting the right image labeling tool can make annotation workflows more efficient and reduce manual effort. For a detailed comparison of the best image labeling tools, visit this expert guide.
Why Image Labeling Tools Are Essential for AI Development
AI models rely on labeled datasets to learn and recognize patterns. Inconsistent or low-quality annotations can negatively impact real-world AI applications, such as self-driving cars, medical diagnostics, and retail automation.
Key Benefits of Using a High-Quality Image Labeling Tool:
✔ Higher Accuracy: AI-assisted annotation reduces errors. ✔ Faster Annotation: Automation speeds up the labeling process. ✔ Scalability: Cloud-based tools handle large datasets efficiently. ✔ Seamless AI Integration: Many tools support direct export to machine learning pipelines.
Key Features to Look for in an Image Labeling Tool
1. Support for Multiple Annotation Types
A versatile tool should offer:
Bounding boxes (for object detection)
Polygons (for irregular-shaped objects)
Key points & landmarks (for facial recognition and pose estimation)
Semantic segmentation (for pixel-wise labeling)
2. AI-Powered Automation
Many tools include auto-labeling, AI-assisted segmentation, and pre-annotation, reducing manual workload while maintaining accuracy.
3. Collaboration & Workflow Management
For teams working on large datasets, features like task assignments, version control, and annotation reviews help streamline the process.
4. Quality Control Features
Advanced tools include error detection, inter-annotator agreement scoring, and automated quality assurance to maintain annotation consistency.
5. Scalability & Cloud Integration
Cloud-based tools allow remote access, easy dataset management, and seamless integration with AI training workflows.
How to Choose the Best Image Labeling Tool?
Different AI projects require different annotation approaches. Some tools excel in AI-powered automation, while others focus on manual precision and flexibility.
To compare the top image labeling tools based on features, pricing, and usability, visit this detailed guide.
Final Thoughts
Choosing the right image labeling tool can enhance efficiency, improve annotation accuracy, and integrate smoothly into AI development workflows. The best option depends on your dataset size, project complexity, and specific annotation needs.For a comprehensive comparison of the best image labeling tools, check out Top Image Labeling Tools.
0 notes
Text

@kittylovelbp ty !! for the most part drawing foster's backgrounds I just use the polygonal lasso tool + paint bucket for any boxy shapes and a basic round brush for any shapes that don't have straight edges. I try to not fuss too much with the background in general bc in the show everything looks kinda loose and like they just quickly threw some shapes down. for Mac's house and room specifically though, I put a layer of noise over the background, and I do use a custom brush for the carpet
for the carpet I use KYLE ultimate inking thick 'n thin brush that comes as a default in photoshop, but really any opaque brush with an irregular shape will work. I adjusted the tip shape to be tall and skinny, adjust the spacing just far enough for each brush tip to be visible, but still touching, then in shape dynamics I add a tiny bit of roundness, size and angle jitter and turn on "flip X jitter" and "flip Y jitter" <- that all just makes it look a bit more random
then I hold shift and draw straight horizontal lines with different colours to make the carpet !

^^^ the brush before and after messing with the settings


^^^ angle & roundness, spacing, size jitter, angle jitter, roundness jitter and flip X/Y jitter are the important settings, but I don't really use any specific numbers, I just adjust the sliders until it looks good

@bloofuskazoo's request got deleted out of my inbox when she got shadowbanned, but here is Bloo Uses Mac's Mom's Name When He's Annoyed
78 notes
·
View notes
Text
Data Annotation Types to execute Autonomous Driving

Autonomous vehicles are still working towards reaching the stage of full autonomy. A fully functioning and safe autonomous vehicle must be competent in a wide range of machine learning processes before it can be trusted to drive on its own. From processing visual data in real-time to safely coordinating with other vehicles, the need for AI is essential. Self-driving cars could not do any of this without a huge volume of different types of training data, created and tagged for specific purposes.
Due to the several existing sensors and cameras, advanced automobiles generate a tremendous amount of data. We cannot use these datasets effectively unless they are correctly labeled for subsequent processing. This could range from simple 2D bounding boxes all the way to more complex annotation methods, such as semantic segmentation.
There are various image annotation types such as Polygons, bounding boxes, 3D cuboids, Semantic Segmentation, Lines, and Splines that can be incorporated into autonomous vehicles. These annotation methods help in achieving greater accuracy for autonomous driving algorithms. However, which annotation method is best suited for you must be chosen according to the requirements of your project.
Types of Annotation for Autonomous Driving
Below we have discussed all types of annotation required to make the vehicle autonomous.
2D bounding Box Annotation
The bounding box annotation technique is used to map objects in a given image/video to build datasets thereby enabling ML models to identify & localize objects.2D boxing is rectangular, and among all the annotation tools, it is the simplest data annotation type with the lowest cost. This annotation type is preferred in less complex cases and also if you are restricted by your budget. This is not trusted to be the most accurate type of annotation but saves a lot of labeling time. Common labeling objects include: Vehicles, Pedestrian, Obstacles, Road signs, Signal lights, Buildings and Parking zone.
3D Cuboid Annotation
Similar to the bounding boxes that were previously discussed, this type involves the annotator drawing boxes around the objects in an image. The bounding boxes in this sort of annotation, as the name implies, are 3D, allowing the objects to be annotated on depth, width, and length (X, Y, and Z axes). An anchor point is placed at each edge of the object after the annotator forms a box around it. Based on the characteristics of the object and the angle of the image, the annotator makes an accurate prediction as to where the edge maybe if it is missing or blocked by another object. This estimation/ annotation plays a vital role in judging the distance of the object from the car based on the depth and detecting the object’s volume and position.
Polygon Annotation
It can occasionally be challenging to add bounding boxes around specific items in an image due to their forms and sizes. In photos and movies with erratic objects, polygons provide precise object detection and localization. Due to its precision, it is one of the most popular annotation techniques. However, the accuracy comes at a price because it takes longer than other approaches. Beyond a 2D or 3D bounding box, irregular shapes like people, animals, and bicycles need to be annotated. Since polygonal annotation allows the annotator to specify additional details such as the sides of a road, a sidewalk, and obstructions, among other things, it can be a valuable tool for algorithms employed in autonomous vehicles.
Semantic Segmentation
We’ve looked at defining objects in images up to this point, but semantic segmentation is far more accurate than other methods. It deals with assigning a class to each pixel in an image. For a self-driving automobile to function well in a real-world setting, it must comprehend its surroundings. The method divides the items into groups like bicycles, people, autos, walkways, traffic signals, etc. Typically, the annotator will have a list made up of these. In conclusion, semantic segmentation locates, detects, and classifies the item for computer vision. This form of annotation demands a high degree of accuracy, where the annotation must be pixel-perfect.
Lines and Splines Annotation
In addition to object recognition, models need to be trained on boundaries and lanes. To assist in training the model, annotators drew lines in the image along the lanes and edges. These lines allow the car to identify or recognize lanes, which is essential for autonomous driving to succeed since it enables the car to move through traffic with ease while still maintaining lane discipline and preventing accidents.
Video Annotation
The purpose of video annotation is to identify and track objects over a collection of frames. The majority of them are utilized to train predictive algorithms for automated driving. Videos are divided into thousands of individual images, with annotations placed on the target object in each frame. In complicated situations, single frame annotation is always employed since it can ensure quality. At this time, machine learning-based object tracking algorithms have already helped in video annotation. The initial frame’s objects are annotated by the annotator, and the following frames’ items are tracked by the algorithm. Only when the algorithm doesn’t work properly does the annotator need to change the annotation. As labor costs decrease, clients can save a greater amount of money. In basic circumstances, streamed frame annotation is always employed.
Use Cases of Autonomous Driving
The main goal of data annotation in automotive is to classify and segment objects in an image or video. They help achieve precision, which to automotive is important, given that it is a mission-critical industry, and the accuracy, in turn, determines user experience. This process is essential because of the use cases it enables:
Object and vehicle detection: This crucial function allows an autonomous vehicle to identify obstacles and other vehicles and navigate around them. Various types of annotation are required to train the object detection model of autonomous driving so that it can detect persons, vehicles, and other obstacles coming in its way.
Environmental perception: Annotators use semantic segmentation techniques to create training data that labels every pixel in a video frame. This vital context allows the vehicle to understand its surroundings in more detail. It’s important to have a complete understanding of its location and everything surrounding it to make a safe drive.
Lane detection: Autonomous vehicles need to be able to recognize road lanes so that they can stay inside of them. This is very important to avoid any accidents. Annotators support this capability by locating road markings in video frames.
Understanding signage: The vehicle must be able to recognize all the signs and signals on the road to predict when and where to stop, take a turn, and many related objectives. Autonomous vehicles should automatically detect road signs and respond to them accordingly. Annotation services can enable this use case with careful video labeling.
Conclusion
Although it takes a lot of effort, delivering Ground Truth quality annotation for self-driving cars is crucial to the project’s overall success. Get the best solutions by using precise annotations created by TagX to train and validate your algorithms.
We are the data annotation experts for autonomous driving. We can help with any use case for your automated driving function, whether you’re validating or training your autonomous driving stack. Get in contact with our specialists to learn more about our automobile and data annotation services as well as our AI/ML knowledge.
#ObjectDetection#LaneMarkingAnnotation#SemanticSegmentation#3DAnnotation#artificial intelligence#machinelearning#dataannotation
0 notes
Note
I just saw your pinned post and I loved it! I don’t even watch the show but it’s gorgeous, really! If I can I wanted to ask if you could tell me how to do the border colored and the background black and white but still manteining the same gif (when it moves all together) if you can’t, that’s okay too xxx
hoi sweet anon thank you so much! this is pretty easy to do so it’ll be quick tutorial
the only tools you have to use are the rectangle marquee tool and you have play a little with layer masks. you can also use a lasso tool for an irregular shape or any other selection tools you are familiar with. It depends on the shape of your selection. as i wanted to select the border i chose the rectangle marquee tool.
tutorial under the cut :)
step 1: after coloring/setting your gif, make a selection with a rectangular marquee tool (or any other selection tools you’re familiar with). select the area that you want to keep colored.

step 2: click on the select option in the top bar. and then on click on inverse. this selects the border portion of the gif. (the portion you want to keep black and white.)

this is what the selection looks like now:

step 3: create a black and white layer. you can either do this with a black and white adjustment layer or with a gradient map.
i chose gradient map. as you had already selected your border, when you create black and white layer it will automatically color only the border portion of your gif.

this is what the gif looks like now:

step 4 (optional): now my layout has the lil triangle on top as well with border. to make that b&w, I selected the area of the triangle with a polygonal lasso tool. then I chose the brush tool to color the area in. remember to click on the layer mask on your gradient map/black and white layer:

to color in the black and white, choose white color.
to erase the black and white, choose black.
i chose white as i wanted to color in the black and white.

this is the the final result:

hope i explained this correctly. if you have any questions, my ask is always open <3
#this is the first time i have ever gotten a request to make to make tutorial i got so excited when you sent me this#so sorrrry for answering this so late#tutorial#layer mask#ask#anon
42 notes
·
View notes
Text
Geographic Information Systems - The Present and Future

Introduction
Geographic Information System comprises hardware, the map management software and data related to different networks. It provides a holistic view of data retrieval and processing. It also uses the technique of data capturing, managing, analyzing and displaying cartographic information referenced using longitudes and latitudes.
Maps have been used by man from time immemorial for travel. GIS is a computerized cartographic system which gives the user access to geographical data from different views. It is possible to map networks such as railways lines, water supply, drainage, roads etc into different layers using a GIS. This is forms the core of GIS based data retrieval and processing. GIS allows us to view, understand, question, interpret, and visualize data in many ways that reveal relationships, patterns, and trends in the form of maps, globes, reports, and charts.
A Geographic Information System invariably has map associated with it. Very often a GIS is mistaken for a mapping program which works on a background database. A GIS is much more than that. For example to access a tourism destination, it is possible to have map interface through the associated web site. This will help the potential traveler zoom on to destination and select the desired the required information, say a hotel. On clicking the appropriate icon he may be taken to the web site of the hotel or a web based booking engine. It is not surprising to find travelers exploring browsing the website for viewing hotel rooms. Thus we can see that a GIS can provide a great deal more problem-solving capabilities than using a simple mapping program or adding data to an online mapping tool.
Vectors and Rasters
GIS has gained important since it is capable of bringing together information from many source simultaneously which enables the user to provide real time solutions. Here data is associated specific locations on the earth's surface. Incorporating positions based on latitude and longitude these locations can be attached to points on the digitized geographic outline. Rasters and vectors are used in a GIS. A raster is basically a digital image such as an aerial photograph of a location, say taken from a satellite. The data is represented as a table consisting of rows and columns. The intersection of a row and column is called a cell, each of which has a single value. This data is then transferred into GIS for use in making maps and other projects.
A vector is the most popular way of representing data in GIS. Vectors consist of shapefiles which in turn are composed of points, lines, and polygons. In a GIS, a point is the location of a feature in the terrain or digitized map say a tourist destination. A line is used to show linear features like roads, railway tracks or rivers and a polygon is a two dimensional feature that shows an area on the earth's surface such as the boundaries of a wildlife sanctuary. It can be seen that the points show the least amount of information and the polygons the most. To map say a mountain terrain, it requires data related to elevation. Here TIN or Triangulated Irregular Network, a common type of vector data is used represent values that change consistently. The values are connected as lines, forming an irregular network of triangles to represent the land's surface on a map. In addition, GIS is capable of translating a raster to a vector in order to make analysis and data processing easier.
The three different views of a GIS
There are three different ways in which data can be viewed in a GIS. The first view is the database view. It basically consists of a database which is capable of storing tables. Data stored in these table can be easily accessed, managed and manipulated suiting to the needs of the work in hand. The second view is the map view which is the first visible interface with the user. This is the most interesting and exciting way of using the GIS since maps can be zoomed, rotated and even linked to the website of the location under consideration.
GIS is in fact a set of maps that show features and their relationships on the earth's surface and these relationships show up most clearly in the map view. The final view is the model view which comprises tools capable of drawing new geographic models based on existing data. These functions then combine the data and create a model that can provide answers for projects. This will help in future implementations of plans and projects.
Read Full Article Here: Geographic Information Systems - The Present and Future
#CompassData Inc#ground control points#Geographic Information Systems#GIS#Global Positioning System (GPS)
5 notes
·
View notes
Text

This is a design that I made on photoshop. my intention was to see how I could experiment with tools on photoshop to create a similar outcome to Lynette Jackson. Overall I really like how it turned out, I like how abstract it is and how the shapes create this irregular form of artwork. The white border contains this busy atmosphere and the Helvetica text creates a modern environment.


I started out with some images of architecture which I liked, I found these on Pinterest and put them into my photoshop document. I then used the polygon lasso tool to create different shapes out of different parts of the structures.


Once I had confidently taken different parts of each image out into different shapes I turned the background black, similar to Lynette. it also provides a good contrast to the work and is easier on the eyes.


I finally rearranged the pictures into an abstract shape which was purposeful but confident. I finalised this by adding overlay shapes and details of colour with different blending options and layers to cover over. Finally adding a grain to the coloured layers and completing this with a white border and some text and It was complete.
Art inspired by Lynette Jackson
1 note
·
View note
Text
Crystal Matrix Basics
Hello my witches, baby witches, aspiring spell casters, students of the occult, and seasoned shamans alike! I'm coming at you today with a brand new entry in my special series on intermediate to advanced sorcery. I'll try to keep updating this blog on at least a weekly basis - if not more often. But, I'm only an interdimensional multifaceted galaxian xenine quantum manipulation nexus in a human body, after all!
Crystal matrices are a component of a much larger school of magic, and one that I always enjoy teaching: the art of WARDING!
To ward means to guard or protect. We do this in the most basic sense a lot of different ways. Someone making the sign of the cross, spitting upon seeing a bad omen, casting a circle of salt, amulets, talismans, gris gris bags, a chicken's foot, eleke beads, a pocket full of iron nails - these behaviors all have one thing in common: they're wards.
My Catholic mother rarely makes the sign outside of church, but when she does? It's a whole production. Spitting to her left and right as she crosses herself, raising her eyes to the sky, and muttering what I imagine is the Hail Mary. There's a rarity to it, because of the severity to it. My mom is in the habit of crossing fingers and knocking wood, and there's always a crucifix around her neck. That, combined with her morning and evening prayers, is typically enough to keep her feeling "warded" all day.
All cultures have their own warding rituals, and it's very likely there is a specific tradition (I find "superstition" racist and colonial) from your own family's culture. If there is? Use it. The magic of your ancestral lineage is always going to be more powerful than a spell you find online.
I've gotten a bit off track, but it's important to realize that all people, from all cultures, and from all walks of life perform some manner of warding magic.
Now, the working we'll be learning today is a bit more complex than the sign of the cross, but as a witch I believe we have more complicated needs when it comes to magickal protection.
Whenever we create sacred space in a traditional manner or cast a Wiccan circle, it's important to remember that these practices are fundamentally seperate from warding spells. A magic circle is a space in which to raise and contain energy in a cone of power. They are NOT circles of protection. No matter how deeply you are embraced by the magick, there is very little chance that a circle of salt is going to "protect" you. That's why we have banishing spells after our rituals.
Why is it important to have this in mind? In my practice, demons and spirits are what we make of them. All demonolators know that just as one might work with the Greek and/or Roman gods - for example - demons can also be part of your pantheon. Not even a very accomplished Magus could cast a warding spell to keep out Diana or Bacchus, and the same goes for demons. At best, a magical circle keeps out all the negative "vibes" that we're increasingly bombarded with.
I have a labyrinth of selenite as a permanent part of my altar - they're great at absorbing EMF and negative energy, and I keep them front and center for just that reason. But, back to demo
Demons are the gods that Christianity tried to eliminate. There's really not much to be afraid of where they are concerned. Working with demons is something best attempted by shadow magi (those who have integrated their shadow selves) but again - I'm not teaching wards that stop demons, angels, or gods. Do you really think Belial or Leviathan can be bothered to pay you personally a visit?
A fear of demons is a Christian concept. The word originally (the Greek Daimon) was a sort of guardian spirit everyone is born with. The Devil isn't the source of all evil (that's capitalism) and demons aren't in shadows waiting to ruin your life. Few things are.
Now, let's get to the magick!
With those disclaimers and background out of the way - let's talk crystal matrix warding!
For this enchantment, you will need:
Palo Santo, Agua Florida, Holy Water, Black Salt, Yerba Santa, or any other purification medicine. (Remember: white sage is over farmed and culturally specific.)
A magic broom / a bundle of tree leaves, esp. from the druid sacred trees.
Copal, sandalwood, cedar, francincense, myrrh, or your preferred incense.
4 quartz points*
A small table
Incense holder
Wand
Athame
Optional: an equal number stones of various types.
Optional: an orgone pyramid, a large piece of vanondanite, a meteor, or a large free-standing piece of selenite/himalayan pink salt
*as these are the only requisite stones, and will be doing the brunt of the work in the spell, choose 4 crystals that are at least 1.5 to 2 inches and well shaped for the task (jamming into the corners of your room).
Personally, I'm not a huge fan of spells that come with long lists like wedding registries. Brujería on a budget is my favorite kind of magic. That said, you should always have purification medicine (I can't ever remember NOT having a bottle of Agua Florida), at least one sacred incense (Nag Champa is a great substitute), and some kind of ritual tool (don't have a wand made of elk horn, emerald, and gold? Enchant a kitchen knife or paint brush. Consecrate a Sailor Moon wand replica. Go outside a stick, hold it up, and shout "this is my magic stick!". You really don't need to drop a lot of cash on this.
Oh, and a magic broom.
Seriously.
Your broom needs to be functional but sole-use. Using the same broom to sweep the kitchen and then your sacred space? It almost cancels out. A magic broom must have a single purpose - to sweep away negative energy.
Your magic broom doesn't have to be fancy. You need not buy a hundred dollar bundle of twigs from Etsy (you can though, if you want). In a pinch, buy a hand broom (not that comfortable) or a regulation size broom from a home goods store.
TBH? I just finished my masters degree so I've had to get very creative with my spell ingredients. Rather than go make an Ikea trip to find a nice witch broom, I gathered a few thin branches from a cedar tree. I've also - when they were blooming - used stems of my yerba santa and basil plants. These work best with holy water, but consecrating is a breeze. Find what you have on hand and use that - don't blow all your money on magic.
OK, now down to the actual spell! Let's go through it step by step.
First, cleanse and purify the room you want to ward. Using either a standard broom or a bundle of herbs dipped in holy water, sweep or swish from the center out - widdershins.
Light your incense in the center of the room. Sit in front of the censer and enter into a state of contemplation. Slow your thoughts. Follow your breath.
If you work with deities, divinities, demons, orishas, etc. - invoke their power.
With a clear mind, close your eyes and begin to meditate on safety - set your intention: "harmful forces: be this your bane. Go ye back from whence you came." Your intention is to block negative energy - not spirits. Most supernatural beings are indifferent to you.
Walking clockwise around your room, place into each corner a quartz point. Whisper into the stone your wish - that no negative energy will enter.
Once you've placed all four crystals, take your athame in hand. If you have a compass, locate the NE or E crystal. Check that the crystal is secure (I shoved mine in the wall cracks) and then touch it with the tip of your athame/tool.
Here you'll need to utilize your visualization skills. Using your athame/tool, draw a line of energy (gold, white, or blue are good choices to envision) from the first crystal to the next.
Repeat this process until you return to the first crystal. You will have a line of magical light running along the wall and around the bottom of your entire room.
Starting at the first crystal, raise a line of magick up to the ceiling. Repeat the previous process.
When you are done, (you should be going up, across, down, back up, across) you will be in a cube (or irregular polygon) of magical energy. Focus on the crystals as you move.
Sit for a moment in front of the censer and strengthen the visualization - you are sitting in an irregular polygon of energy.
With your wand, walk around clockwise from the first crystal. This is where your creative energy comes in - draw (like a light drawing) magickal and protective symbols as if on a wall that sits like skin atop the physical wall. Invent your own mantra to chant. "Ommmmmmm" works in a pinch.
Your room is now a cube or polygon of energy, covered on all sides with magical graffiti. These symbols will protect you. The crystals have become sentient guardians. Imagine, if you can, a spider web of runes and protective symbols stretching across it.
This is optional, and a bit labour intensive, but the next step would be to create a "generator" to "power" your warding. On a small table, lay out a cloth and place in the center a crystal pyramid, an orgone pyramid, or any other large power stone. Around it, either in an ordered or organic manner, place various small crystals.
Once you are confident with your "core," enter into as deep a meditative state as possible. Channel energy from above and below, push it into your core matrix, and then envision beams of the same magical energy from the central matrix to the other, larger one. In your mind's eye, see the energy swirling clockwise from the generator outwards. Your matrix is now powered by a crystal core.
For the next few days, meditate on your matrix and the core (if you built one) to reinforce the permanence of the ward.
It's easy to find crystal matrix cloths online - especially on Etsy. I use a Cube of Metatron crystal matrix cloth - because it's pretty. You can use anything, honestly. The energy and intent are what's important.
And that's pretty much it! Keep your matrix in mind as often as possible. Maintenance is importance so this spell isn't a one time deal. In addition to reinforcing the wards, it also will give you a good indication as to when the system needs to be recharged - from the core outward.
I know, I know; this is a lot. I just hope you haven't gotten too confused by what should have been "crystals in each corner and some more in the middle of the room."
Complicated and long as it may be, this spell has given me a peace I didn't know I could have. As someone with PTSD, feeling secure and safe anywhere is massive. And it isn't just me: everyone who comes into my space remarks on how safe and warm they feel in the matrix. As I said - forget demons and "evil" spirits. Once you're protected from the rampant negative energy radiating from your surroundings, you'll thank me.
And then there's my favorite protection charm - my Black Magic woman.
But that will have to wait until next time, my witches!
-Magus Aradia
4 notes
·
View notes
Text
Photoshop - selection tools
Selection Tools is a tool used in Photoshop for various purposes such as: cutting out a part of an image and moving it or transferring it to another image, marking the area you want to work on (change color, brightness, add an effect, etc.). Photoshop offers different selection tools, each one can be used for something different.
These tools are on the left panel, you can expand them by holding down the small arrow in the lower right corner,
The selected part of the image will be distinguished to form so-called marching ants.


Marquee tools:
- Rectangular Marquee tool
- Elliptical Marquee tool
- Single Raw Marquee tool
- Single Column Marquee tool
The tools named above are the basic tools used to cut out regular shapes. To use them, you need to choose the necessary tool and draw it in the selected place. These tools are best for selecting shapes such as squares, rectangles, circles and lines, or to quickly select an entire image.
Selection with use of Rectangular Marquee tool:

Selection with Elliptical Marquee tool:

To create perfect shaped circle click and drag then hold Shift key ( small “plus” sign will appear) that will lock the shape of perfect circle, keep dragging if you need. Release the cursor button and Shift at the end:

Lasso Tool
With this tool, you manually mark / select any part of the photo. Useful when we want to quickly select something and we don’t need it to be precise.

Polygonal Lasso tool
This tool is more precise than previous one, it is good at selecting any polygons, when using it is important to remember here to finish selecting at the point where it begins, otherwise the program itself will connect both ends by choosing the shortest way.

Magnetic Lasso tool
This tool is great when the image you want to select clearly stands out from the background, e.g. an orange on a white background. To use it, you need to select a point - an edge, and then move the cursor over the area without moving away from the edge. When you move the cursor too far on the edge you can undo it using the backspace key. As the name suggests, the magnetic lasso holds these points together like a magnet, holding them together, attracting contrasting pixels. When finishing the selection, click on the point at the beginning.


Object selection tool
It is a great tool that allows to select an object with one click.
Just select this tool and then click on "select object" which is at the top of the panel. Photoshop will automatically select the object:


I think this tool works great when the object clearly stands out from the background. In the case when there are, for example, a lot of details, similar shades then the tool will not be that precise and you have to make manual corrections. It can be done by clicking on "select and mask", it allows to see what the selection looks like on different backgrounds and make the necessary corrections using the tools on the left.
A new option in Properties panel is "refine hair" which improves the edges along the hair so you don't have to do it with a brush. Fast and effective!

Quick Selection tool
This tool works in a such a way that you pick the area you want to select and ‘paint’ on it, Photoshop detects and marks the edges .This area can be enlarged or reduced by using the tools on the top of the control panel or keyboard shortcuts ( look at the bottom of this post).
This tool is good for choosing an object in the photo with an irregular shape, different texture, colors and tones.

Magic Wand tool
Magic wand tool automatically selects pixels of a specific tones and colors.
This tool is good for images with clear contrast/lines and useful when want to change the color and appearance of the background.


1 note
·
View note
Text
NM3217 Assignment 1 Blog Post (Abstraction)
When I first read the assignment brief, I thought of doing something related to food. Food to me, was best suited for the process of abstraction because you could strip it down to its most basic components by removing each ingredient one by one, layer by layer until you obtained its simplest form.

In the beginning, I believed that pizza was a relatively easier object to do given my lack of artistic ability and inexperience with the Adobe Illustrator application. But oh boy was I very wrong. I faced many problems utilizing the pen tool effectively and my curves often felt awkward and out of place.
I realised that designing on a digital application was significantly different from drawing in real life. Drawing in real life afforded more control to the designer whereas digital applications required mastery over various tools to effectively communicate your design. The image below showcases my poor attempt to draw a pizza.

After feeling frustrated at my first attempt at the assignment, I decided to play some games on my Nintendo Switch Lite instead. When I picked up the device, I noticed that the device contained many familiar shapes such as circles, squares and rectangles. It lacked the irregularity of a pizza slice where the crust, for instance, was not perfectly cut straight and sausage pieces came in different sizes. The Nintendo Switch was more structured in this sense with clear borders and boundaries for each individual element. Hence, I chose this device as my new assignment material. I decided to use a photo of the Nintendo Switch taken from a top-down view so that I could do a flat 2d drawing instead of one which required perspective.

For stage 1, I mainly used the rectangle, ellipse and polygon tool for drawing the various elements. The pen tool was used only to create the L and R buttons of the device because of its irregular shape. For colours, I used a grey colour palette that I found in the dropdown bar in Adobe Illustrator. Using the different shades of grey allowed me to achieve a more accurate representation of my chosen object. All the buttons which can be pressed are represented by a light grey tone that differentiates itself from the darker parts which form the main frame of the device. The screen is given a 3pt stroke to more clearly showcase its boundaries and its inner fill is lowered to a transparency of 60% to give the design a feeling of depth.
For stage 2, I removed many aesthetic choices of the device that did not directly impact the functionality of it. For instance, the arrow keys of the up, down, left, right buttons were removed alongside the A, B, X, Y letters on the buttons. A secondary border around the screen was also removed because it did not provide any additional functionality to the device.
For stage 3, lesser used buttons on the device were removed because they were not essential to the functionality of the system. Buttons like the screen capture (represented by the button with the circle on the bottom left), home button (represented by the button on the bottom right), plus and minus buttons were excluded as a result. The 3pt stroke of the screen was shifted back to 1pt because I felt it could still be identified as a screen whilst making it less conspicuous.
For stage 4, I removed the L and R buttons and also the circular joysticks because they were not key features of what constitutes a Nintendo device. My frame of reference was the old Gameboy Advance which mainly comprised of the cross-shaped joystick and A and B buttons. From my own experience, the L and R buttons were less commonly used, so I decided to exclude it during this stage of abstraction.
For stage 5, I changed the cross-shaped button to 2 intersected lines and circular buttons to dots, in an attempt to further simplify the image.
At this point, I felt confident in my stage 1-3 abstractions but was a bit apprehensive about my stage 4 and 5 abstractions. Thus, my main goal of the critique was to focus on getting opinions on these 2 stages.


During the in-class critique, I was given many helpful suggestions which helped inform my decisions regarding changes to improve my abstractions.
For stage 1, a student mentioned how I could consider adding reflections to enhance its look further. I took into account that in my original image, a reflection of myself could be seen on the screen. Hence, I decided to add a simple reflection using slanted rectangles that were in a lighter grey tone, which shows light hitting the screen.
Secondly, another student mentioned how there was still too much colour in stages 4 and 5 of my abstraction. She suggested using just black and white to more effectively simplify my design. After tinkering a bit with my designs, I felt that there was no need to use any black due to the fact that the outlines/strokes were sufficient in demarcating each specific element of the device. Thus, I completely removed all fill colour and left it as white for all the elements in stages 4 and 5.
Thirdly, a student brought up how the L and R buttons felt significant in helping her identify the design as a Nintendo switch. As a result, I decided to include the buttons in stage 4 of the abstraction since I felt that I had downplayed the significance of those 2 buttons given my own personal experience with it.
Lastly, another coursemate pointed out how in stage 5 of my abstraction, the circular buttons looked like speaker holes and could cause a misinterpretation of my intended device. This made me scrap the idea of simplifying both the circular buttons and joystick further, reverting it back to its original design in stage 4. The only difference between stages 4 and 5 is the removal of the L and R buttons.

0 notes
Text
Image Annotation Services Explained: Choosing the Right Company for Your Project

Introduction:
In the fast-paced realm of artificial intelligence (AI) and machine learning (ML), the quality of training data is essential for developing effective models. For tasks like object detection, image recognition, and autonomous systems, annotated images are fundamental to achieving success. The process of Image Annotation Company , which involves labeling images to enable machines to interpret visual information, has emerged as a vital component in training AI algorithms. However, with numerous options at your disposal, how can you select the most suitable image annotation Company for your project? Let us delve into this topic.
What Are Image Annotation Services?
Image annotation is the process of attaching metadata or labels to images, enabling machines to recognize and comprehend the objects present within those images. This labeling can vary from simple tagging to intricate semantic segmentation. The various types of image annotation include:
Line and Polyline Annotation: Employed for delineating road lanes, pipelines, and other similar linear structures.
Bounding Boxes: Drawing rectangular outlines around objects to facilitate their identification.
Polygon Annotation: Accurately marking the boundaries of objects with irregular shapes.
Semantic Segmentation: Assigning a specific object category to each pixel within an image.
3D Cuboids: Providing depth and volume annotations for the identification of three-dimensional objects.
Landmark Annotation: Pinpointing specific features in an image, such as facial characteristics or significant body parts.
Why Outsource Image Annotation?
Delegating image annotation to specialized firms provides several advantages:
Focus on Core Competencies: Enables organizations to prioritize their primary AI development efforts rather than engaging in manual annotation activities.
Scalability: Extensive datasets can be annotated effectively, preventing internal teams from becoming overloaded.
Accuracy: Specialized knowledge in labeling leads to superior data quality, minimizing errors in artificial intelligence models.
Cost-Effectiveness: Utilizing specialized tools and personnel conserves time and resources.
Key Considerations When Choosing an Image Annotation Company
Proficiency in Your Field: Not all annotation projects are identical. It is essential to select a company that possesses expertise in your particular sector, whether it pertains to healthcare, autonomous vehicles, e-commerce, or security.
Annotation Precision and Quality :The success of AI models heavily relies on high-quality annotations. Inquire about the company’s quality assurance measures and the methods they employ to maintain accuracy.
Capacity for Scalability and Timeliness :Verify that the company is equipped to manage extensive datasets and can provide results within your specified timeframe. Discuss their operational infrastructure and workforce capabilities.
Technological Tools and Resources : An effective image annotation company utilizes sophisticated tools and methodologies to enhance efficiency. Confirm whether they employ AI-assisted annotation technologies or bespoke software solutions.
Data Protection and Privacy : Given the often sensitive nature of the data involved, it is vital to ensure that the company adheres to stringent data security measures, including compliance with GDPR, HIPAA, or other pertinent regulations.
Cost Structure: It is crucial to maintain transparent pricing. Examine the pricing model employed by the company, whether it is determined on a per-image basis, hourly rates, or according to the scope of the project, in order to prevent any unforeseen expenses.
Client Testimonials and Portfolio: Investigate the company’s history and performance. Seek out client feedback, testimonials, or case studies that highlight their proficiency and experience in the field.
GTS: Your Trusted Partner for Image Annotation Services
GTS is recognized as a dependable partner in the realm of high-quality image and video annotation. With a solid history of providing accurate, scalable, and secure annotation services, GTS enables businesses to develop robust AI models. The following aspects distinguish GTS from its competitors:
Industry Knowledge: Expertise spans multiple sectors, including healthcare, automotive, and retail.
Innovative Technology: Utilizes state-of-the-art tools to enhance precision and efficiency.
Flexible Solutions: Equipped to manage projects of any scale with rapid turnaround times.
Dedication to Excellence: Guarantees superior annotations through comprehensive quality control measures.
Data Protection: Complies with rigorous data security standards to protect your information.
Conclusion
Selecting an appropriate image annotation company is crucial for the success of your AI initiative. By assessing factors such as expertise, quality, scalability, tools, security, and pricing, you can identify a partner that aligns with your objectives. Whether your focus is on developing autonomous vehicles or enhancing medical imaging, accurate annotations will propel your models toward success.
Are you prepared to elevate your AI projects? Discover the extensive services provided by Globose Technology Solution and guarantee that your data is managed by professionals.
0 notes
Text
Top Features of an Image Annotation Tool for AI
In the world of Artificial Intelligence (AI), high-quality data is the backbone of successful projects. For AI models to learn and perform accurately, they require well-annotated datasets. This is where an image annotation tool becomes invaluable. These tools streamline the process of labeling data, enabling teams to create datasets that power cutting-edge AI solutions. But what makes an image annotation tool truly effective? Here’s a look at the top features you should consider when selecting one.
1. Support for Multiple Annotation Types
AI models are used for a variety of applications, from object detection to semantic segmentation. A robust image annotation tool should support multiple annotation types, such as:
Bounding Boxes: Ideal for object detection in autonomous driving or surveillance.
Polygons: Perfect for annotating irregular shapes, such as buildings in satellite imagery.
Key Points: Useful for facial recognition or body posture analysis.
Semantic Segmentation: For pixel-level labeling in medical imaging or robotics.
3D Cuboids: Essential for depth perception in applications like self-driving cars.
The flexibility to choose different annotation types ensures that the tool can cater to diverse project needs.
2. Automation Features
Manual annotation can be a time-consuming process, especially for large datasets. Automation features significantly reduce the effort required by leveraging AI to assist with labeling. Key automation capabilities include:
Auto-labeling: Automatically annotates objects based on predefined criteria.
Pre-labeling: Uses AI to generate initial labels for manual review.
Smart Predictions: Suggests annotations by identifying patterns in existing data.
These features not only save time but also enhance the overall efficiency of the annotation process.
3. Quality Assurance Mechanisms
The quality of annotations directly impacts the performance of AI models. An effective annotation tool includes features to ensure high-quality and consistent labels:
Confidence Scoring: Flags low-confidence annotations for manual review.
Inter-Annotator Agreement: Ensures consistency across multiple annotators.
Error Detection: Identifies anomalies or inconsistencies in the dataset.
These mechanisms help maintain data integrity, resulting in more reliable AI models.
4. Scalability
As datasets grow in size and complexity, scalability becomes a critical factor. A good image annotation tool should be able to handle:
Large datasets without compromising performance.
Seamless cloud-based solutions for storage and collaboration.
The ability to scale as project needs evolve over time.
5. Integration with ML Pipelines
The tool should integrate smoothly with machine learning workflows. This includes:
Data Format Compatibility: Supporting popular formats like COCO, YOLO, or Pascal VOC.
Cloud Platform Integration: Enabling easy data transfer with platforms like AWS, Azure, or GCP.
Seamless integration reduces friction and speeds up the transition from annotation to model training.
6. Collaboration Features
For teams working on large projects, collaboration features are essential. Look for tools that offer:
Real-Time Feedback: Allows annotators and reviewers to communicate efficiently.
Guideline Sharing: Ensures consistent annotations by providing clear labeling instructions.
These features enable teams to work together effectively and maintain high standards.
Conclusion
Choosing an image annotation tool with the right features is essential for the success of any AI project. A tool that supports multiple annotation types, offers automation, ensures quality, and integrates with ML workflows can save time and enhance the accuracy of your datasets.
For a comprehensive solution, explore Labellerr’s image annotation tool. Designed with scalability, efficiency, and collaboration in mind, Labellerr empowers AI teams to create high-quality datasets that drive innovation.
Invest in the right tool today to streamline your AI project and achieve better results tomorrow.
#ArtificialIntelligence#MachineLearning#DataAnnotation#ImageAnnotation#AItools#DataLabeling#ComputerVision#AIInnovation#DeepLearning#AITechnology
0 notes
Text
An Introduction to Stone Masonry Construction

Stone masonry is a method of construction that involves using stones bound together with mortar. Stones are more robust, more durable, more economical, and some may even say more aesthetically pleasing compared to other construction materials like bricks. Builders use stone masonry in constructing walls, arches, beams, and marine structures such as piers, docks, and dams.
The stones used in stone masonry are natural rocks. They must be stiff and void of cracks, sand holes, and cavities. Although there are many rocks to choose from, the stones selected usually depend on their availability and the requirements of the structure. Commonly used stones include limestone, sandstone, marble, and granite.
Mortar is the binding material used to join cut stones. Builders make mortar using cement, water, and sand. The mortar must be strong enough to withstand the load from the structure being built.
There are two significant stone masonry classifications, rubble masonry and ashlar masonry. Rubble masonry involves using irregular-sized stones that are either undressed or roughly dressed. Due to the irregularity in size, they usually have wide joints. Constructors further divide rubble masonry into coursed, uncoursed, random, dry, flint, and polygonal rubble masonry.
Coursed rubble masonry uses different-sized stones of equal heights, usually from two to eight inches. The technique also involves the gradual layering of the rocks on the course. Builders commonly use coursed rubble masonry in constructing parts of residential buildings and public houses. Uncoursed rubble masonry, on the other hand, involves undressed stones that have had their corners chipped away. This category uses equally sized 15 to 20-inch rocks that do not require the layering technique. Masons use them for building compound walls, garages, and warehouses.
Random rubble masonry involves the irregular arrangement of different-sized stones to create aesthetically pleasing structural elements. Dry rubble masonry requires labor with these specific skills, as they do not use mortar or any binding material. It is cheaper than most other categories. Polygonal rubble masonry uses hammered stones shaped into irregular polygons, and also requires highly skilled labor to execute. Flint rubble masonry uses silicon stones, usually three to 12 inches long. They can be layered or non-layered, depending on the technique employed.
The second major category of stone masonry is ashlar masonry. Ashlar masonry uses square and rectangular stones ranging from about 10 to 12 inches. The stones used must be accurately dressed to be uniform and fine jointed. In ashlar masonry, the stone's length should be proportional to its height. Builders further divide ashlar masonry into five categories: ashlar fine, ashlar rough tooled, ashlar quarry faced, ashlar chamfered, and ashlar facing.
Ashlar fine masonry uses chisel-dressed stones that create an appealing look. This masonry type is usually costly due to the technique involved. Ashlar rough tooled masonry or bastard ashlar also uses chisel-dressed rocks that have had their edges roughened up with a tool. Ashlar quarry-faced masonry has a distinct one-inch wide strip with a bevel around its perimeter. Ashlar chamfered masonry also uses a one-inch wide strip, but in contrast, has its edges cut at a 45-degree angle. Ashlar-facing masonry uses a combination of brick and stone masonry, creating a unique appearance.
0 notes
Text
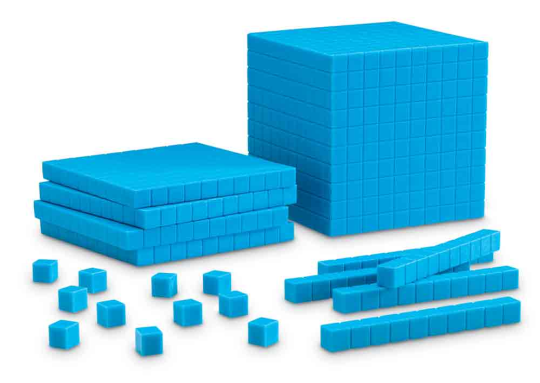
For those confused, this was how they taught us math and geometry for years and years in American schools. The cubes in the first were about teaching area and volume. The clear chips in the second were general counting tools for demonstrating addition, subtraction, etc. The cubes with holes were good for demonstrating several things, like volume of irregular shapes (but in practice they were mostly for keeping kids hands busy). The shapes in the last photo were good for demonstrating tessellation, regular polygons, angles, that kind of thing, and they were mostly used by kids to make some really great mandalas.
breakfast
406K notes
·
View notes