#1 Port Console Server
Explore tagged Tumblr posts
Visit Tumblr Blog
Explore Tumblr blogs with no restrictions, modern design and the best experience.
Last Seen Tumblr Blogs


Fun Fact
The Tumblr office adopted Tommy, an 11-year-old Pomeranian.
Text
Network switches
What’s a network switch ?
A switch is a device used in computer networks to connect multiple devices together within a single local area network (LAN). Its main role is to facilitate communication between different connected devices, such as computers, printers, servers, IP phones, etc.
It is a mini-computer which is made up of RAM, ROM, flash RAM, NVRAM, a microprocessor, connectivity ports and even an operating system.

RAM
RAM (Random Access Memory) contains the current configuration of the switch and temporarily stores the MAC address table, which is then processed by the microprocessor.
Microprocessor
The microprocessor is the heart of the switch, responsible for data processing, including switching and creating links between multiple devices.
External memories
External memories, such as flash RAM, ROM, and NVRAM (Non-Volatile RAM), store configuration files , different versions of the IOS , etc ...
Ports
The switch ports are the communication interfaces of the switch. There are several of them, generally 24 for a Cisco switch. Each port is associated with an LED which indicates its status and activity.

How does it work ?
Now how does a switch work to transfer information from one machine to another?
Suppose we have 4 machines: A, B, C and D connected to our switch in ports 1, 2, 3 and 4 as follows:

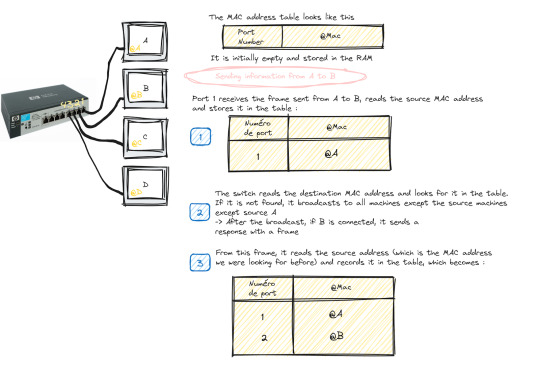
The switch only works with MAC addresses , so basically we have an empty MAC address table stored in RAM as soon as the switch starts up which looks like this :

Transmitting data from machine A to machine B happens in the following steps:
Machine A sends a frame to machine B
Once this frame arrives at port 1 (which is the one linked to A), the switch reads the source MAC address and stores it in the MAC address table
The switch reads the destination MAC address and looks for it in the table, if it is not in the table, it broadcasts to all the active machines connected to the switch except the source one.
If the port linked to the machine we want is active, it sends a response frame from which the switch reads the MAC address we were looking for (@B)
Once done, it records the MAC address of B in the table.

This process repeats until the switch reaches what is called "MAC address table stability", that is to say it knows all the MAC addresses of the connected machines and has no more need to broadcast.
Starting and configuring a switch
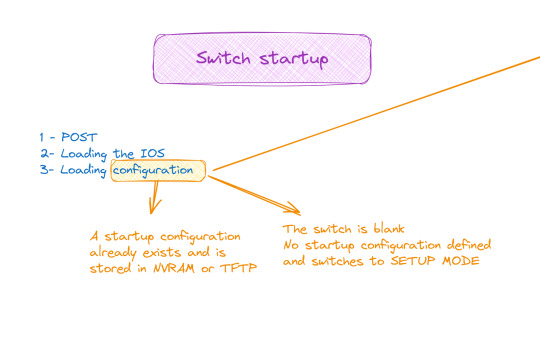
When it comes to booting a switch, the process is similar to that of a traditional computer system:
POST (Power-On Self Test): The switch performs proper functioning tests on all hardware.
Loading IOS (Internetwork Operating System): The switch operating system is loaded.
Loading the configuration. At this stage we have two cases:
Either the switch already has a startup configuration defined and stored in NVRAM
Either the switch is blank and it is up to us to define the startup configuration when it goes to setup mode
Switch configuration

The configuration of a switch is done through different modes, such as user mode, privileged mode and global configuration mode, which allows access to specific configuration modes, such as interface mode, routing mode, line mode, etc.
And to do all this of course you must first connect the switch with the machine via the console cable and open a terminal emulator
💡 It should be noted that the only machine that can configure the switch is the one connected to it by a console cable, the others are only hosts.
#software#network switches#codeblr#code#css#html#javascript#java development company#python#studyblr#progblr#programming#comp sci#web design#web developers#web development#website design#webdev#website#tech#html css#learn to code
99 notes
·
View notes
Text
ENDTHOUGHTS: CA-6 & POKERMAN23

Pokerman is the codename for the underlying card-game engine (not Unity's parts) of the GLITCHYPSI CA-6 game, which was made for Artfight as a means to challenge myself in a gamejam-esque fashion. I was kind of soured by the fact it didn't garner attention by the Artfight staff despite the effort I put into it, but even in light of that, I have employed techniques that I had not used before which have increased my confidence as a game developer, and I kind of enjoyed it even if I pulled an allnighter to complete this one in time, with my job and all...
Pokerman started as an exclusively CLI application, as my approach this time was to separate the actual card game logic from the game itself. Kind of an engine-frontend separation, which would allow the engine to be extensible and also ported to many other "frontends" if so I wished, so the game could exist in Unity, maybe even MonoGame, as a webapp with a C# backed server, and so on.
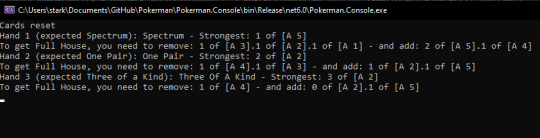
I worked on the "dealer" and card values first. The way the engine is set up is that every hand is its own instance that checks a hand's cards, and if it matches, it puts itself as the "Hand result" for that hand, and that is used to determine the weight of the hand, which can be compared to other hands to decide which is stronger.
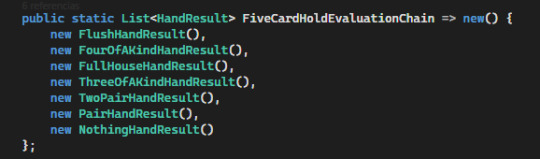
This approach makes it easy for me to add new hands, for instance. Currently, the only existing Hand Results are all the results that pertain to the 5-card hold rules with no jokers.
What the engine does is use a set of hand instances and check from strongest to weakest until the first one yields true. The last one will always happen, as it is the bogus hand. The only chain is, as expected, the 5-card hold one.
This, the hand weight comparisons, and the tie mechanics were perhaps the places I debugged in the most to check for potential pitfalls. With the console and specific non-automated tests, it was kind of easy and fun, although... the code... might use some work.
Next I worked on the AI. With all the ML fuzz I must state that this AI is merely a random chance AI. No machine learning is involved in this AI.
All this AI does is look at a chance table given a number of cards to replace which determines the chances of getting the wanted hand with X cards to replace. The table is precomputed. (1 = 100%)
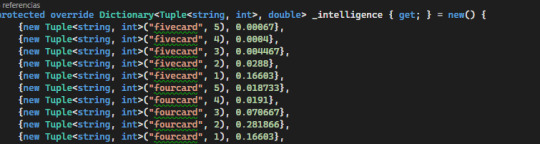
Some of the values may be probabilistcally wrong. My combinatorics aren't as polished as they used to be, and instead of using raw math I took a simpler approach and used the engine itself to generate 10k pseudorandom (System.Random() .NET 6 implementation) draws to determine a percentage. However, for the purposes of the game engine, and given extreme precision was not necessary, it's acceptable.
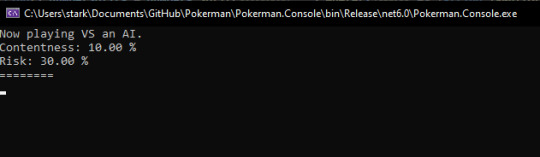
Risk and Contentness were a pair of values that determined whether the AI would risk discarding their current hand for a stronger one. Contentness was tested for first. If it met the margin, it would draw no new cards. Riskiness was tested for last. If it met the margin, it would go up one hand in terms of hand weight to aim for. It then gave back the result evaluation that it desired to get the cards for, or, if content, the actual hand (signifying contentness with the current hand).
It would've made a fair game with a degree of difficulty that wasn't ever the same, and the AI risk and contentness parameters can be changed at any moment during runtime.
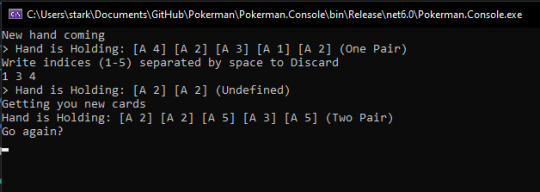
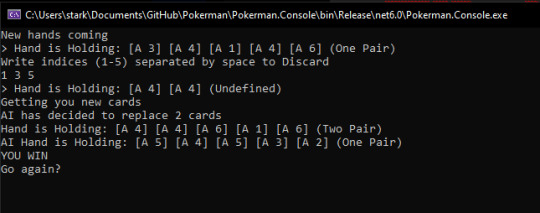
This was all for the underlying engine. Next was to actually link all these faceless bits of data to something the player could interact with...
...and while at work, when I had completed all my assigned development projects (under supervision of my boss, so I was not just slacking!!!) I made a placeholder set of cards.
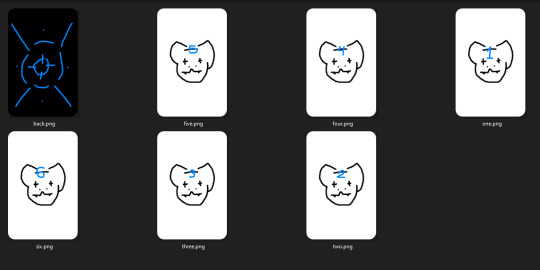
These were used to make a Unity ScriptableObject. This was also my first time working with ScriptableObjects themselves, but a dear friend had shown me their power before and I was raring to try them out for this project.
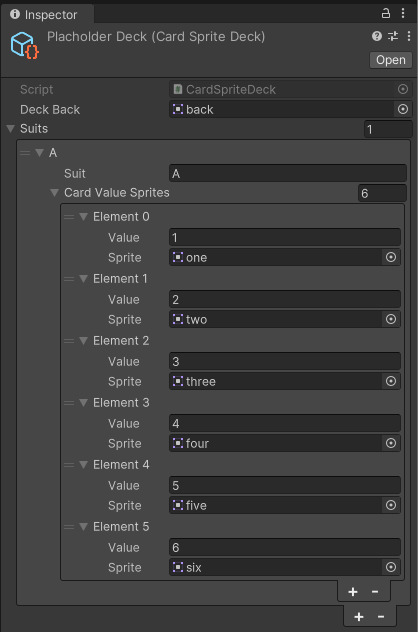
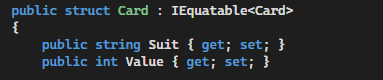
The data is reminiscent of the Pokerman Engine Card (structure below), with added relevant Unity information.
The approach of using ScriptableObjects with their own methods I could call to, for example, get the sprite for a particular Card, was extremely useful, because I could write code once and make seven thousand themed decks if I so wanted.
I used this to make the world-space and GUI space cards that you can touch in the game.


Yes. they DO flip, literally. It was the easier way to do this, and in the context of the game (and shader used) you couldn't just cheat out of that.
After the cards were set in place, it was time to make the dealer..................................... oh mama
The assets often are the hardest part of these things. They take so long because animations are something else. The first dealer was
hm
this.

Yes, that is positively a Henohenomoheji.
It was simple, sketchy and scratchy, which was perfect to test out animations with. Lord, it did take some time still. Animating is hard. Praise animators.

I had some fun playing with it, not gonna lie.
After all this, it was time for the real deal.
Oh boy. Remember when I said animation was hard? With such tight timeline to work with and having to work in my usual artstyle?
Yeah. Look at this.
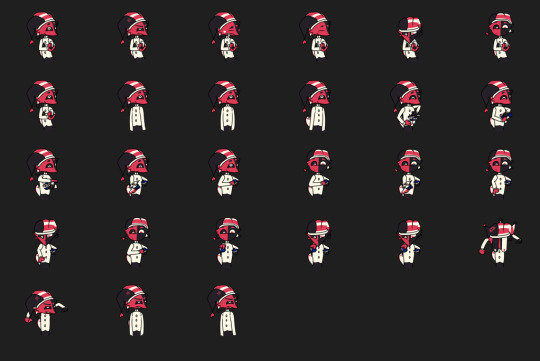
This took me a relatively mean amount of hours (entire afternoon), and it was the final day I could work on this game by the time I had started making this spritesheet.
It is composed of individual parts to make my life easier and then put together in Aseprite. It was probably the part that took me the most time out of everything else asset related. It even still has some flaws, such as the body sometimes shifting positions between frames. My bad.
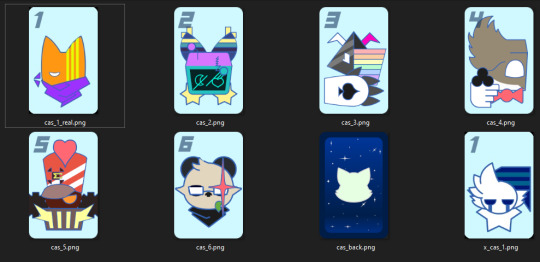
After that I worked on the cards. They were abstract-ish representations of the characters I had chosen to become cards as part of my Arfight gimmick for this year, and a Casandra themed cardback.
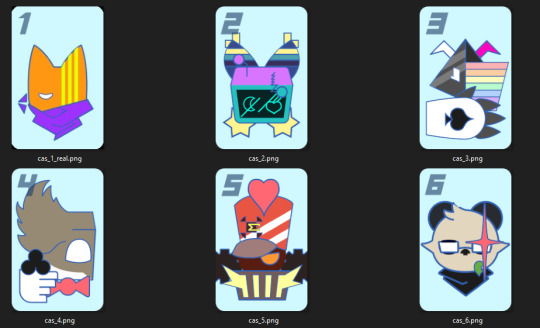

Fun fact. Card with value 1 was gonna be somebody different.
After everything was put together......... it was time for the audio. I left audio for last. I suck at music. I have said it once I will keep saying it and it does NOT seem to be getting any better, and it was not going to improve within the remaining 12 hours I had to work on the game. I could not afford time to laze off in FL Studio when I had to polish some stuff to make the game get out there. I wasn't confident in my music skills at all (in contrast to my programming and graphics skills).
I got some sfx from freesound and edited it to match, and used some of the stream assets for other sound effects related to the coins (taken straight from Mario Party 3, ha ha)
The music track... I had asked another dear friend about it when development was still in the console-app stage, but they said they wouldn't be available for such. So, I just left it for the very last moment. I was then SCRAMBLING to find a nice track to use that would not get me in trouble (I did not use Luigi's Casino's track for this reason), so I looked where I get some of my tracks I play while programming, and settled on this one...
youtube
I liked it for the ambience (background) I pulled at the last minute (because I HADN'T even drawn the background then yet!!!) and with that, it just needed to be polished and uploaded to itch and Artfight (most importantly Artfight!!!!)
I pulled an allnighter finishing the final details of the game and authoring the page for it in itch. I had done allnighters before for other games I had made for people I cherished (although those are... probably better left in the past now.)
And so while at work I published the game and posted it on Artfight.
It sure was a ride and yes I will mention again I am sort of mad I was not even mentioned among the games that were highlighted in the final Artfight blogpost despite all the effort I put into it. However... the people the game featured really liked it, and that warmed my heart and justified my effort, as well as what I learned while making it.
This game was a promise to myself to complete, since in 2021 my computer was stolen while I was making a Subway Surfers clone for the same reasoning. I wanted to get it done by all means necessary, and I can now reliably say I have completed my goal.
Hope you enjoy the game. I am going to polish it a little bit more and upload it to Newgrounds at a later date... but no more allnighters over it.
It's done. It's cute, it's small, and it's something I should've done when I first started my gamedev career instead of trying to lift the big pumpkins first without any muscle.
Maybe I'll make Pokerman open source... or make another game using it, extending it to be able to properly handle Hold'Em Poker.
Want to play the game? Click "CA-6" in the title of this post.
7 notes
·
View notes
Text
Server Security: Analyze and Harden Your Defenses in today’s increasingly digital world, securing your server is paramount. Whether you’re a beginner in ethical hacking or a tech enthusiast eager to strengthen your skills, understanding how to analyze adn harden server security configurations is essential to protect your infrastructure from cyber threats. This comprehensive guide walks you through the key processes of evaluating your server’s setup and implementing measures that enhance it's resilience. Materials and Tools Needed Material/ToolDescriptionPurposeServer Access (SSH/Console)Secure shell or direct console access to the serverTo review configurations and apply changesSecurity Audit ToolsTools like Lynis, OpenVAS, or NessusTo scan and identify vulnerabilitiesConfiguration Management ToolsTools such as Ansible, Puppet, or ChefFor automating security hardening tasksFirewall Management InterfaceAccess to configure firewalls like iptables, ufw, or cloud firewallTo manage network-level security policiesLog Monitoring UtilitySoftware like Logwatch, Splunk, or GraylogTo track suspicious events and audit security Step-by-Step Guide to Analyzing and Hardening Server Security 1. Assess Current Server Security Posture Log in securely: Use SSH with key-based authentication or direct console access to avoid exposing passwords. Run a security audit tool: Use lynis or OpenVAS to scan your server for weaknesses in installed software, configurations, and open ports. Review system policies: Check password policies, user privileges, and group memberships to ensure they follow the principle of least privilege. Analyze running services: Identify and disable unnecessary services that increase the attack surface. 2. Harden Network Security Configure firewalls: Set up strict firewall rules using iptables, ufw, or your cloud provider’s firewall to restrict inbound and outbound traffic. Limit open ports: Only allow essential ports (e.g., 22 for SSH, 80/443 for web traffic). Implement VPN access: For critical server administration, enforce VPN tunnels to add an extra layer of security. 3. Secure Authentication Mechanisms Switch to key-based SSH authentication: Disable password login to prevent brute-force attacks. Enable multi-factor authentication (MFA): Wherever possible, introduce MFA for all administrative access. Use strong passwords and rotate them: If passwords must be used,enforce complexity and periodic changes. 4. Update and Patch Software Regularly Enable automatic updates: Configure your server to automatically receive security patches for the OS and installed applications. Verify patch status: Periodically check versions of critical software to ensure they are up to date. 5. Configure System Integrity and Logging Install intrusion detection systems (IDS): Use tools like Tripwire or AIDE to monitor changes in system files. Set up centralized logging and monitoring: Collect logs with tools like syslog, Graylog, or Splunk to detect anomalies quickly. Review logs regularly: Look for repeated login failures, unexpected system changes, or new user accounts. 6. Apply Security Best Practices Disable root login: prevent direct root access via SSH; rather,use sudo for privilege escalation. Restrict user commands: Limit shell access and commands using tools like sudoers or restricted shells. Encrypt sensitive data: Use encryption for data at rest (e.g., disk encryption) and in transit (e.g., TLS/SSL). Backup configurations and data: Maintain regular, secure backups to facilitate recovery from attacks or failures. Additional Tips and Warnings Tip: Test changes on a staging environment before applying them to production to avoid service disruptions. Warning: Avoid disabling security components unless you fully understand the consequences. Tip: Document all configuration changes and security policies for auditing and compliance purposes.
Warning: Never expose unnecessary services to the internet; always verify exposure with port scanning tools. Summary Table: Key Server Security Checks Security AspectCheck or ActionFrequencyNetwork PortsScan open ports and block unauthorized onesWeeklySoftware UpdatesApply patches and updatesDaily or WeeklyAuthenticationVerify SSH keys,passwords,MFAMonthlyLogsReview logs for suspicious activityDailyFirewall RulesAudit and update firewall configurationsMonthly By following this structured guide,you can confidently analyze and harden your server security configurations. Remember, security is a continuous process — regular audits, timely updates, and proactive monitoring will help safeguard your server against evolving threats. Ethical hacking principles emphasize protecting systems responsibly, and mastering server security is a crucial step in this journey.
0 notes
Text
Creative DIY Projects Using Old Laptops

Technology evolves rapidly, and many people find themselves with old laptops that no longer meet their needs. Instead of discarding them, why not explore some innovative ways to repurpose them? Whether you have a second hand laptop, a refurbished MacBook Air, or an outdated Windows device, there are plenty of DIY projects to bring them back to life.
If you’re looking for sustainable and budget-friendly ways to reuse your old devices, here are some creative DIY ideas to make the most of used laptops in India.
1. Transform It into a Home Media Center
One of the easiest and most useful ways to repurpose an old laptop is by turning it into a media center. With apps like Plex or Kodi, you can use your laptop to stream movies, music, and TV shows directly to your TV. Simply connect it via HDMI, install your favorite media player, and enjoy a personalized entertainment hub.
How to Set It Up:
Install Plex or Kodi for a streamlined media experience.
Connect an external hard drive for additional storage.
Use an HDMI cable and link it to your television.
2. Convert It into a Home Server
An old second hand laptop can be repurposed into a home server for storing files, hosting websites, or even running smart home automation software. This is a great way to keep your data centralized and accessible from anywhere in your home.
How to Do It:
Install Ubuntu Server or FreeNAS for file sharing.
Use it to store backups, family photos, and important documents.
Set up a basic cloud storage system for easy access to files.
3. Create a DIY Digital Photo Frame
If your laptop’s screen is still functional, why not turn it into a digital photo frame? This is a fantastic way to display family photos, artwork, or even inspirational quotes.
Steps to Make It Work:
Install photo slideshow software like Google Photos.
Remove the keyboard and mount the screen in a frame.
Set it up in your living room or office for a modern touch.
4. Use It as a Secondary Monitor
A renewed laptop with a functional display can be repurposed into a secondary monitor for increased productivity. Whether you're working from home or gaming, a second screen can improve multitasking.
How to Set It Up:
Use SpaceDesk (Windows) or Air Display (Mac) to connect wirelessly.
Connect using an HDMI cable if the ports are compatible.
Extend or mirror your screen for better workflow.
5. Turn It into a Gaming Console
Older refurbished laptops may not support high-end gaming, but they can still be turned into retro gaming consoles with emulators. With software like RetroPie or Lakka, you can play classic games from PlayStation, Nintendo, and more.
What You Need:
Install RetroPie, Lakka, or Batocera.
For a console-like experience, use a Bluetooth controller.
For a larger screen, connect it to your television.
6. Donate or Sell Your Old Laptop
If your laptop is still functional but no longer useful to you, consider donating or selling it. Platforms like Retechie specialize in refurbished laptops in India, offering a marketplace for buying and selling second hand devices. This not only helps someone else but also promotes sustainability by reducing electronic waste.
Where to Sell or Donate:
Sell it on Retechie if it still has good resale value.
Donate it to schools or NGOs for students in need.
Get credit for a newer gadget by trading it in.
7. Extract and Repurpose Individual Components
Even if your laptop isn’t working, some parts can still be useful. Here’s what you can salvage:
Hard Drive: Convert it into an external storage device.
RAM & Battery: Use them for repairs or upgrades.
Screen Panel: Repurpose it as an external monitor.
Final Thoughts: Give Your Old Laptop a New Life
Instead of letting your old laptops collect dust, these DIY projects can help you turn it into something practical and exciting. Whether you transform it into a media center, home server, or secondary monitor, there are plenty of creative ways to extend its usefulness. Looking to buy used laptops or sell your old one? Explore Retechie, the trusted marketplace for refurbished Apple laptops, second hand laptops, and renewed laptops in India.
#Buy used laptop#Used laptop#refurbished laptop#refurbished laptops#Refurbished apple#Refurbished Apple Laptops#Refurbished macbook air#refurbished laptops in India#Old laptop#Old laptops#Second hand laptops#Renewed Laptop#Used laptops in India#renewed laptops#Second hand laptop#Retechie
0 notes
Text
Here is the python code for an ip address html dirrect message box to a server console message! :
import socket from http.server import HTTPServer, BaseHTTPRequestHandler import argparse import threading import webbrowser import urllib.parse
class HTMLHandler(BaseHTTPRequestHandler): """Handles HTTP requests and serves HTML from input."""def do_GET(self): """Handles GET requests.""" if self.path.startswith('/'): if '?' in self.path: query = urllib.parse.urlsplit(self.path).query query_components = urllib.parse.parse_qs(query) if 'myTextbox' in query_components: text_input = query_components['myTextbox'][0] print(f"Text box input: {text_input}") # Print to console self.send_response(200) self.send_header('Content-type', 'text/html') self.end_headers() html_with_textbox = self.server.html_content + """ <br><br> <form action="/" method="GET"> <input type="text" id="myTextbox" name="myTextbox" placeholder="Type here..."> <input type="submit" value="Submit"> </form> """ self.wfile.write(html_with_textbox.encode('utf-8')) else: self.send_response(404) self.end_headers()
def run_server(ip_address, port, html_content): """Starts an HTTP server with dynamic HTML content.""" try: server = HTTPServer((ip_address, port), HTMLHandler) server.html_content = html_content print(f"Serving dynamic HTML on http://{ip_address}:{port}") server.serve_forever() except OSError as e: if e.errno == 98: print(f"Error: Address {ip_address}:{port} is already in use.") else: print(f"An unexpected Error occurred: {e}") except KeyboardInterrupt: print("\nStopping server…") server.shutdown() print("Server stopped.")
if name == "main": parser = argparse.ArgumentParser(description="Serve dynamic HTML from input.") parser.add_argument("-p", "--port", type=int, default=8000, help="Port number to listen on.") parser.add_argument("-i", "--ip", type=str, default="127.0.0.1", help="IP address to listen on.") parser.add_argument("-o", "--open", action="store_true", help="Open the webpage in a browser automatically.") parser.add_argument("-f", "--file", type=str, help="Read HTML content from a file.") parser.add_argument("html_content", nargs="*", help="HTML content to serve (as command-line arguments).")args = parser.parse_args() html_content = "" if args.file: try: with open(args.file, 'r') as f: html_content = f.read() except FileNotFoundError: print(f"Error: File '{args.file}' not found.") exit(1) elif args.html_content: html_content = " ".join(args.html_content) else: html_content = input("Enter HTML content: ") server_thread = threading.Thread(target=run_server, args=(args.ip, args.port, html_content)) server_thread.daemon = True server_thread.start() if args.open: webbrowser.open(f"http://{args.ip}:{args.port}") server_thread.join()
0 notes
Text
Previously on 68616472696616e7573:
I built a network lab from a shitty old Cisco SG350 switch, Lenovo m72 mini-PC and tp-link router. Lenovo works as a bare-bone Linux server. I selected this gear pretty much only because I had them laying around.
It worked fine for a week or two, until I realised I had given the same IP to both the router and the switch. I don’t even know how I managed to do that, probably because I didn’t configure all of them together and make a clear network map before configuring. I’m surprised it worked at all.
Aaaaand I did the noob mistake (which I knew not to do but did it anyway) and tried changing the Cisco IP in the GUI. It’s impossible, I don’t think anyone has successfully configured a Cisco Network Switch via GUI, at least not these cheaper models.
In the end I just ended up digging up the console cable, resetting the switch and doing it all over via serial commands. Which is a lot faster than any other method, it didn’t take that long. Dilly dallying with GUI and then trying to remove commands via terminal took several hours and led to nowhere.
Anyway, I learned a lot, which is why you do these things:
1. I still have an few years old CCNA book, that is really good
2. ‘line tty’ does not exist on SG models for some reason, I don’t know how to make SSH work
3. ‘vlan databases x,y’ is how you create a vlans, but I guess this is deprecated method and you can do it via configuration mode in Catalyst and newer switches?
4. Commands: ‘ctrl+h, write mem, sh run, sh start, conf t’
5. In SG350 the command to reset the configuration is ‘delete startup-configuration’, man it took a while to find that! Even ChatGPT didn’t know.
I also made the TP-link as secure as possible creating 16-character wifi pass, hiding the SSID, turning on DDoS attack prevention and preventing WAN ping. I have updated the firmware already. However these are still massively unsecure devices:
With all this I managed to prevent my server accessing my WiFi and it doesn’t seem to understand to switch to Ethernet, so I have no remote access. I have to plug it into a monitor and keyboard and update the network authentication. Maybe I can connect an USB-cable from it to the switch’s USB serial port and try to get the SSH to the Cisco console working?
Maybe I should eat some breakfast…
Sir, this is a Wendy’s, please place order or leave.
1 note
·
View note
Text
Part 2: Automating Data Migration with Apache Airflow
In this second part of our blog, we’ll walk through how we automated the migration process using Apache Airflow. We’ll cover everything from unloading data from Amazon Redshift to S3, transferring it to Google Cloud Storage (GCS), and finally loading it into Google BigQuery. This comprehensive process was orchestrated with Airflow to make sure every step was executed smoothly, automatically, and without error.

Step 1: Setting Up Apache Airflow
Before diving into the migration tasks, we first need to ensure that Apache Airflow is properly set up. Here’s how I set it up for my project.
1. Install Apache Airflow: If you don’t have Airflow installed, use the following command to install it via pip:pip install apache-airflow
2. Initialize the Airflow Database: Airflow requires a backend database to track tasks and maintain state. To initialize it, run:airflow db init
3. Start the Web Server and Scheduler: Once Airflow is initialized, start the web server (for monitoring) and scheduler (to run tasks):airflow webserver --port 8080 airflow scheduler
Set Up Connections in Airflow:
Redshift: Create a connection in the Airflow UI under Admin → Connections for Redshift (with your host, database, username, and password).
AWS: Set up an AWS connection with your AWS Access Key and Secret Access Key.
Google Cloud: Set up a connection for Google Cloud using a service account (we’ll go into this below).
[ Good Read: The Role of AI in Edtech ]
Step 2: Setting Up Google Cloud Resources
Before we can transfer data from S3 to Google Cloud Storage (GCS) and eventually to BigQuery, we need to configure the necessary resources in Google Cloud.
Create a Google Cloud Project
Go to the Google Cloud Console.
Create a new project (e.g., migration-project).
Enable the Necessary APIs
To interact with Google Cloud services, you need to enable the following APIs:
Google Cloud Storage API
BigQuery API
Go to the APIs & Services → Library, search for these APIs, and enable them.
Create a Service Account
Next, you’ll need to create a service account with the appropriate permissions:
Go to the IAM & Admin → Service Accounts section in Google Cloud.
Click Create Service Account, give it a name, and provide the following roles:
Storage Admin (for access to Google Cloud Storage)
BigQuery Data Editor (for BigQuery access)
After creating the service account, you’ll be prompted to generate a key for it:
Select Create Key and choose the JSON format.
Download the key file and save it securely.
This key file will be used to authenticate Airflow with Google Cloud.
Set Up IAM Roles
Make sure to assign these roles to the service account to ensure it has access to perform actions on GCS and BigQuery.
You can check more info about: Data Migration with Apache Airflow.
AWS Database Migration Service.
Continuous Delivery and Automation Service.
Managed DevSecOps.
Security Consulting.
0 notes
Text
Why does this exist?
This is one of those products that just makes me scratch my head and wonder why someone decided to build and ship it. To be fair Unifi is doing this more and more–leaving me wondering why did they do this with more and more products.
Specifications
Price: $4999
Processor: 16 Core Xeon Gold
Ram: 32GB
Storage: 256GB SSD (only one)
Network: 1 GbE Management Port, 1 GbE Port, 1 10Gb SFP+ Port
Power: Dual hot-swap Power Supplies
They claim:
Manage 1,000+ UniFi Network devices and 10,000+ clients
Let's keep in mind the price and that it has no redundant storage. It only has 32GBs of RAM and 16 core 32 thread processor and they are charging almost $5000 for it. Also keep in mind it only runs the Unifi Network Application, InnerSpace and Enterprise Identity. Don't believe me see here. You know the Unifi Network application you can self host. Keep in mind you will still need something else to provide the routing and firewall–this contraption does NONE of that. Let me say that again: you cannot route a single packet with this device. You still need something like the Gateway Pro for $499 or the Gateway Enterprise for $1999.
So just to get started you are going to spend just shy of between $5500 and $7000 and you don't even have a single access point or switch.
Bottom Line
I think this product is just comical. It is over-priced low-end server hardware running an application that can be run in numerous other ways for less money. The fact that it exists has serious cringe factor. This is one of those products that hopefully Unifi will abandon soon. Unifi is trying to break into the enterprise, but this is just not the way to do it.
0 notes
Text
Introduction to Amazon EC2: Launching Your First Virtual Machine

Introduction:
Amazon Elastic Compute Cloud (EC2) is one of AWS’s most powerful and popular services, providing scalable virtual servers in the cloud. Whether you’re hosting a website, running an application, or performing data analysis, EC2 gives you the flexibility and control to meet your needs. In this blog, we’ll walk you through the basics of EC2 and guide you in launching your first virtual machine.
What is Amazon EC2?
Introduce EC2 and its core features:
Elasticity: Scale up or down based on demand.
Customization: Choose the operating system, storage, and network configuration.
Pay-as-you-go Pricing: Only pay for what you use, whether it’s minutes or hours.
Global Availability: Deploy instances in multiple regions and availability zones for redundancy.
Briefly mention common use cases:
Hosting web applications
Running batch processing jobs
Development and testing environments
Key Concepts to Understand
Instances: Virtual servers in EC2.
AMI (Amazon Machine Image): Pre-configured templates for your instance.
Instance Types: Defines the hardware (CPU, memory, storage) of the instance. Examples: t2.micro (basic), m5.large (medium workload).
Regions and Availability Zones: Geographic locations for deploying your instances.
Key Pairs: Used for secure SSH access to instances.
Elastic IPs: Static IP addresses that can be associated with your instance.
Section 3: Prerequisites
An AWS account (refer to your earlier blog on setting up an AWS account).
Basic understanding of cloud computing and SSH (optional).
Section 4: Step-by-Step Guide to Launch Your First EC2 Instance
1. Open the EC2 Console:
Log in to the AWS Management Console and navigate to the EC2 Dashboard.
2. Choose a Region:
Select a region near your target audience for lower latency.
3. Launch an Instance:
Click on Launch Instance.
Name your instance (e.g., “MyFirstEC2Instance”).
4. Choose an AMI:
Select a pre-configured Amazon Machine Image (e.g., Amazon Linux 2023 or Ubuntu).
For beginners, stick with the Free Tier Eligible options.
5. Choose an Instance Type:
Select t2.micro (Free Tier eligible, suitable for light workloads).
6. Configure Instance Details:
Use the default settings for networking and storage.
Optional: Configure IAM roles or enable termination protection.
7. Add Storage:
Review and adjust storage size if needed (default is 8 GB).
8. Add Tags:
Add tags to organize and identify your instance (e.g., “Environment: Test”).
9. Configure Security Group:
Define inbound rules for accessing the instance:
Allow SSH (port 22) from your IP address.
Allow HTTP (port 80) if hosting a web application.
10. Review and Launch:
Confirm your settings and click Launch.
Select an existing key pair or create a new one for secure access.
Download the key pair file (.pem) and store it securely.
Section 5: Accessing Your EC2 Instance
Connect via SSH:Open a terminal and use the following command:
bash
ssh -i /path/to/key.pem ec2-user@<Public_IP>
Replace /path/to/key.pem with the path to your downloaded key file and <Public_IP> with the instance's public IP address.
Test Your Instance:
Run basic commands like uname -a or df -h to check system information.
Cleaning Up
To avoid unexpected charges, stop or terminate your instance when you’re done:
Navigate to the EC2 Dashboard.
Select your instance.
Choose Instance State > Terminate Instance.
Tips for Beginners
Start with Free Tier Instances:
2.Use t2.micro to explore without incurring costs.
Monitor Instance Usage:
Use the AWS Cost Explorer or Billing Dashboard to track your usage.
Secure Your Instance:
Regularly update your instance and avoid exposing sensitive ports unnecessarily.
Conclusion
Launching an EC2 instance is an essential skill for anyone exploring cloud computing. Amazon EC2 provides the flexibility to run a variety of workloads, and with this guide, you’re now ready to start your journey. In future blogs, we’ll dive deeper into optimizing EC2 instances and exploring advanced features like Auto Scaling and Elastic Load Balancing.
0 notes
Text
i fucking forgot i had -enablefakeip[1] in launch options and i started a server to test something[2] and someone scared thee absolute SHIT out of me by joining. literally felt like i was in a source engine arg youtube video.
footnotes:
[1] "-enablefakeip" is a launch option the average tf2 player can use to host servers off of their own computer, instead of doing complicated shit with port forwarding
[2] i needed to troubleshoot issues with my microphone so i typed "map itemtest" (puts you in a tiny map mainly used for testing purposes) and "voice_loopback 1" (plays your microphone back to you) in console and started making weird noises into the mic
1 note
·
View note
Text
Exploring PCIe Slots and Their Versatile Uses
Introduction
Peripheral Component Interconnect Express (PCIe) slots are integral to modern computing systems, serving as the interface for a wide array of expansion cards. The PCIe interface, known for its high-speed data transfer capabilities, has become a standard for connecting components and peripherals to a motherboard. This article explores the various applications of PCIe slots, focusing on their versatility and the types of expansion cards they support.
Understanding PCIe Slots
PCIe slots are designed to accommodate expansion cards through a card edge connector, a key feature that allows these cards to be inserted into the motherboard. This card edge connector consists of a series of metal contacts that align with corresponding pins in the PCIe slot, ensuring a stable electrical connection. PCIe slots come in different sizes and configurations, including x1, x4, x8, and x16, which denote the number of data lanes available for communication.
Types of Expansion Cards
Graphics Cards (GPUs) One of the most common uses for PCIe slots is to install graphics cards. These cards, often referred to as GPUs (Graphics Processing Units), are essential for rendering complex graphics and performing computational tasks. High-end gaming, video editing, and 3D rendering applications demand powerful GPUs, which are typically installed in x16 PCIe slots to leverage maximum bandwidth and performance.
Network Interface Cards (NICs) Network Interface Cards enhance a computer's connectivity by providing additional Ethernet ports or supporting advanced networking features. While most motherboards come with built-in Ethernet ports, dedicated NICs can offer higher speeds, better reliability, or additional networking functionalities, such as dual or quad-port configurations. These cards are commonly installed in x1 or x4 PCIe slots, depending on their performance requirements.
Storage Controllers PCIe slots are also used for installing storage controllers, including those for NVMe (Non-Volatile Memory Express) SSDs (Solid-State Drives). NVMe SSDs, which offer significantly faster data transfer speeds compared to traditional SATA SSDs, can be installed directly into M.2 slots on the motherboard or through dedicated PCIe expansion cards. These controllers are crucial for enhancing data storage performance in both consumer and enterprise systems.
Sound Cards For users requiring advanced audio capabilities, sound cards are a popular choice. While integrated audio solutions are sufficient for general use, dedicated sound cards can offer superior audio quality, support for surround sound, and enhanced audio processing features. These cards are typically installed in x1 PCIe slots and are favored by audiophiles and professionals in the music and film industries.
Capture Cards Capture cards are essential for video production, streaming, and gaming. They allow users to capture and record video from external sources, such as cameras, game consoles, or other media devices. Capture cards, which often require substantial bandwidth to handle high-definition video signals, are usually installed in x4 or x8 PCIe slots to ensure smooth operation and minimal latency.
RAID Controllers RAID (Redundant Array of Independent Disks) controllers manage multiple hard drives or SSDs to improve performance, increase storage capacity, or provide data redundancy. RAID controllers can be installed in PCIe slots to facilitate complex storage configurations, such as RAID 0, RAID 1, RAID 5, or RAID 10. These controllers are particularly valuable in server environments or for high-performance computing tasks.
USB Expansion Cards USB expansion cards add additional USB ports to a system, which can be useful for users who require more connectivity options than what is provided by the motherboard. These cards can offer USB 3.0, USB 3.1, or even USB-C ports, enhancing the versatility of a system’s connectivity options. Depending on the card’s design and the number of ports, they may be installed in x1 or x4 PCIe slots.
Wi-Fi and Bluetooth Cards While many motherboards now come with integrated Wi-Fi and Bluetooth, dedicated expansion cards can provide better connectivity options or support for newer standards. These cards are particularly useful in systems where integrated wireless capabilities are not available or where higher performance is desired. Typically, these cards are installed in x1 PCIe slots.
Additional PCIe Slots Expansion Cards For users with motherboards that have limited PCIe slots, expansion cards that provide additional PCIe slots can be installed. These cards effectively allow users to expand the number of available PCIe slots, enabling the installation of more expansion cards than the motherboard originally supports. These are generally used in high-performance workstations or servers where multiple cards are necessary.
Choosing the Right PCIe Slot
When selecting an expansion card, it’s essential to choose the appropriate PCIe slot based on the card’s bandwidth requirements and the slot’s size. For instance, high-performance GPUs and RAID controllers typically require x16 slots to fully utilize their capabilities. Conversely, NICs, sound cards, and USB expansion cards often function well in x1 slots.
Conclusion
PCIe slots, with their card edge connectors, provide a versatile platform for expanding the capabilities of a computer system. From enhancing graphics performance with GPUs to improving connectivity with network and USB cards, PCIe slots play a crucial role in modern computing. Understanding the different types of expansion cards and their corresponding PCIe slot requirements enables users to build or upgrade systems tailored to their specific needs, whether for gaming, professional work, or general computing.
0 notes
Text
1 LDAP URLs configured by IP address, please consider using FQDN.
Details of LDAP server configured with IP address: [(u’ldap’, u’172.28.X.X’, 389, u’ihostname’)] ldap_config_check Solution :- If the test result is a FAIL status or WARN status, the cluster function is not impacted, and some users may not be able to log in to the Prism Web Console. Verify that the port 389 is open bidirectional in firewall if port is not with SSL then the port is…
View On WordPress
0 notes
Text
ECE 4122/6122 Hmk #4
Problem #1 TCP Sockets Server-70 points Write a console program that takes as a command line argument the port number on which the TCP Server will listen for connection requests. A separate thread shall be created to handle the data received from each remote client and the remote clients can continue to send and receive data on the connections until either the server or the client closes the…

View On WordPress
0 notes
Text
The First Steps to AWS for Beginners
Starting with Amazon Web Services (AWS) can feel overwhelming, but breaking it down into manageable steps can help. Here’s a beginner’s guide to your first steps on AWS:
1. Create an AWS Account
- Go to the [AWS website](https://aws.amazon.com/) and sign up for an account. You’ll need a credit card for billing, though AWS offers a free tier with many services available at no charge.
2. Explore the AWS Management Console
- Once you have an account, log in to the AWS Management Console. This is where you can access all of AWS’s services.
- Familiarize yourself with the layout: the search bar, service categories, and the navigation panel.
3. Learn About Core AWS Services
Start with these basic services:
- Amazon EC2 (Elastic Compute Cloud): This allows you to rent virtual servers (instances) to run applications and websites.
- Amazon S3 (Simple Storage Service): A scalable storage service where you can store and retrieve any amount of data.
- Amazon RDS (Relational Database Service): A managed database service that supports multiple database engines like MySQL, PostgreSQL, and SQL Server.
- Amazon Lambda: A serverless compute service that runs your code in response to events.
- AWS IAM (Identity and Access Management): Manages permissions and user access to AWS resources.
4. Start with the AWS Free Tier
- The AWS Free Tier allows you to use a limited set of services for free, or at a low cost, for the first 12 months. This includes services like EC2, S3, Lambda, and more, at a restricted level.
5. Launch Your First EC2 Instance
- In the AWS Management Console, search for EC2 and follow the prompts to launch a new instance.
- Select an Amazon Machine Image (AMI), choose instance type, configure security settings (make sure to open the appropriate ports like HTTP/HTTPS), and start your instance.
6. Play Around with S3 Buckets
- Try creating an S3 bucket to store files. You can upload a file, configure permissions, and explore the features for managing your data.
7. Understand Billing and Cost Management
- Learn how AWS charges for its services. Keep an eye on your usage, especially if you're using the free tier, to avoid unexpected costs.
- Use the AWS Pricing Calculator to estimate costs.
8. Use AWS Documentation and Learning Resources
- AWS has comprehensive documentation for every service. Start exploring [AWS documentation](https://docs.aws.amazon.com/) for tutorials and guides.
- AWS also offers free training courses and certifications that can be a great way to level up your skills, such as the [AWS Cloud Practitioner Essentials](https://aws.amazon.com/training/) course.
9. Join AWS Communities
- AWS has a large online community, including forums, webinars, and meetups. Participating in these can provide additional learning opportunities and help you network.
10. Experiment with More Advanced Services
Once you’re comfortable with the basics, try exploring more advanced services like AWS CloudFormation (for infrastructure as code), AWS Elastic Beanstalk (for deploying applications), or Amazon SQS (Simple Queue Service).
By taking it step by step and experimenting with AWS services, you'll build a solid foundation for more advanced cloud development.
1 note
·
View note
Text
I've been thinking. Jirard The Completionist buying up all of the Wii U and 3DS eshop games and donating them to video game historians is a massive step towards game preservation. That is definitely something impressive he did
But now I'm just thinking of those games that got pulled before he was finished. Before he started even.
He shouldn't have had to spend $24k on this just to preserve them.
Honestly I really think that if a game company is not going to make a reasonable method of legally obtaining a game through traditional means without having to resort to hundreds or thousands of dollars through second hand, they should be free to emulate and available through libraries of some kind. Hell I'll go a step further and say that any game over 10 years of release should be free and legal to emulate.
I know lawmakers and a lot of society may not understand why it's such a big deal, but video games have just as big of an impact on society as books, music, and movies. I'd argue that it's a marriage of the three+ user interaction that really adds a degree of personalization you just can't get from the others unless you've had a personal hand in creating them. A lot of culture has changed and been affected by games- and hell, games even give people the opportunity to interact with the past in a historical or meta sense. RDR2 for instance gives you a small glimpse of life back in the later 1800s, and Donkey Kong Arcade machines are literally historical pieces from an era before house-hold gaming was really viable.
And you know the really, really terrible thing out of this? The data from Jirard's spree is under 2 terabytes. That's not even a server at that point. That's literally a few modern games. They literally had them contained in a few external hard drives and SD cards. Was that really that hard to keep operational? To me, this is just Nintendo ensuring they can port these to the Switch and beyond for a higher price, or worse- sweep some under the rug forever.
Pirating imo has done more for game conservation than Nintendo ever has tbh.
In that light, I think a few things should okay, legal, and done:
1. If a game is no longer available to purchase by reasonable means on modern consoles for a reasonable price without having to resort to price gouged second hand sales, it should be legally free to download, distribute, and emulate
2. If a game console with specific specs is no longer available to customers via reasonable means, it should be legal to emulate on pc or legal to replicate the tech required to do so for a reasonable price. Think like the Retron 5, but for Wii, GameCube, DS, 3DS, and WiiU.
3. There should be fun and accessible museums dedicated to the preservation of older games and other entertainment media, and provide access to those that wish to experience the games as originally intended. Located not just in big cities in California or NYC, but also in smaller cities and states/countries across the globe.
4. From this point onward, there needs to be a larger effort to ensure backwards capability of older games on modern consoles. That means going forward, something like what happens after the Switch needs to be able to support Switch games as well as new ones. For disc based games especially, would it really be that hard to program a ps5 to run a ps2 disc through an internal emulator?
If the tech is no longer being made to play these, and if the old tech or old games are deteriorating, the very least that can be done is to ensure the old still can live on somehow with the new.
#long post#video games#emulation#nintendo#game preservation#btw this is DD from the future: i do not condone Jirard's controversy that happened a while back. this was written beforehand
15 notes
·
View notes
Note
team fortress 2 !!
Team Fortress 2 is a 2007 multiplayer first-person shooter game developed and published by Valve Corporation. It is the sequel to the 1996 Team Fortress mod for Quake and its 1999 remake, Team Fortress Classic. The game was released in October 2007 as part of The Orange Box for Windows and the Xbox 360, and ported to the PlayStation 3 in December 2007.[1][2] It was released as a standalone game for Windows in April 2008, and updated to support Mac OS X in June 2010 and Linux in February 2013. It is distributed online through Valve's digital retailer Steam, with Electronic Arts managing retail and console editions.
Players join one of two teams—RED or BLU—and choose one of nine character classes to play as, with game modes including capture the flag and king of the hill. Development was led by John Cook and Robin Walker, the developers of the original Team Fortress mod. Team Fortress 2 was announced in 1998 under the name Team Fortress 2: Brotherhood of Arms. Initially, the game had more realistic, militaristic visuals and gameplay, but this changed over the protracted nine years of development. After Valve released no information for six years, Team Fortress 2 regularly featured in Wired News' annual vaporware list among other entries. Finally released on the Source game engine in 2007, Team Fortress 2 would preserve much of the core class-based gameplay of its predecessors while featuring an overhauled, cartoon-like visual style influenced by the works of J. C. Leyendecker, Dean Cornwell, and Norman Rockwell, alongside an increased focus on the visual and verbal characterization of its playable classes and what the developers have described as a 1960s spy movie aesthetic.
Team Fortress 2 has received critical acclaim for its art direction, gameplay, humor, and use of character in a wholly multiplayer game,[3][4][5][6] and since its release has been referred to as one of the greatest video games ever created.[7][8][9] The game continues to receive official Valve server support as of January 2023, in addition to new content being released on a seasonal basis in the form of submissions made through the Steam Workshop. In June 2011, the game became free-to-play, supported by microtransactions for in-game cosmetics. A 'drop system' was also added and refined, allowing free-to-play users to periodically receive in-game equipment and items. Though the game has had an unofficial competitive scene since its release, both support for official competitive play through ranked matchmaking and an overhauled casual experience were added in July 2016.[10] Since early 2020, the official Valve servers have seen an influx of bot accounts using cheat software, often inhibiting legitimate gameplay.[11]
Gameplay
A group of RED players attack a BLU base on the map "Well".
In most game modes, BLU and RED compete for a combat-based objective.[4] Players can choose to play as one of nine character classes in these teams, each with their own unique strengths, weaknesses, and weapon sets. In order to accomplish objectives efficiently, a balance of these classes is required due to how these strengths and weaknesses interact with each other in a team-based environment. Although the abilities of a number of classes have changed from earlier Team Fortress incarnations, the basic elements of each class have remained, that being one primary weapon, one secondary weapon, and one melee weapon.[12][13] The game was released with six official maps, although over one hundred maps have since been included in subsequent updates, including community-created maps.[14][15] When players choose a gamemode for the first time, an introductory video is played, showing how to complete its objectives. During matches, the Administrator,[16] voiced by Ellen McLain, announces events over loudspeakers.[17] The player limit for one match is 16 on the Xbox 360 and PlayStation 3, and 24 on the Windows edition.[18] However, in 2008, the Windows edition was updated to include a server variable that allows for up to 32 players.[19]
Team Fortress 2 is the first of Valve's multiplayer games to provide detailed statistics for individual players, such as the total amount of time spent playing as each class, most points obtained, and most objectives completed in a single life. Persistent statistics tell the player how they are performing in relation to these statistics, such as if a player comes close to their record for the damage inflicted in a round.[14] Team Fortress 2 also features numerous achievements for carrying out certain tasks, such as achieving a certain number of kills or completing a round within a certain time. Sets of class-specific achievements have been added in updates, which can award weapons to the player upon completion. This unlockable system has since been expanded into a random drop system, whereby players can also obtain items simply by playing the game.[20]
Game modes
Core game modes
Team Fortress 2 contains five core game modes.
Attack/Defend (A/D) is a timed game mode in which the BLU team's goal is to capture RED control points. The number of control points varies between maps, and the points must be captured by the BLU team in respective order. To capture a control point, a player must stand on it for a certain amount of time. This process can be sped up by more players on one team capturing a single point. Once a control point is captured by the BLU team, it cannot be re-captured by the RED team. The RED team's job is to prevent the BLU team from capturing all the control points before the time limit ends. Once a point is captured, the time limit will extend.[21]
Capture the Flag (CtF) is a mode which revolves around the BLU and RED teams attempting to steal and capture the opposing team's flag, represented in-game as an intelligence briefcase. At the same time, both teams must defend their own intelligence. When the intelligence is dropped by the carrier – either by dying or dropping it manually, it will stay on the ground for 1 minute before returning to its original location if it is not picked up again. A team's intelligence can only be carried by the opposing team. The first team to capture the enemy's intelligence three times wins.[22]
Control Points (CP) is a timed game mode where there are several control points placed around the map, with 3 or 5 control points in total depending on the map. These are referred to as "3CP" and "5CP," respectively. The game will start off with only the middle control point being available for capture, with the other control points split equally among both teams. Once this middle control point is captured, a team can begin capturing the enemy team's points in respective order. The time limit is extended on the capture of a control point by either team. For a team to win, they must capture all the control points within the time limit.[21]
King of the Hill (KOTH) is a timed game mode that contains a single control point at the middle of the map that can be captured by both the RED and BLU teams. Upon capturing the control point, a team-specific timer sta
5 notes
·
View notes