#Android home screen setup
Explore tagged Tumblr posts
Visit Tumblr Blog
Explore Tumblr blogs with no restrictions, modern design and the best experience.
Last Seen Tumblr Blogs


Fun Fact
Tumblr has been banned in Indonesia for providing people with access to pornographic content.
Text
UBUNTU TOUCH | DAY ONE
If you didn't see one of my previous posts, I've got a phone to experiment with, and I'm gonna be trying out various mobile operating systems! (Primarily linux based! Not that android isn't linux but lets be real.) please ignore my greasy ugly hand Installation Process: The installation actually wasn't that bad! Was kinda awkward trying to get the phone updated to the correct version without upgrading too far, but after that was dealt with everything else was taken care of very smoothly and easily with the UB Ports custom installer! Didn't have a fail state, nor did the phone brick! I'd rate this an 8/10! Setup and Tutorial: Setting up the phone after the install was very fast, frankly there wasn't much to set up. Thankfully it's not like Google or Apple where they ask for your firstborn son before even asking for your SIM card. Just needed to set up a password/passcode, set up my SIM (Which was thankfully automatic kinda, details later) and confirm a Wi-Fi connection if I wanted to!) Tutorial however, was a bit lackluster. While it was descriptive, it also only popped up on my first time seeing each screen. (E.g. I didn't get the tutorial for the phone app until I opened the phone app.) While I don't think this is necessarily a bad thing, it also means I would need to walk through every inbuilt app to make sure the tutorials are all done. kinda annoying in my personal opinion. Overall I'd rate this 6~7/10. Usage and Experience: For day one this isn't super important, however first impressions do matter for most people. The OS as a whole was very snappy, and never froze or lagged in any of my testing. Additionally, the pull-down shade is very nice! Could be simplified a little more so that you don't need to scroll sideways, and it would also be nice to see more settings overall since the system seems to be quite bare for settings at the moment. However one of the things that really bothers me as a button-enjoyer is the OS not having a button navigation method. The only way to navigate between screens is to swipe from the sides, top or bottom as gestures, similar to Apple and the recent Android iterations. These gestures don't even work perfectly either, which makes it more annoying that I don't have a home button or back button. If there is a home-swipe or back-swipe, then the tutorial did not detail it, and I cannot find it anywhere in the settings. Overall, it's a 4/10 but with LOTS of potential! Functionality: This focus' almost entirely on how it functions as a phone, and if it's problematic for any reason. So far it seems great outside of one issue, as commented on earlier (This is the details later bit lmao). Plugged an active SIM card into the phone and it automatically logged the APN and other important information which was very nice. Tested the mobile data and texting, and found no issues except for maybe being unable to send MMS (Need to double check that it was not a file size issue.) However, this entire time I've not had the ability to make or take calls. I'm not sure why, the APN, provider, and everything in the settings is correct to what I can tell. I may attempt to either reinstall the dialer application, or erase and manually set the APN in the event that might fix it. If I cannot get calling to work this score will look a lot uglier. Overall, it's a 7~8/10! for now.
App Availability: Seems great! The built in app-store, or "OpenStore" is pretty cool, and seems to have a lot of useful apps. I did notice a small fraction of android apps that I could use (Like Slack, thanks workplace -ﻌ-) but they were just WebUI apps, which isn't bad, but it's bad. I haven't attempted to set up or use Waydroid, but I will not have that change the score at all since using Android apps (kinda barely) defeats the purpose of an alternative operating system. Overall score, 8/10, but needs a deeper dive.
I'll likely put out another update at either 15 days or 30 days!
Whenever you guys think you want one!
8 notes
·
View notes
Text
i can understand wanting headphone jacks back (not really) but the home button sucked ass.
yeah let me just take up 1/6th the screen for a Single button which does two things.
the digital android 3 button setup is just fucking peak i hate the swipe bars thats common these days
oh but you want a physical button to press ok. but did you notice that the iphone 7, 8, SE2, and SE3 didnt have physical home buttons? its a digital button with a vibration motor to make it seem like a button. nobody complained. its a digital button but it takes up physical space like its dumb.
im sorry to all the apple fans who have to live with the swipe bar my condolences that actually does suck
12 notes
·
View notes
Text
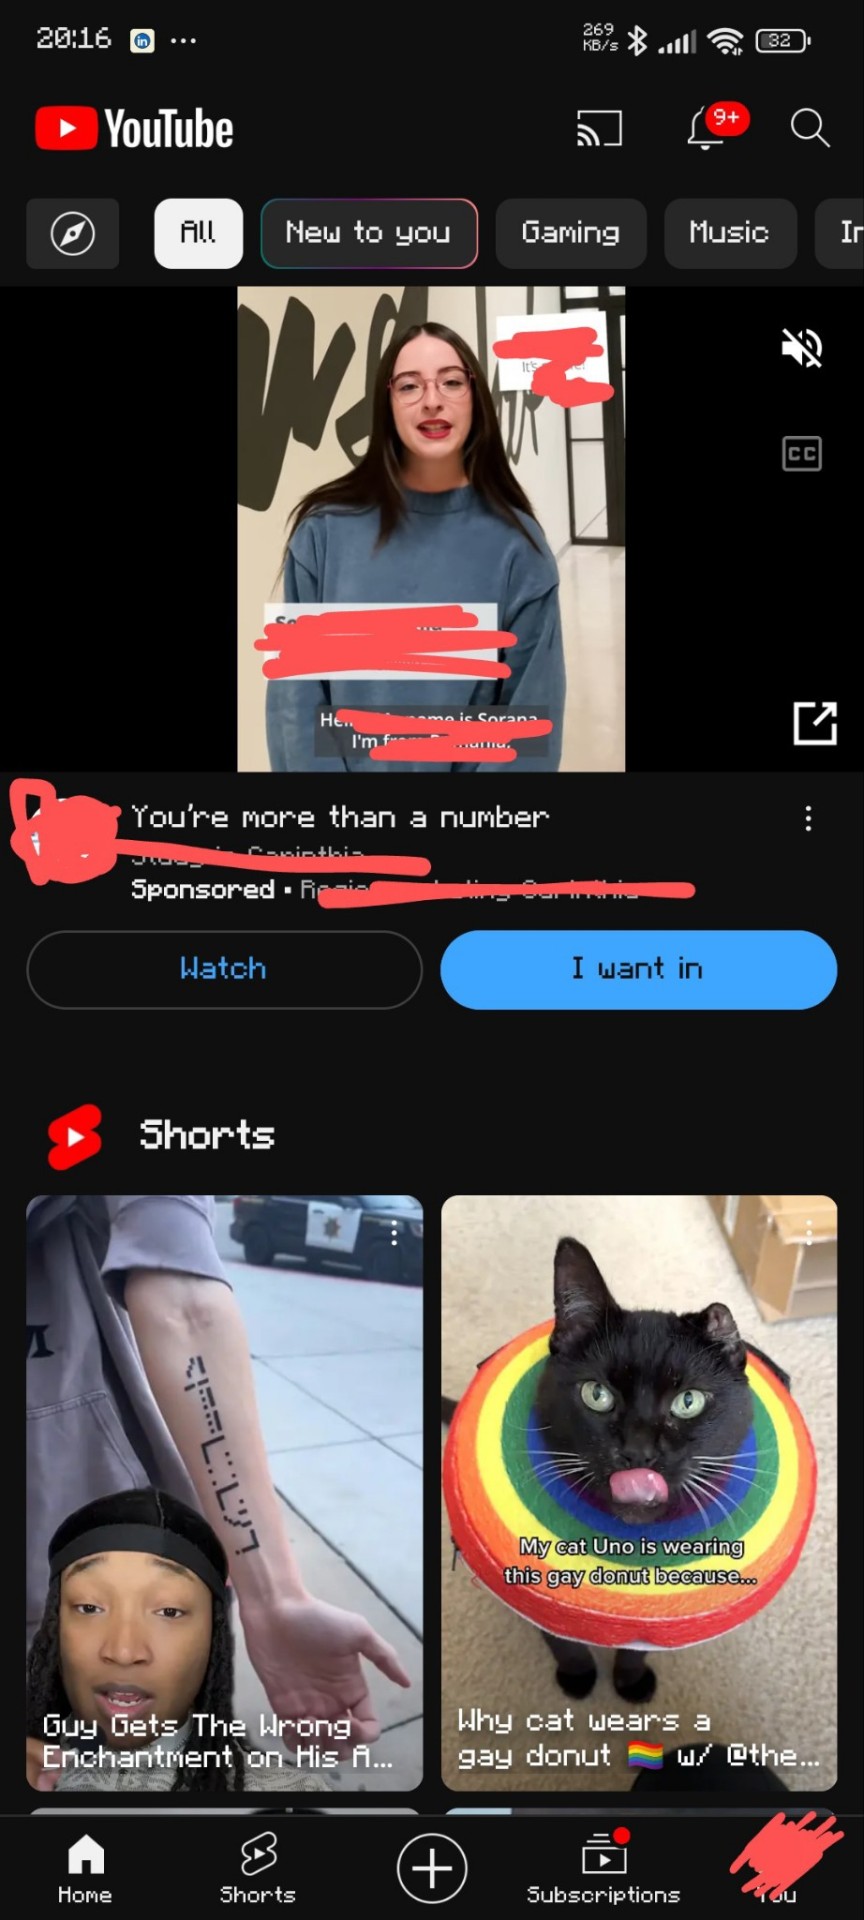
I despise short form content.
I hate YouTube shorts and I hate Instagram reels. I hate not having control over the time I spend on these 2 particular apps and just how easy it is to get lost — after all, that's what they are designed to do.
If you're on the same boat as me and don't want to download some sketchy shit to stop those urges, let me show how to completely remove ads, shorts, reels and skip annoying sponsors with just the Firefox mobile browser.
Below the cut is an (I hope) comprehensive guide on how to achieve the dream homepage
Before I begin, I need to say that:
I am not sponsored by anything mentioned
This is only tested on an android device
There is a trade off in performance in both apps
Notifications will direct you to the hellscape that is the original app
The font in the screenshots is not something native to Firefox, I just love pixels
Here is a pros and cons list to using my method
YouTube pros:
No ads
No sponsorships (mostly)
No shorts
No community posts
Background play (finicky)
More privacy
Extentions for this are all widely used
Cons:
Outdated UI
Unable to have a video minimised at the bottom of the screen by scrolling down
Slower to load vids on homescreen (not by much)
Full screen is a bit finicky sometimes
Important to note:
I don't know if this impacts data usage
Video quality is the same
I've been using this for at least a month, imho the pros outweigh the cons by a BIG margin.
Instagram pros:
No ads
No reels
Quicker access to direct messages
Cons:
Definitely a lot more laggy
Refreshes are sometimes needed
Extention is not used by many
Important to note:
Same as YouTube, but I have not used this for a while. I figured out that what I can do with YouTube is applicable with Instagram today.
Having said that
Let us begin
The thing that this whole "hack" revolves around is the ability to use extensions in the mobile version of the Firefox browser.
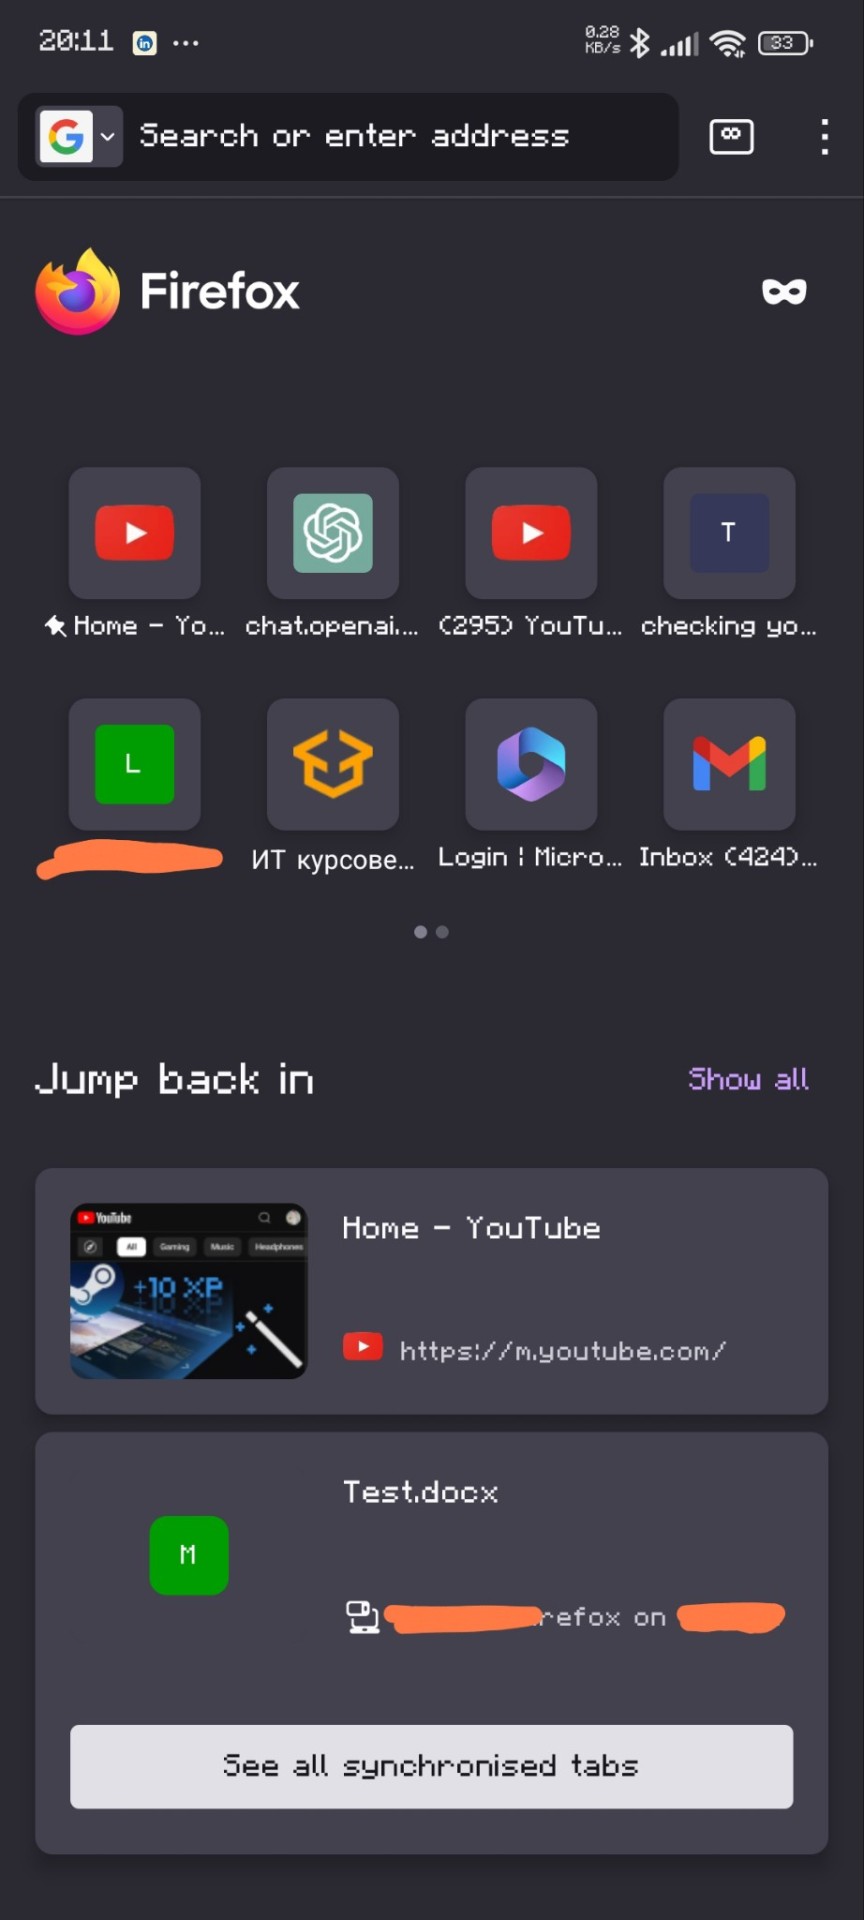
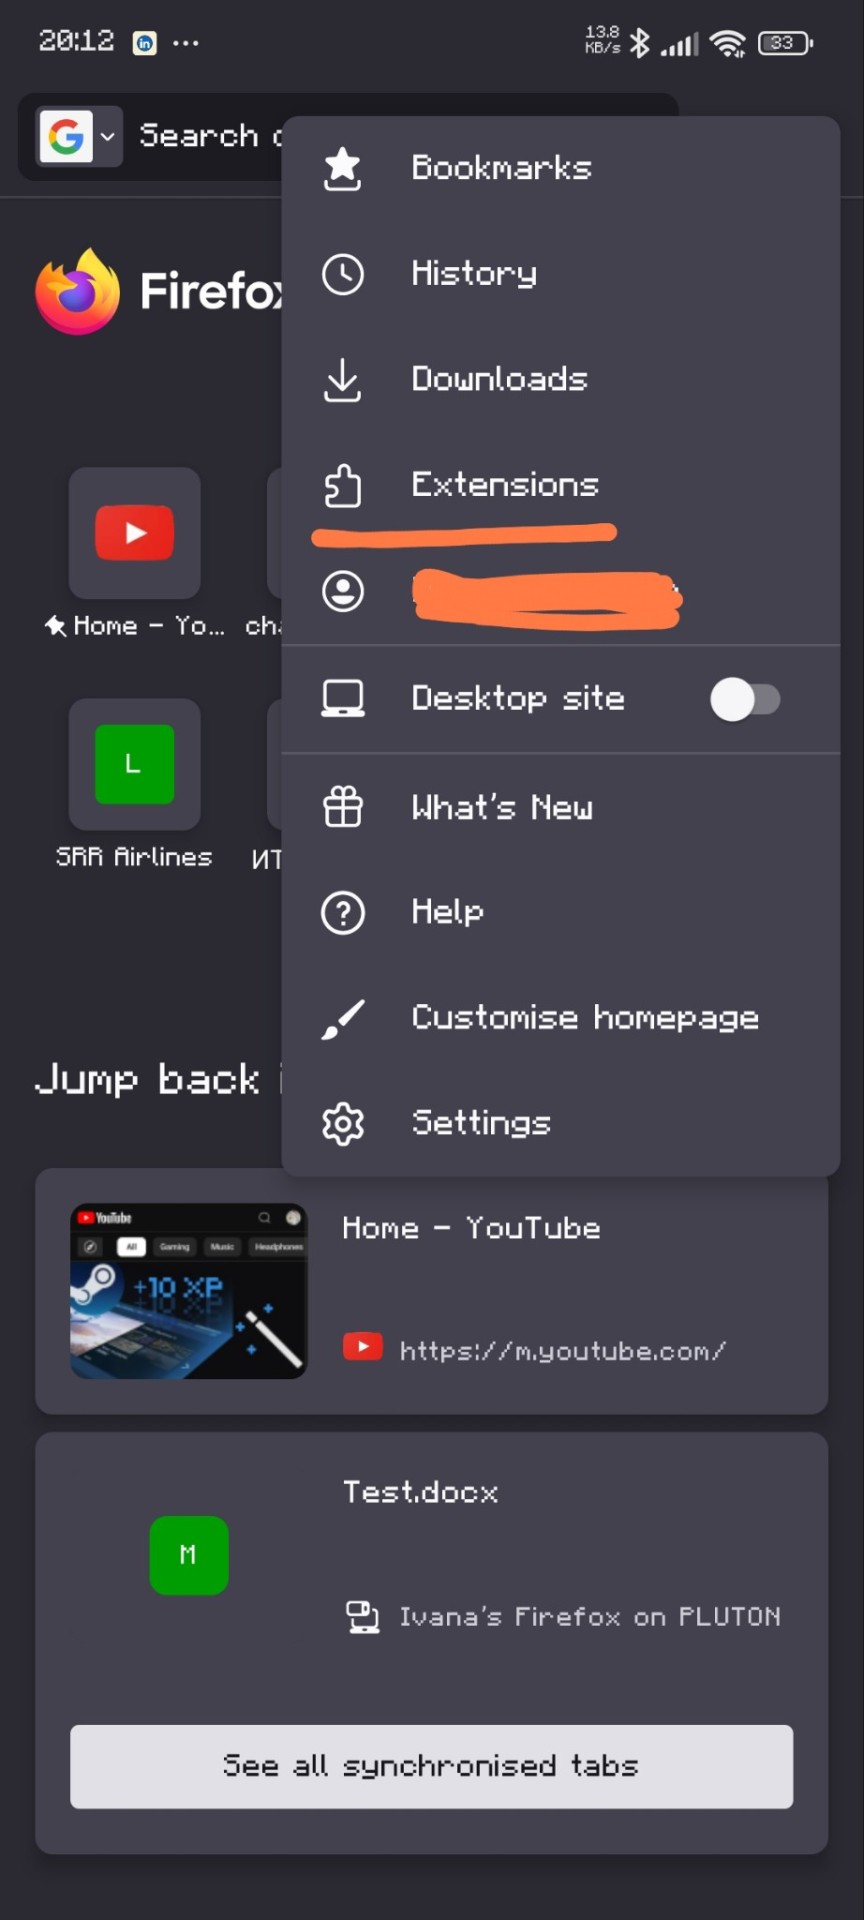
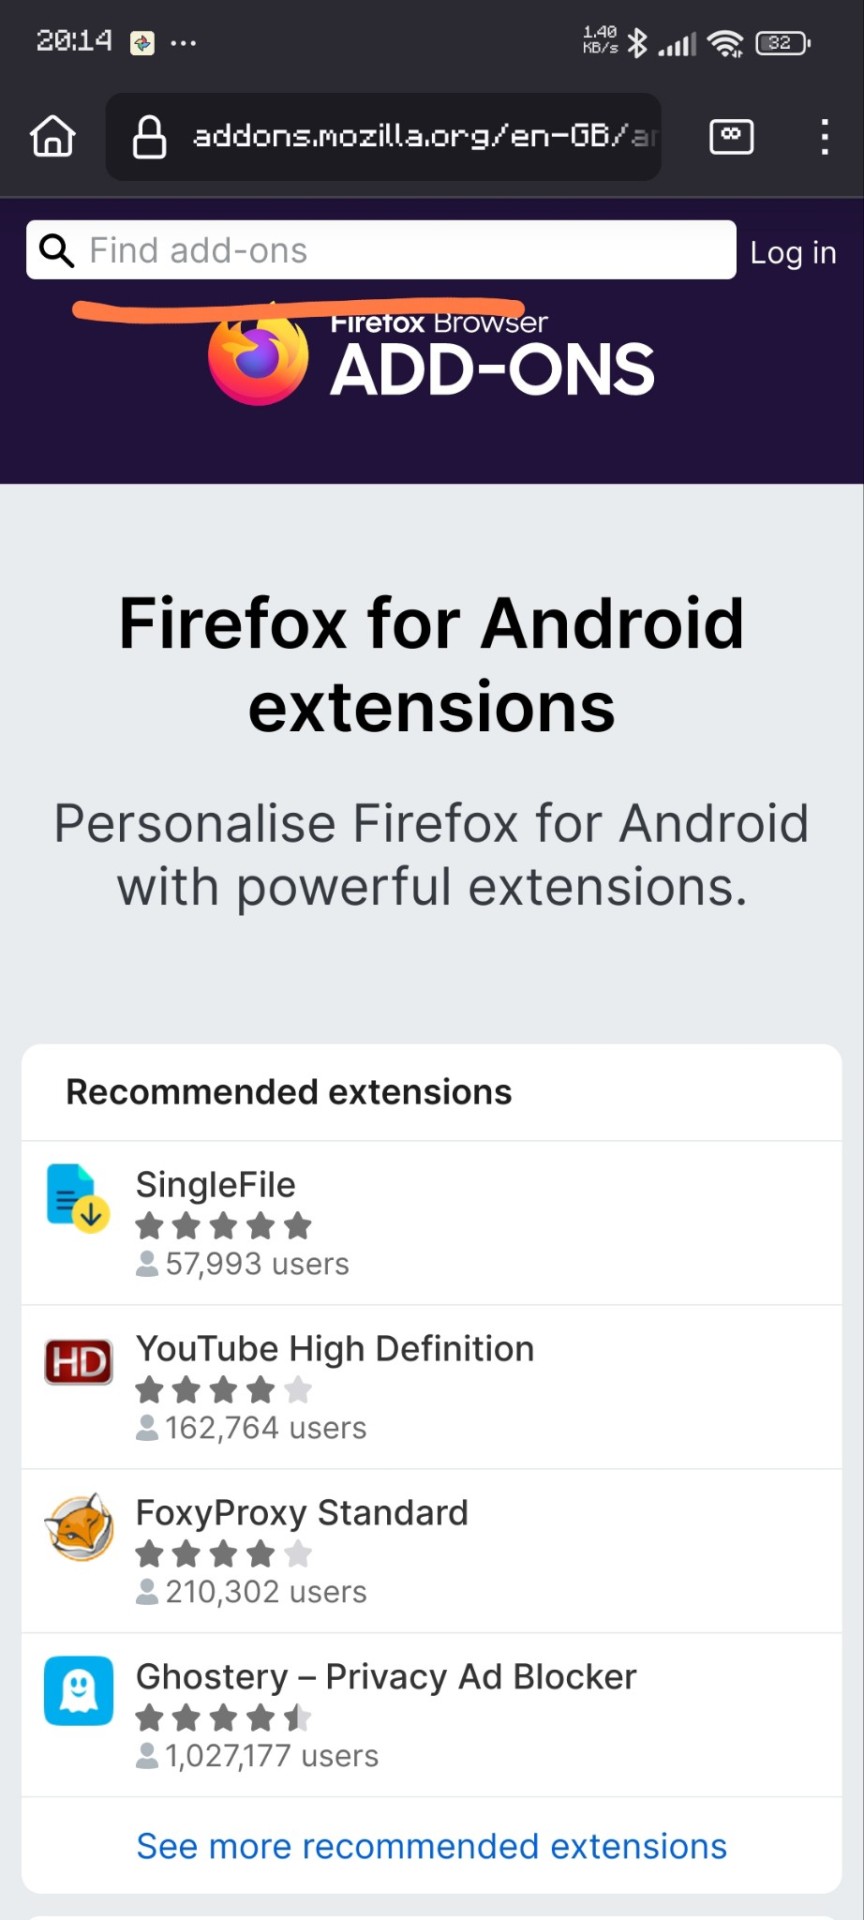
Once you have downloaded the browser (it'd probably ask you to make an account, I don't know if it's a necessity), you'd want to go to the settings(top right) then the Extensions menu (fourth one top down). Scroll down to the "Find more Extentions" button and then search.

Here are the extensions I have
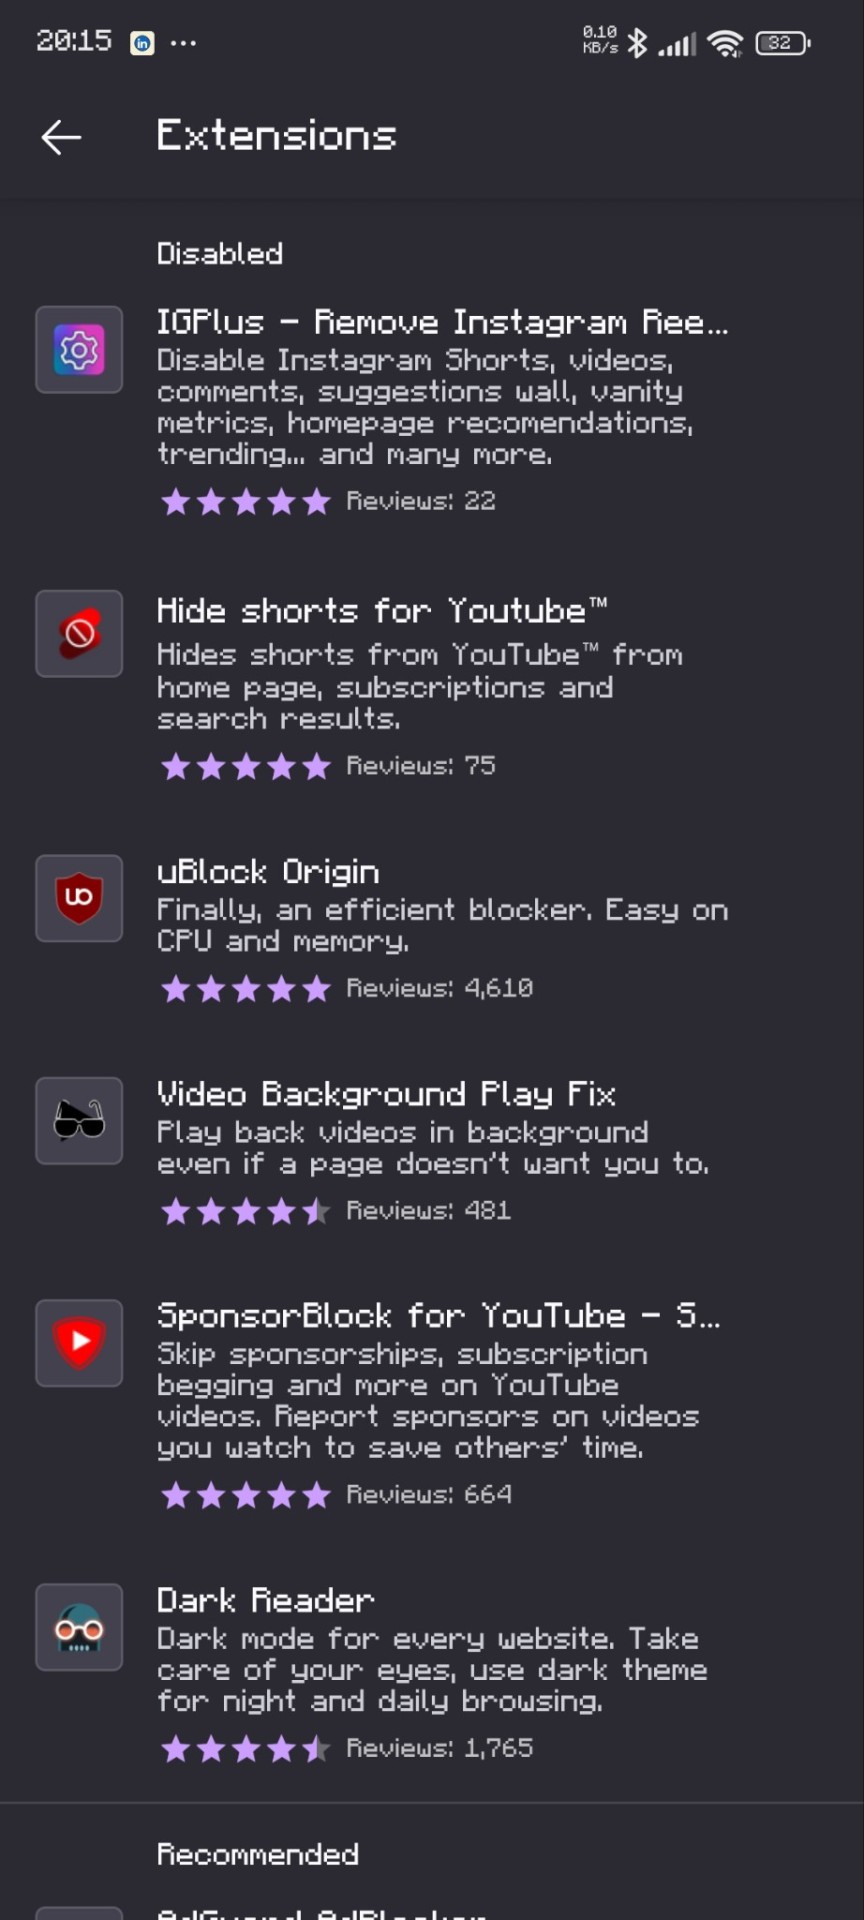
Not all of these are necessary, this is just my setup. Firefox is my default browser so i use other stuff too.
That's it! Here are some before and afters:
YouTube
Before:
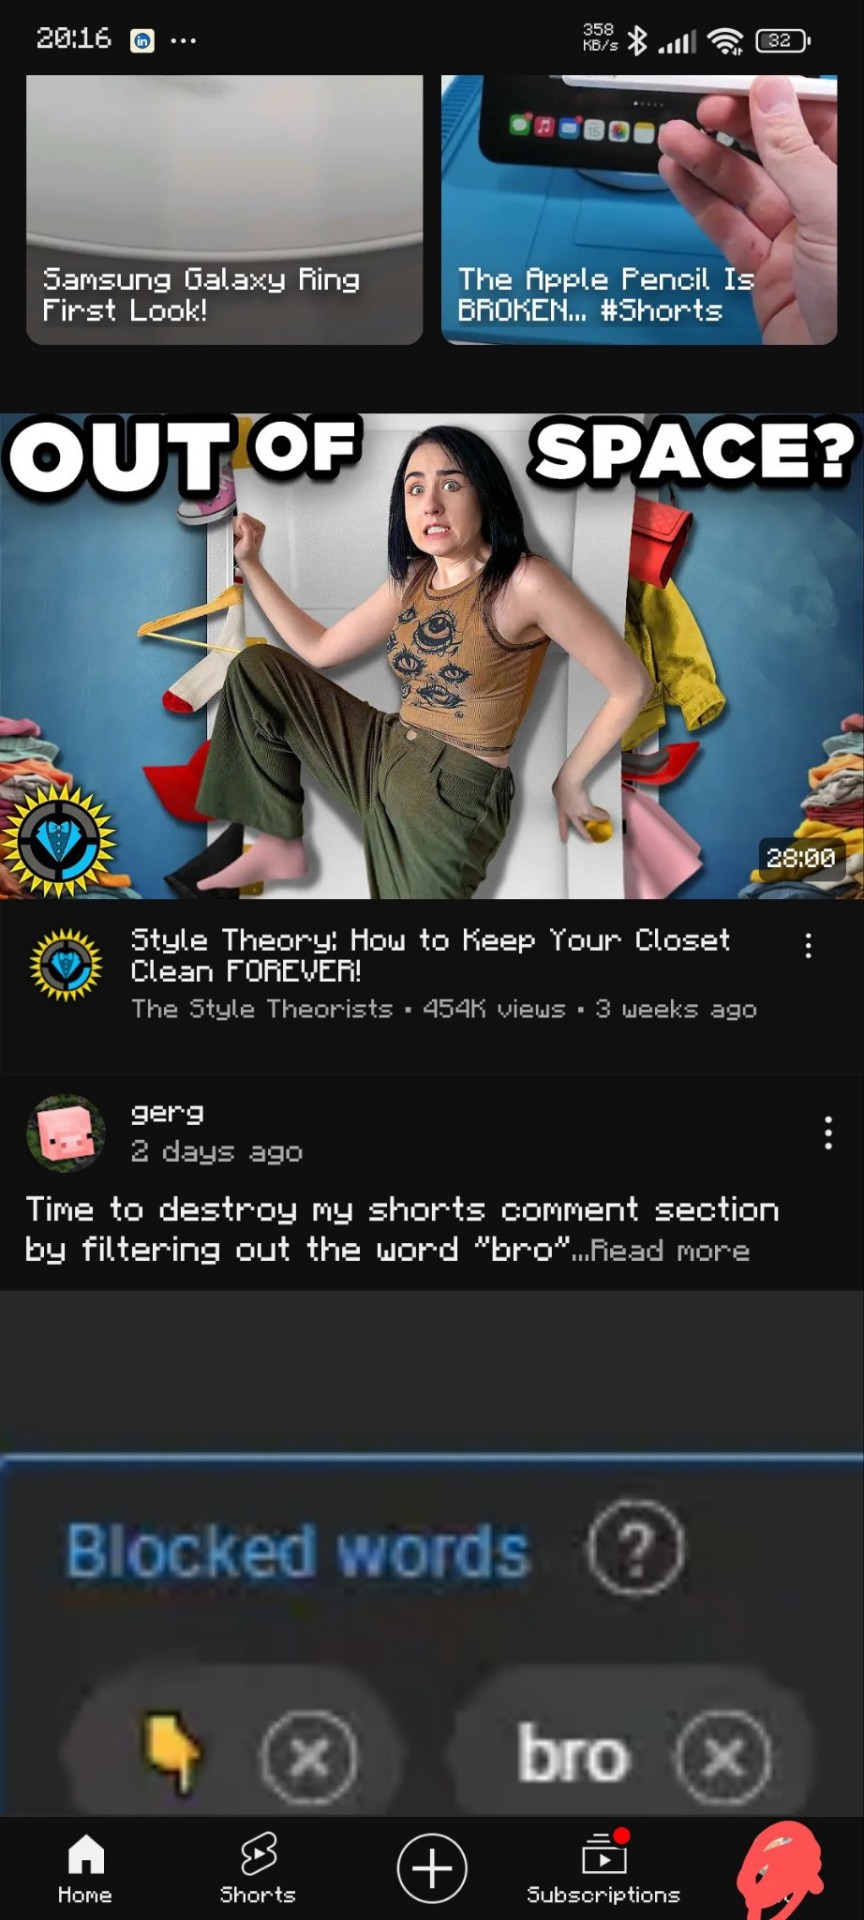
After:


(thank you matpat for the perfect video for this lol)
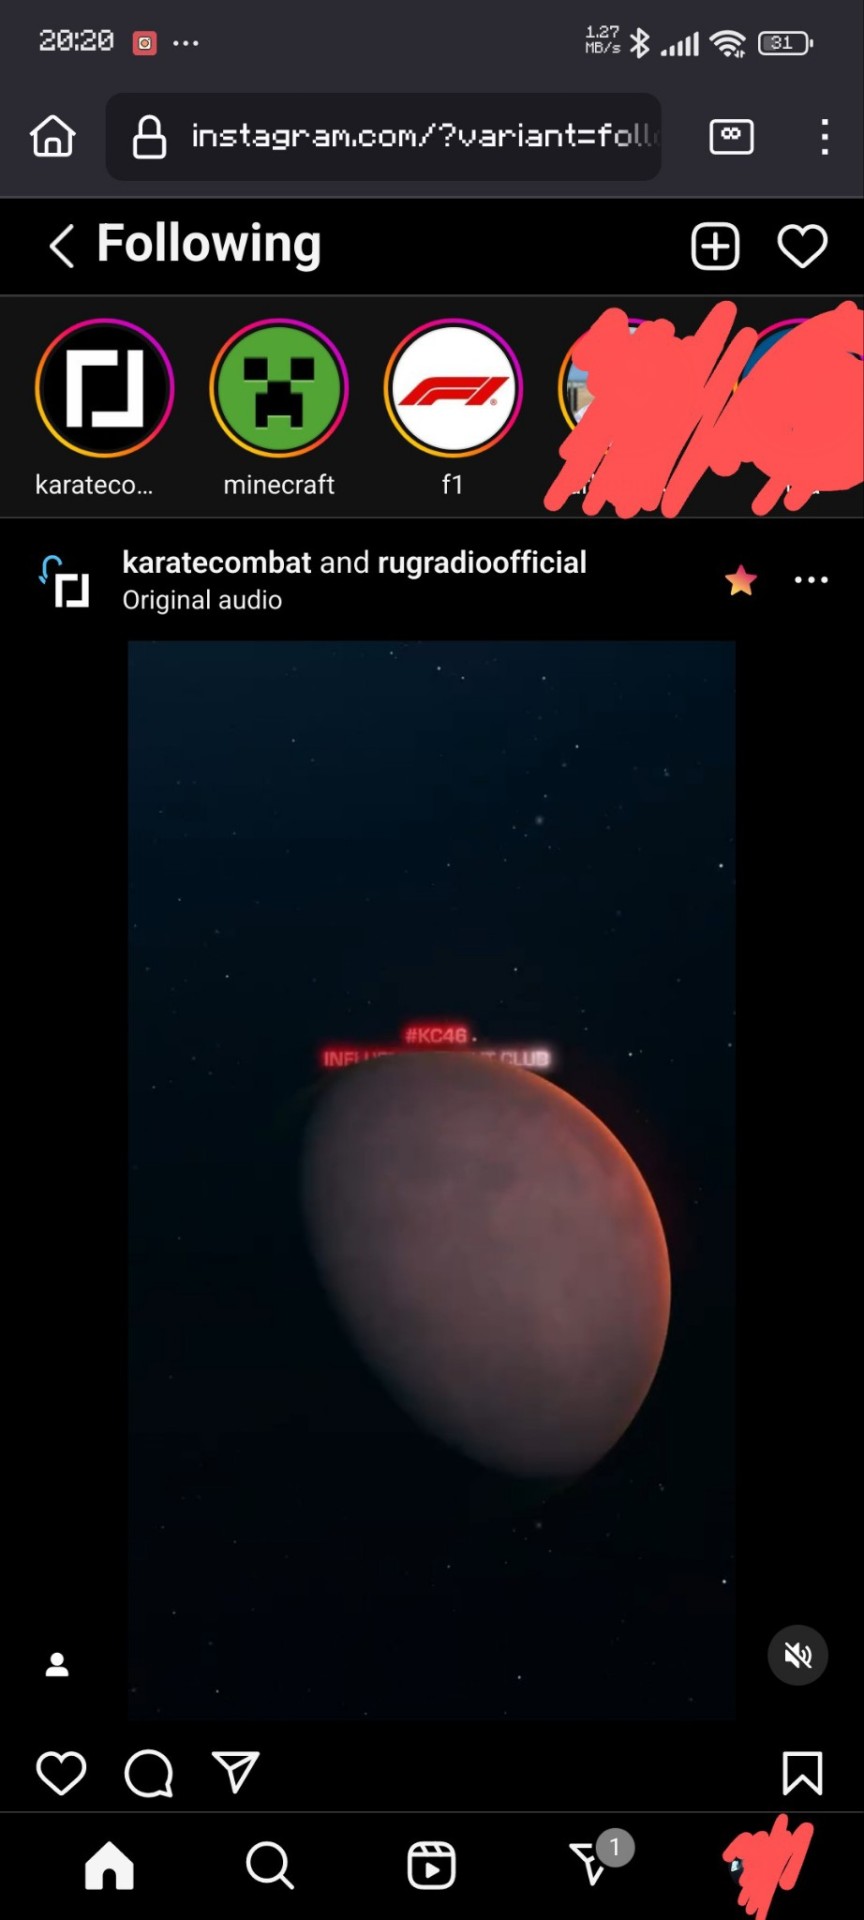
Instagram
After:
(I'm out of pics per post so only the after)
Hopefully I've managed to be of help. I'll answer any questions that you may have!
Oh, and if you guys want I can give a shorter tutorial on how to add a shortcut to these sites to your home screen.
#adblock#instagram#youtube#life hacks#no ads#shorts#instagram reels#reels#not sponsored#quality of life#adhd hacks#ig lol#online tutoring#tutorial#firefox#advice#advise#reblog to save a life
17 notes
·
View notes
Text
Why IPTV 5 Connections Is the Ultimate Streaming Solution for Families and Power Users
In the age of digital streaming, Internet Protocol Television (IPTV) has revolutionized the way we consume entertainment. From sports and movies to international channels and on-demand content, IPTV services offer a wide array of options—often at a fraction of the cost of traditional cable. But if you’re part of a busy household or someone managing multiple devices, a standard subscription might not cut it. That’s where IPTV 5 connections becomes a game-changer.
📺 What Does “IPTV 5 Connections” Mean?
When an IPTV provider offers 5 connections, it means you can stream on five devices simultaneously using a single subscription. Whether it's a Smart TV, smartphone, tablet, PC, or streaming box—everyone in your household can enjoy their favorite content at the same time, without interruptions or extra charges.
Top Benefits of IPTV 5 Connections
1. Perfect for Families
No more fights over the remote. Dad can watch sports in the living room, mom can binge her favorite drama in the bedroom, and the kids can enjoy cartoons on their tablets—all at once.
2. Multi-Room Viewing
Whether you’re in the kitchen or the garage, IPTV with 5 connections allows seamless entertainment access across your entire home setup.
3. Cost-Effective
Instead of buying multiple subscriptions for each user, a single plan with 5 connections saves you money while giving everyone personalized viewing freedom.
4. Ideal for Small Businesses
Running a small sports bar, cafe, or waiting room? IPTV with multi-connection support ensures every screen has engaging content without bandwidth issues or licensing confusion.
🔒 What to Look for in a Reliable IPTV Provider
When searching for an IPTV service that supports 5 connections, consider the following factors:
Server Reliability: Look for providers with 99.9% uptime and fast-loading servers.
Channel Variety: Ensure they offer channels that matter to your audience—sports, movies, news, kids’ content, etc.
Customer Support: Choose a service that offers 24/7 support in case you need assistance.
Device Compatibility: Verify that it works across platforms like Firestick, Android TV, MAG boxes, iOS, and more.
🔥 Best IPTV Services Offering 5 Connections (Examples)
Note: These are hypothetical or commonly known options. Adjust as needed for your real affiliate/product links.
Streamnet TV
IPTV Trends
YeahIPTV
IPTV Gang
All of these providers offer packages with 5+ connections and support full HD/4K streaming with EPG and VOD features.
🎯 Final Thoughts
Choosing an IPTV service with 5 connections isn’t just a luxury—it’s a smart, future-proof solution for modern households and stream-hungry users. Whether you’re a content connoisseur, a busy family, or a business owner, this option guarantees flexibility, affordability, and performance that’s hard to beat.
Looking to upgrade your streaming game? Opt for an IPTV plan with 5 connections and unlock seamless entertainment across all your devices.
#iptv#iptv m3u#iptv subscription#4k iptv streaming#best iptv#iptv service#iptv usa#iptv2025#iptv firestick#tv series#iptv 5 connections
3 notes
·
View notes
Text

Unlocking the power of Android apps on your xmltv iptv epg source can be a game-changer in terms of entertainment and convenience. Imagine being able to access all your favorite apps, videos, and games right from the comfort of your couch.
But before you dive into this world of possibilities, it's important to ensure that your digital TV is compatible with Android apps. In this comprehensive guide, we will walk you through everything you need to know about compatible models and how to get started.
First things first, not all digital TVs are equipped with the necessary hardware and software to run Android apps. To enjoy the full benefits of Android apps on your TV, you'll need a smart TV that supports the Android operating system. These TVs come with built-in Wi-Fi connectivity, an app store, and a user-friendly interface that allows you to download and install Android apps.
One popular brand that offers a wide range of Android-compatible digital TVs is Sony. Their Bravia series is known for its stunning picture quality and extensive app library. Models like the Sony Bravia X90H and X950H are highly recommended if you're looking to unlock the full potential of Android apps on your xmltv viewer. These models run on Android TV, which is a version of Android specially designed for television sets.
Another brand worth mentioning is Samsung. Their smart TVs also support Android apps, thanks to their integration with the Tizen operating system. The Samsung QLED series, such as the Q90T and Q80T, are known for their vibrant colors and smooth performance. With these models, you'll have access to the Google Play Store and a plethora of Android apps at your fingertips.
LG is another player in the market that offers Android-compatible digital TVs. Their OLED series, like the CX and BX models, are known for their deep blacks and rich colors. These TVs run on LG's webOS platform, which has its own app store but also supports Android apps. With an LG OLED TV, you'll have access to a wide range of entertainment options, including popular streaming services like Netflix and Hulu.
Once you have identified a compatible digital TV, setting up Android apps is relatively straightforward. Most smart TVs come with an on-screen setup wizard that guides you through the process. You'll need to connect your TV to your home Wi-Fi network, create or sign in with a Google account, and then browse the app store to download your favorite Android apps.
It's worth noting that not all Android apps are optimized for TV screens. Some may not work properly or may have limited functionality when displayed on a larger screen. Therefore, it's important to choose apps that are specifically designed for TVs or have a TV mode available.
To enhance your experience with Android apps on your digital TV, consider investing in additional accessories such as a wireless keyboard or game controller. These accessories can make navigating through apps and playing games much more enjoyable.
In conclusion, unlocking the power of Android apps on your digital TV opens up a world of possibilities in terms of entertainment and convenience. To ensure compatibility, look for smart TVs that support the Android operating system from brands like Sony, Samsung, and LG. Once you have a compatible model, setting up Android apps is a breeze. Just follow the on-screen instructions and start enjoying all your favorite apps right from your couch. Remember to choose apps optimized for TV screens and consider additional accessories to enhance your experience. Happy streaming!
youtube
7 notes
·
View notes
Text
Tata Curvv SUV Unveiled – All Key Features & Launch Details

The much-awaited Tata Curvv has finally been unveiled in its close-to-production avatar for the Indian market. The carmaker says that it merges “the toughness and durability of an SUV with an elegant and sporty silhouette of a Coupe”. It will be the first mass-market coupe SUV from the home-grown automaker that will come with both ICE (internal combustion engine) and electric powertrains.

he electric iteration of the Curvv underpins the brand’s new Acti.ev architecture and features signature split LED headlamp clusters, a new grille with piano black and body color finish, bumper-integrated fog lamps, larger air intake, and a pronounced faux skid plate at the front.
The interior of the coupe SUV will share features with the Harrier and Safari. It will have a 10.25-inch screen setup for the instrument cluster and digital dials, a floating touchscreen infotainment system with Apple CarPlay and Android Auto connectivity, a Harrier-like two-spoke steering wheel, Head-Up Display, ventilated front seats, an electric parking brake, wireless charger, connected car features, dual-zone climate control, and a 360-degree camera. The higher trims will be offered with some exclusive amenities such as a panoramic sunroof and Level 2 ADAS tech.
Specifications of the Tata Curvv EV are yet to be revealed. However, the electric SUV is likely to deliver a range of around 450km – 500km. The SUV’s ICE version will use Tata’s new 125bhp, 1.2L, 3-cylinder turbo petrol and Nexon’s 1.5L, 4-cylinder diesel engines. It’s also reported to be offered with a CNG fuel option at a later stage.

The Tata SUV-coupe’s back feels tall and the boot lid is positioned a lot higher than the bonnet, which has likely been done to increase the luggage space on offer (422 litres claimed).
Its key styling detail here is the wraparound and connected LED tail lights. The tall bumper – having a faux skid plate with silver finish at the bottom – mimics the split-headlight setup, which is replaced by the reflectors and reversing lamps here.
2 notes
·
View notes
Text
How to Install IPTV Smarters Pro on FireStick, Android, and iOS: A Step-by-Step Guide
"Waves-iptv.com offers a diverse range of channels and programs - from live sports events to the latest movies and TV shows, there's something for everyone."
This guide will show you how to install IPTV Smarters Pro on Firestick, Android, iOS, and even Roku devices.
IPTV Smarters Pro is one of the best IPTV Players available that works on just about every device imaginable.
How To Setup IPTV ltd on Firestick/Android device
First, you must install an Application known as Downloader, this app can be found in the Amazon App Store in case you have an Android device, the app is available on Play Store.
Once you finish installing Downloader app, make sure to use this link to grab the application:
Downloader URL: bit.ly/40i7HUu
Downloader Code: 78522
Screenshot Guide
1. Install the Downloader app from your respective App Store (Amazon App Store or Google Play) and enable Unknown Sources within the settings of your streaming device.
If you haven’t done this yet please refer to the following screenshot tutorial for step-by-step instructions.
2. Launch Downloader
3. Hover over the URL bar and click the select button on your remote to open the keyboard.
4. Type the Downloader Code for IPTV Smarters Pro apk which is 78522 and click Go.
5. You will then see a redirect page https://aftv.news/78522
6. Wait for the app to download.
7. Click Install.
Install IPTV Smarters Pro on FireStick, Android, and iOS
9. You can now launch the app for use.
Install IPTV Smarters Pro on FireStick, Android, and iOS
Note: if you want to install the app on Firestick you first need to enable Unknown Source in developer mode. If you don’t know how, follow this complete detailed guide to learn how to do that: Install IPTV Smarters on Firestick
When the app is downloaded, install it on your device and then click open to Launch.
There is another option where you can go to the Home Screen and select IPTV Smarters from there to open it.
Install IPTV Smarters Pro on FireStick, Android, and iOS
When you open and the app is launched you will see the List Users, just click on the Add New User option
Another screen will appear after clicking on Add New User. It will ask for the method to Login Your account. Here you need to click on the Login with Xtream Codes API.
Install IPTV Smarters Pro on FireStick, Android, and iOS
On the next screen you will need to put your Username, Password, and the Portal URL, which were provided by Xtreme HD IPTV.
On the next screen you will need to put your Username, Password, and the Portal URL, which were provided by Xtreme HD IPTV.
On the next screen you will need to put your Username, Password, and the Portal URL, which were provided by waves iptv
5 notes
·
View notes
Text
Best Android TV Boxes For Streaming in 2023
In the ever-evolving realm of home entertainment, Android TV boxes have emerged as versatile juggernauts of contemporary streaming. These devices have transcended their basic media conduit origins to become multi-functional hubs for immersive content experiences. Picture this: a single device seamlessly blending HD IPTV viewing, gaming thrills, and immersive entertainment. Welcome to the cutting edge of TV streaming, where Android TV boxes redefine how we engage with content.
The days of TV boxes confined to rudimentary functions are long gone. Modern Android TV boxes epitomize versatility. Once connected to your TV, they open portals to a multitude of streaming services, turning your screen into a smart entertainment hub. Services like Netflix and Disney Plus are at your fingertips.
So, you’ve decided to elevate your TV experience with an Android TV box, tapping into the power of the beloved Android operating system. However, navigating through a sea of options can be daunting. With countless Android TV boxes flaunting slight variations in specifications, how do you choose the perfect fit for your needs?
Worry not, as we have meticulously scrutinized the cream of the crop among Android TV boxes, ensuring that you embark on your streaming journey armed with the right information. Whether you’re a cinema buff, a gaming enthusiast, or someone with unique streaming preferences, we have categorized the best options for every taste. Our mission is to guide you not only to the best Android TV box but also to the ideal companion tailored perfectly to your entertainment aspirations.
1.NVIDIA Shield TV Pro

NVIDIA’s Shield TV has reigned as the undisputed king of Android TV boxes, and the Shield TV Pro takes this legacy to new heights. Despite its age, the Tegra X1+ processor delivers exceptional performance, driving AI-enhanced 4K upscaling that genuinely enhances HD picture clarity and color vibrancy on a 4K display. This powerhouse chip also adeptly handles real-time transcoding, allowing seamless streaming of various file formats from a NAS drive. With support for Dolby Vision HDR, Dolby Atmos, and DTS-X surround sound, it solidifies its reputation as an AV powerhouse.
Running on NVIDIA’s customized Google TV OS, you have access to the full array of software on the Google Play store. Plex comes pre-installed, and if you wish to expand beyond the usual suspects like Netflix and Amazon Prime, adding Kodi is a breeze. While the onboard 16GB storage might feel limiting, a simple USB 3.0 external drive upgrade resolves this concern.
Gaming is another forte of the Shield TV Pro. The Tegra X1+ not only handles a plethora of major titles from the Google Play store but also directly streams games from Nvidia’s GeForce Now service. This ingenious feature lets you access your PC games library on your TV, provided the service supports the titles. For those seeking a more streamlined setup, the new Shield TV “stick” might be appealing, as it mirrors the software and wields the same Tegra X1+ chip. Nevertheless, the Shield TV Pro embodies the quintessential Android TV experience.
Pros:
Reliable performance
Excellent remote
Wide variety of native 4K content
Supports Nvidia’s GeForce NOW cloud gaming
Cons:
AI upscaling can be overly aggressive
Controller not included
2.Magabox MG4
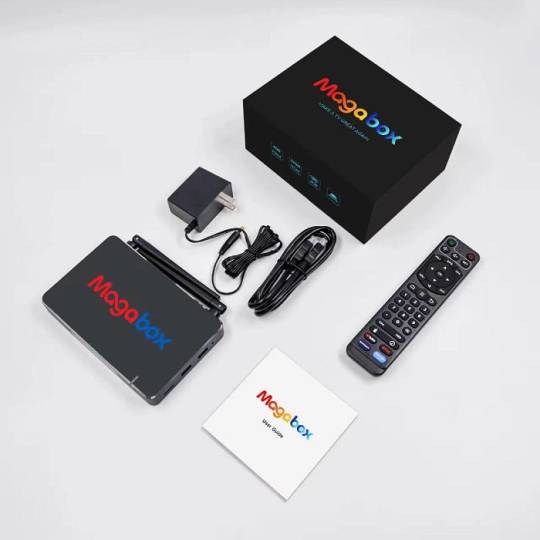
The Magabox-MG4 stands as the latest iteration in the Magabox series, pushing the boundaries of convenience and performance. Packed with 2GB of RAM and 32GB of storage, it transforms into a multimedia powerhouse. Its integrated voice command feature ushers in a superior streaming experience, redefining the market. Connect it to your TV and the internet, and witness your standard TV evolve into a smart wonder.
This exceptionally user-friendly Android TV box redefines its predecessor, the MG4, with a revamped design and interface. While its hardware remains steadfast, the revamped design and interface, coupled with superior streaming and DVR capabilities, make it an irresistible choice for streaming enthusiasts. Constant system updates ensure access to the latest features and security enhancements, cementing its place as a dynamic entertainment companion.
Remarkably, the Magabox MG4 remains budget-friendly, maintaining the same price point as the MG4. This commitment to affordability ensures that users can access its advanced streaming capabilities without breaking the bank, making it an even more compelling choice for budget-conscious consumers.
Pros:
User-friendly interface
Built-in apps with voice search support
Stable streaming, especially for sports gaming
Maintains the same price as the previous version
Cons:
Batteries not included in the package
3.Amazon Fire TV Stick (3rd generation)

The base-level Fire TV Stick offers respectable functionality but may leave some users craving more due to its modest 1GB of RAM, quad-core CPU, and limited 8GB of storage. In terms of both hardware and software, the third-generation Fire Stick closely mirrors its predecessor. The primary distinction lies in its slightly updated remote, featuring a Channel Guide button and four app shortcuts for convenient access to region-specific apps like Amazon Prime and Netflix. Impressively, it supports various HDR standards, including Dolby Atmos, HDR10, HDR10+, and HLG, making it a solid choice for modern HDR 4K televisions.
For ardent Kodi enthusiasts and those seeking an extra performance boost, investing an additional £10 in the Fire TV Stick 4K Max might be worthwhile. This upgraded version boasts a faster CPU, more RAM, and Wi-Fi 6 connectivity, along with robust 4K video support and compatibility with Dolby Vision HDR.
Pros:
Good hardware
Excellent HD antenna
Stunning 4K resolution
Cons:
Non-expandable storage space
4.MINIX NEO U9-H

The MINIX NEO U9-H 64-bit Media Hub for Android delivers swift video playback at an impressive 60fps, enhancing your viewing experience with seamless and razor-sharp 4K visuals. What’s more, it excels in picture quality, thanks to comprehensive HDR10 compatibility.
Leveraging HDR (High Dynamic Range) technology, this media hub broadens the color spectrum, rendering whites brighter and blacks deeper, thereby intensifying contrast for a lifelike and vibrant visual journey. All of these features come in an affordable package, priced under $50 / £50 / AUD$80, making it a budget-friendly choice for value-conscious users.
Pros:
Excellent streaming performance
Versatile
Micro SD slot
Cons:
Lacks a USB 3.0 port
5.Google Chromecast with Google TV (4K)

The Chromecast with Google TV 4K undoubtedly stands among the finest media streaming devices available, a viewpoint we firmly endorse. However, when compared to Android TV boxes, it gracefully concedes the top spot to the NVIDIA Shield TV, known for delivering superior performance across the board. Nevertheless, Google’s Chromecast with Google TV 4K offers an exceptional value proposition, priced at just $49.99.
It’s important to note that when we mention “Google TV,” we are referring to Google’s revamped user interface, while the Chromecast with Google TV continues to operate on the robust Android TV platform, providing access to a comprehensive array of streaming services. Furthermore, it comes complete with Google’s popular Chromecast remote right in the box.
Pros
Affordable price tag
Google TV interface with Google Assistant
dedicated compact remote
Cons
Limited storage
No AV1 codec support
In conclusion, the world of Android TV boxes has evolved to redefine how we experience home entertainment. From the powerhouse NVIDIA Shield TV Pro to the user-friendly Magabox MG4, and the budget-friendly Amazon Fire TV Stick to the vivid visual experiences offered by the MINIX NEO U9-H and the value-packed Google Chromecast with Google TV 4K, there’s a streaming companion tailored to every preference and budget. These devices not only grant access to an array of streaming services but also open doors to gaming thrills and immersive content. The future of streaming is here, and it’s a world of limitless possibilities, all at your fingertips. Whether you seek performance, affordability, or versatility, these Android TV boxes are your gateway to a dynamic and personalized entertainment journey.
4 notes
·
View notes
Text
Defense Witches Past World 2 - Part 1 (Memu Method)
LINK TO PART 2
Heyo, I JUST MADE A BREAK THROUGH WITH TWO DIFFERENT METHODS TO PLAY PAST WORLD 2
Okay not exactly all the hard work fo this method of getting the game working again goes to Kinac The Frog (@/allforest01) on Youtube who discovered how to play past world 2 + an added bonus :) on Memu (Calling It Memu Method) and DWNicola for sharing their data with Kinac to make this method possible
I would say the Memu method is definetly worth the effort that needs to be put into it for its added bonus with the end result however its also significantly more complicated and takes a lot of time which is why I'm sharing this tutorial with added pictures to make the process easier (and maybe save time not having to watch the programs download in real time in the video)
If you have complications with this method, would rather play the game on mobile devices (android only sorry >_<), or are okay with replaying the whole game with the vanilla experience I would recommend the easy method
EASY METHOD
For those of you who are willing to go through the process I screenshoted the entire process, which came to around 38 screenshots.... this is gonna take a while but... LET DO THIS
Here is the Video
youtube
What is Needed?
To begin, I want to specify the tutorial is done on a Windows computer I'm not sure how doing this would work on Mac or how this would work on Apple & Android phones (we are basically emulating a phone)
You will need...
A Computer/Laptop
Memu https://www.memuplay.com/
The App itself: Download either from google play store (from account that had it previously) or an apk
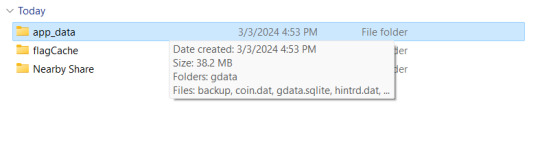
App data Folder: this is provided in the description of the video and was provided by thee DW Nicola (confirmed here sort by newest comment)
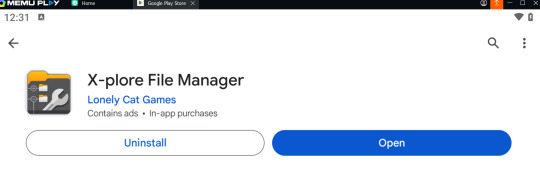
X-plorer File Manager: Download from playstore
App Data
This is provided in the description of the video but I'll share it here as well here you will need the app data folder and if your going the apk method an apk to the game is provided here as well
Before Opening Memu
Here is a list of some of the necessary things to have/do before opening Memu for the first time and arguably the easiest part of this whole process (It doesn't get easier T_T)
If your going APK route make sure to have it downloaded before opening Memu
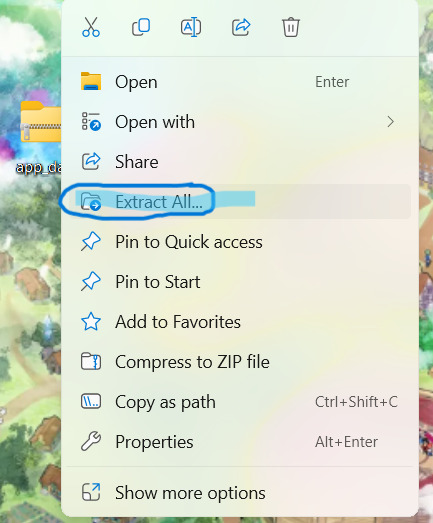
Download the App Data Folder (Should be a zip file)
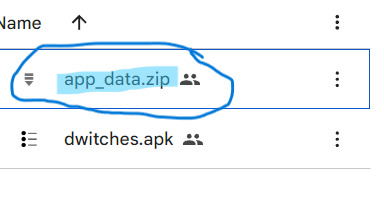
Extract The Zip File
Setting Up Memu
The video jumps around a bit sometimes stopping in a middle of a step below to download something however to make it easier here is some of the basic setup you may need to do
Open Memu and complete the Download and Installation
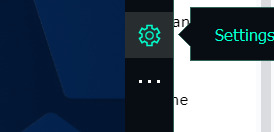
Once on home screen click gear on the far right task bar
Enable Root Mode (move the switch to on)
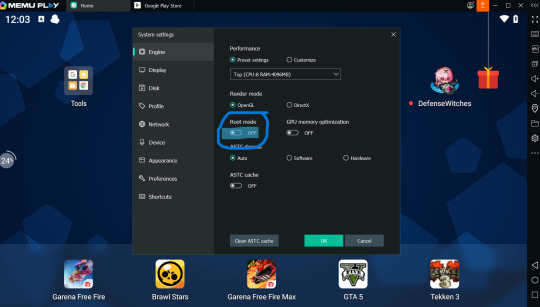
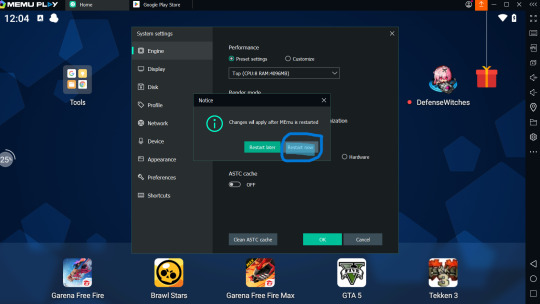
Click Restart Memu
Download the Neccessary Apps (X-plore File Manager and Defense Witches)

Downloading Defense Witches (Play Store Method)
Log into an account with Defense Witches previously downloaded and install
Downloading Defense Witches (APK Method)
You should have the apk already dowloaded onto your computer
Click APK button on the far right
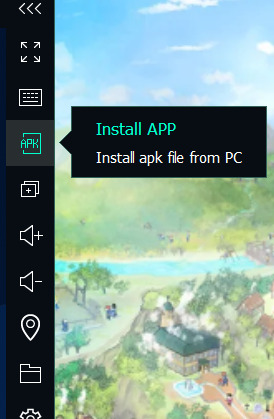
Click on Defense Witches APK to install

Data Transfer
Here is the start of transfering the app data on your computer to the emulator
Open Defense Witches (I'm not sure if you need to fully play the first stage in order for the files to show up or if you can exit right away but I would play through the first level)
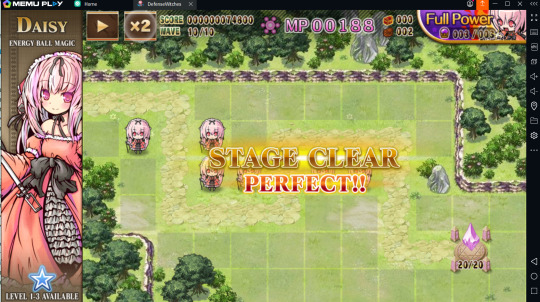
Fully Exit and Close Defense Witches (Click Square and slide right + click on x on the top tab)
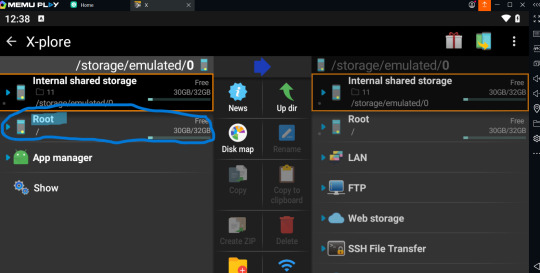
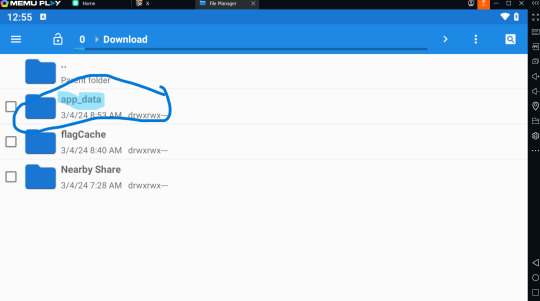
Open X-plore File Manager
Click on Root File on the left side
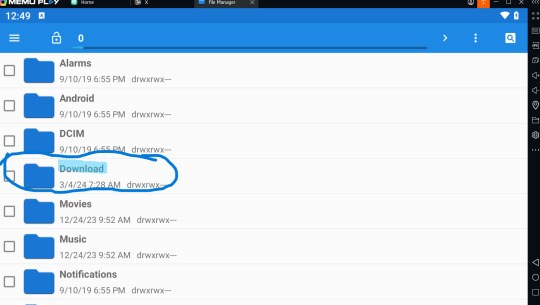
Open the preinstalled File Manager (Inside the tools folder) we aren't using this to change game files. We are only using this to check if transfer of the app data folder is successful.


Click Download Folder
Click Shared Folder
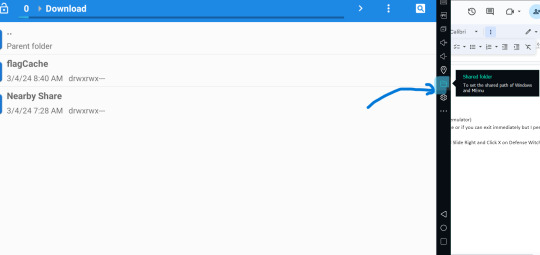
Click on windows button under shared download path

Copy and Paste (or click and drag) the extracted app data folder into the newly open file
When you check back into the preinstalled File Manager it should appear meaning it sucessfully transfered over
Close the pre installed File manager
Reopen X-plore File Manager
Running out of space for the next step (a lot of images very complicated T_T) I'll be continuing this tutorial in part 2 see you then :D
LINK TO PART 2
2 notes
·
View notes
Text
Plus TV BOX: Your Gateway to Ultimate Home Entertainment with Free Trial!
Tired of endless scrolling and fragmented entertainment? Introducing Plus TV BOX, the game-changer! It’s not just a streaming device, it’s a complete home entertainment revolution offering thousands of channels, movies, shows, and games right on your TV. Cutting-edge features, an intuitive interface, and a stunning design — Plus TV BOX has it all.
Unleash Endless Entertainment:
Ditch cable bills: Enjoy hundreds of live channels from around the world without extra fees. Local channels, sports, entertainment, news, and more — it’s all here!
Say goodbye to multiple subscriptions: Access popular streaming services like Netflix, Hulu, and Disney+ directly on Plus TV BOX. One device, endless possibilities.
Movie marathons and binge-watching made easy: Dive into a vast library of on-demand movies and TV shows, including the latest releases and timeless classics.
Game on! Plus TV BOX even lets you play your favorite Android games on the big screen with a dedicated gamepad.
Experience Unmatched Quality:
Stunning visuals: Immerse yourself in crystal-clear 4K resolution with vibrant colors and sharp details. HDR and Dolby Vision technologies take it further, delivering breathtaking contrast and lifelike images.
Smooth streaming: Say goodbye to buffering! The powerful processor and ample storage ensure seamless playback even for the most demanding content.
Effortless control: Navigate the intuitive interface with ease using the sleek remote or your smartphone as a remote control.
Sleek Design, Seamless Integration:
Modern and compact: Plus TV BOX doesn’t just perform, it looks good too. Its sleek, minimalist design complements any home theater setup.
Discreet and versatile: Easily fits on a shelf or mounts behind your TV. Take control of your entertainment center, not the other way around.
Effortless connectivity: Connect to your TV via HDMI, and enjoy a world of content with the built-in Wi-Fi.
Ready to experience the future of home entertainment? Try Plus TV BOX risk-free with a free trial (link to free trial)! Discover a world of endless possibilities and transform your living room into the ultimate entertainment hub.
Don’t wait, unleash the revolution with Plus TV BOX!
2 notes
·
View notes
Text
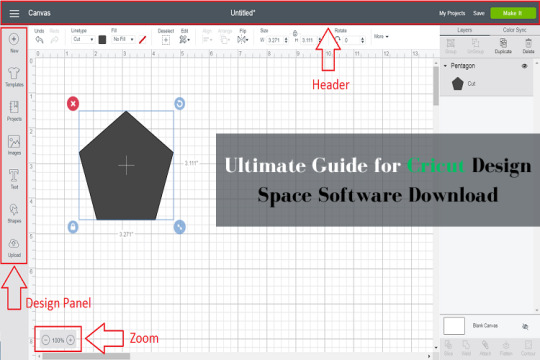
Ultimate Guide for Cricut Design Space Software Download
Last year, I bought my first Cricut crafting cutting machine. To use this machine, I need to perform the Cricut Design Space software download. Also, the app offers an iCould sync option, so now I use the Cricut app on my computer and smartphone. Moreover, I have helped many of my friends to download the Design Space software on their devices. If you also want to get Cricut Design Space on Windows, iOS, Mac, or Android devices, then I will help you with that. Get the complete guide to downloading the Cricut app on your computer or smartphone.
Steps for Cricut Design Space Software Download on Your Windows PC
You can easily follow the below steps to download and install the Cricut app on your Windows device.
Start with opening a browning on your PC and then visiting the Cricut official page design.cricut.com.
Now, look for the Cricut Design Space option on the website. (Usually, you need to go to the Apps section).
When the Cricut Design Space for Widows screen shows up, click on the Download option. (Click on the Terms and Conditions checkbox if the Download option is greyed out).
Once the download process begins, you will notice a slight change in the screen.
After the downloading process is complete, click on the software file from the Downloads section.
You can also go to the Downloads folder to open the setup file.
You need to choose the correct option if a prompt appears to ask if you trust this app.
Now, the installation process will appear on the screen.
After that, enter the Cricut ID and password to access the Cricut account. (Make a new account by clicking on the Create Cricut ID option).
Finally, the Cricut app will be ready to connect your cutting machine and create a project.
The Process of Cricut Design Space Software Download on Mac
If you want to download the Cricut app on your Mac device, then these are the steps you need to follow.
Initially, browse the Cricut website on any browser on your Mac.
Next, click on the Terms and Privacy checkbox and then select the Download option under the Design Space for Mac option.
Now, a pop-up box will show up on the screen to ask you where you want to save the file.
When the download process starts, the screen will take a slight change.
Once the driver download is complete, please open the file from the browser or go to the folder you choose to save it.
Afterward, a new window will appear on the screen; move the Cricut app icon to the Applications folder to start the installation.
In the Applications folder, double-click on the Cricut icon to open it.
You need to choose the open option if a notice appears on the screen to ask if you want to open the application you have downloaded.
Enter the Cricut account details to sign in and connect to the Cricut machine.
Finally, use the app to design your projects and turn your ideas into reality.
Cricut Design Space Software Download on Your iOS Smartphone
If you have an iPad or iPhone and want to download the Cricut app, then the following steps will help you do so without any issues.
On your iOS device, tap on the Apple App Store icon from the home screen.
Next, go to the search section to search for the Cricut Design Space option.
When the Cricut icon appears on the screen, tap on it and then select the Get option.
Once the download is complete, the app icon will be added to the home screen.
After that, launch the Cricut Design Space and then tap on the Cricut Machine Setup or Sign In option.
Finally, the process will be complete.
Steps for Cricut Design Space Software Download on Android Mobiles
To download the Cricut design app on your Android device, here are the procedures you have to follow.
Open the Google Play Store app on your Android smartphone or tablet.
From the search section, find the Cricut Design Space option.
Once you see the option, tap on it and choose Download/Install.
Wait for the download to complete; when the download is complete, then the app icon will appear on the screen.
Next, please tap on the App icon to launch it.
After that, you can choose to sign in or add a machine to start with.
Frequently Asked Questions
How to Download Cricut Design Space on a Computer?
Here are the steps to get a design space app on a computer.
On your computer device, go to the Cricut office support page.
After that, search for the Design Space option and then click on Download.
When the download is complete, open the setup file and then follow the process to complete the installation.
Once the app installation is complete, sign in with your Cricut account.
Now, start using the app with your Cricut machine to create stunning crafts.
How Can I Download Cricut App on My iOS Phone?
The steps to download the Cricut app on iOS devices are as follows.
First, launch the App Store function on your iPhone or iPad.
After that, search for the Cricut Design app by typing the name in the search section.
Tap on the Cricut icon if it appears in the results.
Then select the Download or Get option.
After the download, the app icon will appear on the computer screen.
Open the app and start using it after adding your Cricut cutting machine.
What Are the Requirements for Cricut Design Space Download?
Take a look at the system requirements for the Cricut app download.
For OS, you must be using Windows 10 or later, macOS 11 or later, iOS 15 or later, and Android 10.0 or higher.
Make sure your device has at least 2GB free space and 4 GB RAM.
The device needs to have Bluetooth connectivity or USB ports.
A stable and fast internet is necessary to download the app.
You can not download the Cricut app on a Chromebook.
The computer device resolution must be a minimum of 1024px x 768px.
For more information visit: cricut.com login Cricut New Machine Setup install cricut design space
Source: Cricut Design Space Software Download
#Cricut Design Space app#design.cricut.com#cricut design space software download#cricut design space download#install cricut design space app#cricut design space for mac
2 notes
·
View notes
Text
In retrospective, the shift whose culmination we see today seems to be about making hardware more uniform and the system infrastructure less opaque to anyone who isn't a developer.
Looking back as a millennial, I feel like the Gen-X are the most literate computer-wise because they dealt with all the weird pre-Windows systems and physical LAN party setups before the Internet at homes became fast enough to hold online gaming. Still, it's strange to read posts like this as a Millennial who was taught to use a PC in primary school because it was a new thing for the entire generation, and then I had to pass this knowledge on to teach my own parents to send an email and not to panic whenever "my window disappeared".
What I see in my boomer parents is a sort of a mental blockade from engaging with a typical window-based UI, like every time you could literally read something on the menu and click accordingly to perform an unknown activity, my mum has a little meltdown and wants to be taught the activity step by step so she can perform it by muscle memory. The greatest peril of my mum's boomer PC experience is that she doesn't watch what's going on on her screen outside the application in focus, she is not used to interactivity on a basic level, a robust system UI is too much for her because you need to learn to "dwell" in a structure of a certain complexity, you need to get used to the thought that a PC has a massive hidden side among all the nested folders, settings and policies. I think my dad has less problems with using a PC because he had vocational technical education before, he understands mechanical schematics and electrical installation charts and abstract structures of that sort. A classic menu is a little like this.
As a kid, I was taught basics of the structure of a pre-XP Windows system. I was taught a common technique to type using as many fingers as possible, without looking at the keyboard as you do it. I was taught how to use the Office suite, how to build a simple website using the ugliest incarnation of HTML, and how to push it to the teacher's host using a FTP manager. I was even taught basics of programming in one of the code-free visual gamified editors made solely for teaching purposes. All of it to familiarize us with a certain innate logic of software that was norm at the time.
Even as an IT worker nowadays, accessing most things I need on mobile devices as a QA tester is locked behind a hidden procedure of enabling Developer tools, and even then, if you look at the folder structure on the device when accessing it from your PC, the said structure is more code-like and obviously not meant for any end user. Or, I need to use workarounds through third party applications like iTunes to even access some stuff in the first place. iOS is a true nightmare when it comes to trying access the things Apple does not want an average end user to access.
What mostly changed since my childhood is that hardware is becoming uniform to the point building your own PC and setting it up to work is easy and foolproof, and Windows is trying to be quicker in providing some template behaviors and more "transparent" in its inner workings. The mobile device design simplified user experience to the levels of "Go to store, download app, tap and swipe, the system takes care of everything else". At the same time, the systems are more intrusive, and they heavily discourage messing around and finding out. Everything is meant to be done from the status bar, or a popup that appears right at your main screen.
Teaching my parents smartphones was a different experience insofar as notifications and popups from Android keep appearing without their consent, so to speak. They feel like they have no agency over their own phone, all they want is to make a call, the entire device with its apps and ads and intrusive messages is the enemy, and "they don't want IT" (where "IT" is an SMS from the provider, a system update notification, a push notification, information about used data, there's too many icons again, there's too much everything, yada yada). Once they learned the basics of using a laptop to click things on an Internet browser, phones started to be the opposite thing.
So this was originally a response to this post:
****
****
Which is about people wanting an AO3 app, but then it became large and way off topic, so here you go.
Nobody under the age of 20 knows how to use a computer or the internet. At all. They only know how to use apps. Their whole lives are in their phones or *maybe* a tablet/iPad if they're an artist. This is becoming a huge concern.
I'm a private tutor for middle- and high-school students, and since 2020 my business has been 100% virtual. Either the student's on a tablet, which comes with its own series of problems for screen-sharing and file access, or they're on mom's or dad's computer, and they have zero understanding of it.
They also don't know what the internet is, or even the absolute basics of how it works. You might not think that's an important thing to know, but stick with me.
Last week I accepted a new student. The first session is always about the tech -- I tell them this in advance, that they'll have to set up a few things, but once we're set up, we'll be good to go. They all say the same thing -- it won't be a problem because they're so "online" that they get technology easily.
I never laugh in their faces, but it's always a close thing. Because they are expecting an app. They are not expecting to be shown how little they actually know about tech.
I must say up front: this story is not an outlier. This is *every* student during their first session with me. Every single one. I go through this with each of them because most of them learn more, and more solidly, via discussion and discovery rather than direct instruction.
Once she logged in, I asked her to click on the icon for screen-sharing. I described the icon, then started with "Okay, move your mouse to the bottom right corner of the screen." She did the thing that those of us who are old enough to remember the beginnings of widespread home computers remember - picked up the mouse and moved it and then put it down. I explained she had to pull the mouse along the surface, and then click on the icon. She found this cumbersome. I asked if she was on a laptop or desktop computer. She didn't know what I meant. I asked if the computer screen was connected to the keyboard as one piece of machinery that you can open and close, or if there was a monitor - like a TV - and the keyboard was connected to another machine either by cord or by Bluetooth. Once we figured it out was a laptop, I asked her if she could use the touchpad, because it's similar (though not equivalent) to a phone screen in terms of touching clicking and dragging.
Once we got her using the touchpad, we tried screen-sharing again. We got it working, to an extent, but she was having trouble with... lots of things. I asked if she could email me a download or a photo of her homework instead, and we could both have a copy, and talk through it rather than put it on the screen, and we'd worry about learning more tech another day. She said she tried, but her email blocked her from sending anything to me.
This is because the only email address she has is for school, and she never uses email for any other purpose. I asked if her mom or dad could email it to me. They weren't home.
(Re: school email that blocks any emails not whitelisted by the school: that's great for kids as are all parental controls for young ones, but 16-year-olds really should be getting used to using an email that belongs to them, not an institution.)
I asked if the homework was on a paper handout, or in a book, or on the computer. She said it was on the computer. Great! I asked her where it was saved. She didn't know. I asked her to search for the name of the file. She said she already did that and now it was on her screen. Then, she said to me: "You can just search for it yourself - it's Chapter 5, page 11."
This is because homework is on the school's website, in her math class's homework section, which is where she searched. For her, that was "searching the internet."
Her concepts of "on my computer" "on the internet" or "on my school's website" are all the same thing. If something is displayed on the monitor, it's "on the internet" and "on my phone/tablet/computer" and "on the school's website."
She doesn't understand "upload" or "download," because she does her homework on the school's website and hits a "submit" button when she's done. I asked her how she shares photos and stuff with friends; she said she posts to Snapchat or TikTok, or she AirDrops. (She said she sometimes uses Insta, though she said Insta is more "for old people"). So in her world, there's a button for "post" or "share," and that's how you put things on "the internet".
She doesn't know how it works. None of it. And she doesn't know how to use it, either.
Also, none of them can type. Not a one. They don't want to learn how, because "everything is on my phone."
And you know, maybe that's where we're headed. Maybe one day, everything will be on "my phone" and computers as we know them will be a thing of the past. But for the time being, they're not. Students need to learn how to use computers. They need to learn how to type. No one is telling them this, because people think teenagers are "digital natives." And to an extent, they are, but the definition of that has changed radically in the last 20-30 years. Today it means "everything is on my phone."
50K notes
·
View notes
Text
How to Connect Cricut Joy to Computer? (Easy Steps)
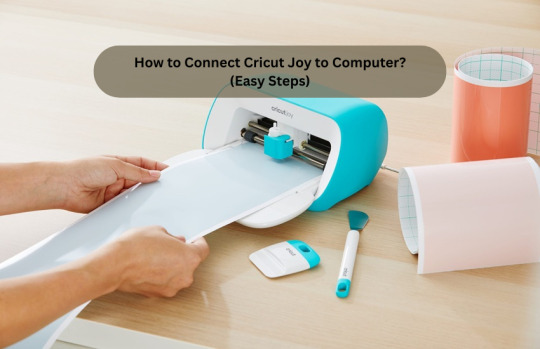
If you've just received your new Cricut Joy machine and don't know where to begin, this guide will help you through the entire process. In this blog, we'll teach you how to connect Cricut Joy to computer without any hassle. It covers every important detail that a beginner needs to know, from basic system requirements to downloading Design Space and connecting their crafting machine to a computer.
Before connecting your machine to the computer, you need to set it up and find a device compatible with Design Space. Cricut offers two methods of connection: USB or Bluetooth. However, Cricut Joy and Joy Xtra only connect via Bluetooth. They do not come with a USB cable.
Cricut Design Space: System Requirements
Before connecting the crafting machine to your computer, ensure your system meets the basic requirements to run the Design Space software. Let’s take a look at these system requirements:
Operating System: Windows 10 or later (64-bit) and Windows 11 are also compatible.
Hardware:
CPU: Intel Dual-core or equivalent AMD processor
Storage: 2 GB free disk space.
Display: Minimum 1024px x 768px screen resolution.
RAM: Minimum 4 GB.
Connection: An available USB port or Bluetooth connection
Internet Connection: A broadband connection is suggested for optimum performance.
Minimum 2-3 Mbps download
1-2 Mbps upload speeds are recommended
How to Set Up Cricut Joy on a Computer?
Follow these easy steps to set up your cutting machine for a computer. This makes the process simple and hassle-free for beginners.
Step 1: Prepare Your Machine and Device for Setup
Power on your computer and the crafting machine, ensuring they are within 10-15 feet for pairing.
After that, go to your web browser and type design.cricut.com/setup.
Step 2: Select Your Cricut Model
Open Design Space and it will ask you to enter your machine model.
Enter your machine model in the search box and select Cricut Joy.
Step 3: Download & Install Design Space
On the following screen, click on the tick box to agree to the terms and conditions at the bottom.
Next, the website will guide you through downloading the installer file.
Once you're done with the downloading process, double-click the .exe file to start the installation.
A setup window will appear, displaying the installation process.
Tip: To access the Design Space more easily, click "Pin to taskbar" or right-click the icon on your desktop. If you're using iOS or Android, you must download Design Space from the App Store or Google Play Store.
Step 4: Sign In With Your Cricut ID
After the installation process, the software will guide you through either signing in if you already have a Cricut ID or creating a new one.
Step 5: Create a Cricut Account
If you create a new account, you'll be prompted to enter your first name, last name, country, and email address. Fill out the form carefully with your details.
Recheck everything twice.
You must agree to the Terms of Use before creating your account.
Choose a password for your new Design Space account.
Once your Cricut ID is created, you'll be guided through connecting your machine to Design Space.
The setup is complete when you are prompted to perform a test cut.
The next step is to connect your machine to a computer to receive commands from the Design Space software.
How to Connect Cricut Joy to Computer?
Follow the steps in the section below to easily connect your machine to the computer and start creating with Design Space in just a few simple steps.
Step 1: Open Design Space Settings
Open Design Space and click on your name in the top right corner of the home page.
Then, a drop-down menu will appear; click "Settings."
On the next window, click on "Machines".
After that, click the Start button next to "New Product Setup".
Step 2: Choose Your Machine
Select your machine model from the options available.
Now, it prompts you with a basic setup guide.
Step 3: Connect Both Devices via Bluetooth
Before connecting via Bluetooth, first turn off your Bluetooth device and then turn it back on, and follow the instructions listed below:
Press the Start menu and then select Settings.
After that, select the Devices tab.
Then, click "Add Bluetooth or other device."
Select Bluetooth and let your computer detect your machine. Your machine should appear in the list of available devices. Select it.
You may need to enter a pairing code or confirm the connection between the computer and the machine. If asked to enter a PIN, then enter 0000.
After that, tap on the Connect button.
Note: The PIN for all Cricut machines is universal: 0000. Once connected, your machine will appear on your computer. If you're using Windows 11, ensure Bluetooth settings are set to "Advanced" to avoid device discovery issues.
Congrats! You've successfully learned how to connect Cricut Joy to computer.
Frequently Asked Questions
Why isn’t Cricut Joy connecting to computer?
Below are some key points that you can try when your machine won't connect to your computer:
Ensure your machine is turned on and in Bluetooth discoverable mode.
To update, go to the Help menu in Design Space and check for updates.
Update your computer's Bluetooth drivers.
Turn off other Bluetooth devices, and if issues persist, try unpairing and re-pairing your machine in Bluetooth settings.
Turn off your machine, unplug it, and plug it back in to resolve the issue.
Why is my Cricut not finding my device?
If Design Space is unable to locate your machine, the issue is likely a connection problem, either Bluetooth, USB, or software.
Make sure Bluetooth is enabled on your device.
Clear the cache or offload the app (for iOS) or clear the cache (for Android).
You may need to unpair and re-pair your machine in your device's Bluetooth settings.
Check if your USB cable is securely connected to both your computer and the machine.
Try to use a different or new USB port on the operating system.
If you have an Explore, ensure the wireless Bluetooth adapter is inserted.
Can Cricut Joy print pictures?
No, the standard Cricut Joy does not allow you to print directly from the machine. This machine is designed for cutting and drawing various materials, including vinyl, cardstock, and paper. It can be used to create stickers, cards, and other craft projects.
It can cut and draw but is not equipped with a printer. However, you can use a standard printer with a "Print Then Cut" feature with other machines and then use your Joy to cut the printed image.
Source: How to Connect Cricut Joy to Computer
#how to connect cricut joy to computer#Cricut Setup#Cricut machine setup#cricut joy setup#cricut joy app
0 notes
Text
Best Projectors in Lucknow – Home, Office & Smart Projector Solutions at Dizitouch
Looking for the best projectors in Lucknow? Whether you're setting up a home theater, upgrading your office presentation system, or adding smart tech to your classroom or cafe, Dizitouch offers a wide range of high-performance projectors to match every need and budget.
As Lucknow’s trusted showroom for digital projectors solutions, Dizitouch provides everything from 4K Ultra HD home projectors, short-throw projectors for compact spaces, and Android smart projectors with inbuilt OTT apps, to professional-grade projectors for business presentations and educational use. Dizitouch also provides complete installation, screen mounting, and remote-control setup — making it a one-stop solution for anyone searching for reliable, branded projectors in Lucknow.
0 notes
Text
Top 5 AV Technologies Every Workplace Should Invest In

In this fast-moving world, offices have to stay abreast of technology to remain efficient, connected, and productive. The second-most-popular area that technology has huge repercussions over is AV-Audio Visual. The AV solutions make people communicate better, present ideas clearly, and collaborate smoothly, be it in the same room or in a remote setting. If one is setting up a new office or renovating the current one, here are 5 AV technologies that each office must have to invest in:
1. Video Conferencing Systems
Video conferencing technology is now a necessity in any workplace nowadays. Irrespective of whether your teams are in-house, at home, or somewhere across the country, a competent video conferencing system must connect them all.
Why it's important:
Facilitates meetings that are easier and more personal than a plain telephone session
Saves travel time and cost
Makes remote teams feel included
What to look for:
Clear camera (HD or 4K)
Good microphones and loudspeakers
One set of applications that are very user-friendly include Zoom, Microsoft Teams, Google Meet, and the like.
2. Interactive Display or Smartboard
Think of an interactive display as a giant touchscreen TV. It replaces the aged and clunky whiteboards or projectors and allows you to draw, write, and move things around while in a meeting or presentation.
Why it’s important:
Great for brainstorming sessions
Easy to share and save notes
Encourages team collaboration
These smart boards are especially useful in meeting rooms, training sessions, or creative team spaces.
3. Wireless Presentation Systems
No more haywire moments trying to share your screen via cables.Wireless presentation offers anybody in the room an option to quickly share their laptop, tablet, or phone with the meeting room screen-short of plugging.
Why it's important:
It saves time and just avoids hassles during setup.
Works with all devices-Windows, Mac, iOS, Android.
Smoothens the flow of meetings.
Some popular systems are ClickShare, Miracast, and AirPlay.
4. Digital Signage
Digital signage uses screens around the office to display information, updates or branding messages. They can be placed in the lobby, meeting rooms, kitchen or corridors.
Why it's important:
Shares important announcements quickly
Improves internal communication
Give a modern look to your office.
You can use the digital signs to greet visitors or show live data or safety updates.
5. Room Booking and Scheduling Systems
These are small screens or software tools that show whether a meeting room is free or booked. Some are placed right outside meeting rooms, while others work with calendars like Outlook or Google Calendar.
Why it’s important:
Prevents double-booking of rooms
Helps teams plan better
Saves time and avoids confusion
Some systems even show which rooms have video conferencing equipment or are suitable for large groups.
Why AV Technology Matters
Investing in AV technologies for the workplace isn’t just about having the latest gadgets. It’s about:
Helping teams work better together
Creating a more professional environment
Supporting remote and hybrid work
Supporting remote and hybrid work
Save time and reduce stress
Your AV is working perfectly so your team can focus on what matters.
Final Thoughts
AV technologies are changing the way the office works. From meetings to comms, it’s a must have. When you’re planning an office upgrade consider these 5: video conferencing, interactive displays, wireless presentation, digital signage, room booking systems.
Need some expert advice or help setting up the best AV technologies for your office?
Contact Engagis – we help businesses across Australia create smarter, more connected workplaces with modern AV systems.
#AV for workplace#audio visual technology#workplace technology#video conferencing systems#smart boards#interactive displays#wireless presentation#digital signage#room booking systems#office AV solutions#hybrid work tools#modern workplace setup#AV systems for business#workplace communication tools#Engagis AV solutions
0 notes
Text
Play Blackjack Online Anytime – A Smart, Fast & Modern Way to Unwind

Why Choose Digital Platforms for Entertainment?
In today’s fast-paced world, flexibility and convenience have become essential. People no longer want to be tied to physical setups or rigid schedules when it comes to relaxation and entertainment. The rise of smart, intuitive online platforms has completely changed how we spend our free time. One of the best examples of this shift is the opportunity to play Blackjack online, especially on a platform like Cricaza247.
Cricaza247 offers a smooth and engaging experience for players who enjoy strategic and time-efficient gameplay. Whether you’re new to it or an experienced player, this platform is designed to suit all levels and lifestyles.
Fast, Smooth, and Easy to Use
What makes Cricaza247 a standout choice is how quick and easy it is to access. There’s no need for complicated setup or heavy downloads. All you need is an internet connection and a device—be it a smartphone, tablet, or desktop.
Once you log in, you’ll find a clean, responsive interface. Every action, from navigating menus to starting a new session, is built for speed. The lightweight design ensures that you don’t face lags or slow loading times. This allows you to focus on what matters—making smart moves and enjoying every moment.
Play Anytime, Anywhere
One of the biggest advantages of playing online is the flexibility it provides. You can play Blackjack online whether you're relaxing at home, taking a break during work hours, or even while traveling. The platform is fully optimized for mobile use, making it the ideal choice for those who want something engaging without being tied to one place.
It works equally well across all screen sizes, so whether you’re on an Android phone, iPhone, tablet, or laptop, the experience remains consistently smooth and enjoyable.
Designed for Everyone
Cricaza247 has created an environment that is welcoming to all types of users. If you’re new, the platform guides you with simple steps and a user-friendly layout. If you’re more experienced, you’ll appreciate the efficiency and speed the site offers.
There’s no pressure or time commitment required—you play on your terms, whenever you like. This makes it an excellent digital option for both casual sessions and more focused play.
Boost Your Strategy While You Relax
When you play Blackjack online at Cricaza247, you’re not just passing time—you’re also sharpening your focus, improving your decision-making, and staying mentally active. This makes it more than just a source of entertainment. It becomes a fun way to keep your mind engaged while enjoying a relaxing moment.
How to Get Started?
Getting started on Cricaza247 is as simple as it gets:
Visit https://cricaza247.com
Create your account in minutes
Click on your preferred game and start playing instantly
There’s no complex verification, no extra downloads, and no long wait times. Just pure, seamless access.
Final Thoughts
If you’re someone who values smart interaction, modern design, and total convenience, it’s time to explore the opportunity to play Blackjack online with Cricaza247. With smooth performance, fast navigation, and device-friendly design, it’s the perfect digital space to enjoy your free time—whenever and wherever you want.
Make your downtime more engaging. Join Cricaza247 today and discover a better way to play online.
0 notes