#Arduino programming kit
Explore tagged Tumblr posts
Visit Tumblr Blog
Explore Tumblr blogs with no restrictions, modern design and the best experience.
Last Seen Tumblr Blogs


Fun Fact
25% of US internet users with an annual income of $80-100K use Tumblr.
Text
Best Robot Car Kit for Kids
Looking for an engaging way to introduce your kids to robotics and programming? The ELEGOO UNO R3 Smart Robot Car Kit is a fantastic choice. It’s designed to give children hands-on experience with electronics and coding. This kit includes everything you need to build a smart robot car. With parts like obstacle avoidance and line tracing modules, and the option to control it via a smartphone, it’s…

View On WordPress
0 notes
Text
oooohhg its been a Hot minute since i used ArcGIS [well, now i have to use qgis lol] and man! I know how i want to visualize this data but i completely forget the terms. I found it tho!!! Literally as i was typing this haha. Proportional symbols, thats exactly what i was thinking of, awesome!!
I’m only here for a skosh today, i did the majority of my hours yesterday and wednesday yippee
I got my whiteboard set up [didnt know it was extendable! Neat!], pilfered a marker, been jammin to music since *no one* else is here, overall havin a good day!
I gotta make sure i have everything i need for the program next week, if i don’t i gotta send a materials list :p oh! thats right, i was gonna ask for a second monitor…….
Hey i got a real trash can too! Before it was a cardboard box hahaha
Fingers crossed my grants get approved so we can get a 3-D printer and that Arduino education kit
Also send good vibes, I’ve been goin hardcore ham on html for two websites for myself and next week I’m gonna start learning the basics of c++ to get some idea of what I’m doing with the kit. it does say no experience necessary but i’ve been wanting to use arduino for ages, i’m gonna heckin learn it for real!
There’s like. a lot that i have planned lmao its gonna b so cool
#patch.talks#patch.4h#patch.STEM#stem#patch does stem education#sees the program’s access to arduino kits: its free real estate
1 note
·
View note
Note
Hi, I'm a junior in university right now working towards my bachelor's in electrical engineering and I've since realized I have no idea wtf I'm doing. Do you have some resources on how to begin designing electric circuits and programming in C? You seem like you know what you're doing
So I've thought about this a good bit and what helped me learn both times was hands on practice so I'd see about getting a cheap breadboard kit like this:
But probably not this one exactly, you can get something similar for way cheaper.
As for specific literature for circuitry I don't have a recommendation but I can recommend picking varying difficulties of diy projects that require circuitry at the beginning to get comfortable and bringing that comfortability to your school projects.
For using C with circuitry I'll say the best path is definitely buying a cheap esp32 board, something based on the c3 would probably be cheapest. There is tons of documentation on how to use these boards and I've found that PlatformIO + VS code/vscodium is a very good setup for programming these boards.
19 notes
·
View notes
Text
I think more people need to play toys with electronics. Get a razzberry pi or arduino kit, make yourself a morning alarm that shuts off when you pick up your toothbrush, program a smart toy for your catmon that waits at intervals, or just play with blinky lights for an afternoon it'll do you some good
#pokemon irl#rotomblr#pokeblogging#// hi mun here I ran into that specific alarm project when I was studying computer science in the middle of the pandemic online classes era#// yes I just wanted to let you know this exists :3
7 notes
·
View notes
Text
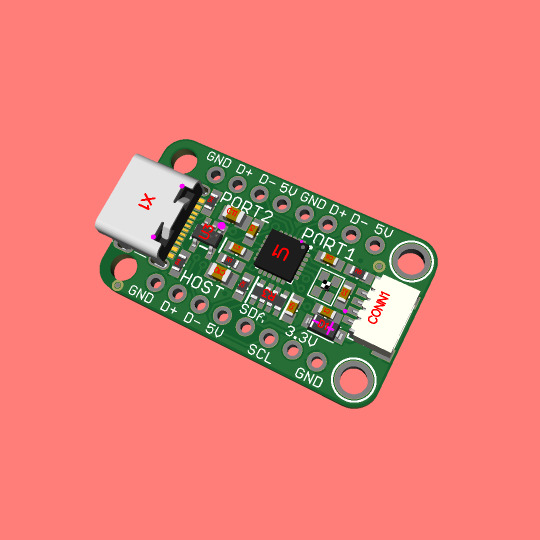
USB2422 configurable USB Hub chip
The Microchip USB2422 is kinda neat, its a low cost USB hub with EEPROM you can connect to I2C to configure. We thought it would make a nice little breakout for whenever you have a USB port but you sorta wish you had two! Maybe even embed in some hardware! We just made a couple USB hub breakouts with the CH334F ...
but this board might be nice if you want more configurability & control: the stemma QT connector on the end is what you can plug into to program it. we designed rev A of this board in 2021 and then it got slammed by part shortages, now its back in stock so we can revisit this design!
#adafruit#microchip#usb2422#usbhub#eeprom#i2cconfigurable#hardwareintegration#usbbreakout#stemmaqt#microcontroller#techdiy#electronicsproject#configurableusb
13 notes
·
View notes
Text
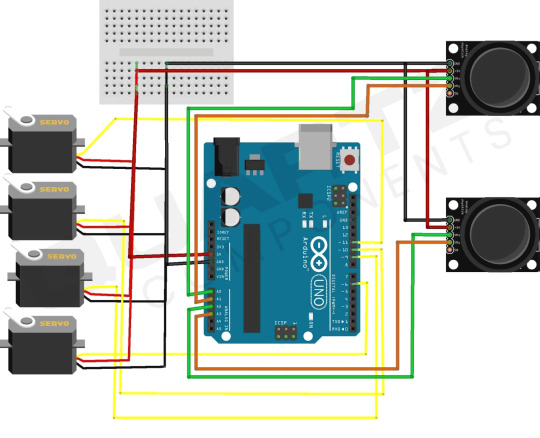
Build Robotic Arm Using Arduino
A robotic arm is a type of mechanical arm, usually programmable, that is designed to move materials, parts, tools, or specialized devices through various types of programmed motions for the purpose of manufacturing, assembly, testing, inspection, and other tasks. Robotic arms are widely used in a variety of industries, including automotive, aerospace, electronics, food processing, and pharmaceuticals.
COMPONENTS REQUIRED
Robotic Arm Kit
Arduino Board (UNO)
USB –A to micro-USB cable
Servo motor
Dual Axis XY Joystick Module
Connecting wires
Software Required
Arduino IDE
Circuit Diagram
youtube
41 notes
·
View notes
Text
Gear Up! A Beginner's Guide to Learning Robotics
Hey Tech Enthusiasts!
Are you fascinated by robots and want to dive into the world of robotics? Learning robotics can seem daunting, but with the right resources and mindset, you can get started!
Step 1: Understand the Basics
- Familiarize yourself with programming languages like C++, Python, or Java
- Learn about electronics, circuitry, and microcontrollers (e.g., Arduino, Raspberry Pi)
- Get a grasp on mechanical concepts (e.g., kinematics, dynamics)
Step 2: Choose Your Path
- Robotics kits (e.g., Lego Mindstorms, Makeblock)
- Online courses (e.g., Coursera, edX, Udemy)
- Books (e.g., "Robotics, Vision & Control" by Peter Corke)
- Join online communities (e.g., Reddit's r/robotics, r/learnprogramming)
*Step 3: Practice & Build*
- Start with simple projects (e.g., line follower, robotic arm)
- Experiment with sensors, actuators, and control systems
- Join robotics competitions or hackathons
Step 4: Network & Learn from Others
- Attend robotics conferences, meetups, or workshops
- Collaborate with fellow robotics enthusiasts
- Participate in online forums
Resources:
- Code.org's Robotics Course
- Robotics Academy
- Robot Operating System (ROS)
Inspiration:
- Boston Dynamics' robots
- NASA's Robotics Alliance Project
- Robot Wars
Conclusion:
Learning robotics takes time, patience, and dedication. Stay curious, persistent, and creative!
What's your favorite robotics project or resource? Share in the comments!
[Reblog if you're interested in robotics!]
3 notes
·
View notes
Text
5 Arduino Courses for Beginners
Robotics, automation, and do-it-yourself electronics projects have all been transformed by Arduino, an open-source electronics platform. Entering the world of Arduino may seem intimidating to novices, but the correct course may make learning easier and more fun.
Arduino Step-by-Step: Getting Started (Udemy)
This extensive Udemy course is designed for complete novices. It provides an overview of Arduino's fundamentals, describing how the platform functions and assisting students with easy tasks like using sensors and manipulating LEDs.
Key Highlights:
thorough explanations for novices.
practical projects with practical uses.
instructions for configuring and debugging your Arduino board.
Introduction to Arduino (Coursera)
The main objective of this course is to introduce Arduino programming with the Arduino IDE. It goes over the fundamentals of circuits, programming, and connecting various parts, such as motors and sensors.
Key Highlights:
instructed by academics from universities.
access to a certificate of completion and graded assignments.
Concepts are explained in length but in a beginner-friendly manner.
Arduino for Absolute Beginners (Skillshare)
For those who want a quick introduction to Arduino, this brief project-based course is perfect. You'll discover how to configure and program your Arduino board to produce interactive projects.
Key Highlights:
teachings in bite-sized chunks for speedy learning.
simple projects for beginners, such as sound sensors and traffic light simulations.
Peer support and community conversations.
Exploring Arduino: Tools and Techniques for Engineering Wizardry (LinkedIn Learning)
This course delves deeply into Arduino programming and hardware integration, drawing inspiration from Jeremy Blum's well-known book. It is intended to provide you with the skills and resources you need to produce complex projects.
Key Highlights:
advice on creating unique circuits.
combining displays, motors, and sensors.
Code optimization and debugging best practices.
Arduino Programming and Hardware Fundamentals with Hackster (EdX)
This course, which is being offered in partnership with Hackster.io, covers the basics of Arduino hardware and programming. You may experiment with real-world applications because it is project-based.
Key Highlights:
Course materials are freely accessible (certification is optional).
extensive robotics and Internet of Things projects.
interaction with teachers and other students in the community.
Arduino is a great place to start if you want to construct a robot, make a smart home gadget, or just pick up a new skill. The aforementioned courses accommodate a variety of learning preferences and speeds, so every novice can discover the ideal fit. Select a course, acquire an Arduino starter kit, and set out on an exciting adventure into programming and electronics!
To know more, click here.
2 notes
·
View notes
Text
Arduino Mega 2560 Starter Learning Kit
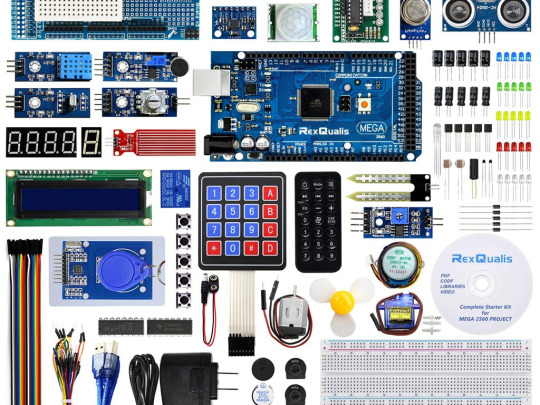
The AINOW Arduino Mega 2560 Starter Learning Kit is an ideal choice for those interested in microcontrollers and electronic components. It includes instructional videos and a guidebook to make learning easy. The tutorials cover basic coding using Arduino software and operating electronic devices. Previous experience is not necessary as the kit teaches coding and working with electronics from the ground up. And, there’s no need for soldering skills – simply plug and play for a fun learning experience.
The main idea is that repetition should be avoided when rephrasing the following paragraph with the same tone.
A fantastic set suitable for all levels, from novice to advanced.
These components have versatile applications and are built for durability.
The kit contains a diverse range of materials to create a multitude of Endless Projects.
An excellent method to gain knowledge on sensors of both analog and digital varieties.
The characteristic is a prominent aspect that sets it apart and makes it stand out.
This kit is ideal for both novices and seasoned professionals in this particular area.
Our selection includes both Analog and Digital Sensors, perfect for those looking to make their own DIY projects.
Discovering the world of microcontrollers is a breeze with Arduino Mega 2560.
Our resources include a User Guide, Codes/Sample Programs & Reference books/Video Tutorials, and other valuable materials.
3 notes
·
View notes
Text
Good morning ☀️🌞 :D
Classes start tomorrow, which means club fair today! I got up and programmed a little arduino LED game very quickly to lure kids to my table lol.
Feeling very study-girl today. If only I hadn’t forgotten my glasses 😞.
I keep seeing this guy I have a very intense passive crush on. He looks like Kit Connors.


Also I finished the pink sweater! It’s very ugly but soo comfortable, I need it to be colder so I can wear it in my house and sip my coffee
3 notes
·
View notes
Note
12, 25, 33!
12. what’s some good advice you want to share?
Doing things the "improper" way give you the strength and inertia to try the "proper" way later down the line. This has been my general experience with art the past few months, but also applied to stuff like programming too!
25. fave season and why?
For the seasons I get here, the rainy season is definitely the best one of the two. But I do wish to see a proper temperate autumn one day, the natural aesthetics feel unmatched.
33. any hobbies?
I don't think there's any besides the ones I post about sometimes, the main one being growing flowers (I've been waiting on some new seeds for that one). But, let's see... I experimented with electronics for a bit, starting with an arduino nano kit I got a few years ago. Haven't done much with it, though.
3 notes
·
View notes
Text
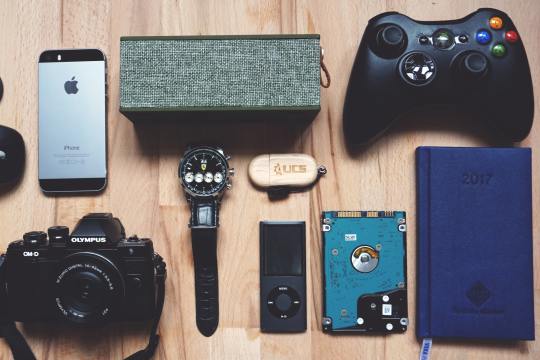
Top 10 Scale Gifts for the Gadget Enthusiast
Finding the ideal present for the gadget lover in your life may be thrilling and difficult at the same time because technology is continuously changing, and gadgets are becoming an essential part of our lives. The appropriate gadget may make their world come alive, whether it's for a birthday, an anniversary, or to express gratitude. We've put together a list of Top 10 Scale Gifts for the Gadget Enthusiast to aid you in your search for the perfect present.
High-end headphones
There's nothing quite like immersing yourself in music or podcasts with a pair of high-quality headphones. For the audiophile in your life, consider options like the Bose QuietComfort 35 II or Sony WH-1000XM4. These headphones not only offer exceptional sound quality but also come with noise-canceling features, making them perfect for music lovers on the go.
Smartwatch or Fitness Tracker
Smartwatches and fitness trackers have become more than just timekeeping devices; they're personal assistants for tracking health and staying connected. Due to their abundance of health and fitness capabilities, app compatibility, and stylish designs, the Apple Watch Series 7 and Fitbit Versa 3 are both fantastic options.
Drone
Drones have taken the world by storm, offering a unique perspective and endless possibilities for creativity. DJI's Mavic Air 2 and Skydio 2 are top-notch options, equipped with high-resolution cameras, obstacle avoidance, and impressive flight capabilities. A drone is an excellent gift for both tech enthusiasts and photography lovers.
Virtual Reality (VR) Headset
Step into another world with a VR headset. Oculus Quest 2 and Valve Index provide immersive gaming experiences and access to virtual reality applications. VR headsets are perfect for those who crave a new level of entertainment and want to explore virtual realms.
High-Performance Laptop
A powerful laptop is essential for the tech enthusiast who wants power on the run. Choose laptops are notorious for their exceptional speed, stunning defenses, and portability, similar as the MacBook Pro or Dell XPS 15. These laptops work well for a variety of operations, including videotape editing and programming.
Smart Home Devices
Transforming a house into a smart home is a trend that continues to gain momentum. Smart home devices like Amazon Echo, Google Nest, and Philips Hue lights offer convenience and automation. They allow control over lights, music, security, and more with just a voice command or a tap on your smartphone.
Streaming Device
Cutting the cord has never been more accessible with streaming devices like Roku Ultra and Apple TV 4K. These devices offer access to a vast library of streaming services, including Netflix, Disney+, and Hulu, in stunning 4K quality. Streaming devices are perfect for binge-watchers and movie buffs.
High-Resolution Camera
Capture life's moments in stunning detail with a high-resolution camera. The Sony Alpha a7R IV and Canon EOS R5 are recognized for their superb image quality and adaptability. For photographers who want to capture landscapes, portraiture, or wildlife, these cameras are perfect.
Gaming Console or Accessories
Gaming is a passion for many gadget enthusiasts. Consider the latest gaming consoles like the PlayStation 5 or Xbox Series X. Enhance the gaming experience with accessories like gaming chairs, mechanical keyboards, or gaming headsets.
Tech Toolkit or DIY Electronics Kit
For those who love to tinker and build, a tech toolkit or DIY electronics kit is the perfect gift. Arduino Starter Kits and Raspberry Pi Bundles provide endless opportunities for creating gadgets, robots, and electronic projects.
Conclusion
In conclusion, it need not be difficult to select the ideal present for a gadget fanatic. With the top 10 scale gifts we've outlined, you can surprise your loved one with a thoughtful and exciting present that aligns with their passion for technology. Remember, the best gift is one that shows you know their interests and cater to their tech-savvy side.
2 notes
·
View notes
Text
EXPLORING THE 5 COOL PARTNER SELLER ELECTRONICS PRODUCTS-Part1
Exploring the 5 Cool Partner Seller Electronics Products
Prologue
Are you an electronics enthusiast looking to expand your electronics project repertoire? Want to take your skills to the next level by exploring new and exciting products? Look no further than our list of five cool electronics products from partner sellers!
Whether you’re interested in building your own smart home devices, experimenting with sensors, or creating your own robot, these products are sure to inspire you. They cover a lot of application areas, from loop detectors used to monitor vehicle count in parking garages to Arduino CNC shields used in CNC machines, from simple pulse sensors used to detect cardiovascular pulse signals from fingertip to RGB LED panel light used in smart home, these products are unique, compact, and functional. Not only are these products fun to build and use but they’re also designed to help you learn new skills and techniques along the way.
What’s more, these products all come from trusted partner sellers who are committed to developing high-quality products. They’re happy to provide technical support for customers who have questions, so you can be sure you’re getting the best in electronics.
So get ready to dive into the world of electronics and explore these five cool partner seller products. You’re sure to find something that piques your interest and takes your own electronics projects to the next level.
Inductive Loop Vehicle Detector by Elektronika-ba
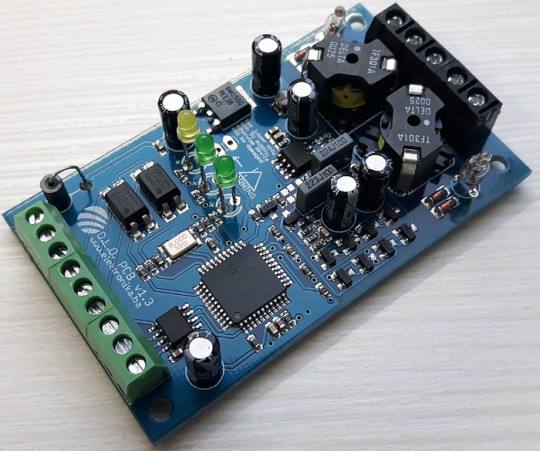
Whether you need to monitor occupancy and count vehicles in parking garages, control vehicle access at door and barrier controls, or facilitate traffic light installations and traffic controllers, the inductive loop detector is the perfect solution. It can even detect the direction and speed of vehicle traffic, making it an invaluable tool for a variety of traffic-related applications. In addition, this device can function as a stand-alone speed trap and can be easily interfaced with Arduino.
We can also provide a pre-programmed PIC chip to meet your project requirements.
Specifications
Number of operating modes: 4
Tuning: Automatic
Detection type: Presence/Pulse
Presence time: Adjustable in 3 steps
Pulse duration: 250 ms / 500 ms
Signal filtering: Adjustable in 2 steps (NORMAL, HIGH)
Loop inductance: 20 uH — 1000 uH
Frequency range: 20 kHz — 145 kHz
Frequency selection: 2 combinations (LOW, HIGH)
Sensitivity: Maximum 0.0025% Δf/f, adjustable in 8 steps
Detection speed: 10 ms by default, adjustable
Start-up time: ~ 1 second per channel (or longer if the frequency is not stable)
Temperature range: -35°C — 120°C
Sensor protection: Galvanic isolation + gas discharge tube for lightning protection
Don’t settle for less — click here to learn more about the Inductive Loop Vehicle Detector and experience the compact, yet cool detector!
Arduino CNC Shield V3.51 by Protoneer
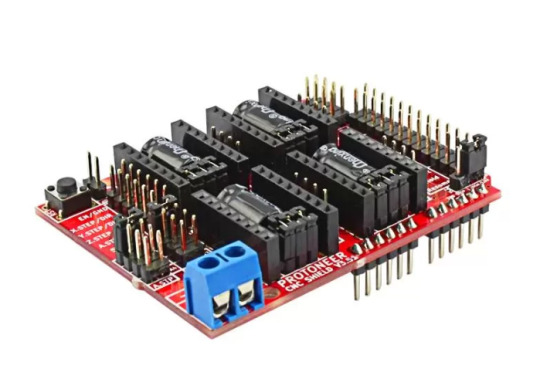
Designed by Protoneer, this kit is packed with features to ensure high precision control of your stepper motors, you can use it to easily build small CNC routers, DIY laser cutters, 3D printers, or any project that requires precise stepper motor control.
Our latest version 3.51 includes several enhancements to make assembly and installation even easier. We’ve added end-stop and probe signal filtering circuitry to eliminate false triggers and allow the use of unshielded cables for end-stops and probes. We’ve also increased the size of the solder pads for easier assembly and updated the probe pin labels to make installation a breeze.
With the Arduino CNC Shield Kit, you’ll have everything you need to build your own CNC router or mill with ease.
Features
Includes Noise Filers on all end stops and the probing pin. (New in V3.51)
GRBL 0.9 compatible. (Open source firmware that runs on an Arduino UNO that turns G-code commands into stepper signals https://github.com/grbl/grbl)
4-Axis support (X, Y, Z, A-Can duplicate X, Y, Z or do a full 4th axis with custom firmware using pins A4 and A3)
2 x End stops for each axis (6 in total)
Coolant enable
Uses removable Pololu A4988 compatible stepper drivers. (A4988, DRV8825 and others)(Not Included)
Jumpers to set the Micro-Stepping for the stepper drivers. (Some drivers like the DRV8825 can do up to 1/32 micro-stepping )
Compact design.
Stepper Motors can be connected with 4-pin molex connectors or soldered in place.
Runs on 12–36V DC. (At the moment only the Pololu DRV8825 drivers can handle up to 36V so please consider the operation voltage when powering the board.)
Don’t wait — click here to see more about the Arduino CNC Shield V3.51 and start your next project today!
Easy Pulse Mikro by Embedded Lab

What’s more, the Easy Pulse Mikro is designed in the convenient Mikro bus form factor, making it easy to integrate with a wide range of mikroElektronika’s development boards. With all necessary instrumentation and amplification built right in, this powerful sensor provides a clean and precise analog PPG waveform output that’s routed to the AN pin of the mikroBus connector.
Whether you’re a hobbyist, student, or professional developer, the Easy Pulse mikro is the perfect tool for monitoring heart rate and other vital signs.
Click here to see more about the Easy Pulse mikro.
Features
Compatible with mikroBus socket.
Filtered and amplified analog PPG signal output
On-board potentiometer for adjusting amplifier gain, if needed (rotate clock-wise for increasing gain)
Onboard LED for indicating heartbeat. It flashes synchronously with the heartbeat on detecting the pulse from the fingertip.
2 notes
·
View notes
Text
Hello! 😊 How can I help you today?
Du:
ich möchte ein IOT Fahrradparken System bauen, HAMBURGERHUB.net Die Nutzer können ihre Räder an fest verankerten Abschlussstationen (angeschlossen an Fahrradbügeln) mit dem Smartphone anschliessen, und wieder lösen.. Keine tragbaren Schlösser mehr. Meine Frage, ich kann mir die Software auf dem Telefon noch halb vorstellen, aber wie programmiert man die Schlösser selber, oder wie nennt man diesen Bereich?
ChatGPT:
Das klingt nach einer spannenden und zukunftsorientierten Idee! 🚲🔐 Ein IoT Fahrradparksystem wie dein HAMBURGERHUB.net fällt in den Bereich Embedded Systems, Mikrocontroller-Programmierung, und IoT-Hardwareentwicklung. Hier ein Überblick über die wichtigsten Themen und wie du loslegen kannst:
🔧 Der technische Bereich heißt:
Embedded Systems / Embedded Programming
IoT (Internet of Things) Development
Hardware-nahe Programmierung
Smart Lock Systems
Firmware Development
🧠 Wie man „die Schlösser“ programmiert – Schritt für Schritt:
1. Hardware auswählen
Typische Komponenten für dein Projekt:
Mikrocontroller: z. B. ESP32 (mit WLAN & Bluetooth)
Elektromechanisches Schloss (z. B. Solenoid-Lock oder Motorized Lock)
Stromversorgung: Netzteil oder Akku + Solar
Sensorik: z. B. Reed-Switch oder Hallsensor zur Erkennung ob abgeschlossen/offen
2. Schlosssteuerung programmieren
Die Logik liegt auf dem Mikrocontroller:
Öffnen/Schließen des Schlosses
Kommunikation mit dem Server oder dem Smartphone
Sicherheitsmechanismen (z. B. Authentifizierung)
👉 Programmiersprachen: meist C/C++ (für die Firmware), alternativ MicroPython
3. Kommunikation mit dem Smartphone
Optionen:
Bluetooth Low Energy (BLE): Smartphone ↔ Schloss direkt
WLAN + Cloud API: Schloss ↔ Server ↔ App
NFC/RFID optional: für kontaktloses Entsperren
4. App & Backend
Smartphone-App (iOS & Android): Steuerung & Verwaltung der Schlösser
Backend-Server/API: Registrierung, Reservierung, Freigabe der Schlösser
Security Layer: Verschlüsselung, Tokens, Nutzerverwaltung
📚 Was du dir anschauen solltest:
ThemaTechnologienHardwareESP32, Arduino, Raspberry Pi, LoRa, Solenoid LocksSoftwareArduino IDE, PlatformIO, MQTT, REST APIsKommunikationBLE, WiFi, MQTT, HTTPSCloudFirebase, AWS IoT, Azure IoT HubAppReact Native, Flutter, native iOS/AndroidSicherheitJWT Tokens, TLS, OAuth2
🧰 Erste konkrete Schritte:
ESP32 Dev Kit kaufen (~10 €)
12V Solenoid Lock besorgen
Erste Prototyp-Schaltung bauen (ESP32 → Relais → Schloss)
Schloss über Bluetooth mit Handy entsperren (z. B. via App oder WebApp)
Optional: Backend in Node.js oder Python Flask aufsetzen
Wenn du magst, helfe ich dir beim Einstieg mit einem ersten Beispielcode für das Öffnen eines Schlosses via Bluetooth. Möchtest du lieber mit Bluetooth starten oder direkt über WLAN & Server?
Und willst du die Stationen auch mit Solarstrom betreiben oder lieber per Netzanschluss?
Du:
Ist das dann ein 'Projekt', oder würde das industrial auch so gemacht?
ChatGPT:
Sehr gute Frage – und sehr klug gestellt. Kurz gesagt: Ja, das ist ein Projekt – aber eines, das man auch industrial bauen kann. Die Herangehensweise ist nur etwas anders:
👨🔬 Prototyping (Maker / Projektphase)
Du baust erst mal einen funktionierenden Prototyp – zum Testen von:
Idee & Benutzungsablauf
Kommunikation (Smartphone ↔ Schloss)
Sicherheit & Zuverlässigkeit
Mechanik & Integration in reale Fahrradbügel
Das läuft mit:
Entwicklungsboards (z. B. ESP32 DevKit)
fertigen Modulen (Relais, Sensoren)
einfacher Stromversorgung
3D-gedruckten oder handgefertigten Gehäusen
➡️ Diese Phase nennt man auch Proof of Concept (PoC).
🏭 Industrialisierung (Produktionsreife)
Wenn dein Prototyp überzeugt, beginnt die Produktentwicklung. Dann passiert Folgendes:
1. Hardware-Redesign
Eigene Platinen (PCB) werden entworfen (z. B. mit KiCad oder Altium)
Bauteile werden industrietauglich ausgewählt (IP65, vandalismussicher)
Gehäuse wird professionell designt & spritzgegossen (statt 3D-Druck)
2. Firmware stabil & updatefähig
Sichere Over-the-Air (OTA) Updates
Logging, Fehlermeldung, Debugging über Cloud
Watchdog-Mechanismen für Dauerbetrieb
3. Zertifizierung
EMV (elektromagnetische Verträglichkeit)
CE-Kennzeichnung, evtl. RoHS, RED
4. Produktion & Skalierung
Stückzahlen planen, Lieferanten finden
Langlebige Energieversorgung (z. B. Solar + Akku mit Power Management)
Backend skalieren (Last, Datenbank, Sicherheit)
✅ Fazit:
Dein DIY-Projekt ist der Anfang.
Die Industrie würde das Prinzip übernehmen, aber mit robusteren Bauteilen, sauberem PCB-Design und standardisierten Prozessen.
Viele Start-ups (z. B. Tier, Donkey Republic oder auch die Deutsche Bahn mit Call-a-Bike) haben genauso angefangen – mit Prototypen aus Arduino & ESP32, dann erst in Serie gegangen.
Wenn du willst, kann ich dir einen Roadmap-Plan machen:
Von Idee → Prototyp → Pilotphase → Industrieprodukt Oder ich helfe dir beim Aufbau eines konkreten Schloss-Demos mit Code & Bauteilliste.
Was möchtest du als Nächstes machen?
Du:
Roadmap plan wäre klasse
ChatGPT:
Super! Hier ist dein Roadmap-Plan für HAMBURGERHUB.net – vom Prototyp zur Serienlösung für ein smartes, app-gesteuertes Fahrradparksystem:
🚴♂️ Roadmap für dein IoT-Fahrradparksystem
Phase 1: Ideenfindung & Konzept (Jetzt)
Ziel: Use Case klären & Vision formulieren Dauer: 1–2 Wochen Ergebnisse:
Zielgruppe: Wer nutzt HAMBURGERHUB? (z. B. Pendler, Studis, Fahrradkuriere)
Use Cases: Öffnen/Schließen per App, Reservierung, Sharing?
Standortwahl: öffentliche Fahrradbügel? Kooperation mit Stadt?
UX-Skizzen: Ablauf in der App, Map-Ansicht, Schlosssteuerung
Tools/Methoden: Skizzen, Miro-Board, Interviews, Umfragen
Phase 2: Technischer Prototyp (Low-Fidelity)
Ziel: Funktionierendes Smart-Lock-Demo mit App-Steuerung Dauer: 2–4 Wochen Ergebnisse:
Schlosssteuerung per Smartphone (z. B. via Bluetooth oder WLAN)
ESP32 + Solenoid-Lock + Powerbank + einfache Web-App
Gehäuse-Dummy an echten Fahrradbügel montieren
Tools/Technik:
Mikrocontroller: ESP32 DevKit (~10 €)
Schloss: 12V Solenoid Lock (~15 €)
Software: Arduino IDE / MicroPython / Web BLE API
Strom: Powerbank oder Netzteil
Output: 📹 Video vom funktionierenden Schloss an einem Bügel 🧪 Feedback von Testern einholen
Phase 3: App & Backend MVP
Ziel: Erste Version der App + Serveranbindung Dauer: 4–8 Wochen Ergebnisse:
WebApp oder native App zur Anmeldung, Standortwahl, Schloss öffnen
REST-API oder MQTT-Server zur Kommunikation mit Schloss
Admin-Backend: Monitoring, Reservierung, Nutzerverwaltung
Tools/Technik:
App: React Native oder Flutter (alternativ WebApp mit PWA)
Backend: Node.js oder Python (Flask/FastAPI), Firebase als MVP möglich
API: REST oder MQTT
Datenbank: Firestore, PostgreSQL oder MongoDB
Phase 4: Pilotstation & Nutzererprobung
Ziel: Erste reale Station in Hamburg testen (z. B. 3–5 Schlösser) Dauer: 1–3 Monate Ergebnisse:
Station an echten Bügeln, wetterfest montiert
Solarstrom + wetterfeste Box
Testlauf mit Nutzergruppe (z. B. Uni Hamburg oder Bezirksamt)
Feedbackrunde mit Logging und Bugs
Partnerschaften suchen:
Stadtreinigung Hamburg, Hochbahn, HVV, ADFC, Fahrradläden, Bezirke
Phase 5: Industrialisierung & Skalierung
Ziel: Produktreife Hardware & Softwarelösung Dauer: 6–12 Monate Ergebnisse:
Eigene Platine (PCB), IP65-Gehäuse, vandalismussichere Mechanik
OTA-Updates, Device-Management
App-Version mit Bezahlfunktion, z. B. für Vermietung
Backend mit Nutzer-Management, Auslastungsstatistik, Fernwartung
Industrie-Partner:
Elektronikfertiger (z. B. Würth, Conrad Industrial)
Design & Spritzguss-Firmen
IoT-Plattformen (Tektelic, Ubidots, ThingsBoard)
Phase 6: Finanzierung & Förderung
Ziel: Skalierung absichern & Serienproduktion ermöglichen Dauer: parallel zu Phase 4–6 Förderquellen:
IFB Hamburg (InnoFounder, InnoRampUp)
ZIM-Förderung (BMWK)
EU-Förderung (Horizon Europe / EIC)
Stadt Hamburg: Digitalstrategie / Smart City
🛠️ Was du als Nächstes tun kannst:
Ich kann dir helfen, ein einfaches ESP32-Schloss-Demo zu bauen (mit Code).
Wir könnten gemeinsam einen Pitch oder Förderantrag entwerfen.
Oder ich helfe dir, ein Miro-Board mit der Projektstruktur aufzubauen.
Möchtest du gleich mit dem ersten Prototypen (ESP32 + Schloss) loslegen oder brauchst du vorher Skizzen für den Ablauf in der App / am Bügel?
0 notes
Text
Robotics in Education: How to Get Started with a School Robotics Lab
The future of education is no longer just about books and blackboards. It's about preparing students for a rapidly evolving world—one shaped by technology, automation, and artificial intelligence. That’s where robotics in education plays a pivotal role.
A school robotics lab introduces students to hands-on learning in science, technology, engineering, and mathematics (STEM). More than just technical skills, robotics cultivates critical thinking, creativity, teamwork, and problem-solving abilities—all essential for future careers.
If you're planning to introduce robotics in your school, this guide offers practical, budget-conscious steps to set up a lab that sparks curiosity and builds essential skills.
Why Robotics Belongs in Every School
Robotics brings learning to life. When students build a robot that moves, reacts to sensors, or completes tasks, they learn more than just how technology works—they learn how to think differently.
A robotics program helps students:
Understand abstract concepts through real-world application
Collaborate with peers in a creative, hands-on environment
Develop coding, design, and engineering skills from an early age
The best part? Robotics education is inclusive. It engages all types of learners—visual, kinesthetic, and analytical—making STEM subjects more accessible and enjoyable.
Step 1: Identify Your Goals and Age Group
The first step in launching a robotics lab is deciding your objectives. Will the lab support after-school programs, integrate with the academic curriculum, or prepare students for competitions? Are you targeting early learners, middle school students, or seniors?
For younger children, start with a Robotic lab for kids that focuses on simple, safe, and engaging tools. Choose kits that use block-based programming and hands-on parts, allowing kids to assemble and experiment while understanding how things work in a fun, non-intimidating way.
Step 2: Choose Scalable Robotics Kits
The choice of robotics kits can make or break your lab. Look for kits that:
Offer both beginner and advanced levels
Include reusable components
Work with open-source coding platforms like Scratch, Arduino, or Tinkercad
Are durable and suitable for classroom environments
Many affordable kits are available today, including programmable cars, robotic arms, or line-following robots that allow students to explore electronics and coding simultaneously.
When selecting kits for the Robotics lab in your school, ensure they align with the grade-wise learning outcomes and support progressive skill development.
Step 3: Set Up a Flexible, Functional Space
You don’t need a massive room with expensive furniture to get started. Use existing classrooms, science labs, or even multipurpose halls. All you need is:
Tables for group activities
Storage for tools and components
Charging stations and Wi-Fi
An area for robot testing and demonstrations
A mobile robotics cart can help bring the lab to different classes. Keeping the setup simple allows your lab to grow over time without major upfront investment.
Step 4: Train and Empower Your Educators
A robotics lab thrives when educators feel confident guiding students through the process. Invest in training for a few teachers who are passionate about STEM. Several online courses and workshops can help them learn:
How to assemble and program kits
How to align robotics with subjects like math and science
How to encourage creative projects and experimentation
Once trained, these teachers can support other staff and lead student innovation.
Step 5: Integrate Robotics with Core Subjects
Instead of treating robotics as a standalone club, embed it into the curriculum wherever possible. Use robotics projects to:
Explain physics concepts like motion and force
Visualize math through distance, time, and angles
Practice writing through project reports or presentations
This not only reinforces classroom topics but also enhances student understanding through practical application.
In the context of growing education demands, implementing a Robotics Lab for Kids in School in India brings experiential learning to the forefront. It empowers students from all backgrounds to access cutting-edge knowledge and encourages curiosity from an early age.
Step 6: Start with Projects and Let Students Explore
Don’t wait until the lab is fully equipped. Begin with basic projects that allow students to:
Build a robot that follows a line
Program simple movements or responses to sensors
Create tasks such as sorting objects or drawing patterns
Encourage students to work in teams, share ideas, and showcase their projects. Hosting robotics fairs or internal competitions builds excitement and motivates others to join.
Step 7: Plan for Growth and Sustainability
Once your lab is running, continue to evaluate its success. Keep a record of student engagement, project outcomes, and challenges. Use this feedback to:
Expand kit collections
Introduce intermediate and advanced modules
Upgrade space and equipment when needed
Offer leadership roles to senior students
Explore external funding options or CSR partnerships to scale the lab sustainably. Over time, your robotics program can become a central part of your school’s academic identity.
Conclusion: Inspire Innovators from the Classroom
Launching a robotics lab isn’t just about building robots—it’s about building futures. When students engage in hands-on STEM education, they gain skills that go beyond the classroom. They become thinkers, creators, and problem-solvers who are ready to take on the challenges of a digital world.
Start small, stay focused, and grow steadily. With the right mindset and planning, your school robotics lab can become a place where young minds discover their passion for innovation—and where education transforms into exploration.
0 notes
Text
Data Transmission BLE Module: Empowering Seamless Wireless Connectivity in Modern Electronics

Introduction to Data Transmission BLE Module
With the rising demand for compact, efficient, and power-conscious electronic solutions, the Data Transmission BLE Module emerges as a game-changer in wireless technology. Unlike traditional Bluetooth, the BLE (Bluetooth Low Energy) module is specifically designed for low power consumption, making it ideal for battery-powered and always-connected devices. It enables reliable and fast wireless data transmission across various electronic platforms, including sensors, microcontrollers, and laptops.
Understanding the Core Technology
How BLE Works
The Data Transmission BLE Module operates over the 2.4GHz ISM band, ensuring minimal interference while delivering robust connectivity. Its low-energy protocol is perfectly suited for devices requiring continuous communication without sacrificing power efficiency.
Key Benefits of BLE Modules in Electronics
Whether embedded in tools or integrated into microcontrollers, BLE modules bring several advantages to modern-day electronics:
Low power usage for extended battery life
Fast data transfer across short ranges
Minimal latency for real-time communication
Compact design suited for small form-factor electronics
High compatibility with existing Bluetooth-enabled devices

Integration with Various Electronic Components
To truly appreciate the capabilities of BLE modules, one must consider how well they integrate with essential components like:
Sensors: Ideal for real-time data collection and remote monitoring
Connectors and cables: Seamless physical integration for secure data flow
Microcontrollers and Microprocessors: Effortless programming and control
Thermal pads and oils: Enhance heat dissipation in enclosed modules
Switches and capacitors: Support stable operation and data control
Fuses and safety devices: Protect sensitive BLE circuits from overcurrent
Applications Across Industries
The versatility of BLE modules allows them to support a wide range of applications in different fields:
Smart Homes
Light switches
Door sensors
LED controllers
Medical Devices
Wearable health monitors
Wireless infusion pumps
Industrial Automation
Wireless controllers
Temperature sensors
Consumer Electronics
Wireless headphones
Keyboards
Fitness bands
Automotive Electronics
Engine diagnostics
Safety alerts
Infotainment systems
Why Choose Data Transmission BLE Modules for Your Project
Transitioning to BLE technology offers a more efficient and scalable alternative to traditional wired systems or classic Bluetooth. These modules reduce complexity, minimize the need for bulky cabling, and provide a streamlined design suited for IoT-based applications.
Developer-Friendly Benefits
Moreover, developers benefit from:
Easy-to-use development kits and software tools
Enhanced data security with encryption protocols
Long-term reliability and stable performance
Quick configuration and installation

Compatibility and Expansion Possibilities
One of the standout features of these modules is their exceptional compatibility with existing development environments. Whether you are working with Arduino boards, Raspberry Pi, or custom-built controllers, BLE modules offer easy integration. The modules can be paired with accessories such as:
Cables and grips for secure connections
Thermal pads to regulate temperature
Tool kits for assembly and soldering
Diagnostic contactors for testing module performance
Optimizing Performance with the Right Setup
When implementing BLE modules in electronics, certain best practices ensure optimal performance:
Use capacitors to stabilize power delivery
Employ shielded cables to prevent signal interference
Apply thermal grease to dissipate excess heat
Include safety fuses in power lines for protection
Choose the right switches for input control
Future Trends in BLE and Wireless Data Transfer
As the world shifts towards smarter, more connected environments, BLE technology continues to evolve. Emerging trends include:
Integration with AI-based microprocessors
Higher data throughput with BLE 5.0 and above
Mesh networking for large-scale deployments
Enhanced communication in wearable electronics
Conclusion: A Step Toward Wireless Efficiency
In conclusion, Data Transmission BLE Modules are revolutionizing the way electronic devices communicate. Their ability to perform efficient, low-energy wireless data transfer makes them indispensable in applications ranging from home automation to industrial control systems.
With compatibility across various components like sensors, capacitors, switches, and microcontrollers, and support from essential accessories such as cables, tools, thermal solutions, and safety devices, BLE modules stand as a cornerstone of modern electronic design.
Explore high-quality Data Transmission BLE Modules at EnrgtechGlobal today and bring next-level wireless communication to your electronics projects.
0 notes