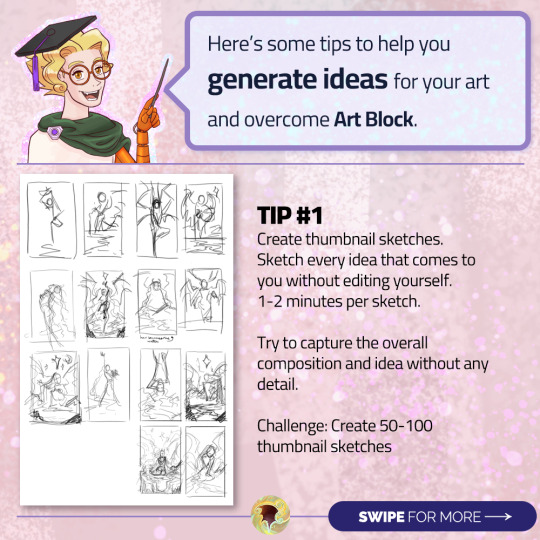
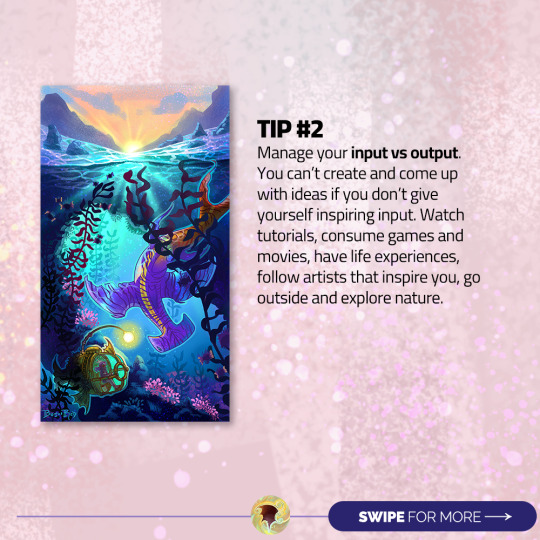
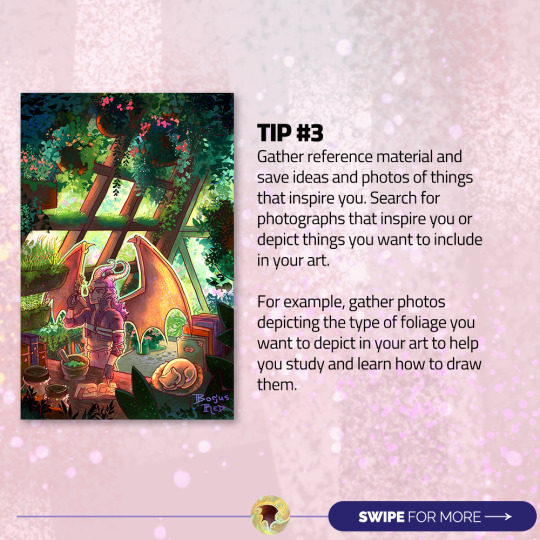
#Art tips and tricks
Explore tagged Tumblr posts
Visit Tumblr Blog
Explore Tumblr blogs with no restrictions, modern design and the best experience.
Last Seen Tumblr Blogs


Fun Fact
Post activity is at the highest at 4:00 pm EDT; notes peak at 10:00 pm EDT.
Text
Who’s got two thumbs and having a lot of fun over at Patreon!
ME! That’s who!
Join my pigeon flock and peruse through over 500+ posts of absolute nonsense (or saucy content if you’re a saucy or extra saucy pigeon!)
#illustrator#illustration#digital artist#artist on tumblr#gleafer art#good omens#good omens art#my fanart#comics#spicy and mild content#sketches#Art tips and tricks#fun community#lovely fandom#we have fun here
84 notes
·
View notes
Text
(instagram)
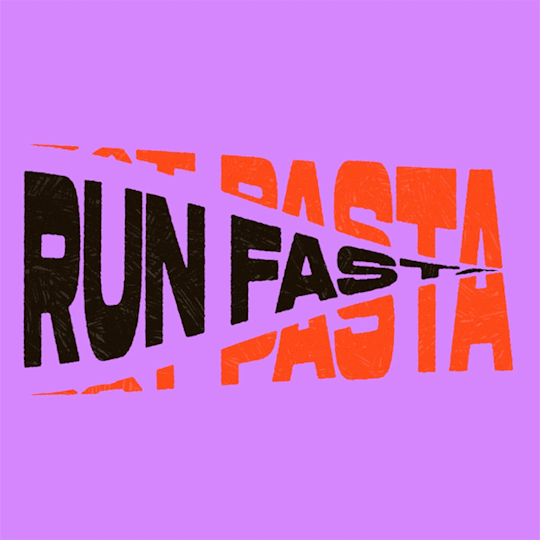
Tutorial in After Effects under the cut.
• Create a new composition and call it Split.
• Write your text, pre-comp it, call it Text or whatever you want.
• Create a mask from the center to one side (top/bottom), change anchor point to the top.
• Bring down Scale property and unlink it, keyframe the text to go from 100% to 0% in 1s towards the anchor point.
• Cut the layer at the end.
• Duplicate pre-comp.
• Select the bottom one, click M to bring down mask properties, invert the mask and move anchor point to the bottom (so the text scales to the bottom).
• Duplicate Text pre-comp one more time. Select it, press M and delete the mask, move anchor point to the center. Create new keyframes to scale it from 0 to 100 in 1s (properties unlinked). Select both keyframes and delay it by 1 frame. It makes the text look like it’s scaling from the center.
• Change bottom and top text color by adding Fill effect to the pre-comp.
• Easy ease all keyframes.
• Select all pre-comps and duplicate them, put them at the top and put them at the back to extend your animation (or arrange in your preferred order if you’re doing a phrase like me). So far it should look something like this:
• Create new comp Wave of 10s, add your Split comp.
• Create new Solid layer, call it Map, add Gradient Ramp effect, make white at the left, black at the right and hide the layer.
• Select Split pre-comp, Right-click → Time → Enable Time Remapping and extend the layer to the end.
• Add loopOut() expression to Time Remap.
• On Split pre-comp add the effect Time Displacement, on Time Displacement Layer select your Solid layer (Map), and on Source select Effects & Mask.
• Change Time Resolution (fps) to 250-300.
• Add Fast Box Blur effect, change Blur Radius to 0.5.
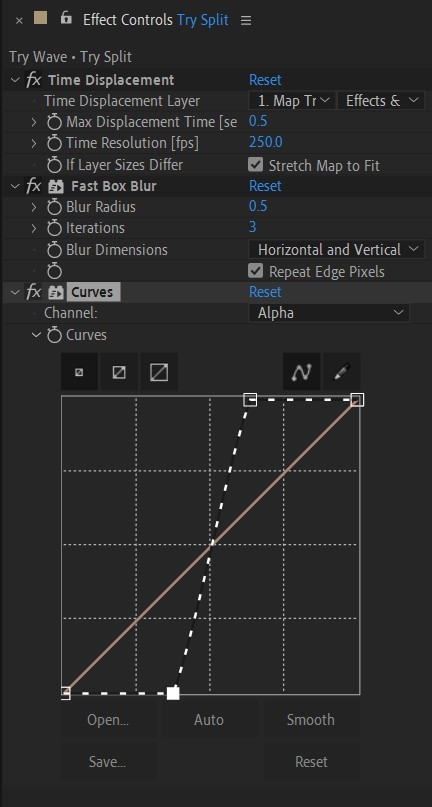
• To bring back the sharpness add Curves effect, change the Channel to Alpha and change values (see screenshot).
• Play around with Max Displacement Time [sec] on Time Displacement effect depending on the look you’re going for. I set it to 0.5.
• Now this whole animation is driven by our Solid layer (Map) we created. So if you make any changes to it, the animation changes too. For example, you can change Ramp Shape to Radial on Gradient Ramp effect, and see how it changes your animation.
• I additionally added some texture on the text, used Track Matte and added wiggle(5,500) expression to the Rotation property so texture would be constantly moving. Also added some additional effects to the new Adjustment Layer on top such as Roughen edges, Turbulent Displace, Posterize Time and Noise. Let your freak flag fly - it’s a matter of taste and creativity of what you do with it. Your animation should look something like this:
#artists on tumblr#animation#artwork#2d animation#after effects#gif tutorial#art tutorial#art tips and tricks#after effects tutorial#tutorial#art#motion design#tips and tricks#tips#digital art#gif#visual art#loop#learn after effects#illustration#infinite loop#pasta#funny#pasta humor
64 notes
·
View notes
Text

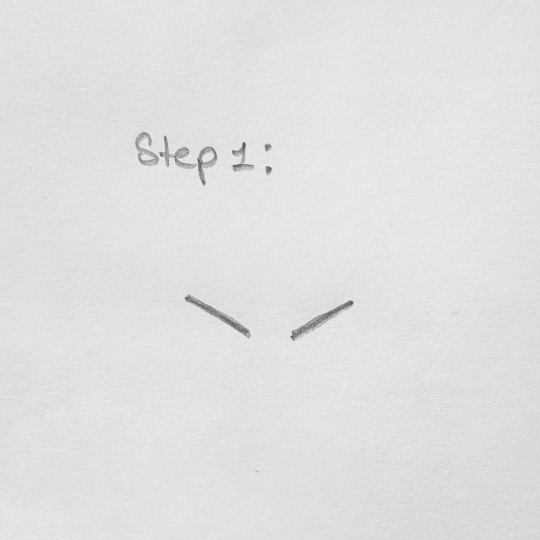
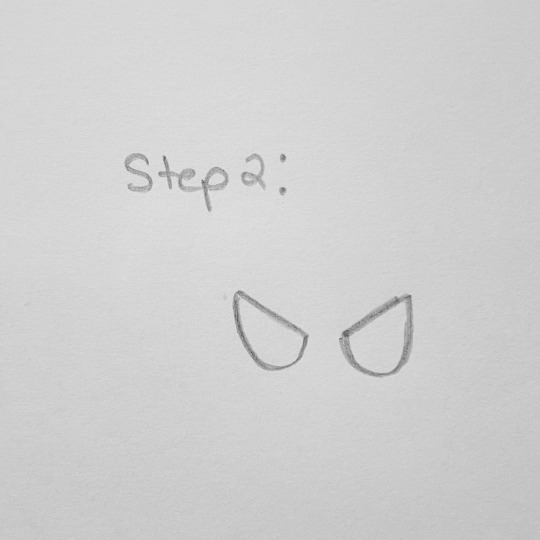
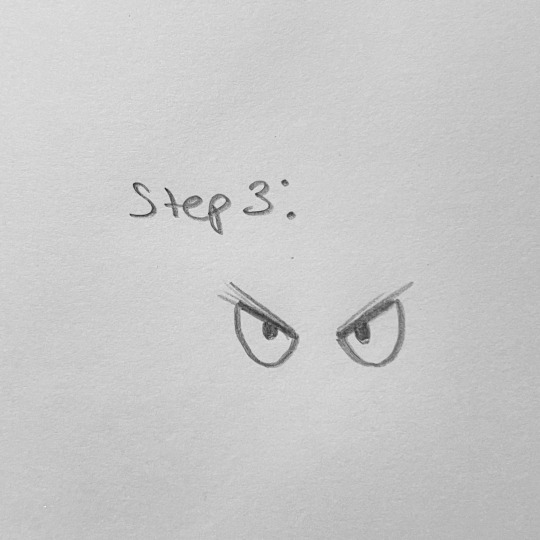

Here is a short little tutorial on how to draw angry cartoon eyes! Swipe to see! You can also altar the eye shapes, sizes, and details! Add eyelashes and thinner eyebrows for a more female look! ✏️
#tutorial#drawing tutorial#art tutorial#art#artist#artwork#sketches#sketchbook art#sketchbook#cartoon art#cartoonist#cartoon artist#tips and tricks#art tips and tricks#art tips#drawing#my art
13 notes
·
View notes
Text
Tutorial 1 / 366 by @artsileo on line weight!
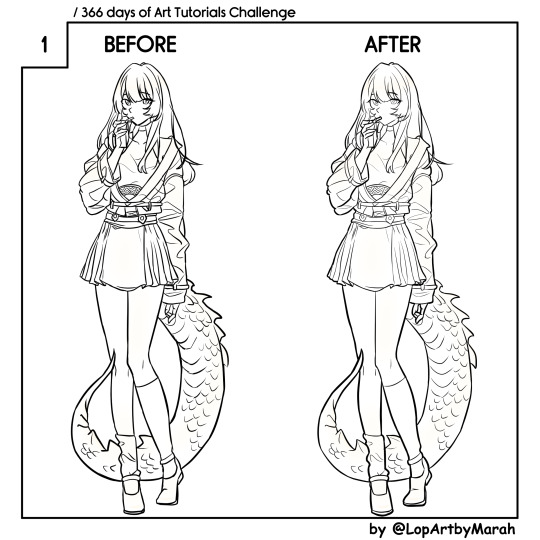
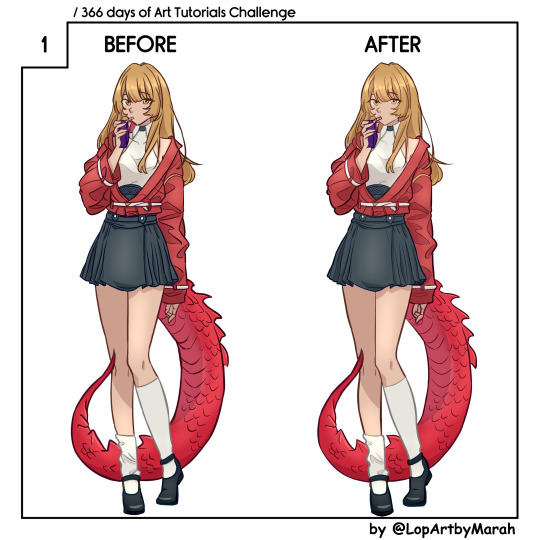
Since 2024 is the year of the dragon, I decided to start this off with one of my RPG NPCs: Ahmara Fuji. She is a lizard faunus in a RWBY campaign and a first year student of Beacon Academy. Her allusion if, unsurprisingly, a classic fire spitting dragon. For those who are curious, you can learn more about Paradigm's RWBY TTRPG rulebook at THIS DISCORD LINK.
#artists on tumblr#art challenge#366ArtTutorialsChallenge#art#artwork#digital art#art tutorial#tips#art tips and tricks#drawing#I should totally go to sleep now#rwby oc#RWBY
27 notes
·
View notes
Text
where to find inspiration
5 notes
·
View notes
Text
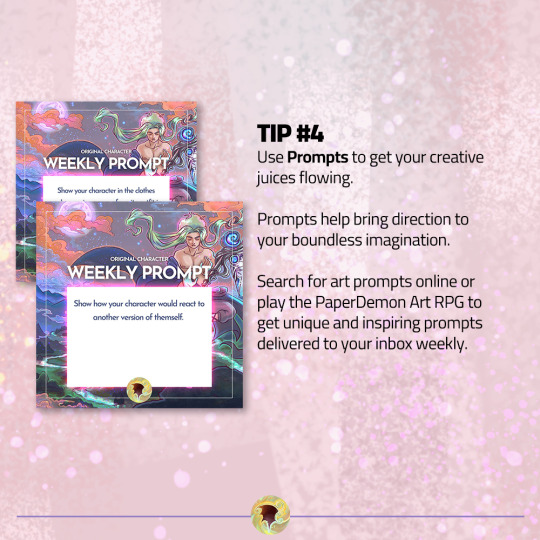
New prompts every week! Follow for more art tips and prompts.
🧙♂️ Draw your character ⚔️ Fight Monsters 💰 Gain loot 💪 Defeat Art Block
▶ PaperDemon: https://bit.ly/3fEHevh
15 notes
·
View notes
Text
Would u guys like it if I started posting small tutorials on certain things? Like someone puts in an ask on how to draw like for example hands and i could post a small sketch on how!
2 notes
·
View notes
Text
youtube
im starting a new series on my youtube channel for basic guides/tutorials/tips/tricks on how to draw and color cats! my first video is on tabby markings if thats something that interests you! my next planned videos will be over white spotting/markings and easy calico/tortoiseshell markings!
#mac speaks#warrior cats#warrior cats art#art tutorial#art guide#art tips#art tricks#art tips and tricks#macs doodles: cat art tutorials#Youtube
13 notes
·
View notes
Text

I have no idea why I couldn't stop drawing her, but I do love her(Cassandra).
#anime#art#artists on tumblr#illustration#oc#oc art#ocs#my ocs#oc rp#oc artwork#my oc art#artwork#original art#digital art#artedigital#arte#art tips#art tips and tricks#illustragram#illustration tips#painting#paint tool sai#poetry#fnaf#arcane2024#arcane#rpg#oc rpg#roleplay#new rp
2 notes
·
View notes
Text
(instagram)
Tutorial in After Effects under the cut.
ALRIGHT let's get into it. Straight to the point, no nonsense tutorial.
• Create a new composition 1080px x 1080px, let’s call it Design.
• Write some text, turn it into shapes (right-click → Create → Create shapes from text).
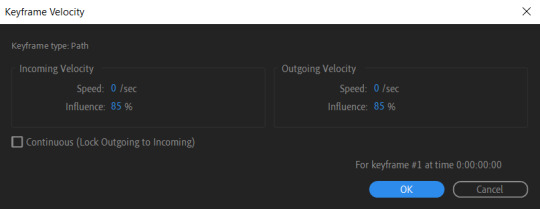
• Animate the path so the text stretches like so in a few seconds time. When animated, right-click on a keyframe and select Keyframe velocity and change coming & going velocity influence to 85%:

• Create another new composition and call it FX. Add your Design pre-comp in this composition.
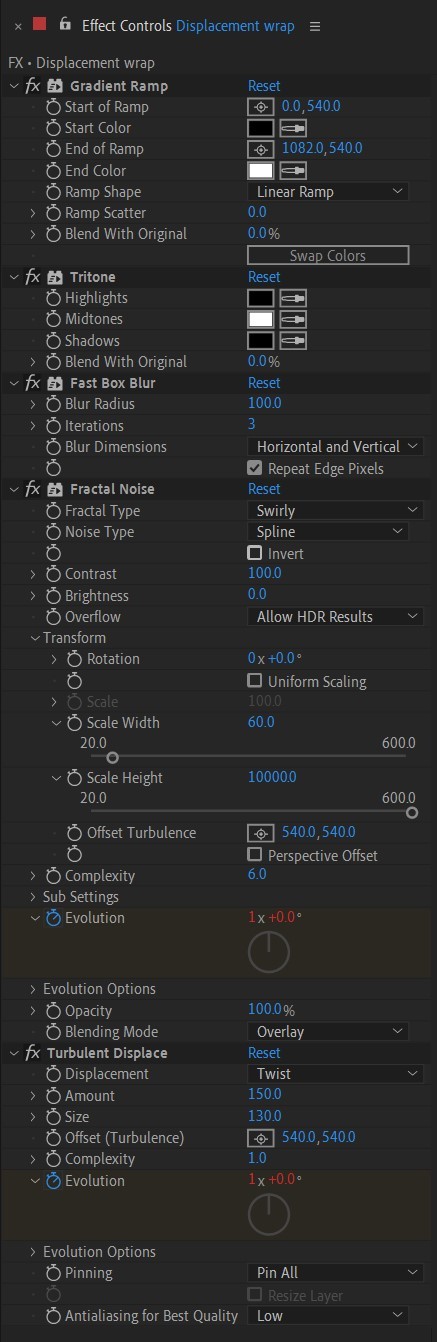
• Add a new Solid layer on top, call it Displacement map. Now we’re gonna add a bunch of effects on that solid layer.
• First add Gradient Ramp. Make it so the white color would be on the right side (End of Ramp) and black would be on the left side (Start of Ramp);
• Next add a Tritone effect and change the Highlights color to black and Midtones color to white.
• Add Fast Box Blur and change Blur Radius to 100.
• Then it’s time to add Fractal Noise effect, and change Fractal Type to Swirly, Noise Type to Spline. Then bring down the Transform panel and uncheck Uniform Scaling, make Scale Width 60, and change Scale Height to a very high number, such as 10000.0.
• Add a keyframe to Evolution at the beginning, and the second keyframe at 2 seconds rotating the slider for one rotation. Add an expression loopOut() on these keyframes so it loops.
• And lastly change the Blending mode to Overlay (at the bottom of the effect).
• The last effect we’re gonna add is Turbulent Displace. Change Displacement to Twist, Amount to 150, Size 130. Add the same keyframes to the Evolution as we did previously on Fractal Noise and loop them with the same expression.
So far your work should look something like this:

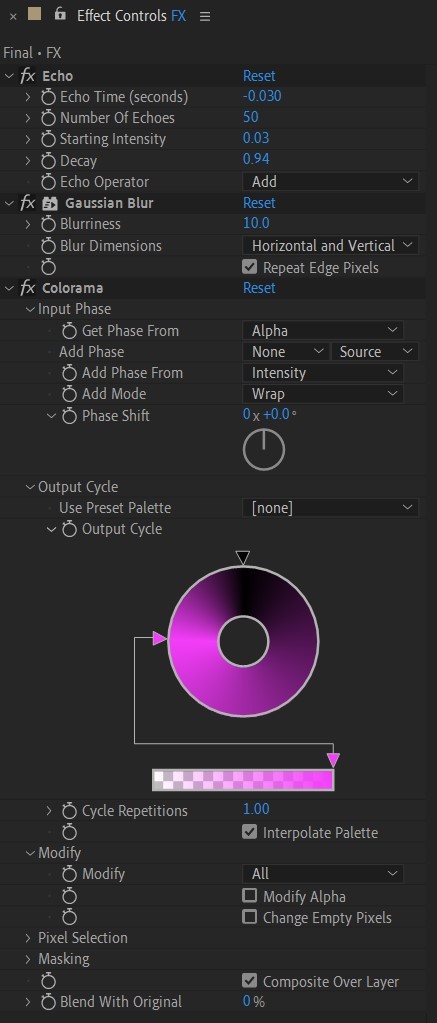
• Then it’s time to add colors! Create another new composition, add your FX pre-comp to it, add a background with a new solid layer (CTRL + Y).
• Then add Echo effect to your FX pre-comp, change Echo Time to -0.030, Starting Intensity to 0.03, Decay to 0.94.
• Next add Gaussian Blur effect, make the Blurriness 10.
• Add Colorama effect, change Get Phase From to Alpha. Then go to Output Cycle and change the color presets (Use Preset Palette) to let’s say Solarize Red (it doesn’t really matter, we’re gonna change the colors, we just need it to have two sliders instead of a lot). Then grab a bottom slider and put it on the left side and choose the lighter color you want. I chose pink.
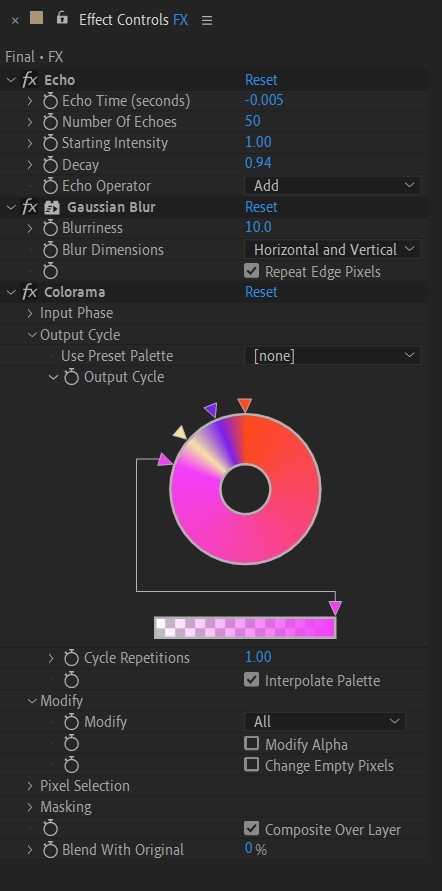
• Now duplicate your FX pre-comp. We’re gonna change some parameters on the effects.
• So the first thing you want to do is change Echo Time to -0.005, Starting Intensity to 1.
• On Colorama go to Modify and uncheck Modify Alpha. Then go to Output Cycle, and add more colors like you see in the screenshot.
• Duplicate your FX pre-comp one more time and delete all the effects on it.
• Last thing to do is add an Adjustment Layer (Ctrl + Alt + Y), add the Noise effect, and make the Amount of Noise 15.0%.
• And you're done!
#art tutorial#tutorial#friday#art#motion design#artists on tumblr#tips and tricks#art tips and tricks#tips#artwork#digital art#gif#animation#visual art#loop#gif tutorial#learn after effects#illustration#2d animation#infinite loop
48 notes
·
View notes
Text
How I draw pleats!
#art tutorial#did this on a whim#how to draw#skirt pleats#please see this#i worked so hard on this#ok not rly it was a quick one#drawing tips#art tips and tricks
83 notes
·
View notes
Text
Tutorial 2 / 366 by @littlefaeella on values!


I had to adapt this one from IbisPaint to Clip Studio. I struggle with Values a lot and so it didn't turned out quite well, but practice makes perfect, right? Again, I used my lovely RWBY NPC Ahmara Fuji. You know, this was a last minute idea and I may be hurrying a bit haha!
#artists on tumblr#art challenge#366ArtTutorialsChallenge#art#artwork#digital art#art tutorial#tips#art tips and tricks#drawing#I should totally go to sleep now#rwby oc#RWBY
11 notes
·
View notes
Text
Art warm up exercises!
being a self-taught artist with no formal training is having done art seriously since you were a young teenager and only finding out that you’re supposed to do warm up sketches every time you’re about to work on serious art when you’re fuckin twenty-five
396K notes
·
View notes
Text
OKAY SO YOU KNOW THAT FEELING when you spend hours creating this gorgeous pattern and it looks PERFECT on your screen but then you print it and suddenly there are these OBVIOUS SEAMS EVERYWHERE??? 😭
Listen, we've been there. We've cried those tears. We've rage-quit Illustrator more times than we can count. And after countless cups of coffee and approximately 47,385 test prints, we're here to share Everything We Learned About Pattern Design™️
This isn't one of those "professional expert guru" guides because honestly? We're still learning too! But we've compiled all our "oh god I wish someone had told me this sooner" moments into one massive post, including:
→ How to fix those annoying visible seams (WITHOUT starting over) → The actual difference between half-drop and brick repeats (with pictures!) → Why your beautiful design might look like a blob when printed on fabric (learned that one the hard way 😅) → All the tools we tried (so you don't have to waste money on the wrong ones) → Real talk about pattern design across different industries
Plus a bunch of troubleshooting tips we've collected through our many, many mistakes. Because if we're going to mess up, at least let's mess up together! 💕
#pattern design#surface pattern#design resources#art tips#artist help#design help#creative resources#art tutorial#design tutorial#pattern tutorial#artist advice#creative career#digital art#art tips and tricks#design basics#pattern making#textile design#surface design#art resources#creative tips
0 notes
Text
Your daily creative pep-talk!
No time to create? Too busy throughout the day? I've got good news and bad news for you. There IS time... if you're willing to fight for it.
youtube
0 notes
Text

(to taste) only enough to know what you cannot have
#art#painting#coyote#traditional#coyotes#oil painting#traditional art#my art#shoutout to quinacridone violet i love you quinacridone violet. also added quinacridone magenta to my palette for this one bc i needed#something a bit more Pink for the prickly pear#also photographing my oil paintings is such a pain in the ass good god. i usually have to cobble together two photographs to account for#how much the flat panel picks up the smallest amount of glare or light augh#i know the tips. i know the tricks. they can only help me so much with what i have#which is also why i'm only posting this now despite it being done for at least a month hdgsklhfdl#greatest hits
3K notes
·
View notes