#Automatic URL Indexing
Explore tagged Tumblr posts
Visit Tumblr Blog
Explore Tumblr blogs with no restrictions, modern design and the best experience.
Last Seen Tumblr Blogs


Fun Fact
Mobile US users spent an average of 115.8 minutes on Tumblr app monthly.
Text
Boost Your Website Performance with URL Monitor: The Ultimate Solution for Seamless Web Management

In today's highly competitive digital landscape, maintaining a robust online presence is crucial. Whether you're a small business owner or a seasoned marketer, optimizing your website's performance can be the difference between success and stagnation.
Enter URL Monitor, an all-encompassing platform designed to revolutionize how you manage and optimize your website. By offering advanced monitoring and analytics, URL Monitor ensures that your web pages are indexed efficiently, allowing you to focus on scaling your brand with confidence.
Why Website Performance Optimization Matters
Website performance is the backbone of digital success. A well-optimized site not only enhances user experience but also improves search engine rankings, leading to increased visibility and traffic. URL Monitor empowers you to stay ahead of the curve by providing comprehensive insights into domain health and URL metrics. This tool is invaluable for anyone serious about elevating their online strategy.
Enhancing User Experience and SEO
A fast, responsive website keeps visitors engaged and satisfied. URL Monitor tracks domain-level performance, ensuring your site runs smoothly and efficiently. With the use of the Web Search Indexing API, URL Monitor facilitates faster and more effective page crawling, optimizing search visibility. This means your website can achieve higher rankings on search engines like Google and Bing, driving more organic traffic to your business.
Comprehensive Monitoring with URL Monitor
One of the standout features of URL Monitor is its ability to provide exhaustive monitoring of your website's health. Through automatic indexing updates and daily analytics tracking, this platform ensures you have real-time insights into your web traffic and performance.
Advanced URL Metrics
Understanding URL metrics is essential for identifying areas of improvement on your site. URL Monitor offers detailed tracking of these metrics, allowing you to make informed decisions that enhance your website's functionality and user engagement. By having a clear picture of how your URLs are performing, you can take proactive steps to optimize them for better results.
Daily Analytics Tracking
URL Monitor's daily analytics tracking feature provides you with consistent updates on your URL indexing status and search analytics data. This continuous flow of information allows you to respond quickly to changes, ensuring your website remains at the top of its game. With this data, you can refine your strategies and maximize your site's potential.
Secure and User-Friendly Interface
In addition to its powerful monitoring capabilities, URL Monitor is also designed with user-friendliness in mind. The platform offers a seamless experience, allowing you to navigate effortlessly through its features without needing extensive technical knowledge.
Data Security and Privacy
URL Monitor prioritizes data security, offering read-only access to your Google Search Console data. This ensures that your information is protected and private, with no risk of sharing sensitive data. You can trust that your website's performance metrics are secure and reliable.
Flexible Subscription Model for Ease of Use
URL Monitor understands the importance of flexibility, which is why it offers a subscription model that caters to your needs. With monthly billing and no long-term commitments, you have complete control over your subscription. This flexibility allows you to focus on growing your business without the burden of unnecessary constraints.
Empowering Business Growth
By providing a user-friendly interface and secure data handling, URL Monitor allows you to concentrate on what truly matters—scaling your brand. The platform's robust analytics and real-time insights enable you to make data-driven decisions that drive performance and growth.
Conclusion: Elevate Your Website's Potential with URL Monitor
In conclusion, URL Monitor is the ultimate solution for anyone seeking hassle-free website management and performance optimization. Its comprehensive monitoring, automatic indexing updates, and secure analytics make it an invaluable tool for improving search visibility and driving business growth.
Don't leave your website's success to chance. Discover the power of URL Monitor and take control of your online presence today. For more information, visit URL Monitor and explore how this innovative platform can transform your digital strategy. Unlock the full potential of your website and focus on what truly matters—scaling your brand to new heights.
3 notes
·
View notes
Text
A free image hosting solution for AO3 and elsewhere - A Tutorial (mobile-friendly!)
See the demo site made from this template IN ACTION: https://hotlink-archive-template.pages.dev/
This guide is for an easy, mobile-friendly way to host files for hotlinking on AO3 or elsewhere, using github and cloudflare pages.
I've encountered far too many dead links in fanfics and forums simply because a hosting service decided to dump older files, or they decided to change their TOS to no longer allow hotlinking or certain kinds of content (nsfw, fictional graphic content). See Optional Steps for even more options.
This is an easy, barebones way to permanently host images that you don't want deleted unexpectedly or that you can't host elsewhere. (Emphasis on barebones. This will not be a nice portfolio style site. Unless you decide to code that yourself!) You can follow the link above for an example of this type of site.
It is also EASY to upload and use on mobile devices after initial setup!
Tools you will need:
Cloudflare Pages/Workers is a free to use static site hosting service. This will publish your files and make them available online. This will publish your files and make them available online. There is a limit to the amount of data you can upload for free, but you can pay for proper hosting if you want to exceed it.
Github is a code sharing/storage platform. Your files will go here first before being published on Pages. You can edit and upload files through your browser at github.com, or through Github Desktop, a program you install on your computer. There are limits to Github repositories, but they are also generous (suggested 1GB to 5GB per repo).
Basic Setup
1. Create a github account
2. Copy this template repository hotlink-archive-template
Your website will be contained in a repository, a place where all the files and the revision history for your project are stored.
This template repository uses an "Action" (using python) to automatically create a "home" page with an Index of all the files in your repository every time it is updated.
NOTE: I recommend you set your repository to Private. Github's history feature is extensive, so if you have sensitive content or think you might want to delete something later, it will be hard to get rid of it completely once it's been committed and publicly available.
3. Enable Action permissions
In order for the Action script to work, you need to give Actions permission to read and write in your repository.
Within your repository, go to the tab Settings > Actions > General > Workflow Permissions

4. Create a Cloudflare account
5. Create a Pages (or Workers) project and link it to your Github repository
Your Pages project will create the front end of the site where the images will be displayed. You will be able to link those images to other platforms like AO3.
You can create either a Workers or Pages project by going to Add > Pages (or Workers). Name your project WISELY! This name will be your site's URL.
Workers vs. Pages
Workers is subsuming Pages on Cloudflare and now has all the same static hosting capabilities, in addition to its original server-side processing services. If you'd like to, read more about this.
While Workers has similar capabilities, I recommend Pages for this project. Pages has the added bonus of a cleaner URL if you do not have your own domain: “MySite.pages.dev” in Pages vs Workers' “MySite.username.workers.dev”
You will be prompted to import an existing Git repository. You will need to give it access to your Github to do this.

Select the repository on your Github you made for your project, then hit "Begin Setup".
Name your project WISELY! This name will be your site's URL.
You do not need to change any settings on the next page, so hit "Save and Deploy". Your image hosting site will now be live!
The URL will be "https://ProjectName.pages.dev". It may take a few minutes to become accessible.
Now you're done with the basic setup!
How to Add files
You can add any files you want to link to on AO3/elsewhere through mobile, desktop browser, or the Github desktop program!
Here is how to do it on Github.com:
Open up the repository that you made (it can be found at github.com/username/repositoryname). You will see a list of folders and files that are in that repository.
Click into the folder "fan-stuff".
In the top right, go Add file > Upload files and drag in the images you want added. You will need to name the images BEFORE you upload them, as there is not an easy renaming feature within Github's browser interface.
In the Commit changes box, choose a title for what action you are doing. This will help you backtrack uploads if needed.
For example, it could be "Uploaded Batman Art". Make sure it's set to "commit directly to the main branch", then commit those changes. This will upload the files.
Now, if you visit your site, you will see your uploaded image under the "fan-stuff" folder!
To embed/link your image, navigate to your file on your Pages site and copy the URL in the address bar. This URL is what you will use to embed your photo (using HTML or "add image as URL" tools some sites have).
Continue onto More Setup to customize your site and implement more advanced settings. See Tips/Troubleshooting if you're running into problems.
More Setup
Perform site customization/advanced setup with Github Desktop on your PC
Github’s web UI is great, but it has major limitations. I highly recommend that you use Github Desktop during the initial setup, as well as when you want to make major organizational changes to your files/site. Once you have everything set, though, you can use Github in your browser to upload whatever files you want to hotlink at the moment.
Download Github Desktop and “clone” (download a copy of) the repository you made.
This is the best time to rename/rearrange folders + files, etc.
There are other methods in the Troubleshooting section if you need, but Github Desktop is by far the easiest way
see Adding/Renaming Folders for important info on how to properly rename/add folders
see About the Index Page for how to customize your Index pages
Once you’re done editing, “push” (upload) all the changes you made to your online Github repository.
Having some sort of text editor like Notepad++ is useful for editing any code, the automatic color-coding is very helpful. You can edit in plain old Notepad as well, it just won’t look as nice.
About the Index Page
The template repository uses a python Action to automatically create an HTML "home" page with an Index of ALL the files in the folder every time it is updated.
This is particularly convenient for mobile use, as you can upload a file, and the python action automatically updates the Index page.
If you don’t want this, just disable the “create-index” Action and delete the .py files. You can just type in the file locations to get to each file, or you can manually maintain an home/Index page yourself, which isn't hard if you know some basic HTML and can remember to do it consistently.
Also note that if you wish to change any of the content on your Index pages, you must edit the "index.py" file, not the "index.html" file. The "index.html" file gets re-written every time the "create-index" Action is run in order to keep the file index up to date.
Adding/Renaming/Deleting Folders
Disclaimer: This is a bit convoluted because I am extremely unqualified to be working with python OR HTML. There’s probably an easy way to do this, but I don’t have the skill to do it, and most of the stuff here is copied from stuff I found around. If you know a better way to do things, please let me know, it’d make my life easier too!
Adding or renaming folders involves some extra steps.
1. The "index.py" file inside the folder needs to be edited to match the parent folder name.
The place you need to do this is found near the top of the file (highlighted below)

2. Then the outer-most "create-index.py" file needs to be updated to match the new name as well. If you’ve added a new folder, duplicate and adjust the code to match.
The place you need to do this is found at the bottom (highlighted below)

If you don’t need any folders at all, great! Just delete them and their contents! No need to edit any files. (Don’t delete “index.html” or “create-index.py” or “.github/workflows”!)
If you would like to have these folders for later use, leave them as-is and simply edit the index files.
The relevant lines of code at the bottom of "create-index.py" like in the previous step for renaming folders. You may delete this code, or comment it out (using # at the beginning of a line will make it “invisible” to the computer)
Then, add the folder’s name to the “exclusions” list at the top of the "create-index.py" file so that it doesn’t show up on your Index page (highlighted below)

You can also use this same concept to create "invisible" files/folders. Any files/folders included in the "exclusions" list in "(create-)index.py" will not be listed on the Index page, however they can still be found through the direct URL to the file.
On the flipside, this means simply hiding the file/folder from the Index page does not get rid of the file from your site. Anyone who has the URL will be able to find that file unless you remove it, or move its location to change the URL
Tips/Troubleshooting
(Re)name your files before uploading
It’s not possible to rename image/media files on Github’s web UI (it is possible with the local Git program). The "create-index" Action lists out the names of your files exactly, so you will end up with ugly strings of numbers and letters on your Index page if you don't rename them, which is terrible to look at and also plain old CONFUSING to navigate.
So if you're uploading on mobile or through Github on browser, name your files with easy to remember and distinctive filenames before you go ahead and upload them. This makes everything much easier, and it makes your Index page look nice :)
My website isn’t updating when I edit my Github repository!
Check to see if your Pages is retrieving from the correct branch, and if it has automatic deployments enabled.

Can’t see your Github repository when trying to link it on Cloudflare?
Check your Github applications Repository Access settings. Go to your ACCOUNT Settings > Integrations - Applications > Cloudflare > Repository Access

Index action is failing!
Go back to step 3 in Basic Setup and check if you’ve given Actions permission to read and write. If that’s not the issue, check to see if you’ve set up your "index.py" files correctly. The folder names should correspond to the parent folders, and the "create-index.py" file in the outer-most folder should have the correct folder names at the VERY BOTTOM.
How do I rename a folder (or move a file) in Github’s web UI?
It isn’t possible to directly rename a folder in Github’s web UI, doing it using Git on your computer is the most foolproof way to do it. But there is a way (except for media files).
Go into the folder you want to rename and select a file such as “index.html” and enter the “edit” mode.
Go to the file name and backspace until you can edit the parent folder name as well. This will create a new folder with the new name.
You’ll have to do this to every file in the folder until they’re all in the new folder.
Unfortunately, you can’t do this with media files like png/jpg/etc, because entering the “edit” mode on a photo “breaks” it somehow, and bye-bye image :’) (Don’t worry if this happens, just don’t commit the change or roll it back in your history).
Optional Steps
Make deployment (semi-)Manual
You can play with cloudflare and github to make deployment of your site a manual step you have to trigger, instead of automatic with each commit (default setting). This is a safeguard in case you accidentally make a change or delete something from your github, it won't affect your website.
Deploy w/ Branches
You could do a semi-automatic deployment with a "Production" branch on your github that is separate from the branch you edit. This creates an extra step before anything is published on Cloudflare. A safeguard against accidental changes/deletion of sorts :)

Go to Settings > Build tab > Branch Control
Choose your Production Branch (MAIN or CLOUDFLARE) and enable (or disable) automatic deployments
If you choose MAIN, every change you commit to MAIN will be published to Pages
If you choose CLOUDFLARE, any changes you make to MAIN will not show up on your Pages site until you Pull from MAIN to CLOUDFLARE
To Pull changes from MAIN to CLOUDFLARE, go to your github repository
Above your files on the Left, you will see a toggle to choose which branch you are on.
Choose Cloudflare. There will be a message like "This branch is 7 commits ahead of, 2 commits behind main." Click "2 commits behind"
Click "Create a Pull Request". Then click "Merge Pull Request". If everything is correct, this should trigger a build on your Cloudflare
Deploy w/ Github Actions
Or you can create a manual command that you have to enter on github to trigger a deployment on cloudflare. If you're paranoid about anything happening to your site due to a mishap on the Github side, this is a safe choice. Unless you manually trigger the command, your Pages site will be completely untouched no matter if something happens to your repo.
This can be done in many ways, I think the most straightforward is with Deploy Hooks (maybe in conjunction with Actions if you want to make it mobile-friendly), and might be a bit complicated, but not too hard to figure out with some Google-fu.
Here’s some links I think will be useful (note: I don’t use this method, so these haven’t been tested)
Manual trigger action tutorial
How to configure Github webooks
Storing Locally instead of on Github
Although this guide is written with Cloudflare's Github integration in mind, particularly for easy online/mobile access, you can also keep your files locally on your PC and directly upload your assets onto your Pages project. This gives you full control over what happens to your files. (Keeping backups is a good idea. You can still use Github Desktop to do this, just keep your repository on your PC.)
Simply clone/download the repository as it is, customize it as you like, and create a NEW Pages project on Cloudflare, using "Direct Upload" to upload your files
Once you have connected a Pages project with Github, there is no way to change the deployment method to Direct Upload or vice versa. Direct Upload is also not available for Workers.
One thing that will NOT work the same is the "create-index" Action that only works on Github.
I have made a "create-index.exe" that will execute the "create-index.py" files in the exact same way as they would work with the Action. You do not have to install python for this to work (if I did everything right). Simply run "create-index.exe" whenever you make a change and want to update the "index.html" files
Remember, this is EXACTLY THE SAME as the "create-index" Action, meaning you have to edit each "index.py" file when you rename folders, add a folder, want to exclude a file from the Index page, etc. (See Adding/Renaming Folders for how to do this)
Find me on Bluesky. Or if you have a problem, open an Issue on this project :)
I'll try to answer your questions as best I can! But really, I am the most amateur of amateurs and figured this all out using Google, so I might not be of much help ^^;
I also recommend Squidge Images (an offshoot of Squidge.org) as a fairly trustworthy alternative. However, Squidge Images does have some additional rules that Squidge does not, and what crosses the line is at their discretion.
I also posted this over on AO3!
5 notes
·
View notes
Text
How to Use Tumblr to Improve Website SEO
Key Takeaways
Tumblr has strong domain authority that can boost your website’s SEO
Creating a properly optimized Tumblr profile helps establish brand consistency
Strategic keyword use in tags and posts increases discoverability
Tumblr can generate valuable backlinks to your website
Visual content performs exceptionally well on the platform
Engagement with the Tumblr community amplifies your SEO benefits
Cross-promotion between Tumblr and other platforms maximizes traffic
Regular analysis of metrics helps refine your Tumblr SEO strategy

Why Tumblr Still Matters for SEO
Ever wonder why some websites seem to appear everywhere while yours is stuck on page 10 of Google? The answer might be hiding in an unexpected place — Tumblr. Yep, that platform you probably forgot about is actually a secret SEO weapon that many smart marketers are using to boost their rankings.
Tumblr ain’t just for fandoms and aesthetic blogs anymore. With over 496 million blogs and a domain authority score of 98/100, Tumblr gives your content serious SEO juice. When you post on Tumblr, you’re basically getting a vote of confidence from one of the internet’s most trusted platforms.
What makes Tumblr special? First, it’s got this unique mix of social media and blogging that search engines absolutely love. Each post creates another indexable page that can rank for your keywords. Plus, the reblog feature means your content can spread organically, creating natural backlinks and social signals that tell Google “hey, this stuff is worth looking at!”
The platform also has stayed relevant by adapting to changing user habits. Unlike other platforms that force rigid formats, Tumblr lets you post pretty much anything — from long articles to GIFs, videos to audio clips. This flexibility means you can repurpose your website content in multiple formats, hitting different search intents.
“I started using Tumblr as part of my SEO advantage strategy last year, and my organic traffic increased by 34% in just three months,” says one digital marketer who discovered the platform’s hidden potential.
Setting Up Your Tumblr Profile for SEO Success
Getting started with Tumblr for SEO isn’t complicated, but there’s definitely a right way to do it. First things first — your username and URL structure matter a ton. Don’t go with something random like “coolblogger123.” Instead, choose a username that matches your brand name or includes your main keyword.
Your Tumblr URL should look something like yourbrand.tumblr.com or keyword-focus.tumblr.com. This consistency helps searchers and search engines connect your Tumblr presence with your main website.
Next up is your Tumblr bio. This little section is prime real estate for SEO! Make sure to:
Include your main keywords (but don’t stuff them)
Write naturally about what your brand does
Add your website URL with proper https:// format
Use relevant hashtags that your audience searches for
The bio section also lets you verify your website, which creates that crucial link between your Tumblr and main site. This verification tells search engines that both properties belong to the same entity, passing authority between them.
Now let’s talk about theme customization. The default Tumblr themes are fine, but for maximum SEO benefit, you’ll want to customize:
Title tags for your main page and individual posts
Meta descriptions that include relevant keywords
Proper heading structure (H1, H2, etc.) in your posts
Alt text capabilities for images
Mobile responsiveness (super important for SEO!)
“When I set up my Tumblr, I made sure to include proper schema markup in my custom theme,” notes a content creator who uses AI tools to create semi-automatic newsletters. “It helped search engines understand my content better and improved my rich snippets in search results.”
Don’t forget to connect Google Analytics to your Tumblr! This integration lets you track how visitors find and interact with your Tumblr content, giving you valuable data to refine your strategy.
Creating Content That Ranks: Tumblr Post Optimization
Now for the fun part — creating content that actually ranks. Tumblr’s got this unique vibe that rewards authentic, creative posts while still following SEO best practices. It’s all about finding that sweet spot.
Visual content absolutely DOMINATES on Tumblr. Images, GIFs, and videos get way more engagement than text-only posts. But don’t just throw up random pictures! Here’s how to optimize visual content:
Use descriptive filenames before uploading (keyword-focus-image.jpg)
Add alt text with relevant keywords
Include a caption that naturally incorporates your target phrases
Make sure image dimensions are optimized for both Tumblr and mobile viewing
When creating text posts, you’ve got more flexibility for keyword placement. But remember, Tumblr users hate obvious SEO content that feels robotic. Instead, try:- Opening with an engaging question or statement - Naturally weaving keywords throughout the content - Breaking up text with subheadings (that include secondary keywords) - Using bulleted or numbered lists for scanability - Ending with a call to action that encourages engagement
The secret weapon of Tumblr SEO? Tags. Unlike hashtags on other platforms, Tumblr tags are POWERFUL search tools. You can use up to 30 tags per post, but 10–15 targeted ones usually work better. Mix specific and broad tags, including:
Your brand name
Primary keywords
Related long-tail keywords
Trending topics in your industry
Community tags where your audience hangs out
“I noticed that posts where I used specific long-tail keyword tags consistently outperformed those with only broad tags,” shares an entrepreneur who uses AI content writing techniques to scale their production.
Another unique opportunity on Tumblr is the “Ask” feature. By encouraging questions from followers, you generate user-generated content that often contains natural search phrases people use when looking for information in your niche. These questions and your answers create additional indexable content.
Building a Strong Backlink Strategy Through Tumblr
Backlinks still reign supreme in SEO, and Tumblr is a goldmine for building them. The trick is creating content that naturally attracts links rather than just self-promoting.
Let’s talk about link-worthy content types that perform best on Tumblr:
Original infographics: Visual data is highly shareable and rebloggable. Creating simple infographics about trending topics in your industry can spread like wildfire across Tumblr and beyond.
Resource collections: Curating the best tools, articles, or resources in your niche positions you as an authority. Other blogs and websites often link to these collections as references.
Opinion pieces: Taking a unique stand on industry issues creates discussion and attracts attention from other content creators looking for supporting viewpoints.
Tutorials and guides: Step-by-step instructions with visuals help people solve problems and are frequently linked to as solutions.
When linking back to your main website, don’t just dump links everywhere. Tumblr users (and search engines) can spot spammy linking a mile away. Instead, follow these practices:
Use varied, natural anchor text (not always your exact keyword)
Link contextually within valuable content
Target specific, relevant landing pages on your site
Space out your links across multiple posts
Balance linking to your site with linking to other valuable resources
“I created a content cluster to dominate SEO using Tumblr as one of my supporting platforms,” explains an SEO specialist. “By strategically linking between my main site content pillars and related Tumblr posts, I strengthened the topical authority of both properties.”
Remember that backlinks aren’t just about direct links to your website. When other Tumblr users reblog your content, they’re essentially creating a form of link that passes value. That’s why creating highly shareable content matters just as much as your direct linking strategy.
Growing Your Audience to Amplify SEO Benefits
A Tumblr blog with no followers is like a billboard in the desert — technically visible but not doing much good. Building a genuine following amplifies every SEO benefit by increasing engagement signals that search engines notice.
First, understand that Tumblr has its own unique community culture. Users value authenticity, creativity, and genuine interaction. Unlike LinkedIn or Twitter, overly professional or sales-y content often fails here. Instead, focus on:
Showing personality and a distinctive voice
Sharing behind-the-scenes glimpses of your brand
Creating content that sparks emotion or discussion
Participating in platform-specific trends and challenges
The reblogging feature is Tumblr’s secret engagement superpower. When you reblog relevant content from others (adding your own perspective), you:
Get noticed by the original poster and their followers
Demonstrate that you’re an active community member
Create content without starting from scratch
Build relationships with potential collaborators
“I spend about 15 minutes each day just engaging with my Tumblr community,” notes a blogger who uses 6-step content creation processes with AI tools. “That small investment pays huge dividends in terms of follower growth and content distribution.”
Hashtags aren’t just for optimization — they’re for discovery too. Following and participating in relevant hashtag communities connects you with users already interested in your topic. Some strategies include:
Joining hashtag challenges relevant to your niche
Creating weekly themed content using established hashtags
Monitoring hashtags for questions you can answer with helpful content
Using a mix of popular and niche-specific tags
Cross-promotion between platforms creates a traffic multiplier effect. Don’t keep your Tumblr isolated! Integrate it with your broader strategy by:
Sharing your Tumblr posts on other social platforms
Adding Tumblr follow buttons to your website
Including snippets of Tumblr content in your email newsletter
Creating platform-specific content that encourages followers to check out your other channels
Tracking and Measuring Your Tumblr SEO Performance
You can’t improve what you don’t measure. Setting up proper tracking for your Tumblr SEO efforts lets you double down on what’s working and fix what isn’t.
Start with the basics — Google Analytics integration. This gives you insights into:
How much traffic Tumblr sends to your website
Which specific Tumblr posts generate the most referrals
User behavior after arriving from Tumblr (bounce rate, time on site, etc.)
Conversion rates from Tumblr traffic compared to other sources
“After analyzing my Google Analytics data, I realized that visitors from Tumblr spent 43% more time on my site than average visitors,” shares a business owner who focuses on building profitable AI automations.
Beyond basic analytics, track these Tumblr-specific metrics:
Note count: This combined measure of likes, reblogs, and comments shows overall engagement.
Follower growth rate: Sudden changes can indicate content that’s particularly effective (or problematic).
Tag performance: Which tags bring the most views and engagement to your posts?
Peak engagement times: When are your followers most active and responsive?
For more serious SEO analysis, use tools like Ahrefs, SEMrush, or Moz to track:
Backlinks generated through your Tumblr strategy
Keyword rankings for Tumblr-specific content
Domain authority improvements over time
New referring domains attributed to your Tumblr efforts
Create a simple monthly report combining these metrics to spot trends and adjust your strategy. Are certain content types consistently outperforming others? Does Tumblr traffic convert better for specific products or services? Use these insights to refine your approach.
Avoiding Common Tumblr SEO Mistakes
Even experienced marketers make mistakes when using Tumblr for SEO. Let’s look at the most common pitfalls and how to avoid them.
Mistake #1: Over-optimization Just like anywhere else, keyword stuffing and unnatural link placement will hurt more than help. Tumblr users are particularly sensitive to content that feels artificial or manipulative. Instead, focus on creating genuinely valuable posts that naturally incorporate your target keywords.
Mistake #2: Content duplication concerns Simply copy-pasting the exact same content from your website to Tumblr can trigger duplicate content issues. Instead, try:
Rewriting content with a different angle or voice
Creating “teaser” content that links to the full article
Transforming written content into visual formats for Tumblr
Adding Tumblr-exclusive commentary or insights
“I made the mistake of just duplicating my blog posts on Tumblr at first,” admits a content creator who now uses automated content creation strategies. “When I started creating platform-specific versions, my engagement shot up by 67%.”
Mistake #3: Inconsistent branding Your Tumblr should feel like part of your broader brand ecosystem. Inconsistent logos, colors, voice, or messaging confuses users and dilutes SEO benefits. Create style guidelines specific to Tumblr that maintain your core brand identity while adapting to the platform’s unique culture.
Mistake #4: Ignoring mobile optimization Most Tumblr users browse on mobile devices. If your custom theme looks great on desktop but breaks on phones, you’ll lose engagement and SEO value. Test your Tumblr thoroughly on multiple devices, and prioritize mobile experience when making design choices.
Mistake #5: Irregular posting schedule Sporadic activity kills Tumblr momentum. Even if you can’t post daily, establish a consistent schedule that your followers can count on. Use scheduling tools to maintain presence even during busy periods.
Integrating Tumblr Into Your Overall Digital Strategy
Tumblr works best when it’s not isolated but integrated into your broader marketing ecosystem. Let’s explore how to make Tumblr a cohesive part of your digital strategy.
Start by defining Tumblr’s specific role in your content ecosystem:
Is it primarily for reaching new audiences?
For nurturing existing community members?
For highlighting specific products or services?
For establishing thought leadership in your industry?
Based on your goals, create content workflows that leverage Tumblr’s strengths while complementing your other channels. For example:1. Publish in-depth article on main website 2. Create visual summary version for Tumblr 3. Share Tumblr post on Twitter/Facebook 4. Gather questions from Tumblr comments 5. Answer those questions in future website content
This cyclic approach creates a self-reinforcing content ecosystem that maximizes the SEO value of each piece.
“I use Tumblr as part of my content automation tools strategy,” explains a digital marketer. “My team creates core content for our main site, then automatically adapts portions for Tumblr with the right formatting and tags.”
Consider creating platform-specific content series that give followers a reason to check each of your channels. For example, “Behind the Scenes” content might live on Tumblr, while your website hosts more formal case studies on the same projects.
Finally, use Tumblr as a testing ground for content ideas before investing heavily in them. The platform’s quick feedback loop lets you gauge interest in topics, formats, or angles before developing comprehensive website content.

Frequently Asked Questions
Is Tumblr still relevant for SEO?
Yes, Tumblr remains highly relevant for SEO with its strong domain authority (98/100), large active user base, and unique content format that search engines value. The platform continues to provide significant SEO benefits through backlinks, content indexing, and social signals.
How many posts should I publish on Tumblr each week?
Quality matters more than quantity, but consistency is key. For most businesses, 2–4 posts per week strikes a good balance between maintaining presence and ensuring content quality. Analyze your engagement metrics to find your optimal posting frequency.
Can I just repost my website blog content on Tumblr?
It’s better to adapt your content for Tumblr rather than directly duplicating it. This prevents potential duplicate content issues and creates a better user experience. Reformat your content with more visuals, different headings, and platform-appropriate voice.
How long should my Tumblr posts be for optimal SEO?
Tumblr accommodates diverse content lengths, but most successful posts fall into two categories: short-form visual content with 50–100 word captions or longer text posts of 300–700 words. Include your target keywords naturally regardless of length.
How do I measure the SEO impact of my Tumblr strategy?
Track referral traffic from Tumblr to your website, backlink acquisition, keyword ranking improvements, and engagement metrics on Tumblr itself. Use Google Analytics for traffic data and SEO tools like Ahrefs or SEMrush for backlink and keyword analysis.
Should I create multiple Tumblr blogs for different keywords or topics?
For most businesses, maintaining a single, strong Tumblr presence is more effective than diluting efforts across multiple blogs. If you have distinctly different business divisions or target audiences, separate blogs might make sense, but ensure each receives adequate attention.
What’s the best way to include links back to my website?
Include links contextually within valuable content, vary your anchor text naturally, and don’t overlink. Aim for 1–2 links per post maximum, and make sure they lead to highly relevant pages on your website that truly extend the value of your Tumblr content.
How important are tags for Tumblr SEO?
Tags are extremely important on Tumblr, serving both as internal search tools and SEO signals. Use 10–15 relevant tags per post, including a mix of broad keywords and specific long-tail phrases. Research popular tags in your niche for better discoverability.
Next -
Be safe and make small steps forward every day.
Doug
Connect on YouTube, X (twitter), and Linkedin
I’ve gained 3387 followers writing on Medium, 1403 Subscribers on YouTube and built two full time Five-Figure Passive Incomes. Get my AI content systems here:
AI Business Plans with Doug
🛆 Investment Disclaimer: You should not invest money into a paid tool until you have maximized the benefits of the free features. Nothing in our training products is a promise or guarantee of earnings.👈
☄ This article contains referral links for some of my absolute favorite AI business tools for content creators and GenAI enthusiasts.
If you purchase one of my favorite software and AI tools, I will receive a small commission at no additional charge to you.
2 notes
·
View notes
Text
i mentioned this in the tags of a post the other day but i want to share more of my vintage tumblr memories for those who werent there to experience them (you lucked out)
the block button didnt do anything except hide that blog from your notifications. they could still follow you and interact with all your posts you just wouldnt see it in your activity.
pursuant to that, if someone violated your DNFI (blog rules were called DNFIs before they were called BYFs before they were called DNIs) and you wanted them off your blog the only option was to send them an ask saying "unfollow me" and hope on the honor system they did.
this is probably why callouts were such a massive part of the blogging ecosystem , if someone annoyed you or was mildly problematic the only sure way to get them to stop was to run them off the site completely.
you probably remember that being able to actually disable reblogs on a post is a pretty new feature, before that it was part of the same honor system as DNFIs. in the old days there were roving gangs of troll blogs solely dedicated to finding vent posts tagged "dont reblog" and reblogging them, including copying over text that was in the tags / readmore.
to evade the troll blogs people had to start tagging their posts with increasingly obtuse typing quirks like "d0%t r38l09". speaking of tags,
the habit of adding slashes to the end of trigger tags is because tumblrs search feature and url parsing used to be Even More Dogshit than it is now and if a tag had certain characters in it (hyphens and i believe asterisks also worked) you couldnt browse it on the blog. this was considered good etiquette to show you cared about your followers wellbeing by not letting them doomscroll the trigger tags, and also made it harder for trolls to find triggering pics to spam your inbox with when you had a controversial take on steven universe ship dynamics. sometimes people just added a bunch of random numbers to the end of a tag like "blood 363820" which had the same effect of making it unsearchable but still worked for the blacklist because
blacklisting was a browser extension. you couldnt blacklist on the app for YEARS. old school users remember when xkit was an actual necessity to interact with the site. ancient school users remember tumblr savior.
this post is already too long so lets do a lightning round: having your blog index page automatically redirect to your aesthetic tag. custom cursors with particle effects. everyones blog being an unreadable pastel-on-white 8pt text nightmare. alternatively, everyones blog being a garish red-on-black knife emoji nightmare. follow forevers. i hear promo hour still survives as a relic population in some circles. kin pages with 75 grid icons sorted into literally me / primary / secondary / tertiary with discrete DNFI rules. every personal post being tagged "lms if read". post limit blogs. hunger games simulator and xyzzy and rabb.it and drawpile and skype groupchats. if you remember tanburu honestly you should be getting paid survivors benefits. i could list a bunch of big name callouts that would overtake some of you with a precipitous feeling of dread but i wont because i know some of them are still on this website Right Now. im not even a real Tumblr Old i was 11 years old in 2014 and i know the true elders have secrets i cannot comprehend. its so dark in here. i remember when DMs were new.
9 notes
·
View notes
Note
Does this blog do interest checks? I'm debating on making a server but I'm not too sure if I have the time/energy to moderate one
the blog description "A confession blog for fictionkin, fictives and systems mates, copinglinks, soulbonds, and others from fictional sources! Icon / Blog Title never spoiler tagged! Not a call blog! Search #blogpages for the 14 blog pages in as posts."
the #blogpages search results https://fictionkinfessions.tumblr.com/tagged/blogpages
the interest checks page https://fictionkinfessions.tumblr.com/ic
the interest checks page as a text post https://fictionkinfessions.tumblr.com/post/632740647002079232/interest-checks-info-page
What’s an interest check?
It’s where you check if anyone is interested in a discord server, usually for a specific source. Interest checks can also be for other things like call blogs or kin related blogs.
How do I send one in?
Send an ask message anonymous or publicly mentioning an ‘interest check’ and for what source or kintype you are hoping to make a server for.
You can keep it brief and say ‘interest check for splatoon kin?’
Or, you can go into detail and say ‘interest check for splatoon kin and systems, double friendly, 18+ only, we’ll have movie nights and splat games, au and oc friendly’,
Both are reasonable and welcome!
Is there any kind of interest check you won’t post?
Yes! They have the same rules as the ones on the Promo Guidelines page. Essentially, please don’t prohibit certain types of systems, prohibit those in Systems, are only anonymous messages with server invites, are welcome to people who aren’t alterhuman, or isn’t for those who are alterhuman, or permit factkin.
How do I respond to one?
Please like, reblog with a positive comment, or reply to the post! Please don’t send in ask responses so we don’t miss anyone looking to join the server!
I made a server for an interest check. Now what?
Let us know! Please make a post on your personal blog or a side blog @/mentioning this blog! Or send us an ask message with a blog url and / or link to the post!
Please keep in mind if you’re using a brand new side blog, tumblr will automatically mute you for anti spam bot purposes. You won’t appear in the search index, or to any other blog, for a little while. If we don’t reblog from your new side blog, it’s because of that. Please send an ask message or DM if this happens!
Also, please check to make sure it’s not breaking any of the promo guidelines! Promo guidelines page here: https://fictionkinfessions.tumblr.com/promo
the promo guidelines page https://fictionkinfessions.tumblr.com/promo
Promo Request information We post promos for blogs that are:
help / info blogs
source call blogs for alterhumans or systems
multi purpose blogs
Additional reblogs of previously reblogged promos!
Interest checks! [See below]
Invite requests via ask messages to open kin / system servers
We don’t promo blogs that:
offer pendulum readings [explanation here]
Permit IRL / DA interaction
use uncredited fanart or uncredited images.
Personal blogs
Anonymous messages with only random discord server invites. This is because I don’t want to direct people into servers that might be full of gore or shock images.
Prohibit any kind of Systems from interacting [eg endogenic, traumagenic, “no fictives / introjects / alters / etc allowed in server or to interact” etc]
The tone of this post / reply is completely neutral, please do not assign emotions or read that deeply into it.
3 notes
·
View notes
Text
Best SEO tools
Yoast SEO Yoast SEO is a powerful WordPress tool that optimizes websites for better search engine performance, enhancing visibility and helping achieve higher Google rankings. It streamlines the SEO process, making it straightforward to increase site reach and ranking potential.
Key Functions of Yoast SEO
On-Page SEO Analysis Yoast offers real-time on-page SEO analysis, suggesting improvements for keyword density, meta descriptions, titles, and headings. This helps in refining content for better SEO.
Readability Analysis The Readability Analysis feature makes content more engaging and user-friendly by recommending improvements to sentence structure and paragraph length.
Meta Tags & Snippet Optimization Yoast allows you to create custom meta tags and snippet previews, boosting click-through rates by optimizing how your content appears in search results.
XML Sitemaps Yoast automatically generates an XML sitemap, helping search engines easily discover and index your site content.
Schema Markup This feature provides easy integration of schema types like articles, business info, and events, resulting in rich snippets that improve user engagement.
Canonical URLs Canonical URLs help manage duplicate content, which is essential for better indexing and SEO performance.
Breadcrumbs Control Yoast’s breadcrumb feature enhances navigation, lowers bounce rates, and improves SEO by organizing content hierarchy.
Social Media Integration By adding Open Graph Metadata, Yoast optimizes content for platforms like Facebook, LinkedIn, and Twitter, improving visibility and engagement.
WooCommerce WooCommerce is a versatile, open-source e-commerce platform for WordPress, ideal for all business sizes. It offers customizable online stores, secure transactions, and powerful SEO features to enhance product visibility.
Key Functions of WooCommerce
Easy Setup & Customizable Products WooCommerce’s user-friendly setup allows quick store launch, with options for digital, grouped, or physical products to suit varied customer needs.
Payment Gateway Integration Supports multiple payment types like credit cards, PayPal, and Stripe, providing a seamless checkout experience.
Inventory & Shipping Management Inventory tracking and flexible shipping options make it easy to manage stock and meet diverse customer demands.
Tax Management Automated tax calculations simplify compliance with location-based tax rates.
Extensions & Mobile-Friendly Design WooCommerce offers various extensions and themes for store customization, with a mobile-friendly design to ensure a seamless experience across devices.
Here’s a refined draft that highlights your team’s expertise, affordable pricing, and experience in Yoast SEO and WooCommerce. I’ve organized the information to reflect your strengths and service offerings in a client-focused format. Reach out to us by clicking here

#wordpress#web design#website#ecommerce website development#e commerce#web development#seo services#seo#digitalmarketing#smm#marketingtrends#emailmarketing#malware
2 notes
·
View notes
Text
Rapid URL Indexer: The Best Google Backlink Indexing Tool For Quick SEO Results
Rapid URL Indexer is revolutionizing the way websites and backlinks get indexed by Google. For just $0.05 or less per URL, SEO professionals can supercharge their indexing success without requiring Google Search Console access or getting locked into subscription plans.
Game-Changing Features That Set Us Apart
Rapid URL Indexer delivers unmatched performance through a combination of powerful capabilities. The platform processes links immediately upon submission, providing initial indexing reports after 4 days and comprehensive results within 14 days. What truly distinguishes Rapid URL Indexer is the automated 100% credit refund system - clients only pay for successfully indexed links. The flexible pay-as-you-go model means no recurring fees or commitments.
Seamless Integration Options for Every Workflow
Beyond the core indexing functionality, Rapid URL Indexer offers multiple integration paths to enhance productivity. The RESTful API enables custom implementations, while the https://rapidurlindexer.com/ Zapier integration automates complex workflows. The WordPress plugin automatically submits new and updated content, and the Chrome extension enables one-click submissions directly from the browser.
Real Results from Real Customers
SEO professionals consistently praise Rapid URL Indexer's exceptional performance. Authority Magnet Co.'s CEO Mohammad Qaiser highlights the platform's competitive pricing and high success rate. Other industry leaders emphasize how Rapid URL Indexer outperforms traditional indexing methods, delivering measurable improvements in search visibility and organic traffic.
Versatile Applications Across SEO Needs
Rapid URL Indexer excels at indexing diverse content types - from standard web pages to traditionally challenging assets like press releases and mass page websites. The platform effectively handles tier 1, 2, and 3 backlinks, social profiles, citations, and SEO test pages. It even accelerates recovery from backlink-related penalties by ensuring disavowed links get recrawled promptly.
The platform maintains complete transparency through detailed analytics and reporting. Users can monitor indexing progress through visual charts and downloadable CSV reports. This data-driven approach, combined with the risk-free refund guarantee, makes Rapid URL Indexer an indispensable tool for SEO professionals focused on delivering measurable results for their clients.
1 note
·
View note
Text
with google automatically using AI to answer questions it seems like a good time to remind everyone about the browser Ecosia which uses ad revenue to plant trees and do other environment-saving and community-aiding projects all over the world
It has IOS and Android apps or you can just set it as your default browser on the beloved firefox
*if u add it to firefox and it asks u to paste the url in use the format below thatll allow you to search directly from the browser search bar instead of just redirecting u to the Ecosia homepage
https://www.ecosia.org/search?method=index&q=define%s
5 notes
·
View notes
Text
How to Create Sitemap XML for your Website?
🚀 Ready to boost your website's visibility? Learn how to create a dynamic sitemap.xml to enhance your SEO game! 🌐Hey there, fellow digital trailblazers! Are you looking to supercharge your website's search engine optimization (SEO) efforts? One surefire way to give your site a leg up in the digital landscape is by creating a sitemap.xml.
What exactly is a sitemap.xml, you ask? It's a roadmap for search engine crawlers, guiding them through your website's pages and content. By providing this organized structure, you can help search engines better understand and index your site, improving its visibility in search results.
How can you create a sitemap.xml for your website? Fear not, I've got you covered with a simple yet practical guide:
1. Understand Your Website Structure: Take a comprehensive look at your website's structure and identify all the pages you want to include in your sitemap.
2. Utilize Online Tools: Several online tools and plugins can help you automatically generate a sitemap.xml file. Platforms like WordPress offer plugins that can handle this task seamlessly.
3. Manually Create Your Sitemap: If you prefer a more hands-on approach, you can create your sitemap.xml file manually. Use a text editor to list the URLs of your website's pages in a structured format.
4. Submit Your Sitemap to Search Engines: Once your sitemap.xml file is ready, remember to submit it to Google and Bing. This will ensure that search engine crawlers are aware of your sitemap and can index your website effectively.
You must update your sitemap.xml regularly, particularly if you add or modify content on your site frequently. You're assisting search engines in learning about the most recent information on your website by doing this. By creating and maintaining a sitemap.xml, you're taking a proactive step toward improving your website's SEO performance. So, why not watch your site soar in search engine rankings? 🚀
#technical seo#seo#seo company#seo marketing#seo services#technical services#technical skills#seo optimization
4 notes
·
View notes
Text
[post text: YOUR WEBSITE'S TITLE HERE
Going to put all this in its own post too by popular request: here's how you make your own website with no understanding of HTML code at all, no software, no backend, absolutely nothing but a text file and image files!
First get website server space of your own, like at NEOCITIES. The free version has enough room to host a whole fan page, your art, a simple comic series, whatever!
The link I've provided goes to a silly comic that will tell you how to save the page as an html file and make it into a page for your own site. The bare minimum of all you need to do with it is JUST THIS: /end ID]
[image ID: a creature explaining what to change after you save the html to make it your own website: “Guess what? The circled bits are all you ever need to change to make it your OWN PAGE” The sections circled in red are:
the text of the page's tab, between "head" and "title" tags. it says “YOUR WEBSITE'S TITLE HERE”; the full line is: <head><title>YOUR WEBSITE'S TITLE HERE</title><head>
a header for the page, between "h1" and "p" tags. it says “BIG, CENTERED TEXT”; the full line is: <h1><p style="font-size:40px">BIG, CENTERED TEXT</p><h1>
a link to the image files of the comic, between an "h1" tag and inside an "img." tag. it says “thisisntyourcomic.png”; the full line is: <h1><img src="thisisntyourcomic.png"></h1>
the three navigation links, each inside an "a" tag. the first link applies to the word “Previous”, the second applies to the word “Home”, and the third to the word “Next”; the first line is: <a href="001.html"><b>Previous</b></a> . the second line is: <a href="YOURWEBSITE.WHATEVER"><b>Home</b></a>&nps;&nps; . the third line is: <a href="001.html"><b>Next</b></a>
/end ID]
[post text: Change the titles, text, and image url's to whatever you want them to be, upload your image files and the html file together to your free website (or the same subfolder in that website), and now you have a webpage with those pictures on it. That's it!!!!!
.....But if you want to change some more super basic things about it, here's additional tips from the same terrible little guy: /end PT]
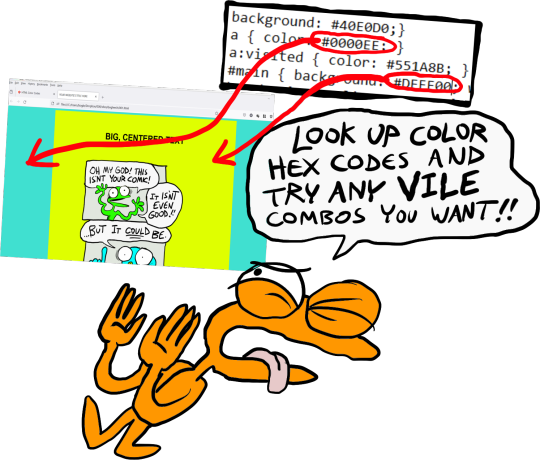
[image ID: the creature from before, explaining how to change the background colors: “AAH! It's extra stuff! Here's where you can change colors!” a few spots for hexcodes and code segments are circled and labelled. The lines of code are:
color: "#000000;" labelled “Font”
background: "#FFFFFF;" labelled “Background 1”
a { color: "#0000EE;" } labelled “Links”
a:visited { "color: #551A8B;" } labelled “Visited Links”
#main { "background: #FFFFFF;" width: 900…} labelled “Background 2”
The creature continues: “There's two different ones for "background" because the sample file has this nice middle column for your content!”
/end ID]
[image ID: a demonstration of the different background colors. Background 1 applies to the background of the webpage, and Background 2 applies to the background of the content column. The creature instructs: “Look up color hex codes and try any vile combos you want!” /end ID]
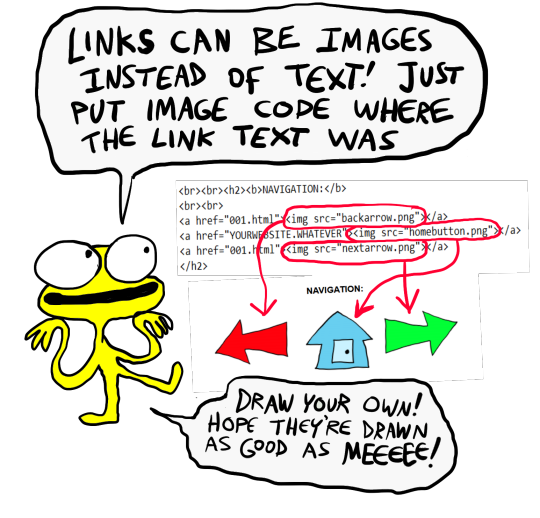
[image ID: the creature explaining how to change the navigation at the bottom: “Links can be images instead of text! Just put an image code where the link text was.” The code segment from the first image for navigation links except with the "Previous", "Home", and "Next" texts replaced with <img src="backbutton.png">, <img src="homebutton.png"> and <img src="nextbutton.png"> /end ID]
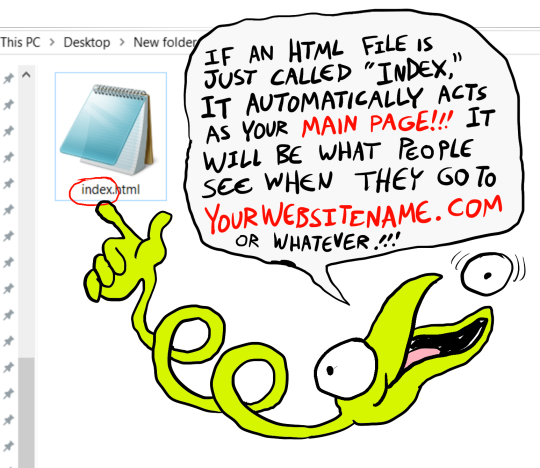
[image ID: a screenshot of the html code inside the computer's files, with the creature explaining: “If an html file is just called "Index," it automatically acts as your main page! It will be what people see when they go to yourwebsitename.com or whatever!” /end ID]
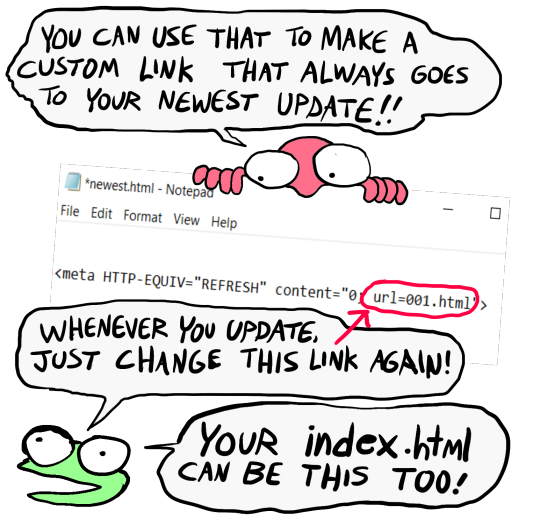
[image ID: a singular line of code: <meta HTTP-EQUIV="REFRESH" content="0; url=yourwebsite.com"> The creature says: “If you make a page with only this one line of code, anyone who goes to the page will be taken to whatever URL you put there!” /end ID]
[image ID: the creature further explains: "You can use that to make a custom link that always goes to your newest update! Whenever you update, just change this link again! Your index.html can be this, too!" There's an arrow pointing towards the "url=yourwebsite.com" in the code segment from the previous image. /end ID]
[post text: That last code by itself is:
<meta HTTP-EQUIV="REFRESH" content="0; url=001.html">
Change "001.html" to wherever you want that link to take people. THIS IS THE REASON WHY when you go to bogleech.com/pokemon/ you are taken instantly to the newest Pokemon review, because the /pokemon/ directory of my website has an "index.html" page with this single line of code. Every pokemon review has its own permanent link, but I change that single line in the index file so it points to the newest page whenever I need it to!
While I catered these instructions to updating a webcomic, you can use the same template to make blog type posts, articles or just image galleries. Anything you want! You can delete the navigational links entirely, you can make your site's index.html into a simple list of text links OR fun little image links to your different content, whatever! Your website can be nothing but a big ugly deep fried JPEG of goku with a recipe for potato salad on it, no other content ever, who cares! We did that kind of nonsense all the time in the 1990's and thought it was the pinnacle of comedy!! Maybe it still can be?!?! Or maybe you just want a place to put some artwork and thoughts of yours that doesn't come with the same baggage as big social media?
Make a webpage this way and it will look the same in any browser, any operating system for years and years to come, because it's the same kind of basic raw code most of the internet depends upon!
/end PT]
小い.> very useful guide~ thank you for making it!♡
게터.> neocities time〜 have fun everyone :]
ゆの.> web liberation W
additional useful things people added in the notes:
alternatives for making a link to the newest update, because the method privided by the guide above will break the back button
website for learning more html and css
how to make the text properly formatted and visible on mobile
Going to put all this in its own post too by popular request: here's how you make your own website with no understanding of HTML code at all, no software, no backend, absolutely nothing but a text file and image files! First get website server space of your own, like at NEOCITIES. The free version has enough room to host a whole fan page, your art, a simple comic series, whatever! The link I've provided goes to a silly comic that will tell you how to save the page as an html file and make it into a page for your own site. The bare minimum of all you need to do with it is JUST THIS:

Change the titles, text, and image url's to whatever you want them to be, upload your image files and the html file together to your free website (or the same subfolder in that website), and now you have a webpage with those pictures on it. That's it!!!!! .....But if you want to change some more super basic things about it, here's additional tips from the same terrible little guy:


That last code by itself is: <meta HTTP-EQUIV="REFRESH" content="0; url=001.html"> Change "001.html" to wherever you want that link to take people. THIS IS THE REASON WHY when you go to bogleech.com/pokemon/ you are taken instantly to the newest Pokemon review, because the /pokemon/ directory of my website has an "index.html" page with this single line of code. Every pokemon review has its own permanent link, but I change that single line in the index file so it points to the newest page whenever I need it to! While I catered these instructions to updating a webcomic, you can use the same template to make blog type posts, articles or just image galleries. Anything you want! You can delete the navigational links entirely, you can make your site's index.html into a simple list of text links OR fun little image links to your different content, whatever! Your website can be nothing but a big ugly deep fried JPEG of goku with a recipe for potato salad on it, no other content ever, who cares! We did that kind of nonsense all the time in the 1990's and thought it was the pinnacle of comedy!! Maybe it still can be?!?! Or maybe you just want a place to put some artwork and thoughts of yours that doesn't come with the same baggage as big social media? Make a webpage this way and it will look the same in any browser, any operating system for years and years to come, because it's the same kind of basic raw code most of the internet depends upon!
#chroma…#〖게타⎯⎯⎯ ʳᵉᵈᵃᶜᵗᵉᵈ : ⿻␘␇ ױ⸋⸋⸋𓐄𓐄𓐄⸋⸋⸋〗#id added#described#neocities#website#htmlcoding#html css#learn to code#indie comics#comics#website development#coding guide#website guide
12K notes
·
View notes
Text
Why Broken Links Are Bad for Your Website’s SEO

Broken links are hyperlinks that point to pages that no longer exist or are unable to be reached , pose a serious problem beyond an inconvenience. In 2025, when user expectations and search engine algorithms are even more sophisticated, having broken links will severely hurt your website’s SEO, user experience, and credibility.
What Is a Broken Link?
Broken links, or dead links, are any instance when you click a hyperlink and it takes you to a page that no longer is available, has been relocated without a redirect, or has a URL . These can be internal pointing within your own site or external pointing to another website.
How Broken Links Affect SEO
Ruins Your User Experience
When searchers follow a link and arrive at a “404 Not Found” error message, it not only breaks their trip, it may even make them feel lost. Frustrated users will bounce off your site and never return, raising your bounce rate and lowering your average page time. This adverse user experience is a red flag even search engines, letting them know that your site is not reliable or useful.
Increased Bounce Rates
If users hit dead ends, they’ll be less likely to stick around your site and find what they need. High bounce rates are bad ranking signals for search engines, and if enough broken links are left to fester, a sharp and continued drop in organic traffic is inevitable.
Crawling and Indexing Concerns
Search engine bots crawl the web by following links from site to site. Broken links cause crawl errors, which eat up valuable crawl budget and can keep important pages from being indexed or ranked. If bots keep running into dead ends, they could crawl past otherwise valuable content on your site and never find or consider it for ranking.
how to prevent and fix broken links
Regularly use a third-party SEO tool to scan for and identify broken links.
Correct or Repoint Broken URLs Either update links to go to the appropriate pages or implement 301 redirects when it’s needed.
Keep Stable URL Formats Don’t change URLs around without a reason, and periodically check links before going live with new content.
Watch for User Response — Stay alert to user feedback or analytics that suggest navigation trouble.
How SeoBix Can Assist
This is where a SEO tool like Seobix comes and helps by automatically scanning your site for broken links, alert you to the issues found and even help you prioritize the fixes you need to make first depending on the highest SEO impact. By providing ongoing audits and clear next steps, Seobix helps your website stay healthy, user-friendly, and optimized to bring you the traffic your business needs.
Conclusion
Broken links are not just an annoying digital pothole , they can kill your SEO rankings, frustrate your users, and erode your brand’s trustworthiness. By staying on top of your site with regular audits and using intelligent tools such as Seobix, you can help find and fix broken links fast, leaving your website’s SEO healthy and your site visitors happy.
0 notes
Text
SEO Depends on Site Health—And That Includes Cron Monitoring

When it comes to SEO, we often focus on content creation, keyword optimization, link building, and user experience. But beneath all of that lies a foundation that’s often ignored: site infrastructure and automation reliability. One of the most critical but overlooked components is cron job monitoring.
Cron jobs are automated tasks that power many behind-the-scenes SEO operations. When they silently fail, your site may still appear to function, but your SEO could be taking a serious hit. That’s why monitoring cron jobs with tools like WebStatus247 isn’t optional—it’s essential.
🛠 What Are Cron Jobs and Why Do They Matter for SEO?
A cron job is a time-based task scheduler in Unix-like systems. Web servers use cron jobs to automatically execute scripts at specific intervals—every hour, day, week, or custom frequency.
Here’s how they directly impact SEO:
Sitemap Automation: Keeping your sitemap updated and notifying search engines ensures faster indexing.
Cache Management: Clearing expired cache files helps maintain site speed.
Broken Link Checks: Regularly removing dead links improves crawlability and user trust.
Scheduled Content Publishing: Timely content updates signal fresh activity to search engines.
Image Optimization: Automatically resizing or compressing new uploads to maintain fast load times.
Without cron jobs doing these tasks, your site can gradually lose technical integrity—hurting everything from crawl budgets to page speed scores.
⚠️ Real-World Scenarios Where Cron Job Failures Hurt SEO
🔄 Sitemap Never Updates
Let’s say your sitemap.xml file hasn’t updated in weeks because the cron job failed. Google doesn’t know you’ve added 20 new blog posts. These pages stay unindexed—missing out on traffic, impressions, and ranking potential.
🧱 Broken Links Go Undetected
You have a cron job that runs a script to identify broken internal links. One day it silently fails. You continue publishing content, unaware that dozens of pages now link to 404 errors. Google starts lowering your site's quality score.
⏳ Sluggish Load Times
Your database cleanup cron job fails. As junk data builds up, your queries slow down and page load speed drops. This affects your Core Web Vitals, which are now a direct ranking factor in Google.
🕒 Missed Content Scheduling
You queue up posts for the next week—product updates, blog articles, promotional pages. But the publishing cron job crashes. Your audience sees no updates, and Google sees an inactive site.
✅ Why You Must Monitor Cron Jobs—Not Just Set Them
Setting up a cron job isn’t enough. They can:
Fail due to coding errors
Be interrupted by server issues
Get blocked by firewalls or security plugins
Conflict with other scripts
Be disabled during hosting migrations
And most importantly: they don’t usually alert you when something breaks. This is where WebStatus247 steps in.
🧩 How WebStatus247 Helps With SEO-Focused Cron Monitoring
WebStatus247 Cron Job Monitoring gives you full control and visibility over your automation stack. Features include:
🛑 Failure Detection: Get notified if a scheduled task doesn’t run or crashes.
📅 Custom Monitoring Intervals: Track hourly, daily, or even by-the-minute jobs.
📬 Real-Time Alerts: Receive instant alerts via email or SMS when things go wrong.
📈 Logging and Dashboards: View detailed logs to troubleshoot quickly and prevent repeat issues.
🔒 Secure Status URLs: Use simple HTTP or webhook pings for status confirmation.
By integrating this tool, you make sure your SEO tasks—especially technical SEO jobs—run like clockwork.
🔍 Technical SEO + Cron Jobs: A Perfect Pair
SEO experts and digital marketers know that technical SEO is just as critical as content. Google rewards websites that are fast, accessible, and technically sound.
Monitoring your cron jobs means you're doing the following:
Maintaining sitemap freshness
Avoiding broken or outdated links
Ensuring content freshness
Improving uptime and stability
Keeping page speed fast and lean
If you run backups, link audits, caching tasks, or image optimization via cron, these all contribute indirectly—but powerfully—to your SEO edge.
🧠 Final Thoughts: Don't Let Silent Failures Kill Your Rankings
SEO isn’t just about what's visible—it's also about the systems that support your site. If your background tasks aren’t monitored, they can quietly fail, and your rankings may drop before you even realize there’s a problem.
✅ WebStatus247 ensures that never happens.
0 notes
Text
Maximize Your Shopify SEO with HyperBoost AI SEO Optimizer
Running a Shopify store is no easy task—and managing SEO on top of everything else can feel overwhelming. Between optimizing page speed, fixing broken links, and writing the right meta tags, it’s easy to miss crucial details that affect your visibility on Google.
That’s where HyperBoost AI SEO Optimizer comes in. Built to simplify search engine optimization for busy Shopify merchants, this powerful all-in-one tool automates technical and on-page SEO tasks, improves your store’s speed, and provides AI-powered insights to help you rank higher in search results.
Let’s break down how HyperBoost can take your store’s SEO performance to the next level—without the stress.
1. AI-Powered SEO Audit: Spot and Fix SEO Issues Instantly
Before you can improve your site’s SEO, you need to know what’s holding it back. HyperBoost begins with a comprehensive AI-powered SEO audit that scans your entire Shopify store for common on-page issues, including:
Missing or duplicate meta titles and descriptions
Improper header tag usage (H1, H2, etc.)
Broken internal and external links
Missing image alt tags
The audit provides a detailed report with clear, actionable recommendations. Even if you don’t have technical SEO knowledge, you’ll be able to fix issues and make improvements with ease.
2. Boost Site Speed with Lazy Loading
Site speed directly impacts both SEO rankings and user experience. If your store takes too long to load, customers leave—and Google notices.
HyperBoost includes a page speed booster powered by lazy loading, which delays loading images until a user scrolls to them. This drastically improves load times, reduces bounce rates, and helps meet Google’s Core Web Vitals standards, giving you a boost in search visibility.
3. Rich Schema Markup: Enhance Search Listings
Getting to the top of search results is one thing—but standing out is another. HyperBoost supports JSON-LD rich schema markup, which helps search engines better understand your content and display rich snippets (like star ratings, pricing, or availability) in search results.
You can add schema for:
Product listings
Blog articles
Recipes
Videos
FAQs and more
With rich schema, your listings become more detailed, clickable, and visually appealing—leading to higher click-through rates.
4. Automated On-Page SEO: Smarter Metadata, Better Content
Writing meta titles, descriptions, and alt tags manually for every product or page can be tedious. HyperBoost makes it simple by automatically generating and optimizing:
Meta titles and descriptions
Image alt text
Heading structures and page content
This ensures your entire store is aligned with on-page SEO best practices—without the need to hire an SEO expert or spend hours editing pages.
5. Complete Technical SEO Toolkit
Technical SEO might be invisible to your customers, but it’s critical for search engines. HyperBoost offers a full suite of technical SEO tools to keep your store optimized and crawler-friendly:
Sitemap generation for proper indexing
301 redirects to preserve SEO value when changing URLs
Custom 404 pages to keep users on your site
Nofollow and noindex settings to control which pages search engines can access
Structured data support to meet search engine requirements
All of this is built into a user-friendly dashboard, making it easy to maintain technical SEO without touching a line of code.
6. Track Progress with Detailed SEO Reports
What good is optimization without measurement? HyperBoost provides detailed performance reports so you can track your SEO progress, see what’s working, and uncover new opportunities.
Reports include data on:
Keyword rankings
Page-level SEO scores
Issue resolution history
Traffic and engagement insights
These insights allow you to fine-tune your strategy and make data-driven decisions that help your store grow.
Final Thoughts
SEO doesn’t have to be confusing or time-consuming. With HyperBoost AI SEO Optimizer, Shopify merchants get a reliable partner that automates, improves, and tracks SEO across every page of their store.
From technical SEO fixes and speed enhancements to smart metadata and schema markup, HyperBoost offers everything you need to boost your rankings—and your revenue.
0 notes
Text
What Are Breadcrumbs in SEO and How to Add Them to Your Website for Better SEO!
In the world of SEO, even small improvements to your website can make a big difference. One such small — but powerful — feature is Breadcrumbs. If you’ve ever seen a trail like Home > Blog > SEO Tips > Breadcrumbs in SEO, that’s a breadcrumb trail.
Breadcrumbs contribute to better search engine optimization in addition to making it easier for users to traverse your website.
In this article, you’ll learn:
What breadcrumbs are in SEO
Why they matter for user experience and SEO
The different types of breadcrumbs
How to add breadcrumbs to your website
Best practices for maximum SEO benefit
Whether you're managing SEO in-house or through an agency offering Affordable SEO Services in Delhi, this guide will help you implement breadcrumbs the right way.

What Are Breadcrumbs in SEO?
A supplementary navigation method used in SEO, breadcrumbs assist consumers in understanding where they are in a website's hierarchy. Think of breadcrumbs like a GPS route — they tell both users and search engines the path taken to reach a specific page.
Example:
Home > Blog > Digital Marketing > What Are Breadcrumbs in SEO
With only one click, consumers can return to a more comprehensive category thanks to breadcrumbs, which show up close to the top of a webpage.
Why Are Breadcrumbs Important for SEO?
Breadcrumbs aren’t just for user navigation — they’re also SEO assets. Here's how they help:
1. Improved User Experience
Breadcrumbs provide an intuitive way for users to move through a website. This leads to:
Lower bounce rates
More time spent on your site
Higher engagement rates
2. Better Site Structure
Search engines like Google love organized websites. Breadcrumbs create a Logical Internal Linking Structure, making it easier for bots to crawl and index your site.
3. Enhanced Search Snippets
When implemented correctly, Google Can Display Breadcrumbs in Search Results, replacing the URL path. This improves the look and clickability of your listing.
Example in Google:example.com > SEO > Breadcrumbs Guide
4. Lower Bounce Rates
By offering an easy way to navigate back to previous pages, users are less likely to exit your site if they don't find what they’re looking for on a specific page.
Types of Breadcrumbs
There are three common types of breadcrumbs:
1. Hierarchy-Based (Location)
These show the position of a page in the site structure.
Home > Services > SEO Services > Local SEO
2. Attribute-Based
Common in eCommerce sites, these show product attributes.
Home > Shoes > Men’s Shoes > Size 10 > Black
3. History-Based (Path)
These reflect the actual path the user took to arrive at the current page.
Home > Last Visited Page > Product Page
For SEO purposes, Hierarchy-Based Breadcrumbs are the most commonly used and most beneficial.
How to Add Breadcrumbs to Your Website
Adding breadcrumbs can be technical, but there are easy ways depending on the platform you're using.
For WordPress Users
If you're using WordPress, you have several options:
1. Using Yoast SEO Plugin
Yoast makes it easy to add breadcrumbs with just a few steps:
Install and activate the Yoast SEO plugin
Go to SEO > Search Appearance > Breadcrumbs
Enable breadcrumbs and copy the given code
Paste the code into your theme’s single.php, page.php, or header.php
Yoast also automatically adds Schema Markup, which is great for SEO.
2. Using Elementor or Page Builders
If you use Elementor, you can:
Use a Breadcrumb Widget (available in Pro)
Place the widget on the page where you require breadcrumbs.
For Custom HTML Websites
You’ll need to:
Create breadcrumb HTML manually
Add CSS for styling
Use structured data to help Google understand your breadcrumbs
Here’s a simple HTML example:
html
CopyEdit
<nav aria-label="Breadcrumb">
<ol>
<li><a href="/">Home</a></li>
<li><a href="/blog/">Blog</a></li>
<li>Breadcrumbs in SEO</li>
</ol>
</nav>
Then, add BreadcrumbList schema markup using JSON-LD:
json
CopyEdit
<script type="application/ld+json">
{
"@context": "https://schema.org",
"@type": "BreadcrumbList",
"itemListElement": [{
"@type": "ListItem",
"position": 1,
"name": "Home",
"item": "https://example.com"
},{
"@type": "ListItem",
"position": 2,
"name": "Blog",
"item": "https://example.com/blog"
},{
"@type": "ListItem",
"position": 3,
"name": "Breadcrumbs in SEO",
"item": "https://example.com/blog/breadcrumbs-in-seo"
}]
}
</script>
Best Practices for SEO-Friendly Breadcrumbs
To make the most out of breadcrumbs, follow these tips:
1. Keep It Consistent
Use the same breadcrumb format across your entire site.
2. Place Above the Page Title
Users expect breadcrumbs near the top — don’t hide them below the fold.
3. Use Schema Markup
Add BreadcrumbList schema so search engines can show them in search results.
4. Keep Links Crawlable
Each step in your breadcrumb trail should be a clickable, crawlable link.
5. Make Mobile Friendly
Ensure breadcrumbs are responsive and don't break on smaller screens.
Final Thoughts
Breadcrumbs are more than just a convenience feature — they’re an essential part of Complete SEO Services. They guide your users, help search engines understand your site structure, and even make your listings more attractive in search results.
If you haven’t implemented breadcrumbs yet, now is the perfect time. Whether you’re managing SEO in-house or outsourcing, adding breadcrumbs is a low-effort, high-impact optimization that supports both user experience and search visibility.
Need help with structured SEO improvements like breadcrumbs, schema, and content strategy? Explore our Affordable SEO Services in Delhi tailored to businesses that want real results without the guesswork.
#AffordableSEOServicesinDelhi, #CompleteSEOServices,
0 notes
Text
Top Website Migration Mistakes That Could Cost You Traffic

Migrating your website from one platform to another can be a game-changer—but if not done right, it can quickly become a nightmare. Whether you're switching platforms for better customization, SEO capabilities, or cost savings, a poorly executed migration can result in lost traffic, broken links, and a dip in conversions.
One common move many online store owners make is the Shopify to WordPress migration. While this transition can offer greater flexibility and control, it’s crucial to avoid key mistakes that could derail your site’s performance. Here are the top migration mistakes and how to prevent them.
1. Skipping a Comprehensive Website Audit
Before making any move, it's essential to know where you stand. Skipping a website audit means you miss out on identifying your top-performing pages, backlinks, and user behavior patterns. Without this data, you risk losing valuable SEO equity and breaking key pages that bring in traffic.
2. Not Setting Up Proper 301 Redirects
When migrating from Shopify to WordPress, your URL structure may change. If old URLs are not properly redirected using 301s, users and search engines will land on error pages. This not only frustrates visitors but also signals to Google that your site’s authority is declining. Set up redirects carefully to retain your SEO rankings and link value.
3. Forgetting to Update Your XML Sitemap and Robots.txt
Your sitemap is what search engines use to crawl your website efficiently. Failing to update and submit a new XML sitemap to Google Search Console can delay indexing and leave important pages out of search results. Also, double-check your robots.txt file to ensure you’re not accidentally blocking critical pages from being crawled.
4. Ignoring Site Speed and Mobile Optimization
Site performance is a ranking factor, especially on mobile. Many store owners overlook speed when switching platforms, assuming WordPress will automatically be faster. However, it takes careful optimization of images, themes, and plugins to match or improve the speed you had on Shopify. Use tools like Google PageSpeed Insights to monitor improvements.
5. Overlooking SEO Metadata and Structured Content
When rebuilding your site, it’s easy to forget meta titles, descriptions, and schema markup. These small elements play a big role in how search engines and users understand your content. Ensure all metadata is transferred accurately and optimized for your target keywords.
6. Failing to Monitor Performance Post-Migration
Once your new WordPress site is live, the work isn't over. You must track performance using Google Analytics and Search Console. Look for changes in traffic, bounce rates, and conversion paths. If you spot sudden drops, investigate immediately.
For a detailed guide on how to retain your SEO rankings and performance during a Shopify to WordPress migration, check out this in-depth article. It walks you through every crucial step—from pre-migration audits to post-launch monitoring.
By steering clear of these common mistakes, your website can not only survive the migration but come out stronger on the other side.
#ecommerce#landing pages#landingpage#website maintenance company#website optimization#shopify migration#wordpress
0 notes
Text
Promo Request Guidelines and Interest Check Information
[apparently I never posted this as a blog post? well better nate than lever!]
Promo Request information We post promos for blogs that are:
help / info blogs
source call blogs for alterhumans or systems
multi purpose blogs
Additional reblogs of previously reblogged promos!
Interest checks! [See below]
Invite requests via ask messages to open kin / system servers
We don’t promo blogs that:
offer pendulum readings [explanation here]
Permit IRL / DA interaction
use uncredited fanart or uncredited images.
Personal blogs
Anonymous messages with only random discord server invites. This is because I don’t want to direct people into servers that might be full of gore or shock images.
Prohibit any kind of Systems from interacting [eg endogenic, traumagenic, “no fictives / introjects / alters / etc allowed in server or to interact” etc]
Interest Checks What’s an interest check? It’s where you check if anyone is interested in a discord server, usually for a specific source. Interest checks can also be for other things like call blogs or kin related blogs. Please do not send on in if you have no intention of making one. How do I send one in? Send an ask message [anonymous or not] mentioning an ‘interest check’ and for what source or community you are hoping to make a server for. You can keep it brief and say ‘interest check for splatoon kin?’ Or, you can go into detail and say ‘interest check for splatoon kin and systems, double friendly, 18+ only, we’ll have movie nights and splat games, au and oc friendly’, Both are welcome! How do I respond to one? Please like, reblog with a positive comment, or reply to the post! Please don’t send in ask responses so we don’t miss anyone looking to join the server! I made a server for an interest check. Now what? Let us know! Please make a post on your personal blog or a side blog @/mentioning this blog! Or send us an ask message with a blog url and / or link to the post! Please keep in mind if you’re using a brand new side blog, tumblr will automatically mute you for anti spam bot purposes. You won’t appear in the search index, or to any other blog, for a little while. If we don’t reblog from your new side blog, it’s because of that. Please send an ask message or DM if this happens! Also, please check to make sure it’s not breaking any of the promo guidelines!
Rewritten 2024
3 notes
·
View notes