#AzureWebSites
Explore tagged Tumblr posts
Visit Tumblr Blog
Explore Tumblr blogs with no restrictions, modern design and the best experience.
Last Seen Tumblr Blogs


Fun Fact
25% of US internet users with an annual income of $80-100K use Tumblr.
Video
youtube
build website with custom script
#youtube#AzureVM CustomScriptExtension AzureWebsites AzureWebApps WebHosting ServerManagement Deployment BeginnersGuide StepByStep
0 notes
Note
To the anon who asked for audio of AH asking JD to cuddle her.
Full audio in the court site link, remove the brackets in the link.
https(://)ffxtrail(.)azurewebsites(.)net/
Click on plaintiff John C Depp and then 4-20-2022 and it's the second MP4A file.
(Insta link)
https(://)www(.)instagram(.)com/reel/CdgPZ6Egx8s/?igshid=YmMyMTA2M2Y=
Thank you ♡
14 notes
·
View notes
Photo

[rollercuck.png]
1 note
·
View note
Link
0 notes
Link
Lunch and Tea Lotto Results. APK https://apktie.com/apps/lunch-and-tea-lotto-results-net-azurewebsites-bongani-uklunchandtearesults/?feed_id=72250
0 notes
Text
Original Post from Rapid7 Author: Lonnie Best
In this blog post, Rapid7’s Managed Detection and Response (MDR) services team outlines a unique phishing campaign that utilizes a novel method of scraping organizations’ branded Microsoft 365 tenant login pages to produce highly convincing credential harvesting pages. This blog post was co-authored by Lonnie Best and Andrew Christian.
In mid-July 2019, Rapid7’s MDR service responded to a phishing attack against several users in a customer environment. The phishing emails that led to the initial investigation appeared as follows:
Upon investigation into what looked to be a rather normal phishing attempt, the attack quickly appeared to be very targeted. Typical phishing attacks attempting to gather credentials from Microsoft Office 365 users utilize fake “login” pages bearing prototypical Office 365 images and logos (often pulled directly from Microsoft hosting). However, the login page in this instance, while being hosted on legitimate Microsoft infrastructure (using the blob.core.windows[.]net and azurewebsites[.]net domains, which is not uncommon in phishing campaigns as of late), bore a background image and banner logo matching those of the target organization’s Office 365 tenant login page (not displayed here due to confidentiality concerns).
Rapid7 MDR analysts identified calls to the domain xeroxprofessionalsbusiness[.]vip during the phishing routine, which appeared to run a check of the targeted user against a predetermined list, leading to further examination of the attacker’s infrastructure. There, we identified a listing of PHP files and corresponding text files in corresponding and ascending order appended with digits 1 through 10 (e.g., chekeml#.php and valid#.txt, where # is a number between 1 and 10). On July 17, 2019, the number of chekeml#.php and valid#.txt file pairs increased from 10 to 20.
The PHP files involved revealed no useful information other than the naming convention, which seems to indicate that they are used to run a check of an email address. However, each text file contains lists of thousands of validated email addresses, of which the email addresses of the phished users discovered by MDR were included.
Further examination of the domains included in the validated email addresses points to a phishing campaign at least initially targeting a spectrum of industry verticals, including financial, insurance, medical, telecom, and energy. This put a dent in the initial speculation that the phishing emails were highly targeted, but led analysts to discover a seemingly new tactic in use by the attackers.
When logging into Office 365 from a primary 365 login address (i.e., login.microsoftonline.com), upon submitting a valid email address for which a branded tenant page is available, the user’s login is redirected to the corresponding tenant login page for the organization.
When configuring Office 365, an organization has the option to set a background logo and background image for the specific tenant’s login page. Whenever a user is successfully redirected to a tenant login page, calls for the background and banner logo are performed via specific HTTP GET requests, and can be downloaded or scraped by anyone who provides a valid email address and is redirected to the tenant page. (Links to these image files are also hard-coded into the HTML source code for the tenant login page.) When configuring such options as the banner logo, a unique link is generated that appears similar to the following: https://secure.aadcdn.microsoftonline-p.com/dbd5a2dd-2xsidmx46vvcjb212xsf5mvmhdtasdfudy9rin2big/logintenantbranding/0/bannerlogo?ts=63685345634565969162
In the case of the particular phishing campaign, the images appear to be dynamically inserted into the phishing landing page via the following mechanism: https://xeroxprofessionalsbusiness%5B.%5Dvip/api/[email protected]
Here, the user is first validated via what would appear to be the valid#.txt files, and then a link containing the company’s logo image is generated and inserted into the phishing page via the following: {“Bnr”:https://secure.aadcdn.microsoftonline-p.com//logintenantbranding/0/bannerlogo?ts=}
In a similar fashion, the background image is generated by running the phished user account against /api/back.php. This combines to create a semi-targeted and rather convincing credential harvesting page tailored to the user’s organization. In the case that a validated organization does not have a custom branded tenant page, the phishing kit is designed to utilize the default Office 365 background image:
Our MDR services team was able to correlate this default mechanism through a review of open-source information, in which organizations described being presented with a “classic” fake Office 365 landing page. It appears that most email subject lines are formatted with some variant of (You) have 7 new emails, and have been observed being sent from the IP address 64[.]8[.]71[.]22 and the domains synacor[.]com or wolffbros[.]com.
The base URL for the attacker infrastructure, https://xeroxprofessionalsbusiness%5B.%5Dvip, presents with a default WordPress site with the page title Aflam zaman أفلام زمان (an Arabic phrase literally translating to “Movies from Old” or roughly “Old-time Movies”), with a blog title of “Give Helping Hand to those who need it” (part of the default packaging of the “NGOworx” WordPress theme produced by a company called Themeworx)—the combination of which is either the typically random text so often observed in such attacker infrastructure, or perhaps could be viewed as a tongue-in-cheek reference to the attacker sitting back and watching as victims hand over their credentials.
Virtually all links in the source code of the WordPress page point to the domain aflamzman[.]ml, registered in the United States by Freedom Registry, Inc. According to WhoIs information, the primary domain, xeroxprofessionalsbusiness[.]vip, is registered via NameCheap, Inc., initially registered in November 2018, but updated as recently as July 24, 2019. At the time of analysis, the domain resolved to 212[.]24[.]103[.]108, belonging to a Lithuanian organization, UAB “Interneto vizija”. This is notable, as Rapid7 MDR has observed an increase in abuse of Lithuanian infrastructure by attackers in recent weeks.
So far, this phishing campaign appears to be targeting specifically users of Microsoft Office 365, so organizations utilizing this service should be diligent in implementing multi-factor authentication (either through Office 365 directly or via a third-party solution) and implementing structured user phishing awareness training programs in order to equip users to spot and report phishing attempts.
Looking for 24/7/365 security monitoring? Learn more about our Managed Detection and Response (MDR) services.
Learn More
Go to Source Author: Lonnie Best How Attackers Can Harvest Users’ Microsoft 365 Credentials with New Phishing Campaign Original Post from Rapid7 Author: Lonnie Best In this blog post, Rapid7’s Managed Detection and Response (MDR) services…
0 notes
Text
Simple terminal for your Azure Website
This guide will help you run server-side commands on your Azure Website hosting environment, it is very simple and useful and since it's implemented in node.js, it'll work on any (node) supporting OS (Windows / MAC / Linux).
First, you should install node.js if you don't already have it (#whynot?).
Install KuduExec:
npm install kuduexec -g
Note: There's also a .NET version of kuduexec called KuduExec.NET
Find your "kuduexec" Azure Website endpoint:
Add "scm" after your site's name (if you have a custom domain you still need to add this to the original URL you received from Azure), for example:
http://somesitename.azurewebsites.net/ --> http://somesitename.scm.azurewebsites.net/
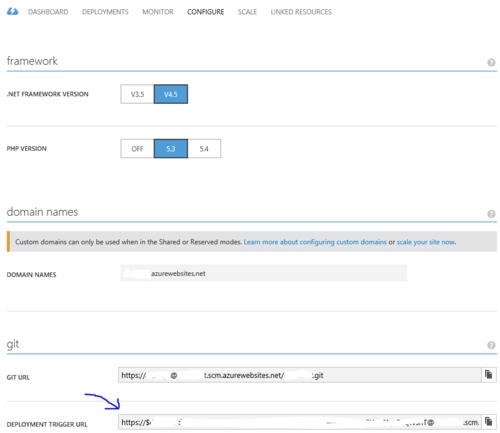
If you have "git deployment" enabled on your site you can get the endpoint (including user name and password) from the Azure portal go to you site, under the CONFIGURE tab, on the git section in the DEPLOYMENT TRIGGER URL:
Now that you have your endpoint, open a shell window and run the command:
kuduexec <Your endpoint URL / git deployment url>
For example:
kuduexec http://somesitename.scm.azurewebsites.net/
Note: You can also add your user name and password to the url (otherwise it simply asks you for them):
kuduexec http://[email protected]/
At this point you'll see a command prompt with the root directory of your site (not "wwwroot"), some info on the directory structure.
Now you can run your commands, including shell commands such as "cd", "dir" and "copy", you'll also be able to run executables such as "git" and "npm".

To quit simply type exit
Usage Examples
One useful scenario this can help you with is when you want to run a garbage collection on your git repository, which can reduce your storage usage:
Simply go to the repository directory: cd site\repository
And run: git gc
Another will be to check if you some lingering processes using: ps -W
Here I have a lingering node.exe process and I kill it using: kill
C:\DWASFiles\Sites\somesitename\VirtualDirectory0> ps -W PID PPID PGID WINPID TTY UID STIME COMMAND 14620 0 0 14620 ? 0 08:26:30 D:\Windows\SysWOW64\inetsrv\w3wp.exe 824 0 0 824 ? 0 08:40:04 D:\Windows\SysWOW64\cmd.exe 28484 0 0 28484 ? 0 08:40:04 D:\Program Files (x86)\nodejs\node.exe 11584 1 11584 11584 ? 500 08:40:48 /bin/ps C:\DWASFiles\Sites\somesitename\VirtualDirectory0> kill -f 28484 C:\DWASFiles\Sites\somesitename\VirtualDirectory0> ps -W PID PPID PGID WINPID TTY UID STIME COMMAND 14620 0 0 14620 ? 0 08:26:30 D:\Windows\SysWOW64\inetsrv\w3wp.exe 29008 0 0 29008 ? 0 08:41:08 D:\Windows\SysWOW64\cmd.exe 19756 1 19756 19756 ? 500 08:41:08 /bin/ps C:\DWASFiles\Sites\somesitename\VirtualDirectory0>
Important notes
This simple terminal is not for running interactive commands, running a command that requires user input will hang (for 3 minutes until recognized as hanging process and then it will be aborted) since there is no way, currently, to provide input for the running command.
The output for a single command will arrive only after the command finish running, so if you run a long running command it'll take time for the output to show (other than piping: requireInput.exe < input.txt).
2 notes
·
View notes
Text
Deploy to multiple Azure Websites with Visual Studio Online and Continuous Integration
Recently I had a VS solution containing two Asp.Net web projects that I wanted to be automatically deployed to Azure Websites as part of the builds in Visual Studio Online. I couldn’t find any place to actually specify which of the projects that should be deployed where, so I googled and found this answer in the Azure forum:
Currently build definitions which do a CI from VSO to Azure will deploy the first web application alphabetically in that solution. If you have a specific web application you want to deploy you will need to create a solution with only that web application in it.
When I was about to give up, an idea came to my mind that you could do a workaround using the configuration manager. I simply created two different release configurations at the solution level that defines which of the websites that should be built and therefore published.
Given this solution structure:

Open the Configuration Manager.

Add a new solution configuration.

Name it something that indicates what project you are targeting, copy the settings from the Release config and don’t create new project configurations.

Uncheck the build checkbox for all other web projects.

Repeat step 4 and five for each web project in the solution.

Edit the build definition for the project and make sure it’s using the related solution config you created. In case you don’t see the Build defenitions, make sure you are set as Build Administrator in the Visual Studio Online project.

Voila! Visual Studio Online should now deploy each project to its own Azure Website.
TD;DR: Create multiple solution configurations and only build the project you want to deploy. Then associate the build with the correct build config.
1 note
·
View note
Text
5 Steps and under 30 minutes to deploy ARM Templates via Octopus Deploy
5 Steps and under 30 minutes to deploy ARM Templates via Octopus Deploy
Octopus Deploy have been really up in the game of constantly adopting to the cloud Platform. Here is one of the example of deploy azure resource manager templates via octopus deploy. Authoring a resource manager template in visual studio, source control in Git based visual studio team services , build using the VSTS build system with the hosted agent and deploy the infrastructure via octopus…
View On WordPress
0 notes
Text
簡単!Azure Websitesにconcrete5をインストールする
Azure Websitesはいわゆるホスティングサービスのように、PHP、rubyなどの動作環境が始めから用意されています。なれてしまえば、意外に簡単でした! Azure Websitesにconcrete5をインストールしてみたのでその備忘録です。
Microsoft Azureの管理ポータルへログインし、まずはWebsitesの作成を行います。 https://manage.windowsazure.com/
サイドメニューから「WEBSITES」−「WEBサイトの作成」を選択

表示されたメニューから「カスタム作成」を選択

「Webサイトの作成」画面が表示されるので、「URL」は任意の文字を、「地域」は日本(東) or 日本(西)を選択、「データベース」は「新しいMySQLデータベースを作成します」を選択、「DB接続文字列名」は任意の文字を入力、「ソース管理から発行」にチェックして次へ ※ 今回はソース管理(Bitbucket)に登録しているconcrete5のソースをAzure Websitesに配置するので「ソース管理から発行」にチェックしています。 ※ FTPでファイルをアップロードする際は、「ソース管理から発行」のチェックは不要です。

「新しいMySQLデータベース」画面が表示されるので「名前」に任意の文字を、「地域」は日本(東) or 日本(西)を選択し、次へ

「ソースコードの位置」画面が表示されるので、任意のサービスを選択し、次へ ※ 今回はBitbucketにconcrete5のソースを登録している前提で。


以上で設定は終わりです!
画面は管理ポータルに戻り、「websites」一覧に「作成中」と表示されています。 しばらくすると「作成中」から「実行中」に変わります。 「実行中」となると、Websitesが利用可能になります。

「websites」一覧の「名前」を選択すると、選択したWebsitesのダッシュボード画面へ遷移します。 画面右サイドバーに「接続文字列の表示」リンクがあるので選択

データベースの接続情報を確認する事ができます。 この情報をconcrete5インストール時に必要になるので、控えておきます。

Websitesのダッシュボード画面右サイドバーに「サイトのURL」があるので、そのURLをブラウザで開きます。

ここからは通常のconcrete5のインストールと同様です。


インストール完了!

仮に途中で手順を失敗しても、Websitesを削除し、また作成しなおせば良いだけなので、Azure Websitesを利用すると、とても気軽にクラウド環境を利用する事が可能になります。
2015/3/10 - 2015/4/30 の期間で「Microsoft Azure トレーニング コンテンツ 評価モニター」を募集しているようです。 https://msdn.microsoft.com/ja-jp/dn912650.aspx
モニターになると特典もつくようなので、Azureに興味がある方はこの機会にでも!
0 notes
Text
Azure Websites Staging Slots and Search Engine Bots
Setting up CI to Azure Websites is extremely easy and convenient. Whether you choose to do it from Git or Visual Studio Online, having a staging deployment slot makes this absolutely dead simple to ensure that you're putting high quality code into production so that a bad check in doesn't affect live users. The problem is that search engine bots are super greedy and manage to start crawling your staging site, which you definitely don't want - then real users may end up there. There are a few easy options you have to address this, and they aren't very well documented at the moment.
The first trick is getting the name of the site you're on, which you can do with the following:
Environment.GetEnvironmentVariable("WEBSITE_HOSTNAME");
If you're on the staging site, this will return a value ending in -staging.azurewebsites.net. So now you need a place to check for this.
I chose to do this with an HTTP Module, partly because I'm old school and partly because I want this check to happen before it gets into any ASP.Net work that ultimately won't be necessary. The key bits are this:
string CurrentEnv = Environment.GetEnvironmentVariable("WEBSITE_HOSTNAME"); if (!string.IsNullOrEmpty(CurrentEnv) && CurrentEnv.ToLower().EndsWith("-staging.azurewebsites.net") && IsBot()) // Redirect to main site
There's a second trick to get this working - it will stick if you release this and swap slots at this point. Go into the latest Azure portal (portal.azure.com at the time of writing) and add an app setting to both the production and staging slots, making sure you check the Slot Setting box. This forces the site to restart before it swaps to production. When you don't have the sticky slot setting, the site doesn't restart, and continues to get the staging value back from WEBSITE_HOSTNAME while in production. Name your sticky app setting whatever you like, it only matters that it is there. You can also set it via Powershell, if that's more your speed.
To see this in action, use something that allows you to change your user agent to Googlebot and visit: http://stagingbotredirector-staging.azurewebsites.net/
For full code, visit the Github repo for the site above. And if you do use the HTTP module method, be sure to register the module in the web.config in the system.webServer modules section.
Sources:
1. See the Deployment Slot App Settings/... section
2. Detecting Honest Web Crawlers
0 notes
Text
Continuous Delivery - ASP.Net Core web applications using Visual Studio Team Services and Octopus Deploy Hosted in Azure
Continuous Delivery – ASP.Net Core web applications using Visual Studio Team Services and Octopus Deploy Hosted in Azure
This article should help you get started with Continuous delivery pipeline using Visual Studio Team Services and Octopus Deploy. This blog post came out after playing with ASP.Net Core applications. To get it working it was bit fiddly but towards the end I got it working. Building applications and Deploying application in azure is getting easier and smooth every day by day. Below Steps should not…
View On WordPress
#Azurewebsites#Continuous Delivery#Continuous Deployment#Continuous Integration#Microsoft Azure#Octopus Deploy#VisualStudioOnline
0 notes
Text
Part 4: Continuous Delivery of Azure websites using OctopusDeploy and Teamcity
Part 4: Continuous Delivery of Azure websites using OctopusDeploy and Teamcity
In the Last Post we have seen how to use the Octopus for windows Service deployments and you might have noticed how easy it was,
Tools/resources required:
Visual Studio 2013
Azure web application (created and available)
Source code repository (In this case, we have our sample solution in the github)
If you are reading this post, then you must be already having the above tools handy. In addition…
View On WordPress
0 notes
Text
How to Secure Azure hosted websites and Disallow/redirect traffic on *.azurewebsites.net by configuring custom domain.
How to Secure Azure hosted websites and Disallow/redirect traffic on *.azurewebsites.net by configuring custom domain.
Always we talk about code fast , ship fast and continuous delivery/continuous integration. At the same time we need to have attention around security to certain level. Hence this post. There are lot of ways and many blog posts exists to explain the scenario of how to implement. But this is how I have implemented and seems to be working. If anyone reading this post have any suggestion or idea I’m…
View On WordPress
0 notes
Text
Microsoft Azure WebsitesにFTP接続できなかった場合の対処法
Azure WebSiteを作成し、FTP接続しようとした際、「Server response: '530 User cannot log in.」のエラーが出たのでその際に行った事を備忘録的に残しておきます。
Azure WebSiteのダッシュボードに「概要」「デプロイ資格情報のリセット」があります。

これを利用し、FTPアカウント、パスワードを設定できるようです。

同じく「概要」下部に「FTPホスト名」があるので、先ほど設定した「ユーザ名」「パスワード」を利用し接続します。


すると「Server response: '530 User cannot log in.'」のエラーが表示されてしまいます。

ユーザ名、パスワードの入力間違いはない。何度も入力しなおしたので。 なぜ(?_?)
で、いろいろ調べた結果、以下を行う事でFTP接続できました!
「概要」「発行プロファイルのダウンロード」をクリックします。

��ウンロードしたファイルをテキストエディタで開きます。 中身はXML形式のデータとなっています。
<publishProfile>タグのpublishMethod属性の値が"FTP"の情報を探します。 このタグ内のuserName属性の値、userPWD属性の値がFTP接続のユーザ名、パスワードになります。

これらの値を利用しFTP接続すると問題なくAzure WebSiteの環境に接続できました!

「デプロイ資格情報のリセット」で設定した「ユーザ名」「パスワード」は???
なのですが、一先ず接続できたので今回はこれで良しという事で...
0 notes
Text
How to deploy Windows Azure WebJobs
Windows Azure WebJobs is a new feature coming from Windows Azure Websites, you can read all about it here.
While you can easily add a new WebJob using the Windows Azure portal, you may want to deploy your WebJob in other ways (ftp / web deploy / git), In this post I'll explain how these WebJobs are stored on your Azure Website and how you can deploy a new WebJob.
Where is your WebJobs stored?
A WebJob is stored under the following directory in your site:
site\wwwroot\App_Data\jobs\{job type}\{job name}
Where {job type} can be either continuous for a job that is always running or triggered for a job that starts from an external trigger (on demand / scheduler).
And {job name} is your WebJob's name.
So a continuous WebJob called myjob will be located at:
site\wwwroot\App_Data\jobs\continuous\myjob
What should be inside a WebJob directory?
The WebJob directory can contain 1 to as much as you'd like files but at the least it should contain the script that starts the WebJob's process, this script can currently be: batch (.exe/.cmd/.bat), bash (.sh), javascript (.js as node.js), php (.php) or python (.py).
The script to be run is automatically detected using the following logic:
First look for a file called run.{supported extension} (first one found wins).
If not found look for any file with a supported extension.
If not found, this is not a runnable WebJob
NOTE: If you have some other type of execution engine you wish to use and is currently not supported, you can always create a run.cmd file and create your executor command there (powershell -Command run.ps).
Deploy my WebJob
So with this information we know that in order to create a new continuous job called myjob all you have to do is get your job's binaries to that folder.
One way to do this is to connect to your site via ftp, create the right directory and copy the binaries there (should include at least one supported script file).
That's it, the WebJob will be auto-detected and immediately start running.
Deploy Website + WebJobs
To deploy a website with WebJobs, all you'll need to do is to make sure you deploy your WebJobs are in the right place, take a look at the following structure as an example for a node.js site with a web job:
./server.js ./App_Data/jobs/continuous/myjob/run.cmd
While this project contains only 2 files, it actually is a website with a continuous WebJob, and you can use whatever deployment preference you have to deploy this (ftp / web deploy / git / ...).
Re-deployment
Continuous - After you redeploy a WebJob, the currently running process will abort and restart with the new binaries.
Triggered - Redeployment will not affect a currently running WebJob but the next run will be using the new WebJob's binaries.
NOTE: Before a WebJob starts to run, the binaries for it are copied to a temporary directory, this way you can always re-deploy a WebJob safely without worrying that the files are locked.
Triggered WebJob caveat
One issue we encounter with this method is that when you deploy a triggered WebJob, the result is a WebJob that is only on demand meaning you need to press the RUN ONCE button in the portal in order to initiate it and (for now) there is no way to easily add a schedule to it.
A workaround would be to create a dummy schedule WebJob with the name you are about to deploy and the deployment will just replace the binaries but keep current schedule.
0 notes