#Beginnerphotography
Explore tagged Tumblr posts
Visit Tumblr Blog
Explore Tumblr blogs with no restrictions, modern design and the best experience.
Last Seen Tumblr Blogs


Fun Fact
In 2020, 27% of US Tumblr users had an annual household income of over $100,000.
Text

Photo of Cathedral - Bendigo, Australia
#photography#photo#photograph#beginner#beginnerphotographer#ditigalcamera#photooftheday#photographyaddict#photographylove#beginnerphotography#photographylovers#photographers#photographer#earthshots#nature#naturephotography#outdoortones#wonderfulworld#natureseekers#wonderworld#landscapephoto#landscapephotographer#landscapephotography#sky#skylover#skyphoto#skyphotography#skyphotograph#clouds#cloudlover
4 notes
·
View notes
Text


Daybreak Fire Blooms 🎆
by calmin.gram
#TwilightSky#EarlyEvening#FireworkMagic#DreamyHues#SkyCanvas#BeginnerPhotography#AbstractArt#SummerFestival#FleetingMoments
1 note
·
View note
Text
Beginner’s Guide to Wildlife Photography – Tips & Tricks

Start your wildlife photography journey with confidence. This comprehensive beginner’s guide by Wildlife Luxuries covers camera settings, field tips, composition techniques, and ethical considerations to capture stunning wildlife moments during your next safari or nature trip. Visit: https://www.wildlifeluxuries.com/beginners-guide-to-wildlife-photography/
wildlife photography guide, beginners photography, wildlife photography tips, Wildlife Luxuries, photography tricks, camera settings wildlife, nature photography, safari photography tips, photography ethics, photography composition
#WildlifePhotography#PhotographyTips#WildlifeLuxuries#BeginnerPhotography#NaturePhotography#SafariPhotography#CameraTips#PhotographyGuide#PhotographySkills#CaptureWildlife
0 notes
Text
Essential 7 Tips for Taking Professional Portraits: A Beginner’s Guide

Essential 7 Tips for Taking Professional Portraits: A Beginner’s Guide
Essential 7 Tips for Taking Professional Portraits: A Beginner’s Guide
Taking professional portraits is an art form that involves more than just pressing a camera button. Whether you are an aspiring photographer or simply looking to improve your skills, understanding how to shoot professional portraits will allow you to capture stunning images that stand out. This beginner’s guide will walk you through the essential tips for perfecting your portrait photography.
1. Master the Art of Lighting in Professional Portrait Photography
Lighting is one of the most crucial elements when learning how to shoot professional portraits. Without proper lighting, your images may fall flat, regardless of the quality of your camera or lens.
Natural Light
For beginners, natural light is often the easiest and most cost-effective lighting option. The golden hour, which occurs just after sunrise or before sunset, provides soft, warm light that’s perfect for portraits. Position your subject near a window to make the most of available daylight.
Artificial Lighting
If you want more control over your lighting, artificial light sources such as softboxes or ring lights are invaluable. These tools create soft, flattering light, which is ideal for creating professional-level portraits.
When learning how to shoot professional portraits, it’s essential to experiment with different light sources to see how they affect your images. The key is to avoid harsh shadows and ensure your subject’s face is evenly lit.
2. Camera Settings: Understanding the Fundamentals
The next step in learning how to shoot professional portraits is mastering your camera settings. Understanding your settings will help you create high-quality portraits every time.
Aperture
A wide aperture (low f-number, such as f/2.8 or f/4) is key to creating beautiful, blurred backgrounds (also known as bokeh) and ensuring that your subject is sharp while
the background remains out of focus. This technique is commonly used in professional portrait photography to make the subject stand out.
Shutter Speed
To avoid motion blur, set your shutter speed to 1/125 or faster. For portraits, a faster shutter speed ensures that your image is sharp and your subject is in perfect focus.
ISO
Always keep your ISO as low as possible to avoid grain in your portraits. A range of 100-400 works best in most situations. If you’re shooting in lower light, you can increase the ISO, but be cautious of introducing noise into your images.
3. Composition: Framing Your Subject for a Professional Look
Composition plays a major role in how to shoot professional portraits. The way you frame your subject can transform an ordinary shot into an extraordinary one.
The Rule of Thirds
One of the most important composition techniques is the rule of thirds. Imagine a grid of two horizontal and two vertical lines dividing the image into nine equal sections. Place your subject along these lines, particularly the eyes, which should fall along the top horizontal line.
Background Matters
When learning how to shoot professional portraits, never underestimate the power of a clean background. A busy, cluttered background can distract from your subject. Choose a background that is simple and complements your subject, whether it’s a nature backdrop or a clean studio backdrop.
4. Connect with Your Subject for a Genuine Portrait
Great portraits go beyond the technical aspects of photography. A great portrait captures the personality and emotion of the subject. Knowing how to shoot professional portraits requires a deep connection with your subject to create authentic images.
Build Rapport
Before you start shooting, engage with your subject. A little small talk can go a long way in helping them feel comfortable in front of the camera. A relaxed subject will result in more natural expressions.
Encourage Natural Poses
While posing can be useful, it’s important to let your subject move naturally. Ask them to adjust their posture or shift their weight slightly to avoid stiff poses. Small changes like tilting the head can add grace and sophistication to the portrait.
Capture Emotions
A big part of how to shoot professional portraits is capturing real, genuine emotions. Whether it’s a smile, a look of contemplation, or a burst of laughter, aim to freeze real moments that reflect your subject’s personality.
5. Details Matter: Focusing on the Small Things
When learning how to shoot professional portraits, attention to detail can elevate your images. Small adjustments in hair, clothing, and posture can make a huge difference in the final result.
Clothing Choices
The clothing your subject wears should not distract from their face. Solid colors work best, while busy patterns can pull attention away from the subject. Encourage your subject to wear clothes that complement their skin tone and the background.
Hair and Makeup
Ensure that your subject’s hair is tidy, and their makeup (if applicable) is even. Small details like stray hairs or uneven makeup can distract from the focus of the portrait.
Eyes
The eyes are crucial in a portrait. Sharp, in-focus eyes convey a sense of connection and engagement with the viewer. Direct your subject to look into the lens or towards a point off-camera for a more candid and engaging look.
6. Choosing the Right Lens for Professional Portraits
Selecting the right lens is vital for how to shoot professional portraits. A 50mm or 85mm prime lens is ideal for portraiture because it provides a flattering perspective and produces beautiful bokeh. The wide aperture of these lenses creates a shallow depth of field, which helps isolate the subject from the background.
Why Prime Lenses?
Prime lenses are preferred for portraits because they offer excellent sharpness and clarity. Their wide apertures help in creating that smooth, blurred background that every professional portrait needs.
7. Post-Processing: Enhance Your Portraits
Post-processing is the final step in how to shoot professional portraits. After taking your photos, use photo-editing software like Adobe Lightroom or Photoshop to refine your images and bring them to life.
Adjust Exposure
Ensure that your exposure is balanced. If your images are underexposed or overexposed, correct the levels to bring back detail in shadows and highlights.
Retouching Skin
Subtle skin retouching can enhance the quality of your portrait, but be sure not to overdo it. A light touch is necessary to keep the image looking natural while reducing blemishes or skin imperfections.
Enhance the Colors
Increase the vibrancy and saturation slightly to make your portrait pop, but keep it natural. You want to enhance the image, not make it look overly processed.
8. Conclusion: Trust The Lens India for Professional Portrait Photography
Now that you know the essentials of how to shoot professional portraits, it’s time to practice! However, if you’re looking to have professional-quality portraits taken, The Lens India is here to help. We specialize in offering high-quality photography services, ensuring that every portrait captures the true essence of our clients.
Whether you need family portraits, corporate headshots, or personal artistic portraits, our team at The Lens India will provide you with top-notch results. Let us help you create timeless memories with our professional photography services!
FAQ: How to Shoot Professional Portraits
1.What are the best lighting techniques for shooting professional portraits?
Use natural light during the golden hour or artificial light like softboxes for more control. Ensure even lighting and avoid harsh shadows.
2.What camera settings should I use when learning how to shoot professional portraits?
Use a wide aperture (f/2.8 or f/4), fast shutter speed (1/125+), and low ISO (100-400) for clear, sharp portraits.
3.How can I compose my shots for professional portraits?
Use the rule of thirds and position the subject’s eyes along the top horizontal line. Keep the background simple and uncluttered.
4. How do I make my subject feel comfortable for a genuine portrait?
Engage with your subject, encourage natural poses, and create a relaxed environment to capture authentic emotions.
5.What details should I pay attention to for a professional-looking portrait?
A 50mm or 85mm prime lens is ideal for sharpness, flattering perspective, and beautiful background blur.
6. What lens is best for shooting professional portraits?
Focus on lighting, camera settings, composition, connecting with your subject, and post-processing.
7. How should I edit my portraits to make them look professional?
Adjust exposure, subtly retouch skin, and enhance colors without over-processing for a polished look.
8. Can I hire a professional photographer for portraits?
Yes, The Lens India offers expert portrait photography services for high-quality results.
Stay Inspired and Informed!
Follow The Lens India on social media for more captivating content, photography insights, and the latest updates:
Instagram: @thelensindia – Explore stunning visuals and behind-the-scenes stories!
Facebook: The Lens India – Join the conversation and never miss a post!
Let’s build a community of creators and storytellers together!
The Lens India
Tirupati Co-op Housing Society, Tirupati Campus, Phase – 2, Bldg – B8, F.no 402, Adarsh Colony Rd no -2,Tingre nagar,
Vishrantwadi Pune, Maharashtra 411015
Visit Us : https://thelensindia.com
Email Us : [email protected]
Our Social Presence :
Facebook — https://www.facebook.com/thelensindiaphotography/
Instagram — https://www.instagram.com/thelensindia
#PortraitPhotography#PhotographyTips#BeginnerPhotography#PhotographyGuide#PhotographyBasics#PhotographySkills#ProPhotographyTips#PhotographyInspiration#PhotographyForBeginners#TheLensIndia#PortraitLightingTips#CameraSettingsForPortraits#ProfessionalPortraits#HowToShootPortraits#PortraitComposition#PhotographyLighting#LensForPortraits#PhotographyPostProcessing#NaturalLightPortraits#GoldenHourPhotography
0 notes
Text
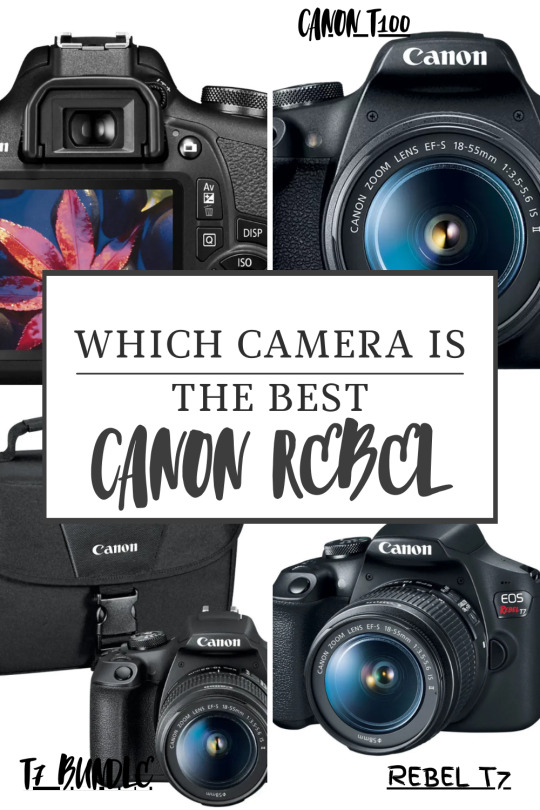
Canon T7 vs Canon T100: Which Budget DSLR Should You
Actually Buy? Spoiler alert: If you’re reading this because you’re overwhelmed, broke-ish, and low-key scared of buying the wrong camera—you’re in the right place. If you are like me, you research everything you buy, but if its a “bigger” purchase, You don’t want to regret it, or have mom guilt. Let’s talk Canon T7 vs Canon T100. These two are like siblings in a rom-com. They look alike, and…
View On WordPress
#Budget#affiliate#affiliatemarketing#affiliatemarketingtools#beginner DSLR#Beginnerphotography#Best Budget DSLR 2025#blog#BudgetDSLR#Camera#cameracomparison#Canon T100#Canon T7 Review#Canonreview#Comparison#Content Creator#Creator#dailyprompt#Investment#marketing#mom#Momlife#new creator#Photography#Rebel#WifiCamera
0 notes
Text
Product Photography Explained: Essential Information to Help You Get Started
Product photography is essential for any retail or eCommerce business, serving as a key factor in converting visitors into customers. High-quality visuals, paired with effective image editing, can strongly influence a customer's decision to make a purchase. As such, mastering product photography is crucial not only for photographers but also for e-commerce owners and retailers.
In this blog, we offer a comprehensive guide to product photography, covering everything from basic techniques to advanced image editing. By following these tips, you can create captivating images that attract attention and drive sales.
1. Introduction to Product Photography

Jizan Reed is photography used in product marketing In which you can click the pics of products for that purpose. Try to place the product in a way that it was taken from its best side, no matter what. Same goes for clothes, technology and make-up! Product Photography can be a Goldmine for Photographers Great photography can improve conversion rates for retailers and ecommerce.
What is product photography and why should you care
At its core product photography is the art of presenting products. It must emphasise their characteristics and attractiveness. This can be clean and simple shots, or something more artistic with stylized photography that evoke an emotion. Product Photography counts a lot when it comes to visuals. And this is what sets the first impression of your product. Stuff-It allows listeners to imagine the product, leading them directly towards a sale.
The Importance of Quality Product Photography
Branding & Highest Resolution Images A little creative gangway to photographers. Improved product displays for retailers and e-commerce sites. Music And Movie Web-sites Need Superior Recommendations For New Users. Low-quality photography causes customers to trust less and therefore buy less.
2. The Role of Product Photography in Ecommerce and Retail
eCommerce and retail alike, product photography holds a key role wherever we see. Research has shown high-quality images can also transform consumer behaviour and make them more likely to buy, substantially increasing conversions.
How Visual Content Affects Consumer Decision-making
Sight is the primary sense consumers use when they purchase a product—especially while shopping online. We do not have shops whereby you can touch the sweater or feel how soft your muffins are. Essentially the way they judge quality is by using images. Good quality High resolution well lit images(making product visible to see texture, color and overall good Quality) This cuts down the risk and helps increase buyer's confidence.
The Impact of Product Photography on Online Sales
In a competitive space like eCommerce, product photography can be an impactful differentiator. Turns out professional photos get more online engagement. Organisations that use quality photo imagery experience more engagement on their site and social media. Visuals that pop tend to catch people's attention resulting in likes, shares and comments. Eye-catching photos also contribute to brand perception, making businesses look more polished and reliable. The effect of this on smart companies is well understood. Fashioning poignant visuals that leverage assets to drive virtual victories and beguile the audience's minds. Resulting in bigger sales Retailers are also key to the success of a business as they must display products in an "open, easy way." It enables them to differentiate themselves in saturated marketplaces such as Amazon or Etsy.
3. Essential Equipment for Product Photography
You cannot make professional product photographs without the right equipment, so this is where we start. A high-quality camera is very useful, it's not the only necessary piece of equipment.
Cameras: DSLR Vs Mirrorless Vs Smartphones
Nevertheless, the choice of camera type should depend on available funds and detail level. More image quality and flexibility by using DSLRs or mirrorless cameras. Both of them have the ability to switch lenses and go completely manual. Smartphones are now commonplace and are best suited to those embarking on their MACS journey or for the small business with a budget.
Colors: Neutral | Caliber: White | Black: SEEKO REAL 67mm UV Lens Cover (Ultra Violet Filter) | New Product Shot Lighting Advice
Lenses are essential for product photography. You would use a macro lens for details. And it is perfect for jewellery, or electronics. This is where fast prime lenses are awesome. That results in a shallower depth of field. This will identify the product from your background
Natural Light vs Studio Lights
Light: Lighting is THE MAIN ESSENTIAL of product photography. Natural light is another good option for newbies. It's soft and available. But it can be unpredictable. But, studio lighting gives you control and consistency. It allows photographers to highlight the features of products with precision.
4. Setting Up Your Product Photography Studio
Product photography and the environment don't necessitate a big investment. 6 Easy Tips for Product Photography to Enhance E-Commerce Sales With the Right Tools, and The Apothecary Box recipes. you will create magic in your world.
The first thing that you need to consider the space factor : Studio or No Studio On-Location
Different products require different approaches to achieve results, depending on the kind of shoot you would like done either in a studio or location-based. A studio provides control of lighting and the background. It is a step that is important in achieving consistent, high quality images. This style can make the shoot feel more real. This is well and good for product photography in the sense of lifestyle.
Product Photography Background Sets
Backdrops are very important for creating the stage of your product. Basic white or neutral backdrops allow the product to do all of the talking. However, textured or coloured backdrops can provide context and a further dimension to the composition.
How? Let me show you how Audio is one of those hobbies / obsessions
It is likely that those who are just starting can afford to set up a professional input. Image by kevinatingIf you want to improve upon that, using a DIY lightbox or cheap tripod can really help. They won't break the bank.
5. Lighting Techniques for Product Photography
Without a doubt, mastering lighting is essential for capturing real beauty in your photos.
Lighting Essentials : Key Light, Fill Light, Backlight
The above three elements are the base of any lighting setups for product photography. From the core, you get the key light which is the life of a lighting. The function of the fill light is to smooth out shadows cast by key light. The back light gives depth and a nice separation of the product from their background.
When to Use Hard Light vs. Soft Light
Hard light creates strong, clean shadows. It is ideal for textures or to add some drama. Soft Light -It provides a smooth, gentle type of light which is diffused. This color is most likely desired for a “natural” look.
Avoiding shadows and glare
The shadows and glare seem to cover up the features of a product. Diffusers can make the light more even and mirror its surface like a reflector to focus on it. Light placement is a little trickier but putting lights from different angles can help cut down on unwanted shadows.
6. Composing the Perfect Product Shot
This is what they teach you about composition — the art of organising elements in frame. That creates an appealing visual that shares the necessary information.
Angles and Perspectives
A way the photographer captures a product will determine the consumer viewpoint on that part. Products can be made larger with a low-angle shot. The top-down view is ideal for flat-lay shots which are very common in the world of fashion and food photography.
Use Rule of Thirds and More Composition Tactics
The rule of thirds is a great composition method. It conceptually divides the frame into nine equal parts. When the products are inside or outside the compositional lines there is a balance and engagement. This formation is also pleasing to the eye. It dances from a form and function standpoint.
Style pointers: inheritance and contextual elements
You may have seen other tutorials that make use of props and context which can definitely spice things up a bit. They can depict product use or lifestyle appeal. Normally, entertainment is supposed to lead the show… but not at the cost of detracting from what you need people to see.
7. Capturing Product Photography for Different Platforms
Different platforms have different conditions of requirements for the bots. Working with them can help your images be optimised for the purpose being used.
Material requirements for E-commerce Websites, Social Media and Print your web domain.
Images should perform well on their own as a high resolution, clean background.Add to your eCommerce site There should be a focus on the product. Social Media (Instagram): more artistic, lifestyle IBOutlet image Images must be the highest resolution for large format clarity in print.
How to Resize and Optimize Images for all the Marketplaces Online
There are specific image guidelines on every online marketplace. A prime example: Amazon — a pure white background with the product covering at least 85% of the frame. But, you will need to meet these requirements. With zero image rejections and your listings will look professional.
8. Post-Processing and Image Editing
It is from here that all the magic takes place and it converts a good image into great.
Editing Software Overview: Adobe Photoshop, Lightroom & Other Tools
Post processing is done with Photoshop and Lightroom And there are plenty of ways to tweak exposure, color temperature and sharpness. There are also two powerful editing options available in Gimp and Canva for free users.
Take out the subject visually away from what we really want to work on.
Image source: unsplashBackground removal is the most common post-processing task in product photography, especially for eCommerce. Features such as Magic Wand & Pen Tool in Photoshop, Remove bg, make this process easier. Dedicated photo — white background removed and product isolated. This makes it more flexible and works on multiple types of the solution.
9. Background Removal Techniques
By taking out the background shadow actually lifts your product, and now it is an integral part of the image.
Why editing background is important for E-commerce Photography
Clean background is the key in Ecommerce Photography It secures the focus on what is being built It maintains a consistent brand aesthetics which also across products.
Methods for background removal from images
But there are some different ways of removing the background. Either one is suitable for a different level of complexity. This is the last step and helps you to get better results in Photoshop, using high-contrast images. They are most efficient while using the Magic Wand and Quick Selection Tools. These tools are particularly well suited for images with very distinct elements in them. All these kinds of features work when subjects give high contrast and they dominate their backgrounds. The pen tool works for straight lines, edges and everything that needs accuracy. Automated but batch processing tools for ease of the user.
10. Product Photography Examples and Case Studies
Seeing real-world examples can show you what works in product photography.
Looking at good product photography examples. Photo by Charisse Kenyon on Unsplashed. There you have it — studying successful product photography can help, but remember: Beautiful shots and updates of your products are important. It shows elements of a powerful photo Editorial Template. Inspiration for your work can be taken from these examples with their use of lighting and composition.
Case Studies of Product Photography From Great Brands
Apple and Nike, for instance, have a long history of stunning product photography. These are the images they use quite a bit for their branding and marketing. Studying their strategy can offer insights in terms of consistency, innovation and technical implementation.
11. Common Mistakes in Product Photography and How to Avoid Them
Even those photographers who have experience can make mistakes. Once you have a good understanding of the common pitfalls, make sure to avoid them in your work!
Solving the Lighting Conundrum
Bad lighting can create images that are too dark, or sometimes even way overexposed. Having said that, it helps to have a basic understanding of manipulating light. Diffusers and reflectors can help you get the lighting balanced.
The Dangers of Bad Composition
This leads to lost subjects, backgrounds that distract and frames that are distracting thereby diminishing the products attractiveness. Part 1, Fundamentals; gets our image quality to the next level by applying basic composition principles. The frame can help with this as well, especially by keeping it simple.
12. Legal Considerations in Product Photography
Understanding the law behind product photography is essential. This eases out any conflicts or troubles in future.
What is copyright and usage rights
Photographers need to know their rights. That entails understanding the copyright laws. If you are using stock images or third-party content in your work, make sure to obtain necessary licences.
Model & Property Releases
If you have people in your product photos (or if they show private property), and releases required just like stock photography. Model releases are agreements allowing the commercial use of a person's likeness in photos. Anyone who appears in a photo must sign the model release, and property releases are necessary for locations or things of private ownership.
13. The Business Side of Product Photography
For those who want to start a product photography business, you need to market your services. You also have to gain a client.
How to price your product photography service
It's one of the toughest things to get right when you first start out….pricing. Research industry standards. Think about what you know and the complexity of the work. This can assist you to apply competitive prices.
How to Build a Portfolio: What You Should Include and Why
Your best marketing weapon is a robust portfolio. Use a mix of work that can demonstrate your technical abilities, creative talents and flexibility. Like my freaking teacher said -> Have your portfolio online!
14. Tools and Resources for Improving Product Photography
It is vital that we continue to learn and improve with so much going on in product photography.
Online Tutorials and Courses
There are various courses you can find online that mainly teach the process of product photography. Photographers — there are sites like Udemy, LinkedIn Learning and CreativeLive. Some great resources for both the more advanced and beginners.
Forum and community for photographers
Online photography communities provide support, motivation and can be a great source of inspiration. So, snap, share, and learn! The photography community on Reddits is a very active one. You also have the ability to share photos and crowdsource opinions.
15. Conclusion
It is a great skill for product photographers, retailers and all eCommerce businesses. It is a lot more than just pushing the button. Productize to Drive Sales and User Engagement This guide teaches you the techniques to take images that will draw and convert users through. Continue to learn and try things out.
#ProductPhotography#PhotographyTips#PhotographyBasics#ProductPhotography101#PhotographyGuide#PhotoTechniques#PhotographyEssentials#BeginnerPhotography#PhotographyTutorial#ProductPhotos
1 note
·
View note
Text
Mastering Photography with YouTube: A Guide to Learning Through Videos
Introduction In the digital age, photography has become more accessible than ever before. Whether you’re using a smartphone or a professional camera, the desire to capture stunning images is universal. One of the most effective and accessible ways to learn photography is through YouTube. This platform hosts a wealth of tutorials, reviews, and tips that cater to all levels, from beginners to…
#A Guide to Learning Through Videos#Beginner Photography#BeginnerPhotography#Camera Techniques#CameraTips#Creative Photography#CreativePhotography#Digital photography#LearnPhotography#Mastering Photography#Mastering Photography with YouTube#Online Education#Photography Tips#Photography Tutorials#PhotographyCourses#PhotographyGuides#PhotographyHacks#PhotographyTechniques#PhotographyTips#PhotoSkills. VideoTutorials#technique#tips#Tips and Techniques#Visual Learning#Youtube#YouTube Learning#YouTubeLearning. PhotoEditing#YouTubePhotography#YouTubeTutorials
0 notes
Text

#clippingdesignhouse#business#photography#portrait photography#photography tips#photoshop#photomanipulation#photoediting#PhotographyCommunity#PhotographyHacks#PhotographyGear#CameraEssentials#PhotographerLife#photoeditingtips#beginnerphotography#InstaPhotography#PhotographyLightingEquipment#PhotographyStudioFurniture#PhotographyTripods
0 notes
Text
Photography Tips for Beginners in Miami: Capturing the Magic of the Magic City

Miami, with its vibrant culture, stunning architecture, and breathtaking beaches, offers a paradise for photographers. Whether you're just starting your photography journey or looking to improve your skills, this guide will help you navigate Miami's diverse landscapes and capture the city's essence through your lens. Here's a comprehensive guide to getting started with photography in Miami.
1. Understand Your Gear
Before diving into Miami’s picturesque spots, it's crucial to understand your camera. Whether you’re using a DSLR, mirrorless camera, or even a smartphone, familiarize yourself with the basic settings:
Aperture: Controls the depth of field. A lower f-stop (e.g., f/2.8) blurs the background, focusing on your subject, while a higher f-stop (e.g., f/16) keeps more of the scene in focus.
Shutter Speed: Determines how long the camera’s sensor is exposed to light. A fast shutter speed (e.g., 1/1000) freezes motion, while a slower one (e.g., 1/30) can create motion blur.
ISO: Adjusts the camera's sensitivity to light. Lower ISO values (e.g., 100) produce clearer images, while higher values (e.g., 1600) can introduce grain but are useful in low light.
Start experimenting with these settings in different environments around Miami to see how they affect your photos.
2. Golden Hour and Blue Hour: The Best Times to Shoot
Miami’s light can be harsh during midday, especially with the strong sun reflecting off the water and buildings. To avoid harsh shadows and blown-out highlights, shoot during the Golden Hour (just after sunrise or before sunset) and Blue Hour (just before sunrise or after sunset).
Golden Hour: This time creates a warm, soft glow, perfect for capturing the pastel colors of Miami Beach's Art Deco buildings or the natural beauty of South Pointe Park.
Blue Hour: The sky takes on a deep blue hue, which contrasts beautifully with the city's lights. It’s ideal for photographing the skyline from spots like the Venetian Causeway or Rickenbacker Causeway.
3. Explore Iconic Locations
Miami is full of photogenic spots. Here are some must-visit locations:
South Beach: Known for its colorful lifeguard towers, South Beach offers vibrant opportunities for beach photography. Try capturing the sunrise here for a dramatic effect.
Wynwood Walls: This outdoor museum of street art is a playground for photographers. Focus on the details of the murals, or capture wide shots that incorporate the surrounding urban landscape.
Vizcaya Museum and Gardens: This historic estate offers a blend of European architecture and tropical gardens. Play with perspectives by photographing the house from different angles or focus on the intricate details of the gardens.
Little Havana: Capture the essence of Miami’s Cuban culture by exploring Calle Ocho. Look for candid street shots, colorful murals, and lively street scenes.
4. Composition: Rule of Thirds and Leading Lines
Great photography often comes down to composition. Two key principles to consider are:
Rule of Thirds: Imagine your frame divided into nine equal parts by two horizontal and two vertical lines. Position the key elements of your photo along these lines or at their intersections. This creates a more balanced and interesting image. For example, when photographing the Miami skyline, place the horizon on the top or bottom third rather than in the center.
Leading Lines: Use natural lines to draw the viewer’s eye into the photo. This could be a road, a line of palm trees, or the curves of a building. Miami’s urban environment offers plenty of opportunities to practice this technique.
5. Mastering Street Photography
Miami’s diverse population and vibrant street life make it an ideal place for street photography. Here are a few tips:
Blend In: Dress casually and try to be unobtrusive. The more you blend in, the more candid and natural your shots will be.
Observe First: Spend some time just watching the scene before you start shooting. Look for interesting characters, interactions, or moments that tell a story.
Use a Prime Lens: A 35mm or 50mm lens is perfect for street photography. It’s wide enough to capture the scene but also allows you to get close to your subject.
Focus on Details: Sometimes, the small details can tell a bigger story. Look for colorful storefronts, unique signs, or interesting textures that represent Miami’s character.
6. Capture Miami’s Unique Architecture
Miami is known for its Art Deco, MiMo (Miami Modern), and contemporary architecture. When photographing buildings:
Use a Wide-Angle Lens: This helps capture the full grandeur of Miami’s architecture. However, be mindful of distortion, especially when shooting up close.
Experiment with Angles: Don’t just shoot buildings straight on. Try different angles to highlight unique features, like the curves of a MiMo building or the symmetry of an Art Deco facade.
Include the Environment: Incorporate elements like palm trees, reflections in water, or people walking by to add context and interest to your architectural shots.
7. Embrace the Weather
Miami’s weather is unpredictable, with sudden rain showers and dramatic skies. Instead of avoiding these conditions, use them to your advantage:
Rain: Rain can add mood and atmosphere to your photos. Capture reflections on wet streets or the vibrant colors of umbrellas. Just make sure to protect your gear with a rain cover or plastic bag.
Storms: Thunderstorms are common in Miami, especially in the summer. The dramatic clouds and lightning can create stunning photos. Be safe and shoot from a sheltered location.
Sun: On bright, sunny days, use a polarizing filter to reduce glare and enhance the colors of the sky and water.
8. Night Photography in Miami
Miami transforms at night view , with neon lights, lively streets, and the glowing skyline. Here’s how to capture it:
Use a Tripod: For sharp, long-exposure shots, a tripod is essential. It stabilizes your camera, allowing you to capture light trails, reflections, and illuminated buildings without blur.
Play with Light: Experiment with long exposures to capture the movement of cars, or use the glow of neon signs to light your subject.
High ISO: While a tripod is ideal, sometimes you’ll need to bump up your ISO to capture shots handheld. Just be mindful of noise, especially with smaller sensors.
9. Editing Your Photos
Post-processing is a key part of photography. Here are some tips for editing your Miami shots:
Use Lightroom or Photoshop: These programs offer powerful tools to enhance your images. Adjust the exposure, contrast, and color balance to bring out the best in your photos.
Stay True to Reality: Miami’s colors are vibrant on their own, so be careful not to over-edit. Enhance what’s already there, but avoid making your photos look unnatural.
Experiment with Presets: Presets can give your photos a consistent look, whether you want a vintage feel for your Wynwood shots or a clean, modern vibe for your architectural photos.
10. Practice, Patience, and Persistence
Photography is a skill that improves with practice. Don’t get discouraged if your first shots don’t turn out as expected. Keep experimenting, learning, and shooting. Miami offers endless opportunities for creativity, so get out there and capture the magic of the Magic City!
Final Thoughts
Miami is a photographer's dream, offering a unique blend of natural beauty, vibrant culture, and stunning architecture. Whether you're capturing the pastel colors of South Beach, the vibrant street art of Wynwood, or the dramatic Miami skyline, these tips will help you make the most of your photography journey. Remember, the best way to improve is to keep shooting, so grab your camera and explore all that Miami has to offer!
Read more :-
#MiamiPhotography#MiamiPhotographer#PhotographyTips#BeginnerPhotography#MiamiShots#MagicCityCaptures#MiamiLife#ExploreMiami#MiamiInFocus#MiamiStreetPhotography#MiamiBeachPhotos#ArtDecoMiami#WynwoodArt
1 note
·
View note
Text
Unveiling the Invisible: Infrared Photography Guide
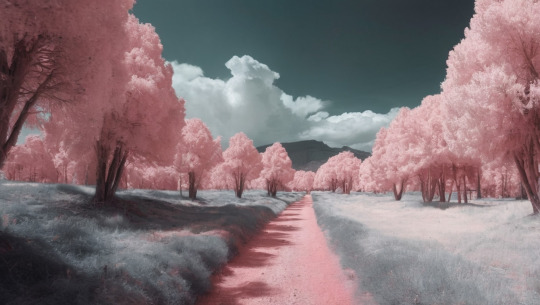
Infrared Reimaginings: Seeing the Unseen in Landscapes, Portraits, and Everyday Objects
Infrared photography of Landscape. Imagine a world where foliage bursts into ethereal white, skies bleed into vibrant pinks and purples, and ordinary objects take on an otherworldly glow. This isn't a science fiction film; it's the captivating realm of infrared photography, a technique that transcends the visible spectrum, revealing a hidden language of light unseen by the human eye. For photographers seeking to push boundaries and explore the unseen, infrared photography offers a unique and powerful tool. It's not just about capturing different colors; it's about transforming familiar scenes into something entirely new, inviting viewers to see the world through a fresh lens. Beyond the Visible: Unveiling the Infrared Spectrum The human eye perceives a limited range of light, known as the visible spectrum. But beyond the red end of this spectrum lies a vast expanse of invisible light, including infrared radiation. Infrared photography captures this invisible light, translating it into visible colors through filters, specialized cameras, or post-processing techniques.

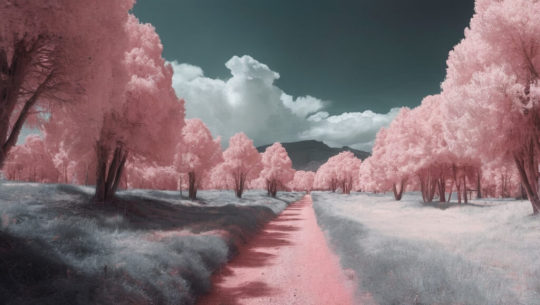
The results are often mesmerizing. Lush green landscapes bathed in white light take on an ethereal quality, while vibrant skies transform into a kaleidoscope of pinks, purples, and oranges. Skin tones become smooth and almost porcelain-like, and everyday objects like leaves, flowers, and even buildings reveal hidden textures and details invisible to the naked eye. A Photographer's Playground: Exploring the Creative Possibilities Infrared photography isn't just about capturing fantastical colors; it's about harnessing its unique properties to create evocative images. The high contrast between light and dark areas creates a dramatic effect, while the ability to capture details invisible to the eye adds depth and mystery to the scene. Landscapes Transformed:

Landscapes with Infrared Photography Imagine a forest where leaves shimmer like snowdrifts, contrasting against the deep blue sky. Or a coastline where crashing waves appear frozen in time, their white foam cascading against the dark, dramatic rocks. Infrared landscapes transport you to a world of forgotten dreams, where the familiar becomes fantastical. Portraits Unmasked:

Portrait With Infrared Technique Infrared light penetrates deeper into the skin, revealing a smooth, almost flawless texture. This can be used to create ethereal portraits with timeless beauty or to emphasize the subject's vulnerability and raw emotion. By playing with different filters and processing techniques, you can achieve various effects, from the dreamy to the dramatic. Everyday Objects Reimagined:

The mundane becomes extraordinary under the infrared gaze. A simple leaf becomes a network of intricate veins, a rusty nail a sculptural masterpiece. By focusing on the textures and details often overlooked, you invite viewers to appreciate the hidden beauty in the ordinary. Technical Considerations: Embracing the Challenge While the creative possibilities are endless, infrared photography requires a different approach compared to traditional photography. Understanding the technical aspects is crucial for achieving the desired results. Filters play a key role, blocking visible light and allowing only infrared wavelengths to reach the camera sensor. Different filters produce different effects, so experimentation is key. Additionally, long exposures are often necessary due to the lower sensitivity of cameras to infrared light, requiring the use of a tripod for sharp images. Finally, post-processing plays a vital role in manipulating the captured infrared data and translating it into visually compelling images. Photoshop allows you to adjust colors, contrast, and other settings to achieve the desired effect. What are the best cameras for infrared photography? Determining the "best" camera for infrared photography depends on various factors, including your budget, experience level, and desired outcomes. However, some top contenders across different categories consistently impress users: Best Full-Frame Mirrorless Cameras: - Sony a7R IV/Sony a7 IV: Boasting high-resolution full-frame sensors, excellent low-light performance, and extensive customization options, these cameras excel at capturing detailed infrared images. They cater to both beginners and experienced photographers. - Fujifilm GFX 50S II: This medium format powerhouse features a massive sensor for stunningly detailed images with incredible dynamic range. Weather-sealed and built for harsh conditions, it's perfect for outdoor enthusiasts. - Canon EOS R6 Mark II: This full-frame marvel offers exceptional image quality, fast autofocus, and a plethora of features, making it versatile for infrared endeavors. - Nikon Z9: This high-end offering boasts a stacked full-frame sensor for incredibly fast burst speeds and blackout-free viewing. Ideal for professionals, it delivers top-notch image quality and advanced features. Best Point-and-Shoot Cameras: - Sony RX100 VII: This compact powerhouse packs a punch with its 1-inch sensor and versatile zoom lens, making it great for travel photography. It's user-friendly and portable. - Canon PowerShot G7 X Mark III: Offering a good balance of image quality, features, and portability, this point-and-shoot is budget-friendly for beginners. - Ricoh GR IIIx: This APS-C sensor gem delivers excellent image quality in a compact body, weather-sealed for outdoor adventures. Budget-Friendly Options: - Olympus OM-D E-M10 Mark IV: This micro four-thirds camera offers good value for its image quality and features. Compact and portable, it's well-suited for travel photography. - Canon EOS M50 Mark II: Ideal for beginners, this entry-level mirrorless camera provides good image quality at an affordable price and is user-friendly. - Sony a6100: This APS-C sensor camera strikes a good balance between image quality, features, and affordability. Relatively compact and portable, it's great for travel photography. Converted Cameras: - Full-frame DSLRs: Many older full-frame DSLRs can be converted to infrared with impressive results, offering excellent image quality and low-light performance at a reasonable price. - Point-and-shoot cameras: Some point-and-shoot cameras can also be converted, providing a budget-friendly option for beginners to experiment with infrared photography. How to take infrared photos with your camera

infrared filter for Cameras In that case, you should know about infrared filters that allow only infrared light to get into your camera sensor. These filters typically come in two main types: 1. Blocking Filters: - These filters completely block visible light and only allow infrared wavelengths to pass through. - Common types include IR720, IR850, and IR950, with numbers indicating the approximate cutoff wavelength for visible light. - They are ideal for capturing pure infrared images with strong effects and minimal color bleed. - However, due to blocking all visible light, they require longer shutter speeds and careful exposure metering. 2. Hot Spot Reduction Filters: - These filters allow some visible light to pass through alongside infrared wavelengths. - They help reduce the "hot spot" phenomenon, a bright central area that can occur in converted cameras due to sensor sensitivity variations. - Popular options include the Hoya R72 and Heliopan R72, offering a balance between IR transmission and hot spot reduction. - They offer faster shutter speeds compared to blocking filters but may have slightly less pronounced infrared effects. Additional factors to consider: - Camera compatibility: Make sure the filter size matches your camera lens thread diameter. - Filter material: Glass filters offer better image quality but are heavier and more expensive. Plastic filters are lighter and cheaper but might show slight color casts. - Focus issues: Some converted cameras may struggle to autofocus with an infrared filter, requiring manual focusing. Alternatives to dedicated filters: - Gel filters: Colored gel filters, particularly red or black, can block visible light to varying degrees. However, they are less precise and may introduce unwanted color casts. - Software conversion: While not ideal for pure infrared, post-processing software can sometimes be used to convert regular photos to an infrared-like look. Ultimately, the best-infrared filter for you depends on your specific camera, desired outcomes, and budget. Researching various options and considering your photography goals will help you make an informed choice. Beyond the Technique: A Journey of Artistic Expression Infrared photography is more than just a technical exercise; it's a journey of artistic exploration. It invites you to slow down, observe the world around you with fresh eyes, and capture the unseen beauty that lies beneath the surface. It's a chance to experiment, to break free from conventional norms, and to create images that challenge viewers' perceptions of reality. It's a gateway to a world of hidden wonders, waiting to be discovered and shared with the world through your lens. So, are you ready to embark on this journey into the unseen? Pick up your camera, embrace the challenge, and start reimagining the world through the unique language of infrared photography. You might just be surprised by the beauty you find. Read the full article
#beginnerphotography;#camerasettings#creativephotography;#filters;#infraredphotography;#landscapephotography;#longexposurephotography;#photographytutorial#portraitphotography#post-processing;
0 notes
Text

Best Camera for Photography
Capture perfection. Explore the best cameras for photography, from pro DSLRs to mirrorless wonders. Whether you're into portraits, landscapes, or street photography, find the gear that brings your creative vision to life.
BestCamera2025 #PhotographyGear #MirrorlessCamera #DSLRPhotography #CameraReview #CreativeTools #PhotoGear #BeginnerPhotography #CameraSetup #PhotographerLife
0 notes
Photo

"📸 Unlocking Photography: My First DSLR Journey When I first picked up this beauty, I was clueless about shutter speed and aperture. But today, every shot feels like magic! DSLR cameras made me fall in love with storytelling through images. Ready to start your journey? 🌐 Explore treasures: Etsy: https://www.etsy.com/shop/AntiquesUSSR7 eBay: https://www.ebay.com/str/gavshyn DM me if you have questions—I’d love to help! #photographyjourney #filmcamera #analogphotography #vintagecamera #camerapassion #capturemagic #dslrphotography #beginnerphotography #classiccamera"
0 notes
Video
youtube
The number one question asked photographers is, "What Camera Should I Buy As A Beginner?" I will try to answer this question in a quick video lesson on this Tip Tuesday. View it and let me know if this helps you. Now enjoy the video https://youtu.be/Tp1n0AqFm3Y #tiptuesday #tuesdaytip #photographytip #photographylesson #beginnerphotographer #beginnerphotography
0 notes
Text
📸Unveiling the Benefits of Nikon Cameras📸
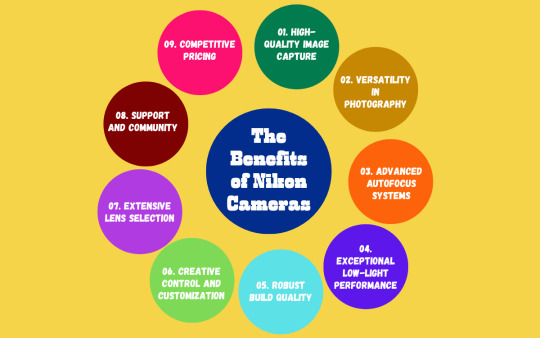
Are you ready to embark on an exciting journey into the world of photography? 🌄📷 Whether you're capturing breathtaking landscapes, candid moments, or creative portraits, Nikon has got you covered!
📸👉For more in-depth tips and insights, check out our latest blog post here: https://guideclever.com/benefits-of-nikon-cameras/
📸 Nikon Cameras for Beginners 📸
🌟 Are you a newbie to photography? No worries! Nikon offers a fantastic range of user-friendly cameras designed to help you kickstart your photography journey.
🌈 Capture Stunning Shots: With Nikon's easy-to-use cameras, you can effortlessly capture those picture-perfect moments that matter most.
🤩 Explore Creativity: Unleash your creative potential and experiment with different shooting modes and features to enhance your photography skills.
🔍 Learn & Grow: Join our Nikon community of like-minded photographers who are eager to share tips, tricks, and inspiration to help you improve your craft.
🌐 Explore the Nikon Experience: Dive into the world of Nikon and discover a wide range of lenses, accessories, and resources to elevate your photography game.
Ready to take the first step? 🚀 Whether you're a budding photographer or just looking to upgrade your gear, Nikon has the perfect camera for you! 📸
Start capturing memories that will last a lifetime with Nikon! 🌟 #NikonPhotography #BeginnerPhotography #CaptureMemories #PhotographyJourney
0 notes
Text
Transform your photos with our comprehensive tutorial on simple photo fixes! Whether you're a beginner or just looking to refine your skills, this guide covers essential techniques to enhance your images effortlessly. Learn how to adjust exposure, improve color balance, and apply quick fixes that make a significant difference. With easy-to-follow steps, you'll be able to elevate your photography game and create stunning visuals in no time. Dive into the world of photo editing and unlock your creative potential today!
0 notes
Photo

#BeginnerPhotography: " WheelGang?! " • still don’t have a name for it but #ImTheLeader there, aren’t I??'🙄 • #PeepGame: I don’t know if it’s a matter of "#Algorithm" or if “#theUniverse” (as people like to put it) or whatever, but I couldn’t help but feel like I was being asked or encouraged to make/write more music geared toward the #Female listener. ..🧐 The perspectives I was being hit with earlier was weird, almost as if I had "#Human'👤'#Friends" or something.. 🖖🏾'#Thankful, if nothing else. So, "#ThankYou✍🏾[for the thought] Like I’m being tested to see if I remember the things that I write before it’s taken away only to have to write it again. [#InOtherNews]: I don’t know what you niguhz are after! but I’m NOT running from youse (and whomever|whatever '#Faction' of Fuhkboi’ yah’ claim).. "I wouldn’t even know how to if I wanted to, 🤣'#Remember?!" Niguhz ain’t teach me a thing, nor do they ""#Demonstrate"", etc. like you niguhz seem to obviously be "#Hip" to in yah’ conditioning / #LearningProcess of how to arrange and #Setup, take and/or #Steal from and #Use👤people like yah do. Like, my being called all types of 🗣'names and having the finger pointed at me when IM THE ONE who use to get in 😓’trouble for the kinds of positive thinking that I was NEVER allowed to finish or test or follow through with, and EVEN THEN, "#iDontEvenKnowAnybody". 😅'so I stopped doing that. Tat was around the same time they were— "Fuhk It, imma just admit it. Them freakin’ teenage female stars was fuhkin’ me up | bustin’ my a**.🤷🏾♂️ 🤦🏾♂️'Had me EXTRA fuhked up, it was kinda embarrassing having already been through the type of shht that I had already been through and/or defeated even amidst #Music'#Industry bullshht'🤫 that operates on and within those same “”#Systems””, #Remember.?!”🤨_ *Sometimes the only reason why a person is "Sleepy" or feels drained when they shouldn’t is because of usage; Someone else is acting on their👤behalf. It’s #theIrony of "'Being in Two Places at Once." "#RIGHT?!" ..#FreeMason, #MasonicRule and their #Illuminati of the processes of #Life.. They tell me that, "I’m next." —but that’s been the talk for over a decade already.😑 (at Life on Earth) https://www.instagram.com/p/Ckgtn59Jhg8/?igshid=NGJjMDIxMWI=
#beginnerphotography#imtheleader#peepgame#algorithm#theuniverse#female#human#friends#thankful#thankyou✍🏾#inothernews#faction#remember#demonstrate#hip#learningprocess#setup#steal#use👤people#idontevenknowanybody#music#industry#systems#theirony#right#freemason#masonicrule#illuminati#life
2 notes
·
View notes