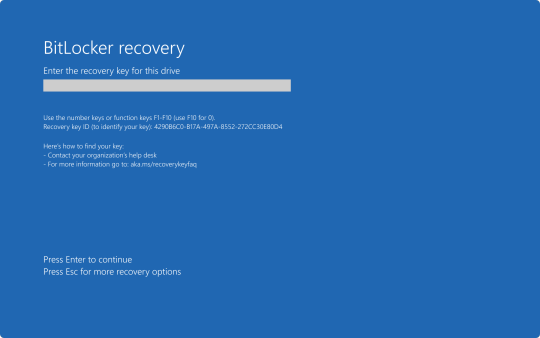
#Bitlocker Recovery Prompt
Explore tagged Tumblr posts
Visit Tumblr Blog
Explore Tumblr blogs with no restrictions, modern design and the best experience.
Last Seen Tumblr Blogs


Fun Fact
The total number of visits Tumblr.com received during January 2021 is 327 million.
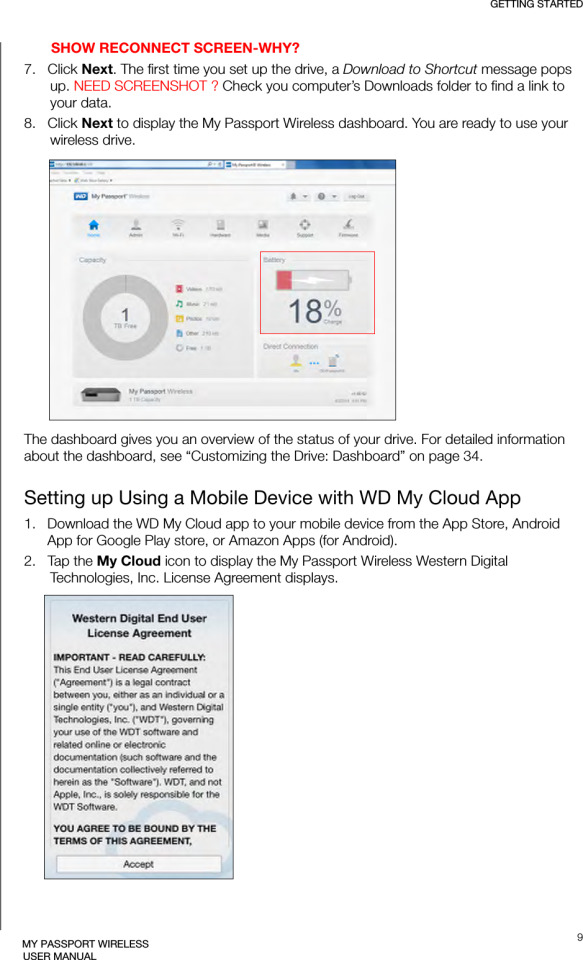
Text
How to fix BitLocker always prompting for Recovery Key
In this article, we will discuss how to fix BitLocker always prompting for Recovery Key. Please see “How to fix you are not allowed to view this folder on SSRS: MBAM reports cannot be accessed because it could not load folder contents“, and How to Change the Lock Screen Wallpaper in Windows 11. BitLocker is an encryption function of the Windows Operating System. Encrypted drives can only be…

View On WordPress
#Bitlocker#BitLocker Backup#bitlocker key#BitLocker Key Recovery#BitLocker Keys in AD#BitLocker Network Unlock#BitLocker Recovery Key Request#BitLocker Recovery Keys#BitLocker Recovery Mode prompted#BitLocker Recovery Password Viewer#Bitlocker Recovery Prompt#Windows#Windows 10#Windows 11
0 notes
Text
Installing Linux (Mint) as a Non-Techy Person
I've wanted Linux for various reasons since college. I tried it once when I no longer had to worry about having specific programs for school, but it did not go well. It was a dedicated PC that was, I believe, poorly made. Anyway.
In the process of deGoogling and deWindows365'ing, I started to think about Linux again. Here is my experience.
Pre-Work: Take Stock
List out the programs you use regularly and those you need. Look up whether or not they work on Linux. For those that don't, look up alternatives.
If the alternative works on Windows/Mac, try it out first.
Make sure you have your files backed up somewhere.
Also, pick up a 5GB minimum USB drive.
Oh and make a system restore point (look it up in your Start menu) and back-up your files.
Step One: Choose a Distro
Dear god do Linux people like to talk about distros. Basically, from what all I've read, if you don't want to fuss a lot with your OS, you've got two options: Ubuntu and Linux Mint. Ubuntu is better known and run by a company called Canonical. Linux Mint is run by a small team and paid for via donations.
I chose Linux Mint. Some of the stuff I read about Ubuntu reminded me too much of my reasons for wanting to leave Windows, basically. Did I second-guess this a half-dozen times? Yes, yes I did.
The rest of this is true for Linux Mint Cinnamon only.
Step Two: Make your Flash Drive
Linux Mint has great instructions. For the most part they work.
Start here:
The trickiest part of creating the flash drive is verifying and authenticating it.
On the same page that you download the Linux .iso file there are two links. Right click+save as both of those files to your computer. I saved them and the .iso file all to my Downloads folder.
Then, once you get to the 'Verify your ISO image' page in their guide and you're on Windows like me, skip down to this link about verifying on Windows.
Once it is verified, you can go back to the Linux Mint guide. They'll direct you to download Etchr and use that to create your flash drive.
If this step is too tricky, then please reconsider Linux. Subsequent steps are both easier and trickier.
Step Three: Restart from your Flash Drive
This is the step where I nearly gave up. The guide is still great, except it doesn't mention certain security features that make installing Linux Mint impossible without extra steps.
(1) Look up your Bitlocker recovery key and have it handy.
I don't know if you'll need it like I did (I did not turn off Bitlocker at first), but better to be safe.
(2) Turn off Bitlocker.
(3) Restart. When on the title screen, press your Bios key. There might be more than one. On a Lenovo, pressing F1 several times gets you to the relevant menu. This is not the menu you'll need to install, though. Turn off "Secure Boot."
(4) Restart. This time press F12 (on a Lenovo). The HDD option, iirc, is your USB. Look it up on your phone to be sure.
Now you can return to the Linux Mint instructions.
Figuring this out via trial-and-error was not fun.
Step Four: Install Mint
Just follow the prompts. I chose to do the dual boot.
You will have to click through some scary messages about irrevocable changes. This is your last chance to change your mind.
I chose the dual boot because I may not have anticipated everything I'll need from Windows. My goal is to work primarily in Linux. Then, in a few months, if it is working, I'll look up the steps for making my machine Linux only.
Some Notes on Linux Mint
Some of the minor things I looked up ahead of time and other miscellany:
(1) HP Printers supposedly play nice with Linux. I have not tested this yet.
(2) Linux Mint can easily access your Windows files. I've read that this does not go both ways. I've not tested it yet.
(3) You can move the taskbar (panel in LM) to the left side of your screen.
(4) You are going to have to download your key programs again.
(5) The LM software manager has most programs, but not all. Some you'll have to download from websites. Follow instructions. If a file leads to a scary wall of strange text, close it and just do the Terminal instructions instead.
(6) The software manager also has fonts. I was able to get Fanwood (my favorite serif) and JetBrains (my favorite mono) easily.
In the end, be prepared for something to go wrong. Just trust that you are not the first person to ever experience the issue and look it up. If that doesn't help, you can always ask. The forums and reddit community both look active.
180 notes
·
View notes
Text
CrowdStrike'd and BitLocker'd
With yesterday's CrowdStrike outage. I'm sure a number of you are probably wondering "what does BitLocker have to do with any of this?" Well, it all has to do with an added layer of security many organizations use to keep data from being stolen if a computers ends up in the hands of an "unauthorized user."
To start, let me briefly explain what the CrowdStrike driver issue did and what the fix for it is.
After the update was automatically installed to computers running the CrowdStrike Falcon Sensor, a faulty driver file caused the Windows kernel on those computers to crash and display a Blue Screen of Death. How Windows typically handles a crash like this is to create a crash log file, then perform a reboot. Since this driver would launch shortly after Windows finished booting, it would cause the operating system to crash and reboot again. When two crashes have occurred in sequence, Windows will automatically boot into Recovery Mode. Hence why we say several pictures of the Recovery Mode screen across social media yesterday.

Unfortunately, this update was automatically pushed out to around 8.5 million computers across several organizations, causing widespread chaos within the matter of a few hours. And the fix for this issue had to be performed by physically accessing each computer, which required those of us working in I.T. to have to run around several facilities, locate each affected computer, and apply the fix one by one.
The short and simple of the fix is either one of two options. You can either use the Recovery Mode that Windows was already booted into to navigate to Start-Up Setting, and launch Safe Mode. Once Windows boots into Safe Mode, the technician can navigate to C:\Windows\System32\Drivers\CrowdStrike, and delete the file C00000291-*.sys. After that the computer can be rebooted as normal, and the crashing will stop.
Or the technician can open System Restore from Recovery Mode. And, assuming there is a recovery point, restore the computer back to a good known working state.
Now, this may all seem simple enough. So why were so many organizations having trouble running this fix? That all has to do with BitLocker. As an added security measure, many organizations use BitLocker on their computers to perform a full hard disk encryption. This is done so that if a computer ends up being lost or stolen, and ends up in the hands of an "unauthorized user" they will not be able to access any of the data stored on the computer without a password to log into the computer, or the computer's BitLocker recovery key.
This presented a problem when trying to restore all of these affected computers, because when either trying to launch Safe Mode or System Restore, the user would be prompted for the BitLocker recovery key.
In my organization's case, we found we could save time by providing our end user the steps to perform one of the two fixes on their own to save time. But the problem we still continue to run into is the need for these BitLocker recovery keys. In my case, I've been fielding several calls where I've had end users walking from one computer to another while I provide them with the key as they walk through reverting back to a previous restore point.
Again, a pretty long story, but hopefully that can provide some context as to what's been happening over the past 48 hours.
30 notes
·
View notes
Text
Understanding the Windows 7 Ultimate Product Key and Windows Pro License in 2025

Windows operating systems remain essential tools for both personal and professional computing. Even as newer versions like Windows 10 and 11 dominate the market, many users still prefer older editions. In particular, the Windows 7 ultimate product key holds significant value for users wanting full access to the features of Windows 7 Ultimate. Similarly, the Windows Pro license is critical for users upgrading to Windows 11 Pro or similar professional editions.
What Is a Windows 7 Ultimate Product Key?
A Windows 7 ultimate product key is a unique alphanumeric code used to activate the full version of Windows 7 Ultimate. This key validates your software, ensuring you are running a genuine copy. Without it, your Windows system may be limited or locked out from essential updates and features.
Windows 7 Ultimate was the most feature-rich edition in the Windows 7 lineup. It includes all the capabilities of Windows 7 Home and Professional, plus extras such as BitLocker encryption, support for multiple languages, and enhanced networking options.
Why Choose Windows 7 Ultimate?
Even though Windows 7 is no longer officially supported by Microsoft, it is still favored by many businesses and individuals. This preference is often due to software compatibility, hardware constraints, or personal comfort.
Windows 7 Ultimate offers:
Comprehensive security features
Advanced backup and recovery options
Full support for business networking environments
To unlock these benefits, you need a valid Windows 7 ultimate product key. This key activates your system, making it fully functional and legally compliant.
The Importance of a Windows Pro License
As technology advances, many users are upgrading their systems to Windows 10 or Windows 11 Pro editions. This is where a Windows Pro license becomes essential.
A Windows Pro license gives you access to professional-grade features such as:
Remote Desktop
Domain Join for enterprise environments
Enhanced security protocols
Windows Update for Business
Buying a genuine Windows Pro license ensures your system stays secure, compliant, and updated.
How to Obtain a Genuine Windows 7 Ultimate Product Key
Purchasing a legitimate Windows 7 ultimate product key is critical. Genuine keys ensure full functionality and access to Microsoft’s update services (where available). They also protect you from software piracy risks and malware.
Many vendors no longer sell Windows 7 keys due to the end of support. However, trusted sellers like PCKeys UK offer authentic digital keys with instant delivery and fair pricing.
Activating Your Windows 7 Ultimate Using the Product Key
Activating Windows 7 Ultimate is a straightforward process:
Click the Start menu and open the Control Panel.
Navigate to “System and Security,” then “System.”
Scroll down and click “Activate Windows.”
Enter your Windows 7 ultimate product key when prompted.
Follow the on-screen instructions to complete activation.
Activation confirms your copy is genuine and unlocks all Windows Ultimate features.
Upgrading with a Windows Pro License
For users looking to upgrade to Windows 10 or 11 Pro, purchasing a valid Windows Pro license is essential. The upgrade process involves:
Buying a license key from a trusted source
Running the Windows Update or activation wizard
Entering the Pro license key during setup
Once activated, your system gains access to powerful features designed for professionals and businesses.
Why Buying from PCKeys UK Is the Best Choice
PCKeys UK offers genuine product keys for both legacy and modern Windows versions. They provide:
Instant digital delivery of keys
Affordable pricing
24/7 customer support
Secure payment gateways
You can trust PCKeys UK for your Windows 7 ultimate product key and Windows Pro license needs.
Legal and Security Benefits of Genuine Keys
Using genuine Microsoft keys protects you legally and technically. Unauthorized keys or cracked software can lead to:
System instability
Security vulnerabilities
Legal penalties
Lack of support and updates
A valid Windows 7 ultimate product key or Windows Pro license ensures your system operates smoothly and securely.
Final Thoughts on Windows 7 Ultimate Product Key and Windows Pro License
Whether you continue to use Windows 7 Ultimate or are upgrading to a modern Pro edition, having the right product key is crucial. It unlocks all features, guarantees legitimacy, and improves your computing experience.
Choosing trusted sources like PCKeys UK means getting authentic keys with quick delivery. Don’t compromise on security or performance — invest in genuine software today.
0 notes
Text
Supporting and Troubleshooting Windows 11 Course in Australia: A Complete Guide
Windows 11 has become the operating system of choice for businesses and individuals, offering advanced security, enhanced performance, and a modern interface. However, managing and troubleshooting Windows 11 in a professional environment requires specialized skills. The Supporting and Troubleshooting Windows 11 Course in Australia is designed to equip IT professionals with the knowledge and hands-on experience needed to support and resolve issues in Windows 11 systems efficiently.
Why Enroll in a Supporting and Troubleshooting Windows 11 Course?
With the transition from older Windows versions to Windows 11, IT support teams must adapt to new technologies, security features, and system configurations. Here’s why taking this course is beneficial:
1. Stay Updated with Windows 11 Technology
Learn about the latest Windows 11 features and enhancements.
Understand changes in system architecture and security protocols.
Gain insights into compatibility issues and best practices for troubleshooting.
2. Enhance Your IT Support Skills
Develop expertise in diagnosing and resolving Windows 11 issues.
Master tools like Windows Recovery, Event Viewer, and Command Prompt.
Improve efficiency in handling system crashes, performance issues, and network problems.
3. Increase Job Opportunities and Career Growth
IT professionals with Windows 11 troubleshooting skills are in high demand.
Employers prefer certified experts for desktop support, system administration, and IT helpdesk roles.
The course prepares you for industry-recognized certifications that boost your resume.
Key Topics Covered in the Course
The Supporting and Troubleshooting Windows 11 Course is comprehensive and designed for IT professionals, covering the following crucial areas:
1. Windows 11 Installation and Configuration
Setting up and customizing Windows 11.
Managing user accounts and permissions.
Understanding Windows Update and Feature Management.
2. Troubleshooting Boot and Startup Issues
Identifying and resolving boot failures and startup delays.
Using Advanced Startup Options and Safe Mode.
Repairing the Windows bootloader and system files.
3. Performance Optimization and System Monitoring
Using Task Manager, Resource Monitor, and Performance Monitor.
Troubleshooting slow performance and high CPU/RAM usage.
Managing background applications and startup processes.
4. Network Connectivity and Troubleshooting
Configuring and troubleshooting Wi-Fi, VPN, and Ethernet connections.
Understanding TCP/IP, DNS, and Firewall settings.
Resolving common connectivity issues and IP conflicts.
5. Security and Access Management
Implementing BitLocker encryption and Windows Defender policies.
Managing user authentication and account recovery.
Preventing and troubleshooting malware and ransomware attacks.
6. Hardware and Peripheral Troubleshooting
Diagnosing driver and compatibility issues.
Troubleshooting printer, scanner, and peripheral device failures.
Using Device Manager and Windows Troubleshooters.
7. Data Recovery and Backup Solutions
Configuring OneDrive and local backup solutions.
Recovering lost data using Windows File History and Recovery Tools.
Preventing data loss through effective backup strategies.
Who Should Take This Course?
The Supporting and Troubleshooting Windows 11 Course is ideal for:
IT Support Specialists – Handling user support and troubleshooting requests.
System Administrators – Managing enterprise Windows 11 environments.
Helpdesk Technicians – Assisting with hardware, software, and network issues.
Technical Consultants – Offering Windows 11 support for business clients.
Benefits of Certification in Windows 11 Troubleshooting
Earning a certification after completing this course offers several advantages:
Better Job Prospects: Companies prefer certified IT professionals.
Higher Salary Potential: Skilled troubleshooting experts earn more.
Enhanced Problem-Solving Skills: Learn real-world troubleshooting techniques.
Industry Recognition: Gain credibility as a Windows 11 support specialist.
Choosing the Right Training Provider in Australia
When selecting a training provider for the Supporting and Troubleshooting Windows 11 Course in Australia, consider these factors:
Accreditation: Ensure the provider is recognized by Microsoft.
Hands-on Labs: Look for courses offering real-world troubleshooting scenarios.
Flexible Learning Options: Online, classroom, or hybrid training formats.
Certification Preparation: Providers offering exam support and practice tests.
Student Reviews: Check ratings and testimonials for course quality.
Final Thoughts
The Supporting and Troubleshooting Windows 11 Course in Australia is an essential step for IT professionals looking to expand their expertise in Windows 11 support. With a structured curriculum covering installation, performance tuning, security, and network troubleshooting, this course provides the necessary skills to manage and resolve issues efficiently.
0 notes
Text
Opened my computer and got prompted for a fucking BITLOCKER RECOVERY KEY to access my files.
I hate Microsoft so. goddamn. much.
#Windows 11 is trash#and when the time comes to get a new computer I may??? just have to learn how to use Linux???#please don't tell me to put it on this PC. It took me long enough to get everything sorted out as-is#by the time I have to replace this laptop I want to have a much more structured system of organization
2 notes
·
View notes
Text
How to Securely Erase Data from Your SSD?
In today’s digital world, ensuring the security of your data is more important than ever. Whether upgrading to a new SSD, repurposing an old one, or just wanting to ensure sensitive information is unrecoverable, securely erasing data from an SSD is critical. Unlike traditional hard drives, SSDs (Solid State Drives) require special methods for secure data deletion due to their unique storage techniques.
SSDs use NAND flash memory to store data organized into blocks and pages, unlike the spinning platters in traditional hard drives. This architecture introduces complexities like wear leveling and garbage collection. Wear leveling ensures even data distribution across memory cells to prevent premature wear, while garbage collection consolidates unused blocks, making old data scattered across the drive and difficult to erase.
When a file is deleted from an SSD, it is not physically erased but marked as available for new data. Until overwritten, the data can be recovered using data recovery software. This is why secure data erasure methods are essential for preventing unauthorized recovery of sensitive information.
Several methods exist for securely erasing data from an SSD:
Built-in SSD Secure Erase Utility: Many SSD manufacturers offer built-in secure erase utilities like Samsung Magician, Intel SSD Toolbox, or Crucial Storage Executive. These tools use the SSD's firmware to perform a thorough data wipe. To use these tools, users need to check the manufacturer's documentation, backup important data, create a bootable USB drive (if necessary), and follow prompts to run the secure erase utility.
Third-Party Software: If the manufacturer doesn’t provide a secure erase tool, third-party software like Parted Magic, HDDErase, or DBAN (Darik’s Boot and Nuke) can be used. Similar to the built-in utilities, these tools offer additional features and allow users to select their SSD and securely erase it.
ATA Secure Erase Command: This low-level command, built into most SSDs' firmware, resets the NAND cells to their factory state. It requires technical knowledge and involves using a bootable Linux distribution like Ubuntu or Parted Magic to execute the ATA Secure Erase command.
Encryption Method: Encrypting the SSD before erasing it adds an extra layer of security. Even if remnants of data remain after erasure, they will be indecipherable without the encryption key. This can be done using encryption software like BitLocker (Windows), FileVault (Mac), or VeraCrypt (cross-platform).
For maximum data security, it’s recommended to regularly update SSD firmware, use multiple erasure methods, and physically destroy the drive if it’s no longer needed. Additionally, proper disposal of the SSD through e-waste recycling ensures that the drive is handled responsibly.
In conclusion, securely erasing data from an SSD is crucial for protecting sensitive information. By understanding the storage mechanics of SSDs and using the appropriate erasure methods, users can ensure their data is irretrievable. Always back up data before proceeding with any erasure and verify the process to ensure complete data destruction.
Want to Buy SSDs in Bulk from VSTL?
If you're looking to purchase SSDs in bulk, VSTL offers a reliable option for businesses and individuals seeking quality storage solutions. With competitive pricing and a range of SSD models to suit various needs, VSTL ensures high-performance drives for both personal and professional use. Bulk buyers can benefit from wholesale rates, making it an efficient choice for large-scale projects or tech upgrades. Whether upgrading office systems or managing data storage for a business, VSTL provides dependable SSDs to meet diverse requirements.
0 notes
Text
Understanding the BitLocker Recovery Key: What It Is and How to Use It

Hey Tumblr friends! 🌟
If you've recently enabled BitLocker on your Windows device and suddenly find yourself staring at a prompt asking for a BitLocker recovery key, you might be wondering what this mysterious key is all about. Let’s dive into the essentials of the BitLocker recovery key, why you might need it, and how to find it when necessary.
What is a BitLocker Recovery Key?
A BitLocker recovery key is a 48-digit numerical password that acts as a backup method to unlock your encrypted drive. This key is generated when you first enable BitLocker on a drive and is crucial for situations where you can’t access your drive through the usual means.
Why Might You Need a BitLocker Recovery Key?
There are several reasons why you might be prompted to enter your BitLocker recovery key:
Forgotten Password: If you forget your BitLocker password, the recovery key is your only way to regain access.
Hardware Changes: Making significant changes to your computer’s hardware, like replacing the motherboard, can trigger the recovery key prompt.
Software Updates: Major updates to your operating system or BIOS might require you to enter the recovery key.
Security Concerns: If BitLocker detects potential security threats or unauthorized access attempts, it will ask for the recovery key.
Where to Find Your BitLocker Recovery Key
If you’re in a pinch and need to find your BitLocker recovery key, here are some common places to check:
Microsoft Account: If you linked BitLocker to your Microsoft account, you can find your key on the Microsoft BitLocker recovery key portal.
USB Drive: If you saved the recovery key to a USB drive, make sure to keep it somewhere safe and accessible.
Printout: Some folks print their recovery key and store it securely.
Azure Active Directory (AAD): If your device is connected to an organization’s AAD, your IT department might have a copy.
File: If you saved the recovery key as a file, it’s usually named something like BitLocker Recovery Key.txt.
What to Do if You Can’t Find Your Recovery Key
If you can’t locate your BitLocker recovery key, your options are unfortunately limited. Without the recovery key, accessing your encrypted data is not possible. This is a vital reminder to store your recovery key securely in multiple locations.
Best Practices for Managing Your BitLocker Recovery Key
Store Multiple Copies: Keep your recovery key in several places, such as your Microsoft account, a USB drive, a printout, and a secure digital file.
Secure Storage: Ensure your recovery key is stored in a safe location, like a safe or encrypted digital storage.
Keep Updated: Regularly update your recovery key and ensure it’s accessible, especially after significant system changes.
By following these best practices, you can avoid the potential frustration and data loss associated with being locked out of your BitLocker-encrypted drive.
For a more detailed guide on BitLocker and managing recovery keys, including step-by-step instructions and troubleshooting tips, check out this Comprehensive BitLocker Recovery Key Guide.
Hope this helps you stay secure and stress-free! If you have any more questions about BitLocker or need further assistance, feel free to drop a comment. 💬✨
Also read our related articals:
How Ad Blockers Might Trigger BSOD Blue Screen
Audio Troubleshooter: Resolve No Sound Issues On Dell Laptop
Laptop Not Connecting To WiFi? Fix Laptop WiFi Issues Today!
How To Fix ‘No Sound�� Issues On Your Laptop Or PC: A Comprehensive Guide
1 note
·
View note
Text
sadly this doesnt work with many enterprise devices as you need the BitLocker recovery key to access the command prompt in the troubleshooting mode
I love being in IT
#also depending on how things are set up you can't even access the filesystem from the troubleshooting command prompt#i ended up basically forgoing it all together and boot into safemode with network so I can login to the domain w/ admin creds
28K notes
·
View notes
Text
BitLocker Windows Update Shutdown or Reboot option behavior
BitLocker is a Windows security feature that provides encryption for entire volumes. It addresses the threats of data theft or exposure from lost, stolen, or inappropriately decommissioned devices. In this article, we shall discuss the following topic “understanding BitLocker Windows Update Shutdown or Reboot option behavior”. This is important for maintaining system security and functionality.…

View On WordPress
#Bitlocker#bitlocker key#BitLocker Recovery Keys#BitLocker Recovery Mode prompted#Microsoft Windows#Windows#Windows 10#Windows 11#Windows Server#Windows Server 2012#Windows Server 2016#Windows Server 2022#Windows Server 2025
0 notes
Text
How to introduce and actuate BitLocker on my gadget?
In the domain of network safety, safeguarding delicate information has become fundamental. BitLocker, a powerful encryption instrument created by Microsoft, fills in as a defend against unapproved admittance to your gadget and guarantees the classification of your information. In this thorough aide, we will walk you through the bit by bit course of introducing and enacting BitLocker on your gadget, normally alluded to as aka.ms/yourpc.
I. Figuring out BitLocker:
Prior to digging into the establishment cycle, it's critical to comprehend what BitLocker is and why it's a fundamental apparatus for getting your information. BitLocker is a full-plate encryption highlight included with Microsoft Windows working frameworks aka ms yourpc. It scrambles the whole plate to safeguard the information put away on it from unapproved access.
II. Framework Prerequisites:
Prior to continuing with the establishment, guarantee that your gadget meets the essential framework necessities. BitLocker is available on Windows 10 Pro, Enterprise, and Education editions, among others. Moreover, your gadget ought to have a Confided in Stage Module (TPM) rendition 1.2 or later for improved security.
III. Bit by bit Establishment Guide:
Presently, we should go through the bit by bit course of introducing BitLocker on your gadget.
Getting to the BitLocker Setup:
Open the Beginning menu and select "Settings."
Explore to "Update and Security" and snap on "Gadget encryption."
Really take a look at BitLocker Similarity:
Guarantee that your gadget meets the important prerequisites for BitLocker encryption.
Check to see if your device supports TPM versions earlier than 1.2.
Activate TPM (if required):
In the event that your gadget's TPM isn't empowered, access the Profiles/UEFI aka ms mfasetup firmware settings during the framework boot.
Enable the TPM settings wherever you find them. After making changes, exit.
Make use of BitLocker:
Get back to the "Gadget encryption" segment in the "Update and Security" settings.
On the off chance that your gadget is qualified, you'll track down the choice to "Turn on BitLocker." Click on it to start the establishment interaction.
Pick Encryption Technique:
Select by the same token "TPM as it were" or "TPM and PIN" in light of your inclination and security necessities.
Pick a Method for Unlocking Your Drive:
Choose whether to utilize a secret key, a savvy card, or both to open your drive.
Take a Backup of Your Recovery Key:
Save your BitLocker recuperation key in a solid area. In the event that you forget your password or run into other problems, you will need this key to unlock your drive.
Pick Encryption Mode:
Select the encryption mode - by the same token "Scramble utilized plate space as it were" or "Encode whole drive." The last option gives more complete assurance.
Start the encryption procedure:
To begin the BitLocker encryption process, select "Start encrypting" and then "Next."
IV. BitLocker activation with MS YourPC:
Since you have effectively introduced BitLocker, how about we investigate how to initiate it utilizing Otherwise known as MS YourPC.
Getting into AKA MS YourPC:
Navigate to the AKA MS YourPC portal using your browser.
Signing In:
Use the credentials from your Microsoft account to log in.
Gadget Approval:
Find the part for BitLocker gadget approval.
Follow the on-screen prompts to interface your gadget to your Microsoft account.
Two-Element Validation (2FA):
Add an extra layer of protection by enabling two-factor authentication.
Evaluating Gadget Status:
Actually look at the Also known as MS YourPC dashboard to guarantee that your gadget is effectively connected and approved.
Far off Administration:
Exploit Otherwise known as MS YourPC's distant administration highlights for BitLocker, permitting you to screen and deal with your gadget's encryption status from the entryway.
V. Best Practices and Investigating:
To expand the viability of BitLocker and aka ms myrecoverykey, think about the accompanying accepted procedures:
Make regular backups of your BitLocker recovery key in a number of safe places.
Update your operating system and device with the most recent security patches.
Test your recuperation key to guarantee it fills in true to form.
In the event that you experience any issues, allude to the BitLocker investigating documentation given by Microsoft or look for help from Otherwise known as MS YourPC support.
Conclusion:
Getting your gadget and information is a basic part of mindful registering. By introducing and initiating BitLocker on your gadget and utilizing the capacities of Also known as MS YourPC, you can essentially upgrade the security of your delicate data. Follow the bit by bit guide gave in this article to guarantee a smooth and secure establishment process. Make sure to remain informed about the most recent security practices and updates to keep up with the honesty of your scrambled information.
0 notes
Text
Windows 10 Update Error 0x80070643 (KB5034122/KB5034441)
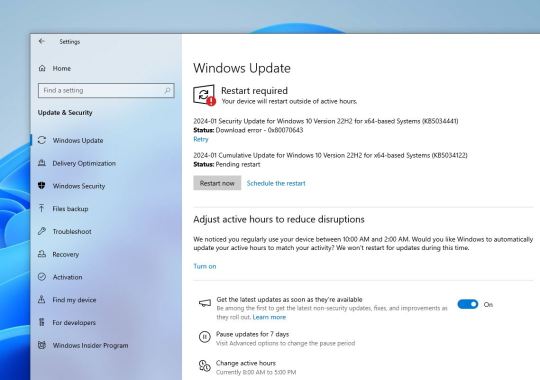
Microsoft recently rolled out new security updates for its Windows operating system. However, some users encountered difficulties during the installation of the KB5034122 update, receiving the error code 0x80070643 — ERROR_INSTALL_FAILURE. This issue seems to persist even upon retrying the installation.
Even after the system restarts, Users encounter an error message stating, "There were some problems installing updates, but we’ll try again later. If you keep seeing this and want to search the web or contact support for information, this may help: (0x80070643)."
This error code indicates a problem, and Microsoft has acknowledged it in a support article.
According to Microsoft, the update aims to address a security vulnerability that could potentially allow attackers to bypass Bitlocker encryption using the Windows Recovery Environment (WinRE).
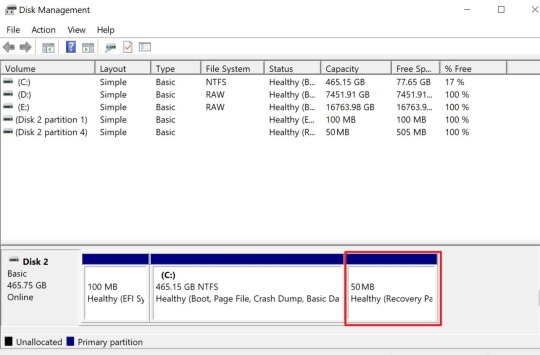
The root cause of the error is usually because of the insufficient size of the recovery partition to complete the update. Some uses may also encounter the error message “Windows Recovery Environment servicing failed. (CBS_E_INSUFFICIENT_DISK_SPACE)” during the installation attempt.
Windows 10 creates a recovery partition, usually around 500 MB, which is not large enough to support the new Windows RE image (winre.wim) file, causing the 0x80070643 error when attempting to install the update.
Microsoft’s suggested workaround involves manually resizing the recovery partition.
Press the Windows key + S, type Disk Management, and select “Create and format hard disk partitions.” Locate the main Windows drive and check for the Recovery Partition.
Microsoft had previously shared a support bulletin describing how to shrink the C: partition by 250 MB and create a new Recovery Partition using the reagentc.exe and dispart.exe command line utilities to accommodate WinRE security updates.
Manually resize your partition by 250 MB Open a Command Prompt window (cmd) as admin.
To check the WinRE status, run reagentc /info. If the WinRE is installed, there should be a “Windows RE location” with a path to the WinRE directory. An example is, “Windows RE location: [file://%3f/GLOBALROOT/device/harddisk0/partition4/Recovery/WindowsRE]\\?\GLOBALROOT\device\harddisk0\partition4\Recovery\WindowsRE.” Here, the number after “harddisk” and “partition” is the index of the disk and partition WinRE is on.
To disable the WinRE, run reagentc /disable
Shrink the OS partition and prepare the disk for a new recovery partition.
To shrink the OS, run diskpart
Run list disk
To select the OS disk, run sel disk<OS disk index> This should be the same disk index as WinRE.
To check the partition under the OS disk and find the OS partition, run list part
To select the OS partition, run sel part<OS partition index>
Run shrink desired=250 minimum=250
To select the WinRE partition, run sel part<WinRE partition index>
To delete the WinRE partition, run delete partition override
Create a new recovery partition.
First, check if the disk partition style is a GUID Partition Table (GPT) or a Master Boot Record (MBR). To do that, run list disk. Check if there is an asterisk character (*) in the “Gpt” column. If there is an asterisk character (*), then the drive is GPT. Otherwise, the drive is MBR.
If your disk is GPT, run create partition primary id=de94bba4-06d1-4d40-a16a-bfd50179d6acfollowed by the commandgpt attributes =0x8000000000000001
If your disk is MBR, run create partition primary id=27
To format the partition, run format quick fs=ntfs label=”Windows RE tools”
To confirm that the WinRE partition is created, run list vol
To exit from diskpart, run exit
To re-enable WinRE, run reagentc /enable
To confirm where WinRE is installed, run reagentc /info
Note If creation failed or you do not want to extend the WinRE partition, run reagentc /enable to re-enable WinRE.
However, it’s crucial to create a system backup before making any changes, as the process involves deleting and resizing partitions.
youtube
Source 01: https://support.microsoft.com/en-us/topic/kb5028997-instructions-to-manually-resize-your-partition-to-install-the-winre-update-400faa27-9343-461c-ada9-24c8229763bf
source 02: https://www.bleepingcomputer.com/news/microsoft/windows-10-kb5034441-security-update-fails-with-0x80070643-errors/
0 notes
Text
Bitlocker Recovery Service Malaysia
Data security is a crucial aspect for any organization or individual. BitLocker Recovery is a feature in Windows that provides data protection to your device by encrypting the entire disk drive.
However, there may be instances when you need to access your encrypted data and cannot do so. This is where BitLocker Recovery comes into play.
In this blog, we will explore the basics of BitLocker Recovery, including its importance and functions. We will also dive into different methods of retrieving your BitLocker Recovery Key, such as through your Microsoft account or using Command Prompt or PowerShell.
Additionally, we will discuss how to verify the correctness of your key and what steps you can take if you have lost it. Stay tuned to learn how to ensure the safety of your valuable data with BitLocker Recovery!
Data Recovery Malaysia
#data recovery malaysia#data recovery#datarecoverymalaysia#datarecoveryservices#data recovery center#hard disk repair malaysia#recovery#data#datarecovery#malaysia#bitlocker#bitlocker recovery
1 note
·
View note
Text
most installers have an option to automatically fit themselves into free space on an existing disk. Open "Partition Manager" in Windows, shrink the main partition of Windows to give yourself a couple hundred gigs, and then use a tool like Balena Etcher to flash the Linux ISO to a USB drive.
Boot from that (I think you probably know how to do that?) and then follow the prompts. It'll ask you if you want to install alongside the existing system or wipe it, if it doesn't you'll have to select "guided partitioner" during the disk setup step and follow the prompts to select the right partition/disk to install to.
The Most Normal Setup is Ubuntu and it works fine if you aren't already a Linux dweeb.
Personally I'd recommend Fedora for a newcomer, but the installer is a little more flexible by default and therefore potentially more confusing for dual-booting
Possible pitfalls: If Windows has Bitlocker disk encryption you'll need to get your Bitlocker recovery key, since it might ask you for that for verification if it detects a second OS installed. That isn't enabled on Windows Home I think? But you should check either way.
If your system has Intel RAID/Rapid Storage Technology enabled in the BIOS (which many laptops do) you're shit out of luck for an easy time, because Linux cannot read it so you have to turn it off, and turning it off will require a full Windows reinstall.
Usually for Fedora or Ubuntu you don't have to disable Secure Boot because they both have the appropriate keys, but you might at least have to turn off "Fast Boot" and you may still have to turn off Secure Boot to get it all installed.
If you're using an Nvidia GPU this has the potential to get really messy because they don't open-source their drivers, you may need to manually install them after you get the system up and you may rarely run into horrendous issues booting the system at all.
Side note: if you have a PC with two drives, you can make your life a little easier by just installing an entire Linux system to the second drive and treating each one as a totally independent system, but this is not practical on most laptops and requires some dedicated manual intervention during installation to make sure it all goes smoothly.
So, anybody have any advice about dual booting Linux? I've been putting it off a while. I mainly want to play with StableDiffusion and browse the internet and keep windows around just in case some game doesn't play nice with Linux. But frankly I'm not even sure where to start.
52 notes
·
View notes
Text
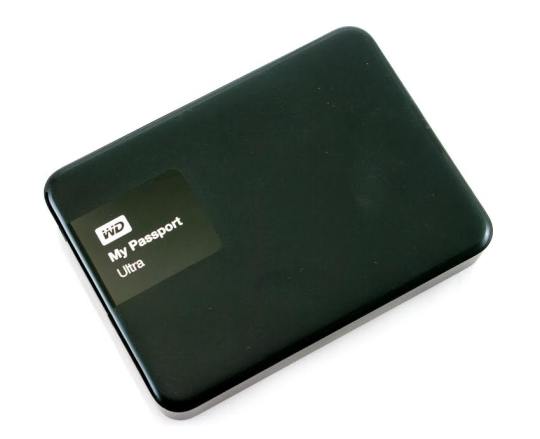
Wd My Passport Ultra Software Download Mac

I have eventually got my personal mac, the problem is I have a WD My Passport portable HD, with all my art, photos, and data I had done with the PC. I wish to copy files from my mac to the drive, it wont allow me. But when I open and copy files from the drive to the mac it works. How do I fix this without formatting the drive?
Summary: Have you received the error: 'The disk you inserted was not readable by this computer' on Mac? Don't worry, this article will focus on how to fix WD My Passport is corrupted or unreadable on Mac. To avoid the loss of important data, you'd better recover lost data from the unreadable WD My Passport with iBoysoft Data Recovery for Mac.
WD My Passport external hard drive is able to work on Mac and Windows for data transferring or backup. It is popular for its auto backup and passport protection features, keeping your files and folders safe. However, there are times that the WD My Passport becomes unreadable or corrupted on Mac. You may be greeted with errors like 'The disk you inserted was not readable by this computer', which prevents you from accessing all data stored on the drive.
Dec 04, 2018 Another difference is My Passport Ultra is USB-C ready, USB 3.0 compatible and formatted for Windows 10 to with plug-and-play storage out of the box. It also includes with NTFS driver for macOS so you can work on macOS operating system without reformatting. While you have to reformat My Passport into compatible file format in order to use it on.
My Passport; My Cloud Home; My Cloud; My Book; Internal Drives / SSDs; WD Elements / WD easystore; Embedded & Removable Flash; WD ReadyView; Legacy & Other Products; Downloads WD Software; Product Firmware; Product Downloads; Warranty & Returns Warranty Services; Warranty Policy; Data Recovery; Shipping Addresses.
List of all WD firmware and software available for download.
It's so frustrating when you meet this issue. If you are struggling to solve this issue, you will find a collection of verified troubleshooting steps.
Table of contents
1. Causes of WD My Passport not readable on Mac error
2. How to fix 'WD My Passport unreadable' on Mac error?
3. Conclusion
Note: If you received the disk not readable error with three options: Initialize, Ignore and Eject, please don't select 'Initialize'. Initializing the drive will erase all of the data that is currently sitting on the drive, which makes it difficult to recover lost data.
Causes of WD My Passport not readable on Mac error
Let's at first take a look at the complaint from community.wd.com:
'My WD My Passport 2TB Portable External Hard Drive has suddenly become unreadable on my laptop (MacBook Pro Server with macOS 10.12 Sierra) and I have tried on a MacBook Pro 2011 running 10.13 High Sierra with the same results. Any suggestions to fix my unreadable WD drive?'
The good news is, even though you have been prompted with an error message, at least your WD My Passport drive is recognized. There are many reasons that can lead to a drive not being readable, but essentially this is because the internal file system is damaged. Some of the possible reasons for this error are described as follow:
Mac malfunctions
Outdated drivers
Faulty connections
Write-protected drive
The WD My Passport is not formatted
An internal file system error or bad sectors
Virus/malware infection to your WD My Passport
Incompatibility issue between your WD My Passport and Mac machine
Accidental interruption or removal of your WD My Passport during transferring data
How to fix 'WD My Passport unreadable' on Mac error?
In most cases, the issue can be repaired with a simple initialize. But this operation will remove all data stored on this drive. Are there any other ways to fix WD My Passport unreadable issue on Mac? Of course, just try these solutions one by one:
Solution 1: Re-insert the WD My Passport
The first and foremost thing is to remove the WD My Passport safely from Mac and then re-plug it into the USB port properly. If the external hard drive mounts and appears on the left sidebar of Finder, then you can access the drive. However, if the WD drive still won't mount or the error persists, continue with the next method below.
Solution 2: Check the Mac computer
The next step is to check whether your Mac machine has a problem or not. Just connect a different storage device to your Mac. If this error still pops up, the problem may refer to your Mac machine, you can restart your Mac to see if everything works well. Otherwise, if you can see the other drive in Finder, the problem is associated with the previous WD My Passport.
Solution 3: Check if the WD My Passport is encrypted
The WD My Passport for Mac corrupted or readable issue can also happen if the drive is encrypted by BitLocker. By default, the Mac computers cannot recognize a BitLocker encrypted drive, which means you are unable to read or write BitLocker encrypted drive on Mac.
You can insert the drive in a PC and then turn off the BitLocker encryption so that it can be read on Mac. In addition, you can access a BitLocker encrypted drive with the help of a third party tool.
Solution 4: Update Mac drivers
Drivers enable one or more hardware devices to communicate with the computer's operating system. If drivers are out-of-date, a variety of issues will happen such as the disk not readable error. Apple handles all system and driver updates for your system. To check if any updates are available, please do the following:
Step 1: Go to Apple menu and select 'App Store'.
Step 2: Click on the 'Updates' button located on the top pane.
Step 3: Check available updates for your system and applications.
Solution 5: Repair the WD My Passport in Disk utility
Disk Utility is a built-in used to erase, format or manage internal disks and external storage devices. The most important feature of Disk Utility is First Aid, which helps detect and repair any issue with your disk. Here is how to run First Aid on your Mac to repair the unreadable WD My Passport:
Step 1: Open Disk Utility from your /Applications/Utilities folder.
Step 2: Select the unreadable WD My Passport in the left side bar.
Step 3: Select the 'First Aid' tab.
If Disk Utility tells you the disk is about to fail, back up your data and replace the disk. You can't repair the disk. Otherwise, continue to step 4.
Step 4: Click Run.
If Disk Utility reports that the disk appears to be OK or has been repaired, you're done. Otherwise, you have to back up as much of your data as possible.
Solution 6: Recover lost data and erase the WD My Passport
If the error still exists, you have no choice but erase the WD My Passport. But keep in mind that you will lose all data store on this disk. If you didn't back up important data, you should get lost data back with free Online data recovery software at first.
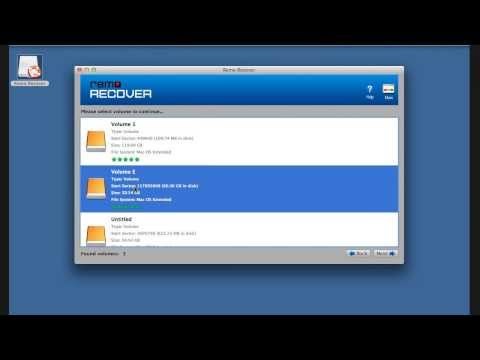
Step 1: Recover lost data from the unreadable WD My Password on Mac
If you are not sure which data recovery tool you can trust, iBoysoft Data Recovery for Mac is highly recommended to recover lost data from the unreadable or corrupted WD My Passport. This free Mac data recovery can scan and recover lost data from unreadable SD cards, internal Macintosh hard drives, external hard drives, USB flash drives, etc. iBoysoft Data Recovery for Mac provides a complete Mac data recovery solution even if your Mac won't boot/turn on, your device is failing, inaccessible or has lost a partition.
Moreover, iBoysoft Data Recovery for Mac can also recover recently or permanently deleted files, recover lost data from formatted hard drives, recover lost data from unmountable hard drives, and recover lost data from inaccessible drives, etc. This software supports recovering documents, photos, videos, emails, and music files. It's fully compatible with macOS Big Sur 11/Catalina 10.15/Mojave 10.14/High Sierra 10.13/Sierra 10.12 and Mac OS X 10.11/10.10/10.9/10.8/10.7.
1. Download and install iBoysoft Data Recovery for Mac on Mac.
2. Launch iBoysoft Data Recovery for Mac.
3. Select the unreadable WD My Passport and click 'Next' to search for lost files.
4. Preview the searching results, choose those you want and click 'Recover' to get them back.
5. Go over to ensure all lost files have been successfully restored.
Step 2: Erase the unreadable WD My Password in Disk Utility
After you get files off the WD My passport hard drive, you are safe to erase this external hard drive to make it work again. Reformatting will fix the unreadable error and the drive can be ready to use. Then you can copy the recovered data back.
• How to format external hard drive on Mac?
Solution 7: Ask data recovery service for help
However, if the solutions above don't fix the WD My Passport unreadable issue for you, or your WD My Passport even won't show up on Mac, it's probably the drive has been physically damaged. In that case, you should send it to a local data recovery service or replace it with a new one.
Wd My Passport Ultra Software
Wd My Passport Ultra Software Download Mac Version
Conclusion
Wd Passport Ultra Software Download
Hope these solutions have helped you fix the WD My Passport corrupted or unreadable issue. If you have any question about this article, stay in touch with us for further assistance. Specifically, we'd love to hear if you have other solutions for this issue.
1 note
·
View note
Text
The Most Popular Enable Bitlocker
If your PC doesn't have TPM, then console indicates that Compatible may not be found (see screenshot). Then you will have to manually restart your PC. When you restart your PC, you might observe a warning your system was changed. You're able to keep working on your computer during the encryption phase, but things could be running a bit more slowly than normal. If you've got an older PC with a couple more miles on the difficult drive, you should decide to encrypt the whole drive.
If you're using Windows 10, you will observe an extra screen allowing you to pick an encryption procedure. Windows 10 has an extra feature named Device Encryption. Following that, your computer should reboot and when you log in again you'll observe the BitLocker window. Windows 10 gives you the ability to allow a Night Light mode (previously referred to as Blue Light) to decrease eye strain. After the window is shaken again, all of them are restored, very similar to desktop preview. Windows 7 also uses the TRIM command. You'll be presented a dialog window to enter new information regarding the image. Want to Know More About Enable Bitlocker Windows 7?
The bitlocker tool demands a reboot after producing the partition anyway. The Repair-bde command-line tool is designed for use once the operating system doesn't start or when you can't begin the BitLocker Recovery Console. There are several full disc encryption software to encrypt your drive or you may use inbuilt Windows option called Bitlocker. In the event your computer doesn't have a Trusted Platform Module (TPM) or the TPM isn't supported, you are going to get a warning. You'll be prompted to restart your computer to begin the encryption procedure. Some computers, particularly on the consumer line, don't have them. It is possible to get rid of a password only once you configure a new procedure of authentication. For instance, the user can enter a PIN or offer a USB drive that has a key. Please note that anybody may use the recovery key to access the drive, even in case they do not know the password entered in the prior step, so please don't disclose it to others.
Sensible option in my opinion and if you wish to finish the encryption quickly, go with first choice. BitLocker drive encryption is a somewhat advanced and useful quality of Windows and with the most current Windows 10, it's far better than ever. When the BitLocker drive encryption is done, you will observe the BitLocker On. Two factor authentication takes the basic passwords or simple to guess passwords from the equation so they are no longer a risk. Encryption is increasingly essential as organizations decide to guard their sensitive data. Briefly, it is basically the process of making any type of data unreadable by anyone without proper authorization. There is an additional way to Enable whole disk encryption on Windows 10.

You will have to copy or write the files to a partition readily available to the neighborhood device so as to modify them. It is possible to save a number of keys of different kinds into a single file. After the VHD file is made, it is going to want to get initialized. Employing BitLocker-encrypted VHD files is one particular possibility.
Placing the enable command at the beginning will significantly boost the deployment time. When there is a simpler way please allow me to know. There's no need to decrypt the entire drive simply to access the files. When it's already being used, select the second option Encrypt entire drive.
There's a choice to save your data when it get steals or you're giving it to someone for quite a while. There's an alternative though and you don't need to have a TPM to enjoy BitLocker in Windows. Additional options are also supplied for the login UI, for example, ability to customize the look of interface lighting and shadows. After you click Applysome additional options should appear. Web-based remote help alternatives are available.
When the initialization procedure is finished, BitLocker To Go will ask you to establish a password which you will utilize to unlock the drive, as shown in Figure C. The procedure is nondestructive, and therefore you don't need to be worried about any data that's already on the drive. The encryption procedure starts when the computer reboots. It will repartition the disk as necessary.
It's possible to select several various ways of unlocking the drive. It is possible to also encrypt different drives than only the system drive. If you wish to decrypt your hard disk, all you have to do is turn off BitLocker. With BitLocker, you make a digital hard disk, and encrypt it. Make certain you have a USB flash drive readily available to store the startup key.
youtube
1 note
·
View note