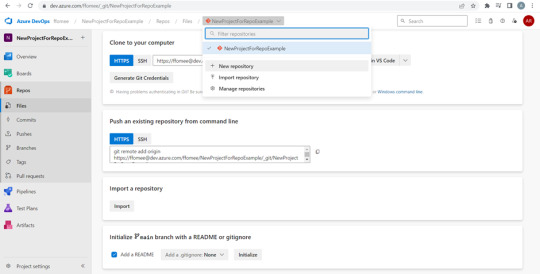
#Clone Repository Azure DevOps
Explore tagged Tumblr posts
Visit Tumblr Blog
Explore Tumblr blogs with no restrictions, modern design and the best experience.
Last Seen Tumblr Blogs


Fun Fact
Tumblr.com is the 103rd most visited website in the world.
Text
How to Clone a Repo from Azure DevOps- OpsNexa!
Learn how to clone a repository from Azure DevOps to your local machine using Git. Our detailed guide walks you through the process of copying the repository URL, How to Clone a Repo from Azure DevOps, authenticating, and setting up the project locally so you can begin coding right away.
#Azure DevOps Clone Repo#Clone Repository Azure DevOps#Clone Azure DevOps Git Repo#Azure DevOps Repository Clone#Clone Repo From Azure DevOps
0 notes
Text
Implementing CI/CD for Snowflake Projects

Introduction
Continuous Integration and Continuous Deployment (CI/CD) for Snowflake enables teams to automate development, testing, and deployment of Snowflake SQL scripts, schemas, stored procedures, and data pipelines. By integrating with DevOps tools, you can ensure version control, automated testing, and seamless deployment of Snowflake objects.
1. Why CI/CD for Snowflake?
Traditional data warehouses lack modern DevOps automation. Implementing CI/CD for Snowflake helps:
Automate schema management (tables, views, procedures).
Improve collaboration with version-controlled SQL scripts.
Reduce errors through automated testing and validation.
Enable faster deployments using pipeline automation.
2. CI/CD Pipeline Architecture for Snowflake
A typical CI/CD pipeline for Snowflake consists of:
Version Control (GitHub, GitLab, Bitbucket) — Stores SQL scripts.
CI Process (Jenkins, GitHub Actions, Azure DevOps) — Validates and tests SQL changes.
Artifact Repository (S3, Nexus, Artifactory) — Stores validated scripts.
CD Process (dbt, Flyway, Liquibase, Terraform) — Deploys changes to Snowflake.
Monitoring & Alerts (Datadog, Prometheus) — Tracks performance and errors.
3. Setting Up CI/CD for Snowflake
Step 1: Version Control with Git
Store Snowflake DDL, DML, and stored procedure scripts in a Git repository.bashgit init git add schema.sql git commit -m "Initial commit" git push origin main
Step 2: CI Pipeline — Linting & SQL Validation
Use SQLFluff to check for syntax issues.bashpip install sqlfluff sqlfluff lint schema.sql
Step 3: Automated Testing
Create a test environment in Snowflake and execute test cases.sqlCREATE DATABASE test_db CLONE production_db;
Run test queries:sqlSELECT COUNT(*) FROM test_db.orders WHERE status IS NULL;
Step 4: CD Pipeline — Deploy to Snowflake
Use Liquibase or dbt to manage database changes.
Liquibase Example
bashliquibase --changeLogFile=schema.xml update
dbt Example
bashdbt run --profiles-dir .
Step 5: Automating with Jenkins
Define a Jenkins Pipeline (Jenkinsfile):groovypipeline { agent any stages { stage('Checkout') { steps { git 'https://github.com/org/snowflake-repo.git' } } stage('Lint SQL') { steps { sh 'sqlfluff lint schema.sql' } } stage('Deploy to Snowflake') { steps { sh 'liquibase update' } } } }
4. Best Practices for Snowflake CI/CD
✅ Use separate environments (Dev, Test, Prod). ✅ Implement automated rollback for failed deployments. ✅ Integrate monitoring tools for performance tracking. ✅ Follow Git branching strategies (feature branches, main branch).
5. Conclusion
CI/CD for Snowflake enables automated, secure, and version-controlled deployments of SQL-based data solutions. By integrating Git, Jenkins, Liquibase, or dbt, you can streamline database development and ensure data consistency.
WEBSITE: https://www.ficusoft.in/snowflake-training-in-chennai/
0 notes
Text
Mastering Azure DevOps: Step-by-Step Training for Developers
Introduction: Why Learn Azure DevOps?
In today's fast-paced software development landscape, mastering DevOps is no longer an option—it’s a necessity. Businesses demand faster deployments, higher efficiency, and seamless collaboration between development and operations teams. Azure DevOps simplifies this by providing a full suite of tools to automate workflows, manage source code, and deploy applications efficiently.
If you’re a developer looking to upskill and future-proof your career, our Azure DevOps training at H2K Infosys is the perfect starting point. In this guide, we'll take you through a step-by-step learning path, covering the essentials and practical applications of Azure DevOps. By the end, you’ll have a solid foundation to earn your Azure DevOps certification and apply these skills in real-world projects.
What is Azure DevOps?
Azure DevOps is a cloud-based DevOps service provided by Microsoft. It offers a comprehensive toolchain for developing, testing, and deploying applications efficiently. Whether you work in software development, IT operations, or cloud engineering, learning Azure DevOps helps streamline workflows, reduce errors, and enhance productivity.
Key Features of Azure DevOps:
Azure Repos: Version control for managing source code.
Azure Pipelines: CI/CD automation for seamless deployment.
Azure Boards: Agile project management for tracking work.
Azure Test Plans: Automated and manual testing capabilities.
Azure Artifacts: Package management for reusable components.
These tools provide an end-to-end DevOps solution, enabling teams to collaborate, automate, and deploy efficiently.
Step-by-Step Training: Mastering Azure DevOps
To gain proficiency in Azure DevOps, follow this structured learning path:
Step 1: Understanding DevOps Fundamentals
Before diving into Azure DevOps, it's essential to grasp the core concepts of DevOps, including:
Continuous Integration (CI) and Continuous Deployment (CD)
Infrastructure as Code (IaC)
Monitoring and Logging
Security and Compliance in DevOps
Step 2: Getting Started with Azure DevOps
Create an Azure DevOps Account: Visit the official site and sign up.
Set Up an Organization and Project: Organize repositories, pipelines, and teams.
Explore the Azure DevOps Interface: Navigate through dashboards, pipelines, and boards.
Step 3: Mastering Azure Repos (Version Control)
Learn Git and TFVC for source control management.
Clone repositories, create branches, and merge changes.
Implement best practices like code reviews and pull requests.
Step 4: Implementing CI/CD with Azure Pipelines
Set Up a CI Pipeline: Automate build and testing.
Deploy Applications with CD: Use YAML pipelines to automate releases.
Monitor Deployment: Integrate with Azure Monitor for real-time tracking.
Step 5: Agile Project Management with Azure Boards
Create user stories and tasks.
Use Kanban boards and sprint planning tools.
Track progress with built-in reporting features.
Step 6: Enhancing Quality with Azure Test Plans
Conduct automated and manual testing.
Integrate Selenium and JMeter for performance testing.
Ensure security compliance with automated scans.
Step 7: Managing Packages with Azure Artifacts
Store and share reusable code components.
Publish and consume packages securely.
Optimize software dependencies.
Real-World Applications of Azure DevOps
Industry Adoption of Azure DevOps
Many companies, from startups to Fortune 500 firms, are leveraging Azure DevOps to accelerate development. A case study by Microsoft shows that organizations using Azure DevOps experience 30-50% faster deployment cycles and significant cost savings.
Use Cases:
Software Development Teams: Automate builds, tests, and deployments.
IT Operations: Manage infrastructure as code.
Cloud Engineers: Deploy scalable solutions on Azure.
QA Professionals: Ensure high-quality releases with test automation.
Preparing for Azure DevOps Certification
Earning an Azure DevOps certification validates your expertise and boosts career opportunities. The recommended certification path includes:
AZ-400: Designing and Implementing Microsoft DevOps Solutions
Microsoft Certified: DevOps Engineer Expert
H2K Infosys offers comprehensive Azure DevOps training and certification prep to help you ace these exams and gain hands-on experience.
Conclusion & Next Steps
Azure DevOps is an essential skill for modern developers, enabling automation, collaboration, and efficiency in software development. Whether you are a beginner or an experienced professional, our Azure DevOps course at H2K Infosys provides step-by-step guidance, hands-on training, and industry-relevant insights.
Ready to elevate your career? Enroll in our Azure DevOps training today and gain the skills needed for certification and real-world success!
#devops engineer#devops engineer course#devops engineer certification#azure devops git training#devops training#azure devops training#devops and aws training#devops with aws training#devops training online#devops certification training#devops online training#devops training and certification#azure devops certification#azure devops course#best devops training online free#learn azure devops#devops certification microsoft#devops microsoft certification#azure devops training online#aws devops training online
0 notes
Text
Azure DevOps Certification Training | Azure DevOps Training in Hyderabad
Beginner’s Roadmap to Azure DevOps Course: Key Concepts Explained
For many organizations, Azure DevOps offers a comprehensive suite to manage the full software development lifecycle. The integration of development and operations has become crucial in today’s fast-paced software industry, and Azure DevOps meets these demands effectively by providing a unified platform. If you’re a beginner considering an Azure DevOps course, or simply interested in building foundational knowledge, this guide will introduce essential concepts and tools. Many resources, such as Azure DevOps Training in Hyderabad, provide thorough, hands-on experience in the fundamentals, preparing developers to use Azure DevOps effectively in their work.

Understanding Azure DevOps: An Overview
Azure DevOps, developed by Microsoft, is a cloud-based platform that combines several tools for streamlined development, testing, and deployment. By integrating development and operations, commonly known as DevOps, teams work collaboratively and enhance efficiency. DevOps encourages continuous integration and continuous delivery (CI/CD), emphasizing automation to shorten development cycles and improve software quality. Azure DevOps Certification Training programs cover these elements and more, creating a solid foundation for those pursuing careers in this field.
This platform is particularly valuable as it’s cloud-based, allowing for easy access from virtually any location and excellent integration with a host of other cloud services. Key tools like Azure Boards, Azure Pipelines, and Azure Repos make Azure DevOps a highly versatile tool, especially valuable for organizations using other Microsoft technologies. Let’s break down the core components that every beginner should understand:
Core Components of Azure DevOps
Azure Boards: Azure Boards allows teams to plan, track, and collaborate on their projects. It provides tools for Agile planning, bug tracking, and feature management. For teams adopting Agile methodologies, Azure Boards is incredibly valuable, as it organizes work into boards, backlogs, and sprints. Azure DevOps Training in Hyderabad often emphasizes the hands-on use of Azure Boards to build familiarity with Agile practices.
Azure Repos: This is the version control tool in Azure DevOps, essential for managing code repositories. Azure Repos offers two options: Git repositories, which are widely used in the industry, and Team Foundation Version Control (TFVC), which is specific to Microsoft. Git’s popularity stems from its distributed nature, allowing every developer to have a local copy of the entire project. For beginners, learning the basic Git commands, such as cloning, committing, and pushing changes, is invaluable. Courses like Azure DevOps Certification Training cover Git extensively as it’s a skill expected in many development roles.
Azure Pipelines: Automation is a crucial aspect of DevOps, and Azure Pipelines is where much of the automation happens. Azure Pipelines allows you to build, test, and deploy code continuously, supporting multiple languages like Java, Python, and Node.js. Continuous integration and continuous delivery (CI/CD) workflows ensure that software updates are automatically deployed and tested, reducing the time required for manual intervention. When considering an Azure DevOps course, make sure it covers Azure Pipelines thoroughly, as these skills are central to a DevOps career.
Azure Test Plans: Testing is a critical part of any software project, and Azure DevOps provides a dedicated testing tool known as Azure Test Plans. It allows for planned and exploratory testing, with manual and automated test options. This component helps teams verify that the application works as expected across different environments. Azure DevOps Training in Hyderabad generally includes test plans as part of its curriculum, ensuring that participants understand the value of quality assurance in the DevOps pipeline.
Azure Artifacts: Managing dependencies is another significant aspect of software development, and Azure Artifacts provides a package management solution for Maven, npm, and NuGet package feeds. This allows teams to create, host, and share packages, improving code reuse and standardizing dependencies across projects.
Getting Started: Building Skills and Knowledge
For those new to DevOps and Azure DevOps, starting with an Azure DevOps course provides structured, comprehensive learning. Look for courses that prioritize hands-on labs and real-world scenarios, enabling you to gain practical experience with Azure DevOps tools. In addition to training, several other resources can supplement your knowledge:
Documentation: Microsoft’s official documentation for Azure DevOps is extensive and often the first resource recommended. It covers all aspects of the platform, from introductory guides to advanced tutorials.
Certifications: Obtaining certification is an excellent way to validate your skills. Azure DevOps Certification Training programs, such as Microsoft’s Azure DevOps Engineer Expert, are widely recognized in the industry. Certifications demonstrate to employers that you have the necessary skills and knowledge to effectively use Azure DevOps.
Online Communities: Platforms like GitHub, Stack Overflow, and Microsoft’s own forums have active DevOps communities. These platforms offer a great way to find answers to questions, get advice, and stay updated on the latest Azure DevOps developments.
Benefits of Pursuing Azure DevOps Training
Azure DevOps simplifies complex workflows, facilitates collaboration, and enhances project visibility, making it highly beneficial for beginners and seasoned developers alike. By pursuing Azure DevOps Training in Hyderabad or an equivalent program, you gain access to an in-depth understanding of essential tools and practices. Certifications can also accelerate career growth, as employers highly value proficiency in DevOps and related tools. As DevOps continues to expand and become essential across industries, learning Azure DevOps is an investment in a future-proof skill set.
Conclusion
Mastering Azure DevOps as a beginner provides a solid foundation for a career in DevOps, opening up opportunities for growth and advancement. Taking an Azure DevOps course equips you with hands-on experience, essential skills, and a broad understanding of the DevOps lifecycle. For individuals looking to make an impactful career in technology, especially in development or IT operations, Azure DevOps is a strategic choice. Whether you choose an in-depth Azure DevOps Certification Training or a local Azure DevOps Training in Hyderabad, you’ll gain the expertise to contribute effectively to modern development environments and enhance your career in the tech industry.
Visualpath is the Best Software Online Training Institute in Hyderabad. Avail complete Microsoft Azure DevOps Training worldwide. You will get the best course at an affordable cost.
Attend Free Demo
Call on - +91-9989971070
Visit: https://visualpathblogs.com/
WhatsApp: https://www.whatsapp.com/catalog/919989971070
Visit https://www.visualpath.in/online-azure-devops-Training.html
#Azure DevSecOps Training#Azure DevOps Training in Hyderabad#Azure DevOps Certification Course#Azure DevOps course#Azure DevOps Training Online#Microsoft Azure DevOps Training#Azure DevOps Online Course
1 note
·
View note
Text
Essential Azure DevOps Skills: What You Need to Succeed in Modern Software Development

In today's fast-paced software development landscape, tools that support automation, collaboration, and streamlined deployment have become essential. Azure DevOps, a comprehensive set of development tools and services by Microsoft, has emerged as a leading platform to support DevOps practices throughout the software development lifecycle.
To effectively use Microsoft Azure course DevOps, professionals need a well-rounded set of skills that go beyond just coding. From managing version control to setting up deployment pipelines, these skills are crucial for building modern, scalable, and reliable software systems.
In this article, we’ll explore the key Azure DevOps skills you need to master to boost your productivity, improve collaboration, and deliver software efficiently and securely.
What Are Azure DevOps Skills?
Azure DevOps skills refer to the technical competencies, best practices, and practical knowledge required to use Azure DevOps tools effectively. These include skills related to:
Source control and version management
Continuous Integration (CI) and Continuous Delivery (CD)
Infrastructure as Code (IaC)
Azure cloud services integration
Automation and monitoring
Whether you’re a developer, DevOps engineer, system administrator, or project manager, mastering these skills can significantly improve your ability to manage software delivery from start to finish.
1. Source Control Management
One of the foundational skills in Azure DevOps is managing source code using a version control system. Azure DevOps supports Git repositories through Azure Repos, providing teams with tools to collaborate on code effectively.
Key Skills to Learn:
Understanding Version Control Concepts: Learn how version control systems work, why they are essential, and the difference between centralized and distributed systems.
Proficiency in Git: Git is the most widely used version control system. You should be comfortable with basic Git operations like clone, commit, push, and merge.
Branching Strategies: Master different branching models such as Git Flow, trunk-based development, or feature branching to manage code changes in a structured way.
Pull Requests and Code Reviews: Know how to create and manage pull requests, conduct code reviews, and resolve merge conflicts.
2. Continuous Integration (CI)
Continuous Integration (CI) is a critical DevOps practice where developers regularly merge code changes into a shared repository, followed by automated builds and tests.
Key Skills to Learn:
Creating CI Pipelines: Use Azure Pipelines to set up CI workflows that automatically build and validate code after each commit.
Writing Build Scripts: Learn how to write and configure build scripts using YAML or visual editors within Azure Pipelines.
Automated Testing Integration: Integrate testing frameworks (like NUnit, JUnit, or PyTest) into your CI pipelines to ensure that new code doesn’t break existing functionality.
CI helps catch issues early in the development process, improving code quality and reducing bugs in later stages.
3. Continuous Delivery (CD)
While CI focuses on automatically building and testing code, Continuous Delivery (CD) takes it a step further by automating the deployment process.
Key Skills to Learn:
Configuring CD Pipelines: Set up CD pipelines in Azure Pipelines to deploy your applications automatically to various environments like development, staging, and production.
Deployment Strategies: Understand different deployment strategies such as blue-green deployments, rolling updates, and canary releases to minimize downtime and risk.
Managing Triggers and Approvals: Configure automatic or manual triggers and approval gates to control when and how deployments occur.
4. Azure Services Integration
Azure DevOps is designed to work seamlessly with various Azure cloud services. Understanding how to integrate these services into your DevOps pipelines is essential for modern application delivery.
Key Skills to Learn:
Deploying to Azure App Services: Learn how to deploy web applications directly to Azure App Service using Azure Pipelines.
Using Azure Functions: Automate workflows or deploy serverless functions as part of your CI/CD process.
Managing Azure Kubernetes Service (AKS): Deploy and manage containerized applications in AKS, Microsoft’s managed Kubernetes offering.
ARM Templates for Resource Management: Define and manage your cloud infrastructure using Azure Resource Manager (ARM) templates.
5. Infrastructure as Code (IaC)
Infrastructure as Code is a critical part of DevOps practices. It allows you to define your infrastructure using code, making deployments repeatable, scalable, and easy to manage.
Key Skills to Learn:
Using ARM Templates: ARM templates allow you to describe your Azure resources in JSON format and automate their deployment.
Working with Terraform: Terraform is a popular tool for defining infrastructure across multiple cloud platforms, including Azure. Learn its syntax (HCL) and how to write reusable, version-controlled infrastructure modules.
Automation and Scaling: Automate the provisioning, updating, and decommissioning of infrastructure using scripts and configuration files.
Why These Skills Matter in a DevOps Career
Organizations are rapidly adopting DevOps to improve software quality, reduce release cycles, and increase agility. Azure DevOps brings all necessary tools into one platform, but to use it effectively, professionals need a combination of development, operational, and automation skills.
Here’s how mastering Azure DevOps skills helps you:
Better Collaboration: Facilitates smoother communication between development and operations teams.
Higher Efficiency: Automates repetitive tasks and reduces time spent on manual processes.
Improved Quality: Encourages continuous testing and monitoring, leading to more stable releases.
Career Growth: Azure DevOps expertise is in high demand, especially in organizations moving to the cloud or adopting DevOps practices.
Conclusion
Azure DevOps is more than just a set of tools—it's a platform that supports modern software development practices through automation, collaboration, and integration with the cloud. To take full advantage of Azure DevOps, professionals must develop skills in source control, CI/CD, infrastructure automation, and Azure services.
If you're just starting out, consider hands-on learning through projects, online courses, or Azure DevOps certification programs. With consistent effort, you'll gain the practical expertise needed to manage the full software development lifecycle using Azure DevOps.
0 notes
Text
Azure DevOps: Handling Source Control operations with Azure DevOps and Repos
Azure DevOps provides a powerful set of features and tools for effective source control management through its Repos service. Here, we will explore the steps involved in creating a new Git repository in Azure DevOps and cloning a remote repository in Visual Studio Code. Creating a New Git Repository in Azure Project: To create a new Git repository in Azure DevOps, follow these steps: Step 1:…
View On WordPress
0 notes
Text
Azure devops clone repository
Azure devops clone repository
Azure devops clone repository Azure devops clone repository News sites Azure devops clone repository Clone an existing Git repo Azure Repos | Azure DevOps Server 2020 | Azure DevOps Server 2019 | TFS 2018 | TFS 2017 | TFS 2015 | VS 2017 | VS 2015 Create a complete local copy of an existing Git repository by cloning it. Cloning a repo downloads all commits and branches in the repo. Cloning sets…

View On WordPress
0 notes
Text
Top 5 DevOps Tools to quickly Jumpstart your DevOps Career

As companies are being digitized, the need for DevOps has increased at a tremendous rate. The future of IT companies is now dependent on the DevOps approach, making it the most demanding job at this time. The market has grown from 40–45 percent within the last five years, increasing the DevOps demand.
If you are believing that you have effectively missed the DevOps flight and presently no chance exist for new applicants, I am glad to let you know that you still have time and also a lot of scope to make a rewarding career into the DevOps domain.
Here I reveal Top Five tools that you need to ace to pursue a DevOps engineer career.
These are the five tools that you will be using daily, and you need to have the knowledge on how to work on them, which includes both hands-on knowledge and also theoretical knowledge. But mostly having hands-on experience is very important.
So, whenever you get the job, you can sit and work on these tools to prove yourself.
The very first tool I would say would be.
DevOps tool #1: Jira

Jira is commonly used by businesses and companies all around the world.
It is a complete Project Management tool in which you can distribute your workflows and workloads within projects and within teams.
Also, in Jira you can have different kinds of tickets, issues, epics stories and different tasks that are assigned to different team members and different teams regarding their own specific projects. It is a simple and easy to learn tool.
So, I would say, for a DevOps Engineer position you should know how to use Jira.
Now the second tool on this list would be
#2: Git or GitHub

GitHub is a commonly known repository tool, many companies use it for the repositories to store and version control their code.
In GitHub you have an option to either make your repositories public, or you can keep them private. It totally depends on your company’s policies. If your organization decides to make the repository public, the code stays on cloud. Otherwise for private repositories, GitHub Enterprise needs to be setup by the organization on one of their data centers.
I would say GitHub is a really good tool that you should know how to use. Especially you need to know,
How To
Create New Repository
Store code in the repository
Clone the code on your local machine
Make changes in your local copy
Create Pull Requests and push the code to the remote repository after code reviews.
You also need to know all the basic Git commands like
Git status
Git add
Git commit
Git Push
Git Pull
Git Fetch
So, these are some basic git commands that you need to know.
For example,
Scenario 1: If you want to fetch a repository from GitHub to your local machine how would you
do that?
Scenario 2: If you want to push your local code to remote GitHub repository, how would you do that?
Apart from these, there are other important things in GitHub that are worth practicing like Web Hooks etc.,
These kind of basic activities in GitHub and ability to nonchalantly run the git commands on the terminal would be must for you to survive in a DevOps Engineer role.
So, moving on to the third tool in this list.
#3: Any Cloud Platform
It can be MS Azure or AWS or GCP or RedHat Open Shift etc.,
You have a variety of cloud platforms to choose from. But you should completely focus on one. Simply
start gaining hands-on experience on it.
Personally, I have learned AWS. I also have AWS certification as an Associate Solution Architect in AWS. The certification itself demands hands-on experience on AWS and that will be thoroughly tested in the certification exam.
Also, my current position as a DevOps engineer. I have mostly worked on AWS, along with Containerization, Orchestration, Continuous Integration and Continuous Delivery (CI/CD). Also having hands-on experience on Storage and database is a must.
Having experience and thorough knowledge on at least one cloud provider is a must for a DevOps Engineer currently. Although, I personally recommend AWS, you can choose any provider that you can get your hands on.
Moving on to the fourth one, which is Jenkins.
#4: Jenkins

Jenkins is a CI tool which is Continuous Integration tool.
You can integrate it with AWS (or any cloud platform), GitHub, and many other tools to achieve CI/CD pipeline. Therefore, as a DevOps Engineer you need to at least know
How to use Jenkins
How to create jobs in Jenkins
How to create builds on Jenkins
How to integrate it with AWS or even GitHub
So, with Jenkins you can create Continuous Integration Continuous Delivery (CI/CD) pipelines
for your business. So, once the developer pushes the code to GitHub repository, the pipeline job is automatically trigger through Jenkins and it updates your application.
Jenkins is a great tool to learn. Although, it is easy to learn and master Jenkins, it is a very critical tool for any organization to practice DevOps. Therefore, you should dedicate a major amount of time and effort in learning and mastering this tool.
Now, the fifth tool on this list would be any Containerization tool which can be Docker in conjunction with Kubernetes.
#5: Docker and Kubernetes
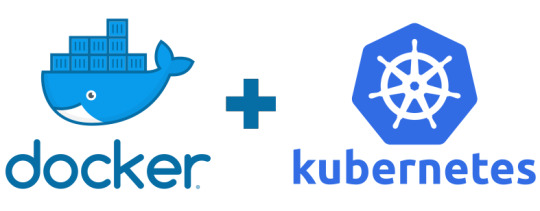
As you might already know containerization is growing rapidly throughout the cloud platform and DevOps world.
Docker makes it easy to deploy your app or Microservice on Cloud.
Kubernetes makes it easier to deploy your app on hundreds of servers.
Besides Docker, if there is another tool or technology which has caught software developers’ attention in recent times then it must be Kubernetes.
Docker also helps with DevOps because it simplifies deployment and scaling, and that’s why Every DevOps engineer should learn Docker.
Kubernetes is a portable, extensible, open-source platform for managing containerized workloads and services, that facilitates both declarative configuration and automation.
So that is it, get to know these tools, have your hands on them, get your hands wet, run into issues, resolve those issues and master these tools to land into your DevOps Engineer job.
For a complete guide on starting your career as a DevOps Engineer. Click here and enter your name and email to download the eBook ‘Guided path to DevOps career’.
#devops#kubernetes#log4j#docker#culture#code#developers & startups#tech#programming#edtech#firewall#install#books & libraries
5 notes
·
View notes
Text
Connecting rcode to github

Remote branches, tags, and remote changes are fetched automatically.ĭetails regarding all the branches and tags you've just fetched are displayed. In the main toolbar, click on Git > Fetch. For more information on the fetch command, refer to the Git documentation: Git Fetch. Retrieve all information about changes that have occurred in remote branches. Select a branch to be deleted, then click OK. In this dialog, both local and remote branches are displayed. In the main toolbar, click the Git icon > Manage Branches > Delete Branch. The branch with an √ icon is your current local branch.Ĭlick OK to finish checking out to the new local branch. Select the local branch you want to check out to be the current branch. In the main toolbar, click the Git icon > Manage Branches > Checkout Branch. The Checkout Branch option allows you to switch from one branch to another. Option to let Katalon Studio checkout that branch after created. Select either remote or local branch, which is your source branch. In the main toolbar, click the Git icon > Manage Branches > New Branch. Selected changes are added to the Staged Changes list.Įnter your comments into the Commit Message, then click on Commit to store your staged changes into the local branch. These changes are committed.įrom the Unstaged Changes list, select the changes to be committed, then right-click on them and select Add To Index. The Git Staging tab is displayed for configuration. In the main toolbar, click on Git > Commit. For more information on the commit command, refer to this Git document: Commit. The Commit option allows users to view all current changes and decide which changes are stored in the local branch. gitignore contains these files and patterns: /bin /Libs. gitignore tells Git which files (or patterns) it should ignore. gitignore are created within the Katalon project. In the main toolbar, click the Git icon > Share Project.įolder. Share Project is a step to enable Git configuration for your new Katalon Studio project. Publish a local non-Git project as a Git repository HTTPS protocol with GitHub personal access token.You can still integrate Katalon Studio with other cloud-hosted services of Git, such as GitLab, BitBucket, and Microsoft Azure DevOps. Since GitHub has dropped the support for DSA and RSA SHA-1, you cannot integrate Katalon Studio with GitHub via SSH. To connect to Git with SSH keys, see Git Integration Authentication with SSH Keys.Ĭurrently, the Git integration in Katalon Studio supports SSH SHA-1, RSA-1024 and RSA-2048 private keys. To let Katalon Studio get details about your repository, enter all required information and click Next. The Clone Git Repository dialog is displayed. In the main toolbar, click on the Git icon and select Clone Project. We are ready to use Git from Katalon Studio.Īdvanced configurations are available at Katalon Studio > Preferences > Team > Git if you want specific settings.Ĭlone a Katalon Studio project from a Git repository Īfter enabling Git Integration, you can clone an existing Git repository into a newly-created directory on the local machine. Now, the Git integration feature should be enabled. Once enabled, you can start using Git at Katalon Studio's main toolbar. The option is available in the following settings: Katalon Studio > Preferences > Katalon > Git. You can integrate Katalon Studio with Git and its cloud-hosted services, including:Įnable Git Integration: To access all Git features, you need to enable Git Integration first. A typical workflow of Git integration with Katalon Studio is depicted in the following diagram: For detailed instruction, you can refer to the Eclipse Foundation document on EGit/User Guide. The Git integration supported in Katalon Studio is based on EGit. You can share a Git repository across multiple team members to help improve the team's collaboration and productivity. In that case, you should use Git or another source control system for managing change and configuration on your test project. Suppose your Katalon Studio automation project involves several or more members. Git is an essential system for version control.
0 notes
Text
2022 Update Microsoft Azure AZ-400 Real Questions
The latest Microsoft Azure DevOps Engineer AZ-400 Real Questions are newly updated for your best preparation. PassQuestion offers the latest Microsoft Azure DevOps Engineer AZ-400 Real Questions that will help you to pass the Microsoft AZ-400 exam with outstanding results on your first attempt. The AZ-400 questions and answers are prepared by Microsoft experts who know what do you need to prepare from Microsoft Azure DevOps Solutions certification to pass the AZ-400 exam. PassQuestion guarantees you that you will pass the Designing and Implementing Microsoft DevOps Solutions AZ-400 exam with the excellent results if you will prepare with our latest Microsoft Azure DevOps Engineer AZ-400 Real Questions.
Exam AZ-400: Designing and Implementing Microsoft DevOps Solutions
Azure DevOps Solutions is one of the new-role based Azure Certification that validates the skills of Azure DevOps Professionals. It's the "AZ-400" test, which qualifies you to work as Azure DevOps Engineers with recognition from Microsoft. Candidates for this exam are developers or infrastructure administrators who also have subject matter expertise in working with people, processes, and products to enable continuous delivery of value in organizations. DevOps engineers must have experience with administering and developing in Azure, with strong skills in at least one of these areas. They should be familiar with both Azure DevOps and GitHub.
Microsoft Certified: Azure DevOps Engineer Expert Path
AZ-400 Exam Information
Skills Measured
Configure processes and communications (10—15%) Design and implement source control (15—20%) Design and implement build and release pipelines (40—45%) Develop a security and compliance plan (10—15%) Implement an instrumentation strategy (10—15%)
View Online Microsoft Certified: Azure DevOps Engineer Expert AZ-400 Free Questions
You have Azure Pipelines and GitHub integrated as a source code repository. The build pipeline has continuous integration enabled. You plan to trigger an automated build whenever code changes are committed to the repository. You need to ensure that the system will wait until a build completes before queuing another build. What should you implement? A. path filters B. batch changes C. scheduled builds D. branch filters Answer: B
You have a project in Azure DevOps. You plan to deploy a self-hosted agent by using an unattended configuration script. Which two values should you define in the configuration script? Each correct answer presents part of the solution. NOTE: Each correct selection is worth one point. A. authorization credentials B. the project name C. the deployment group name D. the organization URL E. the agent pool name Answer: A,D
In Azure DevOps, you create Project3. You need to meet the requirements of the project. What should you do first? A. From Azure DevOps, create a service endpoint. B. From SonarQube, obtain an authentication token. C. From Azure DevOps, modify the build definition. D. From SonarQube, create a project. Answer: A
You need to perform the GitHub code migration. The solution must support the planned changes for the DevOps environment. What should you use? A. git clone B. GitHub Importer C. Import repository in Azure Repos D. git-tfs Answer: A
You need to meet the technical requirements for controlling access to Azure DevOps. What should you use? A. Azure Multi-Factor Authentication (MFA) B. on-premises firewall rules C. conditional access policies in Azure AD D. Azure role-based access control (Azure RBAC) Answer: B
You need to configure Azure Pipelines to control App2 builds. Which authentication method should you use? A. Windows NTLM B. certificate C. SAML D. personal access token (PAT) Answer: D
You are automating the build process for a Java-based application by using Azure DevOps. You need to add code coverage testing and publish the outcomes to the pipeline. What should you use? A. Cobertura B. JUnit C. Coverage.py D. Bullseye Coverage Answer: A
You have an Azure DevOps project that uses many package feeds. You need to simplify the project by using a single feed that stores packages produced by your company and packages consumed from remote feeds. The solution must support public feeds and authenticated feeds. What should you enable in DevOps? A. Universal Packages B. views in Azure Artifacts C. upstream sources D. a symbol server Answer: B
0 notes
Text
Microsoft visual studio 2012 for mac download

Team Explorer for Microsoft Visual Studio 2012 (free) download.
Download Visual C++ Redistributable for Visual Studio 2012.
Download microsoft visual studio 2012 for free (Windows).
Download Visual Studio 2012 For Mac.
Download Update for Microsoft Visual Studio 2012 (KB2781514).
Visual Studio 2012 For Mac Free Download - intensivebasket.
Install Visual Studio for Mac.
Microsoft Visual Studio 2012 For Mac.
Microsoft developer tools - Microsoft Download Center.
Microsoft Store Deals: Computer Sales & Laptop Deals - Microsoft.
Microsoft Visual Studio 2012 For Mac - d0wnloadlan.
Microsoft Visual C 2010 Redistributable Package 64 Bit Download.
Visual Studio 2012 Ultimate - Download for PC Free.
Team Explorer for Microsoft Visual Studio 2012 (free) download.
Big Microsoft Store Sales and Savings. Get the things you want - and need - for less. Microsoft sales give you access to incredible prices on laptops, desktops, mobile devices, software and accessories. And whether you need to upgrade your work space, update your computer, connect with friends and family, or just want to kick back, play a.
Download Visual C++ Redistributable for Visual Studio 2012.
On the Configure your new Console Application window, add a Project name, Solution name, and Location, and then choose Create. The project is created. Select the code file P in the Solution window, which is on the left-hand side of Visual Studio for Mac. The file P opens in the Editor window. Download Git Extensions for free. A toolkit to make working with Git more intuitive. Git Extensions is a toolkit aimed at making working with Git on Windows more intuitive. Git Extensions is also.
Download microsoft visual studio 2012 for free (Windows).
Microsoft Visual Studio 2012 free download - Microsoft Visual Studio 2010 Professional, Microsoft Visual Basic, Microsoft Visual Studio 2005 Standard Edition , and many more programs. Try the latest 64-bit Visual Studio 2022 to create your ideal IDE, build smarter apps, integrate with the cloud, optimize for performance, and stay ahead of the curve. Download Visual Studio 2022. Visual Studio Code is free and available on your favorite platform - Linux, macOS, and Windows. Download Visual Studio Code to experience a redefined code editor, optimized for building and debugging modern web and cloud applications.
Download Visual Studio 2012 For Mac.
Use Git as the default source control experience in Visual Studio right out of the box. From the new Git menu, you can create or clone repositories from GitHub or Azure DevOps. Use the integrated Git tool windows to commit and push changes to your code, manage branches, sync with your remote repositories, and resolve merge conflicts. Download Microsoft Visual Studio 2012 For Mac; Include a NuGet package in your project.; 4 minutes to read Contributors. All; In this article. NuGet is the most popular package manager for.NET development and is built in to Visual Studio for Mac and Visual Studio on Windows. Oct 30, 2019 There is a lot of developer goodness happening at Ignite. Visual Studio Online reached public preview for developers to try cloud hosted development environments with your tool of.
Download Update for Microsoft Visual Studio 2012 (KB2781514).
Team Explorer for Microsoft Visual Studio 2012 belongs to Development Tools. This free program was originally designed by Microsoft. Our built-in antivirus scanned this download and rated it as virus free. The latest installation package that can be downloaded is 881 KB in size.
Visual Studio 2012 For Mac Free Download - intensivebasket.
Microsoft Intune Download Mac Faststone Capture For Mac Download Download Mac 10.7 4 Antivirus Para Mac Download Can U Download Windows On Mac Samsung Ml 2510 Software Download For Mac Visual Studio 2012 Download For Mac Paragon Ntfs 8 For Mac Chat Video For Mac Vmware Fusion 6 For Mac Free Download Download Koplayer For Mac. Visual studio 2012 free download free download - Visual Studio Code, Visual SEO Studio, Real Studio, and many more programs. Enter to Search. My Profile Logout. Visual Studio 2019 for Mac. Develop apps and games for iOS, Android and using.NET. Download Visual Studio for Mac. Create and deploy scalable, performant apps using.NET and C# on the Mac.
Install Visual Studio for Mac.
The Microsoft Download Manager solves these potential problems. It gives you the ability to download multiple files at one time and download large files quickly and reliably. It also allows you to suspend active downloads and resume downloads that have failed. Microsoft Download Manager is free and available for download now.
Microsoft Visual Studio 2012 For Mac.
Download Microsoft Visual Studio 2012 For Mac; Visual Studio 2012 For Web Product Key;... Visual studio 2012 free download free download - Visual Studio Professional 2012, VS.Php for Visual Studio 2012, Visual Studio Professional 2015, and many more programs. Best Video Software for. Please complete the security check to access this website.
Microsoft developer tools - Microsoft Download Center.
The Microsoft.NET Framework 4.5.2 is a highly compatible, in-place update to the Microsoft.NET Framework 4, Microsoft.NET Framework 4.5 and Microsoft.NET Framework 4.5.1. The offline package can be used in situations where the web installer cannot be used due to lack of internet connectivity. 07. Apr 09, 2022 · The 11.0 version of Microsoft Visual Studio Ultimate 2012 RC is available as a free download on our software library. The actual developer of the free program is Microsoft. Our antivirus scan shows that this download is malware free. The most popular version of the software 11.0.
Microsoft Store Deals: Computer Sales & Laptop Deals - Microsoft.
Download Microsoft Visual C++ 2017 64 Bit - MAC DOWNLOAD powered by. Go to the Microsoft Visual C++ 2010 Redistributable Package download site for the corresponding system type (x64). Download the package to your local folder. Double-click the package in Windows Explorer to display the User Account Control window. Visual Studio 2012 Express free download - Visual Studio Community, Visual Studio Booster, Visual Studio Professional 2012, and many more programs... Mac. Most Popular; New Releases; Browsers.
Microsoft Visual Studio 2012 For Mac - d0wnloadlan.
Install Instructions. Click the Download button on this page to start the download, or select a different language from the Change language drop-down list and click Change. Do one of the following: To start the installation immediately, click Run. To save the download to your computer for installation at a later time, click Save.
Microsoft Visual C 2010 Redistributable Package 64 Bit Download.
Microsoft Visual Studio Express 2012 RC for Windows 8. Download. 4 on 15 votes. Microsoft Visual Studio 2012 Express RC for Windows 8 is your tool to build Metro style apps for Windows 8. Microsoft Visual Studio 2012... Blend for Visual Studio, and... C , C# and Visual Basic. Download visual studio 2012 for free. Development Tools downloads - Microsoft Visual Studio Ultimate 2012 RC by Microsoft and many more programs... Windows Mac.
Visual Studio 2012 Ultimate - Download for PC Free.
Download Visual Studio IDE or VS Code for free. Try out Visual Studio Professional or Enterprise editions on Windows, Mac.
Other links:
Adobe Photoshop 0.7 Brushes Free Download
Ford Racing Off Road Pc Download
Brooktown High Psp Iso Download
Samsung Frp Bypass Ottg Solution
Amd Radeon Settings Download
1 note
·
View note
Text
Azure DevOps Git Training: Mastering Collaboration and Continuous Integration

Introduction: Why Azure DevOps Git Training Matters
In today’s fast-paced tech industry, businesses demand streamlined workflows, efficient collaboration, and rapid deployment. Azure DevOps has emerged as a leading platform for teams aiming to achieve these goals. Combining the power of Git for version control with Azure DevOps' continuous integration and deployment tools enables organizations to deliver high-quality software efficiently.
If you aspire to become a DevOps engineer or enhance your career prospects, mastering Azure DevOps and Git is essential. Through our comprehensive Azure DevOps Git Training at H2K Infosys, you’ll learn the skills to collaborate effectively, manage source control, and implement robust CI/CD pipelines.
Understanding Azure DevOps and Git: A Dynamic Duo
Azure DevOps is Microsoft’s cloud-based platform that integrates development, testing, and deployment tools. Git, on the other hand, is a distributed version control system widely adopted for managing source code. Together, they form a powerful combination for:
Team Collaboration: Streamlining workflows and improving communication.
Source Control: Managing code versions efficiently.
Continuous Integration (CI): Automatically testing and building code changes.
Continuous Deployment (CD): Delivering updates seamlessly.
Why Choose Azure DevOps for Git?
Azure DevOps enhances Git workflows by offering:
Built-In CI/CD Pipelines: Automate code integration and deployment.
Pull Request Policies: Enforce best practices and improve code quality.
Scalability: Handle projects of any size with ease.
Key Features of Azure DevOps Git Training
1. Git Basics: Version Control Fundamentals
The training begins with an introduction to Git:
Creating Repositories: How to initialize a Git repository.
Branching and Merging: Managing feature development and resolving conflicts.
Commit Histories: Tracking changes effectively.
2. Azure Repos: Extending Git’s Capabilities
Azure Repos takes Git to the next level:
Centralized Collaboration: Host and manage your code in the cloud.
Code Reviews: Conduct pull requests for better quality assurance.
Branch Policies: Enforce team standards through rules and workflows.
3. Continuous Integration: Automating Builds
Learn to set up CI pipelines in Azure DevOps:
Pipeline Configuration: Define build and test processes using YAML.
Integration Testing: Validate code changes automatically.
Build Agents: Utilize hosted or self-hosted agents for flexibility.
4. Continuous Deployment: Seamless Delivery
Master the art of continuous deployment:
Release Pipelines: Deploy code to multiple environments.
Environment Gates: Implement approvals for production deployments.
Monitoring and Feedback: Integrate with Azure Monitor for insights.
5. Advanced Git Techniques
Deep dive into advanced topics such as:
Rebasing vs. Merging: When and how to use each approach.
Cherry-Picking: Selectively apply changes.
Submodules: Manage dependencies effectively.
Real-World Applications and Benefits
Industry Use Cases
E-Commerce: Automate deployments for frequent updates to online platforms.
Healthcare: Maintain compliance through version control and audit trails.
Finance: Streamline workflows for high-volume transactions.
Career Advancement
DevOps Engineer Certification: A stepping stone to becoming a certified DevOps professional.
Job Readiness: Practical skills to excel in roles requiring DevOps expertise.
Enhanced Collaboration: Master tools that improve teamwork and productivity.
Hands-On Exercises and Learning Outcomes
Exercise 1: Setting Up a Git Repository
Create a repository using Azure Repos.
Clone the repository to your local system.
Commit and push changes to the cloud.
Exercise 2: Configuring a CI/CD Pipeline
Define a CI pipeline using Azure Pipelines.
Add build and test stages.
Deploy the application to a staging environment.
Exercise 3: Managing Branches and Pull Requests
Create a new branch for feature development.
Submit a pull request and assign reviewers.
Merge the branch into the main codebase.
Evidence of Effectiveness
Statistics: According to a 2024 DevOps Trends report, organizations using Azure DevOps experienced a 40% increase in deployment frequency and a 25% reduction in lead time for changes.
Case Study: A mid-sized tech firm implemented Azure DevOps and Git, resulting in a 50% reduction in bugs during production and a 30% faster release cycle.
Conclusion and Call to Action
Mastering Azure DevOps and Git is not just a technical skill; it’s a career-defining opportunity. With H2K Infosys’ DevOps training online, you’ll gain hands-on experience, industry-relevant knowledge, and the confidence to excel as a DevOps engineer.
Take the next step in your career today. Enroll in H2K Infosys’ Azure DevOps Git Training and transform the way you work and collaborate!
#azure devops training#devops online training#devops with aws training#devops engineer course#devops certification training#aws devops training#devops training#devops and aws training#devops training and certification#devops engineer#azure devops certification#devops engineer certification#azure devops git training#devops training online#azure devops course#best devops training online free#learn azure devops#devops certification microsoft#devops microsoft certification#azure devops training online#aws devops training online
0 notes
Text
Visual Studio 2017 Github

-->
How to use the GitHub Extension for Visual Studio 2017? Connect Once you have installed GitHub Extension for Visual Studio 2017, you should connect to your GitHub account by doing the following: From Team menu, click Manage Connections. Click Connect to connect to your GitHub account. Or signup in case, you don't have a GitHub account by clicking SignUp. Visual Studio solution file headers - 2003, 2005, 2008, 2010, 2012, 2013, 2015, 2017, 2019 - Visual Studio solution file headers+ Skip to content All gists Back to GitHub Sign in Sign up.
Git is now the default version control experience in Visual Studio 2019. Since version 16.6, we've worked on building out the feature set and iterating on it based on your feedback. The new Git experience is turned on by default for everyone with the release of version 16.8.
Tip
Git is the most widely used modern version control system, so whether you’re a professional developer or if you’re learning how to code, Git can be very useful to you. If you are new to Git, the https://git-scm.com/ website is a good place to start. There, you’ll find cheat sheets, a popular online book, and Git Basics videos.
How to use Git in Visual Studio
We'll walk you through how to use the new Git experience in Visual Studio 2019, but if you'd like to take a quick tour first, check out the following video: Video length: 5.27 minutes
There are three ways to start using Git with Visual Studio to be more productive:

Open an existing Git repository. If your code is already on your machine, you can open it by using File > Open > Project/Solution (or Folder) and Visual Studio automatically detects if it has an initialized Git repository.
Create a new Git repository. If your code is not associated with Git, you can create a new Git repository.
Clone an existing Git repository. If the code that you would like to work on is not on your machine, you can clone any existing remote repositories.
Note
Starting also with version 16.8, Visual Studio 2019 includes a fully integrated GitHub account experience. You can now add both GitHub and GitHub Enterprise accounts to your keychain. You’ll be able to add and leverage them just as you do with Microsoft accounts, which means that you’ll have an easier time accessing your GitHub resources across Visual Studio. For more information, see the Work with GitHub accounts in Visual Studio page.
Create a new Git repository
If your code is not associated with Git, you can start by creating a new Git repository. To do so, select Git > Create Git Repository from the menu bar. Then, in the Create a Git repository dialog box, enter your information.
The Create a Git repository dialog box makes it easy to push your new repository to GitHub. By default, your new repository is private, which means that you are the only one who can access it. If you uncheck the box, your repository will be public, which means that anyone on GitHub can view it.
Tip
Whether your repository is public or private, it's best to have a remote backup of your code stored securely on GitHub even if you are not working with a team. This also makes your code available to you no matter what computer you're using.
You can choose to create a local-only Git repository by using the Local only option. Or, you can link your local project with an existing empty remote repository on Azure DevOps or any other Git provider by using the Existing Remote option.
Clone an existing Git repository
Visual Studio includes a straightforward clone experience. If you know the URL of the repository that you would like to clone, you can paste the URL in the Repository location section and then choose the disk location you would like Visual Studio to clone to.
If you don’t know the repository URL, Visual Studio makes it easy to browse to and then clone your existing GitHub or Azure DevOps repository.
Open an existing local repository
After you’ve cloned a repository or created one, Visual Studio detects the Git repository and adds it to your list of Local Repositories in the Git menu. From here, you can quickly access and switch between your Git repositories.
View files in Solution Explorer
When you clone a repository or open a local repository, Visual Studio switches you into that Git context by saving and closing any previously open solutions and projects. Solution Explorer loads the folder at the root of the Git repository and scans the directory tree for any View files. These include files such as CMakeLists.txt or those with the .sln file extension.
Visual Studio adjusts its View based on which View file you load in Solution Explorer:
If you clone a repository that contains a single .sln file, then Solution Explorer directly loads that solution for you.
If Solution Explorer doesn’t detect any .sln files in your repository, then by default it loads Folder View.
If your repository has more than one .sln file, then Solution Explorer shows you the list of available Views for you to choose from.
You can toggle between the currently open View and the list of Views by using the Switch Views button in the Solution Explorer toolbar.
Visual Studio 2017 Github Clone
Git Changes window
Git tracks file changes in your repo as you work, and separates the files in your repo into three categories. These changes are equivalent to what you would see when you enter the git status command in the command line:
Unmodified files: These files haven't changed since your last commit.
Modified files: These files have changes since your last commit, but you haven't yet staged them for the next commit.
Staged files: These files have changes that will be added to the next commit.

As you do your work, Visual Studio keeps track of the file changes to your project in the Changes section of the Git Changes window.
When you are ready to stage changes, click the + (plus) button on each file you want to stage, or right-click a file and then select Stage. You can also stage all your modified files with one click by using the stage all + (plus) button at the top of the Changes section.
When you stage a change, Visual Studio creates a Staged Changes section. Only changes in the Staged Changes section are added to the next commit, which you can do by selecting Commit Staged. The equivalent command for this action is git commit -m 'Your commit message'. Changes can also be unstaged by clicking the – (minus) button. The equivalent command for this action is git reset <file_path> to unstage a single file or git reset <directory_path> to unstage all the files in a directory.
You can also choose not to stage your modified files by skipping the staging area. In this case, Visual Studio allows you to commit your changes directly without having to stage them. Just enter your commit message and then select Commit All. The equivalent command for this action is git commit -a.
Share your videos with friends, family, and the world. Omnifocus youtube video downloader. Set up the YouTube trigger, and make magic happen automatically in OmniFocus. Zapier's automation tools make it easy to connect YouTube and OmniFocus.
Visual Studio also makes it easy to commit and sync with one click by using the Commit All and Push and Commit All and Sync shortcuts. When you double-click any file in the Changes and the Staged changes sections, you can see a line-by-line comparison with the unmodified version of the file.
Before performing these procedures, you must do the following: On the PS4™ system's function screen, select (Settings) Remote Play Connection Settings, and then select the Enable. If you are connecting the systems directly using Wi-Fi, select (Settings) Remote Play Connection Settings. PS Remote Play is a free to use feature on all PS4 and PS5 consoles. All you need is: Your PS5 or PS5 Digital Edition, PS4 or PS4 Pro 2 connected to your home wired broadband network. A compatible device – also connected to your network. The free PS Remote Play app. A DUALSHOCK 4 wireless controller or DualSense controller 3. PS Remote Play A PS5 console or PS4 console is required for Remote Play. With Remote Play, you can control your PlayStation® console remotely wherever you have a high-speed internet connection. Using the PS Remote Play app, you can control your PlayStation®5 console or PlayStation®4 console from a device in a different location. Find out more about activating your PS4 console as your primary console in the PS4 User’s Guide. To start Remote Play while your PS4 console is in rest mode, select Settings Power Save Settings Set Features Available in Rest Mode. Then select the checkboxes for Stay Connected to the Internet and Enable Turning on PS4 from Network. Remote Play via local network and not via Internet? My remote play app on Mac first searches nearby consoles, then searches the internet, then connects. Your hub for everything related to PS4 including games, news, reviews, discussion, questions, videos, and screenshots. Created May 17, 2010. Remote play ps4 local network.
Tip
You can associate an Azure DevOps work item with a commit by using the '#' character if you are connected to the Azure DevOps repository. You can connect your Azure DevOps repository through Team Explorer > Manage Connections.
Select an existing branch
Visual Studio displays the current branch in the selector at the top of the Git Changes window.
The current branch is also available in the status bar on the bottom-right corner of the Visual Studio IDE.
From both locations, you can switch between existing branches.
Create a new branch
You can also create a new branch. The equivalent command for this action is git checkout -b <branchname>.
Creating a new branch is as simple as entering the branch name and basing it off an existing branch.
You can choose an existing local or remote branch as the base. The Checkout branch checkbox automatically switches you to the newly created branch. The equivalent command for this action is git checkout -b <new-branch><existing-branch>.
Git Repository window
Visual Studio has a new Git Repository window, which is a consolidated view of all the details in your repository, including all of the branches, remotes, and commit histories. You can access this window directly from either Git or View on the menu bar or from the status bar.
Visual Studio 2017 Github
Manage branches
When you select Manage Branches from the Git menu, you’ll see the branches tree-view in the Git Repository window. From the left pane, you can use the right-click context menu to checkout branches, create new branches, merge, rebase, cherry-pick, and more. When you click the branch, you can see a preview of its commit history in the right pane.
Incoming and outgoing commits
When you fetch a branch, the Git Changes window has an indicator under the branch drop-down, which displays the number of unpulled commits from the remote branch. This indicator also shows you the number of unpushed local commits.
The indicator also functions as a link to take you to the commit history of that branch in the Git Repository window. The top of the history now displays the details of these incoming and outgoing commits. From here, you can also decide to Pull or Push the commits.
Commit Details
When you double-click a Commit, Visual Studio opens its details in a separate tool window. From here you can revert the commit, reset the commit, amend the commit message, or create a tag on the commit. When you click a changed file in the commit, Visual Studio opens the side-by-side Diff view of the commit and its parent.
Connect Visual Studio To Github
Handle merge conflicts
Conflicts can occur during a merge if two developers modify the same lines in a file and Git doesn’t automatically know which is correct. Git halts the merge and informs you that you are in a conflicted state.
Visual Studio makes it easy to identify and resolve a merge conflict. First, the Git Repository window shows a gold info bar at the top of the window.
The Git Changes window also displays a ‘Merge is in progress with conflicts’ message, with the unmerged files in their separate section below it.
But if you have neither of these windows open, and instead you go to the file that has merge conflicts, you won’t have to search for the following text:
Instead, Visual Studio displays a gold info bar on the top of the page that indicates that the opened file has conflicts. Then, you can click the link to open the Merge Editor.
The Merge Editor
The Merge Editor in Visual Studio is a three-way merge tool that displays the incoming changes, your current changes, and the result of the merge. You can use the tool bar at the top level of the Merge Editor to navigate between conflicts and auto-merged differences in the file.
You can also use the toggles to show/hide differences, show/hide word differences, and customize the layout. There are checkboxes on the top of each side that you can use to take all the changes from one side or the other. But to take individual changes, you can click the checkboxes to the left of the conflicting lines on either side. Finally, when you finish resolving the conflicts, you can select the Accept Merge button in the Merge Editor. You then write a commit message and commit the changes to complete the resolution.
Personalize your Git settings
To personalize and customize your Git settings at a repository level as well as at a global level, go to either Git > Settings on the menu bar, or to Tools > Options > Source Control on the menu bar. Then, choose the options you want.
How to use the full Team Explorer experience in Visual Studio
The new Git experience is the default version control system in Visual Studio 2019 from version 16.8 onwards. However, if you want to turn it off, you can. Go to Tools > Options > Environment > Preview Features and then toggle the New Git user experience checkbox, which will switch you back to Team Explorer for Git.
What's next
Affinity designer cdr. While the new Git experience is now on by default in Visual Studio 2019 version 16.8, we continue to add new features to enhance the experience. If you'd like to check out new updates to the Git experience in a Preview release, you can download and install it from the Visual Studio Preview page.
Important
If you have a suggestion for us, please let us know! We appreciate the opportunity to engage with you on design decisions via the Developer Community portal.
See also
Get Started with Git and GitHub in Visual Studio tutorial on Microsoft Learn
Getting started with Git in Visual Studio video on YouTube
Announcing the Release of the Git Experience in Visual Studio blog post
The launch of the new Git experience video on YouTube
The Visual Studio Toolbox series presents: The new Git experience video on Channel 9 and on YouTube
Exciting new updates to the Git experience in Visual Studio blog post
Improved Git Experience in Visual Studio 2019 blog post
-->
Azure Repos | Azure DevOps Server 2020 | Azure DevOps Server 2019 | TFS 2018 | TFS 2017 | TFS 2015
This article walks you through the steps to get a Visual Studio solution on your PC into an Azure DevOps Git repo you can share with others. If you want to work with a Visual Studio solution hosted in an existing repo, see the Git tutorial.
Why Use Visual Studio
Note


Visual Studio 2019 now includes a new Git tool that provides an improved experience when connecting to a Git repository. When you enable this tool, the Team Explorer tool is effectively disabled when connected to a Git repository. You can acquire the new tool by downloading Visual Studio 2019 version 16.6. To enable and use the new tool, see Git experience in Visual Studio (Preview).
Prerequisites
An organization in Azure DevOps. If you don't have an organization, you can sign up for one for free. Each organization includes free, unlimited private Git repositories.
Create a local Git repo for your project
Create a new local Git repo for your project by selecting on the status bar in the lower right hand corner of Visual Studio.This will create a new repo in the folder the solution is in and commit your code into that repo. You can also right-click your solution in Solution Explorer and choose Add Solution to Source Control.
Once you have a local repo, select items in the status bar to quickly navigate between Git tasks in Team Explorer.
shows the number of unpublished commits in your local branch. Selecting this opens the Synchronization view in Team Explorer.
shows the number of uncommitted file changes. Selecting this opens the Changes view in Team Explorer.
shows the current Git repo. Selecting this opens the Connect view in Team Explorer.
shows your current Git branch. Selecting this displays a branch picker to quickly switch between Git branches or create new branches.
Note
If you don't see any icons such as or , ensure that you have a project open that is part of a Git repo. If your project is brand new or not yet added to a repo, you can add it to one by selecting on the status bar, or by right-clicking your solution in Solution Explorer and choosing Add Solution to Source Control.
Publish your code to Azure Repos
Navigate to the Push view in Team Explorer by choosing the icon in the status bar. You can also select Sync from the Home view in Team Explorer.
In the Push view in Team Explorer, select the Publish Git Repo button under Push to Visual Studio Team Services.
Verify your email and select your account in the Team Services Domain drop-down.
Enter your repository name and select Publish repository.
This creates a new project in your account with the same name as the repository. To create the repo in an existing project, click Advanced next to Repository name and select a project.
Your code is now in a Git repo in Azure Repos. You can view your code on the web by selecting See it on the web .
Commit and push updates
As you write your code, your changes are automatically tracked by Visual Studio.You can commit changes to your local Git repository by selecting the pending changes icon from the status bar.
On the Changes view in Team Explorer, add a message describing your update and commit your changes.
Select the unpublished changes status bar icon (or select Sync from the Home view in Team Explorer). Select Push toupdate your code in Azure DevOps Services/TFS.
Get changes from others

Sync your local repo with changes from your team as they make updates.
From the Synchronization view in Team Explorer, fetch the commits that your team has made.Double-click a commit to view its file changes.
Select Sync to merge the fetched commits into your local repo and then push any unpublished changes to Azure Repos.
The changes from your team are now in your local repo and visible in Visual Studio.
Frequently asked questions
I don't see the Add to Source Control button in the status bar.
The button in the status bar was added in Visual Studio 2017 (it was Publish in Visual Studio 2015 Update 2 and later) and will only appear when you have Git as your source control provider. If your code is already in a Git repo, you won't see the Add to Source Control button in the status bar, but the status of the current branch in your local repo instead.
If you are in a previous version of Visual Studio, create a local Git repo for your project by selecting the Create new Git repository option in the New Project window when you create a new project.
You can create a local Git repo for an existing solution by right-clicking your project in the Solution Explorer and selecting Add Solution to Source Control.
How can I see what changes are in a commit before I pull it into my local branch?
To see what's changed in a commit, go to the Synchronization page in Team Explorer and right-click on the commit. Select View Commit Details.You can then right-click on any file modified by the commit and select Compare with Previous.. to view the changes compared to the previousversion of the file.
How do I associate my commits with work items?
You can include work items in your commits through Related Work Items in the Changes page in Team Explorer.
Work items can be included in commits by adding #ID into the commit message. For example, Fixing bug #23 in the reporting tools would link work item 23to the commit. The work item is linked when the commit is pushed to Azure Repos.
Can I use the Git command prompt with Visual Studio?
Visual Studio's Team Explorer and the Git command line work great together. Changes to your repos made in either tool will be reflected in the other.Make sure to install the latest release of Git for Windows, which has tools to help you connect to your Azure DevOps Services/TFS repos.
See the Azure Repos Git tutorial and the command reference for additional help using Git from the command line.
Next steps
0 notes
Text
Git Visual Studio Code

GitDuck is a video chat tool built for developers that has direct integration to the IDE so you can talk, share your code in real-time and easily collaborate with your team. It enables remote developers to work as if they were side by side. With GitDuck you can code with people using different IDEs, like VSCode or WebStorm, IntelliJ or PyCharm.
Visual Studio Connect To Git
Git For Visual Studio Code
Chapters ▾
Visual Studio Code has git support built in. You will need to have git version 2.0.0 (or newer) installed. The main features are: See the diff of the file you are editing in the gutter.
The easiest way to connect to your GitHub repositories in Visual Studio. Download GitHub Extension for Visual Studio anyway. Download Download GitHub Extension for Visual Studio. By downloading the extension you agree to the End-User License Agreement. Requires Windows and Visual Studio.
1. Getting Started
1.1 About Version Control
1.2 A Short History of Git
1.3 What is Git?
1.4 The Command Line
1.5 Installing Git
1.6 First-Time Git Setup
1.7 Getting Help
1.8 Summary
2. Git Basics
2.1 Getting a Git Repository
2.2 Recording Changes to the Repository
2.3 Viewing the Commit History
2.4 Undoing Things
2.5 Working with Remotes
2.6 Tagging
2.7 Git Aliases
2.8 Summary
3. Git Branching
3.1 Branches in a Nutshell
3.2 Basic Branching and Merging
3.3 Branch Management
3.4 Branching Workflows
3.5 Remote Branches
3.6 Rebasing
3.7 Summary
4. Git on the Server
4.1 The Protocols
4.2 Getting Git on a Server
4.3 Generating Your SSH Public Key
4.4 Setting Up the Server
4.5 Git Daemon
4.6 Smart HTTP
4.7 GitWeb
4.8 GitLab
4.9 Third Party Hosted Options
4.10 Summary
5. Distributed Git
5.1 Distributed Workflows
5.2 Contributing to a Project
5.3 Maintaining a Project
5.4 Summary
6. GitHub
6.1 Account Setup and Configuration
6.2 Contributing to a Project
6.3 Maintaining a Project
6.4 Managing an organization
6.5 Scripting GitHub
6.6 Summary
7. Git Tools
7.1 Revision Selection
7.2 Interactive Staging
7.3 Stashing and Cleaning
7.4 Signing Your Work
7.5 Searching
7.6 Rewriting History
7.7 Reset Demystified
7.8 Advanced Merging
7.9 Rerere
7.10 Debugging with Git
7.11 Submodules
7.12 Bundling
7.13 Replace
7.14 Credential Storage
7.15 Summary
8. Customizing Git
8.1 Git Configuration
8.2 Git Attributes
8.3 Git Hooks
8.4 An Example Git-Enforced Policy
8.5 Summary
9. Git and Other Systems
9.1 Git as a Client
9.2 Migrating to Git
9.3 Summary
10. Git Internals
10.1 Plumbing and Porcelain
10.2 Git Objects
10.3 Git References
10.4 Packfiles
10.5 The Refspec
10.6 Transfer Protocols
10.7 Maintenance and Data Recovery
10.8 Environment Variables
10.9 Summary
A1. Appendix A: Git in Other Environments
A1.1 Graphical Interfaces
A1.2 Git in Visual Studio
A1.3 Git in Visual Studio Code
A1.4 Git in IntelliJ / PyCharm / WebStorm / PhpStorm / RubyMine
A1.5 Git in Sublime Text
A1.6 Git in Bash
A1.7 Git in Zsh
A1.8 Git in PowerShell
A1.9 Summary
A2. Appendix B: Embedding Git in your Applications
A2.1 Command-line Git
A2.2 Libgit2
A2.3 JGit
A2.4 go-git
A2.5 Dulwich
A3. Appendix C: Git Commands
A3.1 Setup and Config
A3.2 Getting and Creating Projects
A3.3 Basic Snapshotting
A3.4 Branching and Merging
A3.5 Sharing and Updating Projects
A3.6 Inspection and Comparison
A3.7 Debugging
A3.8 Patching
A3.9 Email
A3.10 External Systems
A3.11 Administration
A3.12 Plumbing Commands
2nd Edition
Git in Visual Studio Code
Visual Studio Code has git support built in.You will need to have git version 2.0.0 (or newer) installed.
See the diff of the file you are editing in the gutter.
The Git Status Bar (lower left) shows the current branch, dirty indicators, incoming and outgoing commits.
You can do the most common git operations from within the editor:
Initialize a repository.
Clone a repository.
Create branches and tags.
Stage and commit changes.
Push/pull/sync with a remote branch.
Resolve merge conflicts.
View diffs.
With an extension, you can also handle GitHub Pull Requests:https://marketplace.visualstudio.com/items?itemName=GitHub.vscode-pull-request-github.
The official documentation can be found here: https://code.visualstudio.com/Docs/editor/versioncontrol.
Those new to Visual Studio (VS) Code might just see a code editor. The true power of VS Code lies in it’s extensions, integrated terminal and other features. In this hands-on tutorial, you’re going to learn how to use Visual Studio Code by working with a Git repo.
Related:What You Need to Know about Visual Studio Code: A Tutorial
Using built-in VS Code tooling and a few extensions, you’re going to write code and commit that code to source control using a single interface.
This blog post is a snippet of a chapter from the eBook From Admin to DevOps: The BS Way to DevOps in Azure. If you like this chapter and want to learn about doing the DevOps in Azure, check it out!
Tutorial Overview
In this tutorial, you’re going to learn how to use various VS Code features on Windows by building a project using Visual Studio Code and Git. You’ve been tasked with figuring out how to build an Azure VM with Terraform as a small proof of concept (POC) project. You have VS Code and have heard of its capability as a full IDE and want to put it to the test.
You’re going to:
Create a VS Code workspace to share with your team
Install the Terraform extension
Modify the Terraform configuration file to fit your naming convention and Azure subscription
Create a snippet for a common task you’ve found yourself typing over and over
Commit the Terraform configuration file to a Git repo
This tutorial will not be meant to show how to use Terraform to deploy Azure VMs. We already have an article on Terraform and Azure VMs for that. This tutorial will focus on learning Visual Studio Code.
Does this sound like an interesting project? If so, read on to get started!
Prerequisites
To follow along with this Visual Studio Code Git tutorial, please be sure you have the following:
VS Code – All examples will be using VS Code 1.44 although earlier versions will likely work as well.
Terraform – All examples will be using Terraform for Windows v0.12.24.
Git for Windows installed – All examples will be using v2.26. If you’d like VS Code to be Git’s default editor, be sure to select it upon installation.
Clone the Git Repo
Since this tutorial is going to be focusing on working with code in a GitHub repo, your first task is cloning that GitHub repo to your local computer.
For this project, you’ll be working from a GitHub repo called VSCodeDemo. Since VS Code has native Git integration, you can clone a Git repo with no additional configuration. To do so:
Open the command palette with Ctrl-Shift-P, type git where you will notice various options, as shown below.
2. Choose Git: Clone which VS Code will then prompt you for the repo’s URL. Here, provide the URL https://github.com/NoBSDevOps/VSCodeDemo.gitand hit Enter.
3. Choose a folder to place the cloned project files. This project will place the repo folder in the root of C:. Once you select the repository location, VS Code will invoke git.exe in the background and clone the repo to your computer.
4. When it’s finished, VS Code will prompt if you would like to open the cloned repository immediately as shown below, click Open to do so.
You now have an open folder in VS Code for the Git repo. You now need to “save” this open folder and all settings you’ll be performing in a workspace.
Creating a Workspace
Now that you have a folder opened containing a Git repo, save a workspace by going up to the File menu and clicking on Save Workspace As….
Save the workspace as project in the project folder. VS Code will then create a file called project.code-workspace in the Git repo folder. This workspace now knows what folder you had opened. Now when the workspace is opened in the future, it will automatically open the C:VSCodeDemo folder.
Now, instead of a folder name, you will see the name of the workspace.
Setting up Extensions
Extensions are one of the most useful features of VS Code. Extensions allows you to bolt on functionality to help you manage many different projects. In this tutorial, you’re going to be working with Terraform.
Open up one of the Terraform configuration files in the workspace along the left sidebar. Notice how an editor tab opens up and shows the text but that’s about it. There’s no usual syntax highlighting or any other features. VS Code thinks this is a plain-text file and displays it accordingly. Let’s remedy that.
For VS Code to “understand” a Terraform configuration file, you need an extension. Extensions are a huge part of VS Code that opens up a world of new functionality. In this case, you need the Terraform extension to assist in building Terraform configuration files and deploying infrastructure with Terraform.
To install the Terraform extension, click on the extensions button on the Activity Bar and search for terraform. You’ll see multiple extensions show up but for this project, click on Install for the top result created by Mikael Olenfalk. VS Code will then install the extension.
Once installed, navigate back to the workspace and click on one of the TF files in the workspace. You’ll immediately see one of the most obvious differences when using an extension, syntax coloring.
Now you can see in the following screenshot that VS Code “knows” what a comment is (by making it green), what a string is (by making it red) and so on. It’s now much easier to read a Terraform configuration file.
There’s a lot more functionality included with Mikael’s Terrafom extension. Be sure to investigate all of the potential benefits you can get from this extension if using Terraform.
Code Editing
Chances are when you find a script or configuration file on the Internet, it’s not going to be exactly how you need it. You’re going to need to modify it in some way.
In this tutorial’s example, you’d like to change the main block label in the infrastructure-before.tf. Terraform configuration file to perhaps project. To do that, you’ll need to find and replace some text. In VS Code, there are multiple ways to do that.
One of the most common ways to find a string and replace it with another is the good ol’ find and replace functionality.
Hit Ctrl-F and you’ll see a dialog similar to the following screenshot. Here you can type in the string you’d like to find and if you click on the down arrow, it will expand and provide a spot to input a string to replace it with. In the screenshot below, you can see options like Aa and Ab| for case-sensitive searching and also regular expressions.
You can also perform a “find and replace” using Ctrl-D. Simply select the text you’d like to find and begin hitting Ctrl-D. You’ll find that VS Code will begin to highlight each instance of that string with a blinking cursor.
When you’ve selected all items, start typing and VS Code changes all instances at once just as if you had selected each one individually.
Saving Time with Snippets
Let’s say you’re really getting into Terraform and Azure and are tired of typing out the Terraform configuration file block to create a new Azure resource group in the following code snippet.
To save time creating these blocks, create a VS Code snippet.
Related:VS Code Snippets: Speed Up Coding with Shortcuts
To create a VS Code snippet:
Copy the azurerm_resource_group block from the Infrastructure-before.tf Terraform configuration file.
2. Open the command palette with Ctrl-Shift-P.
3. Type “snippets” to filter the list of options.
4. Select Preferences: Configure User Snippets. This brings up a list of all the snippet files typically separated by language.
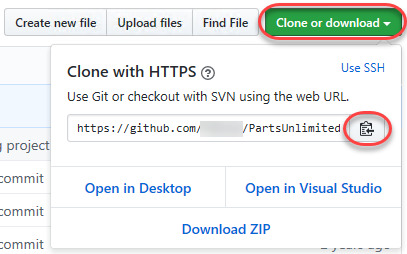
5. Type “terraform” to filter by the Terraform snippets.
6. Select terraform (Terraform) to open the Terraform snippets file (terraform.json).
Visual Studio Connect To Git
With the Terraform snippets file open, remove all of the comments and copy/paste the following JSON element inside.
Note the use of t and the backslashes. You can’t directly place tab characters inside of a snippet. To represent a tab character, you must use t. Also, you must escape characters like double quotes, dollar signs, curly braces, and backslashes with a backslash.
8. Save the terraform.json file.
Git For Visual Studio Code
9. Go back to the Terraform configuration file and type “rg”. Notice now you see an option to expand a snippet.
10. Select the rg snippet as shown above. Notice that it now expands to the snippet you just created with three items highlighted.
VS Code highlighted each of the words to act as placeholders due to the variables defined in the terraform.json snippets file (${1:block label}).
At this point, you can hit Tab and simply type in the values you need without worrying about how to create the block itself.
For a full breakdown on snippet syntax, be sure to check out the Snippets in Visual Studio Code documentation.
Commit Code to Git
At this point, you’ve cloned a public GitHub repo that contains a couple of Terraform configuration files. You’ve edited some files and now you’re ready to get those changes back up to the GitHub repo.
To get changes back up to the GitHub repo, you must first use Visual Studio Code and Git to commit changes to your local cloned Git repo. When you cloned the GitHub repo earlier, you downloaded not only the configuration files but also a Git repo.
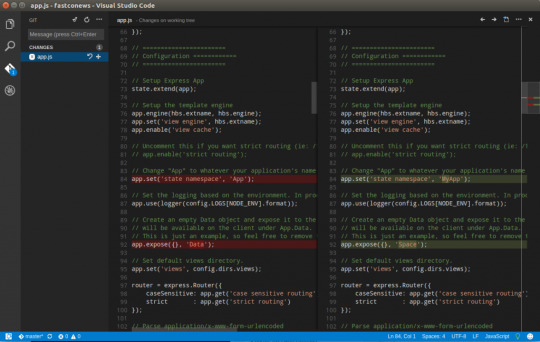
If you’ve been following along, you should now have the cloned Git repo open with a couple of pending changes, two to be exact. How do you know that? By noticing the number in the Activity Bar, as shown below.
When you have a Git repo opened in Visual Studio Code, you’ll get a glimpse on the number of files that you can stage and commit into a local Git repo in the Activity Bar.
Click on the Source Control item on the left and you’ll see two items; the infrastructure-before.tf Terraform configuration file and the workspace you saved earlier (project.code-workspace). The configuration file will have a red M to the right indicating it’s been modified. The workspace file will have a green U to the right of it because it’s untracked meaning it’s currently not under source control.
To ensure both of these files get back to the GitHub repo, first create a helpful commit message indicating why you’re committing these files. The message can be any descriptive summary. Once you’ve written a commit message, stage the changes. Staging changes in Visual Studio Code in Git adds the file contents to the staging area preparing for a commit to the repo.
While on the Source Control pane, click on the + icon beside each file to stage them as shown below.
Once staged, click on the check mark to commit all of the staged changed, as shown below.
You will probably receive an error message indicating you need to configure a user.name and user.email in Git.
No problem. You simply need to provide Git the information it needs. To do that, go into your VS Code integrated terminal and run the following two commands changing my email address and name for yours.
Now try to commit the files. You should now see that the files commit to the repo.
You can stage all changed files without manually clicking on the + beside each file by committing them all at once. VS Code will automatically stage all of the files for you.
If you were working on a team with a shared repo, the next step would be to push these changes back to the GitHub repo or opening a pull request.
Conclusion
VS Code is a feature-rich IDE. It can not only help you write and understand code better, it can also build and make changes to infrastructure, invoke utilities and more. VS Code provides you one place to manage all of your development efforts.
Although this tutorial only covered a portion of what VS Code can do, this IDE is capable of so much more. If you’d like to learn about what VS Code can do, check out What You Need to Know about Visual Studio Code: A Tutorial.
0 notes
Text
Azure devops clone repository
Azure devops clone repository
Azure devops clone repository Azure devops clone repository New newspaper Azure devops clone repository Azure Repos Get unlimited, cloud-hosted private Git repos for your project Free private Git repositories, pull requests, and code search Get unlimited private Git repository hosting and support for TFVC that scales from a hobby project to the world’s largest repository. Support for any Git…

View On WordPress
0 notes
Text
Clone Azure DevOps Repository from Eclipse
Clone Azure DevOps Repository from Eclipse
In this post, we are going to clone an Azure DevOps Repository from Eclipse. I have picked up a demo repository from Azure DevOps which I will be cloning onto my local system using Eclipse. Prerequisites EclipseAzure DevOps Repository Clone Repository Open your Eclipse and go to File -> Import. Choose Git -> Projects from Git. If you don’t see Git, install it from the Eclipse…

View On WordPress
0 notes