#Contingency Contract
Explore tagged Tumblr posts
Visit Tumblr Blog
Explore Tumblr blogs with no restrictions, modern design and the best experience.
Last Seen Tumblr Blogs


Fun Fact
Tumblr.com rank in the US is 25.
Text

Contingency Contract are over so Myrtle can finally rest.
To be clear this is a redraw of this page from Ashita no Joe.
659 notes
·
View notes
Text

feel like pure shit just want her back x
#u ever open your account#and look at your ops#and the urge comes over u#THE URGE#to play cc#and there is just nothin u can do#sigh sigh#arknights#mine#contingency contract
36 notes
·
View notes
Text

I think I’m probably not going further than that. A personal best is still a personal best so we take those
31 notes
·
View notes
Text

I'll be real, I kinda hate this stupid gamemode that screws you over if you don't have the exact operators to thread the stupid needle. I ain't going beyond this without Ines.
#arknights#contingency contract#when you make an ersatz Ines with Silverash and Eyjaalter desperately trying to keep him breathing#no caster eyja either btw#literally only doing it for the royal tokens
13 notes
·
View notes
Text

Contlingency Contrat cleared... perhaps forever, since afaik they haven't run another one on CN yet. I think this strategy ends at 830, since even a little less Atk ruin's Virtuosa's timing. After that... well, the youtubers already have it covered.
I feel Yuhsia is a bit too good this CC. She hands you a bundle of points essentially for free, so that the difficulty feels like I've got 10 contracts unpicked even though there's only 2—which means there's nothing left to scale up into. And not using Lin would mean rebuilding the entire everything, which I just don't have time for.
At least she's paying for it by having to handle shift change with these two:

#Most toxic workplace on Terra#99% of operators asked to be deployed on the nethersea brand instead#Arknights#Contingency Contract#...Unless swapping Ifrit for Suzuran...#...but then that's really just converging onto the youtubers...
12 notes
·
View notes
Text
Today's rotating max risk map feels like it was designed in a lab to try and make "dueling" type units look good except even they aren't good at it lmao
8 notes
·
View notes
Text
8 notes
·
View notes
Text

the results are in, the arknights girlies sure fuckin Love That Carp
26 notes
·
View notes
Text


Funny CC, the floor is lava, deploy rat, Virtuosa can't handle the second dog at the startoff without more stats so i decided to bring peepaw Friston along to experience The Horrors™
It's kinda lame that they don't have CCBP3 in CN yet but i guess that's the price of them trying out other things, i just wish they didn't have to sacrifice CC to do it since the other time-limited event gamemodes don't have a central theming with a cool custom theme song to tie it all together (and also the other time-limited event gamemodes don't have a permanent shop with currency that carries over so there's that too)
3 notes
·
View notes
Text
The History of Area 59 Ruins
If you're dumb enough to Max Risk CC this weekend, you're a big enough schmuck to come to the Area 59 Ruins.
For now, let's settle with a little mood music while I get started.
So this post is just me kind of rambling nostalgically but with CC12 coming soon I figure we can enjoy the end of our CC journey with the very beginning. Plus this event happened like, at the beginning of this game's lifespan I kind of doubt most of the current Arknights players remember doing it.
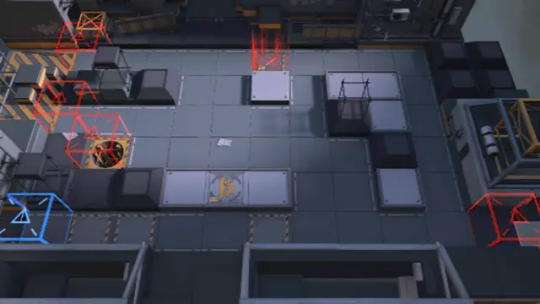
These days you can only experience this map in the Training Grounds, which is a bit of a shame that it hasn't rotated back in. The gist of the stage is this: from the bottom left entrances come Light-Armored Soldiers, Heavy Defenders, and Armed Militants. From the upper left come Avengers, Hateful Avenger, and one Invisible Caster Leader I call The Rat Bastard because he sucks. From the bottom right, only Invisible Caster Leaders spawn.
There's no bosses and all of the enemies primarily just have their stats (and the Caster's Camo) to threaten you with. If you look at the contracts available...
Originium Zone: Activation III - Enemies have their HP increased by 2.5x. (3 points) Originium Zone: Stimulus III - Enemies have their ATK increased by 1.8x. (3 points) Objective: Blade Breaker III - Avengers and Hateful Avengers have their HP, ATK, and DEF increased by 2.2x, 1.8x, and 3x, respectively (3 points) Objective: Armament Destruction III: Armed Militants have their HP, ATK, RES, and weight increased by 2.5x, 1.8x, 1.75 and 2, respectively. (3 points) Objective: Covert Action III: Only 4 Operators (including the Support Unit) can be included to the squad. (3 points) Objective: Strategic Dispatch: Casters and Medics cannot be used. (2 points) Objective: Deep Infiltration: DP generation rate reduced by 50% (1 DP every 2 seconds). (2 points) Environment: Precipituous Terrain III: Friendles cannot be deploying in 10 tiles (3 points) Anti-Armor I: Enemies have their DEF increased by 50% (1 point) Anti-Sniper I: Ranged enemies have their attack range increased by 50%. (1 point) Anti-Mobility I: Enemies have their speed increased by 50%. (1 point) Objective: Last Line of Defense: Life Point reduced to 1. (1 point) Originium Zone: Erosion III: Friendlies have their maximum HP reduced by 75%. (3 points).
There might be a couple that jump out at you (we'll get to that in a minute) but total max risk was 29 and most of these are pretty simple in their execution. What was the Max Risk that was achieved by players?
To the best of my knowledge, the Max Risk achieved was 26. Which is kind of wild to think about. In this day and age it seems like almost a guarantee that a CC will get a Max Risk clear super quickly, and there are some truly heinous clears like that Ashpoint All Specialist clear. So how...did this happen?
Well there's two reasons really. The first is actually really simple: as of CC Beta's release, the most recently released operator was Mostima. This meant in terms of meta-breaking 6-stars, you had: Ch'en, Siege, Shining, Nightingale, Ifrit, Eyjafjalla, Exusiai, Angelina, Silverash, Hoshiguma, Saria, Skadi, Schwarz, Hellagur, Magallan, and Mostima. There's a lot of good operators there, but most people would agree that the grand majority of them aren't what we think of when it comes CC all-stars.
The second is how the stage is set-up. With all the tags enabled, let's look at the stats of two enemies in particular: the Hateful Avenger

and the Armed Militant

(HP, ATK, DEF, RES, Movement Speed in tiles/sec, Weight, and Attack Range)
Now despite that gigantic 99,000 HP, the Hateful Avengers were not really a big problem. They can actually be Push stalled basically endlessly. They'll take a while to actually die but it's not particularly hard to just whittle them down.
The Armed Militants are the problem. Their 5 Weight means they are very difficult to stall with shifting and thanks to the Erosion contract, nothing survives their axe swings. So already the map has two lanes you need to hold.
But it actually has a secret, THIRD LANE.
These guys are also nightmares and need to be dealt with basically immediately. Their 720 damage Arts attacks are much more lethal with -75% HP, but their increased attack range makes them a bigger issue. With the tag, they have an Attack Range of 3 tiles, but this is a little deceptive in how its framed. Let me illustrate.
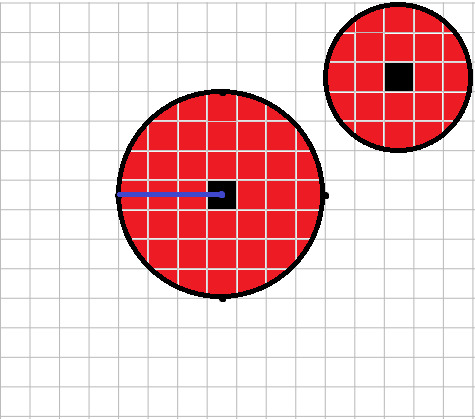
Attack ranges are essentially circles, with a radius of the attack range distance in tiles. This means they can hit some tiles you might immediately think are actually four tiles away and not three.

The difference in attack ranges means that the Caster Leaders will often have complete free reign from their starting position to blast away at your entire bottom line if left unchecked, which is very bad. This isn't even getting into the one that spawns at the top too.
(Ignore the quality of these diagrams, I did them in Paint.)
So you have three lanes to defend, that's not hard, right?
Objective: Covert Action III: Only 4 Operators (including the Support Unit) can be included to the squad.
This. This is the bastard. To this day, I don't believe they've ever done a similarly restrictive squad condition in a main map (its possibly been in a rotating one, there's been 12 CCs I'm not checking).
The Risk 26 clear takes the 2 risk HP increase contract (which only boosts HP by 1.6x) and the 1 risk Squad contract (maximum of 10). With the current pool of obviously busted operators, I think it would be really easy to take the Risk 3 HP increase contract and the Risk 2 squad contract. Risk 28 is obvious. But trimming the squad down to four operators is a much more monumental task. I don't know if I would say impossible, but very very difficult.
Area 59 Ruins also ran on the rotating schedule for two CCs (CC0 Barrenlands and CC1 Pyrite) and I'll include them later on as their existence as rotating stages is far less interesting and I'm making this post while recovering from a virus lmao.
19 notes
·
View notes
Text
youtube
This is a big one. My very first time niching a CC, and I pushed it to the absolute limit. I'll break it down below:
So this is only 510, but it's way harder than the 620 I did with my full roster (and the 500 I did with the niche before this, but I'll go over that later). That's a common thing with niching because it just doesn't give you as many options (and honestly, that's kind of the point), but it's actually not just my operators that are different. The thing about niching this cc is that your niche can easily just lock you out of a huge number of tags. Without a vanguard, I can't take any dp related risks; without enough guards or casters to be able to just rely on one or the other, I can't take the class bans; without more than one unit that has offensive recovery, and relying on ranged units who have their non reed tiles banned, I can't take the sp down tags; etc. Add the fact that those things break set bonuses and lock me out of a number of other tags that my niche might be able to do, and I'm very limited in what I can take. Because of this, the only way I can maximise my score is by pumping as many points as possible into making the enemies as strong as possible. I took all the drone tags and all the car tags (though I took the non-invis option for them, since blocking them was a non-option, locking me out of another set bonus). I took the enemy caster buff tag, I added the extra evocators, and on top of all of that, I maxed out all enemies' attack, minimised my units' HP, and reduced my units' attack substantially. With all of this, there's little to no room for error throughout. But let's get to what I'm doing here.
So the opener is Bassline and Eyjaberry. Bassline cannot survive there on his own, with either skill, as the burn burst, the melee mobs, and the caster together all provide just too much pressure for him to heal through, requiring Eyjaberry. Then Lessing sets the tone for how tight the rest of the clear will be, by taking out the first enemy in the blue box. He goes really hard on this map, particularly on S2. Reducing the damage from the seeds, casters, and evocators lets him live things that no one else would manage. After that I activate Eyjaberry S3 to make sure Bassline is at max HP before I retreat her (and to leave him with some lingering heals from her talent), and I swap in regular Eyja to clear out the enemies that Bassline is blocking before I retreat him and place Vivi. (I can't open with Eyja, as she'll use all her S2 charges on the caster that's there, meaning she'll leak the melee mobs that open the map. Managing her charges is very important throughout the map, but I'll touch on that more as we go).
When I M9ed Viviana, I had no intention of using her S1 seriously. I just wanted to finish her M9 before I got to any of the more practical ones because she's my favourite character, and if I was going to invest those kinds of mats into any character, it was going to be her. I did not expect to then use it to AFK more or less an entire lane in a CC, especially not with the -30% attack that I took. It just happens that it works perfectly for taking each enemy out before they enter the reeds and turn invisible. The only exceptions are the first enemy that spawns before I can place her and the two that enter the map together. Her being able to do all of that is huge, as it lets me focus my five unit deployment limit to taking out the map's big threats, and means that I don't have to block/heal on that side beyond those two enemies that come together.
Next come Eben and Diamante. Diamante is my main option for dealing with the seeds in this map, and that first deployment is half to clear them out so that they don't expend Eyja's S2 charges, and half to deal extra damage to the rush. Meanwhile Eben uses his delta mod for extra damage to take out the rover, and Lessing takes out one evocator and more than enough of the next one for Eyja to deal with it later (again, I cannot stress enough how massive his damage reduction is on his S2. The fact that he survives for his full skill duration there is nuts). His placement is also really, really tight, as I want him to get hit by the second evocator right before he takes out the first. This means that he'll take that damage while blocking, reducing it massively, and giving him as much time as possible before its next attack so that he can maximise his damage. Though while I'm managing that timing, I miss something and make the one mistake in this run.
I was supposed to retreat Diamante the second that caster fell, so that I'd have DP to deploy Carnelian ASAP. I missed that by a few seconds, meaning Carnelian was just slightly too late. This almost cost me the run. A second or two later, and it actually prevents her from taking out the evocators and doing extra damage to the rover, meaning that it would move far enough to reveal Eyja, letting the caster that's walking down the middle take her out. In my desperation to let her get as much damage in as possible, I end up missing retreating her, costing me some valuable dp as the caster and seeds take her out. This ultimately works out still, but it makes everything else even tighter. One more missed retreat and I won't have enough for later.
After that is just setting up for the leak. Lessing and Eyja thin out the enemies on the left, leaving just the one that Bassline needs to block for the eventual invis drone leak. But I can't talk about the drone leak without talking about the 500 point clear I got before this. The difference was that I swapped the -20% ally attack for the -30%. That doesn't sound like much! But wow did it mess things up.
So most of my units do just fine with the reduction. I was a bit worried about Lessing and Eben, since they both scale so hard off of attack, meaning any decrease to that base attack gets magnified, but they were actually totally fine. The problem unit, however, is also the one that I lean on heavily to deal with all the seeds: Diamante. Without him dealing with the seeds, this is not possible. His +90 ASPD and hit-two from his S2 is desperately needed. With -20% attack, he two shots them, letting him deal with them efficiently and making the painful process of baiting out the last few seeds (including the ones that spawn INSIDE the blue box) doable. But with -30%, he needs three hits. This extra hit is the difference between him clearing them out and him getting overwhelmed. But I can't let that happen. Having only four ground units, baiting the seeds is really hard, and with all the attack up and HP down that I stacked, no one can live getting hit with three or more. Enter Earthspirit and Czerny.
Earthspirit was the only unit that didn't actually get used in my 500, and she isn't out for long here, but she is VITAL. She slows down the seeds, keeping them away from my ground units, and crucially gives Diamante the third hit that he needs to take them out, easing the pressure while he's off skill. But still, that can only last until they start spawning outside of her range.
Czerny, on the other hand, was used in my 500, but mostly just as a body. He still needed to do that first deployment to block the enemies in the reeds, and then I'd use him again at the end to bait some seeds. But here the margins are so much tighter that I actually need him to bait two rounds of seeds. The timing on this is incredibly tight, but with placing him at the right point, and activating Bassline's S2 at the right moment to get him up again in the moment between two seeds hitting him, he can live long enough to activate his S2, giving him +100% HP, and making him the only unit in my niche that, with Eyjaberry's S3 also giving him +30% HP, can tank more than one round of the seeds. However, the other thing complicating that is that his S2 blast going off would destroy the stall that I need for the seeds that spawn in the blue box, so the timing on it all is unbelievably tight. Actually, yeah, speaking of the stall, let's talk about that.
So leaking the drones is possible, but it's a major pain. I fully believe that HG did not intend for us to be able to leak them, as it's difficult enough to let them get to the blue box in the first place, but then they both spawn seeds INSIDE the blue box. Now, there are some units that, with some work, can attack/destroy them before they leak, but that wasn't really an option for me. Instead, I have to bait them, but the ones that spawn deepest in the box only have one tile in their range. And that tile is the bottom left, in the reeds. You know, where your unit is invisible. This means that to make the leak work, you need to stall an enemy on a blocker there to the end. But you also need to keep that blocker alive, so they can't actually bait a wave of seeds themselves until the ones that come from the blue box. This requires a lot of bodies. My niche, however, does not have a lot of bodies. That meant that there was no margin for error here, and that each and every seed had to be individually accounted for, especially to manage leaking both of the invis drones.
The second drone was much easier to leak in my 500. There, because Diamante handled the seeds just fine, I was able to save Eyja to deploy her where I have Carnelian here, and the splash damage from her S2 would take out the seeds that spawn in the blue box that time (though they would have been out of her range for the first one, and even if they were in her range, they spawn too close to the leak point itself for her projectile travel time to let her take them out before they leak, so I did still need to have Bassline stall up until the first drone leaked). (Also, no, Carnelian isn't doing anything here. She's just kind of an emergency button in case the seeds end up taking out Bassline and I suddenly need to get rid of the enemy he was blocking). But here I need her to replace Diamante, as even with skill, he won't be able to stop enough of the seeds from hitting my ground units. Because of this, I need to keep the stall going for EVEN LONGER, so that Bassline can bait the seeds from that one too. It's all so tight, and you can see that based on how much I keep the operator select bullet time going, as well as in me going back and forth on whether to place a unit or not at various points. Fun fact, this clear's recording is about two minutes longer than the 500 point clear, because of just how long I kept the bullet time going. Even after it works, I still place Eben and activate Carnelian out of paranoia for a potential extra seed spawn. But ultimately, it works out. All the things that I'd planned and theorised would work finally did. And Vivi even gets the final kill.
21 notes
·
View notes
Text

My first CC that I actually got all the medals for. I fucked up and had to do it a second time bc I didn’t get the screenshot the first time…
18 notes
·
View notes
Text
Boy I sure am glad we got rid of Contingency Contract so we could have this more confusing CC-knockoff with worse rewards and without a cool vocal theme /s
10 notes
·
View notes
Text
I have mixed feelings about Contingency Contract ending.
I love the idea of picking your own difficulty modifiers to build up a custom challenge, particularly for a puzzle-like gacha game like Arknights. It allows for different strategies and playstyles, and its incremental nature gives a natural path for evolving your strategy.
But the nature of combinatorics means you get fewer and fewer choices in the high-risk range, and almost none at max risk. And max risk isn't always possible — is that a good or a bad thing?
When CC debuted, we had one-third as many operators, and less than a quarter as many 6*s. With all those new options, should we expect more strategies to be viable at the top of top-difficulty content? Would we be right to? Who does that cater to?
Several CCs have seen the highest-risk strategies degenerate into fiddly stall loops. Who does that cater to?
Arknights has some funny edge cases whereby upgrading an operator actually cuts off certain strategies. Famously, pot4 Weedy loses the ability to stall golems, and Kafka is arguably best at E0. This doesn't matter if you have alternatives, but in high-end CC there may be no alternatives. Push the system to its limit and cracks start to show.
Really, this is a long way of saying that CC is janky. But some of it is the natural result of pushing things — players, difficulty, game systems — to their limit. So maybe it's not possible to make a cleanly polished alternative. Maybe "polished" means simple enough to be verifiably safe, or guardrailed enough to make sure players can't go exploring too far.
I can make peace with CC coming to an end; after all, nothing lasts forever. There are surely some things they can do to improve the experience, but I also worry they'll throw out the baby with the bathwater.
...and whatever comes next might not have such good music.
27 notes
·
View notes
Text


Contingency Contract #2 Underdawn
Main Test Site: Iberia Immortal Hall Cleared
score: 325
325 is the highest I can go on my own before getting to frustrated. I'm generally happy with clear as it gave me the opportunity to use Tsukinogi to reveal the Reefbreaker.
3 notes
·
View notes