#Cool Timeline Plugin
Explore tagged Tumblr posts
Visit Tumblr Blog
Explore Tumblr blogs with no restrictions, modern design and the best experience.
Last Seen Tumblr Blogs


Fun Fact
In 2020, Tumblr had 29.4 million users in the US.
Text
In the dynamic world of web design, unlocking the magic of Gutenberg Timeline Blocks within WordPress unveils a realm of possibilities that far surpasses other timeline solutions. The seamless integration of Gutenberg with WordPress Timeline Blocks offers a user-friendly and intuitive experience, allowing even novices to effortlessly craft captivating timelines for their websites.
#Gutenberg Timeline Blocks#Timeline Plugin Wordpress#Cool Timeline#Gutenberg Wordpress#Timeline Plugin#Wp Timeline#Page Timeline#Custom Gutenberg Blocks#Wordpress Timeline Plugin Free#Wp Timeline Plugin#Gutenberg Blocks#Horizontal Timeline Plugin Wordpress#Wordpress Blocks#Timeline Plugin Wordpress Free#Cool Timeline Plugin
0 notes
Note
I was wondering if you could explain how the Matrix actually... works? Is it more like a Time Lord artificial afterlife, or just a collection of knowledge? Do you ask your dead housekeeper for her cookie recipe, or do you just access it like Google?
Absolutely!
How does the Matrix work?
Think about Wikipedia.
Now, imagine if Wikipedia had detailed profile pages of every single member of the human race that had lived since its inception in 2001 (around 7.5~ billion individual, heavily detailed profiles).
Then, imagine each profile page had a little downloadable file that was that person's consciousness.
Next, think about how every person's knowledge gained in their life is spread throughout that Wikipedia on every single subject.
Now, think, 'What if Wikipedia had a plugin that could tell you future events based on all the information it has from all these people's experiences?'
Finally, put all this into a cool little weird video game that uses virtual reality.
If you can imagine that, you're pretty close.


💻 Functions of the Matrix
Knowledge Repository: The Matrix acts as an archive, containing the lived histories and profiles of every Time Lord that's lived, and all the knowledge they gained in their life.
Quick Updates: Living Time Lords are biologically connected to the Matrix, able to access the information at will (except if you've been a bad Time Lord, of course). When they die the Matrix automatically creates their profile page when they die, so their entire life goes to the Time Lord Wiki for the benefit of all.
Simulated Reality: If entered, the environment is a simulated reality where the personalities of deceased Time Lords can continue to exist. This can make it seem like a kind of artificial afterlife where you could potentially interact with past or future incarnations of Time Lords.
Predictive Tool: The Matrix generates prophecies and foresees potential futures, guiding Time Lords in making informed decisions about potential timelines.
Physical and Astral Projection: Time Lords can also use the Matrix to project their images across spacetime or within the confines of a TARDIS, communicating across vast distances or even between different temporal phases. Isn't that handy?
🔐 Security and Integrity
Despite its advanced capabilities, the Matrix isn't infallible. It can be tampered with, and its data can be manipulated or stolen, which is considered a helluva crime on Gallifrey. The Matrix also uses various safeguards, like Cloister Wraiths and living fibre optic cables that act like firewalls to protect its most critical data.
🔑 Access and Interaction
Access to the Matrix varies; it can be through physical terminals, via direct neural connections, or by using artefacts. Once inside, users can navigate a realm where physical laws are malleable and where their thoughts can shape reality because anything is possible.
🏫 So ...
In practical terms, if you're deadset on finding that cookie recipe, the Matrix could definitely provide access to that knowledge, either by allowing you to interact with the housekeeper's stored personality or by just retrieving the information like a search engine. Alternatively, you could shirk your holiday in Disneyland and jump right into the Matrix to spend a day being attacked by virtual blancmanges and Victoria sponges until you find what you need.
Related:
What is biodata?: What biodata is and what you can use it for.
Factoid: How do Time Lords biologically stay connected to the Matrix?
Hope that helped! 😃
More content ... →📫Got a question? | 📚Complete list of Q+A and factoids →😆Jokes |🩻Biology |🗨️Language |🕰️Throwbacks |🤓Facts →🫀Gallifreyan Anatomy and Physiology Guide (pending) →⚕️Gallifreyan Emergency Medicine Guides →📝Source list (WIP) →📜Masterpost If you're finding your happy place in this part of the internet, feel free to buy a coffee to help keep our exhausted human conscious. She works full-time in medicine and is so very tired 😴
#doctor who#gil#gallifrey institute for learning#dr who#dw eu#gallifrey#gallifreyans#ask answered#whoniverse#GIL: Asks#gallifreyan culture#gallifreyan lore#gallifreyan society#GIL: Culture and Society
36 notes
·
View notes
Note
Hi there!
I saw the game you coded and I think its really awesome!
I've been thinking about making a game for awhile but was always intimated by the fact that I don't know how to code things you said in the post for "A Pound of Flesh" that you hadn't done it before and I was hoping you might be able to point me toward some good resources for learning!
Thank you!!
HIHI!! So for 'A Pound of Flesh', I used the visual novel building system called Renpy to make it! It's basically a free software that streamlines a huge part of the visual novel making timeline and its also the main reason why I was able to develop it by myself in 36 hours.
Renpy uses Python to code visual novels, and when you download it, it immediately prompts a tutorial that teaches you the basics of coding in it which you can replay. It's not too in depth, but it provides enough that I was able to understand the main functions and also some other cool stuff that Renpy can do! Honestly because i only had 36 hours I didnt have time to pour over much resources, a lot of what I learnt came from typing in my questions into google and praying someone had asked it before in either a visual novel dev forum called Lemmasoft or reddit (and it often worked). Most people who help out will also give their own code that worked so I kinda reversed engineered it to learn on my own Tbh I'm sorry I couldn't help more! I kinda just went in hoping the best and didn't think I'd come out with a finished product.
But hopefully the forums and their website I linked down below will help you out if you decide to try Renpy out for developing! It's honestly not as hard as I thought it would be, and if you use Visual Studio Code there's even a plugin which highlights code for you making it so much easier to see what's part of the dialogue and what's actually just code
Forum link: Link Quickstart help website: Link
25 notes
·
View notes
Text
Ortiz On: The Revival Of The Old Internet
I’ve been noticing a trend and I wanted to bring it to your attention. Lately I’ve been noticing a rise of apps & services that emulates websites and apps that give you the experience of the internet of old. For example I’ve been noticing a rise in the userbase of the website Spacehey, which for those unaware is a social network that emulates the classic Myspace of the early 2000’s. I’ve been on the site for 4 years and when I log in I’m always seeing a new set of their “Cool New People” that they feature on my homepage.
Another example is the recent revival of the news aggregation service Digg. As I’ve been alpha testing it I’ve been seeing a whole lot more users get in on the platform and get involved with other users. There’s a certain air of coziness with these services as it feels like these apps & services aren’t getting decimated from new internet stuff like ragebait content & AI slop, though the Digg revival does have AI summaries for articles that get posted on the service but it’s mainly out of the way from what I’ve experienced.
There’s also some extensions and modded apps that I’ve been using lately that gives you the experience of popular apps & sites that give you the experience of the website’s glory days before everything went to shit. For example I have an extension in my Zen Browser where combined with a user style & Stylus makes my Twitter experience look like how it used to in the early 2000’s. Complete with a timeline overhaul to make it look and function like it was back in the day.
There’s also similar browser plugins & themes I use for Reddit to give it the old style because the current one is utter garbage, ads and all.
The last piece of old internet that’s making a serious return from what I’ve noticed is Geocities, albeit under the new name Neocities since the original name is essentially dead. Neocities is basically the same as the Geocities of old where people create their own websites with the classic HTML & CSS flairs & everything. It’s incredible to see some of the creativity of people on Neocities with the limitations of HTML & CSS.
It’s lovely to reacquaint myself with the internet I grew up on and see that others are as well or are acquainting themselves with it for the first time. Hopefully more and more people catch on to the rise of old internet and that companies will listen and stop making horrid changes to the internet we know and…currently tolerate.
0 notes
Text
I have to really decide whether I wanna do art fight and try doing small animations for it or just keep making small animations on my own.
On one hand: being that one insane mf that creates animations during art fight would be cool af
On the other hand: I'm never really good at keeping up with art fight and animating adds a whole other depth of time consuming and stressful.
On the other other hand: doing animations for art fight is an incredible way to not only get out of my comfort zone; but also an incredible way to get used to animating figures I'm not used to (I love Sigma as the perfect self expression vessel but let's get real: drawing a hard surface crt head all the time is not doing me favours with drawing humanoid heads or other heads)
There's also factoring in that I'm using toon boom while I decide what to do in terms of animation software. Put this way:
I love Krita. Krita has been my go-to for art for the whole time I've done digital and my go-to for animation for the most part.
HOWEVER.
I cannot deny that Krita has its drawbacks with animation.
I know that animation was initially a plugin you could only get on Linux and then later was properly introduced into Krita officially. But there's some stuff that makes it a chore past the initial roughs and basic animation. These are my problems:
Vector tools
Krita's vector tools (based on the version I use which is admittedly a tinge outdated) aren't fantastic. Krita's key strength is raster tools I think. Painting in Krita is really nice. A lack of vector tools would normally not bother me. Hell even when I moved from flash/animate to Krita animation it still didn't too much. I missed the ability to easily fill drawings cause it saves a lot of time, but outside that I was okay. However. If you've ever used toon boom or have a basic understanding on how those tools work: they absolutely leave Krita in the dust in terms of animating. The ability to modify your strokes (because they are vector lines) and the ability to easily cut off unwanted portions of strokes is absolutely INSANE. The amount of accumulated time saved makes it hard to justify using Krita at all for animation. Which sucks cause there's some stuff I genuinely prefer with Krita but the difference is insane. I really hope in the future Krita revisits vector based drawing specifically for animation as it truly makes a universe of difference.
Colouring tools
Because Krita is not strong with vector tools colouring also takes time for lined animations. There is the colorize layer/filter thingy but I'll be real; I've used it like 2-3 times and each time it was more worthwhile to colour something myself since it takes a while to process and isn't exactly the best. I mean I'm sure it's great in terms of raster colouring but it pales in comparison to how simple colouring in a vector drawing is. On top of that there's palettes. Toon boom allows you to have colours set that you can change at anytime and these changes will reflect across the entire animation. You technically can achieve the same effect in Krita but you have to add a filter mask for HSV and sure it "works" but it's a bit clunky and definitely adds clutter and also means of a colour is the same across layers you have to manually set both instead of just setting something once. On top of that, it requires you to already have that in mind when initially colouring vs just slapping colours on and adjusting whenever.
Onion skinning
This is simple and quick: in Krita you can set the onion skin colour and how many frames it applies to. However how you set this is by clicking on a widget dedicated specifically to the onion skinning. Unlike flash/animate and toon boom, you do not get a little thing on the timeline that allows you to quickly adjust the onion skinning. It is small but paired with everything else, it does add to things unfortunately.
And honestly, all of this is kind of a shame because Krita could really capitalise on this. As it stands; free animation software is better than it used to be, but still is rough the moment you compare anything to a professional tool. Open toonz is neat but I found to be quite laggy the further things go on (same with Tahoma2D), Pencil2D can't really even compete if I'm honest, which kinda leaves Krita and potentially Blender (which I haven't really gotten behind for 2D animation or hybrid animation cause the idea feels backwards in my head but I do want to try one day).
Toon boom used to have a standalone version you can buy but now it's purely subscription based, and flash/animate would of been a fine middle ground if it weren't for the fact that it's Adobe AND it's subscription based
Anyways I kinda rambled instead of talking about the one thing I wanted to but the TL;DR is:
I am undecided whether I animate more solo stuff or do art fight or do animated art fight stuff
I love Krita but I wish it's animation tools got a bump
Toon boom is incredible with 2D animation but the industry is filled with subscription models I fucking hate
0 notes
Text
Week 10 (Project Update) – Davinci + Shimmer Reverb
Probably the most productive week I have had throughout the semester. I discovered (and implemented) what is one of the most useful workflow techniques for this project. Before this technique, I used to try to time the duration of sounds by starting and stopping a stopwatch on my computer. This was inaccurate, time-consuming and annoying as I was trying to perfectly line up a sound attack/decay with what was happening in the game. Then I started using duration markers in Davinci, which changed everything; now, I was able to perfectly mark the in/out points on the timeline, convert them to duration markers, and get a precisely calculated time for a specific sound.
youtube
The atmospheric mood of the gameplay footage reminded me of a friend's old guitar modeller, which had a cool shimmer reverb effect. Despite my extensive library of plugins that I have hoarded over the years, I actually did not have any shimmer reverbs. However, I thought, "Surely there's a way to recreate this with stock plugins?" It turns out that it was as simple as one 30-second YouTube short; most of the shimmery effect is achieved through the FL Studio Pitch Shifter plugin placed after a wet reverb.
youtube
References -
(BlackMagic Design 2025) -Davinci Resolve 19.1.4 (Video Editor ).
(Image-Line 2025) - FL Studio 24.1.1 (Digital Audio Workstation).
(Murrary 2022) - "I made Shimmer Reverb in FL Studio without spending a ton." YouTube. https://youtu.be/cdY05AM5vGE.
#Shimmer Reverb#SFX#Sound Design#electronic#music producer#Davinci#Video Editing#video game music#game music#Youtube
1 note
·
View note
Text
Making Level 01
I decided while making this level to make it facility themed, very portal inspired but with no portals lol
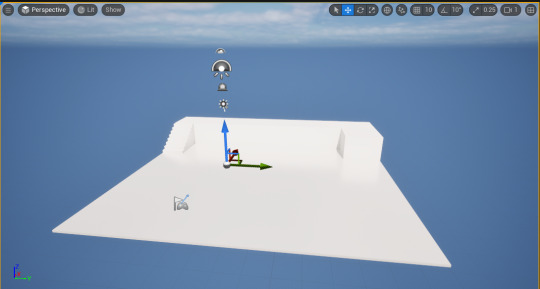


added hallway
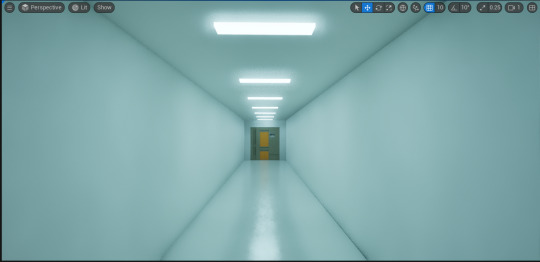
hallway eerie lights

at 2.2, testing how fast the wall should go to push the cube over an obstacle

wallzz

making a giant pit with cubegrid
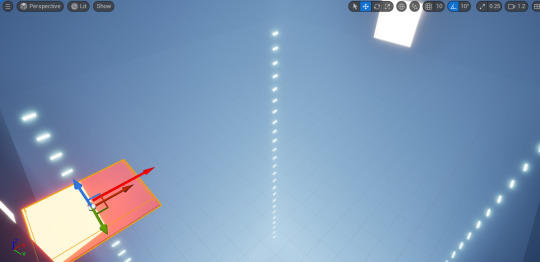
made the pit with lights and a platform that activates when stood on

I duplicated the platform bp and replaced the custom events with an overlap node of a collision box

player will have to use a button the the other side of the pit to turn on the platform to transport the cube to the other side. the main door is going to block cubes from entering

for detail, I am making a pile of cubes as a single static mesh in a separate level, using simulate and pressing 'k', and then converting the selected objects into a blueprint

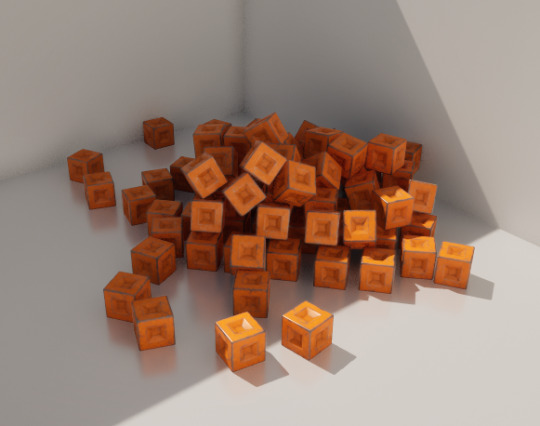
cool !
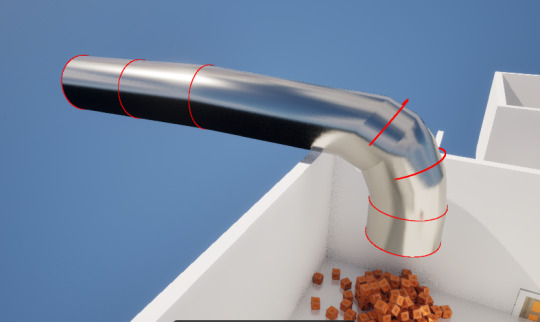
making a pipe using a cylinder, warping, then beveling the edges
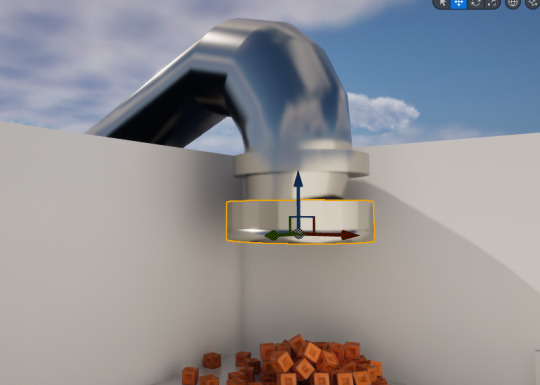

this tiny platform will move and make it look like it fell out of the pipe when the button is pushed


replaced the platform with a spinning fan, there was an issue with the player activated platform, if you fell off while riding it, it would be stuck so I thought of this as a replacement.

to make it I duplicated the platform, replaced the static mesh, and changed the top node to a rotation node and set the plugin to Z

I also had to make the timeline graph look like this and set the rotation to 360 (degrees) so that it has a smooth endless rotate
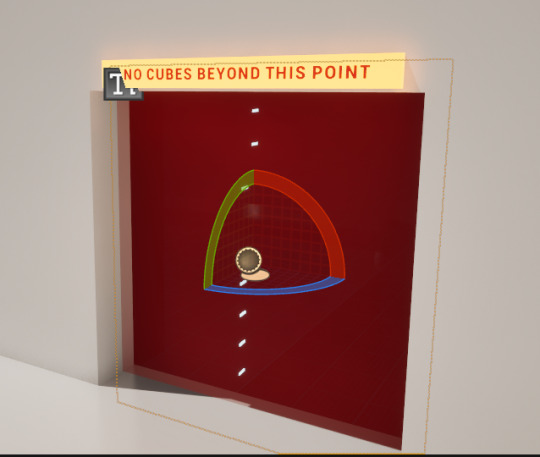
made a laser anti cube thingy

I had to make a new event, and build the code so that when it detects the cube, it destroys it and creates a new one at a spawn point I made. there was an issue where it wouldnt destroy the cube it would just teleport it and would cause weird flying cube bugs

this is the maths for the spawner/spawn point that the death plane is calling. fairly simple

on advice I placed rectangle light sources to get better lighting in the hallways. looks much better I feel

for the cube transport, I had to make a new platform so that the cube doesn't fly off. of course it was more complicated than that. I had to make a duplicate button that held info of THIS platform instead of the normal one

the screenshots got lost sadly, but I made a platforming part using the double jump. I originally had the posts thinner but it was too difficult for this early on so I made it much simpler/easier.

this is the set up for getting double jump, I placed a spotlight over the orb hoping it would draw more attention to it and imply it is important to the player
that is level 1 (excluding the tut lvl) finished !
0 notes
Text
New plan 2024.03.29 for 3 mo.
3 mo = 2024.06.29 - Sat, June 29th.
Mondays & Fridays @ 4 pm: Spanish with dad (edit: 2024.04.06)
2024.04.17 edit - balance approx. goal: 51% SV, 32% KR, 17% ES.
= SV 5.1 hr/week. KR 3.2 hr/week. ES 1.7 hr/week.
(to try for the next 3 mo. 1 active study lang and the rest, 2, passive study langs. total: ~3.5h/day)
1 hour ACTIVE study for 🇸🇪 + 1h TV
- read to flashcards, study EN -> SV (Currently: Kalle Anka) 15 terms. ~30 min (see post on flashcard tips for more info)
Edit 2024.04.04: focus on reading/watching flashcards for the 1st 3 months.
can spend ~1hr per lang per day bc i found myself doing general lang study for about 3hrs a day naturally. think ill just watch (eng/target subs) or study (target/blurred eng subs + flashcards) whenever/additionally.
- speak (or simply write in early days + flashcards) to describe something in Swedish (with or without speaking/writing in English 1st)
& consider reviewing SV pronunciation videos from YT too. (On deck: rewriting my personal journals, or texts etc in SV)
&/or - pronunciation practice: for 3 MONTHS just listen to my recordings and take note of any obvious variations. Later, record myself copying swedish ppl speak and review and retry. ~30 min
(or 1h or read or speak on rotation)
Edit: add singing along/music? no.
- listen to TV show etc with SV. Watch with Eng subs for 3 MONTHS. Then (probs) switch to SV subs with help from Language Learning with Netflix plugin. Later, no subs. (On deck: Young Royals & Love is Blind Sweden) ~1hr
(other ppl: 1. beginner textbook, 2. listen ur heart out with target subs, 3. speak and record and playback)
PASSIVEish study for 🇰🇷🇲🇽
- read Korean. translate as I go. start with basic books 1st oc. 하늘의 일기 ~15min + TV (kor/langlearnsubs) +~30min = ~45min
- watch Spanish TV (eng subs) Latin Am. food show
goal: collect and recognize more words with more focus on Korean over Spanish
1hr Swedish + Korean and/or Spanish (1hr total)
Archive:
1.5h total
- read to flashcards EN -> target. 7 terms. ~15 min
- listen to TV show (~30 min) etc for each. (On deck: read 하늘의 일기 or 한식 show + Street Food Latin America)
things to consider:
2024.04.05
yes: still listening (1)/reading (2) first in the that way i am
listening: eng/target subs native content for chilling + add level-appropriate audio
reading: level-appropriate & topics of interest
i think the listening goes with the reading the way i make flashcards, so whether the flashcards come from a book or a video - there is still an audio component.
add speaking ("from day 1")component to flashcards: use new words to create another sentence that is SIMPLE and RELEVANT to you.
keep in mind, some speaking will occur just by repeating audio from flashcards and audio content.
and you can count on your curious mind to do some speaking exercises both in your mind and outloud.
however, some writing may be beneficial to speaking and easier at this point. (lang journal/brain dump) more details below
+ some recordings of you speaking what you wrote or audio youre copying early on, maybe with benchmarks, would be good to have just to track progress over time

Create a language journal Write only for yourself. This is the simplest way to get started. Do it in a Google Doc or a journal, whichever you prefer. Write about what you did the day before, the things you’re doing at work, your plans for the summer, your thoughts on quantitative easing, or whatever strikes your interest and is near your level.
Brain dump for 25 minutes
Set the timer and start writing, stream-of-consciousness. Whatever comes to mind. The only goal is to get in the zone and write in your target language while the timer is running.
(Maybe...) write an essay
maybe. challenging, but would be cool to write an essay regardless of the language.
Next 3mo. (for an example timeline),
move to speaking to yourself or stuffed animal without writing crutches (record yourself and review) + upgrade listening to avoid eng subtitles or even any subtitles. more details below.
THEN speaking (3) - tips I appreciate:
start here korean 🇰🇷
Read out loud - pronunciation
Focus on pronunciation more than on comprehension. Listen to a native speaker and repeat after them (this is called “shadowing”).
If you don’t have audio for the text, you can put it into Google Translate. It’s not the most natural pronunciation, but it’s better than nothing.
Speak with yourself - sentence creation
Give yourself a topic and record yourself speaking for 5 minutes (increase difficulty based on level).
The topic can be anything. You can summarize an episode of TV, list your plans for the day, talk about your favorite food, describe how you get to work, describe what you see around you, or anything else.
+ review my recordings
+ cont. step 2 of reading/watching to gather more vocab. (into flashcards)
remember flashcards are for: listening practice (if no original audio), and eng to target practice, as well as some basic speaking practice. so if that's not already built into the study content, flashcards need to be made. also plz add grammar to a sort of simple grammar database/dictionary.
& upgrade listening around this time to native only subs and/or no subs
let's skip writing beyond what's necessary to memorize and read and work through sentences.
2024.04.14 Edit
listen to, think then speak
imagine situation while studying the target lang. (and actually dont focus too much on this, think it happens naturally as I study from English to Target)
- and i actually find that this happens naturally when going from listening to speaking. it happens well with reading too but a little more imaginative effort may be required (note: this is also natural, it's kinda harder for me to zone out of whats being said when listening than it is when reading in native lang)
2024.04.23 Edit
Maybe [edit: not] stop with the English speech prompts? I'm finding it more useful to just memorize and repeat. But how to do that for long from speaking? Maybe the issue is I'm going into the speaking without having practiced the repetition (echo method) enough yet.
lesson (naturally includes listening and speaking) -or- another comprehensible audio (or text)
echo method for each section (need TL transcript, need EN transcript in next step too)
use EN to TL speech prompt to record self [upload to Proton]
review video of self, take notes on errors and what is correct
(any need to review pronunciation side by side audio, or do the echo method again before next step, consider that here.)
Return to TL transcript and simply record self reading it. [upload to Proton]
Calendar week
can read for the rest of my "study time" on passive learning days <3
M: light learning/rest day + ES
T: active
W: active
Th: light learning/rest day
F: light learning/rest day + ES
Sa: active
Su: light learning/rest day + ES prep
light learning = actively listen to (or read in) (pre-watched) TL with no subs for 10-15 min each (aka review).
active learning = echo method, speaking, learning new vocab via listening/reading
other times it's good to just listen with ENG subs or TL subs. TBC
1 note
·
View note
Text
Top 25 Tools, Libraries, and Resources for Web Development

Today, the visual appeal and usability of a website take precedence over its development intricacies. Prioritizing a user-friendly and resilient front end is crucial. Thankfully, an array of plugins and frameworks exist in the market, simplifying development processes. These tools offer easy integration and negate the need for in-depth knowledge of specific technologies, ultimately saving valuable time.

ullpage.js: Enables creation of fullscreen scrolling websites and landscape sliders, ideal for One-Pagers.
Owl Carousel: A favorite slider plugin for creating simple sliders with easy integration.
jQuery custom content scroller: Allows customization of scrollbars with vertical and horizontal options, along with different themes.
matchHeight.js: Useful for equalizing heights of columns or floating boxes, especially when using flexboxes.
fancyBox: Popular for image popups with mobile-friendly features and quick setup.
Highcharts: Offers interactive chart creation for various purposes like stocks, timelines, and maps.
Animsition: Provides CSS animated page transitions for smoother reloading experiences.
TwentyTwenty: Allows comparison of two images with a draggable slider, responsive across devices.
Wow.js: Adds cool animations for page scrolling effects.
Dragdealer.js: Enables 2D dragging and tapping functionalities for mouse and touch interactions.
Select2: Replaces select boxes with a customizable jQuery plugin offering features like searching, tagging, and more.
CSS libraries / Design stuff
Animate.css: A CSS animation library.
Flat UI Colors: Offers a selection of trendy colors.
Material Design Lite: Google’s material design framework.
Materialui.co: Provides resources for material design.
Colorrrs: Generates random colors.
CSSpin: Offers a variety of CSS spinners.
Font Awesome: Provides a wide range of icons.
Bootstrap: A popular open-source toolkit for web development.
Foundation: Responsive front-end frameworks for designing websites, apps, and emails.
Interested in delving deeper into these valuable tools and resources for web development? Explore further details and insights by visiting our blog post at: Read more at — https://nitsantech.com/blog/25-useful-tools-libraries-and-resources-for-web-developer
0 notes
Text
0 notes
Text
Introducing the JNext WordPress Timeline Plugin: Elevate your website's storytelling with our innovative visual timeline solution. Seamlessly integrate historical narratives, project progress, or personal achievements using this dynamic plugin. Engage your audience with a captivating chronological display that combines aesthetics and functionality.
#WordPress Timeline Plugin#JNext Timeline Plugin#Timeline Block for Gutenberg#Gutenberg Timeline Block Plugin#Gutenberg Timeline Plugin in WordPress#Timeline Block Plugin in Gutenberg WordPress#Timeline Block Plugin in WordPress Gutenberg#Timeline Plugin Wordpress#Wordpress Timeline Plugin Free#Time Line Block Plugin#Timeline Plugin for Gutenberg#Timeline Plugin for Wordpress#Cool Timeline#Gutenberg Wordpress#Timeline Plugin#Wp Timeline#Page Timeline#Custom Gutenberg Blocks#Wp Timeline Plugin#Gutenberg Blocks#Horizontal Timeline Plugin Wordpress#Wordpress Blocks#Timeline Plugin Wordpress Free
0 notes
Text
Cool Timeline Plugins For WordPress by Cool Plugins

Cool Timeline is a powerful WordPress plugin that allows you to create informative and visually impressive timelines. It is built with pure HTML and CSS for maximum compatibility and offers horizontal and vertical layout options. Creating a timeline is simple and intuitive: just create a post, set an image, and specify a date. The plugin will automatically sort your posts in chronological order, whether you prefer ascending or descending. With the simple [cool-timeline] shortcode, you can easily display a timeline on any page of your website. The plugin is also fully responsive, ensuring your timeline displays perfectly on any device. Gutenberg Timeline Block: - Advanced timeline block for Gutenberg, allows you to easily create stylish timelines using predefined presets. With this block, you can create any type of timeline, from roadmaps to process steps and events, opening up endless possibilities for presenting your content in a visually appealing way. Compact timeline: -Our free users can also create compact timelines, meaning a timeline without many gaps between stories. Clean Layout:- If you prefer a clean and clear look without a lot of colors, you can present your story through our clean layout. Horizontal roadmap timeline: - With the help of roadmap design, you can present the plans and phases of your project/business. Enhanced design and optimized code: - We also made it developer friendly, you can easily customize story query according to default timeline. Ability to create single-sided and double-sided vertical timelines. Option to display timeline image in popup or link to full story. Ability to include interesting icons next to the story. Customizable background color for stories and year circle. Option to specify different title colors for the story. You can specify different colors for the post title. Read More button to link to the full story page. Ability to sort stories in ascending or descending order. Easily use the shortcode to place the cool timeline wherever your heart desires – [cool timeline]. The plugin is translation ready and has been translated into 4 languages: German, French, Indonesian and Italian. TinyMCE button to create a timeline shortcode or easily add shortcodes on any page using Gutenberg ready blocks. Responsive, mobile-ready timeline.
1 note
·
View note
Text
https://omiyou.com/read-blog/17986

Timeline Block Plugin for Gutenberg allows you to create beautiful vertical horizontal “Content-Timeline-Block” and “Timeline-Block”. Using this option you can create both-sided vertical content-timeline or post-timeline. Orientation Options allow to set Connector in center of Timeline blocks.
#Timeline Plugin#Timeline Plugin Wordpress#Cool Timeline#Wp Timeline#Page Timeline#Custom Gutenberg Blocks#Wp Timeline Plugin#Gutenberg Blocks#Horizontal Timeline Plugin Wordpress#Wordpress Blocks#Timeline Plugin Wordpress Free#Cool Timeline Plugin
0 notes
Text
Revolutionize Your WordPress Website with Cool Timeline Pro: Unleash the Power of Stunning and Interactive Timelines!

re you looking for an innovative and visually captivating way to showcase your content on your WordPress website? Look no further! With Cool Timeline Pro, you can revolutionize your website and unlock the power of stunning and interactive timelines.
Timeline Plugins are a dynamic way to present information, tell a story, or showcase historical events. Whether you're a blogger, journalist, historian, or just someone who wants to add an engaging visual element to your website, Cool Timeline Pro is the ultimate plugin for you.
So, what makes Cool Timeline Pro stand out from the crowd? Let's explore some of its amazing features:
Intuitive Timeline Builder: With Cool Timeline Pro, you can easily create and customize timelines with a user-friendly drag-and-drop interface. No coding skills are required, making it accessible to beginners and advanced users alike.
Interactive and Responsive Design: Cool Timeline Pro offers sleek and modern designs that are fully responsive, meaning your timelines will look stunning on any device, from desktops to mobile phones. The plugin also allows for interactive elements such as tooltips, icons, and multimedia content, making your timelines engaging and interactive.
Customization Options Galore: Cool Timeline Pro provides a wide range of customization options, allowing you to personalize your timelines to match your website's branding and style. You can customize colors, fonts, backgrounds, and more to create a unique timeline that aligns with your website's aesthetics.
Multiple Timeline Layouts: Cool Timeline Pro offers various timeline layouts, including vertical, horizontal, and compact, giving you flexibility and versatility in displaying your content in a visually appealing way.
Advanced Timeline Features: Cool Timeline Pro goes beyond basic timeline functionality by providing advanced features such as timeline navigation, timeline filtering, timeline stories, and timeline animations. These features allow you to create complex and dynamic timelines that are sure to impress your website visitors.
SEO-friendly: Cool Timeline Pro is optimized for search engines, ensuring that your timelines are SEO-friendly and can be easily crawled and indexed by search engines, helping to improve your website's visibility and ranking in search results.
In conclusion, Cool Timeline Pro is a powerful plugin that empowers you to create stunning and interactive timelines that will enhance your WordPress website's visual appeal and user experience. Whether you want to showcase your blog posts, highlight historical events, or present your portfolio, Cool Timeline Pro is the ultimate tool to revolutionize your WordPress website. So why wait? Unleash the power of Cool Timeline Pro and take your website to the next level!
#wordpress developers#cool timeline#timeline plugins#wordpress plugins#plugin#web developers#web developing company#web development#wordpress
0 notes
Note
Hello Vylet, I find your music inspiring to me. as I am beginning to get into music production myself. With that being said I find it very difficult to find a place to start and I don't really have a direction. Is there any advice that you could give beginners like me on trying to get a foothold in music? Like sources, or things that should have a higher priority in learning?
the thing i tell most ppl is to start learning with whatever interests you the most first. for example, if you rlly like drums and rhythms, start by experimenting with drum beats and programming stuff and performing things like that. if you really like the idea of arranging things into a song, get some loops and shit and just feel out how to arrange things. as you get proficient in one aspect, start throwing in more things that you're interested in.
for me, i really liked composing and arranging when i started. so i didnt care about how good the instruments were or how to mix anything or how to refine anything. i just focused on taking instruments, composing things with them, and arranging on a timeline. then i got super interested in sound design so i started to learn more about how synths ACTUALLy worked, and how to use effects to change things.
—
whats cool is you can actually find lots of old sample cd's archived on archive .org [just google archive . org sample cds]. so tons of free samples there. looperman is another classic sample resource. freesound also. you can pay splice for sample credits and u can have a certain amount of sounds for a monthly fee. but u can also just sample songs too. hey! you can sample my songs. that's always safe :3
—
i always find andrew huang's videos to be great for beginners
fact magazine has a great series called against the clock where you can watch ppl make a song in a few mins and observe workflows and ideas
even if u dont use live, ableton has some great videos and seminars on making music and stuff.
—
if you need a DAW, bitwig is available on rent-to-own so you dont need to commit to smth
and if you need some third party plugins, check out vital , ob-xd , klanghelm , and analog obsession for some cheap and free stuff. i say this everytime ppl ask for software recommendations but Vital is such an awesome free synth. i use it on almost every single song i make!!!!
also sylenth is one of my fav synths after over 10 years of using it and it's also on rent-to-own
everything on kilohearts is rent-to-own and i love all their shit too.
hope this helps a little bit!
144 notes
·
View notes
Text
Cool Timeline Pro v3.5.2 - WordPress Timeline Plugin
Cool Timeline Pro v3.5.2 – WordPress Timeline Plugin
Cool Timeline Professional v3.5.2 – WordPress Timeline Plugin Cool Timeline Professional is a sophisticated WordPress timeline plugin that showcases your life historical past timeline or your organization’s story timeline in a responsive horizontal or vertical chronological order based mostly on the yr and the date of your posts. It’s best plugin to create a timeline theme. You may also convert…
View On WordPress
0 notes