#DIY Grouting
Explore tagged Tumblr posts
Visit Tumblr Blog
Explore Tumblr blogs with no restrictions, modern design and the best experience.
Last Seen Tumblr Blogs


Fun Fact
Tumblr Inc. is funded by 13 investors.
Text
How to Apply Ceramic Tile Grout (DIY)
How to Fill Gaps Between Tiles
Ceramic tile grout mix is a kind of filling material that is used in the construction industry, mainly for masonry works involving the application of tiles. It is used to seal ceramic tile joints after tile installations, and to fill voids and cracks in between the ceramic floor and wall tiles.
The materials used for grouting depend on what material is being joined together. It can be composed of a cement and sand mix if it is required for filling cement block joints, or a cement-based epoxy if it is for filling joints of ceramic wall and floor tiling.
When you have coloured tiles but no matching epoxy filler, a colour tint of any shade can be added to the mix. With that, the tile grout will be a close colour match to the already laid tiles. Grouting material can also be made a contrasting colour that highlights or complements the tiles. If this is the case, the colour tint and epoxy mix will contrast with the tiles.
Grouting is a simple task and can be done by most DIY enthusiasts. As long as you have the essential tools and grouting materials, the application is not a job that requires the services of professionals.
However, if you are not a hands-on person, you can always call in professional tilers from home improvement stores who will carry out your grouting works to your satisfaction.
Tools Required to Apply Ceramic Tile Grout
Before you commence the application, you will need to prepare adequately. Grouting can be a mess if you don’t use the right applicators and tools. To ensure a job well done, you'll need these simple things to perform your grouting task- whether you are installing new tiles, or re-grouting discoloured, broken, or chipped old grout works:
Grout Saw/Remover (an electric grout saw ensures a faster job)
Scraper
Float
Sealer
Attachment
Grout Saw: A grout saw is composed of tungsten carbide blades and is used to cut and remove old tile grout. This is required if renovation works are being carried out on existing laid tiles.
Scraper: A scraper is a simple hand tool that is required to remove old grouting that has been discoloured with age.
Grout Float: A grout float is similar to a trowel used by masons but it has a sponge rubber pad at the bottom. It is used to smoothen the surface when it's just been freshly applied to the tile works.
Sealer: The sealer is water-based and is applied over dried grout. They must possess qualities that resist water, oil or acid-based contaminants.
Guide (Attachment): A grout attachment acts as a guide. It is placed over a rotary implement and it helps in the quick removal of old ceramic tile grout. It can be used in place of the saw for faster and better grouting works.
Preparations Required Before Grouting
Preparing for grouting works actually commences before laying the tiles. You want to determine how wide or narrow your spacing (gap between tiles) will be. To do this, you will need plastic spacers.
Plastic spacers help to space tiles evenly and squarely to ensure that the tiles are laid perfectly straight and squared and the gaps are the widths of your choice. After tile application and before grouting, the X-shaped flexible plastic spacers should be removed.
Now that you are ready to commence your grout works,
Mix the grout material with water. Note that the quantities required will depend on how much tiling needs to be done. Follow the instructions on the package carefully and ensure you use the right ratios of tile grout to water (or the acrylic latex liquid) mix.
Buy grout material that has an acrylic latex additive in its components. This will ensure good flexibility and eliminate the chances of having fine line cracks a few weeks after it has hardened.
If the tile grout you have purchased comes without the additive, you can get some acrylic latex liquid admixture which can be used in place of water.
Instructions on How to Grout
These simple 10 step instructions apply to both wall and floor tiles grout works.
Spray the already tiled surface with a light mist of water. You can do this in sections so the water doesn't dry faster than you can work. The moisture will give the mix some moisture that without it, would affect its setting.
Scoop some amount of grout onto the surface starting from the inner corner of the room. Spread the paste with a grout float held about 30 degrees horizontally from the surface and move in a wiping motion at an angle to the gaps.
Work in a consistent pattern and avoid haphazard smearing.
Carefully and evenly spread the mix while compacting it into the gaps. Add more grout and spread until the spaces are well compacted.
Use the edge of the float to scrape off the excess grout from the floor or walls and wait for 20 minutes (or whatever time is stipulated on the package). During this waiting period, clean all messy grout from the edges of the walls or floor in case there has been a bit of smearing whilst grouting.
Sponge-clean the tiles. Cleaning with a sponge removes the thin film of grout from the tiles without affecting the grout within the gaps. It is important to keep to the stipulated waiting time or it will become difficult to remove the tile grout film.
Rinse the sponge often while cleaning, ensuring the water is wrung out well. Always wipe gently but firmly.
After about 40 to 45minutes, again depending on the stipulated drying period on the package, clean the faint residue of grout off the tiles using a simple paper towel. At this time the grouting has hardened, though not thoroughly, but enough to give a good clean a chance.
After the application, give your finished work a spray of misty water twice a day for three days after grouting.
After curing, apply the grout sealer to prevent the growth of mould and mildew, and prevent staining, yellowing, or darkening.
Ceramic tile grout mix comes in a variety of colours so there is something in the market that will suit each individual need. There are also the un-sanded and the sanded variety which contains some sand, great for those who want a special effect grout finish. The sanded type can be used for wider gaps because the sand serves as a filler, while 'un-sanded' grout is used to fill very thin gaps of mosaic tiles, marble tiles and granite tiles.
How to Maintain Ceramic Tile Grout
Occasionally, clean your tile grout by applying a baking soda paste on the grout, leave it on for some time, and then wash it off. Alternatively, you can use a solution of water and hydrogen peroxide to clean grout, especially if it is stained, or yellowing. You can also use a commercial grout cleaner and let it sit for about 15 minutes before scrubbing the dirt away with a sponge and rinsing it with clean water.
Another way to clean and maintain grout lines is by adding oxygen bleach powder to your mop water (for floors) or your cleaning water (for walls). Apply the solution liberally and on the grout joints. Leave it on for about 15 minutes, then clean thoroughly with clean water.
For a homemade cleaning solution, mix together a half-cup of baking soda, a quarter-cup of hydrogen peroxide, and one teaspoon of dishwashing liquid and apply onto grout/ after about 10 minutes, scrub off the mixture from the ceramic tiles grout lines and rinse well.
Source: www.Discover.HubPages.com
#Ceramic Tile Grout#DIY Grouting#Tile Installation#Grout Application#Grout Maintenance#Grout Tools#Tile Repair#Home Improvement
0 notes
Text


Mochi's finally getting a much needed tank upgrade 🩷
I'm making a DIY background for him with lots of climbing enrichment. I carved some ledges out of pink insulation board, used spray foam to attach them to the tank, and now i'm painting grout onto everything so it looks like rocks. Once the grout's dry I can paint it, then seal it all with a waterproof sealer.
I can't wait to move him into this!! He loves climbing, I think he's really going to love this tank 🥰
#huge tank for my little guy#he's in a 20 gallon long right now.. which *was* considered fine for adults when i first got him#but nowadays it's considered too small.. so i'm glad i can finally give him a proper upgrade#reptiblr#diy background#also my back is fucking killing me now i just spent over an hour bent over painting the grout 😭
33 notes
·
View notes
Text

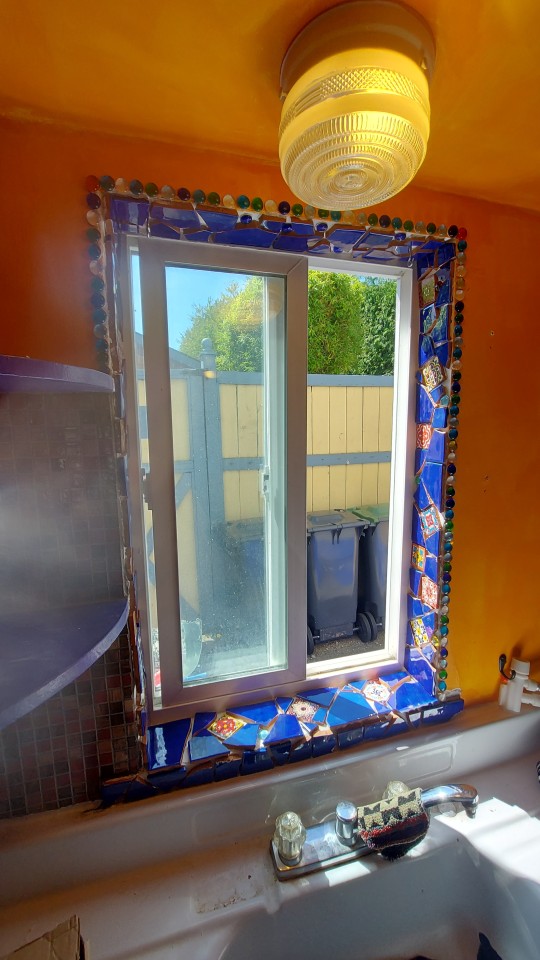
current art project: kitchen window
#garryposting#diy#will grout tomorrow but aaaaa im excited about it :)#i was worried i wouldnt have enough tile but it ended up being perfect#best $5 ive ever spent#mosaics
11 notes
·
View notes
Text
Mosaic chip art involves creating intricate designs or images by arranging small, flat, and usually colored pieces of material called tesserae (or chips). These chips can be made from various materials such as glass, ceramic, stone, or even wood. Mosaic art has been used throughout history to decorate walls, floors, and objects, blending craftsmanship with visual storytelling.
Here’s a step-by-step guide to creating mosaic chip art:
1. Gather Materials
Tesserae (Mosaic Chips): These can be purchased pre-cut or created by breaking larger materials.
Base Surface: Choose a sturdy surface such as wood, cement board, or a canvas.
Adhesive: Use mosaic glue or thin-set mortar to secure the chips.
Grout: For filling gaps between the tesserae.
Tools: Tile nippers, tweezers, spatula, and safety gear (gloves and goggles).
2. Design Your Mosaic
Sketch your design on paper or directly onto the base surface.
Simplify complex images into manageable shapes and colors.
3. Prepare the Base
Clean the surface to ensure the adhesive sticks properly.
If needed, apply a base coat of paint or primer.
4. Arrange the Chips
Start placing the tesserae on the design, either directly onto the adhesive or dry for planning.
Use tweezers for precision with smaller pieces.
5. Glue the Chips
Apply adhesive to the back of each tessera or the base surface.
Press the tesserae firmly onto the surface.
6. Apply Grout
Once the adhesive is dry, spread grout over the entire surface using a spatula.
Push grout into the gaps and remove excess.
7. Clean and Polish
Wipe off grout residue from the tesserae with a damp sponge.
Polish the surface once the grout has dried.
8. Seal the Mosaic
Apply a sealer to protect the mosaic and enhance its colors.
Mosaic Chip Art Tips:
Use color gradients to create depth and dimension.
Experiment with patterns, such as geometric or abstract designs.
Incorporate recycled materials for a sustainable touch.
#home#stone#granite#diy#art#mosaic#tesserae#chips#design#create#creator#designer#wall art#floors#floor#resin#tile grout#epoxy grout#aesthetic#asmr video
4 notes
·
View notes
Text
How to Clean Grout in Tiles Like a Pro DIY Grout Cleaner at Home

Tiles always look great when they’re clean — but the grout between them? That’s where dirt loves to hide. Grout is the material that fills the gaps between tiles, and because it’s porous (meaning it has tiny holes), it easily soaks up water, dirt, and stains. Over time, it can look dark, stained, or even mouldy — making your whole floor or wall look dirty.
The good news? You don’t need expensive cleaners or fancy equipment to fix it. In this blog, I’ll show you how to clean grout safely and effectively using simple ingredients you probably already have at home. These easy DIY grout cleaning methods will help restore the fresh, clean look of your tiles — just like a pro!
Let’s get started and bring that fresh, clean look back to your tiles!
Tools and Ingredients You’ll Need for DIY Grout Cleaning
Before diving into the methods, gather the following items. Don’t worry — you won’t need to use all of them at once. Each method in this guide uses a different mix of these tools and ingredients, depending on the type of grout cleaning you’re doing (light stains, heavy-duty, everyday grime, or regular maintenance).
Most of these are common household products you probably already have at home:
Baking soda – A gentle abrasive that helps lift dirt and stains
Hydrogen peroxide – A natural bleaching agent that kills bacteria and whitens grout
White vinegar – Useful for breaking down mineral buildup (avoid on natural stone)
Water – Helps dilute ingredients
Old toothbrush or scrub brush – For precision scrubbing
Sponge or microfibre cloth – For wiping away residue
Gloves – Protect your hands during scrubbing
Spray bottle(optional) – Makes applying solutions easier
Bowl or container – To mix your cleaning paste
Safety Tip: Make sure to work somewhere with good airflow, especially when you’re using vinegar or hydrogen peroxide. Do not mix vinegar and hydrogen peroxide together because that can be dangerous — use each one separately.
Methods: How to Clean Grout in Tiles Like a Pro
Method 1: Baking Soda and Water Paste
Best for: Light stains and regular maintenance
What You Need:
1 part baking soda
1 part water
Instructions:
Make the paste: Combine baking soda and water in a bowl to form a thick paste similar to toothpaste.
Apply it: Use a toothbrush to spread the paste thoroughly along the grout lines.
Let it sit: Wait 10–15 minutes. This allows the baking soda to loosen dirt and grime.
Scrub gently: Use a circular motion to scrub the grout. Don’t press too hard—you want to clean the grout, not erode it.
Rinse and dry: Remove the paste by wiping the surface with a damp cloth. Then, dry with a towel to prevent mould from forming.
Method 2: Baking Soda + Hydrogen Peroxide (The Heavy-Duty Winner)
Best for: Tough stains, yellowing, and mildew in high-moisture areas like bathrooms
What You Need:
1 part baking soda
1 part hydrogen peroxide (3% solution)
Instructions:
Mix it up: Combine baking soda and hydrogen peroxide to make a bubbly, slightly runny paste.
Apply the paste: Spread it directly onto the grout using a toothbrush or your fingers with gloves on.
Let it sit: Allow the mixture to work for 10–20 minutes to activate its cleaning power.
Scrub thoroughly: Focus on tough spots with a scrub brush or stiff toothbrush. Use short, firm strokes.
Rinse well: Wipe away the paste using a wet cloth or rinse with warm water.
Dry it off: Pat dry with a clean towel so it stays dry and mould doesn’t come back.
Pro tip: Hydrogen peroxide not only cleans but also naturally disinfects and whitens grout without harsh chemicals, making it one of the best ways to clean grout.
Method 3: Vinegar and Warm Water Solution
Best for: Everyday grime and surface-level dirt
What You Need:
1 part white vinegar
1 part warm water
Spray bottle
Instructions:
Mix the solution: Pour equal parts white vinegar and warm water into a spray bottle.
Spray generously: Spray the solution on the grout lines.
Let it soak: Wait 5–10 minutes to loosen dirt and soap scum.
Scrub lightly: Use a toothbrush to scrub along the grout lines.
Wipe clean: Use a damp cloth to wipe away residue.
Dry completely: This helps prevent mould or mildew from forming.
Note: Do not use vinegar on natural stone tiles like marble or limestone—it can damage the finish. But for ceramic or porcelain tiles, this solution is an excellent homemade grout cleaner.
Method 4: Dish Soap and Warm Water
Best for: Light cleaning, regular maintenance, and safe use on most surfaces
What You Need:
A few drops of dish soap
A bowl of warm water
Instructions:
Create soapy water: Add a few drops of dish soap into warm water and mix.
Dip your brush: Soak a toothbrush or scrub brush in the solution.
Scrub the grout: Focus on dirty lines and rinse your brush frequently.
Wipe clean: Wipe the grout clean with a damp cloth.
Dry well: Dry the grout with a towel to stop water from soaking in.
Gentle and non-toxic, this method is great for regular grout cleaning in homes with kids or pets.
Tips for Maintaining Clean Grout
Once your grout is sparkling, you’ll want to keep it that way.
Here’s how:
Clean grout once a month in high-use areas like kitchens and showers.
For low-traffic areas, clean 2–3 times a year.
After cleaning, you can apply a grout sealer (available at hardware stores) to prevent future staining and make cleaning easier.
Mop or wipe tiles regularly to avoid buildup.
Avoid using too much soap or detergent on tiled floors — it leaves a film that attracts dirt.
What NOT to Use on Grout (And Why)
Avoid these common household products when cleaning grout:
Bleach: While it seems effective, it’s too harsh. Over time, it breaks down grout, weakens the bond with tiles, and can leave a film that attracts dirt.
Ammonia: Can irritate your lungs and damage grout.
Toilet bowl cleaners: These products often contain bleach or acids that can damage grout and leave stains on tiles.
Remember: Grout is porous and delicate, so overly harsh chemicals cause more harm than good.
Bonus: Homemade Grout Cleaner Recipes for Different Needs
Here are a few quick DIY grout cleaner recipes for different types of grout problems:
For Deep Stains:
2 tablespoons baking soda
1 tablespoon hydrogen peroxide
1 teaspoon dish soap
For Mould and Mildew:
Equal parts of white vinegar and water
Spray on grout, let it sit for 10 minutes, scrub, then rinse
For Natural Stone Tiles:
Avoid vinegar
Use a paste of baking soda and water only
For Quick Spot Cleaning:
A paste made from lemon juice and baking soda.
These natural cleaners are budget-friendly and safe when used properly.
DIY Grout Care Tips
Cleaning grout doesn’t have to be a hard chore. With some common household ingredients like baking soda and hydrogen peroxide, plus a bit of effort, your grout can look nearly brand new.
Remember, the key is patience, proper technique, and knowing what to avoid. Whether you’re doing regular maintenance or tackling years of dirt, these DIY grout cleaning tips will help you clean like a pro.
When to Consider Professional Grout Cleaning or Regrouting
DIY grout cleaning works wonders for most people, but sometimes it’s not enough.
Signs you need professional help:
Your grout is falling apart or missing in spots
Deep stains that don’t respond to homemade grout cleaners
Mould keeps coming back even after you clean
Benefits of hiring professionals:
Heavy-duty equipment gets deeper into the grout
Steam cleaning or high-pressure tools restore original colour
They can also fix grout that’s damaged or put new grout in if needed.
Sometimes, calling in experts is the safest and most effective way to restore your tiles and grout — especially if the damage is beyond what home cleaning can fix.
Need Help with Grout Cleaning?
If grout cleaning feels too time-consuming or overwhelming, don’t worry — experts at Brisbane Commercial Cleaning and Pest Control are here to help. We bring professional tools, years of experience, and muscle to make your tiles and grout look great again.
Contact us today and let us do the hard work, so you can enjoy a cleaner, fresher home without the stress.
#Clean Grout#commercial cleaning#DIY Grout Cleaning#office cleaning#Office Cleaning Fortitude Valley
0 notes
Text
McKinney Homeowners: Is DIY Tile Cleaning Worth It?
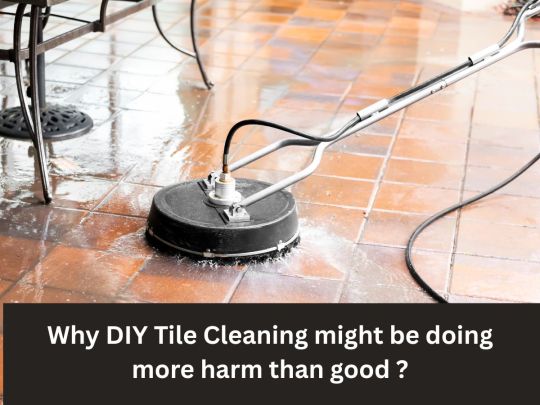
Rolling up your sleeves for some weekend tile cleaning in McKinney? You’re not alone—but most homeowners don’t realize the hidden DIY tile cleaning risks involved. 😓 At Home Bright Carpet + Floor Care, we’ve seen what happens when good intentions meet the wrong tools.
Here’s what could go wrong:
🧪 Bleach & vinegar destroy grout over time 🔧 Scrubbing too hard leaves scratches 🌫️ Dirt hides deep in grout—DIY won’t reach it 💭 Surface cleaners don’t prevent future buildup ⏳ DIY takes forever with “meh” results
There’s real value in letting experts handle it. Trust Home Bright Carpet + Floor Care for safe, efficient service that truly gets the job done. We understand the importance of professional tile cleaning, and we’re here to help your floors shine—without the stress.
#diy-tile-cleaning-risks#tile-cleaning-in-mckinney#professional-floor-care#grout-cleaning#home-bright-carpet#carpet cleaning#home#mckinney
0 notes
Text

Tile Cleaning Equipment
Whitehall Carpet Cleaners uses state-of-the-art tile cleaning equipment to ensure your floors receive a deep, thorough clean that regular household tools can’t provide!
#professional tile cleaning#tile cleaning services#tile cleaning columbia sc#grout cleaning services#benefits of professional tile cleaning#deep tile cleaning#tile and grout cleaning#tile cleaning company near me#tile stain removal#tile cleaning vs diy#expert tile cleaning#tile cleaning equipment#tile cleaning and sealing#tile and grout cleaning experts#tile cleaning service columbia sc#mold and mildew in grout lines#professional grout cleaners#high-traffic tile cleaning#contact Whitehall Carpet Cleaning#WhitehallCarpetCleaners#whitehallcarpetcleaners.com
0 notes
Text

Perfecting Your Tile Installation with Clariannt PVC Tile Spacers Achieving a flawless tile installation requires precision and attention to detail, and Clariannt PVC Tile Spacers are here to ensure that your tiling projects are executed to perfection. Whether you're a professional contractor or a DIY enthusiast, Clariannt's high-quality tile spacers are designed to provide consistent and uniform gaps between tiles, enhancing both the functionality and aesthetics of your tiled surfaces. Discover how these essential tools can transform your tiling work and deliver outstanding results every time.
Website Link:
#PVC Tile Spacers#Clariannt Tile Spacers#Tile Installation#Tile Spacers#Grout Lines#Professional Finish#DIY Tiling#Tile Alignment#Tiling Accessories#Tile Spacers Sizes
0 notes
Text
Grouting with Epoxy Grout: Achieve Seamless and Stain-Resistant Tile Joints
Transform your tiles with the power of epoxy grout. Say goodbye to messy and porous grout lines! Epoxy grout offers superior durability, stain resistance, and a flawless finish. Learn expert tips on application, color selection, and maintenance. Elevate your tiling project and enjoy the beauty of your tiles for years to come.
#epoxygrout#tile grout#grouting#homeimprovement#DIY#tiles#bathroom#kitchen#stainresistant#durable#homedecor
0 notes
Text


dumping some recent arts & crafts!
#garryposting#diy#i will probably put other stuff on that shelf eventually. i made it with that lip so like frames or art can go there#also i have been wanting to make a mosaic light switch cover for LITERALLY YEARS#i remember when i first got into mosaics that was one of the first things i saw when looking for insp online#and it blew my mind. it feels like such a small silly thing but IM REALLY EXCITED ABOUT IT#the pieces got a little grout stained bc they were pretty scratched (it was once a well-loved plate) but its fine#mosaics
3 notes
·
View notes
Text
How to Clean Grout in Tiles Like a Pro (DIY Grout Cleaner at Home
Tiles always look great when they’re clean — but the grout between them? That’s where dirt loves to hide. Grout is the material that fills the gaps between tiles, and because it’s porous (meaning it has tiny holes), it easily soaks up water, dirt, and stains. Over time, it can look dark, stained, or even mouldy — making your whole floor or wall look dirty. The good news? You don’t need expensive…

View On WordPress
#Clean Grout#commercial cleaning#DIY Grout Cleaning#office cleaning#Office Cleaning Fortitude Valley
0 notes
Text
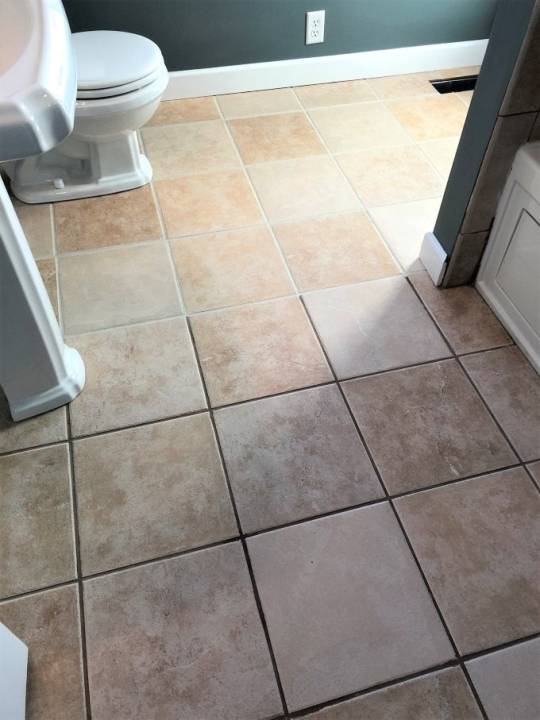
Tile Cleaning Columbia SC

5 Reasons You Need Professional Tiles Cleaning More Often Than You Think
Have you experienced it? No matter how hard you scrub your tile floors, they never regain their original shine. That’s when you need professional tile cleaning to revitalize those floors.
Expert care can restore your tiles to their original beauty and help protect a substantial investment in your home.
Key Takeaways
Professional tile cleaning extends tile lifespan by removing built-up dirt and grime that can damage surfaces over time.
Expert cleaning achieves a deeper clean than DIY methods, removing harmful bacteria and improving indoor air quality.
Regular professional cleaning saves money in the long term by preventing costly repairs and replacements due to improper cleaning.
Professional methods restore tile brightness and color, enhancing the overall appearance of floors and living spaces.
Expert cleaning prevents mold and mildew growth in grout lines, which can pose health risks if left unchecked.
5 Reasons to Opt for Professional Tiles Cleaning
Professional tile cleaning offers more benefits than you might think. We’ll explore five key reasons expert care is crucial for your tiles.
Extends the Lifespan of Your Tiles
Regular professional cleaning extends the life of your tiles. We’ve seen how neglect leads to discoloration and damage over time. Our expert cleaning methods remove built-up dirt and grime that can wear down tile surfaces.
This prevents costly repairs or replacements down the road.
Professional cleaning and sealing prolong tile life.
Clean tiles resist stains and maintain their appearance longer. At Whitehall Carpet Cleaners, we use specialized equipment to deep clean tiles and grout lines, helping preserve your tile flooring’s integrity for years.
Our team’s knowledge of different tile types ensures we use the proper techniques for your specific flooring.
Achieves Deeper Clean and Removes Bacteria
Professional tile cleaning achieves a deeper clean than regular home methods. We use specialized equipment and cleaning solutions to reach deep into tile pores and grout lines, removing stubborn dirt, grime, and bacteria that household cleaners often miss.
Our professional cleaning service not only improves the appearance of your tiles but also creates a healthier living space.
Harmful bacteria can thrive in dirty water, tiles, and grout. Our thorough cleaning process eliminates these hidden threats. Our methods are gentle on your tiles but effective against germs.
This deep clean promotes better indoor air quality and reduces the risk of respiratory issues. Count on us to give the entire floor and your tiles a fresh, hygienic start that DIY cleaning can’t match.
Saves Time and Cost in the Long Run
With Whitehall Carpet Cleaners, professional tile cleaning saves time and money in the long run. Our expert services prevent costly repairs caused by improper cleaning methods. We use the right tools and techniques for each tile type, avoiding damage that leads to expensive replacements.
Regular pro cleaning also stops mold growth, which can cause health issues and big bills. By choosing us, you skip buying ineffective products that waste your cash and might harm your tiles.
Let’s explore how our cleaning enhances your tile’s look and brings new tile back its shine.
Enhances Appearance and Restores Tile Brightness
Professional tile cleaning revitalizes dull floors. Our expert methods eliminate deep-set dirt and grime, restoring your tiles’ original shine. This process improves the look of your space and creates a cleaner, more inviting atmosphere.
A clean tile floor is like a fresh canvas for your home’s beauty.
Whitehall Carpet Cleaners uses advanced techniques to boost the color and brightness of your tiles. This restoration process can make your floors look as good as new without costly replacements.
The result is a more attractive living space that you’ll be proud to show guests.
Prevents Mold and Mildew Growth
Beyond brightening tiles, professional grout cleaning tackles a hidden threat: mold and mildew. These fungi thrive in damp, neglected grout lines, especially in bathrooms and kitchens. We’ve seen how regular expert cleaning stops their growth before it starts.
Our methods create a barrier against moisture, keeping your floor tiles dry and inhospitable to mold.
Mold isn’t just unsightly; it’s a health risk. It can trigger allergies and breathing problems. We use special techniques to remove existing mold and prevent future growth. Our cleaning process doesn’t rely on harsh chemicals, making it safe for your family and pets.
With expert care, your tiles stay clean, healthy, and mold-free for longer.
How Professional Tiles Cleaning Differs from DIY
Professional cleaning uses specialized tools and methods not available to most homeowners. Experts also know how to treat different tile types, ensuring the best care for each surface.
Use of Specialized Equipment and Techniques
Whitehall Carpet Cleaners uses advanced tools to clean tiles thoroughly. Our equipment includes high-pressure steam cleaners and rotary scrubbers, which reach deep into tile pores and grout lines.
They remove dirt and grime that regular mops can’t touch.
Our methods go beyond essential cleaning agents. We apply unique solutions that break down tough stains. Then, we use powerful suction to extract all the dirt and water, leaving the tiles spotless and dry.
Our process is safe for all tile types, from ceramic to natural stone.
Expert Knowledge of Different Tile Types
Professional cleaners know the ins and outs of various tile types. We understand that ceramic, porcelain tile, and natural stone tiles each need special care. Our experts choose the proper cleaning methods and products for each surface.
This knowledge helps us avoid damage and keeps your tiles looking great.
Different tiles have unique needs. For example, natural stones like marble or granite require gentle cleaning to prevent scratches, while porcelain tiles can handle stronger cleaners. Our team’s expertise ensures your tiles get the best treatment possible.
Next, explore how regular professional cleaning impacts your home’s air quality and tile appearance.
The Importance of Regular Professional Tiles Cleaning
Regular professional cleaning keeps your indoor air clean and maintains your tiles’ look and strength over time.
Maintaining Indoor Air Quality
Clean tiles and grout play a significant role in indoor air quality. They reduce allergens, mold, and mildew in your home. Professional cleaning goes even further. It wipes out bacteria and germs that can make you sick.
This matters a lot in places like hospitals. Good cleaning helps lower the number of airborne germs and improves patient outcomes.
Clean air is vital in all buildings, not just hospitals. That’s why we always stress the need for regular professional cleaning. It’s not just about looks; it’s about keeping the air you breathe healthy and safe.
Next, let’s look at how professional cleaning helps preserve your tiles.
Preserving Tile Integrity and Aesthetics
Professional tile cleaning plays a vital role in preserving tile integrity and aesthetics. Our expert methods remove deep-seated dirt and grime that regular mopping can’t reach. This thorough cleaning helps maintain your tiles’ original shine, keeping them looking fresh and new for years.
We use specialized equipment and techniques to clean different tile types without causing damage when cleaning tiles.
Regular professional cleaning also protects your tiles from wear and tear. High-traffic areas need cleaning every 12-18 months to prevent permanent staining and discoloration. Our cleaning process includes sealing the tiles, which creates a protective barrier against dirt and spills.
This makes future cleaning easier and extends the life of your tiles. Let’s explore how professional shower tile cleaning differs from DIY methods.
Conclusion
Professional tile cleaning offers more than just a sparkling surface. It extends tile life, removes hidden germs, and saves money over time. Regular expert care keeps your home healthier and more beautiful.
We urge you to consider professional tile cleaning solutions. Your floors will thank you, and so will your wallet in the long run. Whitehall Carpet Cleaners is here to help.
Contact Whitehall Carpet Cleaning today for all your floor, rug, and upholstery cleaning, disaster restoration, tile and grout cleaning, and disinfection services!
#professional tile cleaning#tile cleaning services#tile cleaning columbia sc#grout cleaning services#benefits of professional tile cleaning#deep tile cleaning#tile and grout cleaning#tile cleaning company near me#tile stain removal#tile cleaning vs diy#expert tile cleaning#tile cleaning equipment#tile cleaning and sealing#tile and grout cleaning experts#tile cleaning service columbia sc#mold and mildew in grout lines#professional grout cleaners#high-traffic tile cleaning#contact Whitehall Carpet Cleaning#WhitehallCarpetCleaners#whitehallcarpetcleaners.com
0 notes
Photo
Keeping this for future reference: how to paint grout by Hannah at Handmade Weekly. What a difference it makes! (I HATE dark grout!)
0 notes
Text
Home Makeover 101: Part 3 – Repairing Broken & Old Kitchen Cabinet (Continued)
Before I forget about this, this is a continuation of the DIY project to repair the broken kitchen cabinet which initially started with the idea of just changing the rusted hinges but it went on into a proper makeover of the whole kitchen cabinet as the tabletop was still in good condition. Continue reading Untitled

View On WordPress
#Budget#Cabinet#DIY#Hardware#Home Makeover#House#Kitchen#Kitchen Cabinet#Paint#Repair#Tile Grout#White Cement#Youtube
0 notes
Text
maybe if i try hard enough i can get rid of the shitty paint.


but i'm fuckin ill so it'll have to wait.
ok i've been living in my shitty flat for 6 years and this WHOLE TIME i thought that the (badly painted) kitchen tiles (WHO PAINTS OVER TILES?) were a horrible beige and i had to make peace with it
but no
a weak bleach solution is whitening that shit right up.
SIX YEARS AND I NEVER THOUGHT TO TRY
#i swear i only get the motivation to DIY when i have an acute illness. it's strange and annoying.#actually tbh maybe i should just get those tile sticker things and do the ''''grout'''' lines with a white posca pen
8 notes
·
View notes
Text
DIY Library Stuff
A little roundup for the folks asking:
Ceiling light fixture Bookcase lighting Starry night projector (I got all three above as returns on Amazon's warehouse tab, always check there for discounted stuff!) Flooring (+ standard black grout) Rug (highly recommend waiting for a sale because it's PRICEY) Couch--FB marketplace but they said it was Article Bookcases--custom/DIY


111 notes
·
View notes