#DataFoundation
Explore tagged Tumblr posts
Visit Tumblr Blog
Explore Tumblr blogs with no restrictions, modern design and the best experience.
Last Seen Tumblr Blogs


Fun Fact
130K people were victims of a chain letter scam that affected Tumblr in May 2011.
Text
Architecture Overview and Deployment of OpenShift Data Foundation Using Internal Mode
As businesses increasingly move their applications to containers and hybrid cloud platforms, the need for reliable, scalable, and integrated storage becomes more critical than ever. Red Hat OpenShift Data Foundation (ODF) is designed to meet this need by delivering enterprise-grade storage for workloads running in the OpenShift Container Platform.
In this article, we’ll explore the architecture of ODF and how it can be deployed using Internal Mode, the most self-sufficient and easy-to-manage deployment option.
🌐 What Is OpenShift Data Foundation?
OpenShift Data Foundation is a software-defined storage solution that is fully integrated into OpenShift. It allows you to provide storage services for containers running on your cluster — including block storage (like virtual hard drives), file storage (like shared folders), and object storage (like cloud-based buckets used for backups, media, and large datasets).
ODF ensures your applications have persistent and reliable access to data even if they restart or move between nodes.
Understanding the Architecture (Internal Mode)
There are multiple ways to deploy ODF, but Internal Mode is one of the most straightforward and popular for small to medium-sized environments.
Here’s what Internal Mode looks like at a high level:
Self-contained: Everything runs within the OpenShift cluster, with no need for an external storage system.
Uses local disks: It uses spare or dedicated disks already attached to the nodes in your cluster.
Automated management: The system automatically handles setup, storage distribution, replication, and health monitoring.
Key Components:
Storage Cluster: The core of the system that manages how data is stored and accessed.
Ceph Storage Engine: A reliable and scalable open-source storage backend used by ODF.
Object Gateway: Provides cloud-like storage for applications needing S3-compatible services.
Monitoring Tools: Dashboards and health checks help administrators manage storage effortlessly.
🚀 Deploying OpenShift Data Foundation (No Commands Needed!)
Deployment is mostly handled through the OpenShift Web Console with a guided setup wizard. Here’s a simplified view of the steps:
Install the ODF Operator
Go to the OperatorHub within OpenShift and search for OpenShift Data Foundation.
Click Install and choose your settings.
Choose Internal Mode
When prompted, select "Internal" to use disks inside the cluster.
The platform will detect available storage and walk you through setup.
Assign Nodes for Storage
Pick which OpenShift nodes will handle the storage.
The system will ensure data is distributed and protected across them.
Verify Health and Usage
After installation, built-in dashboards let you check storage health, usage, and performance at any time.
Once deployed, OpenShift will automatically use this storage for your stateful applications, databases, and other services that need persistent data.
🎯 Why Choose Internal Mode?
Quick setup: Minimal external requirements — perfect for edge or on-prem deployments.
Cost-effective: Uses existing hardware, reducing the need for third-party storage.
Tightly integrated: Built to work seamlessly with OpenShift, including security, access, and automation.
Scalable: Can grow with your needs, adding more storage or transitioning to hybrid options later.
📌 Common Use Cases
Databases and stateful applications in OpenShift
Development and test environments
AI/ML workloads needing fast local storage
Backup and disaster recovery targets
Final Thoughts
OpenShift Data Foundation in Internal Mode gives teams a simple, powerful way to deliver production-grade storage without relying on external systems. Its seamless integration with OpenShift, combined with intelligent automation and a user-friendly interface, makes it ideal for modern DevOps and platform teams.
Whether you’re running applications on-premises, in a private cloud, or at the edge — Internal Mode offers a reliable and efficient storage foundation to support your workloads.
Want to learn more about managing storage in OpenShift? Stay tuned for our next article on scaling and monitoring your ODF cluster!
For more info, Kindly follow: Hawkstack Technologies
0 notes
Text
Get data from MongoDB and display it on the browser using Fetch API
How to get the data stored in the database back and display it on the front-end?
To get the data stored in MongoDB back and use it to display it on the HTML page we’ll use fetch() API.
To know how to send the data from the front-end to the back-end using NodeJS and fetch() API check my tutorial: https://purpose-code.com/fetch-api-send-data-from-front-end-to-back-end/
To know how to store data and send it from the backend to a database check my tutorial:https://purpose-code.com/send-data-from-backend-node-js-to-mongodb/
1)- Step 1: Fetch API in the front-end:
The first thing we will do is to add the fetch() syntax in the HTML file. But this time, we’ll add a GET request instead of POST request.
So the code will be:
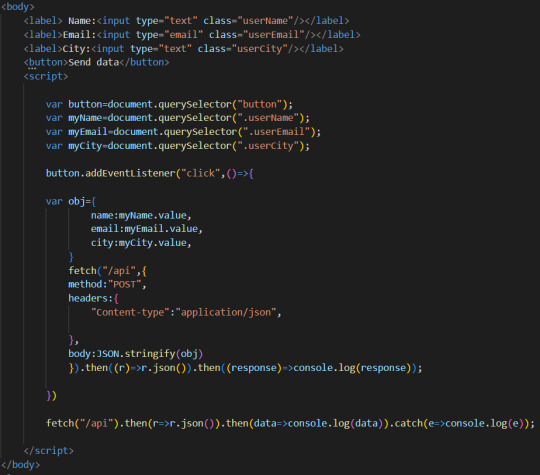
So here we will search the data from the same URL we set to POST the data to. In Part 1 of this tutorial that you can check here: https://purpose-code.com/fetch-api-send-data-from-front-end-to-back-end/ when we wanted to send data from the front-end to the back-end, we set a POST request with fetch() API, and we chose URL “/api” to send the data to, and we added a routing for this URL in Node JS.
Now to get the data, we can use the same URL “/api” with fetch(), but this time it will be a GET request.
We can use the same URL to POST and GET data, this is not a problem for the fetch() API.
Fetch() syntax is an asynchronous method that returns a promise. That’s why we have then() and catch() methods.
The 1st then() is to receive the response from the backend in JSON format. And the 2nd then() is to display the data in the console of the HTML page.
catch() method is here to catch errors if there are any.
Now if we go directly to the HTML page and refresh it to see whether we have our data displayed we will get the following error:
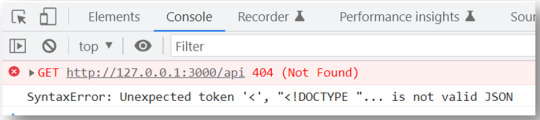
And that is because we asked the front-end to fetch the data from “/api” URL, but we did not set the rounting for the GET method of the “/api” URL yet in Node JS.
So in short, the front-end did not find the URL “/api” we are requesting.
2)- Step 2: Add GET routing in the backend
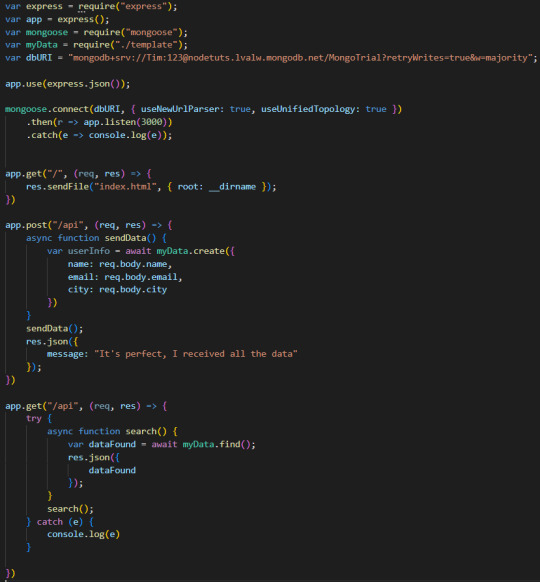
To set a routing for the GET request in Node JS let’s go back to index.js file.
The code will be:
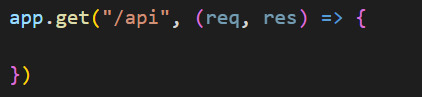
The syntax to set a GET request routing is similar to the one to set a POST request routing.
So inside of this routing we’ll add one MongoDB method that allows us to retrieve data from the database. And this method is find().
There are many MongoDB methods that you can use depending on what you want to do.
For example the find() method retrieves all the data stored in the database.
find({name:”Tom”}) will retrieve all the data that has a name of “Tom”.
findOne({age:39}) finds the first match where the age is 39 and so on…
For this tutorial we will use the find() method.
So the code is:
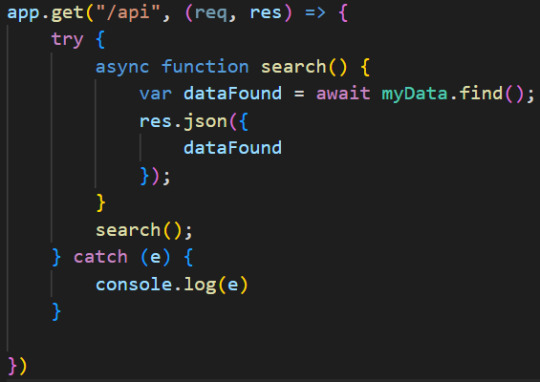
So here inside the app.get() routing we added a try{] catch{} block in case if there are any error, to keep the code going.
We also added also a function and stored the data retrieved from the database inside a variable that we called dataFound.
So to get the data from the database the syntax is very simple, all you have to do is to use myData module we exported and the find() method.
After that, once the data is stored inside dataFound variable, we ask the server to send it to the front-end in JSON format by adding res.json() instruction.
So the back-end code will be at the end:
Now if you go to the browser and refresh, in the console you’ll have:
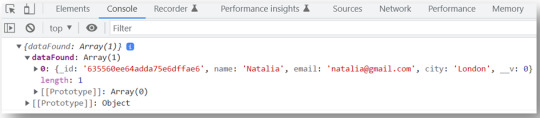
So far this is good, but what about if we want to have our data displayed in the HTML page instead of the console?
3)- Step 3: Display data on the browser
To display the data retrieved from a database in the HTML page we’re going to tweak the front-end code a little bit.
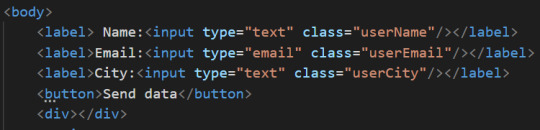
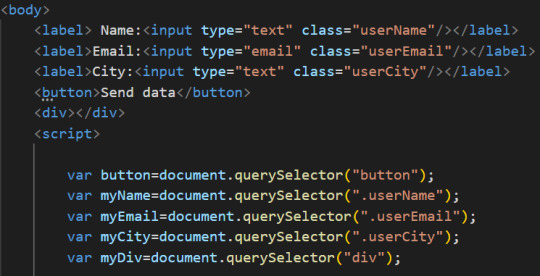
First let’s add a place in the HTML page where the data will be displayed.
Let’s say we’ll display the data in a div. So let’s go and add a div element.
Now let’s select this div using JavaScript and document.querySelector() syntax and put it inside myDiv variable.
Now let’s go to the fetch() code, and for the 2nd then() method, instead of having then(data=>console.log(data)) we’ll change the code to the following:

So first we declared an empty variable which is dataDisplayed.
Then we added a for…of… loop to loop through the elements of the array. As you noticed from the results we had in the console, we had an array that was displayed, this array name is dataFound, which is the variable we declared in the backend.
So to access this array we use data.dataFound syntax.
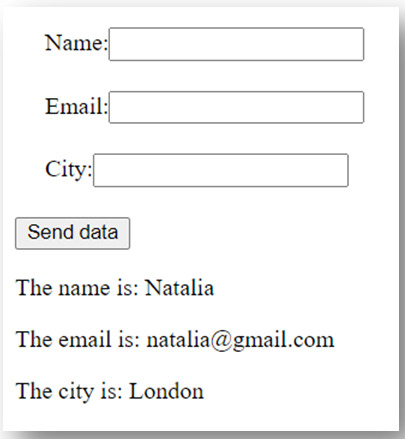
Once we access each element of the array we tell the browser that we want to display each element in a paragraph. We want to display the name in a paragraph, and then the email in another paragarph, and then the location in a third paragraph. Hence the code :
<p>The name is: ${a.name}</p><p>The email is: ${a.email}</p><p>The city is: ${a.city}</p>
And after that we put this code in the dataDisplayed variable.
Once the for…of…loop is finished we want to display the results in the div we added to the HTML page.
So as a result you’ll have:
To get access to the entire code visit my blog here:
https://purpose-code.com/get-the-data-back-from-the-database-mongodb-and-display-it-on-the-front-end/
#nodejs#node js development company#node js development services#node js#node js developers#javascript#javascripttutorial#mongodb#database
0 notes
Text
#The #Truth #About #Face #Cream #Reviews #bnw #brunettebabes #flight #green #hairdo #photographymodeling #sketch #soccergirl #soundcloud #sunset
You’ll disagree, nevertheless listen to me out on this. I incorporate go through numerous experience product evaluations and have even created a number of, myself. It is crucial to proportion notifyation with fellow consumers. It really is very clear that we can not rely on manurealityurers to provide fair details. Of course, some makes do occur clean with the information. However, most merely disguise powering shiny adverts and movie star endorsements.
A refreshing internet datafoundation, developed by the Environmental Functioning Category, a general public protection watchdog, of kinds, offers consumers with a minor surplus assist. The databases lists the substances in countless numbers of various pores and skintreatment items and the EWG ranks these ingredients in phrases of safety.
They way too permit consumers to add face cream reviews or make feedback relating to the products. Some consumers are dissatisfied with the EWG evaluation, but the base their evaluations completely on the facts.
Beauty organizations typically use identified allergens, irritants and poisons in their products. The purpose behind here’s income. There is certainly no other explanation. As tough as the EPA and the FDA fights to acquire greater laws for skincare products produced in the US, the a lot more lobbyists beauty companies ship to Washington.
The hope of the EWG is effortlessly to inform the consumer, so that they can make their own options. It took several years of hard function to get this information to the public and I, for one, am appreciative of all of the work that they’ve accomplished.
If you read ample face cream reviews, you may see that some folks “enjoy” a product, although other people “loathe” it. Which is not really astonishing as soon as you’ve got a little more information.
In accordance to surveys performed by the Meal and Drug Management, twenty five% of all cosmetic associates have experienced an adverse response to one of the skincare products that they have utilised. So, if you read ten face cream reviews for the exact same product, 2 or 3 are heading to be poor.
It is a known fact that sensitivity to some allergens develops previously mentioned time. So, an ingredient that may ended up non-aggravating in a man or woman’s youth can result in a reaction, as they get older.
It is also known that there are minimize degrees of hyaluronic acid in older skin. Hyaluronic acid is one of the stuff that stop toxins and irritants in opposition to penetrating deeply. The further it penetrates, the more likely it truly is to cause inflammation. That is possibly the reason that you see some several negative comments about wrinkle lotions and anti-ageing face cream reviews.
Cosmetic companies don’t search to believe how a severe substance could impact an older person. They shell out a good deal of time deciding their ad strategies and marketplaceing approaches. But, they spend very little time on studying or increasing truly productive products.
Place this to the test appropriate absent! There is a new obtain into the skincare product classification. It is a maker that helps make some of the greatest anti-aging nutritional supplements on the market. You will not likely read many face cream reviews for their products, until you locate their site. They allow their consumers to go away comments on their site. So far, there has not been a solitary negative one.
To discover more about vitamins and minerals for healthful skin, and other remarkable organic substances for natural healthy skin care, go to my website nowadays.
The post The Truth About Face Cream Reviews appeared first on Beautiful Women.
source http://topbeautifulwomen.com/the-truth-about-face-cream-reviews/
0 notes