#Diy Ceiling Insulation Installation
Explore tagged Tumblr posts
Visit Tumblr Blog
Explore Tumblr blogs with no restrictions, modern design and the best experience.
Last Seen Tumblr Blogs


Fun Fact
Post activity is at the highest at 4:00 pm EDT; notes peak at 10:00 pm EDT.
Text
Efficient DIY Ceiling Insulation Installation: A Step-by-Step Guide
Installing ceiling insulation yourself is a cost-effective way to improve your home's energy efficiency and comfort. Here's a simplified step-by-step guide for a successful DIY ceiling insulation installation:
Safety First: Wear appropriate protective gear, including gloves, safety glasses, and a dust mask, to safeguard against irritants.
Measure and Buy Insulation: Measure your ceiling area accurately and purchase the appropriate type and amount of insulation material, typically batts or rolls.
Prepare the Area: Clear any obstructions in the attic or roof space, such as debris, wiring, or pipes, and ensure proper ventilation.
Lay Insulation: Carefully unroll or place insulation between ceiling joists, ensuring a snug fit and no gaps. Use a utility knife to trim pieces as needed to fit corners and edges.
Safety Precautions: Avoid compressing the insulation excessively, as it reduces its effectiveness. Keep it at the recommended thickness for your climate zone.
Seal Gaps: Seal any gaps around light fixtures, vents, or other ceiling penetrations with appropriate sealant or insulation covers.
Safety Again: Maintain safe footing on ceiling joists or boards to prevent stepping through the ceiling.
Clean Up: Dispose of any waste materials properly and leave your workspace clean and safe.
Inspect and Test: After installation, inspect for any gaps or areas you may have missed. Conduct an energy audit to ensure your insulation is effectively reducing heat transfer.
Enjoy the Benefits: With your DIY ceiling insulation in place, you'll experience improved energy efficiency, reduced heating and cooling costs, and a more comfortable living space.
Remember that while DIY insulation can be rewarding, it's essential to follow safety guidelines and local building codes. If you're unsure about any aspect of the installation, consult a professional or consider hiring an insulation contractor to ensure a successful project.
0 notes
Text
Insulation Baffles
My wife and I started insulating the ceiling of the shed. This was the hardest so far physically for both of us. I am not sure I could have completed it easily if she wasn’t 6’2″ tall with “monkey arms.” I can only do a few hours of work each week. I mean, if my body was fine, I would do more, but neither my wife or I am in good enough shape that we can do much more. I miss being in my 30s and…

View On WordPress
#DIY#First Home#Front Yard Shed#Home Ownership#insulating ceiling#Insulation#little blue house#Shed#Shed Installation
0 notes
Text
How to Identify and Repair Common Types of Roof Leaks
Introduction
Roof leaks can be one of the most frustrating issues for homeowners. Not only do they compromise the integrity of your home, but they can also lead to significant damage if not addressed promptly. Knowing how to identify and repair common types of roof leaks is essential for maintaining a safe and comfortable living environment. In this comprehensive guide, we will explore various types of roof leaks, their causes, and effective strategies for repair. Whether you're a seasoned DIY enthusiast or considering hiring roofing contractors for professional roofing services, this article has something valuable for everyone.
youtube
Understanding Roof Leaks: What Are They? What is a Roof Leak?
A roof leak occurs when water penetrates through the roofing material into the building's structure. This can happen due to various factors such as weather conditions, wear and tear, or improper installation.
youtube
Common Causes of Roof Leaks Age of the Roof: Over time, roofs degrade and become less effective at preventing water intrusion. Weather Damage: Heavy rain, snow, or strong winds can loosen shingles or tiles. Improper Installation: Poor craftsmanship during installation can lead to gaps that allow water in. Clogged Gutters: When gutters are clogged, they cannot direct water away from the roof effectively. How to Identify and Repair Common Types of Roof Leaks
Identifying a roof leak requires careful inspection both inside and outside your home. Here’s how you can go about it:
Conducting an Interior Inspection Check the Attic: Look for signs of moisture on beams or insulation. Ceiling Stains: Discoloration on ceilings may indicate a leak directly above. Mold Growth: Mold in corners or around vents could signify persistent moisture. Exterior Inspection Techniques Visual Inspection: Examine shingles or tiles for missing pieces or cracks. Flashing Check: Inspect areas around chimneys and vents where flashing may be damaged. Gutter Examination: Ensure gutters are free from debris; check for sagging sections. Tools Needed for Inspection Flashlight Ladder Water hose (for testing suspected areas) Types of Roofs and Their Unique Leak Issues Asphalt Shingle Roofs
These are common but prone to wear and tear after 20-25 years.
Common Issues: Curling shingles Missing granules Tile Roofs
Tile roofs offer durability but https://penzu.com/p/110d978c882571aa can crack under severe weather.
Common Issues: Cracked tiles Broken mortar joints Metal Roofs
Metal roofs are long-lasting but require regular maintenance.
Common Issues: Rust spots Loose seams Flat Roofs
Flat roofs have unique drainage challenges.
youtube
Common Issues: Ponding water Cracks
2 notes
·
View notes
Text
How do you choose skylights for vaulted ceilings?
Skylights can transform your vaulted ceiling, adding natural light and enhancing the overall feel of your home. Here's a straightforward guide to help you make the best choice for your space.
Why Add Skylights to Vaulted Ceilings?
Natural Light: Brightens the room, creating a warm and inviting atmosphere.
Energy Efficiency: Reduces the need for artificial lighting and can help with temperature regulation.
Aesthetic Appeal: Offers a stunning view of the sky and elevates the style of your space.
Types of Skylights to Consider
Fixed Skylights: Perfect for adding light without ventilation; low-maintenance and cost-effective.
Vented Skylights: Open to fresh air, ideal for reducing humidity or improving airflow.
Tubular Skylights: Great for smaller spaces, channeling light efficiently with minimal roof space required.
Selecting the Right Size and Shape
Room Size: Larger skylights work best in spacious rooms, while smaller ones maintain balance in compact areas.
Shape Options: Rectangular skylights are classic, but circular or custom shapes can add a unique flair.
Ensure the size and shape match your vaulted ceiling's design for a cohesive look.
Choosing the Right Glass
Tempered Glass: Durable and resistant to breakage.
Laminated Glass: Offers insulation, UV protection, and added safety.
Tinted Glass: Reduces glare and helps control light intensity.
The right glass enhances both the functionality and comfort of your skylights.
Energy Efficiency Matters
Look for skylights with Low-E coatings or double glazing to minimize heat loss and UV exposure.
Proper installation is crucial to avoid drafts or leaks and maximize energy savings.
Consider Blinds or Shades
Adding blinds or shades lets you control light and temperature:
Manual Blinds: Budget-friendly and simple to operate.
Motorized Blinds: These are convenient for high ceilings and are operated with a remote or smart device.
Installation Tips
While DIY installation might seem appealing, skylight installation can be challenging and requires precision. Hiring a professional ensures proper placement, sealing, and performance, saving you time and potential repair costs later.
Conclusion
Adding skylights to your vaulted ceiling enhances your home's beauty, comfort, and energy efficiency. Choosing the right type, size, and glass allows you to create a space that feels open, inviting, and filled with natural light.
2 notes
·
View notes
Text
How to Plan a Basement Renovation on a Budget in Ottawa?
Renovating a basement can be an excellent way to add usable space and increase the value of your home. However, undertaking a basement renovation in Ottawa can also be costly. With the right planning, you can achieve your desired results without breaking the bank.

Follow our comprehensive guide on how to plan a basement renovation on a budget in Ottawa.
Set a Realistic Budget
Before diving into your basement renovation project, it’s crucial to establish a realistic budget. Begin by assessing your financial situation. Determine how much you can afford to spend without straining your finances. When setting your budget, consider the following:
Total Costs: Estimate the total costs, including materials, labor, permits, and contingency funds (about 10-20% for unexpected expenses).
Prioritize Features: List out what you need versus what you want. Focus on essential elements like insulation, flooring, and lighting before considering luxury features.
Research Local Regulations
In Ottawa, basement renovations may require permits and adherence to local building codes. Research the necessary regulations in your area:
Building Codes: Familiarize yourself with the Ontario Building Code and any local by-laws specific to Ottawa.
Permits: Determine whether your renovation requires a building permit. Projects like adding bedrooms, bathrooms, or major electrical work typically require permits.
Zoning Laws: Check if there are zoning laws that may affect how you use the space (for example, if you plan to create a separate rental unit).
Design Your Space Wisely
Once you have a budget and understand the regulations, it’s time to design your basement. A well-thought-out design can save you money and create a functional space. Consider the following tips:
Functional Layout: Think about how you will use the space. Do you want a guest room, home office, or recreational area? Ensure the layout maximizes the available space.
Open Concept: An open concept design can make your basement feel larger and reduce the need for additional walls and doors, saving on construction costs.
Natural Light: Utilize existing windows or consider adding egress windows to bring in natural light, making the space feel more inviting.
DIY Where Possible
One of the most effective ways to cut costs in a basement renovation is to do some work yourself. Here are areas where you can save money by taking on DIY projects:
Painting: Painting walls and ceilings is a relatively simple task that can dramatically change the look of your basement. Choose neutral colors to make the space feel larger and more inviting.
Flooring: If you’re comfortable with basic flooring installation, consider options like laminate or vinyl planks, which are user-friendly and budget-friendly.
Simple Fixtures: Install light fixtures, shelves, and other simple features yourself. This not only saves money but also gives you a sense of ownership over the project.
Source Affordable Materials
The materials you choose will have a significant impact on your overall renovation costs. To stay within your budget, consider the following:
Local Suppliers: Look for local building supply stores and lumberyards in Ottawa that offer competitive pricing. Sometimes, smaller businesses may have better deals than large chains.
Reclaimed Materials: Explore options for reclaimed or second-hand materials. Websites like Kijiji or Facebook Marketplace often have great deals on used fixtures, furniture, and building materials.
Sales and Discounts: Keep an eye on sales, clearances, and discounts at home improvement stores. Timing your purchases can lead to significant savings.
Consider Energy Efficiency
Investing in energy-efficient features can save you money in the long run. While some upfront costs may be higher, the savings on energy bills can make it worthwhile:
Insulation: Proper insulation can help maintain a comfortable temperature in your basement, reducing heating and cooling costs.
Energy-Efficient Windows: If you plan to replace windows, opt for energy-efficient models that can help reduce your energy consumption.
LED Lighting: Using LED lights instead of traditional bulbs can cut down on electricity costs and reduce the need for frequent replacements.
Hire Qualified Professionals Wisely
While DIY is a great way to save money, some tasks may require professional expertise. If you decide to hire contractors, ensure you choose wisely:
Get Multiple Quotes: Contact several contractors for estimates on the work you need done. Compare their prices, experience, and references.
Negotiate: Don’t hesitate to negotiate pricing. Many contractors are open to discussing costs, especially if you have multiple projects in mind.
Hire Local: Opt for local professionals who are familiar with Ottawa's building codes and regulations, as they can provide valuable insights.
Plan for the Future
When renovating your basement, think about future needs and potential changes. Designing your space with flexibility in mind can save money down the road. Consider:
Multi-Purpose Rooms: Create spaces that can serve multiple functions. For instance, a guest room can double as a home office.
Wiring for Future Needs: If you plan to add technology or appliances in the future, consider wiring for these needs now to avoid expensive retrofitting later.
Stay Organized and Monitor Progress
As your renovation progresses, stay organized to avoid unexpected costs and delays:
Timeline: Create a timeline for the project, setting realistic deadlines for each phase of the renovation.
Track Expenses: Keep a detailed record of all expenses, including materials and labor. This will help you stay within your budget and make adjustments as needed.
Regular Check-Ins: Regularly check in on the progress of the work, ensuring that it aligns with your plans and budget.
Enjoy the Process
Renovating your basement can be a rewarding experience. While it may be challenging at times, remember to enjoy the process and celebrate your accomplishments. As your vision comes to life, you'll be able to create a space that enhances your home and serves your needs for years to come.
Conclusion
Planning a basement renovation on a budget in Ottawa requires careful consideration and smart choices. By setting a realistic budget, researching regulations, designing wisely, and making informed decisions about materials and labor, you can create a beautiful and functional basement without overspending. Remember to stay organized, plan for the future, and enjoy the process, turning your basement into the ideal space for you and your family.
2 notes
·
View notes
Text


Bedroom installation project
I've been meaning to write up about the bedroom insulation project for ages, but what with being away and also trying to move to a new studio I haven't found the time to finish the job. However, the bulk of it is done, and as I am away again over the next couple of weeks, I thought I'd summarise the installation process so far.
So for the people who haven't been following the highs and lows of it on my Instagram, over the last couple of months, I've been tackling the issue of a very cold and very small bedroom.
I live in a late 1970s building by Benson and Forsyth. It's a modestly sized one-bedroom flat, but what the architects did to make the space feel bigger is add a split level and give the majority of the space to the living areas and compromise on the size of the bedroom. This doesn't bother me at all, apart from a bed and some drawers, what else does a bedroom need? The room, essentially a little cube, juts out from the rest of the flat meaning there are three external walls, it's also partially sunk into the ground. Additionally, above the ceiling is the pedestrian deck, so again, no insulation. All this amounts to a very cold room.
When I first moved in 2015 I just kept the heating on in that room the whole time, but it just seemed ridiculous to heat a room that I wasn't in during the day. And then, during the pandemic, I noticed little mould spots all over my mattress and wall behind the bed. Gross. I had to do something about it. Properly.
Over the last couple of years I started researching different insulating materials, but because of the size of the room (it's about 2.5 x 2.5m) I really couldn't afford to lose any wall space with regular insulation. I then came across Spacetherm WL made by Proctor. There wasn't much written about it when I first discovered it, but I've since found a BBC article that you can read here.
This seemed ideal as it's only 13mm thick, and you can glue it directly onto the wall, plus you can do it yourself. You can download the installation guide here from their website, but here's what I learnt from the installation. I could have done some things better, so I hope you learn from my mistakes and this is useful.
First of all, if you can, clear EVERYTHING out of the room. I couldn't move my bed out and it was a pain to have to work around it, plus, the particles from the material are horrible. More on this later.
Step 1: it goes without saying, measure the walls and work out the amount of boards you need. I ordered them directly from Proctor. They were really helpful every time I emailed them with a question. The boards are 1200 x 600 mm, so are easy to handle for just one person. I'm no stranger to DIY I should say, but I do think most people could do this themselves. The boards are stuck on with Foam Glue, which I also ordered from Proctor. I underestimated the amount I needed but managed to get the same stuff from Screwfix.
Step 2: Get everything off the walls, obviously, including radiators. Obviously. I've done quite a bit of tiling in the past, so I treated this job in a similar way: I installed a batten at the bottom of the wall where I wanted the boards to sit and worked my way up with whole boards first. You need to spray the glue onto the furry side of the material in a zig-zag pattern. One thing to note is the thickness of the glue. Try and make this consistent otherwise it's difficult to get the adjacent boards flush (I had this issue, more on this later).
I haven't mentioned the material. Right. So essentially it's 10mm of Spacetherm aerogel insulation blanket — a weird feeling fibrous furry material, bonded to a 3mm Magnesium Oxide Board. I found it horrible to handle, and when I cut it, tiny tiny little fibres would end up everywhere, including my bed. They were like little tiny shards of glass. The instructions do say to wear PPE and seal the area you are working in if possible. I ended up having to cut it outside during the heatwave, so was wearing shorts — a mistake!
Step 3: Once all the full boards are in place, you need to measure and cut the boards to fill in the spaces. A friend lent me his Festool circular saw (thank you Huw), which as I mentioned I set up outside. He was worried about me damaging the blade, he needn't of worried, the material cuts very easily.
Step 4: So the gaps are now filled and all the walls are lined with the material. The instructions say you to tape and fill the gaps between the boards, prime it, paint it and you're done. Ha ha ha!! My advice is to ignore that. I could not get the boards to align next to each other completely perfectly. Unless you are really experienced, I don't think you will either, so in the end I decided to get them plastered. That meant ordering a different primer (at £100 a pop, ouch) and it delayed things by a week.
Step 5 and 6: Once the pot finally arrived, I was ready to go. I'd imagined a watery consistency which would take half an hour to do. But this stuff was weird. It's basically grit or sand, in a viscousy fluid which you have to paint on evenly with a paintbrush. So it took half a day, and the result — rough textured walls — reminded me of a Greek taverna. It stayed like this for a while until I managed to pin my plasterer down, who skimmed the whole thing last week.
Getting there.
Step 7: This weekend I managed to get three coats of paint onto the walls, and also get the furniture back in. I still need to sort out the skirting boards and repaint the woodwork, but the walls themself are done and are looking good! It really doesn't feel like it's eaten much into the space, which I was worried about. Of course, the proof will be when it starts getting cold, I'll be sure to update you on its effectiveness. Fingers crossed!
4 notes
·
View notes
Text
how to make a room soundproof
how to make a room soundproof
how to make a room soundproof how to make a room soundproof How to Soundproof a Room for professional musicians and dubbers who need perfect room soundproofing environments. Soundproofing is, in many cases, a must: to get along with the neighbors – and avoid disturbing them with amplifiers, fitness equipment, and other annoying sounds – and to find the right concentration in the home office. What are the affordable and efficient methods for room soundproofing?

Find out if and when you can opt for DIY.
Soundproofing techniques.
how to soundproof a room Multiple solutions exist to shield an environment from external noise and prevent the spread of internal sounds. The choice depends on the budget and the specific need: is the goal to protect privacy or avoid neighborhood disputes? Shield the sound of the electric guitar or the vibrations produced by the DJ set? Let’s explore how to soundproof a room and the required materials, depending on the specific case.
Insulate doors and windows- Pay attention, first of all, to the fixtures and try to “plug” every possible crack. For the door, you can use a simple draft excluder or a wooden shim. If you want, you can use sound-absorbing curtains to insulate the windows or, even better, install high-performance seals and glass.
Use insulating panels- How to soundproof a room without spending a fortune? The cheapest option is to install acoustic panels in full view. Depending on the use – walls, floor, or ceiling – they will have different characteristics and costs.
Make a double partition- This technique essentially consists in building a double wall against the wall and is particularly suitable for soundproofing the bedroom. However, it is a rather demanding and expensive masonry work.
Use furniture to soundproof- A quick way to insulate a room at no cost is to place shelves, bookcases, sofas, and other furniture in strategic places. Creating extra thickness along the walls – and at the corners of the room – allows you to deaden sounds (of course, without providing complete sound insulation). If You Want To Soundproof A Room Go To This Website https://soundproofhub.com/
3 notes
·
View notes
Text
7 Super Energy Tips To Keep Cool and Save This Summer
New Post has been published on https://www.ohenergyratings.com/blog/7-super-energy-tips-to-keep-cool-and-save-this-summer/
7 Super Energy Tips To Keep Cool and Save This Summer
Save Energy This Hot Summer Season
Avoid skyrocketing AC bills! Use our 7 tips to save energy during your July 4 celebrations and stay cool all summer long!
We’re right around the corner from the 4th of July and that means more than grilling and fireworks. It also means cranking up the AC for the hottest days of the season when electricity rates are rising. For many families, it also means facing some of the biggest Ohio energy bills of the year! But you can cut down costs and save a little money by making some easy smart energy choices. Here are seven fast and easy tips to save more this summer.
Ohio Hot Summer & Energy Use
Ohio families use an average of 811 kilowatt-hours (kWh) per month. Also, about 12% of energy used in most US homes goes straight to air conditioning. That means Ohio spends an average of nearly 100 kWh per month just to stay cool and comfortable.
For this year, NOAA predicts that Ohio will see a hotter-than-normal summer. That means AC units are running sooner and longer, and that means bigger bills in July and August. On top of that, utility PTC rates are on the rise, which means even HIGHER bills than normal. That’s why it’s important to start saving energy around the house.
7 Energy Tips for July 4 to Save More
Use Coolers During Cookouts Keeping your fridge open carelessly can waste up to 120 kWh per year. So imagine how much energy your guests can waste opening and closing your fridge for drinks during your next cookout. Instead, keep the beverages inside coolers where guests can easily get at them.
Replace Old Heating And Cooling Equipment Is your HVAC system 10 or more years old or in need of frequent repair? You could save anywhere from 5-20% on your bills if you replace old HVAC systems.
Use Energy-Efficient Window Coverings Did you know that up to 30% of heat gain/loss comes through your windows? Energy-efficient window coverings can limit this gain/loss during the summer and winter months.
Weatherstripping Windows And Doors You can also limit energy loss if you apply weatherstripping to your doors and windows. This can be as simple and cheap as applying caulk. Handy homeowners can also tackle this as a full DIY project.
Check Your Attic Insulation Insulating your attic can reduce energy waste by keeping your living space cool in the summer and warm in winter. You’ll pay much lower bills for seasonal cooling and heating and enjoy more comfort.
Turn Back Your Thermostat Did you know you can save up to 10% on your energy bills per year, by using setbacks for 8 hours a day? For example, raise your AC temperature 7 degrees in the summer while you work or while you sleep. In the winter, set it lower by 7 degrees. You’ll save energy by not running your HVAC system when you’re not using it. And you’ll save money. It’s even easier if you install a programmable thermostat.
Use Fans Wisely Properly sized ceiling/room fans can keep you cool without cranking up the central AC. Just remember to turn it off when you leave the room. Fans cool people and not rooms.
Shop For Energy Bill Savings
The hottest weeks of the year are right around the corner. So don’t forget to shop best electricity rates in town. Locking in the lowest priced long term plan now can help you save money all year ’round.
You can start shopping for energy deals right here at https://www.ohenergyratings.com. We’re also your best source for news and tips that could affect your bills.
0 notes
Text
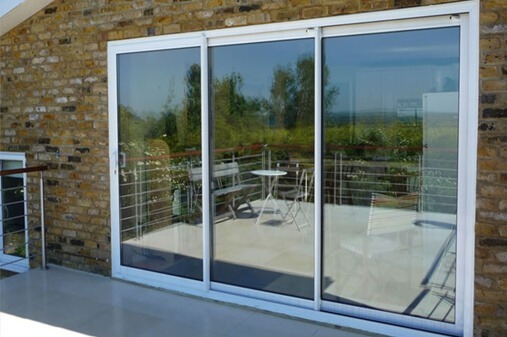
Is Sliding Door Installation in Minooka a Smart Investment for Your Home?
Thinking about upgrading your patio door but not sure if it’s worth the time and money? If you live in Minooka, IL, where temperatures swing from humid summer highs to freezing winter lows, a high-quality sliding door isn’t just a cosmetic improvement — it’s a practical upgrade that can add comfort, value, and efficiency to your home.
Let’s break down whether sliding door installation in Minooka is the right move for you.
Why Homeowners Are Choosing Sliding Doors
Sliding doors aren’t just about looks — although let’s be honest, the clean lines and natural light are a huge bonus. The real value lies in the combination of functionality and efficiency they bring to a home.
Here’s what you can expect from a properly installed sliding door:
Improved energy efficiency: Modern doors come equipped with Low-E glass, argon gas fills, and tight seals to reduce drafts and keep heating/cooling costs down.
Better use of space: Sliding doors don’t swing open like traditional doors, making them ideal for tighter layouts or decks with limited clearance.
Enhanced natural lighting: Floor-to-ceiling glass panels flood your home with light and create a seamless connection to the outdoors.
Increased home value: A sleek, modern patio door is a smart way to boost curb appeal and impress future buyers.
What’s the Investment?
Cost varies depending on materials, size, and features. You can expect pricing to range from $1,500 to $4,500 for most residential installations. While that may seem like a large upfront expense, it’s an investment that pays off through reduced energy bills, lower maintenance needs, and increased property value over time.
Fiberglass and vinyl are the most popular frame materials, especially in Illinois homes. They offer great insulation, weather resistance, and durability — exactly what’s needed in a climate like Minooka’s.
Why Local Installation Matters

Installation might seem like a weekend DIY project, but the reality is, proper fitting, leveling, and sealing make a massive difference in long-term performance. A poorly installed door can lead to air leaks, water damage, and endless frustration every time you try to open or close it.
That’s why many Minooka homeowners choose experienced local contractors — like Will County Siding & Windows — to handle the job. With over 40 years in the business, they understand the quirks of Midwest construction and climate, ensuring the installation is done right the first time.
So, Is It Worth It?
If you're looking to:
Eliminate drafts
Brighten up your living space
Create easier access to your deck or backyard
Cut down on energy costs
Improve your home’s resale value
...then yes, a sliding door is more than worth it.
You’re not just replacing a door — you’re upgrading the way your home feels, functions, and performs year-round.
With high-quality products, professional installation, and long-term benefits, sliding door installation in Minooka is a smart move for homeowners who want comfort and value without sacrificing style.
0 notes
Text
Emergency Roof Repair: What to Do When You Have a Leak
Introduction
Having a well-maintained roof is essential for any home or business. It protects your property from the elements and ensures the safety and comfort of its occupants. However, even the best roofs can develop issues over time. One of the most common problems is a leak, which can lead to severe damage if not addressed promptly. In this comprehensive guide, we will explore everything you need to know about emergency roof repair, including how to identify leaks, what steps to take when you find one, and how to choose the right https://www.google.com/search?kgmid=/g/11rrqp0cb4&uact=5#lpstate=pid:-1 roofing contractors for your needs.
Emergency Roof Repair: What to Do When You Have a Leak
When you discover a leak in your roof, it can be both alarming and overwhelming. The first step is to remain calm and assess the situation. Here are some immediate actions you can take:
Identify the Source of the Leak
Start by locating where the water is entering your home. Check ceilings, walls, and even floors below the roof for water stains or dampness.
Contain Water Damage
If possible, place buckets or containers under the leak to catch dripping water. This will help minimize damage to your flooring and furnishings.

Protect Your Belongings
Move any valuable items away from the area of concern. Cover furniture with plastic sheeting to protect it from moisture.
Document the Damage
Take photographs of any visible damage as well as areas affected by water intrusion. This documentation will be helpful when discussing repairs with roofing contractors and filing insurance claims.
Contact a Roofing Company
Reach out to licensed roofing contractors immediately for an inspection and repair estimate.
Avoid DIY Repairs
While it may be tempting to attempt a quick fix yourself, it’s important to remember that improper repairs can lead to more significant issues down the line.
Understanding Different Types of Roof Leaks Common Causes of Roof Leaks Age: Over time, roofs deteriorate due to exposure. Weather Damage: Wind, hail, heavy rain, and snow can all cause significant issues. Poor Installation: If a roof was not installed correctly initially, it may develop leaks sooner than expected. Lack of Maintenance: Regular inspections and maintenance are crucial in preventing leaks. Types of Roofs Prone to Leaks Flat Roofs Flat roofs often accumulate standing water which can lead to leaks if not properly drained. Shingle Roofs Asphalt shingles can become brittle with age or weather conditions leading to cracks or missing pieces. Tile Roofs Broken tiles can expose underlayment material which may result in leaks. Metal Roofs While generally durable, metal roofs can develop rust spots that create potential leak points. Signs You Have a Roof Leak Water stains on ceilings or walls Mold growth in corners Dampness in insulation
0 notes
Text
The Right Way to Approach Legal Basement Development and Load-Bearing Wall Removal
Homeowners are increasingly looking for ways to add functionality and value to their homes, and two of the most transformative renovations today are legal basement development and the strategic removal of load-bearing walls. When undertaken correctly, both projects can significantly improve a home's livable space and flow. However, these are not DIY jobs to be taken lightly. Legal basement development and obtaining the correct permit for load bearing wall removal are not just technical necessities—they are the foundation of safe, structurally sound home enhancements.

Legal basement development ensures that a basement space is converted in accordance with municipal regulations and building codes. Whether it’s for rental income, extra family space, or a home office, developing a basement legally means it meets specific requirements in ventilation, insulation, ceiling height, emergency exits, and more. One of the first steps in any legal basement development project is determining what is permitted in your local jurisdiction. Without the proper permits and approvals, homeowners may face fines, insurance issues, or be forced to reverse the renovation.
The other key component that often coincides with these basement upgrades is modifying the home’s layout above or below by removing walls. While it might seem like a simple way to open up a floor plan, removing a load-bearing wall is a complex process. It requires an engineering review, architectural planning, and most importantly, a permit for load bearing wall removal. These permits confirm that the structural integrity of the house won’t be compromised. This type of wall supports the weight of the structure above it, and improper removal can lead to significant damage and dangerous conditions.
Before starting either project, homeowners should consult with experienced professionals such as structural engineers or qualified architectural designers. These experts can assess existing structural elements and create designs that comply with building codes. Furthermore, they can handle the submission of drawings and documentation required to obtain a permit for load bearing wall removal and for converting basements legally.
Another key aspect of both renovations is ensuring inspections are scheduled and passed. During legal basement development, multiple inspections may be required at different stages—framing, electrical, plumbing, and final occupancy. Similarly, after a load-bearing wall is removed, inspectors must verify that proper beams, supports, or posts have been installed as approved in the permit documents.
While these renovations might seem extensive or costly, they provide long-term value. A finished basement that is code-compliant can be legally rented out, adding significant monthly income. It also boosts the resale value of a property. An open floor plan upstairs, made possible through strategic wall removal, enhances natural light, flow, and aesthetic appeal. These features are highly desirable in today’s real estate market.
In addition to following safety and structural requirements, working with trusted design professionals ensures that the visual elements of the renovation meet the homeowner’s expectations. Selecting appropriate materials, layouts, lighting, and finishes can elevate the final result from functional to beautiful.
One of the challenges homeowners face is navigating local bylaws and understanding permit timelines. Depending on the city, the process for obtaining a permit for load bearing wall removal can take a few weeks to several months. Legal basement development often involves more than one permit, including zoning clearance and building approvals. Starting the process early and staying organized is essential to avoid delays.
Professionals who specialize in residential design and structural planning can help simplify these steps. They offer guidance on what’s feasible within a given budget and how to maximize space without compromising safety or compliance.
Ultimately, approaching legal basement development and structural changes like wall removal the right way offers peace of mind. It means knowing your home is safe, your investment is protected, and your improvements are secure for years to come.
Homeowners who prioritize proper permitting and design expertise are better positioned to enjoy the full benefits of their renovations. By ensuring your basement development is legal and that you have the proper permit for load bearing wall removal, you are making a smart, future-focused investment in your home.
For more info:-
Facebook
Instagram
Linkedin
Youtube
0 notes
Text
Curtains Sydney: A Complete Guide to Dressing Your Windows
Why Curtains Matter in Sydney Homes
Sun-drenched days, salty harbour air and eclectic architecture make Sydney a unique setting for interior design. Well-chosen curtains sydney residents choose don’t just finish a room; they influence temperature, acoustics and mood. Whether you’re blocking glare in a Barangaroo penthouse or softening heritage sash windows in Balmain, the right fabric weight, lining and header can transform both comfort and style.
Blockout vs Sheer: Understanding Your Options

Blockout curtains Sydney homeowners swear by are engineered with dense, opaque linings that halt up to 99% of external light. They’re perfect for shift-workers, nurseries and west-facing living rooms where the afternoon sun can raise indoor temps by several degrees. By insulating windows, blockouts can cut cooling costs and protect rugs, art and timber floors from UV damage.
Conversely, sheer curtains Sydney stylists love are all about ambience. Lightweight voiles, linens or polyester blends diffuse daylight, obscure nosy neighbours and add romantic movement in coastal breezes. Many Sydneysiders layer sheers beneath blockouts on a double track, enjoying privacy by day and darkness on demand after dusk.
Design Considerations: Fabric, Colour & Header
Fabric Weight & Texture – Linen blends lend relaxed, coastal vibes; velvets or jacquards deliver drama for formal dining rooms.
Colour Palette – Match wall tones for a seamless look, or create contrast with deep navy or charcoal panels against white trims—great for framing harbour or bushland views.
Header Style – S-folds skim modern floors with fluid waves, while pinch pleats sit neatly in Federation-style homes. Eyelets make DIY installation a breeze for renters.
Puddle, Kiss or Float? – Allow an extra 20 mm “kiss” on the floor for a tailored silhouette, or add a 200 mm puddle for luxe understatement in high-ceilinged spaces.
Measuring Up Like a Pro
Take width measurements outside the frame, extending 150–200 mm past each side so curtains can stack clear of the glass. For height, mount tracks as close to the ceiling as possible to elongate walls and create the illusion of larger windows—especially effective in terrace houses. Record three drop measurements (left, middle, right) and use the smallest to avoid floor drag on uneven surfaces.

Where to Buy Quality Curtains in Sydney
Skip the cookie-cutter imports and choose a local specialist. At curtains sydney you’ll find an extensive library of blockout and sheer fabrics sourced from leading Australian mills, competitive pricing, and a no-pressure in-home measure-and-quote service. Supporting local manufacturing shortens lead times, reduces transport emissions and ensures accountability if alterations are required.
Trends to Watch in 2025
Sustainable Textiles – Recycled polyester and organic hemp blends are gaining traction among eco-minded renovators.
Neutral Layering – Layer tone-on-tone neutrals (think oat over stone) for depth without visual clutter—perfect for compact city apartments.
Tech Integration – Voice-controlled tracks are moving mainstream as costs fall. Pair with home assistants for seamless routines (“Hey Siri, goodnight”).
Maximalist Prints – Bold botanicals and oversized geometrics are staging a comeback, working brilliantly when confined to a feature window so as not to overwhelm.
Final Thoughts
Investing in quality curtains is one of the most cost-effective ways to elevate a room’s comfort, energy efficiency and resale appeal. Whether you crave the serene glow of sheer fabrics or the restful darkness of premium blockout linings, curtains sydney solutions from trusted experts make custom window dressing simple, stylish and long-lasting.
0 notes
Text
How to Choose the Best Insulated Attic Access Door for Energy Efficiency

When it comes to home energy efficiency, the attic often plays a surprisingly significant role. A poorly sealed or insulated attic access door can become a major source of heat loss in the winter and heat gain in the summer, undermining the performance of your HVAC system and increasing your energy bills. Choosing the right insulated attic access door is one of the smartest steps homeowners can take to improve comfort and energy savings.
Why Insulated Attic Access Doors Matter
An attic access door is often one of the most overlooked components of a home's thermal envelope. Typically located in hallways, closets, or garages, these doors create a direct opening into the attic space. Without proper insulation and air sealing, they allow conditioned air to escape and unconditioned air to enter, disrupting indoor temperature regulation.
The U.S. Department of Energy identifies attic access points as potential problem areas for heat loss. A well-insulated, airtight attic door helps maintain consistent indoor temperatures, reduces HVAC workload, and improves overall energy efficiency.
Types of Attic Access Doors
Before selecting a product, it’s important to understand the different types of attic access doors:
Scuttle Hole (Push-Up Panel)
Simple, often uninsulated hatch panel
Typically found in older homes
Can be upgraded with insulation kits or new insulated covers
Drop-Down Stairs (Folding Ladder Access)
Built-in ladder folds down for easy attic access
Common in garages and hallways
Requires insulation around the frame and the door panel
Knee Wall Door
Provides access to attic storage behind short walls
Needs to be insulated and sealed like a regular exterior door
Hinged Access Panel
Flush-mounted, often insulated and air-sealed by design
Offers better energy efficiency and aesthetic appeal
Each type can be made more efficient with the right insulation materials and installation techniques.
Key Features to Look For
Insulation R-Value
The R-value measures the thermal resistance of a material. Higher R-values offer better insulation. When choosing an attic access door, aim for a product with at least R-10 to R-15 insulation. Some premium models go up to R-30, offering maximum energy efficiency.
Air Sealing
Air leaks around the perimeter of an attic access door can nullify even the highest R-value. Look for models with integrated gaskets or weatherstripping that create an airtight seal when the door is closed.
Durability and Construction
Opt for doors made from sturdy materials like aluminum, steel, or high-quality composite. The frame should be rigid and stable, preventing warping over time. A well-constructed door will maintain its seal and insulation performance for years.
Ease of Installation
Many manufacturers offer insulated attic access doors as complete kits with everything needed for DIY or professional installation. Choose a model that fits your existing opening dimensions or one that can be easily retrofitted.
Fire-Rated Options
In certain areas or for added safety, consider fire-rated attic access doors. These provide extra protection and may be required by building codes, especially for garage installations.
Top Insulated Attic Door Options
Here are a few high-performing products to consider:
Sealin’ Hatch
No assembly is required. It installs with just six screws (included)
Fits in standard 16” or 24” on-center framing.
Pre-primed Trim and Door Panel - ready to (sand and) Paint after Installation
Has R39 recycled cotton insulation fastened to the backside of the door.
Has energy-saving weather stripping for a tight seal.
Has 12" Loose-fill Insulation Dam (shorter for garage version)
Battic Door R-50 Attic Stair Cover
Fits over pull-down attic stairs
Lightweight and easy to install
Very high R-value
Calvert USA Insulated Attic Access Door
Pre-assembled and sealed
High R-value foam core
Ideal for hallway or ceiling applications
DuPont Thermax Access Panel
Combines polyisocyanurate insulation with durable sheathing
High-performance air sealing
Professional-grade quality
Energy Guardian Kits
Designed for drop-down stairs
Includes insulation cover and weatherstripping
Budget-friendly and effective
Installation Tips for Maximum Efficiency
Even the best insulated attic access door won’t perform well if improperly installed. Follow these best practices:
Measure accurately - Ensure your access door fits tightly within the opening to avoid gaps.
Use spray foam or caulk - Seal around the frame with expanding foam or caulk to prevent air leakage.
Add weatherstripping - Reinforce the seal with quality weatherstripping materials.
Insulate the attic side - If applicable, install additional insulation on the attic-facing side of the door.
Custom-Built Solutions
In some cases, a custom-built insulated attic door may be the best option, especially in older homes with non-standard openings. A carpenter or insulation professional can build a door tailored to your space using rigid foam board, reflective insulation, and air-sealing gaskets.
Custom solutions can also be designed to blend seamlessly with the surrounding décor while maximizing thermal performance.
Complementary Upgrades
Pairing an insulated attic access door with other energy-saving improvements can amplify results:
Attic Insulation - Ensure your attic floor is properly insulated to DOE recommendations.
Radiant Barriers - Reduce heat gain in summer with foil-faced barriers.
Ventilation - Proper attic ventilation helps regulate temperature and humidity.
Together, these upgrades can transform your attic from an energy sink into a thermal buffer.
Energy and Cost Savings
Installing a properly insulated attic access door can lead to significant savings on heating and cooling costs. According to the EPA, sealing and insulating attics and air leaks can save homeowners up to 15% on energy bills annually.
Though some high-end attic doors may cost more upfront, the long-term energy savings and comfort improvements offer a solid return on investment.
Environmental Benefits
Improving your attic’s energy efficiency isn’t just good for your wallet—it’s good for the planet. Reduced energy use means fewer greenhouse gas emissions and a smaller carbon footprint. This is especially important for homeowners committed to sustainable living and green building practices.
Maintenance and Inspection
To keep your attic access door functioning optimally:
Inspect seals and gaskets annually
Reapply weatherstripping as needed
Check for warping or gaps
Ensure the insulation remains intact
Routine maintenance will extend the life of your investment and maintain peak energy performance. Choosing the best insulated attic access door is a small change that delivers big energy efficiency benefits. Whether you’re retrofitting an older home or building a new one, investing in a well-sealed, well-insulated attic entry can help you control energy costs, improve comfort, and contribute to a greener home. Need help? Contact Eco-Building Products today via email or call 231-399-0700.
1 note
·
View note
Text
Manage Sound and Savings With Acoustic Insulation Batts in Melbourne
Putting comfort and quiet in perfect balance. Acoustic insulation batts are the secret to reducing unwanted noise while enjoying a cosier home environment. Whether it’s blocking out street sounds or minimising echoes between rooms, these batts combine practical functionality with top-tier quality to bring peace to where it matters most. They are an ideal choice for anyone looking to create a home that feels as good as it works.
Crafted for reliability and designed to minimise noise transfer, Acoustic Insulation Batts are perfect for all types of living spaces across Melbourne. From use on timber-framed walls to subfloors or between rooms, they offer a versatile solution that adapts to your needs. When it’s this simple to control sound and improve energy efficiency, the choice is straightforward.
Acoustic Insulation Batts Made Easy in Melbourne
Selecting the right insulation isn’t just about managing temperature; soundproofing plays a huge role in modern living. These high-density batts absorb sound more effectively than standard options, stopping it from travelling through walls, ceilings or floors.

With a range of thicknesses and R-values, acoustic insulation batts combine durability with versatility. Whether you’re working on a new build, renovating, or updating a single room, there is a product suited to your exact needs.
It’s not only about their brilliant performance but also long-term benefits. By using high-quality acoustic insulation batts in Melbourne, you can reduce energy costs while enjoying a more comfortable and peaceful environment. Install with professional help or take the DIY route to introduce tranquillity into every corner of your space.
Source: Manage Sound and Savings With Acoustic Insulation Batts in Melbourne
0 notes
Text
Affordable Skylight Repair Services in San Bruno, CA – Zeek’s Discount
When your skylight starts leaking, cracking, or showing signs of wear, you need fast and affordable skylight repair services in San Bruno, CA. At Zeek’s Discount, we specialize in high-quality, budget-friendly repairs to keep your home safe and well-lit. Whether you’re dealing with a minor seal issue or major structural damage, our expert team provides reliable solutions without breaking the bank.
Why Choose Professional Skylight Repair?
Skylights enhance natural lighting and improve ventilation, but they can develop problems over time. DIY fixes may seem cost-effective, but improper repairs can lead to bigger issues like water damage, mold growth, or energy loss. Hiring a professional service like Zeek’s Discount ensures long-lasting results, preventing costly future repairs. Our skilled technicians assess the damage accurately and use premium materials to restore your skylight’s functionality.
Common Skylight Problems We Fix
From cracked glass to faulty seals, skylights face various issues. Some of the most frequent problems we handle include:
Leaks & Water Damage – Caused by worn-out seals or improper installation.
Foggy or Cracked Glass – Reduces visibility and insulation efficiency.
Operational Failures – Difficulty opening or closing vented skylights.
Condensation Buildup – Leads to mold and structural damage if ignored.
No matter the issue, Zeek’s Discount offers affordable skylight repair services in San Bruno, CA, ensuring your home stays dry and energy-efficient.
Our Skylight Repair Process
At Zeek’s Discount, we follow a structured approach to deliver top-notch repairs:
Inspection – We identify the root cause of the problem.
Assessment – Providing a transparent cost estimate before starting work.
Repair/Replacement – Using durable materials to fix or replace damaged parts.
Sealing & Waterproofing – Preventing future leaks with high-grade sealants.
Final Check – Ensuring everything functions perfectly before leaving.
Our efficient process minimizes disruption while maximizing skylight longevity.
Benefits of Timely Skylight Repairs
Ignoring skylight damage can lead to expensive consequences. Here’s why prompt repairs are essential:
Prevents Water Damage – Leaks can ruin ceilings, walls, and insulation.
Improves Energy Efficiency – Damaged skylights let in drafts, increasing heating/cooling costs.
Enhances Home Safety – Cracked glass poses a risk of shattering.
Boosts Property Value – Well-maintained skylights improve curb appeal.
With Zeek’s Discount, you get affordable skylight repair services in San Bruno, CA, protecting your home’s integrity.
Why Zeek’s Discount Stands Out
Many companies offer skylight repairs, but we go the extra mile with:
✔ Competitive Pricing – Quality repairs that fit your budget. ✔ Experienced Technicians – Licensed professionals with years of expertise. ✔ Quick Response – Emergency services available for urgent repairs. ✔ Customer Satisfaction Guarantee – We stand by our work.
When you need reliable and affordable skylight repair services in San Bruno, CA, trust Zeek’s Discount for exceptional results.
How to Maintain Your Skylight
Regular maintenance extends your skylight’s lifespan. Follow these tips:
Clean Glass & Frames – Remove dirt and debris to prevent seal damage.
Check for Leaks – Inspect after heavy rain.
Trim Overhanging Branches – Prevents scratches and cracks.
Schedule Annual Inspections – Early detection avoids costly repairs.
For professional maintenance, Zeek’s Discount offers affordable inspection services.
Contact Zeek’s Discount Today!
Don’t let a damaged skylight compromise your home’s comfort. Whether it’s a minor fix or a major repair, Zeek’s Discount provides affordable skylight repair services in San Bruno, CA. Call us today for a free estimate and let our experts restore your skylight to perfect condition!
📞 (XXX) XXX-XXXX | ✉ info@zeeksdisc
0 notes
Text
Garage Renovation: Transforming Unused Space into Functional Living

A garage is no longer just a space to park your car or store seasonal tools—it's a blank canvas full of potential. With smart planning and modern design trends, a garage renovation can completely transform an underutilized area into a valuable and functional part of your home. Whether you're looking to create a home gym, a workshop, a guest suite, or a stylish lounge, renovating your garage offers endless possibilities and a high return on investment.
Why Renovate Your Garage?
Many homeowners overlook the potential of their garages, but with growing families, remote work culture, and the rising cost of real estate, making the most of every square foot is essential. A renovated garage can increase your home’s resale value, improve energy efficiency, and provide much-needed space for hobbies, relaxation, or productivity.
Popular Garage Renovation Ideas Home Office or Study Room With remote work becoming more common, converting your garage into a home office is a practical solution. Soundproof walls, ample lighting, and a comfortable layout can create a quiet and professional workspace just steps away from home.
Personal Gym or Yoga Studio Skip the gym membership and build your own fitness area with rubber flooring, mirrors, proper ventilation, and gym equipment. A dedicated wellness space helps you stay consistent with your health goals.
Guest Suite or Rental Unit With a bit more investment, you can convert your garage into a small guest suite with a bathroom and kitchenette. It can serve as a cozy space for guests or be rented out for extra income.
Kids’ Playroom or Teen Hangout Keep the noise away from the main house with a designated area for children or teenagers. Add soft flooring, games, seating, and bright décor for a fun, safe environment.
Creative Workshop or Hobby Space Artists, DIY enthusiasts, or tinkerers can enjoy a personalized studio or workshop. Install tool storage, workbenches, and proper lighting for a functional space that supports creativity.
Steps to a Successful Garage Renovation Set a Clear Purpose Decide how you want to use the space. Your renovation should be designed with your end goal in mind.
Check Local Regulations Make sure to comply with building codes, especially if you’re adding plumbing or making structural changes.
Insulate and Seal Proper insulation is crucial for comfort. Insulate the walls, ceiling, and garage door to regulate temperature and reduce noise.
Upgrade Flooring Replace concrete with durable, stylish options like epoxy coatings, vinyl tiles, or laminate flooring.
Improve Lighting and Electrical Systems Add task lighting, ceiling fans, outlets, and even air conditioning if needed, depending on the use of the space.
Maximize Storage Use wall-mounted shelves, cabinets, and ceiling racks to keep the space organized and clutter-free.
Final Thoughts
A garage renovation Dubai is one of the smartest ways to add functional living space to your property without expanding your home’s footprint. With thoughtful planning, a modest budget, and a clear vision, you can turn your garage into one of the most useful and enjoyable areas in your home. Whether for work, play, or relaxation, the possibilities are endless when it comes to reimagining your garage.
0 notes