#Dowel Design Tips
Explore tagged Tumblr posts
Visit Tumblr Blog
Explore Tumblr blogs with no restrictions, modern design and the best experience.
Last Seen Tumblr Blogs


Fun Fact
Mobile Tumblr US users spend an average of 4.04 minutes per session on the app.
Text
Engineering Best Practices for Dowel Bars in Rigid Slabs

Dowel bars in rigid pavement are the unseen heroes of structural durability. Found across expressways, airfields, industrial yards, and bus lanes, they’re vital for smooth load transfer between concrete slabs. But their success isn’t based on guesswork—precision is everything. Coupled with innovations like construction rings and Super Rings, dowel bars have evolved from simple cylindrical inserts to engineered components in rigid pavement systems.
From the very beginning of slab installation, construction rings play a foundational role. These elements help maintain proper spacing, alignment, and position during placement, preventing misalignment that could otherwise lead to joint failure. Meanwhile, Super Rings—known for their high tolerance and performance in extreme loads—deliver unmatched holding power, particularly in high-traffic zones. These two elements, when integrated properly, elevate the lifespan and integrity of rigid pavement structures.
Why Proper Load Transfer Can’t Be Overlooked
Concrete expands and contracts. It cracks. It shifts. That’s inevitable. Without an effective load transfer system, these natural changes cause differential settlement—making one slab sink while the next holds. The result? A bumpy ride, early cracking, and costly maintenance. Dowel bars in rigid pavement solve this problem by linking adjacent slabs, distributing the wheel load evenly, and reducing stress concentration on the joint.
But even the best dowel bar won’t work if placed incorrectly or without adequate alignment support. This is where construction rings step in. These devices ensure precise positioning during installation, especially in repetitive paving operations. Super Rings, on the other hand, are engineered to keep the dowel in optimal alignment even when subjected to heavy vibration or shifting during the pour. Together, these components form a fail-proof trio.
Installation Techniques That Define Performance
Surface Preparation and Alignment
The foundation of rigid pavement success starts with a clean, compacted sub-base. Once formwork is in place, construction rings are used to hold dowel bars exactly perpendicular to the joint face. Misalignment by even a few degrees can compromise load transfer and cause binding.
Joint Width and Embedment Length
The spacing of dowel bars typically ranges from 300 mm to 400 mm, depending on load class. Embedment length is equally critical—ideally half the length of the dowel sits in each slab. The role of Super Rings becomes evident here, locking the bar into perfect position during curing, preventing any shift due to weight or concrete flow.
Benefits That Go Beyond Basics
Long-Term Pavement Performance Proper dowel installations drastically reduce faulting at joints, leading to smoother surfaces and fewer maintenance disruptions.
Cost Efficiency Fewer repairs mean less downtime and resource allocation. Integrating Super Rings early on may seem like a minor added cost, but they pay off in lifecycle extension.
Sustainability and Resource Optimization With longer service life, pavements need fewer reconstructions. Fewer reconstructions mean reduced use of concrete, fuel, labor, and logistics—a win for both budgets and the environment.
Common Pitfalls and How to Avoid Them
1. Misaligned Bars
A slightly tilted dowel may create restraint instead of freedom of movement. Using construction rings during placement eliminates such misalignments.
2. Floating During Concrete Pour
The buoyancy of steel in fluid concrete is often underestimated. This is why Super Rings—with their strong anchoring capability—are essential.
3. Inadequate Bar Length or Diameter
Cutting corners on dowel specs often leads to cracked slabs. Always consult pavement design loads and use recommended diameters.
Final Thoughts: Engineering That Lasts
Dowel bars in rigid pavement aren’t just optional accessories—they are a critical design element. When paired with construction rings for alignment and Super Rings for stability, they offer unparalleled longevity and performance in rigid slab systems. These practices aren’t just “best”; they’re essential. Long-lasting roads, safer industrial platforms, and stronger airport runways all begin with what lies beneath—precise, engineered connection.
#Dowel Bar Basics#Rigid Slab Tips#Concrete Dowels#Slab Joint Guide#Load Transfer Bars#Dowel Bar Size#Dowel Bar Use#Rigid Pavement#Slab Crack Fix#Pavement Joints#Dowel Bar Code#Slab Strength Bar#Tied vs Dowel#Bar Alignment#Bar Placement#Dowel Spacing#Rebar vs Dowel#Road Joint Bars#Slab Load Guide#Dowel Design Tips
0 notes
Text
What Are Dowel Bars and Why Do Builders Use Them?

Dowel bars represent one of the most essential yet often unnoticed additives in present-day creation. These specialized metallic reinforcement elements serve as crucial load transfer gadgets in concrete pavements, slabs, and structures. When properly mounted, these unassuming steel rods significantly decorate structural integrity and amplify the lifespan of concrete installations throughout residential, commercial, and infrastructure projects.
Functionality of Bar Dowels The construction industry is based closely on those cylindrical metal elements to create stronger connections among adjoining concrete segments. A traditional bar dowel includes easy, round metallic that permits mild horizontal movement even as it prevents vertical displacement among concrete sections. This apparently easy function will become critical in preventing not unusual concrete screw-ups like cracking, faulting, and untimely deterioration that plague poorly designed systems.
Thermal Stress and Flexibility Concrete naturally expands and contracts with temperature adjustments, creating pressure that could cause cracking and structural issues. Bar dowel installations mitigate those issues by way of allowing adjacent concrete sections to transport horizontally while keeping vertical alignment. This managed flexibility proves specifically critical in roadways, business floors, and outdoor concrete packages in which temperature fluctuations and heavy masses create regular strain on the shape.
Quality and Manufacturing Considerations Quality subjects notably while selecting those components. Leading TMT bar manufacturers produce dowel bars that meet rigorous engineering specs for power, dimensional accuracy, and corrosion resistance. These specialized metal elements undergo precise production approaches to make sure they deliver constant performance underneath worrying conditions. The distinction between premium and substandard products becomes evident over the years as systems face the test of environmental stressors and continuous usage.
Installation Advancements Installation techniques for bar dowel systems have evolved considerably. Modern strategies encompass dowel bar baskets that make certain best alignment earlier than concrete pouring and dowel bar retrofitting for existing pavements with deteriorating joints. These advanced strategies maximize the effectiveness of the weight switch gadget and enlarge pavement lifespan drastically in comparison to non-doweled alternatives.
Economic and Performance Benefits The financial blessings of nicely implemented dowel bars increase a ways beyond their initial price. By dispensing loads more successfully throughout concrete sections, these factors reduce preservation requirements and prevent premature disasters. Many TMT bar producers now provide specialized coatings and substances that, in addition to decorating sturdiness and performance, make those additives even more greatly treasured in difficult environments wherein moisture or chemical exposure threatens steel integrity.
Application in Large-Scale Infrastructure For infrastructure projects like highways and airport runways, particularly engineered bar dowel systems have come to be widespread exercises amongst forward-thinking groups and contractors. These essential additives permit heavy automobiles to transition easily throughout concrete joints without developing the uncomfortable bumps drivers experience on poorly built roadways.
Choosing the Right Dowel Bars Builders should consider numerous elements while deciding on dowel bars: diameter, length, spacing, cloth grade, and defensive coatings all impact overall performance. Premium products from installed TMT bar producers typically feature consistent dimensional tolerances, suitable strength traits, and defensive remedies that save you from corrosion and binding.
Innovation in Dowel Design The production panorama continues evolving, with innovative bar dowel designs addressing specific utility-demanding situations. Square, elliptical, and plate dowels have emerged along with traditional spherical options, each imparting specific blessings for unique eventualities. Regardless of design variations, the fundamental purpose stays regular: growing powerful load switches while accommodating movement among concrete sections.
Conclusion Understanding dowel bars and their essential role in concrete production empowers challenge planners to make informed selections that beautify structural overall performance and toughness. By choosing suitable structures from legitimate providers and ensuring proper installation techniques, developers can drastically improve concrete's overall performance while lowering lifetime renovation fees—turning in higher prices for customers and growing greater sustainable infrastructure for communities.
#Dowel Bars#Concrete Bars#Steel Dowels#Road Joints#Joint Stability#Load Transfer#Bar Placement#Rebar vs Dowel#Dowel Uses#PCC Joints#Concrete Tips#Dowel Purpose#Dowel in Roads#Slab Dowels#Dowel Function#Bar Spacing#Steel Rods#Slab Cracks#Dowel Role#Joint Design
0 notes
Text


♡ agere crafts༅
paw print: i tried to do some crafts you can do alone n some with a cg! and im pretty sure theres tutorials online for most of these things if needed!༅🐾

♡ clay ──୨ৎ── air-dry clay is wut j use! and you can use colored air dry clay or paint it when its dry!༅
✂ - - - - - - - - - - - - - - - - - - - - - - - - - - - - - - - - - -
♡ sticker making ──୨ৎ── draw or print cute designs, then laminate them or use sticker paper to make your own stickers! there lots of tutorials online!༅
✂ - - - - - - - - - - - - - - - - - - - - - - - - - - - - - - - - - -
♡ make a wand ──୨ৎ── but howw? well first pick a base for your wand like a stick, dowel, or anything that works!! then paint it if you want before adding maagic details like wrappin' a ribbon round the base, gluing on tiny gems, or drawing lil designs! then lastly...the top! glue a big star, heart, charm, etc. to the top! and if you wanna do a lil extra you can make up a fun spell for your wand, like “this wand brings happiness" or whateva you wan! or im pretty sure ive also seen already made star wands at places that you can just paint and add details to!༅
✂ - - - - - - - - - - - - - - - - - - - - - - - - - - - - - - - - - -
♡ sensory bottles ──୨ৎ── fill a clear bottle with glitter, beads, charms, whatever you wanna add!! and then add water to finish the sensory bottle!༅
✂ - - - - - - - - - - - - - - - - - - - - - - - - - - - - - - - - - -
♡ scratch offs ──୨ৎ── i mentioned these in my tips for littles without a cg post, but im mentioning them again!! they can be used as a reward system for yourself or you can put positive messages on them, whatever you want!! to make them you outline your scratch off on a piece of paper, so a star, circle, heart, box, etc!! and write what you want inside! then you put tape over it before mixing paint and dish soap together to paint onto the tap afteer youve placed it down! thats all! if i didn't do a good enough job explaining, there are lots of tutorials online too!!༅
✂ - - - - - - - - - - - - - - - - - - - - - - - - - - - - - - - - - -
♡ make a fish ──୨ৎ── get a paper plate and then cut a triangle out! then glue the triangle on the opposite side for the fin! you can get paper to make more fins to glue on as well! then color your fish!༅
✂ - - - - - - - - - - - - - - - - - - - - - - - - - - - - - - - - - -
♡ finger painting ──୨ৎ── prettyyyy self explanatory and already pretty well known but i still thought id mention it! id recommend getting an outfit you don't mind getting messy before though ofc, and then paint to your hearts content!༅
✂ - - - - - - - - - - - - - - - - - - - - - - - - - - - - - - - - - -
♡ mini garden/terrarium ──୨ৎ── get a bowl or a flower pot and you can paint it if you wish!! then add some soil in grass or moss and thennn add cute lil decorations! you can add fairys, just lil characters, a mini house, anything! and even a real flower or smth! you could also do it in a mason jar and make it like a terrarium!༅
✂ - - - - - - - - - - - - - - - - - - - - - - - - - - - - - - - - - -
♡ juice popcicles ──୨ৎ── anotherr popular one, get an ice tray, pour juice in, and then add a popsicle stick, put in freezer over night, n boom!! juice popsicles!༅
✂ - - - - - - - - - - - - - - - - - - - - - - - - - - - - - - - - - -
♡ pom-pom popsicles ──୨ৎ── you can look up how to do this one too, but you just get a card, pom poms ofc, a popsicle stick, and some double sided tape, and cut out the card into a popsicle shape, glue it to the stick, then use the tape to add the pom poms! you might need some help with this one! but you can use your favorite colors, your flag colors, whatever you wana do!༅
✂ - - - - - - - - - - - - - - - - - - - - - - - - - - - - - - - - - -
♡ paint a rock ──୨ৎ── another self explanatory one! you can look up some ideas for inspo though if you wish!༅
✂ - - - - - - - - - - - - - - - - - - - - - - - - - - - - - - - - - -
♡ paper bags ──୨ৎ── you can use paper bags to make puppets or lil houses! if you're confused on how, you can again look it up!༅

#sfw agere#age regression#agere blog#agere community#age regressor#sfw little blog#sfw littlespace#littlespace blog#age dreaming#sfw agedre#agere#agedre#agere resources#agere regression#agere crafts#sfw age regression#agere tips#agere positivity#safe space#agere safe space#agere diy#soft agere#lulu's library
371 notes
·
View notes
Text

For years, the idea of food independence has conjured images of sprawling gardens, backyard chickens, and rows of home-canned goods. But let’s be real: not everyone has an acre of land—or even a backyard. Does that mean food independence is out of reach? Not by a long shot. In 2025, it’s time to rethink what food self-reliance looks like. Whether you’re in an apartment, a condo, or just don’t have the time or space for traditional homesteading, you can still build a pantry that’s resilient against supply chain hiccups, inflation, and shortages. Step 1: Maximize Shelf-Stable Staples You don’t need a garden to stock up on dry goods. Focus on building a pantry of essentials with long shelf lives. Stock Up On: - Rice, beans, and lentils - Oats, pasta, and flour - Shelf-stable milk and powdered eggs - Salt, sugar, and cooking oils Step 2: Canned Goods Are Your Friend Canning isn’t just for homesteaders. Commercially canned goods offer a long shelf life, convenience, and variety. Buy Smart: - Focus on vegetables, proteins (tuna, chicken), soups, and fruits - Check for sales and bulk-buy deals - Rotate stock and use older cans first Pro Tip: Don’t forget about canned butter, ghee, and shelf-stable cheese options. FIFO Countertop Mini Can Tracker Holds 30 Standard 10-24 Oz Can Sizes, White| Stackable & Adjustable Can Organizer for Pantry, USA Made, White - Mini Can Tracker: Keeps your kitchen organized by storing and rotating your canned goods on a First In First Out model saving you from expired food cost and waste - Can Organizer Easy Install: Ensures effortless installation saving you time and energy; Carefully sized dowels fit smoothly into the panels, giving your fridge or pantry a fresh new look; Made in the USA - Customizable Can Rack: Includes the following easy-fit dowels; 3 - A dowels (fits family soup cans), 6 - B dowels (fits chunky soup and fruit cans), 6 - C dowels (fits standard vegetable/soup cans) - Canned Food Organizer Capacity: Make room for up to 30 cans, preserving sodas, soups, and veggies in great harmony; Measures 16 inches long, 16 inches wide, 12 inches tall, and weighs 5 pounds - Expandable Food Storage: Expand your organized empire in your refrigerator, pantry, cupboards, and cabinets by adding panels, dowels, or even units for limitless growth $44.19 Buy on Amazon Step 3: Think Vertical—Indoor Gardening No backyard? No problem. Grow small-scale crops indoors with minimal space. Try These: - Herbs (basil, parsley, cilantro) on windowsills - Microgreens using shallow trays - Hydroponic kits for lettuce and greens Step 4: Store Water, Not Just Food Water is just as critical as food, and most urban preppers underestimate how much they’ll need. Store: - At least one gallon per person per day (for drinking and minimal hygiene) - Water filters and purification tablets as backup - Collapsible storage containers to maximize space Big Berkey Gravity-Fed Stainless Steel Countertop Water Filter System 2.25 Gallon with 2 Authentic Black Berkey Elements BB9-2 Filters - ENJOY GREAT-TASTING TAP WATER EVERY DAY AT HOME- The 2.25-gallon Big Berkey System can be used on a countertop in your kitchen or office to transform tap water into delicious drinking water that's also ideal for making your favorite beverages or cooking. - INDEPENDENT TESTING- Black Berkey Elements (the original BB9-2) are composed of a unique, proprietary blend of multiple media types backed by testing from accredited, third-party labs. Black Berkey Elements remove or dramatically reduce over 250+ typical contaminants that could be present in freshwater sources—no electricity, tools, or plumbing are required. - INCLUDES AUTHENTIC BLACK BERKEY ELEMENTS (THE ORIGINAL BB9-2)- Don't fall for lookalike filters that use our Berkey BB9-2 model number or trademarks in their titles or product descriptions to legitimize their brand as replacements or "compatible", when they are not. Black Berkey Elements are designed to work synergistically and target specific contaminants that far exceed the reduction capabilities of black filters solely composed of activated carbon. - ECONOMICAL, LONG-LASTING- Black Berkey Elements provide filtered water for just pennies per gallon. Each pair of Black Berkey Elements lasts for up to 6,000 gallons before replacement is recommended. Elements may require replacement sooner based upon the quality of influent water. Each additional pair of Black Berkey Elements (sold separately) adds an additional 6,000 gallons of contaminant reduction. - THE GOLD STANDARD IN GRAVITY-FED WATER FILTRATION- Authentic Black Berkey Elements are capable of greater contaminant reduction and a longer lifespan than virtually any of the other filter elements on the market. Berkey systems are simple and easy to use and require no electricity, costly installation, or tools, providing economical, long-lasting water filtration for just pennies a gallon. $367.00 Buy on Amazon Step 5: Get Creative with Storage When space is tight, you have to think vertically and creatively. Ideas: - Under-bed bins for bulk goods - Overhead shelving in closets or garages - Stackable containers that maximize footprint Step 6: Plan for Rotation and Replenishment A pantry is only as good as its maintenance. Maintain It: - Label items with purchase and expiration dates - Create a simple inventory spreadsheet - Set reminders to rotate stock every few months Final Thoughts: You Don’t Need Land to Be Ready Food independence isn’t just for the rural prepper. It’s about mindset, strategy, and a commitment to self-reliance—no matter where you live. By focusing on shelf-stable essentials, clever storage, and a few innovative growing techniques, you can build a pantry that stands strong against whatever comes next. Related Reads: - The Sensible Prepper – Practical Advice for Tough Times - Survival Gear List – The Essentials You Shouldn’t Leave Without Finally, remember that food independence is an ongoing journey. Stay informed about food preservation techniques, explore new recipes using your stored items, and continuously adapt your strategies as your needs evolve. This proactive approach will help ensure that you remain prepared for any eventuality, no matter where you live. Moreover, engage with your community to share ideas, resources, and even trade goods. Building relationships with local farmers or joining community-supported agriculture (CSA) programs can enhance your food independence and introduce you to fresh, local options that may not be available in stores. Regular maintenance of your pantry is essential for ensuring that your food supply remains fresh and ready for use. Consider setting up a reminder system on your smartphone or calendar to help you keep track of your inventory and remind you when it's time to check on your supplies. When considering creative storage solutions, think beyond the conventional. Utilize space in your home creatively by incorporating multi-functional furniture that doubles as storage, such as ottomans or coffee tables with hidden compartments. Every bit of space counts when preparing for potential shortages or emergencies. Another critical aspect of water storage is the need for emergency preparedness. Storing water isn’t just about filling up containers; it’s also about ensuring you have access to clean, drinkable water during emergencies. Invest in high-quality water filtration systems and purification tablets to ensure your stored water remains safe for consumption over time. As you think vertically for indoor gardening, consider the benefits of LED grow lights. These lights can mimic sunlight, enabling you to grow plants indoors even when natural light is scarce. This technology allows for greater control over your indoor gardening environment and can significantly expand your growing options. In addition to canned goods, consider freeze-dried options. These products not only have an impressive shelf life but also retain more nutrients and flavor compared to traditional canned foods. They can be rehydrated and used in many recipes, making them a versatile addition to your pantry. When thinking about shelf-stable staples, it's beneficial to explore legumes beyond just basic beans and lentils. Incorporate a variety of dried beans—such as black beans, kidney beans, and chickpeas—not only for their nutritional value but also for their versatility in a variety of dishes. Each type of legume can bring unique flavors and textures to your meals, enhancing your culinary repertoire. Consider urban gardening techniques that allow you to grow food in small spaces, such as vertical gardening or hydroponic systems. These innovations can transform a small apartment balcony into a lush, productive garden, yielding fresh vegetables and herbs all year round. In today's fast-paced world, the notion of achieving food independence takes on new dimensions. It's not just about self-sustaining your food source; it's about creating resilience in the face of global uncertainties. With the increasing volatility of food prices and supply chains, understanding how to prepare for the worst while still enjoying the best of what our urban environments have to offer is crucial. Read the full article
9 notes
·
View notes
Text
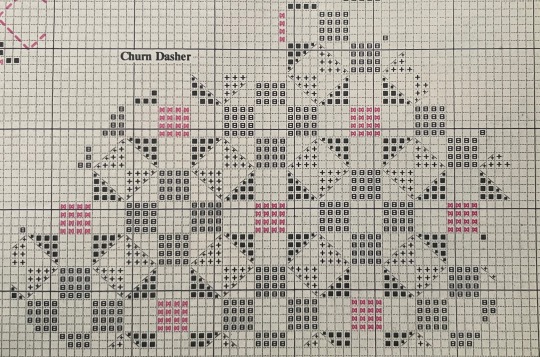


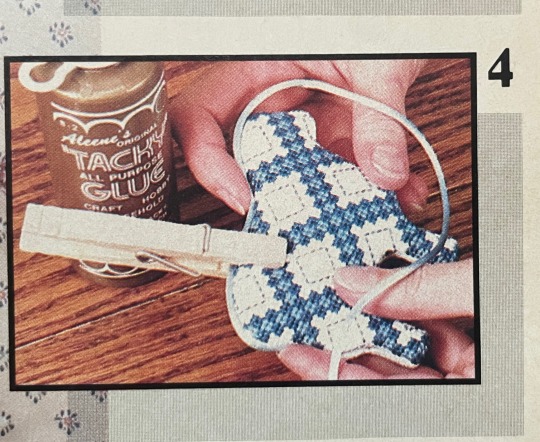
Directions on making ornaments below
For each animal ornament, you’ll need: two 6”x7” Aida 14 (ivory, white, pink #357-2, gray #357-7 from Wichelt), complete design on one; Stik’n Puff Country shape set; 1/2 yd. rattail or rope cord; pencil; Tacky Glue; clothespins; straight pins.
1. Trace and cut out pattern provided with Country shapes. Center design fabric over dotted lines (cross stitches will extend beyond the dotted lines). Pin pattern in place and cut out.
2. Center Country shape, foam-side down on wrong side of design fabric, and remove backing paper. Press Country shape firmly against the design fabric with eraser end of the pencil. Firmly pull the fabric wedges up and press them down into adhesive backing. Use glue where the wedges overlap and where the shape comes to a point. Repeat procedure for other side, using remaining Aida fabric.
3. To form hanger: Fold 8” of cord in half and glue ends to design back at center tip before flying front and back pieces together.
4. Glue front and back shapes together, using cloths pins to hold pieces together while glue dries. Glue rattail cord at intersection between front and back pieces, using straight pins to hold cord in place. Trim cord so that the two ends meet exactly. Glue the two ends together neatly.
5. To mount in wooden stand (wheeled or 4-pegged): Before glue dries, insert tapered doweling between front and back shapes at center bottom while shapes are being held together with clothespins. Optional: ribbon bow (12” of 1/4” wide) and bell (approx. 3/8”-dia. may be added to necks if the animals.


#cross stitching#pattern#cross stitch pattern#CS&CC Nov/Dec 1985#Rabbit#animal ornament#designed by not mentioned#alternate colour#different colour themes
2 notes
·
View notes
Text
Exclusive Fresh cozy Boho Bedroom Ideas
Let’s explore these creative ways to infuse your bedroom with boho charm, starting with essential elements like statement wall décor and working our way through furniture pieces, lighting options, and those special finishing touches that will make your space uniquely yours.
Macramé Wall Hangings

Macramé wall hangings are the quintessential element of a boho bedroom, bringing texture, artistry, and organic beauty to your space. These intricately knotted pieces serve as stunning focal points while adding a handcrafted touch to your walls.
Key Elements of Macramé Wall Hangings
Natural cotton cord designs
Geometric patterns
Fringe details
Wooden dowels or driftwood mounts
Mixed textile combinations
Styling Tips
Layer multiple pieces of different sizes
Mix with other wall decor like mirrors or plants
Create an asymmetrical arrangement
Incorporate beads or shells for added interest
Position above the bed or in corner spaces
Size Guide for Placement
Wall SpaceRecommended SizeStyle ImpactAbove Bed36-48″ wideDramaticSide Walls18-24″ wideAccentCorners12-18″ wideSubtle
For maximum impact, choose pieces that incorporate natural fibers and varying textures. A large, statement macramé hanging above your bed can serve as an alternative headboard, while smaller pieces can fill empty wall spaces with bohemian charm. The neutral tones of natural cotton rope complement any color scheme while adding depth and visual interest to your boho bedroom.
Now that we’ve explored how to incorporate macramé wall hangings, let’s look at how mismatched throw pillows can add another layer of boho charm to your bedroom space.
Mismatched Throw Pillows

Transform your bedroom into a bohemian paradise with an eclectic array of mismatched throw pillows. This design approach celebrates individuality and creates visual interest through diverse textures, patterns, and colors.
Essential Pillow Combinations
Textured pillows (macramé, tasseled, or fringed)
Global-inspired patterns (ikat, tribal, or mandala prints)
Solid-colored velvet or linen pillows
Hand-embroidered or block-printed designs
Vintage or antique cushions
Color and Pattern Mix Guide
Base ColorsAccent ColorsPattern TypesEarth tonesJewel tonesGeometricNaturalMetallicsFloralNeutralsDeep bluesEthnicRustRich purplesAbstract
Styling Tips
Layer pillows from largest to smallest
Mix 3-5 different patterns while maintaining a cohesive color story
Include at least one solid-colored pillow to provide visual rest
Vary pillow sizes and shapes for dimension
Incorporate different textures to add depth
The key to successful mismatched pillow styling is maintaining balance while embracing imperfection. Choose pillows that share at least one common color to create harmony within the eclectic arrangement. Now that you’ve mastered the art of mixing throw pillows, let’s explore how vintage rugs can further enhance your boho bedroom’s charm.
Vintage Rugs

Vintage rugs serve as the foundation of any cozy boho bedroom, adding instant character and warmth through their rich patterns and lived-in appeal. Here’s why they’re essential and how to incorporate them effectively:
Key Features of Vintage Rugs for Boho Bedrooms
Natural fiber materials (wool, cotton, jute)
Faded colors that create a time-worn aesthetic
Intricate geometric or tribal patterns
Distressed details that add authenticity
Various sizes for layering possibilities
Placement Options
LocationStyle SuggestionImpactUnder BedLarge Persian or TurkishAnchors the roomBedsideSmall Kilim runnersAdds warmth to foot traffic areasLayeredMultiple smaller rugsCreates depth and visual interestWall HangingMedium-sized flat weaveDoubles as artistic statement
Styling Tips
Layer different sized rugs at angles for added dimension
Mix patterns while keeping a cohesive color scheme
Choose faded hues that complement existing furniture
Incorporate both geometric and organic patterns
Use rugs with fringe details for extra bohemian flair
Vintage rugs work particularly well when paired with natural textures and materials. The weathered appearance of these rugs creates perfect harmony with rattan furniture, which we’ll explore next.
Canopy Bed

Transform your bedroom into a dreamy bohemian sanctuary with a statement canopy bed. These ethereal sleeping spaces create an instant focal point while adding vertical interest and romantic appeal to your room.
Types of Canopy Beds for Boho Style
Four-poster bed with draped fabric
Wall-mounted crown canopy
Bamboo frame canopy
Macramé canopy
Natural fiber rope canopy
Styling Tips for Your Canopy Bed
ElementStyle SuggestionFabricLight, flowing materials like muslin or gauzeColorNatural tones or jewel-toned fabricsDrapingAsymmetrical or gathered stylingAccentsTassels, pom-poms, or beaded trim
Create layers of interest by mixing textures and fabrics. Start with sheer white curtains as your base, then add colored scarves or vintage saris for an eclectic look. For added boho flair, weave fairy lights through the canopy frame or hang small crystals from the corners.
Shop Reed Diffusers
Enhance your canopy bed’s ambiance with strategically placed reed diffusers. These natural fragrance dispensers complement the bohemian aesthetic while providing subtle aromatherapy benefits:
Place diffusers on bedside tables
Choose earthy scents like patchouli or sandalwood
Opt for glass bottles with natural reeds
Rotate reeds weekly for optimal fragrance
Now that we’ve created a dreamy canopy centerpiece, let’s explore how rattan furniture can further enhance your boho bedroom’s organic appeal.
Rattan Furniture

Rattan furniture serves as a cornerstone element in creating an authentic boho bedroom sanctuary. This natural material brings organic texture and warmth while maintaining a lightweight, airy feel that’s essential to bohemian design.
Popular Rattan Pieces for Boho Bedrooms
Rattan headboards – Statement pieces that create a tropical resort vibe
Side tables – Perfect for displaying plants and decorative items
Storage trunks – Functional pieces that add texture and organization
Room dividers – Creates intimate spaces while maintaining airflow
Magazine racks – Adds both functionality and decorative appeal
Styling Tips for Rattan Furniture
PlacementStyling SuggestionVisual ImpactBedsidePair with macramé wall hangingCreates layered textureCornerAdd trailing plantsEnhances natural elementsWindow areaMix with bamboo blindsCoordinates natural materialsRoom centerCombine with woven rugsBuilds depth and interest
To maximize the boho aesthetic, mix rattan pieces with soft textiles like chunky knit throws and vintage cushions. The key is to balance the structured nature of rattan with softer elements. Consider incorporating both light and dark rattan pieces to create visual depth and interest.
Now that we’ve explored how to incorporate rattan furniture, let’s look at how hanging chairs can add an extra layer of boho charm to your bedroom sanctuary.
Hanging Chairs

A hanging chair is the quintessential bohemian bedroom statement piece that instantly transforms your space into a dreamy sanctuary. These suspended seats not only serve as functional furniture but also create an artistic focal point that epitomizes boho style.
Types of Hanging Chairs for Boho Bedrooms
Macramé Swing Chairs
Rattan Egg Chairs
Woven Bamboo Pods
Cotton Rope Hammock Chairs
Wicker Pod Chairs
Styling Tips for Hanging Chairs
ElementStyling SuggestionCushionsLayer with textured throws and ethnic print pillowsHeightInstall 18-24 inches from the ground for optimal comfortLocationPlace in a corner or near a window for reading nookAccessoriesAdd tassels, fringe, or beaded curtains
Installation Considerations
Ensure proper ceiling support (rated for at least 300 pounds)
Use appropriate mounting hardware
Install into ceiling joists or use heavy-duty anchors
Consider swivel hooks for 360-degree movement
Leave adequate space for gentle swinging
The key to incorporating a hanging chair is creating a cozy corner that invites relaxation while maintaining the free-spirited boho aesthetic. Add soft textiles and perhaps a small side table for books or beverages to complete the setup. Now that we’ve covered this floating sanctuary, let’s explore how bohemian art prints can further enhance your bedroom’s artistic appeal.
Bohemian Art Prints

A key element in creating an authentic boho bedroom is incorporating vibrant and eclectic art prints that reflect the free-spirited nature of bohemian style. Here’s how to effectively use bohemian art prints in your space:
Types of Bohemian Art Prints
Mandala designs
Abstract botanical illustrations
Spiritual and mystical symbols
Desert landscapes
Celestial patterns
Ethnic and tribal motifs
Psychedelic artwork
Gallery Wall Arrangement Ideas
StyleDescriptionBest LocationSymmetricalUniform spacing, aligned framesAbove bed or dresserOrganicRandom arrangement, mixed sizesAny large wall spaceFloor-to-ceilingVertical arrangementNarrow wall sectionsClusteredTight grouping of framesCorner spaces
Art Print Selection Tips
Mix different sizes and orientations
Choose complementary color schemes
Combine vintage and modern prints
Include at least one oversized statement piece
Layer prints with other wall décor
Use both framed and unframed pieces
Select prints with natural or earthy elements
The right combination of bohemian art prints can transform your bedroom into a personal gallery that captures the essence of boho style. Now let’s explore how patterned bedding can complement these artistic elements to create a cohesive look.
Patterned Bedding

Patterned bedding serves as the centerpiece of a bohemian bedroom, creating a vibrant focal point that sets the tone for the entire space. Here’s how to make it work:
Essential Elements
Mandala prints
Geometric patterns
Floral motifs
Mixed textile patterns
Layered designs
Pattern Combinations for Boho Bedding
Base LayerMiddle LayerTop LayerSolid sheetsGeometric duvetEmbroidered throwStriped sheetsFloral comforterTextured blanketPrinted fittedTribal patternsKantha quilt
Styling Tips
Mix patterns of different scales
Large-scale prints for duvet covers
Medium patterns for sheets
Small designs for pillowcases
Color Coordination
Choose 2-3 dominant colors
Add 1-2 accent colors
Include neutral tones for balance
The key to successful boho bedding lies in layering different patterns while maintaining a cohesive color story. Start with a bold duvet cover featuring ethnic prints or paisley patterns, then add complementary sheet sets with smaller-scale designs. Top it off with throw pillows and blankets in varying textures and patterns.
Now that your bed is a stunning bohemian masterpiece, let’s explore how vintage trunks can add both storage and character to your space.
👉Full Article
2 notes
·
View notes
Note
Hi!! your Alecto cosplay is so cool and your sword looks FANTASTIC, did you make it? do you have any other pics with it?
thank you so much! that sword is my husband’s handiwork, originally made to go with my gremlin harrow look last holmat, but the process was pretty straightforward.
figure out the scale in comparison to me (who is very short) so that it’s long enough to look BIG but not so long it’ll drag on the floor if i put it on my back.
cut blade out of foam in two pieces (one for each side), carving a channel down the middle.
glue dowel rod down the length of the blade.
carve the blade down with a dremmel on the sides, but it doesn’t need to be terribly flat or sharp to read as a sword.
cover remaining dowel handle in foam for pommel and cross guard.
give it a couple layers of spray on plasti dip and then paint once dry. i think he did silver and then went back in with black for shading.
add painted highlights along edges for fake sharpness.
the whole sword is SUPER light and very con safe! he didn’t actually give it as heavy a coat of plastidip as i’d recommend just due to time, so it’s definitely gotten kind of beat up, esp at the tip. but like, it still looks cool even with it’s non-sharp tip lol.
here’s me right after getting into gremlin harrow for holiday matsuri brandishing my new sword:

and here’s some closeups of its current state:


and i’ll have more photos of it later once we get to editing my alecto shoot from metrocon!
oh and follow my husband @shmaba if you like neat weapon designs. this sword is basic, but he did a whole bunch of cool ones for last swordtember!
27 notes
·
View notes
Text
DIY Wooden Wax Seal

Project by RageHaus:
This is a wooden wax seal tutorial I created and used on my S'amuser Avec Le Français project.

Before you begin, make sure you have access to all of these items:
wooden dowel
wood burning tool with a fine tip
pencil
printout of design
xacto knife
sandpaper
tape
stain
old rag
vegetable oil
paper towels
sealing wax
matches
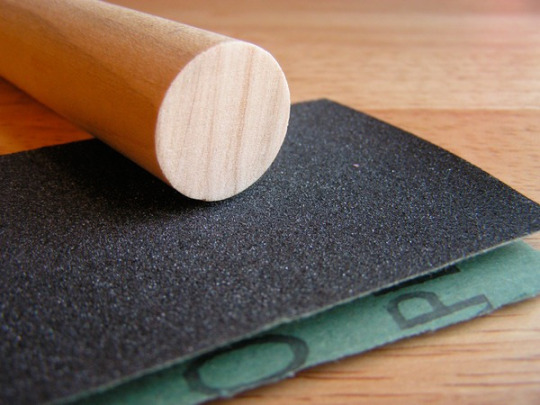
1. Prep the dowel by sanding the end you plan on using as the seal. Try to get out the little dings and scratches, otherwise they will show up in the wax impression.
2. Measure the exact diameter of the wooden dowel and design your seal. If you are designing a simple monogram, such as our RageHaus seal, you can easily design it in a variety of computer applications. Start by drawing a circle that is the exact diameter of the dowel with a thin stroke. Then arrange the letters within the circle. Keep in mind that you should keep the detail relatively simple unless you have a lot of experience carving small detail into wood.

3. Print the final design and cut out the letters with an xacto knife. Think of this step as making a stencil. Keep in mind that it doesn't have to be perfect, but you do want to capture the structure of the design.


4. Flip your stencil so it reads backwards and trace the image onto the dowel. Remember that your design needs to be backwards on the seal so the impression it leaves reads correctly. Tape the stencil onto the dowel and trace your design. Once you have a good trace, take off the stencil and fill out the design where you see fit.


5. Carve out the design with the wood burning tool. They are readily available in most craft stores and come with a fine point tip that can capture small detail. As you carve your design, keep the depth you carve relativity the same for the entire design so you can create an even, smooth impression in the wax.
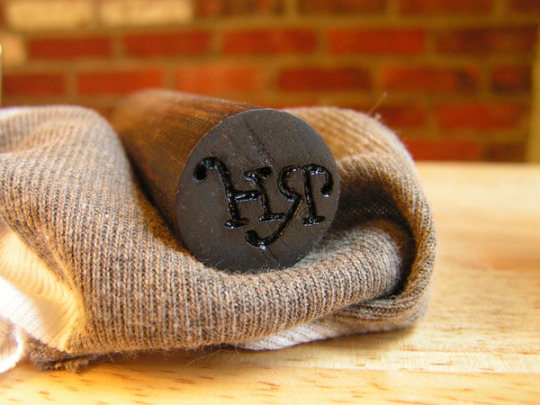
6. Seal the wood with stain. Wood is a porous material and to prevent the wax from sticking to the seal, you need to seal the wood with stain. Once you have stained your seal, put it in a warm place to dry overnight. You don't want to worry about getting stain on your hands or on your envelopes. 7. Gather the sealing wax, matches, oil, paper towels and an envelope. This process goes quickly and it is important that you have everything you need right in front of you. After you are sure your seal is dry, you can test it. I tried testing mine with candle wax at first, just to see if the impression was coming out correctly. However, if you seriously want to seal envelopes, then I would invest in proper sealing wax. You will find that it has a thick viscosity that creates a strong seal.

8. Have your envelope in front of you with the back facing up. If the flap you want to seal doesn't lay flat then you should weight it down. I used my xacto knife to do this. 9. Hold the sealing wax over the area you want to seal and light the wick. Give the flame a chance to strengthen before you tip the wax to begin dripping it. Once you get a good drip going, keep an eye on the diameter of the wax puddle in relation to the diameter of the seal. This will take practice figuring out how much wax you will need, so don't get frustrated if you don't get it on the first try.

10. Give the wax about 15 seconds to set up, in the mean while prep the seal for action. While I let the wax set-up a bit, I like to take this time to prep my seal by dipping the tip in oil. This gives you double the protection from having the wax stick to the seal. Blot the excess oil on a paper towel and make sure you wipe down the edges of the seal.

11. Press your seal gently, but firmly in the wax and let it sit. Let the wax dry completely before removing the seal. When you are sure that the wax is completely dry, start to wiggle the seal back and forth gently until you feel the seal release from the wax.


12. Voilà! A seal is made. With a little practice it will get easier. You can also use this impression to go back and fix anything you might not have noticed while carving out the design.
10 notes
·
View notes
Photo

Antique Hand Tool Steel Barn Beam Fence Post Tiber Wood Auger Peg Drill Variable
T-handle auger or timber auger. Based on its size and construction, this particular example looks like it was used for boring large holes in wood, typically in log cabin building, timber framing, or post-and-beam construction.
Key Features:
T-handle: Wooden cross handle for two-handed torque
Spiral bit: Very large, screw-tip auger bit for starting and boring into hardwood
Heavy-duty forged iron collar: Unusual wide design, adding extra leverage and strength
Marking: Faintly visible “THE BEST” stamped on the handle — that was a common brand slogan used by several U.S. toolmakers in the late 1800s to early 1900s
Ready for that homestead, for off the gird, analog / manual labor and reliability.
Approximate Era:
Late 1800s to early 1900s
Typical Uses:
Boring holes in logs for pegs, dowels, or timber framing
Fence post or barn beam work
Possibly for well cribbing or early construction in rural/homestead settings
This is a large antique hand auger with a wooden T-handle and heavy-duty forged steel bit. Used for boring holes in timber, this piece likely dates to the late 19th or early 20th century and was used in traditional log cabin or timber frame construction. The auger has a wide spiral screw bit and a tapered shaft. Handle is stamped "THE BEST," a slogan used by several American toolmakers during the 1800s.
Wooden Handle is 10" W
Overall she's 13" T
The spiral section is approximately 2 3/8" L
Overall the drilling area has a total possible depth of 9" L
The bore shaft section starts out about 1.19" in diameter and tapers all the way up to 2" ( I measured the circumference via soft tape measure, and did the math for accuracy sake).
Overall she's well crafted, solid, and ready for another lifetime of service; Please note the tiny chip, mid-bore, the the leading edge (see thumb point pic).
Hand-forged steel and solid wood
Rustic patina and authentic wear
A rare, functional survivor of early American craftsmanship
Great for display in a vintage tool collection, historical reenactment, or use in traditional woodworking.
0 notes
Text
Turn Wood on a Metal Lathe — Techniques, Tips, and a Complete Guide

Turning wood on a metal lathe might sound unconventional, but it’s a powerful technique that blends the best of both woodworking and machining. Whether you're a beginner exploring lathe work or an experienced maker looking to experiment, learning how to turn wood on a metal lathe unlocks a whole new set of creative possibilities.
Unlike traditional wood lathes, metal lathes offer increased stability, precision, and the ability to multitask. However, using them for wood involves its own set of practices. This guide walks you through key techniques, pros and cons, and essential tips to help you master woodturning on a metal lathe.
How to Turn Wood on a Metal Lathe
Start by securely mounting your wood piece using a chuck or faceplate. Make sure it is well-centered and balanced to avoid vibration. You can trace the profile you wish to shape using a pencil or template. This serves as your visual guide while turning.
Begin with the lathe running at a low speed to minimize the chance of sudden jerks. As you get more comfortable and the workpiece stabilizes, you can increase the speed gradually. Use lathe tools to remove material and shape the piece to your desired form. Focus on smooth, controlled movements to maintain accuracy and surface quality.
Once the shaping is complete, sanding comes next. Start with coarse-grit sandpaper and move up to finer grits until the surface feels smooth. If your project requires any internal cuts or hollow sections, a router bit can be used on the lathe, especially sizes like ¾ or 1 inch, depending on the design.
Why Use a Metal Lathe for Wood?
There are some clear advantages:
Stability and Power Metal lathes are heavier and more stable, making them ideal for working on longer or irregular pieces of wood. They also have more powerful motors, allowing you to cut through dense hardwoods with ease.
Precision Metal lathes are designed for tight tolerances and repeatability. The alignment between the headstock and tailstock is extremely accurate, and the use of a leadscrew and carriage means you can replicate exact measurements across multiple parts.
Drilling Capabilities One of the metal lathe’s strengths is in its ability to drill holes with high precision. This is a big plus when you’re working on wood projects that need consistent diameters or complex internal shapes.
Variable Speed Control Some metal lathes offer back-gears for ultra-slow speed control, which can be great for delicate woodturning and finishing. This reduces the chance of tear-out or splitting in softer woods.
Ideal for Long Pieces Thanks to the power feed feature, you can turn long wooden rods or dowels more efficiently, with less physical strain and greater precision.
What Are the Drawbacks?
Limited Shape Flexibility Curved, artistic, or freeform shapes are better suited to traditional wood lathes. Metal lathes are built for straight, symmetrical forms and may limit your creative design flexibility.
Custom Tooling Required Using traditional woodturning tools on a metal lathe might require a special setup. Some tool posts may not support standard wood gouges, requiring custom adaptations or purchases.
Lower Maximum Speeds Some woodturning operations benefit from high speeds. Most metal lathes don't reach those high RPMs, which can limit how smooth the finish gets, especially on softwoods.
Maintenance Concerns Wood dust and shavings are abrasive. If they settle into the metal lathe’s bed, carriage, or slides, they can lead to wear and tear. It's important to clean your machine thoroughly after each session.
Size Constraints Metal lathes generally offer less swing capacity, so they might not be ideal for large wooden bowls or platters. If your work requires wide diameters, a dedicated wood lathe might serve you better.
Metal Lathe vs Wood Lathe: What’s the Difference?
Metal lathes are engineered to work on hard materials and use advanced mechanisms for motion control. Wood lathes are simpler in design, often lighter, and allow for more fluid, hands-on carving. Metal lathes also tend to be more expensive and require a stronger foundation due to their weight and size.
Extra Tips
Always clean the lathe after woodturning to avoid rust or mechanical wear.
Use a sturdy steel bar in the tool holder as a rest for traditional wood tools.
Adapt your techniques and stay mindful of the mechanical limits of the machine.
Conclusion
Turning wood on a metal lathe offers a rewarding blend of stability, power, and precision. While not a full replacement for a wood lathe, it provides an excellent alternative for straight cuts, drilling, and long-form turning. With the right setup and care, you can expand your creative projects well beyond conventional woodworking limits.
For more information and in-depth guides, visit: Turn wood on a metal lathe
#craftwithlathe#tooltalk#lathetools#precisionmachining#workshopgear#metalworking#machinistlife#woodworking#latheprojects#DIYguide#makerspace#woodturning#metaltools#woodlathe#precision tools
0 notes
Text
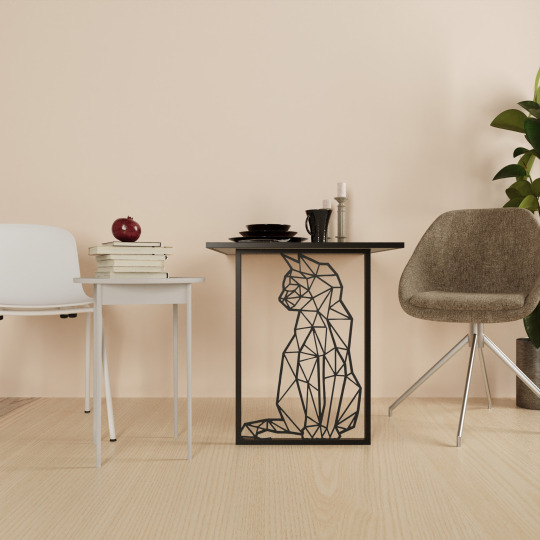


🌟Welcome to Magic Table Shop! 🐈 🐈⬛
I am here with my tables that have prepared for you to color and make your living space useful. I present my tables that have designed and prepared with love in every stage to your liking.
You can use decoration foldable wall tables both as a wall painting and a useful table. Thus, it saves space. This wall-mounted foldable tables can be used as a dining table and adult study table. In addition, it can be used for activities such as eating, doing homework, and painting for children.
My tables are made of materials that comply with TSCA standards, using strong metal, MDF wood and natural wood, and water-based paints. They are highly resistant to impacts and are designed for you to use for many years. The tables has a locking system that can be fixed to the wall after it is mounted on the wall.
Cleaning/Maintenance Tips:
We recommend that you clean the MDF part of the table regularly by wetting a soft microfiber cloth with a mixture of water and white vinegar.
The metal part does not oxidize in any way. You can clean this part by wetting a soft microfiber cloth very lightly.
If you wish, you can contact me for a personalized table that will fit your living space.
Your satisfaction is my first priority. I do good packaging to completely prevent damage. My valued customer, I closely follow the shipping process from shipping to delivery for you.
Table legs have a carrying capacity of 100 kg.
Product Package: 1 table top, 1 table leg, dowel and screw set
0 notes
Text
How the Right Dowel Bars Improve the Performance of Concrete

Concrete systems depend closely on excellent reinforcement substances for durability and energy. The combination of well-decided-on dowel bars with excessive-grade TMT Saria creates construction answers that face up to immense pressure and demanding environmental situations. Leading TMT Saria manufacturers recognize that reinforcement systems require strategic integration of multiple components to achieve optimal structural integrity.
Understanding the Synergy Between TMT Saria and Dowel Bars
TMT (Thermo-Mechanically Treated) Saria presents the primary tensile electricity in strengthened concrete, serving as the spine of structural integrity. However, while concrete sections meet—consisting of highways, business floors, or constructing foundations—dowel bars turn out to be crucial connecting elements. These specialized bars transfer loads across concrete joints while allowing necessary horizontal movement.
The relationship between these components isn't merely additive but synergistic. Quality dowel bars complement TMT Saria by preventing differential settlement and minimizing stress concentration at critical junctures. This partnership dramatically extends the functional lifespan of concrete structures, particularly those exposed to heavy traffic or shifting loads.
Key Factors Affecting Dowel Bar Performance
Several characteristics determine how effectively dowel bars enhance TMT reinforcement systems:
Material Composition: Premium dowel bars feature consistent carbon content and precise microstructure that align with TMT Saria specifications, ensuring compatible expansion rates and corrosion resistance.
Surface Treatment: Epoxy-coated or stainless-steel dowel bars dramatically lessen corrosion capacity while used along with corrosion-resistant TMT Saria, especially in moisture-inclined packages.
Dimensional Precision: Properly sized dowel bars distribute loads calmly throughout concrete sections, stopping localized stress on TMT reinforcement networks.
Installation Alignment: Even the highest-grade materials from a TMT Saria manufacturer will underperform if dowel bars aren't perfectly horizontal and parallel to traffic direction.
The Hidden Role of Binding Wire in Reinforcement Systems
While focus often centers on dowel bars and TMT Saria, binding wire plays a crucial supporting role that affects overall structural performance. Quality binding wire secures reinforcement components during concrete placement, maintaining precise spacing and alignment. The interaction between binding wire, dowel bars, and TMT Saria creates a comprehensive reinforcement system greater than the sum of its parts.
Construction teams should select binding wire that resists corrosion and maintains tensile strength compatible with both TMT Saria and dowel bars. Inadequate binding wire can compromise positioning during concrete pouring, negating the benefits of even premium-grade reinforcement materials.
Optimizing Construction Projects Through Integrated Solutions
Construction professionals increasingly recognize that sourcing TMT Saria, dowel bars, and binding wire as an integrated package improves project outcomes. Selecting materials from a reputable TMT Saria manufacturer that also provides compatible dowel bars ensures dimensional tolerance matching and consistent material properties across all reinforcement components.
Modern construction specifications now frequently require documented compatibility testing between dowel bars and TMT Saria, particularly for infrastructure projects with expected lifespans exceeding 50 years. This evolving standard acknowledges the critical relationship between these reinforcement elements.
Making Informed Reinforcement Decisions
When evaluating reinforcement options, construction teams should:
Consider the specific load transfer requirements at concrete joints.
Match dowel bar specifications with TMT Saria grade and dimensions.
Select appropriate binding wire that maintains positioning integrity.
Consult with specialized TMT Saria manufacturers about compatibility assurance.
The modest additional investment in properly specified dowel bars yields substantial returns through extended service life and reduced maintenance requirements. Projects utilizing integrated reinforcement solutions typically demonstrate superior crack resistance and load distribution characteristics compared to those using mismatched components.
The construction industry continues moving toward system-based reinforcement approaches rather than treating dowel bars, binding wire, and TMT Saria as separate considerations. This holistic perspective recognizes that structural performance depends on how successfully these elements work together to create durable, resilient concrete structures designed for generations.
#dowel bars#concrete performance#construction strength#concrete durability#structural stability#concrete reinforcement#concrete joints#dowel bar placement#dowel bar use#concrete quality#concrete cracks#reinforced concrete#construction materials#concrete design#road construction#dowel bar benefits#concrete roads#concrete repair#dowel bar installation#construction tips#concrete solutions.
0 notes
Text
Your Guide to Choosing High-Quality Wood Furniture for a Stylish Home
Finding high-quality wood furniture for your home can be a rewarding experience — but only if you know what to look for. With an increasing number of mass-produced pieces flooding the market, learning the basics of solid wood identification and understanding the hallmarks of premium craftsmanship will help you make smarter, long-lasting furniture choices.
What Makes Wood Furniture “High Quality”?
High-quality wood furniture is defined by three core elements: the type of wood used, the way it's constructed, and the craftsmanship behind the piece. Unlike particle board or MDF-based items, premium solid wood furniture is built to last decades with minimal wear and tear.
Furniture made from solid wood such as teak, oak, mahogany, or walnut not only looks beautiful but also stands strong against daily use, making it an ideal choice for modern homes.
Solid Wood Identification: Tips to Spot the Real Deal
With the market full of wood-like finishes and veneers, identifying real solid wood is the first step in choosing quality furniture. Here are some key indicators:
Visible wood grain: Real wood has irregularities, grains, and natural patterns. Engineered wood often has uniform or printed patterns.
Weight test: Solid wood pieces are generally heavier than furniture made with engineered wood or MDF.
Drawer and edge inspection: Pull out drawers and inspect the side panels — solid wood shows natural variations and texture.
Solid wood identification helps ensure you’re paying for durability, not just appearance.
Premium Furniture Tips: What to Look For
Beyond materials, premium furniture construction techniques ensure stability, longevity, and aesthetic appeal. Use the following checklist when shopping:
Check the joinery: Look for dovetail joints, wooden dowels, and mortise-and-tenon structures. Avoid pieces that rely solely on staples or glue.
Inspect the finish: A smooth, even finish that showcases the wood grain is a sign of attention to detail.
Try before you buy: Test drawers, doors, and shelves. They should open and close effortlessly, without wobbles or noise.
These tips will help you distinguish real craftsmanship from clever marketing.
Why It Matters for Your Home
High-quality wood furniture brings warmth and character to a space. Unlike cheaper alternatives, it develops a rich patina over time, giving your home a lived-in charm. Premium pieces also tend to be more customizable, allowing you to match finishes, dimensions, and wood types to your specific interior design preferences.
Smart Buying for Modern Homes
In today’s world of fast furniture, it’s easy to be swayed by low prices. But when it comes to durability, function, and aesthetics, premium wooden furniture always wins. By focusing on high-quality wood furniture and learning how to spot solid craftsmanship, you’re making a timeless investment in your space.
0 notes
Text
Stained Glass Succulents -
Step 1 : Trace leaf into glass. Score leaf shape with glass cutter, then break apart glass to remove design ( use pliers as needed ). Repeat for all 10 leaves. Use glass grinder to smooth edges of leaves.
Step 2 : Adhere copper tape along edges and corners of leaves. Burnish to smoothen and secure.
Tip : For even application, center tape along edges, then fold it over both sides of leave.
Step 3 : Brush safety flux over copper tape. To tin each leaf, apply solder along taped edges with soldering iron, creating solid sliver borders.
Step 4 : Hold two leaves together with just bottom edges touching and solder along joint. Repeat with remaining leaves ( connect them one by one and work from middle ).
Step 5 : Turn leaves over ( onto points ) and fill in base with soldering iron. Cut 2" dowel, wrap it in copper tape and brush it with safety flux. Then solder it to base of succulent. Tin rest of dowel.
0 notes
Text
What Makes a Great Hotel Dining Chair? A Selection Guide
A hotel dining chair is more than just a place to sit—it plays a crucial role in guest comfort, dining experience, and overall restaurant ambiance. Choosing the right hotel chairs can enhance the style and functionality of your dining space while ensuring durability for long-term use.
This guide will help you select the best hotel dining chairs by considering essential factors like comfort, materials, durability, and style. Whether you're working with hotel furniture suppliers or customizing your own, these tips will help you make the best choice.
1. Comfort: The Key to a Great Dining Experience
Comfort is the most important factor when selecting hotel dining chairs. Guests often spend a significant amount of time sitting while enjoying their meals, and uncomfortable chairs can leave a negative impression. Here are a few things to consider:
Seat Padding and Cushioning
Chairs with plush cushions or upholstered seats offer extra comfort.
High-density foam provides better support and retains its shape longer.
If using wooden or metal chairs, ensure they have ergonomic designs that support posture.
Backrest Support
A well-designed backrest supports the spine and prevents discomfort.
Curved or slightly reclined backrests provide a more relaxed seating experience.
For added luxury, upholstered or padded backrests are a great option.
Seat Height and Depth
The chair height should match the dining table for a comfortable posture.
Standard seat height is around 18 inches (45 cm).
A deep seat can be uncomfortable for short guests, while a shallow seat may not provide enough support.
2. Material Choices: Durability vs. Aesthetic
The choice of material affects both the durability and style of hotel chairs. You’ll need to balance functionality with aesthetics when selecting the right materials.
Wooden Chairs
Offer a classic and timeless look.
Available in various finishes like oak, walnut, or mahogany.
Sturdy and long-lasting, but may require polishing or refinishing over time.
Metal Chairs
Modern and industrial-style chairs are often made from metal.
Durable and resistant to wear and tear.
Powder-coated metal resists rust and corrosion.
Can be paired with upholstered seats for added comfort.
Plastic or Polypropylene Chairs
Lightweight and easy to clean.
Affordable and available in various colors and styles.
Suitable for both indoor and outdoor dining areas.
Upholstered Chairs
Provide luxury and comfort with soft fabric or leather upholstery.
Available in a wide range of colors and textures.
Require regular cleaning and maintenance, especially in high-traffic areas.
Rattan or Wicker Chairs
Ideal for outdoor or casual dining areas.
Natural and eco-friendly look.
May require weatherproof coatings for long-lasting durability.
3. Durability: Choosing Chairs That Last
Since hotel dining areas experience high traffic, durability is crucial. Investing in high-quality hotel furniture suppliers ensures that your chairs last longer and require minimal repairs or replacements.
Weight Capacity
Commercial-grade chairs should support at least 250–300 lbs (113–136 kg).
Sturdier frames can handle frequent use without weakening.
Construction Quality
Look for chairs with reinforced joints and solid frames.
Metal frames should be welded securely to prevent loosening over time.
Screwed or doweled joints in wooden chairs enhance stability.
Scratch and Stain Resistance
Choose materials that resist stains, especially if serving wine, coffee, or sauces.
Laminated or coated wood, stain-resistant fabric, or treated leather are good options.
Weather Resistance (for Outdoor Use)
Outdoor chairs should be water-resistant and UV-protected.
Avoid materials that fade or crack under sunlight.
Stackable or foldable chairs can help with easy storage.
4. Style and Aesthetic Appeal
Your hotel dining chairs should complement the restaurant's interior design and theme. Whether your dining space is modern, rustic, or luxurious, choosing the right chair style can elevate the ambiance.
Classic and Elegant Styles
Wooden chairs with carved details suit traditional or fine-dining setups.
High-back upholstered chairs add a luxurious touch.
Modern and Minimalist Styles
Sleek metal or plastic chairs in neutral tones work well in contemporary settings.
Simple, clean lines enhance a modern dining space.
Rustic and Industrial Styles
Raw wood, distressed finishes, or metal-framed chairs create an industrial look.
Earthy tones and natural materials pair well with a rustic theme.
Vibrant and Playful Styles
Bright-colored chairs or patterned upholstery add energy to a casual dining area.
Mix-and-match chair styles create a dynamic, trendy atmosphere.
5. Space Optimization: Choosing the Right Size and Shape
Hotel dining spaces vary in size, and choosing the right hotel chairs ensures maximum comfort without overcrowding the area.
Armless vs. Armrest Chairs
Armless chairs save space and allow more guests to fit around a table.
Armrest chairs provide extra comfort but take up more space.
Stackable and Foldable Chairs
Ideal for banquet or event spaces where chairs need to be moved frequently.
Easy to store when not in use.
Compact Designs for Small Spaces
Slim-profile chairs work well in small or crowded dining areas.
Chairs with a lower backrest create an open, spacious feel.
6. Maintenance and Cleaning
To keep your hotel chairs looking new and hygienic, consider ease of maintenance when selecting materials.
Cleaning Fabric Upholstery
Choose stain-resistant or removable covers for easy washing.
Use fabric protectors to prevent spills from soaking in.
Cleaning Wooden Chairs
Wipe with a damp cloth and avoid harsh chemicals.
Polish occasionally to maintain shine and durability.
Cleaning Metal and Plastic Chairs
Use mild soap and water to clean surfaces.
Avoid abrasive cleaners that may scratch finishes.
Leather Care
Wipe spills immediately with a dry cloth.
Apply leather conditioner to prevent cracking.
7. Budget Considerations
Balancing quality and cost is important when choosing hotel furniture suppliers. While it’s tempting to go for cheaper options, investing in high-quality chairs saves money in the long run.
Affordable Yet Durable Choices
Metal or plastic Hotel Room Chairs offer durability at a lower cost.
Wooden chairs with veneer finishes provide an elegant look without a high price tag.
Long-Term Investment
High-end upholstered or solid wood chairs may cost more but last longer.
Choosing timeless styles prevents the need for frequent replacements.
8. Customization Options
Many Hotel Study Table furniture suppliers offer customization to match your hotel’s branding and theme.
Custom Upholstery
Select fabrics or leathers that match your interior decor.
Add embroidered logos for a personalized touch.
Custom Colors and Finishes
Choose from different wood stains, metal coatings, or painted finishes.
Chair Shapes and Designs
Modify the shape of backrests or seats to fit your aesthetic.
Conclusion
Selecting the right hotel chairs is essential for providing comfort, durability, and style in your dining space. From material selection to maintenance and customization, every aspect contributes to a better dining experience for guests.
When purchasing chairs, always consider reputable Hotel Table furniture suppliers that offer quality products and customization options. Investing in well-designed, comfortable, and durable dining chairs will ensure a welcoming and enjoyable atmosphere in your hotel restaurant for years to come.
Also Read:
Furniture Manufacturers in Mumbai
Furniture Manufacturers in Delhi
Furniture Manufacturers in Bangalore
0 notes
Text
Title: The Essential Guide to Hardware: Choosing the Right Tools for Every Project
Meta Description: Discover essential tips for selecting the best hardware and tools for your home improvement, construction, or DIY projects. Learn which hardware items are must-haves for your toolbox. stainless steel casting
Introduction: The Importance of Choosing the Right Hardware
When it comes to home improvement, construction, or DIY projects, having the right hardware and tools can make all the difference. Whether you're a professional contractor or a weekend warrior, knowing which tools to invest in is key to getting the job done efficiently and effectively. In this guide, we’ll explore the essential hardware tools every toolbox should have and how to choose the best options for your needs.
Key Hardware Tools Every Toolbox Needs
Screws and Fasteners
Screws, nuts, bolts, and washers are the backbone of most construction projects. These fasteners come in various sizes, materials, and styles, each suited for different tasks. For example, wood screws are ideal for securing wooden surfaces, while drywall screws are perfect for attaching drywall to studs. Be sure to stock up on a variety of fasteners to ensure you're always prepared for any project.
Hammers and Mallets
A good hammer is essential for driving nails into wood or metal. You can choose from different types of hammers, including claw hammers for general tasks and sledgehammers for heavier demolition work. Mallets are softer and can be used for tasks where you need a less aggressive strike, such as driving dowels or assembling furniture.
Measuring Tools
Accurate measurements are crucial for any project, whether you're building a shelf or installing cabinets. A tape measure, level, and square should be in your toolbox for precise measurements. These tools help ensure that your work is level, straight, and correctly sized, preventing costly mistakes.
How to Choose the Best Hardware for Your Project
Consider the Material Different projects require different materials. For example, if you’re working with wood, you'll want screws or nails designed specifically for wood. For metal or masonry work, you’ll need specialized fasteners and tools. Always choose hardware designed for the material you’re working with to ensure durability and safety.
Prioritize Durability Investing in high-quality hardware pays off in the long run. Durable materials like stainless steel, hardened steel, or brass resist wear and corrosion, extending the life of your tools and fasteners. While the initial cost may be higher, the long-term savings and performance make it worthwhile.
Keep an Organized Toolbox A cluttered toolbox can make finding the right tool or hardware difficult. Invest in a tool organizer or a tool chest to keep your hardware easily accessible. This saves time and ensures that you have the right items at hand when needed.
Conclusion: The Right Hardware Makes All the Difference
Choosing the right hardware tools is essential to the success of your project. By selecting high-quality fasteners, tools, and measuring equipment, you set yourself up for a smoother and more efficient experience. Remember, preparation and organization are key to achieving great results, whether you're tackling a small DIY project or working on a large-scale construction job.
Call to Action: Ready to start your next project? Browse our selection of premium hardware and tools to find everything you need to complete your job with ease.
This type of article is structured to include SEO-friendly elements like clear subheadings, relevant keywords, and helpful tips, which help improve its ranking on Google and attract readers interested in hardware and tools.
1 note
·
View note