#FAT32 USB Stick
Explore tagged Tumblr posts
Visit Tumblr Blog
Explore Tumblr blogs with no restrictions, modern design and the best experience.
Last Seen Tumblr Blogs


ganzer-ralph-reichts-2-seamcloud
[StreamCloud] Ralph reichts 2: Chaos im Netz (2019) Ganzer Filme
1 post
Fun Fact
US Tumblr user growth rate is estimated to slow down to 4.1%.
Text
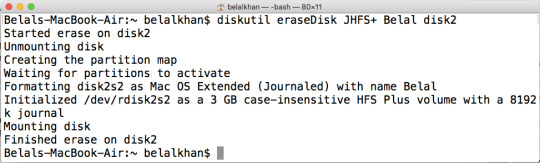
Mittels Datei Image einen FAT32 formatierten USBStick erstellen.
Dieses ist notwendig, um an Geräten wie dem #Amiga500MINI, TheSpectrum , C64 MINI + MAXI UND EBEN Auch den ATARI 400 MINI einen USB Stick mit zusätzlichen Spielen und Programmen nutzen zu können.
einen USB Stick benutzen zu können.
https://youtu.be/S8kbQKjbJCA
#FAT32#USB#Imager#Image#OnlyFAT32compatible#Rufus#FAT32 USB Stick#USB Stick bis 32GB#Retro#Atari 400 MINI#The Spectrum#Amiga 500 MINI#C-64 MAXI#C-64 MINI#VC-20 MAXI
0 notes
Text
Memory Stick: The Gum-Shaped Star of a Forgotten Tech Planet
A Meeting in the Circuit Desert
When I first wandered into the desert of old cameras and dusty laptops, I thought all storage devices were like the ones I’d seen—shiny, loud, and eager to prove their worth. But then I spotted it: a small, rectangular shape, half-buried in sand like a forgotten piece of gum.
“You’re… unusual,” I said, kneeling. “And you’re a child who talks to memory sticks,” it replied, its surface glinting faintly. “But some things outlive their planets. Ask the fox.”

1. The Gum That Outlived Floppy Disks
This wasn’t just plastic and circuits—it was a Memory Stick📀, born in 1998 on a tech planet called Earth. Let me decode its story:
Variants:
PRO Duo: Smaller, faster (32GB max), used in PSPs and cameras—like a sparrow in a world of eagles.
PRO-HG: High-speed for HD camcorders (now as rare as a baobab in the desert).
M2 Micro: Tiny for phones, but SD cards “won” (like a cactus losing to a rose in a garden).
Fun Fact: Shaped like gum, but it won’t melt in your car (unlike floppy disks, which dissolved like sugar in rain).
“Why gum?” I asked. “Sony thought it’d fit in pockets,” it said. “Turns out, it fit in hearts too.”
2. The Rose of a Closed Garden
On its home planet, the Memory Stick wasn’t just storage—it was a rose. Sony planted it in an exclusive garden: cameras, VAIO laptops, PSPs. No other flowers allowed.
“Why so picky?” I asked. “Ecosystem lock-in,” it said. *“Like a garden where only one rose blooms. It kept pirates out, too—MagicGate encryption for NSYNC MP3s. Even thieves love boy bands.”
But time passed. SD cards, the “universal” daisies, spread everywhere. Yet the Memory Stick survived—not because it was better, but because some gardens still needed its thorns: legacy medical gear, satellites, and retro gamers who whispered, “I remember when you were new.”
Roast Alert: SD Card: “I’m universal!” Memory Stick: “I’m in satellites. You cry in radiation.” 🚀

3. How to Love a Forgotten Star (In 2025)
Even old stars need care. Here’s how to keep a Memory Stick alive:
Adapters: Use a $5 “PRO Duo to SD” adapter—like teaching a cactus to grow in a new pot. Plug it into your laptop, and voilà: it speaks modern.
Formatting: Right-click, “Format,” choose FAT32. It’s like watering a desert plant—simple, but critical.
Bad NVMe?: Swap with a new drive. The Memory Stick won’t judge—its era was about loyalty, not upgrades.
“Do you miss the old days?” I asked. “Not really,” it said. “I’m just glad I still matter. Some roses don’t need gardens to bloom.”
4. Where to Find a Memory Stick (2025 Edition)
In 2025, it’s a treasure hunt:
New: Amazon or B&H Photo (Sony still sells them for industrial clients—like a baker keeping a rare recipe).
Used: eBay (vintage PSP bundles) or Akihabara (Japan’s tech desert, where nostalgia costs extra).
Adapters: $5-$10 on Amazon. Avoid “Rare Sony Stick!!” listings—they’re like overpriced baobab seeds.
Pro Tip: A 32GB Memory Stick costs $50? Walk away. It’s not gold—it’s just a gum-shaped star.

5. The Tale of Two Planets
Once, I met an SD card in the desert. We compared notes:
Capacity: SD holds 2TB (a mansion), Memory Stick 32GB (a cozy hut).
Speed: SD zips at 300MB/s (a cheetah), Memory Stick crawls at 20MB/s (a snail).
Price: SD is $20 for 1TB (a market stall), Memory Stick $50 for 32GB (a boutique).
“Why do people still choose you?” the SD card asked. “Because some things aren’t about size or speed,” the Memory Stick said. “They’re about history. And loyalty.”
6. The Star That Still Lights Up Skies
In hidden corners of the universe, the Memory Stick glows:
Medical: Stores patient data in Sony MRI machines—steady as a heartbeat.
Aerospace: Survives radiation in satellites—tougher than a desert storm.
Retro Gaming: PSP fans hoard them like rare stars—because some games only speak its language.
Burn Alert: USB Drive: “I’m cheaper!” Memory Stick: “I’m in the Smithsonian. You’re in a conference swag bag.” 🏛️
The Secret of the Gum-Shaped Star
The Memory Stick isn’t flashy. It doesn’t need a new planet or a trendy name. It’s the kind of friend you remember when you dust off an old PSP, or find an unopened pack in a drawer.
“What makes you special?” I asked, as I left. It didn’t answer. It just sat there, quiet as the desert, as the stars, as time itself.
And I realized—some things outlive their purpose. They become stories. And stories never die.
Written by a wanderer who once mistook a Memory Stick for gum. (Spoiler: It didn’t taste good. But it lasted longer.)
🌵 You become responsible, forever, for the stars you once loved.
1 note
·
View note
Text
See also: a USB stick with exFAT or FAT32
does anybody else have a discord server thats only yourself and nobody else exclusively used to send images from your mobile phone to your tablet or computer
44K notes
·
View notes
Text
Price: [price_with_discount] (as of [price_update_date] - Details) [ad_1] Product Description 2 in 1 Micro USB Y Splitter OTG Cable Micro usb otg firestick cable 2 in 1 Cable About this KIPZO Product : ✔ NOTE:Will not charge phones or tablets. If used on a mobile phone, it only supports the OTG function. ✔ Applicable:Add peripherals to your fire TV stick 4K or host device. As USB flash drives(Format must be FAT32), keyboards, mouse, external hard drives, USB card readers, game controllers. ✔ Advantage:Micro female port provide power for USB peripherals. Make sure your device's battery will not run out as quickly as other ordinary OTG cables. ✔Expansion: OTG cable for fire TV stick 4K compatible with the most popular streaming and media devices. ( NOT 1ST GEN sticks ). ✔ Does not apply to any micro USB Ethernet adapter. ✔ 4 inch perfect length 2-in-1 Micro USB OTG Cable. KIPZO on Indian electronics e-commerce platform offers a bunch of mobile, watch and computer accessories products to satisfy its customers need & to ease their daily style of living. In the year 2021 KIPZO started selling trending and innovative solutions like OTG, USB cables, HDMI / OPTICAL Connectors, Jointers, Chargers, Watch straps and many more. KIPZO with your continuous support is growing and maintaining a high standard for its customers on a long term based relationship. Our each product with the deep research is best at its performance to ensure you get the prime experience. FUNCTION : Can provide both power & OTG for TV Stick, PlayStation Classic, Google Chrome cast, Raspberry Pi Zero, NES N64 Nintendo devices and many other streaming media players powered by a micro USB charging cable. [ad_2]
0 notes
Text
How to Fix "Update Required" on Your HP 8210 Printer with a USB Stick
If your HP 8210 printer displays the error message, “A problem has occurred with one of the printer’s critical system files. A printer update will be installed to fix the problem,” don’t worry. You can fix it yourself with a USB stick and a few simple steps. Follow this easy guide to update your printer’s firmware and get it running again. What You’ll Need: A USB stick formatted to FAT32 Access…
0 notes
Text


Motherboard: Gigabyte Z390 Aorus
Export Bios Settings
Im Easy Modus (F2) kann man Q-Flash (F8) aufrufen und das Bios auf einen FAT32 formatierten USB Stick exportieren. Ich verwende als Dateinamen im orange farbigen Feld "F13", das ist die von mir installierte BIOS Version für dieses Motherboard.
Taste F12 erzeugt übrigens Screenshots vom BIOS Bildschirm auf den Stick. Nur des OC (OpenCore) Startmenü kann so nicht als Screenshot gespeichert werden (s.u. den blauen Screen, den habe ich mit dem Handy abfotografiert).


Mein PC verfügt über Windows 11 (24H2) und OSX 15 (Sequoia). Für die Startkonfiguration sind 2 Profile angelegt. Wird der Windows Bootmanager verwendet, bootet ausschließlich Windows.

Aber wähle ich das Profil OSX 15, wird der OpenCore Bootloader (REL-102-2024-10-03) aktiv und zeigt mir optional neben den Mac auch die Windows Startmöglichkeit an (das Screen Design habe ich etwas angepasst). Bootoptionen: EFI, Windows (SSD), OSX 14 (HD), OSX Sequoia (CCC Backup auf HD), OSX Sequoia (SSD).


Mein PC Tower verfügt über eine Glasscheibe auf der linken Seite. Mit dem Utility RGB Fusion können unterschiedliche Beleuchtungseffekte am Motherboard mit seinen Komponenten eingerichtet werden. Zusätzlich habe ich ein umlaufendes LED Leuchtband integriert.
Verbaut sind diese Festplatten:
1 SSD Windows (500 GB, NTFS)
2 HD (je 1 TB, NTFS)
1 SSD (500 GB, APFS)
1 HD (1 TB, APFS)
Dr. Andreas Korn, 12.12.2024
+ + +
0 notes
Text
AGECASH USB Thumb Drive 512MB USB Flash Drive 50 Pack with 50 Lanyard & Label FAT32 USB2.0 Flash Drive Bulk Jump Drive Multipack USB Memory Stick USB Drive Pack of 50 Pendrive Zip Drive for Project
http://i.securitythinkingcap.com/TDh6Rd
0 notes
Text
hoho, very wise and true!
gui format is a very powerful spell that allows thou to format anything as fat32... (the kind of format a 3ds will use), much unlike that weak and powerless format spell already available on windows computers....
thou may download the tool at this link here

from there, thou mayest select how much storage you wish to format (in this case, 32768 bytes), and thou may also name the drive to thine hearts content <3
but be warned... formatting will erase all previous contents from a drive. one must move important files to somewhere safe!
of course, wicked hardware manufacturers have been omitting sd card readers from modern devices... how might one get around this?

fret not! with only seven dollars, you may obtain:
A DONGLE OF POWER!!!!!!!!!!!!
(i do not endorse this magical item in particular, nor have i used this model and make before. this image was obtained as an example of many available adaptors upon the market)
with use of this device, or one similar, thou are free to use an sd card like a usb stick instead. GUI format will work just as well :)
now go forth, and claim the magic of your devices as your own!!!!!
REMEMBER TO HACK UR 3DS AND WII U BEFORE NINTENDO SHUTS DOWN THEIR INTERNET SUPPORT (April 8th)
#3ds#3ds hacking#nintendo#guiformat#tech tips#wizblr#tech#techno fantasy#wizard posting#wizardblr#tutorial
11K notes
·
View notes
Text
youtube
ZX Spectrum (The Spectrum - Replika) Hier testen / zeigen wir alle offiziellen 48 Spiele, die mit dem "The Spectrum" ausgeliefert werden.
Zu beachten ist aber, das man auch selber per FAT32 formatierten USB Stick weitere ZX Spectrum Spiele hinzufügen kann, auch die vom ZX Spectrum 128k
0 notes
Text
it was as if my whining post summoned the ups guy lol. got the package from the UPS guy came with the package. some initial thoughts:
those people were right when they said that the hinges felt a little flimsy. that display assembly does bounce in a way that isn't uh.... good.
i already despise windows 11 and I've used for a grand total of 1 minute. take meeeeee back.
I'm not a huge fan of the touchpad, but that's not a deal breaker because i already own like 5 different mice. once you go mac on touchpads, you never go back. it's one of those hardware things that apple really has gotten right. obviously the pinnacle of apple touchpads in my mind is the glass touchpad that they had on the plastic body unibody macs. the responsivity on that is *chef's kiss*. The gesture responsivity on the macbook pro touchpads is also fantastic.
I quite like the keyboard, the glowing blue backlight is fun and the chicklet keys are well spaced.
the fans are somewhat loud, but uh being a person of many old computers i am used to that. i think they're also just loud because the computer has so many vents that really let you hear that.
why do all modern laptops ever seem to only have like 2 usb ports, trash. it has always been one of my big complaints about macbooks and apparently people making pcs copied apple's homework on that. you would think that with all the space they saved on one side of the computer by not having an optical drive they could stick some bonus port in there, but noooo. no modern computer manufacturer is going to do this. we can't have nice functional port laden computers like the dell latitude xps (2003).
not a huge fan of the location of the charging port on this thing. also magsafe chargers on mac are the bomb and everyone should do that so that no computer suffers the death of my samsung pc (2010-2014) via cord trip (by way of cat).
haven't had a chance to really play around with it yet because i've been trying to figure out how to make a restorable system image of my old system (now only a hard drive) because the backup that I did have of the system, uh, got corrupted rip.
i feel clever because i tricked my new pc into booting to my externally connected old hard drive, thus enabling me to access my old system. There was enough hardware that used generic drivers for this to work. Notably however, the wireless lan card drivers were not the same, so the computer couldn't connect to the internet because it didn't know that it had a wlan card, which lmaooooo. fortunately i am fairly tech savvy, so I found out that the good folks over at msi offered downloads of the hardware drivers in their computers (a+ to them), and downloaded this driver installer to my macbook. I then found a flash drive, erased it using diskutil and reformatted it FAT32 so windows could read it. I then copied the driver installer to this flash drive, plugged the flash drive into the computer, copied the driver installer to the downloads folder, uncompressed it and installed it. With that installed, I was able to retrieve the other missing drivers, and the date/time mismatch error resolved. After some regedits and other tweaks, it was time to start the back up
the first backup did not work, but I think that had more to do with the peripherals getting yoinked in a way they did not appreciate. Going for a take 2 on the backup using the windows 7 legacy backup and restore tool from control panel. hopefully this works overnight and does what I want it to do.
#personal bs#computer issues plague me: the series#why must it take 2000000 years to make this backup??? i mean technically i know why but im still unhappy
0 notes
Note
I don’t want to be rude, but in regards to your post about New Girl and her usb stick, “how do i format a usb” is a genuine question. There are different formats a usb can be (NTFS, FAT32, exFAT). usbs formatted for Windows will not play nice with Mac and Linux computers. It is entirely possible to stick a usb into your computer and get an error message because the format is wrong. Some formats can transfer larger files than others. It is not as simple as making a folder.
She was asking how to create a folder and rename the folder. She was not asking how to format the usb. I was confused by the question because we typically dont format anything in our line of work.
36 notes
·
View notes
Text
Format Usb Flash Drive Mac Terminal
Dec 16, 2020 • Filed to: USB Recovery • Proven solutions
Format Mac Usb On Windows
Reformat Flash Drive Mac
Format Usb Drive Mac Fat32
Format Usb For Mac And Pc
Mac Os Format Usb Drive
Alternatively (in case the disk does not show up on your desktop), open Finder, on the sidebar menu locate your USB drive under Devices, right-click and select “Get Info.”. In the new dialogue, pay attention to General Format, where it says “MS-DOS (FAT32)”.
Terminal will then warn of the USB drive being wiped as part of the process. Type 'Y' and press enter. Leave the Mac alone as it formats and copies over the installer. Once Terminal says 'Install.
Right-click on it and choose 'Run as administrator'. Step 2: On the Command Prompt window, type diskpart and press 'Enter'. Step 3: Type list disk and press 'Enter'. According to the list disk information, check which disk is your USB flash drive. For example, disk 2.
Is there any feasible solution to format a USB drive in Linux?
If you are thinking the same thing, then today is your lucky day – as you have come to the right place. A lot of Linux users find it hard to format USB drives due to the restricted environment of the OS. Although Linux offers tons of advantages, it can be a bit tedious to work on at times. Worry not – as I'm here to help you solve this problem and format flash drive in Linux in two different ways. Apart from that, the guide has also included a quick solution to recover accidentally deleted data from a USB drive.
Part 1: How to Format a USB Flash Drive in Linux?
You might already know that Linux is one of the most widely used open-source operating systems in the world. While Linux is a kernel, it is presented through different distribution systems like Ubuntu, Fedora, Debian, and so on. Therefore, the GUI solution to format a pen drive in Linux would depend on its distribution system. Apart from that, you can also take the assistance of certain commands to access and format a USB drive in Linux. Let's discuss both of these solutions in detail.
Solution 1: Format USB Drive via Terminal (Command Prompt)
Terminal or Command Prompt is one of the most vital components in any operating system that lets us communicate with it via a command-line interface. Therefore, it doesn't matter if you run a Fedora or Ubuntu, you can take the assistance of certain commands to format a USB stick in Linux.
Step 1: Launch Terminal on your Linux system
There are different ways to launch Terminal on Linux. Firstly, you can just press the Ctrl + Alt + T keys at the same time to launch the Terminal window. Gnome users can also find it under Applications > Accessories. Also, you can go to the Dash widget on the GUI and search for 'terminal' as well.
Step 2: Identify the attached USB drive
Now, attach your USB drive to the system and let it detect it. To know its identifier, you can enter the '$ df' command. This will display a list of the connected media and disks with their details. For instance, in this case, it is identified as '/dev/sdc1'.
Step 3: Unmount the disk
When a USB drive is first attached to a Linux system, it is automatically mounted. To format the flash drive in Linux, we need to unmount it first. To do this, you have to enter the 'unmount' command, following by the identifier. In our case, we will enter the command: $ sudo umount /dev/sdc1
Step 4: Format the USB drive
Now, you can just format the USB drive in Linux by entering the 'mkfs' command. It will have a parameter that will decide the file system on the drive. Mostly, NTFS or FAT32 is recommended due to its compatibility with Windows. Here are the common possible ways to write it:
For the vFAT (FAT32) file system: sudo mkfs.vfat /dev/sdc1
For NTFS file system: sudo mkfs.ntfs /dev/sdc1
For the EXT4 file system: sudo mkfs.ext4 /dev/sdc1
Please note that the '/dev/sdc1' identifier can be replaced by the one in your Linux system for the connected USB drive.
Solution 2: Format USB Drive via the Disks Utility
If you have an advanced layer of Ubuntu or Fedora over the Linux kernel, then you can also use its graphic user interface to format a USB drive. For instance, Ubuntu systems come with an inbuilt utility program known as 'Disks'. To learn how to format a USB drive in Linux via its GUI, follow these steps:
1. Firstly, access the Disks Utility on your system. To do this, click on the Dash option on Ubuntu on the top-right corner. Make sure that the USB drive that you wish to format is connected to the system beforehand.
2. Type 'Disks' on the Dash search and when the relevant result is displayed, click on the icon to open it. You can also find the Disks Utility under its Applications as well.
3. This will launch the Disks Utility interface on the system. On the left panel, you can view the available internal and external storage sources. From here, select the connected thumb drive.

4. On the right, this will display various details of the USB drive. Click on the gear icon to visit its settings.
5. This will launch a dedicated window for formatting the disk. Select the file format and the type of formatting. You can also give the disk a new name as well. Once you are done, click on the 'Format' button and wait as Linux would format the USB drive.
Part 2: How to Recover Files from Formatted USB Drive in Linux?
There are times when users end up formatting a USB drive in Linux by mistake. To resolve this and get back your formatted data, you can take the assistance of a data recovery tool. For instance, Recoverit by Wondershare is one of the most trusted and effective data recovery applications for Windows and Mac. If you have formatted a USB drive accidentally on Linux, then unmount it first, and connect it to a Windows or Mac. Later, you can take the assistance of Recoverit to extract all kinds of lost or deleted content from it.
Video: How to Recover Lost Data
The application supports all sorts of USB drives with every major file format. The interface is also extremely user-friendly with an option to preview the data before restoring it. Here's how you can perform data recovery on a formatted USB drive using Recoverit.
Step 1: Connect the USB drive and select it
Firstly, disconnect the formatted drive from the Linux system and connect it to the Windows or Mac system on which Recoverit is installed. Launch Recoverit and check that the connected USB drive has been detected by it. Select its icon and click on the 'Start' button to scan it.
Step 2: Wait for the scan to be over
As Recoverit would scan the connected USB drive, you can wait for it to be completed. Although, you can pause the process in between and even preview its results as well.
Format Mac Usb On Windows
Step 3: Restore your data
Reformat Flash Drive Mac

In the end, you can just preview the extracted content like photos, videos, documents, etc. on Recoverit. Select the files you wish to get back and click on the 'Recover' button to save them on the location of your choice. Instead of restoring your data to the USB drive, prefer saving it on your system instead.
Format Usb Drive Mac Fat32
That's it! After reading this quick and informative guide, you would certainly be able to format the USB drive in Linux like a pro. As you can see, there are so many ways for Linux users to format a USB drive on their system. Apart from that, if you have accidentally formatted a pen drive, then recover your lost data with a tool like Recoverit. Go ahead and give its free version a try and share this guide with others to teach them how to format a pen drive in Linux as well.
Format Usb For Mac And Pc
USB Topic
Mac Os Format Usb Drive
Recover USB Drive
Format USB Drive
Fix/Repair USB Drive
Know USB Drive
1 note
·
View note
Text
Windows 10 Uefi Iso

Windows 10 Uefi Iso File Download
Windows 10 Uefi Iso Usb
PAGE CONTENT:
What Can You Do with a UEFI Bootable Disk
How to Create a UEFI Bootable USB Drive in 3 Ways
How to Boot Windows 10 Computer from UEFI Bootable USB Drive
Bonus Tip: How to Repair Hard Drive and Recover Data with a WinPE Bootable Disk
The windows 10 ISO supports booting both UEFI and Legacy Mode. Mount the ISO and Copy the contents of the ISO to your DVD Burner (a USB Stick is the preferred method of choice) Then use the F12 BootMenu to select the UEFI DVD Device as the Bootable device. After creating the UEFI boot USB drive of Windows 10 from ISO using CMD utility, you can insert the USB to the computer that you need to install operating system and boot from the USB drive to launch the 'Windows Setup' wizard and continue with the installation process.
What Can You Do with a UEFI Bootable Disk
A UEFI bootable USB drive can be used to complete an in-place Windows upgrade or clean install of Windows 10. It's also needed to start the system when your computer cannot be booted due to a virus attack, MBR damage, bad sectors, corrupted system files, etc. Once you can start your computer from the USB bootable drive, you can perform a disk check and repair. These are the two most important reasons to use a bootable USB disk. Other purposes include backing up systems, using portal operating systems on a foreign computer, and protecting computer data security.
But how to create a Windows 10 UEFI bootable USB drive?
We all know that there are two boot modes for computers: BIOS VS UEFI. If you have a computer with a Unified Extensible Firmware Interface (UEFI), instead of the legacy Basic Input/Output System (BIOS), you should know how to create a UEFI bootable USB drive on Windows 10.
There are several different ways to make a bootable disk in UEFI mode. Let's learn together.
How to Create a UEFI Bootable USB Drive in 3 Ways
In this part, we will introduce three common ways to create a bootable USB drive by using Windows 10 Midea Creation tool, Diskpart, and third-party software - Refus.
1. Create a UEFI Bootable USB with Windows 10 Media Creation Tool
If you want to create a UEFI bootable USB media for an in-place upgrade or clean install of Windows 10, you can use the Microsoft Media Creation Tool.
To create a Windows 10 UEFI bootable USB, prepare a USB flash drive with at least 8GB of capacity. Then use these steps:
Step 1. Download Windows 10 installation media from the official website of Microsoft.
Step 2. Run the exe file of MediaCreationTool. Click 'Accept' to agree to the license terms.
Step 3. On the Windows 10 Setup screen, select 'Create installation media (USB flash drive, DVD, or ISO file) for another PC'. Click the 'Next' button.
Step 4. Click 'Next' on the language, edition, and architecture screen. Select the 'USB flash drive' option, and click 'Next'.
Step 5. Select your connected USB flash drive from the list. And click 'Next > Finish' to complete the process. Wait for the Media Creation Tool to download the files and create a bootable USB flash drive that you can use to install Windows 10 on devices with support for UEFI and BIOS.
2. Create a UEFI Bootable USB on Windows 10 with Diskpart
With the built-in Diskpart utility, you can also create a Windows 10 UEFI bootable USB drive. Note that this solution requires command-line operations, so if you're not confident, you’d better choose a simpler graphical solution.
The process of making a USB bootable drive will erase all data on it. Remember to back up important files and data in advance.
Step 1. Connect your USB flash drive to the computer.
Step 2. Type CMD in the Search box, and right-click on the Command Prompt, and select Run as Administrator.
Step 3. In Command Prompt, type Diskpart and press Enter.
Step 4. Type the following commands in order, and press Enter after each one.
list disk select disk # clean create partition primary select partition 1 active format fs=fat32 (it means you format the drive with fat32 file system) assign exit
Step 5. Copy the Windows installation files to the USB flash drive. You can do this by simply using copy-and-paste. Then, the process of creating a bootable UEFI flash drive with Windows 10 finishes.
3. Create UEFI Bootable USB Drive with Rufus
If you have difficulty in creating Windows 10 UEFI bootable USB with Diskpart, you can use Rufus, an open-source program that allows you to create a UEFI bootable disk on Windows 10/8/7.
Step 1. Download Rufus from the official website: https://rufus.ie/en/.
Step 2. Connect your USB flash drive to the computer.
Step 3. Run this program and make the following main settings:
Device: Select your USB flash drive.
Boot selection: Select DISK or ISO image. And click the SELECT button to choose the Windows 10 ISO file from the folder location.
Partition scheme: Select GPT for UEFI.
Target system: Select UEFI (non CSM).
File system: Select NTFS.
On other options and settings, choose based on the actual situation. Then, click the START button to let Rufus create a UEFI USB flash drive.
How to Boot Windows 10 Computer from UEFI Bootable USB Drive
You can create a UEFI bootable USB drive on Windows 10 by taking any of the methods above. After successfully creating the boot disk, you also need to know how to boot your computer from the bootable USB.
Follow the steps below to start your computer from Windows 10 UEFI bootable USB drive.
Step 1. Connect the UEFI bootable USB disk to a dead, unbootable, inaccessible Windows computer.
Step 2. Restart your computer, hold F2/F11/Del to enter BIOS.
Step 3. Go to the Boot Drive section and set the UEFI bootable USB as the boot drive.
Step 4. Save the changes and exit BIOS. Wait for your computer to boot up from the UEFI bootable USB disk.
Bonus Tip: How to Repair Hard Drive and Recover Data with a WinPE Bootable Disk
When your computer cannot start, besides using the BIOS or UEFI USB bootable drive, is there another way to access the computer to fix errors and manage hard drives? Yes, you can resort to a disk management WinPE bootable disk by using partitioning software - EaseUS Partition Master.
With simple clicks, you can create an EaseUS Partition Master WinPE bootable disk and run it on your computer without system boot partitions. Then, you can repair and manage your hard drives with advanced solutions, or restore data by cloning the hard drive.
EaseUS Partition Master
Resize, merge, delete, create, and format partitions
Repair corrupted MBR that causes the hard drive to fail to boot
Clone hard drives to rescue data
Steps for creating a WinPE bootable USB drive with EaseUS partitioning software.
Step 1. To create a bootable disk of EaseUS Partition Master, you should prepare a storage media, like a USB drive, flash drive or a CD/DVD disc. Then, correctly connect the drive to your computer.

Windows 10 Uefi Iso File Download
Step 2. Launch EaseUS Partition Master, find the 'WinPE Creator' feature on the top. Click on it.
Step 3. You can choose the USB or CD/DVD when the drive is available. However, if you do not have a storage device at hand, you can also save the ISO file to a local drive, and later burn it to a storage media. Once made the option, click the 'Proceed' button to begin.
When the process finishes, you have successfully created an EaseUS Partition Master WinPE bootable disk. Now, you can manage your hard disks and partitions through the bootable drive whenever the computer fails to boot normally.
If you have RAID drives, load the RAID driver first by clicking Add Driver from the menu bar, which can help you add the driver of your device under WinPE environment, as some specific device cannot be recognized under WinPE environment without drivers installed, such as RAID or some specific hard disk.
Once the Easeus Partition Master bootable disk has been created, you can access your computer and the disk from this USB bootable drive for subsequent disk repair and data recovery operations.

Windows 10 Uefi Iso Usb
Wrapping Up
How to create a UEFI bootable USB on Windows 10? If you are still struggling with this question, you can find the answer here. You can create a UEFI bootable disk in four ways by using Windows 10 installation media, Diskpart, and Refus.
If you need to boot your computer from a USB bootable disk and manage or repair your disk in a WinPE environment, we strongly recommend you use EaseUS Partition Master, which enables you to clone failing hard drive to a new HDD/SSD.
1 note
·
View note
Text
Price: [price_with_discount] (as of [price_update_date] - Details) [ad_1] Product Description Dual Type-C Pen Drive 2 in 1 OTG 64GB/128GB Dual interface design In the digital age, the importance of data is self-evident. From work files to precious memories, we all need a reliable and efficient storage device to protect them. One end is the Type-C interface, which is perfectly compatible with popular Android phones, iPhone15, tablets and other devices; the other end is the USB-A interface, which can easily connect to the computer for fast data transmission. This design not only breaks the limitation of the single interface of the traditional USB flash drive, but also allows users to switch seamlessly between multiple devices. Type C Pen Drive Specifications Brand KOOTION Interface USB Type-A + USB Type-C Product Name USB Flash Drive Capacity 64GB,128GB Optional Read Speed up 70MB/S Write Speed up 20MB/S USB version USB 3.0 Default Format exFAT (Reformat to FAT32, NTFS is supported.) Weight 10g/0.35oz Size mini size of 63.5x17.8x8.4mm/2.5x0.7x0.3inch High Speed Pen Drive 3.0 USB Type-C and Type-A 2 in 1 design This dual USB C flash drive is designed with a USB A connector and a Type-C connector at each end, ending your hassle to resort to an extra USB stick when dealing with different USB devices. Fast Data Transfer High Speed USB 3.0 port is compatible with USB 3.0 and USB 2.0, which can help a lot to improve work efficiency. Easy Data Transfer This USB flash drive Type-C lets you move contents easily from your OTG Android smartphone, tablet, iPad Pro to your laptop, PC, or Mac computer. Reliable Performance The pen drive built-in aluminum alloy enclosure is with excellent heat dissipation, water-resistant, dustproof, and shockproof. Caps prevent the connectors from damage and Grade-A flashes always keep your data safe.
Portable and Easy to Carry Photo stick mini size makes you more like: Light weight, like the size of a lipstick, the size is 2.5*0.7*0.3 inches. it is also very convenient to carry, no matter where you are. The jump drive can be with you as long as you need it. Colorful Your Life Nice gift, keep up the picture, video and all the wonderful moment to the usb flash drive. How a meaningful and special gift for your friends, classmate, family and your lover. Memory Stick for Phone Widely Used You can plug and play on your smartphone, transfer files, and expand your phone's memory anytime.Use the pen drive to share photo and video as a gift.You can store Digital Brochures, Instruction Manuals, Software in the jump drive and provide it to the customers with your products or services.You can load a promotional video in the usb flash drive and provide it to your customers in an event.Can be used in schools, colleges, universities and other professional institutes to provide study material to their students. Note: 1.128GB USB flash drive: the actual usable capacity is about 115GB as some of the capacity is used for format of other function. 2.USB drive transfer speed performance may vary by capacities depending on host device, file attributes and other factors. 3. Android device requires an On-The-Go (OTG) function. Package Included: 1 x USB C Flash Drive OTG 2-in-1 USB Stick: Please make sure your smartphone supports OTG and turn it on before use. You can transfer data between devices by simply inserting a USB flash drive into the port Preserve Precious Memories: 128GB memory stick lets you carry 20,000 high-quality photos or 5000 average videos Plug and Play: The USB drive connect and work, you do not need to install any software, just connect the USB type C port of the computer or other devices and use it Stable Transmission: This USB 3.0 flash drive allows fast and stable data transfer. Read up to 70 MB/s and write up to 20 MB/s Actual storage is less than the capacity that listed on the page,nearly 117.76 GB [ad_2]
0 notes
Text
The usb stick is generic as possible, perhaps branded with a generic company name. It is formatted fat32 for maximum compatibility. The root drive has one folder, named generically as possible. Within that folder is an executable with a folder icon. The executable is named "porn". Opening this executable will, on the first attempt, do nothing. On the second attempt it will start deleting files - documents, downloads, things 5he user has regular access to.
1 note
·
View note
Text
Avi Und Mp3 Zusammenfьgen
MP3Tag ist ein Software zum komfortablen Bearbeiten von Tags, den Informationen zu Interpret, Album, Titel, usw. Danke für die Blumen, ich hoffe das Tutorial hilft weiter. Du sprichst da etwas an, dass mich auch schon seit längerem beschäftigt. Ich habe dies der Einfachheit halber aus dem Tutorial bewusst rausgelassen. Ich habe aber inzwischen einen neuen Submit geschrieben, der genau dieses Problem angeht. Bei der Recherche bin ich außerdem noch auf ein anderes Freeware Programm gestoßen, dass dir auch gefallen dürfte. Bitte berichte, was für dich am Besten funktioniert.
Dateien, die Sie codieren möchten, fügen Sie dem Warteschlangenfenster hinzu. Sie können Quellvideo- oder Audiodateien, MP3s zusammenfügen Adobe Premiere Pro-Sequenzen oder Adobe After Effects-Kompositionen zur Warteschlange der zu codierenden Objekte hinzufügen. Sie können die Dateien per Drag-and-Drop in die Wartschlange ziehen oder auf Quelle hinzufügen klicken und dann die zu codierenden Quelldateien auswählen. Timbre prides auf Sein der kompletteste Audioherausgeber und Provideodie herausgeber-APP, die überhaupt gebildet werden. Die populärsten Eigenschaften von Timbre sind der Scherblock MP3 Cutter u. mp4. Aber es tut viel mehr, Liede mp3 als einfach schneiden oder schneidenvideos, es auch die Funktionalität Ringtone Maker und MP3 des Bildschirmes Converter hat. Der Clou bei Lame ist nun, dass dieses Downside umgangen wird, indem die samplegenaue Länge des Stückes in den Header der MP3-Dateien geschrieben wird. foobar2000 kann diese Data auslesen, und spielt auch nur die gefüllten Samples ab. So kann man mit foobar2000 auch lückenlose AudioCDs brennen, oder die einzelnen Tracks per Converter lückenlos, dafür natürlich aber mit Qualitätsverlust durch erneute Umwandlung, zusammenfügen. Nun mit "File -> Add file(s)" das MP3 im mp3val öffnen. Es wird nun in der Liste angezeigt. Rechtsklick auf die Datei, "Scan chosen files for errors" anklicken. Je nach Größe derDatei kann die Überprüfung auch einige Minuten dauern! Das Programm ist fertig, wenn rechts neben der Datei entweder "OK" oder "Drawback" angezeigt werden. Wenn "Problem" angezeigt wird, so klickt man nochmals auf die Datei (und sieht auch in der unteren Fensterhälfte, was genau das Problem ist) und wählt "Repair selected file" aus. Auch das kann je nach Dateigröße und Tempo des PCs einige Minuten dauern. Bei OK passt alles - weiter zum nächsten Schritt. Für die Bearbeitung von Songs, die nicht länger als sieben Minuten sind, bietet sich dieses kostenlose MP3 Schnittprogramm an, die ebenfalls darauf verzichtet, die MP3s ins Wave-Format zu konvertieren. Die Software program eignet sich besonders, um am Anfang und am Ende des Songs ein wenig zu schneiden. Damit der Schnitt dann auch nicht zu abrupt wirkt, gibt es die Möglichkeit durch Fade-in und Fade-out Anfang und Ende des Tracks abzurunden. Das Free Studio ist ein Multimedia-Baukasten mit Werkzeugen für viele Zwecke, einige davon speziell für On-line-Movies von YouTube oder Dailymotion. Zu dem Programm gehören mehr als 20 Module, mit denen Sie zum Beispiel YouTube-Videos herunterladen oder dort veröffentlichen können, den Ton von Musikvideos als MP3-Datei sichern, Aufnahmen für bestimmte Ausgabegeräte konvertieren oder Clips schneiden. Dazu kommen Brenner und ein 3D-Picture-Maker. Wenn Sie über ein YouTube Benutzerkonto verfügen, MP3s zusammenfügen können Sie Ihre fertigen Werke direkt bei YouTube veröffentlichen. Zusätzlich wird Batch-Konvertierung unterstützt, was Zeit spart. Sie können mehrere Video- und Audiodateien in MP3 Audio, OGG Vorbis Audio, WAVE Audio, AAC Audio, MPEG-four Audio, http://www.mergemp3.com/de/ WMA Audio und Free Lossless Audio Codec gleichzeitig umwandeln.In Ihrem täglichem Leben brauchen Sie manchmal Lieder zusammenzuzufügen. Oder Sie möchten manche wertvolle Audiodateien zusammenfügen. Folgender MP3 Merger hilft Ihnen, alle MP3 nach Wunsch auf Ihr Laptop computer zusammenzufügen. Kostenlos downloaden Sie den MP3 Merger und folgen Sie die Schritte darunter. Wenn Sie MP3 auf Mac zusammenfügen möchten, können Sie eine Mac-Verison MP3 Merger downloaden. Die Methode der Benutzung ist gleich wie House windows.Speichere zunächst alle Dateien auf dem USB-Stick ab. Wichtig: Damit die PS4 das Gerät erkennt, muss es mit dem Dateisystem FAT32 oder ExFAT formatiert sein − bei NTFS geht es nicht. Um das zu überprüfen, klickst Du mit der rechten Maustaste auf den am Laptop-Bildschirm angezeigten USB-Stick. Anschließend wählst Du „Eigenschaften aus und suchst den Punkt „Dateisystem. Dort sollte die Data stehen, welches Dateisystem der USB-Stick hat.
1 note
·
View note