#FirmwareUpdates
Explore tagged Tumblr posts
Visit Tumblr Blog
Explore Tumblr blogs with no restrictions, modern design and the best experience.
Last Seen Tumblr Blogs


Fun Fact
In 2020, 44% of users from Denmark used Tumblr daily.
Text

Seamless OTA Firmware Updates for MeshTek IoT Devices This diagram illustrates the over-the-air (OTA) firmware update process for MeshTek's IoT devices. The latest firmware package is stored in the cloud and downloaded through a gateway or a mobile app. Once retrieved, the firmware is distributed to connected devices, ensuring consistent updates across the network. The diagram highlights the scalability and efficiency of MeshTek's self-healing Bluetooth Mesh network, which simplifies device maintenance and optimizes performance.
#MeshTek#IoTDevices#FirmwareUpdates#OTAFirmwareUpdate#BluetoothMesh#IoTConnectivity#SmartDevices#SelfHealingNetwork#IoTSolutions#WirelessFirmwareUpdate#IoTScalability#DeviceManagement#CloudFirmwareUpdate#SmartAutomation#EdgeComputing
1 note
·
View note
Text
Raspberry Pi 5 / RP1 chip support for Neopixels with Python bindings coming soon 🎉💡🖥️🌈🐍
Hot off the PIO-presses, our resident Jepler created a Python binding for the Raspberry Pi 5 that lets us use the RP1 chip
on the 5/500 series boards to drive Neopixels using PIO. This is great because we can now use Neopixels
and friends on the latest Pi boards, and we can use any pin because PIO is not limited by underlying peripherals. You do need the latest kernel and firmware, so it is not quite ready for prime-time, but once piolib
is more readily available, we'll be able to have folks test this out.
#raspberrypi5#rp1chip#neopixels#pythonprogramming#pio#raspberrypi#adafruit#technews#opensource#hardwarehacks#makercommunity#ledlights#diyprojects#pythoncode#hardwaredevelopment#microcontrollers#embeddedprogramming#ledart#firmwareupdate#raspberrypilovers#neopixelmagic#techinnovation#raspberrypiupdate#codingcommunity#makerspace#iotprojects#diyhardware#ledprogramming#technologynews#pythonista
10 notes
·
View notes
Text
How to Perform OTA Upgrade on the OKMX8MP-C Platform Based on Android 11 System
Ready to simplify your device updates?

Check out our comprehensive guide on performing Android 11 OTA upgrades for the OKMX8MP-C platform powered by i.MX8M Plus!
Learn how to build secure, incremental firmware updates with rollback support, keeping your industrial devices up-to-date and reliable.
0 notes
Text
Discover how to download, install, and use Dell Peripheral Manager effortlessly. Learn about its customization options, firmware updates, and troubleshooting tools. Get started today!
#DellPeripheralManager#DellSoftware#DownloadDellManager#TechSupport#DellAccessories#FirmwareUpdate#DellCustomization#PCOptimization#DellPeripherals#Windows10#Windows11#DellSetup#DeviceManager#TechGuide#TechTips#DellSupport#GadgetOptimization#DellDrivers#Troubleshooting#PCSoftware
0 notes
Text
Why is IoT device firmware important for my business?
IoT device firmware is the software that powers your IoT devices, enabling them to function properly and communicate with your network. It's crucial for security, performance, and device management, ensuring your devices operate efficiently and stay up-to-date with the latest features and protections.
#IoTDevice#FirmwareUpdate#SmartDevices#TechSecurity#IoTFirmware#ConnectedDevices#DeviceManagement#TechInnovation#SmartTechnology#IoTSolutions#iot platform#iotnbo#iot#software development#innovation#web development#iot applications#iot development services#bluetooth
1 note
·
View note
Text
Thinking about flashing your phone for more features or performance? 🪛 Our comprehensive guide walks you through every step safely & effectively. Flash like a pro!
https://allof-technology.com/a-complete-guide-to-phone-flashing/
0 notes
Link
https://bit.ly/4a2jHiK - 🌍 Zyxel has issued a security advisory for multiple vulnerabilities in their NAS products, specifically addressing an authentication bypass and several command injection issues. The vulnerabilities, identified by CVE numbers CVE-2023-35137, CVE-2023-35138, CVE-2023-37927, CVE-2023-37928, CVE-2023-4473, and CVE-2023-4474, pose significant risks to system security. Users are strongly advised to update their devices with the latest patches provided by Zyxel for enhanced protection. #CyberSecurity #ZyxelNAS #VulnerabilityUpdate 🔒 The identified vulnerabilities vary in their nature and potential impact. They range from improper authentication in the authentication module (CVE-2023-35137) to several command injection vulnerabilities in different components of Zyxel NAS devices (CVE-2023-35138, CVE-2023-37927, CVE-2023-37928, CVE-2023-4473, CVE-2023-4474). These vulnerabilities could allow both unauthenticated and authenticated attackers to execute operating system commands, leading to possible unauthorized access and control. #NetworkSecurity #CommandInjection #AuthenticationBypass 🔎 Affected Zyxel NAS models include NAS326 and NAS542, with specific firmware versions listed as vulnerable. Users of these models should refer to the advisory for the appropriate firmware patches. Zyxel’s proactive approach in identifying and addressing these issues reflects their commitment to customer security and product integrity. #FirmwareUpdate #NASsecurity #ZyxelAdvisory 💡 The discovery of these vulnerabilities was made possible thanks to the efforts of security researchers Maxim Suslov, Attila Szász from BugProve, and Drew Balfour from IBM X-Force. Their contributions underscore the importance of collaborative security research in identifying and mitigating potential cyber threats. #CyberResearch #CollaborativeSecurity #ThreatIntelligence 📅 As of November 30, 2023, Zyxel has released the initial advisory with detailed information on the vulnerabilities and the available patches. Users are encouraged to contact their local service representatives or visit Zyxel’s Community for additional information and support in addressing these security concerns.
#CyberSecurity#ZyxelNAS#VulnerabilityUpdate#NetworkSecurity#CommandInjection#AuthenticationBypass#FirmwareUpdate#NASsecurity#ZyxelAdvisory#CyberResearch#CollaborativeSecurity#ThreatIntelligence#ZyxelSupport#CyberSafety#TechCommunity
0 notes
Text
Troubleshooting Tips for Netgear Extender and Laptop Connectivity Issues
A Netgear WiFi extender is a handy device that helps expand your existing wireless network coverage in areas where the signal is weak or doesn't reach. For example, you may have WiFi dead zones in parts of your home or office that are too far from your main router. The extender connects wirelessly to your router, catches the existing WiFi signal, and rebroadcasts it using the same network name and password. This effectively boosts the range and fills in any dead spots, allowing you to get online from more locations.However, many laptop users run into issues getting their devices to connect properly to the Netgear extender network. You may notice lost connections, slow speeds, or not seeing the extender WiFi network at all during the scan for available connections. This inability to connect can be very frustrating when you can't get online.This article will provide several useful troubleshooting tips to help diagnose and fix the connectivity issues between your laptop and Netgear WiFi range extender. We'll outline key steps to get your laptop back online and connected through the extender network. Follow our troubleshooting guide below to resolve problems joining the extended network. Easy Steps to Fix a Netgear Extender That Won't Connect to Your Laptop1. Confirm the Extender is Working 2. Check Connectivity on Other Devices 3. Restart the Laptop and Adapter 4. Eliminate Any Viruses or Malware 5. Update Network Adapter Drivers and Firmware 6. Forget and Reconnect to the Network 7. Double Check Extender Password 8. Adjust Extender Placement 9. Change the WiFi Channel to Avoid Interference 10. Factory Reset Extender Read the full article
#connect#connection#connectivity#contactsupport#driverupdate#extender#firmwareupdate#laptop#netgear#Netgearextender#netgearextendersetup#netgearrangeextender#netgearsetup#netgearwifiextender#optimizewifiextender#password#reset#technicalsupport#tips#troubleshoot#troubleshooting#wifi#wificonnectivity#wifiextender#WiFiextendernotconnectingtolaptop#wifiextenderoptimization#wifiextendertroubleshooting#wifihelp#wifirangeextender#wifisetup
0 notes
Text
Unlocking the Power of MikroTik Router for Advanced Networking
In today’s connected world, a reliable and flexible network is vital for both homes and businesses. One of the most popular choices for advanced yet affordable network management is the MikroTik Router. Known for its powerful performance, versatility, and cost-effectiveness, MikroTik has become a go-to brand for network professionals, system integrators, and tech-savvy home users alike.

Why Choose MikroTik?
MikroTik offers a wide range of products including Cloud Router Switch, POE devices, and RouterBOARD units. Each device runs on RouterOS, MikroTik's proprietary operating system that enables robust network customization. From simple routing tasks to complex traffic shaping and VLAN Setup, RouterOS delivers enterprise-level features at a fraction of the cost.
Whether you're managing a small office or setting up a router for home, MikroTik routers are engineered to scale with your needs. Their wide range of routers and switches ensures seamless integration across various network topologies.
Features That Set MikroTik Apart
1. Advanced VLAN Setup
VLANs (Virtual Local Area Networks) are critical for network segmentation, especially in business environments. MikroTik makes VLAN setup straightforward through RouterOS, allowing administrators to isolate traffic and enhance network security with minimal configuration.
2. Powerful Firewall Rules
Security is a top concern in any network. MikroTik routers include comprehensive firewall rules that help control inbound and outbound traffic. You can create custom rules to block unwanted connections, prevent DDoS attacks, and safeguard sensitive data.
3. Effortless Port Forwarding
Need to access a server or camera remotely? Port forwarding on MikroTik routers is quick and efficient. With a few settings in RouterOS, you can open specific ports and control traffic direction without compromising network security.
4. Reliable Firmware Update
Frequent firmware updates keep your MikroTik devices secure and efficient. Updates often include performance enhancements, bug fixes, and new features that extend the functionality of your router or switch.
5. Versatile POE Support
For those using IP cameras or VoIP phones, MikroTik’s POE support (Power over Ethernet) simplifies device setup by combining power and data over a single cable. This reduces clutter and minimizes the need for additional power adapters.
Comparing MikroTik vs Ubiquiti
A common debate in networking circles is MikroTik vs Ubiquiti. While both brands offer robust networking solutions, MikroTik excels in customization and cost-effectiveness. Ubiquiti may offer a more user-friendly interface, but MikroTik stands out for users who want deeper control and scriptable configurations.
For advanced users or network engineers, MikroTik is often preferred due to the flexibility of RouterOS and the sheer variety of available tools. Whether it’s traffic control, bandwidth management, or setting up firewall rules, MikroTik provides granular control unmatched by most competitors.
Ideal Use Cases
MikroTik routers and switches are used across various industries including telecom, education, hospitality, and enterprise IT. Even as a router for home, MikroTik delivers far more functionality than traditional consumer-grade equipment. With advanced features like VLAN setup, port forwarding, and firewall rules, users can enjoy enterprise-grade performance at home.
If you're deploying a network with multiple access points, the Cloud Router Switch series provides excellent backbone support. Combine that with RouterBOARD for specialized applications and you have a complete network solution tailored to your needs.
Conclusion
Whether you're building a network from the ground up or upgrading your existing infrastructure, a MikroTik Router offers unmatched value and capability. With features like RouterOS, POE, firmwareupdates, and flexible switches, MikroTik is ideal for both beginners and professionals. From router for home to enterprise networking, MikroTik delivers reliable, scalable, and secure solutions.
0 notes
Text

For a client in Richmond, Virginia, we tackled a custom storage server issue and got everything back on track! Here's the scoop: Secured all internal and power cables, but the system wasn’t recognizing the hard drives ⚡ Followed remote support's advice to update the firmware 🚀 Reseated cables and reloaded the configuration 🔄 Hard drives are now showing in good health and everything’s working perfectly ✅ Performed thorough tests with the user and all systems are go! 👌🙌 Happy to keep tech running smoothly! #ServerSupport #TechFix #FirmwareUpdate #ITSuccess #Teamwork

0 notes
Text
Roku Tv HDCP Error or "Copyright Protection Error"
HDCP Error or "Copyright Protection Error" is a common issue that can occur on Roku TV devices when attempting to play protected content from various streaming services or external devices. This error typically arises due to compatibility issues with the High-bandwidth Digital Content Protection (HDCP) technology, which is designed to prevent unauthorized copying and distribution of copyrighted digital content.
#RokuTV #HDCPError #CopyrightProtectionError #StreamingIssues #HDCPTroubleshooting #DigitalRightsManagement #HDCP #HDMIIssues #TechSupport #RokuHelp #StreamingProblems #FirmwareUpdate #CompatibilityIssues #DeviceSetup
Hope you like this video. Please like, share, and subscribe to our channel.
youtube
0 notes
Text

Seamless Firmware Updates via Cloud-Connected Bluetooth Mesh Network
This visual represents the integration of cloud-based firmware updates with a robust Bluetooth Mesh network. The cloud securely delivers the latest firmware packages to all interconnected devices within the mesh network, ensuring reliable and synchronized updates. This approach enhances device performance, scalability, and connectivity while maintaining the efficiency of the network.
#BluetoothMesh#IoT#FirmwareUpdates#CloudIntegration#MeshNetwork#SmartConnectivity#OverTheAirUpdates#IoTTechnology#ScalableNetworks#IoTSolutions#SmartAutomation
1 note
·
View note
Text
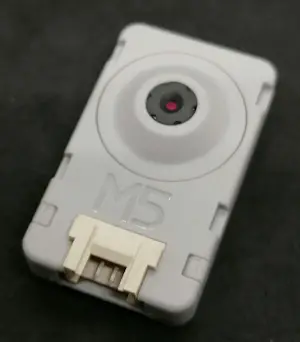
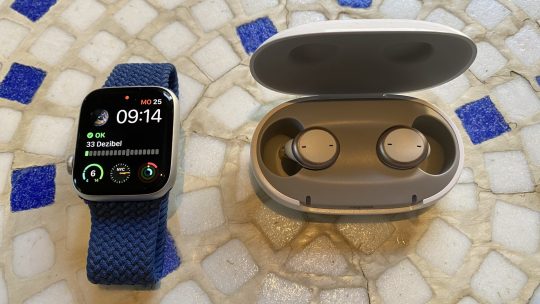
Kleine Kamera, große Leistung: Vorstellung der ESP32 S3 CAM von M5Stack

Was die kleine ESP32 S3 CAM von der Firma M5Stack leistet, erfährst du hier in diesem neuen Beitrag auf meinem Technikblog. Es gibt bereits diverse kleine Kameras von der Firma M5Stack, jedoch finde ich diese deutlich performanter und der Zugriff auf den Stream ist so einfach geworden, dass ich dir das hier gerne einmal zeigen möchte. https://youtu.be/UqutOVkcmqg Disclaimer: Der vorliegende Blogbeitrag dient ausschließlich der persönlichen Vorstellung und Bewertung der ESP32 S3 CAM von M5Stack. Ich möchte darauf hinweisen, dass ich keinerlei geschäftliche Beziehungen oder finanzielle Interessen mit der Firma M5Stack unterhalte. Die hier geäußerten Meinungen und Eindrücke basieren ausschließlich auf meiner eigenen Erfahrung als Käufer dieser Kamera. Jegliche Erwähnungen von Marken, Produkten oder Dienstleistungen erfolgen unabhängig und ohne jegliche Beeinflussung von außen. Der Beitrag ist als persönliche Rezension zu verstehen und soll lediglich informativen Charakter haben.


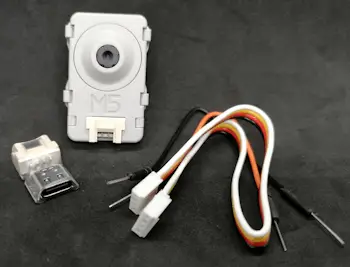
Bezug der M5Stack ESP32 S3 CAM Unit
Diese kleine Kamera bekommst du im offiziellen Shop von M5Stack für derzeit 14,9 $ (umgerechnet 13,53 €) zzgl. Versandkosten. Da die Versandkosten ziemlich hoch sind, schaue ich mich gleich im Shop etwas mehr um und bestelle gleich ein paar Sensoren / Aktoren etc. für die nächsten Projekte mit. Zubehör im Lieferumfang Zum mitgelieferten Zubehör gehört nicht nur die Kamera selbst, sondern auch eine kompakte Adapterplatte für die Integration mit Lego Technik. Darüber hinaus sind ein Grove-Kabel, zwei Jumperkabel/Breadboard-Kabel und ein Adapter von Grove auf USB-C enthalten, der sowohl für die Stromversorgung als auch für die Verbindung mit dem PC genutzt werden kann.
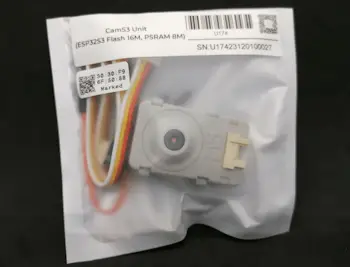
Technische Daten der ESP32 S3 CAM Unit von M5Stack
Hier nun die technischen Daten der ESP32 S3 CAM Unit von M5Stack: - Prozessor: Dual-Core mit 240 MHz (ESP32-S3-WROOM-1-N16R8), Modul mit integrierter Antenne - PSRAM: 8 MB PSRAM - Flash-Speicher: 16 MB Flash - Kamera: 200W Pixel @OV2640 - Unterstützte Ausgabeformate (OV2640): YUV(422/420)/YCbCr422, 8-Bit komprimierte Daten, RGB565/555, 8-/10-Bit Raw RGB-Daten - DFOV (Diagonal Field of View): 66,5° - Mikrofon: PDM-Mikrofon @MSM1261D4030HCPM - Speicherkarte: Micro SD-Karte - Betriebstemperatur: 0 - 40 °C - Gehäusematerial: Kunststoff - Produktgröße: 40 mm x 24 mm x 11 mm - Verpackungsgröße: 136 mm x 92 mm x 20 mm - Produktgewicht: 10,8 g - Verpackungsgewicht: 18,9 g
Stream von der Kamera empfangen
Den Stream der Kamera kannst du ganz einfach via Handy/Tablet und PC empfangen, alles, was du benötigst, ist ein WiFi Adapter. Die ESP32 S3 CAM Unit von M5Stack baut nach der Verbindung mit dem PC oder einem USB-Ladegerät ein eigenes WiFi Netzwerk auf (einen Accesspoint), zu welchem man sich verbinden kann.


Zu diesem offenen Netzwerk kannst du dich dann verbinden und im Browser gibst du die IP-Adresse 192.168.4.1 ein, du gelangst dann zu einer Seite, wo du eine Momentaufnahme als Bild speichern oder aber den Stream starten kannst. Zusätzlich kannst du noch eine Audioaufnahme starten und eine LED EIN/AUS schalten.
Speichern der Bilder im Intervall auf der SD-Karte
Nachdem ich ein Firmwareupdate mit dem M5Burner gemacht habe, konnte ich ein weiteres Feature freischalten. Es ist das Speichern von Bildern in einem Intervall auf der SD-Karte.

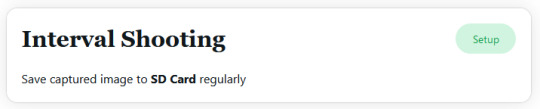
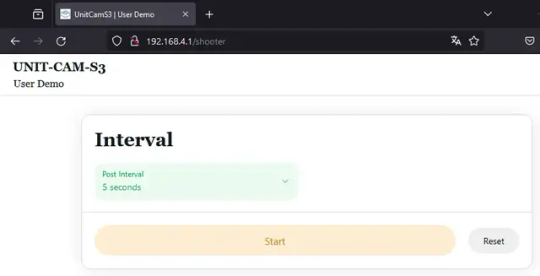
In meinem Fall habe ich eine 1 GB SD-Karte eingelegt und nach einem Klick auf "Update" wurde diese erkannt. Wenn wir nun auf "Setup" im Abschnitt "Interval Shooting" klicken, dann öffnet sich eine neue Seite, auf welche wir das Intervall einstellen können und den Prozess starten können.
Solltest du keine SD-Karte eingesteckt haben und trotzdem auf Start klicken, so wird dieser Prozess nicht gestartet, du erhältst leider aber auch keine Rückmeldung, dass die Karte fehlt.
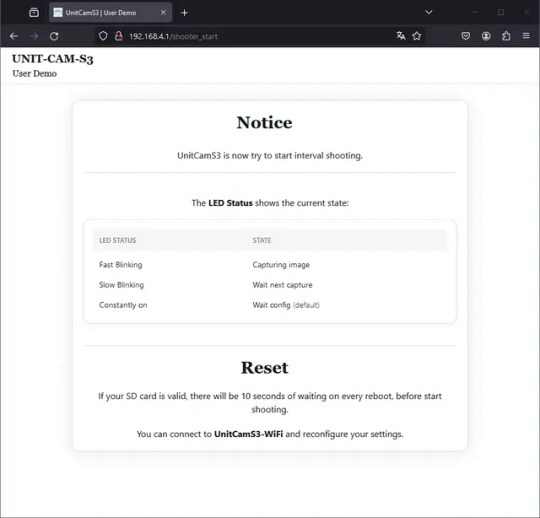
Wenn der Prozess gestartet ist, dann erhältst du eine kleine Seite, auf welcher du eine Erläuterung findest, welchen Status die LED einnehmen kann. Um die Bilder auslesen zu können, musst du die SD-Karte entnehmen und mit einem passenden Micro SD-Karten Leser mit dem PC verbinden. Ich empfehle dir dazu, die CAM jedoch zunächst vom Strom zu trennen, damit die SD-Karte korrekt getrennt wird. Auf der SD-Karte findest du jetzt einen neuen Ordner "captured" in welchem du die Bilder abgelegt sind. Die Dateinamen sind fortlaufend nummeriert und auch wenn du den Prozess neu startest, wird mit der letzten Nummer fortgesetzt. - Dateinamen sind fortlaufend nummeriert, - Auflösung 640 x 480 Pixel, - JPG-Format
Zugriff auf die Bilder via Image Poster
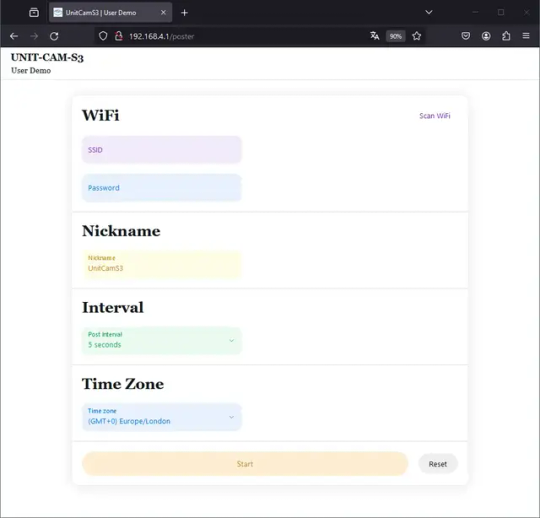
Die CAM Unit bietet dir noch ein weiteres Feature. Jedoch ist dieses, wie ich finde, nicht ganz zu Ende entwickelt. Du kannst die Bilder via Image Poster an den IoT-Service Ezdata senden und von dort außerhalb aus deinem WiFi Netzwerk abrufen.

Das klingt recht cool, aber dieses geschieht ohne Authentifizierung, d.h. jeder der diese Adresse hat, kann auf die Bilder deiner Kamera zugreifen! Zunächst musst du deine Kamera in dein lokales 2.4 GHz WiFi Netzwerk einbinden. Den Nickname kannst du individuell wählen, jedoch wird dieser später nirgends erscheinen. Als Intervall für die Aufnahme der Bilder kannst du wählen zwischen 5, 10, 30 Sekunden, 1,5,10 und Minuten. Die Zeitzone solltest du einstellen, denn in den Bildern wird dir zusätzlich ein Zeitstempel der Aufnahme angezeigt.
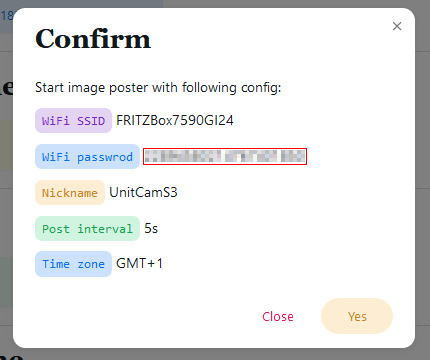
Wenn du nun alle benötigten Daten eingeben und die Schaltfläche "Start" geklickt hast, dann wird dir nochmal eine kleine Zusammenfassung angezeigt und dort musst du dieses nun mit Der Dialog wird dann mit der Schaltfläche "Yes" bestätigt und die Kamera verbindet sich mit dem WiFi Netzwerk. Dabei fängt die kleine blaue LED zu blinken an. In der Zusammenfassung erhalten wir einen QR-Code und eine Webadresse, von welcher wir dann die Bilder abrufen können. Zusätzlich wird auch hier eine Erläuterung gegeben, welchen Zustand die blaue LED einnehmen kann, um dir den aktuellen Status zu geben.
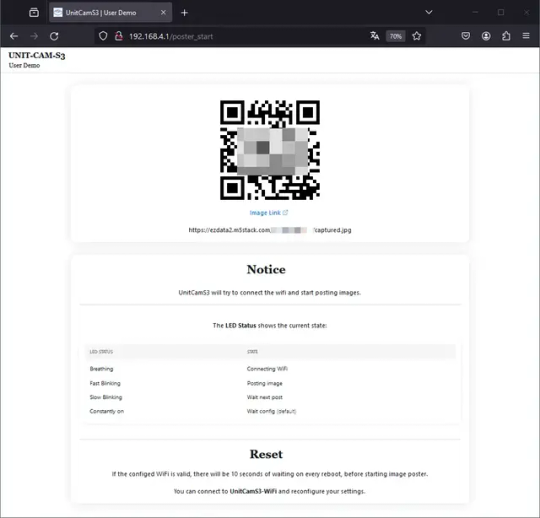
Wenn man nun die Webseite öffnet, dann wird das letzte Bild angezeigt, oben rechts findet man einen Zeitstempel und unten links einen Index mit der laufenden Nummer.

Nachdem die Kamera mit dem lokalen WiFi Netzwerk verbunden wurde, hast du immer nach einem Hardreset (Strom EIN/AUS) 10 Sekunden Zeit dich zum lokalen WiFi Netzwerk "UnitCamS3-WiFi" zu verbinden ansonsten startet der Prozess wieder automatisch.
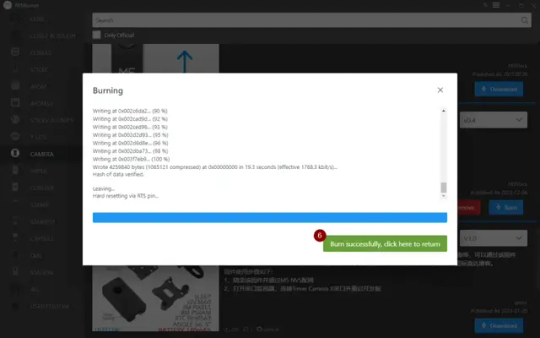
Firmware aktualisieren / erneut aufspielen
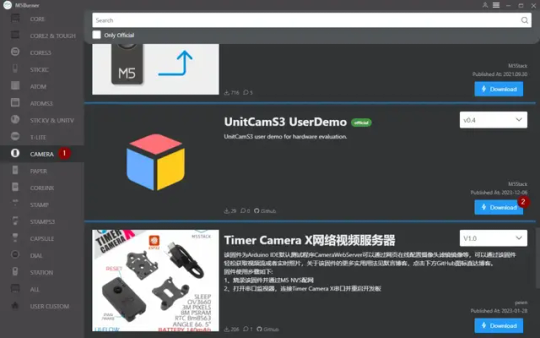
Damit ich alle hier gezeigten Features nutzen konnte, musste ich zunächst die ESP32 S3 CAM Unit mit der neuen Firmware bzw. dem UserDemo aus dem M5Burner bespielen. Dieses UserDemo musst du auch erneut aufspielen, wenn du, wie im letzten Abschnitt gezeigt, deine Kamera mit deinem lokalen WiFi Netzwerk verbunden hast. Das Tool, welches du benötigst, ist der M5Burner, diesen bekommst du für macOS, Windows und Linux unter https://docs.m5stack.com/en/download. Im M5Burner wählst du zunächst den Eintrag "CAMERA" (1) auf der linken Seite und scrollst danach zum Eintrag "UnitCamS3 UserDemo", um dort dann die Schaltfläche "Download" (2) zu klicken.
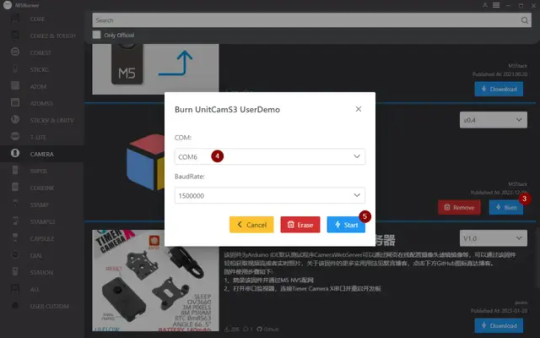
Im neuen Dialog wählst du nun den COM-Port aus, in meinem Fall hatte ich nur ein serielles Gerät angeschlossen und daher war gleich der korrekte Port ausgewählt. Die Baudrate solltest du so belassen! Mit einem Klick auf "Start" wird dann automatisch die neue Firmware überspielt. Wenn der Vorgang abgeschlossen ist, dann wird dir dieses durch die grüne Schaltfläche (6) angezeigt und du kannst dann das Tool verlassen.
Troubleshooting
SD-Karte wird nicht erkannt Wenn du die SD-Karte im laufenden Betrieb einsteckst und die Schaltfläche "Update" klickst, dann kann es vorkommen, dass diese nicht erkannt wird. Dieses wird dir mit einem entsprechenden Text und Smiley angezeigt.

Die Lösung in meinem Fall war recht einfach, ich habe die Stromversorgung von der CAM getrennt und wieder verbunden, quasi einen Neustart erzwungen. Danach wurde die SD-Karte korrekt erkannt.

Fazit zur M5Stack ESP32-S3 CAM Unit
Die kompakte Kamera zeigt eine beeindruckende Leistung, und der Livestream läuft geschmeidig. Obwohl sie nur über eine Auflösung von 2 MP verfügt, empfinde ich sie dennoch als ansprechend. Eine gute Beleuchtung ist jedoch entscheidend für ein qualitativ hochwertiges Bild. Read the full article
0 notes
Text
HP Thunderbolt Dock G4 280W und HP Fury 16 G9 geht nicht?
Ok, ich besitze ein HP Thunderbolt Dock G4 280W für mein HP Fury 16 G9 Notebook (i9, 1TB PCIe v4.0 NVME, 32GB Ram, Nvida A2000). This article is in german, because you can find the solution with google in English, but not in German. May the search engine be with me for German users, but you can click the link, it's the article I found in English from which this comment is based. Nun möchte ich das Notebook auch an einem anderen Arbeitsplatz verwenden, deswegen schnell bei ebay ein zweites HP Thunderbolt Dock G4 280W (ok, der Link geht zu Amazong... ist ein Affiliate-Link...) geschossen. Wird auch schnell geliefert, angeschlossen und... irgendwas ist komisch. Das Thunderbolt Dock schaltet sich ein, schaltet sich aus, schaltet sich ein... und so weiter. Das Dock scheint permanent zu rebooten/resetten. Es kann doch nicht sein, dass dieses Gerät kaputt ist - ich schreibe den Verkäufer an, aber der schreibt natürlich zurück, dass es bei ihm die ganze Zeit funktioniert hat. Gut, akzeptieren wir so. Dann habe ich ein paar Versuche gemacht. Mit meinem Netzteil, mit dem mitgekauften Netzteil. Nur Stromanschluss zum Notebook - ok, das klappt. Nur USB-C Verbindung: wieder Blinker-Fehler... geht an, geht aus, geht an, geht aus. Hm. Was tun. Ich frage Dr. Google und spezifiziere exakt beide Geräte und treffe auf folgenden Link. HP Thunderbolt Dock G4 280W Lösung ZBook Fury 16 G9 not working with G4 dock Das liest sich ja genau so, wie bei mir? Na gut, ich habe ein zweite Notebook mit USB-C, versuche ich mal ein Firmware-Update von dem Dock. Nun, die deutsche HP-Supportseite ist Mist. Dort konnte ich das Firmwareupdate für das Dock nicht finden (außer das hier HP Dockingstationen – Aktualisieren der Firmware für unterstützte HP Dockingstationen - also wer mit Linux oder Chrome OS updaten will, ist hier gut bedient, aber das Update mit Windows hätte ich schon erwartet). Das gibt es auf der US-Seite: https://support.hp.com/us-en/drivers/selfservice/closure/hp-thunderbolt-dock-280w-g4-w-combo-cable/2101085531?ssfFlag=true&sku= Bitteschön. Read the full article
0 notes
Photo

你今日更新左未? #A7iii #firmwareupdates https://www.instagram.com/p/BwHwR69BkRZ/?utm_source=ig_tumblr_share&igshid=1d4fpwucszjig
0 notes
Text
Fehlerprotokoll Signia Active Pro
Meine Hörsysteme scheinen einen Schaden zu haben. Ich erstelle ein Fehlerprotokoll der Probleme und berichte über die weiteren Schritte.
Die Signia Active Pro sind seit Dezember 2021 meine Hörsysteme. Sie funktionierten einwandfrei. Auch wenn die Komfortfunktionen der Made for iPhone (MFi) zertifizierten Hörsysteme manchmal nicht zuverlässig funktioniert haben, so liefen sie doch 8 Monate einwandfrei. Nach Problemen mit dem linken Hörsystem habe ich beschlossen ein Fehlerprotokoll zu den Signia Active Pro zu erstellen. Keine…
View On WordPress
0 notes