#Graphic Design Templates
Explore tagged Tumblr posts
Visit Tumblr Blog
Explore Tumblr blogs with no restrictions, modern design and the best experience.
Last Seen Tumblr Blogs


Fun Fact
Tumblr was named as a finalist in Lead411’s New York City Hot 125 in Aug 2010.
Text
The Best Place to Find Graphic Design Templates
In need of high-quality graphic design templates but don't want to spend a penny? Look no further than our free graphic design templates! From business cards to social media posts, our templates offer a range of options to help you create stunning designs.
2 notes
·
View notes
Text
How Social Media Templates Create Consistent Branding
Imagine scrolling through your feed and seeing a post that feels instantly familiar. That’s the power of consistent branding. I’ve seen how scattered visuals can confuse people. Social media templates changed that. They’re not just design shortcuts; they’re tools that bring order to chaos. Brands like Papirfly and Duolingo use them to keep their look consistent. So, how do social media templates…
#Brand Consistency#Brand Guidelines#Content Branding#Digital Marketing Templates#Graphic Design Templates#Marketing Collateral#Online Brand Presence#Social Media Branding#Social media strategy#Visual Identity
0 notes
Text
Design Brilliance Unleashed: RGBSpot's Graphic Design Templates
Embark on a journey of creative excellence with RGBSpot's Graphic Design Templates. Each template is meticulously crafted to simplify and elevate your design process, maintaining the highest standards of quality. Versatile and inspiring, these templates cater to both seasoned designers and newcomers, ensuring your projects stand out effortlessly. Explore a realm where innovation meets inspiration, and bring your unique visions to life with RGBSpot.com's Graphic Design Templates.
0 notes
Text


bubbly resources? f2u do not credit me i did not make them, dm for removal/credit join my server for stuff like these
#discord server#discord layouts#discord bios#discord profiles#bungo stray dogs#discord banners#pink rentry dividers#aesthetic#kawaii#mizuki akiyama#bubbly#rentry resources#carrd resources#rentry recourses#recources#web resources#web graphics#web decor#rentry graphics#graphic design#rentry template#rentry decor#rentryblr#rentry frame#rentry dividers#rentry stuff#editblr#bungou stray dogs chuuya#promo post
629 notes
·
View notes
Text
Flower Goth rentry frame and dividers 🦇⚰️ f2u!! Credit necessary (=^ ◡ ^=)


#aesthetic#art#cute#gothabilly#gothic#goth#goth aesthetic#rentry#rentry inspo#rentry decor#rentry graphics#rentry resources#rentry stuff#rentry template#rentry frame#frame#sntry decor#sntry resources#sntry graphics#sntry#sntry inspo#sntry frames#sntry template#sntry stuff#bundlrs#bundles#graphic art#graphic design#pfp icons#pfp mask
1K notes
·
View notes
Text

#black sails#had to make the damn meme myself cause i couldn't find the template. graphic design is my passion
299 notes
·
View notes
Text

CHARACTER TEMPLATE - Editable in Canva. #4
US$1,50: PAYHIP / DeviantArt / Ko-fi / Elements Free
FAMILY TREE
IMPORTANT
Do not republish or claim as your own.
Do not reuse my resources.
Credits are appreciated.
For personal use only.
Please do not share the link.
Editable in Canva.
IMPORTANTE
Não republicar nem revindicar como seu.
Não reuse meus recursos.
Créditos são apreciados.
Apenas para uso pessoal.
Por favor, não compartilhe o link.
Editável pelo Canva.
Para brasileiros via dm com valor ajustado
#rp template#rp resources#character template#rp promo template#rp resource#template#character sheet#oc template#discord rp#discord#discord oc#muse template#discord template#twitter#twitter rp#muse document#muse about#roleplay#rp help#mabel ; resources#supportcontentcreators#character psd#character design#character sheets#psd template#graphic template#template psd#rph#mabel ; canva studio#canva templates
136 notes
·
View notes
Text
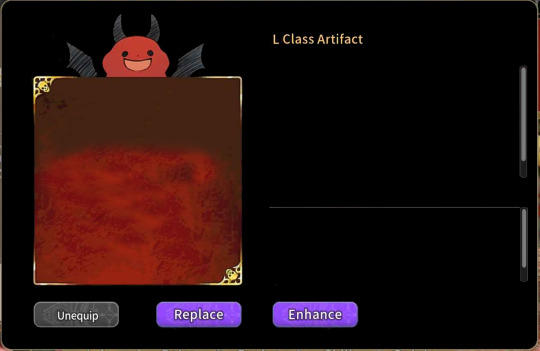
What in "Hell" is Bad Assets.
Hello WHB fandom,
As a benefactor of the Adobe Illustrator, I was able to recreate the Devils, Angels and Other templates. Also it applies to the Artefacts Templates modified with photoshoped with better easy access. Beyond that, I haven't decided to take the step into the Secret Club for obvious reasons.
These templates are fun time made.
They are for people with MCS, OCs of WHB fandom.
Please considerable to tag me if you use these assets. Need to be translated to another language? Please let me know and I will do what I can.
Static Assets are below the cut.
Edit: I'm adding the editable versions. Downloadable PSD
Character Info Card
Green (Angel), Blue (Other), Red (Devil/demon)


~~~~
Extra character template descriptions


~~~~
Artefacts Templates
Description / Artefact list

#stestylius: graphic design services#what in hell is bad#whb au#whb template#what in hell is bad template#whb oc#whb mc#whb devil#whb angel
200 notes
·
View notes
Text

#kirby#swearing#daily kirby#my art#digital#hal laboratory#nintendo#graphic design is my passion#I almost feel like I should upload a blank template for the news chiron even though I'm sure there's already thousands lol#(where the diagonals actually go together in some way instead of being slapped on with zero adjusting)
294 notes
·
View notes
Text

PROMO TEMPLATE HYACINTH.
free.
size ; 900x500, will be transparent on twitter !
for downloading, click on the title “promo template”
FILTER INCLUDED. but if you want only the filter, click here.
do not claim as yours please, you can credit me 'faustgraphs' and tag me I would love to see what you would do and reblog/retweet it !
if you want to support me here is my ko-fi ! or please donate to palestine for helping families to survive in those terrible days!
#editorial design#graphic design#psd coloring#rp psd#psd#coloring psd#coloring#work#character template#template psd#template#psd download#faustgraphs#free psd#rp resources#writing resources
470 notes
·
View notes
Text
0 notes
Text


HOLLOW BLISS - TUMBLR THEME interactive and highly custom theme for your blog

FEATURES: - tabbed content with interactive visuals - high customizability - ethereal 3d sidebar widget in three.js - vibes
DOWNLOAD HERE
[i took a poll on ko-fi asking which types of themes you guys would be interested in from me and it was an overwhelming vote for tumblr, so i decided to start focusing more on tumblr themes rather than neocities. i hope you guys enjoy the next few tumblr themes as much as i enjoy this one! purple is my thing.. ha, thanks for following<3]
#old web graphics#css#cybercore#html#htmlcoding#html css#web graphics#web resources#tumblr themes#artists on tumblr#on tumblr#tumblr theme#tumblr html theme#blog theme#theme#themes#blog resources#purple#web development#early web#old web#web decor#web design#web weaving#webcore#webdesign#webdevelopment#website#nhela#template
140 notes
·
View notes
Text
I just found a blog that dedicate their blog in dividers and line breaks and such. Let me just say, THANK YOU. YOU ARE MY SAVIOR. I NEEDED THEM! ( I thought Tumblr does it, and got confused when I don't have those fancy dividers when I started writing)
I haven't used tumblr for such a long time, I didn't know those blogs existed. Man, I felt old, trying to understand how tumblr work
If you or someone you know does blogs like those, please tag yourself or them in the comments please. In case someone like me needs them.
Credits will and should be given. <- This should already be obvious. Please take your time to read their rules.
Anyone wanting to know which blog I was talking about, it's @cafekitsune.
So excuse me while I work on my older work to add those fancy dividers.
129 notes
·
View notes
Text
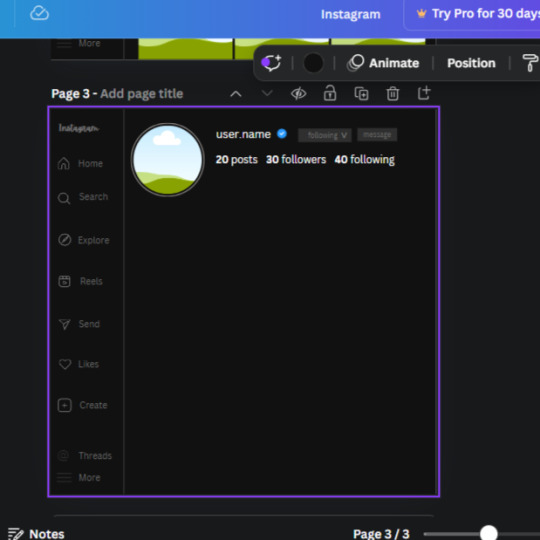
𓈒༷♪˚.✧ How to make a mockup like this for smaus, ocs, etc. (step-by-step tutorial ☆ no Photoshop, easy, free) (requested by @lovebittenbyevans) ✿
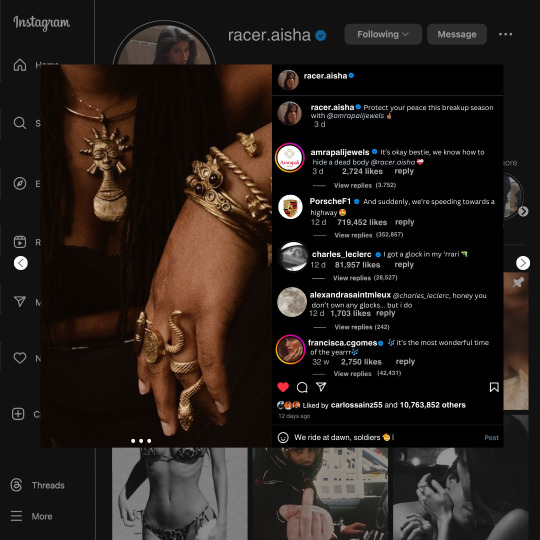
guys this took me two hours to make and you could probably get this done in like, 30 minutes :) I hope this is coherent <3 Please look back this image for comparisons, if my explanation is not well explained, etc.
first of all, if you dont already have one, make a free canva acount. once you're signed in, hit the purple "create design" button on the sidebar. A pop-up will appear with different design template options. For this design, we want the dimentions to be 1080 x 1080, so you can either make a custom size or choose the instagram post (square) template by either searching or scrolling through the list.

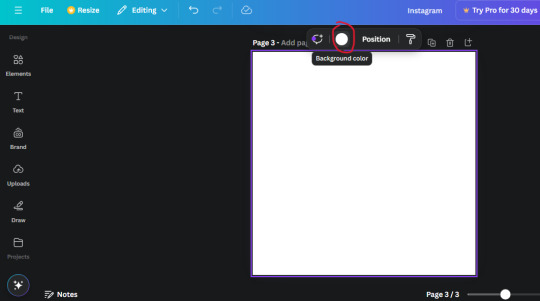
2. Now you have a blank page. Zoom in with the slider at the bottom of the page if you need to (Mine is currently zoomed in 41%). Click on the page and change the color to an off black (hex code #111111).
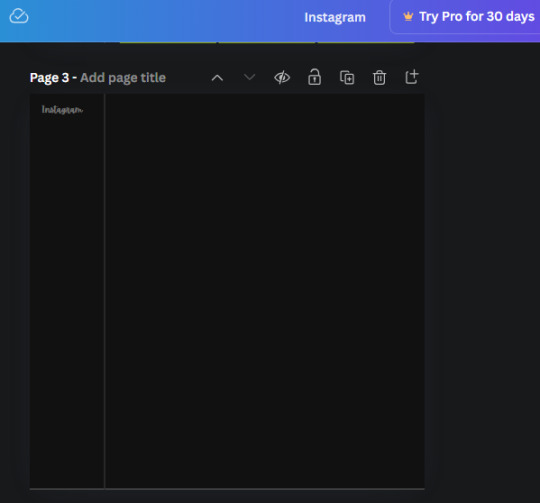
3. Now that the color is changed, click the "elements" tab and search "line". Click the shape and it will add it to the page automatically. These line are particularly hard to navigate and hard to get it at the right angle and length so this part might take a little longer than the rest.
4. stretch it from top to button and turn in a 90 angle so its straight on the left side of the page. Change the color of this as well to a grey tone (hex code #2F2F2F).
5. Now we'll add the Instagram logo. Click the "text" tab then click the purple "add text box" button. Write "Instagram" in the box and change the font to "apricots". This is the closest font I could find that resembled the logo font but if you find a better one, feel free to use that instead. Make the font size 19.3 (you can do this manually or do it in the text options). Change the color to grey color (hex code #707070). Add it to the upper left corner of the page like this:
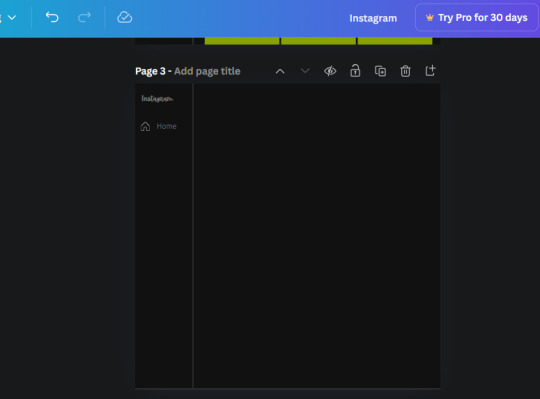
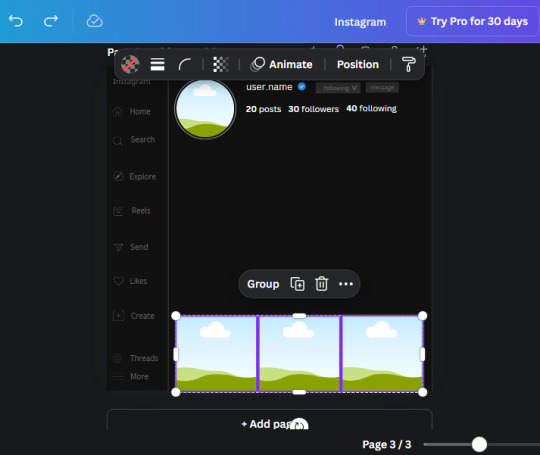
6. now we're adding icons and a menu inside the border we just made. Click the "elements" tab again and search for "instagram home icon" and add the element by sketchify to the page. Click the home icon, an options icon with pop-up above the page. Look for the "Position" button and click it. Scroll to find the advanced options and you can manually type in the width and height at 26.6 and 28.7.
Move it inside the border, under the logo (photo below). Change the color again (the hex code is #707070).
7. Open the text tab and add a text box. Change the font to Canva Sans and write "Home" in the box. Change the font size to 18.1 and align with with the house icon. It will look something like this,
8. Go into the elements tab again and search "instagram search icon". Scroll until you find the one by sketchify and add it to the page.
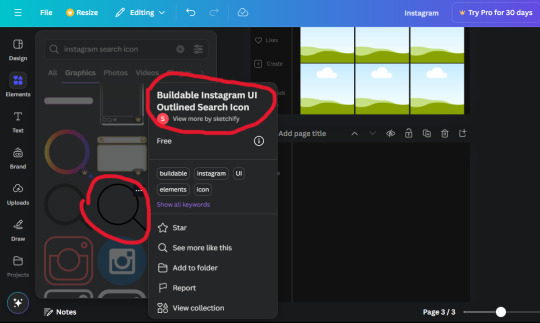
9. Shrink it so the W and H is at 36.6 and 31.3. Move it below the home icon until a purple "67" pop ups and aligns under it. Change it to the same color as the Home text and icon (#707070). Go ahead and Duplicate the the "Home" text box and clicking it and a pop-up will show up then edit the text so it says "Search" and align with the searcch icon we just added.
10. You know the drill. We are continuing to search up more icons in the "elements" tab. Search "instagram compass icon" and choose the one by sketchify (are u seeing the pattern?). Add it to the page and change the width and heigth to 33.1. align it under the search icon just like how we did before and change it to the say colors as the other icons.
11. Do the same as before and write "Explore" in a text box and align it with the icon. We're doing the same thing for all of these.
We'll be using the same search prompt for all of these icons so just change the type of icon you're looking for like we've done before hand. Next look for the Instagram reel icon and add the outlined one by sketchify and change the W and H to 31.2 x 30.9. Change the color to the ones we've used before, align it underneath the icons above and add your text ("Reels").
12. The next icon is an outlined, "sent" one. W and H is 31.1 x 27. The text will say "Send". Then an heart outline by sketchify; W and H is 34.2 x 29.1 and the text is "Likes". Next is the "create" outline icon by sketchify, W and H is 36.8.
(p.s if you are struggling to align the icons and text correctly, shoot me a message and I'll send you the X and Y positions ;D)
If you followed it through, it should look like this,
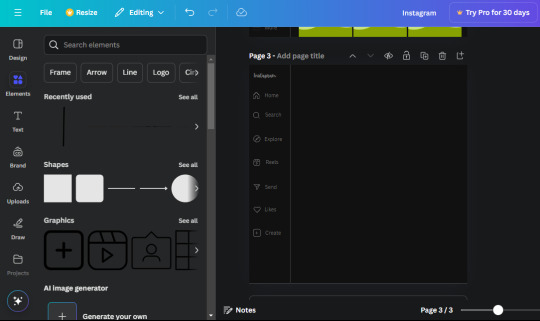
13. Now onto step 13, we'll be adding the Threads logo. You don't have to add this but to make it look more like the actual website, I will be adding it. Open the "text" tab and add a text box. Write an "@" symbol in the box and change the font to Nanum Sqaure and the size to 24.9. Add in the bottom corner below all the icons we just added to our page. We need another text box now (Color is still #707070), write "Threads" and align it to the "@" symbol.
14. We're adding another icon now. Search "Instagram menu icon" and find a wireframe menu icon by sketchify. the W and H are 42.5 x 24.6. Add a text box that says "More". It will look like this:
We are a quarter way done now :D
15. Search in the elements tab "circle frame" and look for the one with a little border around it.

At first, the circle will be green and inside the circle will be white. Change the white to color of the background of the page (hex code #111111) then change the green to a grey color (#8D8986).
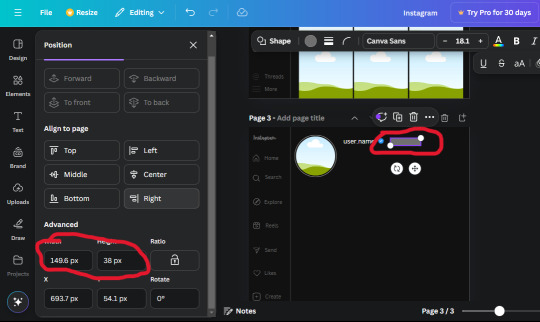
16. Add a new text box, change the font to Canva Sans and the size to 22.8 and the color is white. I just wrote "user.name" in the box. the W and H will be 153.3 x 35.7.
Enter the "elements" tab and search for a blue checkmark and find the icon by Victor Aguiar. The W and H is 28.1 by 28.
17. Search in the search box for a rectangular shape and add it to the page. Place it next to your username and checkmark icon and make the W and H to 149.6 x 38. Add another and place it next to the other rectangle shape. the W x H is 111.4 x 36.7.
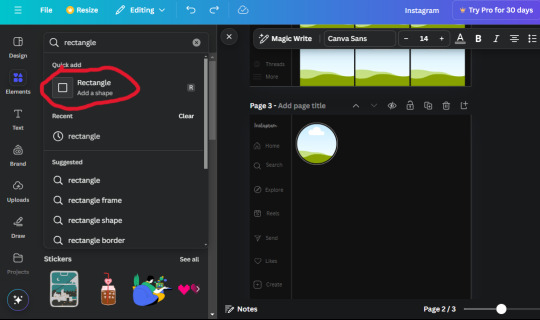
Change the color of both boxes to #2F2F2F. Add a text box and write "following" then change the W and H to 82.6 x 21.8 and fit it inside the first box. Add a second text box and write "message" in it then change the W and H to 77.8 x 21.8. Change both text colors to #7A7A7A

18. Add another text box. Write "<" and turn it upside down and place it beside the "following" text inside the rectangle. Adjust the size as you need to. I also like the round the corners to around 8 so its not so pointy and square.
19. Add 3 new text boxes. Write the amount of posts, the amount of accounts you're following and the amount of followers your have. Write "20 posts", "30 following" "40 followers". Bold the numbers and change the text W and H to 116.4 x 32.7. These are just place holders that I use.
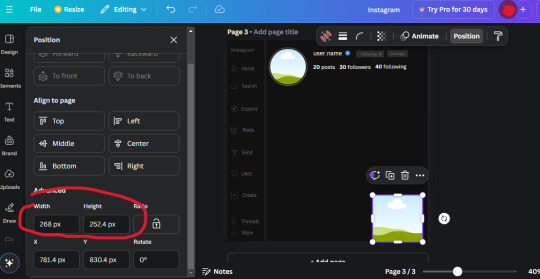
20. Open the "elements" tab again and search "frame". Choose the first one.
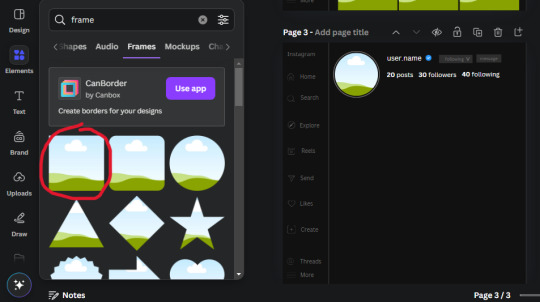
We want the height and width to be 268 x 252.4. Place it at the bottom of the page but we want some space between the frame and the page.
Now we'll duplicate the frame we just placed (the icon between the comment and trash can on the pop up above the frame). Place it next to the previous frame but we want to leave a bit of space between them like this:
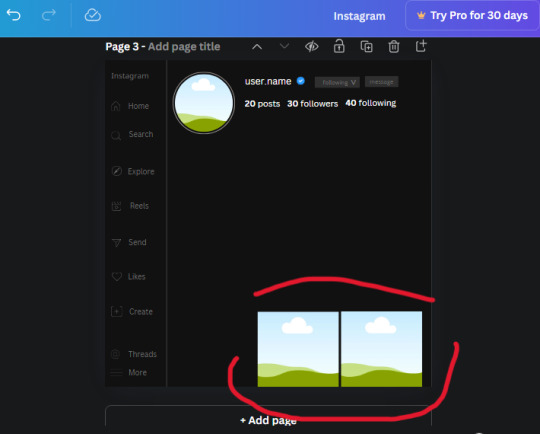
If its a little wonky, don't worry. You can always adjust it so it looks right.
Duplicate the frame again and place it next the second frame you just placed, same distance between. Make sure they're even. Now we have a row.
Select all three frames and duplicate them. Move them above our original frames but leave a little space between them.

Again, if they're uneven, adjust them as you need to.
21. Select the line again from the elements tab. Stretch starting from the top frame to the last frame and make the color grey (#2F2F2F).
Because the line is stupid hard to navigate, use something like a text box to mark where you want it to end like this:


Delete the text box and the line with be where we want it.
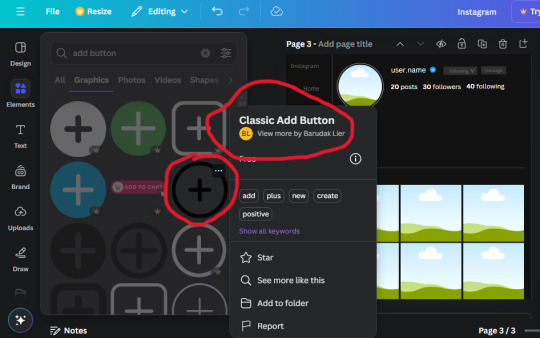
22. On to the highlight reels. Seach for "add button" and find the one by Barudak Lier.
Change the heigh and width to 81.1 and move it above the border.
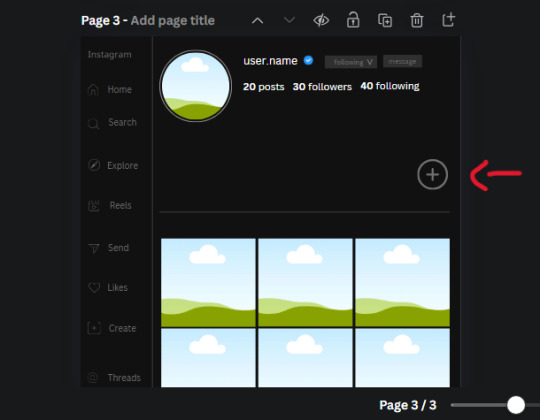
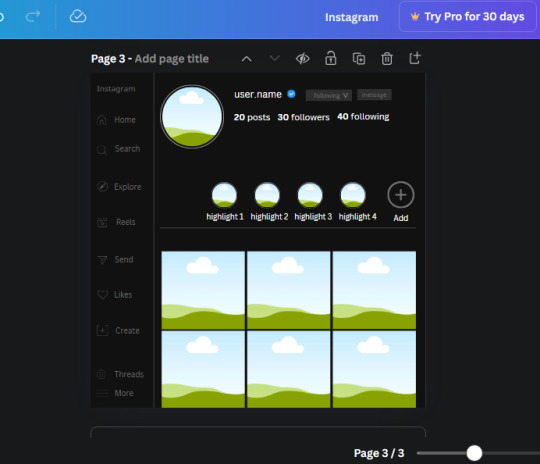
Search for circle frames now and add this one to the page (The same one we used for the pfp), change the width and height to 85.4 and move it next to the add button. Since this is a generic, blank template, I add about 4 of these highlight frames but you can do however many you want. You can change the border color to a gradient or leave it grey.
Add a text box now. The font will be Canva Sans, the size will be 18.1 and the color will be white. Change the text to "Add" and place it under our add button. Make more of these text boxes to place under the circle frames. Depending on which frame its under, write "Highlight 1", "Highlight 2", etc. etc. or you can give them different names and such.
23. Add another text box, write "name" and bold it, change the size to 19.1 and the W and H to 69.2 x 28.8. The font will be Canva Sans and the color will be white. It will go under the amount of posts, followings and followers.
Add another box. The font is Canva Sans, font size to 20.1, the W and H is 40.8 x 31.3 and the color is white as well. This is our "bio". Place it under "name".

Yay!🎉🎉🎉 You're halfway done!
24. Search for a shape in the elements. Look for the rectangle again and add it. Change the width and height to 460 x 760.4 and the color to an off black/grey color (#191919), placing it like this:
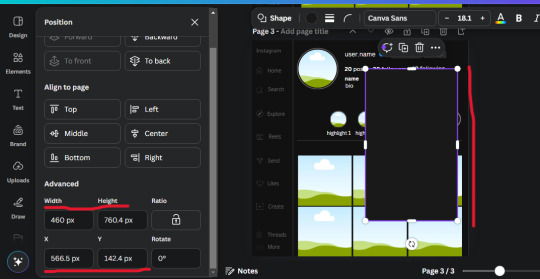
Get the same kind of square frame we used before to make the profile grid and make it the same size as the rectangle we just added. Place right up against the rectangle like it's its other half. Add another line like before and span across the upper half of the black rectangle as a border then add a circle frame inside the border.
Add a text box, "user.name" and align it with the frame. The text is white and the W and H is 111.5 x 25.9
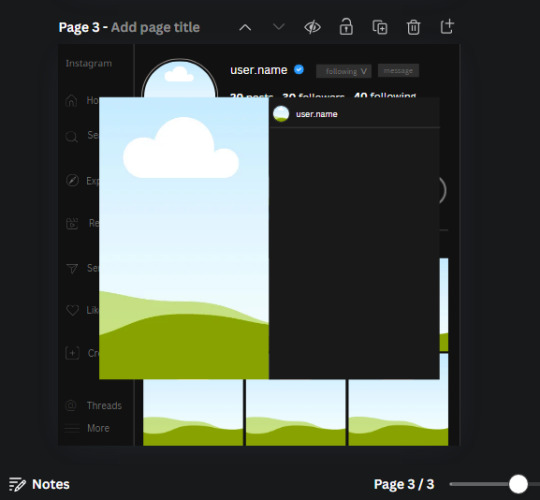
25. Add more circle frame along the inside of the rectangle to resemble the comment section. Make sure the W and H of the frames are 46.1.
Add more text boxes that align with the frames you just made and write "username" again and bold them. Add even more text boxes that align with the usernames and write "comment". These are place holders for when you decide to use this template.
Add another rectangle on the lower part of the rectangle and make the color black. and search for "instagram heart icon", "instagram comment icon" and "instagram send icon". Make sure the lines are thick. Find the heart icon by sketchify, and the the comment and send icon are by Mirazz Creations. Make the lines white and make sure the W and H are the following:
Heart icon: 38.7 x 32.9
Comment icon: 35.2 x 35. 8
Send icon: 35 x 32
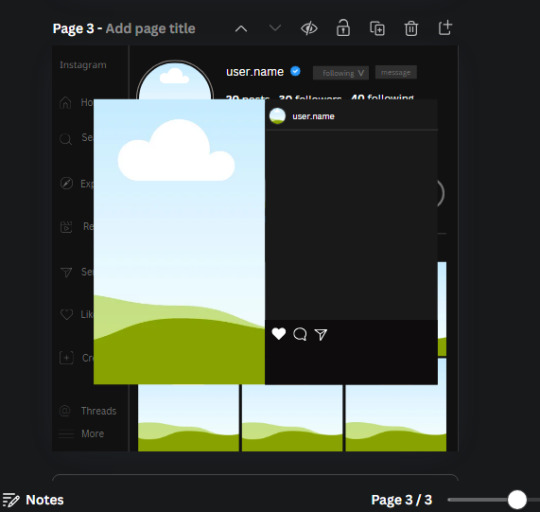
Next, look for "instagram bookmark icon" and find the one by Adricreative. Change the color to white and the W and H to 29.7 x 40.2. Move it to the other end of the rectangle.
26. Now add three circles frames and change the W and H to 37.2. Move them below the heart icon and have them overlap each other some. Then, add a text box and write "liked by username and 1000 others". Change the font size to 13.6 and change the font to Canva sans. the color will be white. Align this with the three overlapped frames.
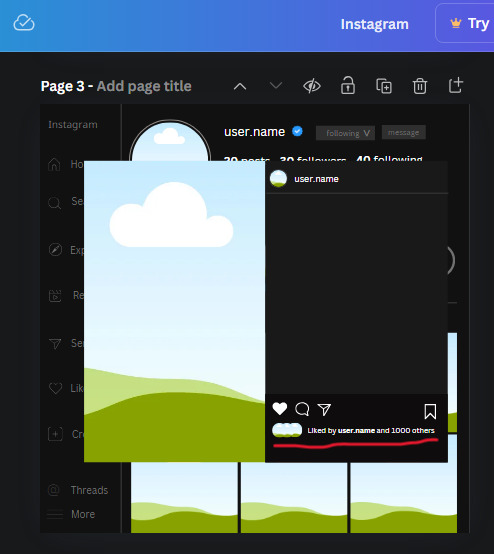
27. Look in the elements tab for an emoji icon and choose the one by Soni Soukell from Noun Project. The W and H will be 32.8 and the color is white.

Now add a another text box and write "Write a comment". The color will be white, the font size will be 14.2 and align with the emoji icon you just placed.
Search for "next arrow button" by Pixeden and make the W and H 42.8 then add it to both sides of the post.
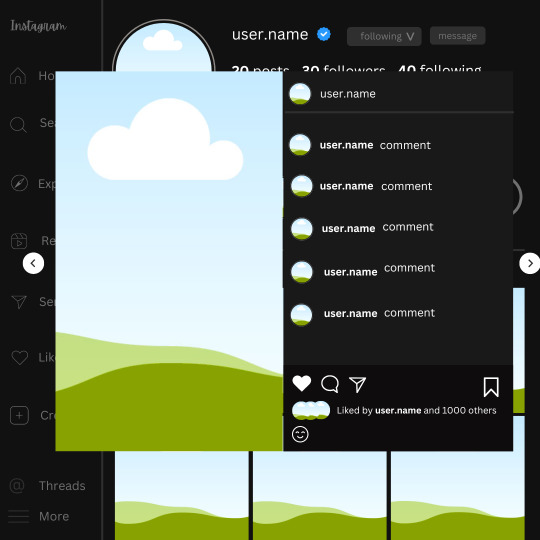
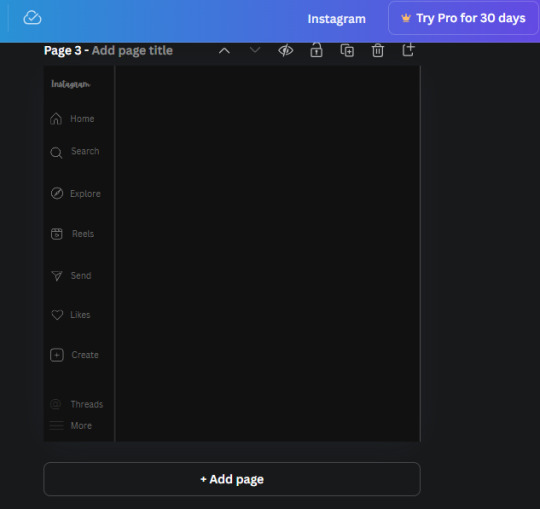
And you're all done with your template! All that is left to do is fill it but before doing that, duplicate the page so you always have an extra blank mockup if you want to use it again.
To fill the frames, upload an image (or use a Canva stock photo), drag and hover it over the frame and it will fill the frame.
Hope this was helpful and you you successfully made one :D <3
#requests#text#smau#template#mockup#moodboard#instagram#instagram moodboard#instagram mockup#graphic design#canva#psd#free tutorial#tutorial#instagram au#social media au#free psd#photoshop#resources#fanfiction resources#graphic design resources#graphic design tutorial#psd tutorial#photoshop tutorial#au#au ideas#mockups#digital design#digital design tutorial
170 notes
·
View notes
Text


# multiple theme ✮
very geometric and playful and messy so they end up together. free to use, credit if reposting and using for edits requests.
#★ :: personal hymn#cat#drip#design#overlay#shape#square#text#circle#cross#squiggly line#decorated#avatar mask#carrd resources#rentry graphics#rentry mask#rentry resources#rentry#image mask#web graphics#carrd#carrd inspo#carrd stuff#carrd material#template#resources
718 notes
·
View notes
Text

The white rabbit 🐇 rentry frame ! f2u w/ credit
#aesthetic#art#cute#rentry decor#rentry graphics#rentry frame#rentry template#rentry inspo#rentry resources#rentry stuff#rentry#rentry gif#rentry pixels#sntry frames#sntry stuff#sntry graphics#sntry template#sntry inspo#sntry#sntry pixels#sntry decor#sntry resources#graphic design#alice in wonderland#wonderland#white rabbit#bundlrs#bundles#cutecore#digital art
418 notes
·
View notes