#How To: Convert Gif File To Mp4-Tutorial For Converting Gif File to Mp4 or Video Gif to Videoifttt
Explore tagged Tumblr posts
Visit Tumblr Blog
Explore Tumblr blogs with no restrictions, modern design and the best experience.
Last Seen Tumblr Blogs


Fun Fact
Tumblr.com is the 103rd most visited website in the world.
Text
Quick GIF tutorial (Photoshop)


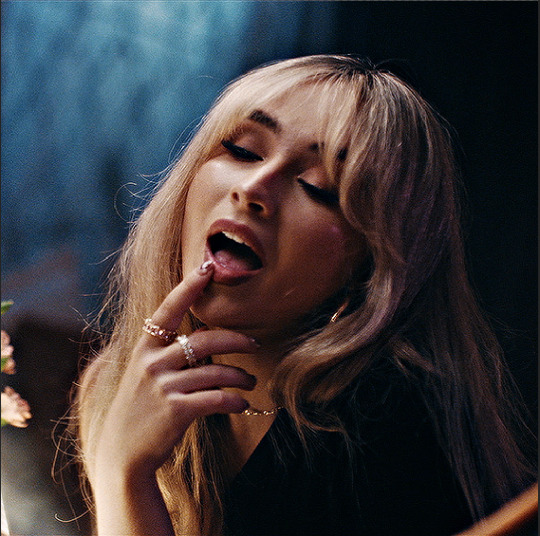
#holy shit this is perfection!!#i am so jealous of this set!#the coloring op THE COLORING!!! (original post)
alright @dontyouknowemma-itsyou and anyone interested, this was really easy to colour so I'm gonna give you a quick breakdown. (i didn't save the psd file?? so i'm redoing this i guess, but i did it on autopilot in the first place. i've been making gifs for over 15 years.)
GONNA INCLUDE A VIDEO AT THE END SHOWING OFF THE SETTINGS!!
General GIF stuff
This is in Photoshop CC. I extract a clip from a video as an MP4 file, which photoshop can open. (I use AviDemux for this, which is free, because it lets you save clips using 'copy' encoding for video output and still change from MKV to MP4 format - without losing any video quality, cause you're not re-encoding.)
Open that shit directly in photoshop as a video layer (just drag and drop), that lets you scan through it to check the colouring works overall. Convert the video layer to Smart Object, that lets you resize and edit it. (Do NOT open a full movie in Photoshop, it'll probably die and it has a max length anyway.)
Also all the colour adjustments are gonna be adjustment layers you can tweak and turn on/off whenever. There's a lil button at the bottom of the Layers window to add them quickly.
When we're done we're choosing a section of the video in the Timeline window and we're doing File->Export->Save For Web. 'Adaptive' (or selective) palette selection, 'pattern' style dithering.
Colouring
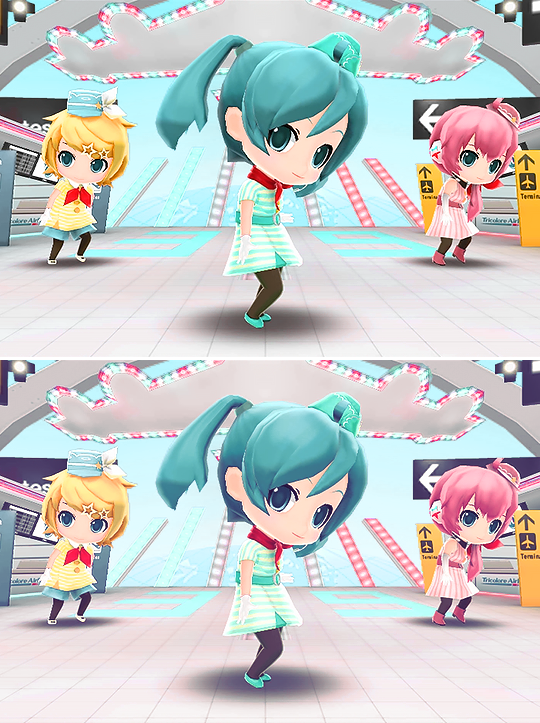
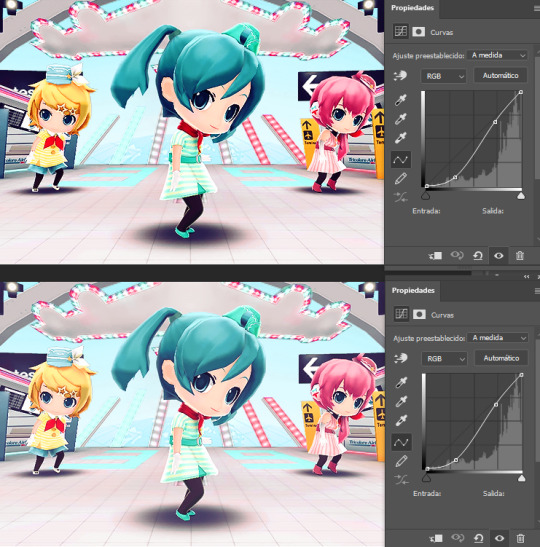
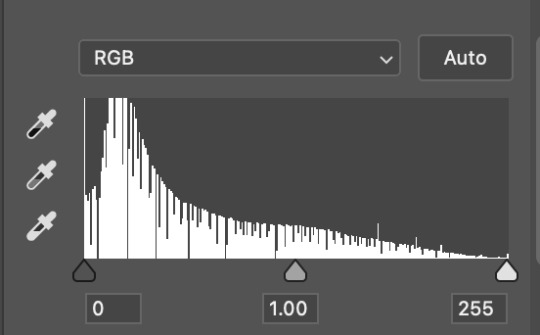
Curves layer to lighten. Just pull the curve up. Curves seem to give a much smoother lightening, since it mostly affects the middle, leaving the brights and the darks where they are.
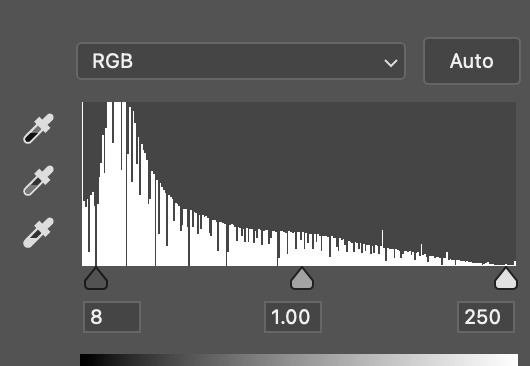
Levels to make the darkest darks pure black, and the lightest lights pure white. Good for limiting GIF size. Don't overdo it though.
Colour balance!! My beloved, most important. So for the Shadows and Highlights, you're gonna move the sliders towards Cyan and Blue, but for the Midtones you're gonna do the opposite - towards Red and Yellow. This means you don't shift the overall colour of the picture, but trust me it does SO MUCH for the contrast and colour. I swear I do this for almost any edit, and also my art tbh. Also if the original clip is like very green or whatever, you can correct that here.
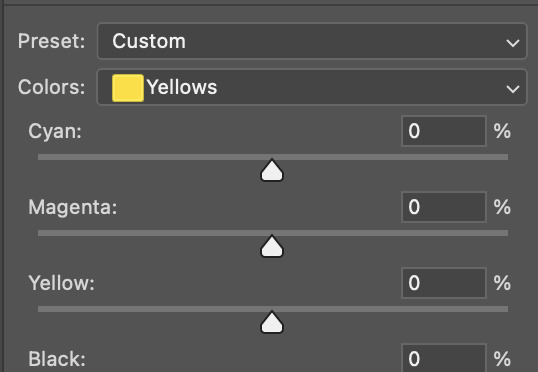
Selective colour. For this I did one thing. For 'Black' dropdown, I upped 'black' and 'yellow' sliders (the latter to counteract the blue in the darks). This in combination with:
Levels again. Bring in those darks, turn them pure black. Basically this does a couple things. It preserves GIF file size, by making sure the dark areas are static (file sizes mostly depends on pixels that are CHANGING). It ALSO makes the palette much more optimized, meaning you don't waste palette on the darks no one sees anyway, and instead uses them in the mid range colour variation, giving much smoother gradients. That's it!! That's all the colouring!!
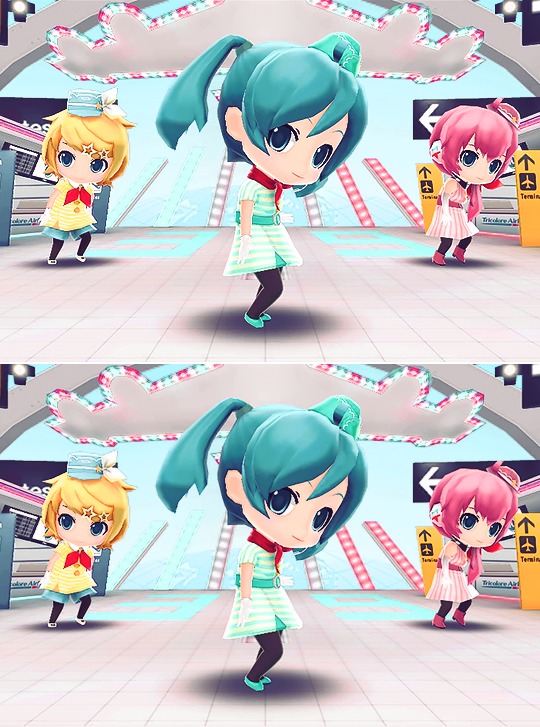
EDIT: Uh I probably also had a Vibrance layer?? Idk. This just ups the saturation, but it's softer than upping Saturation. Makes the colours pop without overdoing it.
Other tips and tricks
Often I'll put a Smart Sharpen (50% amount, 0,5px radius) filter on the video layer, just to make it a bit crisper. Subtle but effective.
You can manually edit the palette when you save as a GIF, either to reduce file size, or because some colour areas look pixelly. See the video for how.
If your file size is huge but you don't want to shorten or resize, you can reduce the frame rate manually. To do this, FIRST save the GIF, then open the GIF you just saved. Go through in the Timeline window (which is now a Frame Animation rather than a Video Timeline), select every other frame, and delete them. When you do this, remember to select the rest of the frames and double their Frame Delay so you don't end up with a super speedy GIF. (You can also make a GIF slow-mo like this.)
Since the video is a smart object, I literally just resized it in between saving the different GIFs, to change composition between the different shots.
Selective Colour layer can be used for a lot of image tweaking. For example, if something is overly yellow or green, I may go to the Yellow and Green in dropdown and just reduce the yellow slider. (I usually then go to Red in dropdown and ADD some yellow to that, to balance out the reds to be less pink.) Or maybe the overall colours are nice but the blues are dull, so I'll just go to Blue/Cyan and tweak those specifically.
If you have a colouring you like that you want to use on lots of things, remember you can drag-and-drop layers between different images. You can also save a photoshop file with nothing but those layers, to use on later gifs and just tweak as needed. (You can also make Actions to automate stuff, but I won't go into that.)
How easy or hard something is to colour HUGELY depends on the original video, both lighting/colouring and video quality.
Finally the video showing settings!
This is like 5 minutes long and has no commentary or anything. This is mostly to show off where you find each individual thing, and what difference it makes in the colouring.
ANYWAY hope someone found this useful!!! ♥
#next to normal#gif making#photoshop#gif tutorial#photoshop tutorial#my posts#my gifs#art things#tutorials#PS if you can't afford Photoshop then just you know.... yo ho ho and all that
121 notes
·
View notes
Note
hi nic!! do u have a tutorial on making gif packs?? i've been trying to look for tutorials and i think i just overwhelmed myself so i dont know where to start :((
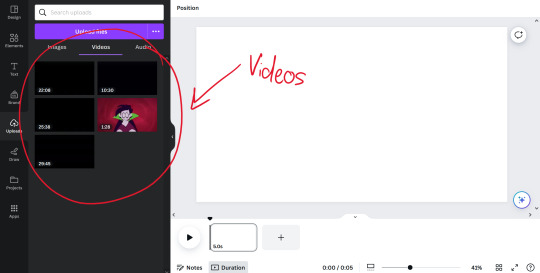
omg hi!! i know a tutorial for this method exists, but i cannot seem to find it 😭 i'll go ahead & make one for you ! beneath the cut, you'll find my gifmaking process + all my favorite gif resources. i think something good to note is that every gifmaker i know does it a little differently, so you may prefer other methods like screencap clipping or video-to-layers. i think these tutorials by pochunts would be super helpful if you wanted to explore other options <3 here's the gif i made in the tutorial btw :p

how to make gifs using photoshop's video timeline (+ extra resources):
(if you want to follow along directly, i'm using this video.)
1) download your video. i use this website (cobalt). for the cleanest final product, try to use videos that are 1080p or higher.
side note: if you're downloading something other than mp4 files, you'll need a file converter- i use handbrake for this. this tends to come up if you're downloading tv shows!!
2) open your video in photoshop. (not import, just regular file > open)
this is what mine looks like now. our layouts may look a little different because mine is tuned to my job too.
if you're new to photoshop, go ahead & pinpoint a few things: your toolbar (yellow), actions panel (pink), adjustments panel (green), layers panel (blue), and video timeline (red). if you don't see these panels, go to window in your topbar & click the names.

general photoshop tip... go to photoshop > settings > preferences and 'up' your number of history stats. this will give you more 'undos' if you mess up rather than hitting a wall :p i have mine set to 75!!

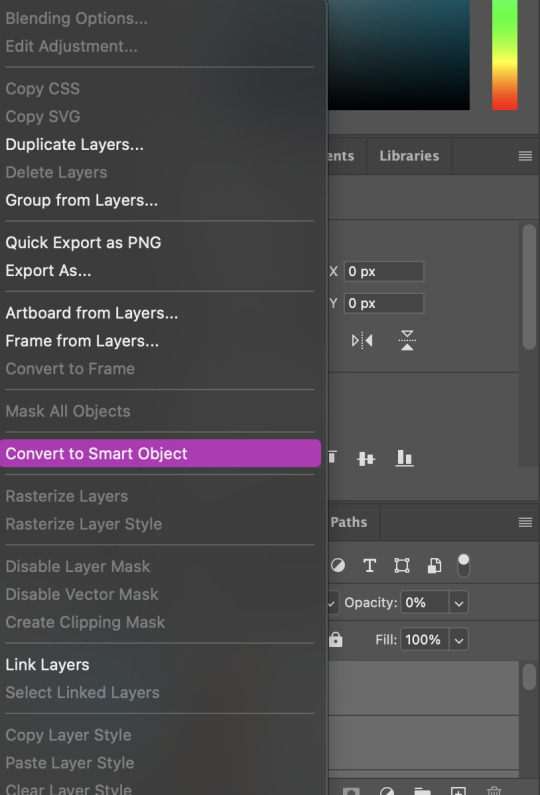
3) convert to smart object. with your base layer protected, right click > convert to smart object, or go to layer > smart objects > convert to smart object. this basically allows you to make changes while keeping the base properties in tact!! you'll notice your timeline change from blue to purple.
bc i use this so often, i made the shortcut cmd+f. you can do the same by going to edit > keyboard shortcuts if you'd like :p


let's focus on that timeline for a moment... get familiar with the split button (red), zoom buttons (yellow), work area (green).
the split button is how we'll divide the video into clips, which will become our gifs. the length of your clip will vary. i just try to fit a completed action into one clip if that makes sense!!
the zoom buttons allow you to move through the video a little easier. this will end up being a personal preference thing. i usually zoom until frames are broken up by 2's (02:00f / 04:00f / etc - shown 2 pics down) but it also depends on the length of the video
the work area defines what will export when you hit save. later on, you'll want to make sure your adjustment layers cover the entire work area.

4) clip your video. skim through your video and pick a scene you'd like to gif. split at the beginning and end by clicking the scissors, so you have something like this. i'll pick three clips for the tutorial.
as a general note, i will clip the entire video in one go, save as a psd, then move onto sizing/coloring/sharpening/etc

go ahead & delete the layers you won't be using as clips. i would rec saving as a psd at this point to save urself the grief of any photoshop crashes since u have now clipped a video to your heart's content!!

5) now, onto sizing your gifs.
first you'll use the crop tool (pink, toolbar). you can input your desired size to keep the scene in ratio (in the pink squared boxes). this is up to personal preference again, i use 260x150.
once you choose a size, you can click the menu the green arrow is pointing to, scroll down, and define a new crop preset.

adjust image size. go to image > image size and type the size you decided. make sure it's set to pixels and that you have the in-ratio button (pink) clicked.

6) next, sharpen your gif.
as you're just starting out, i would suggesting using an action. i have my favorite options in this tag! to keep us on the same pace for this tutorial, i'll use this one by svgarboo.
using an action: click into your actions panel (red), click the options button (yellow) and choose 'load action', use the arrow (green circle) to open your action's folder and choose the playable option (green box). with your layer selected, click the play button (pink).
NOTE: if your play bar isn't over your active layer it won't apply
your video should look a little better & your layer should now look like this over in the layers panel:

if you want to make adjustments, double click the options buttons (pink) and adjust opacity to your liking.
7) coloring your gif. i could not begin to make a coloring tutorial bc i hate how mine turn out 90% of the time </3 BUT there are some beautiful tutorials in here ... I WILL SHOW U HOW TO PLACE THE LAYERS STILL !!!
add a new group (pink) & drag it above video group 1. it will float above your clips on the timeline. this is where your adjustment layers will go! i'm including a screenshot of my adjustment layers so you have an idea.


8) exporting your base gifs. adjust your working area bars to the beginning and end of each clip. go to file > export > save for web. i'll attach a screenshot of my export settings.

WHEN MAKING ADDITIONAL GIFS, REPEAT STEPS 5-8 AS NEEDED. because you used smart objects, you can use ctrl+t/cmd+t on your gif layers to resize instead of cropping each time.
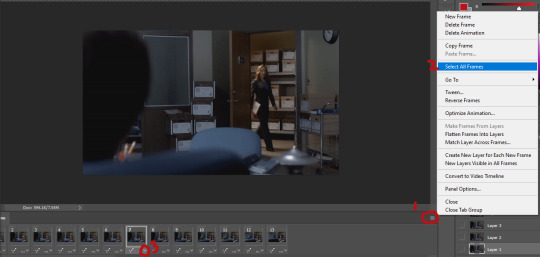
9) adjusting gif speed. open your exported base gifs. you'll see that your video timeline has changed to a frames timeline.
go to options (pink) > select all frames. with all frames selected, click the dropdown arrow (yellow) and adjust your time.
timing will depend on a case-by-case basis. i usually go 0.05, 0.07, or 0.09. play around with speeds until the motion seems fluid and natural. my gif is around 110 frames long so i'm doing 0.05.
10) export again, using the same settings as step 8.
YOU CAN SET UP ACTIONS TO HANDLE STEPS 9 & 10 IN BATCHES. lmk if u would want a tutorial on that :p
now i have 3 finished gifs!!


11) uploading your gif packs. i think hosting directly on tumblr is going to give you the best loading time. and by that i do mean, just uploading gifs to a tumblr page 🙂↕️ if you choose to use alternate hosting sites like imgbb or gifyu, make sure you back your gifs up with a zip file on google drive.
81 notes
·
View notes
Note
Hello. 🥺I hope you can still remember me! 😂 would you mind provide me the specific tutorial on how to make these HQ gifs especially this post: https://www.tumblr.com/sinnersmovie/781373995991826432/the-pitt-2025-created-by-r-scott?source=share ? 🥺 the quality is really nice! I have the problem of gif making, the thing is that I have followed many tutorials on how to make HQ gifs but it always turn out differently even tho I follow every step.. I am too confused. Literally, so desperate to fix the problem 😭 not sure what did I do wrong..
yes, hi!!! so, for this gifset from the pitt, i can walk you through my process on capturing footage and coloring, but if what you're struggling with is quality, the most important part is the file and definition of the footage you're working with.
i personally almost exclusively use 1080p footage with a decent file size. a file can be HD and still vary in size from a couple hundred megabytes to several gigabytes. this will also depend on the length of the episodes (half-hour episodes vs. an hour-plus). since we're talking specifically about my gifs of the pitt, my DLs of the episodes are all in the 2-3.5gb range, give or take.
i know there are gifmakers that swear by 4k footage and i certainly won't deny that gifs made from 4k files are stunning, but i've already spent a lot of money on external hard drives and don't have the space to spare for the frankly massive sizes of 4k movies and tv. besides, most 1080p quality gifs turn out perfectly well!
below the cut, i'll show you how i capture, gif, and color scenes from the pitt like this:

note: this tutorial is beginner-oriented!
step 1a: once you obtain your file (this is not a piracy tutorial lmao, but if you google "piracy reddit" you can find a lot of reputable suggestions for sites to peruse), it's time to screencap or clip the scene(s) you want to gif. i would say that, from what i've seen, most gifmakers use screencaps, but i highly prefer taking short video clips (which i keep and usually label for future use/reference), so i'll be showing you that version. if you would prefer to screencap, please check the "beginner tutorials" tag on my resource blog @gifmakerresource
step 1b. i only use windows pcs, so i can't give any specialized info regarding macs, just as a disclaimer. i use the program VLC Media Player, both for clipping scenes and as my regular media player on both my laptop and my desktop. to initially set up vlc's recording capabilities, i used this website (please just ignore all their annoying advertising for movavi).
step 1c. now that vlc is set up to record footage played through it, i open my video clip (ctrl+o) and navigate to the scene i ultimately want to gif. i typically recommend recording an extra 5-10 seconds before and after the clip, especially if you need to convert the clip afterwards.
step 1d (optional). depending on the file format of your episode, you may need to convert the clips you take before photoshop will accept them. for example, a vast majority of the files i download are mkv files, but photoshop works best with mp4 files. for this, i use another program called HandBrake. once downloaded, i add whatever file(s) i need to convert, select the appropriate preset (which is almost always "Super HQ 1080p30 Surround" to maintain as much of the original quality as possible). you can select where the converted files automatically save for organization purposes, just like with vlc.
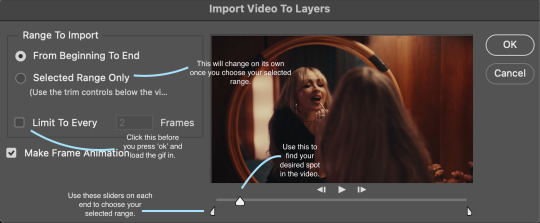
step 2. now that we have the clip we want to turn into a gif, it's time to bring it into photoshop. to do so, select file -> import video frames to layers. once you select your video clip, photoshop will pop up with a little media player with a few controls. here's what that looks like:

the box on the left that i've highlighted is what you'll adjust depending on whether you want to load in the entire clip or a specific range of the clip. with the way i clip scenes, i have quite literally NEVER used "from beginning to end." instead, i use the toggles on either side of the progress bar (circled in red) to select a specific range. you don't have to be overly precise with this as you can always delete extra frames, so i'll navigate using those little arrows until i roughly have the shot i want to turn into one gif and click okay. i would not recommend checking "limit to every x frames" because while this can help with file size, it will make your gif appear choppy. make sure "make frame animation" is checked.
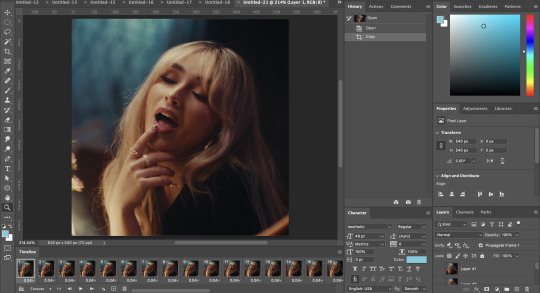
this is what photoshop looks like after clicking OK:

across the bottom are the frames. make sure that "forever" is selected at the bottom left rather than once or three times. this makes sure that wherever you post your gif, it will play continuously. the 0.04 below each frame is the frame rate -- at this setting, each frame plays for four tenths of a second. this might vary depending on your source material, but i HIGHLY recommend using 0.05-0.06. we're not going to worry about that yet, though, so don't bother changing it right now.
over on the right under "layers" are, you guessed it, each frame's corresponding layer. now, i could go more in-depth on this, but i don't gif using frame animation. i used to a very long time ago (over ten years ago), but i use a series of actions to convert to timeline animation. before doing that, however, i execute a couple more steps first.
step 3 (optional). i may be a slob irl, but i'm extremely organized and neat on my computers, so the first thing i do is use an action i created to select all the layers and put them into a group. to manually do this, you can either click on the first (or last) layer and then click on the last (or first) while holding down shift OR you can go to select -> all layers OR you can use the keyboard shortcut alt+ctrl+a. i just turned this process into an action to save time.
step 4 (optional). delete any excess frames. because i don't bother with being extremely precise with photoshop's media player, i usually have to trim off extra frames at the beginning and/or end of my gif. to delete frames, select the first frame and either hold down control and click each one or hold down shift and click the last one to select everything in between. once the frames you want to delete are selected, click the little trashcan below the frames (near the left side just before the horizontal scrollbar).
note: to watch your gif at any time, simply press the spacebar. press it again to pause.
step 5. while everyone's process is different, i prefer to crop my gif to its final proportions here. there's nothing wrong with doing it later, but sharpening and coloring can take longer at larger dimensions. the width of a single gif in a row on tumblr needs to be 540px. two gifs in a row are both 268px wide. three gifs in a row are 177px, thus making tumblr's gutters (the small transparent spaces separating gifs) 4px.
step 6. this is when i sharpen my gif and convert it to timeline animation. when it comes to sharpening, i think everyone probably does it a little differently. here's how i sharpen my gifs (which i turned into an action to save time) and here's the sharpening tutorials tag on my resource blog. as with most things gifmaking-related, i recommend trial and error. try different things until you find what you like! once again, to save time, i turned that sharpening tutorial (and its base sharpening) and the timeline conversion into a single action.
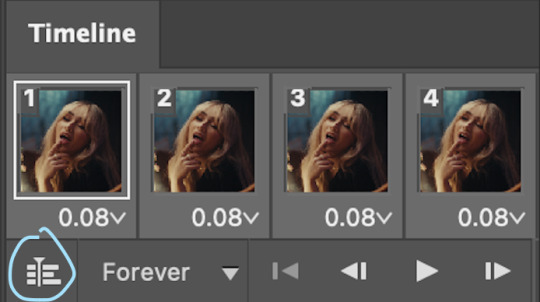
to convert your gif from frame animation to timeline, you need to select all your layers and all your frames and select "convert to video timeline" from the menu after clicking these three lines:
this is what i have once i've run my action to sharpen and convert:

you can adjust how zoomed in your timeline is with the slider at the bottom and if you're having issues with playback (though especially with larger/longer gifs, it always takes a while to load before playing smoothly) click the gear icon near the top of this screenshot and make sure it's set to 100% and to loop playback.

(group 2 is my vivid sharpening per the tutorial i linked, so if you don't use that, yours won't look exactly like this.)
step 7. time for my favorite part: coloring! now, i'd recommend taking a look at coloring tutorials as every show and every movie is going to be different. even separate scenes in the same episode can have totally different lighting. i have a bad good habit of saving just about every psd (photoshop file that contains all coloring adjustment layers), so there are times where i can just reuse a coloring i've already made rather than having to color each gifset from scratch, but you might be surprised just how much i DO color from scratch.
in several of my other gif tutorials, i explain and go step-by-step through my entire coloring process and why i use the adjustment layers i use, but as i said, what works for one scene may not work for another, so the best thing i can recommend is to familiarize yourself with commonly-utilized adjustment layers. play around with them, see what each one does, and over time, you'll be able to recognize which ones to use and when to use them. the adjustment layers i use are brightness/contrast, curves, selective color, channel mixer, gradient map, vibrance, hue/saturation, photo filter, levels, and exposure. the bolded ones are the ones i use on almost every single coloring.
on the navigation page on my resource blog, you can find a lot of tutorials that are specific to one or more types of adjustment layers and i encourage you to check those out as well as explore the navigation page itself.
here's an overview of my coloring for the pitt:

and here's a visualization for you of what each layer does:


(top to bottom, left to right) no coloring, brightness/contrast, adding curves, adding selective color 1 (black, neutrals, and white), adding selective color 2 (blue and cyan), adding gradient map (b&w set to 25%), fully colored, without vivid sharpening, and a comparison of the original to the full-coloring.
step 8. it's time to save! i HIGHLY recommend using this save action from @anyataylorjoy as it's a total lifesaver. if you save your gif right from here, photoshop will automatically set your frame rate to 0.07. while i used to gif at 0.07, i cannot believe how slow and choppy that looks now. all of my gifs are now 0.05, which is what this action does in part. without this action, you'd have to save your gif here and then open that file, change your frame rate, and re-save.
once this action has finished running, you go to file -> export -> save for web (legacy). here are my save settings, which do make a difference:

just remember, to be uploaded to tumblr, a single gif must be below 10mb in size. # of frames, #of colors, and dimensions all play a big part in the size of your gif. here's the finished gif at 540px:
to sum up, what's most important when trying to make high-quality gifs is the quality of your footage. generally, the larger the file size the better, but you do not have to use 4k instead of 1080p. and a 3gb 1080p file will likely look higher quality than a 300mb 1080p file. sharpening and coloring go into it, yes, but they're probably not going to make or break your gif.
as always, if you have additional questions or need clarification on any part of this tutorial, please let me know! i don't believe in gatekeeping and will always help to the best of my ability (it just might take me a few days).
29 notes
·
View notes
Text
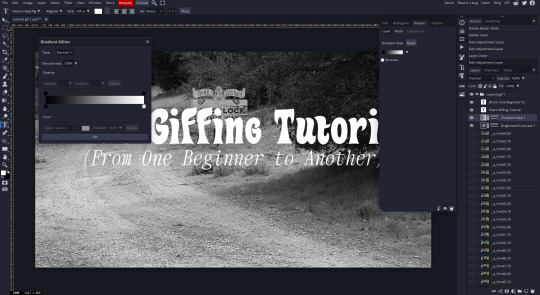
Poe's Giffing Tutorial (From One Beginner to Another)
Hey, everyone! So, I've been thinking about this for a while, and decided to finally make it happen. This post aims to be a giffing tutorial that isn't a bunch of technical jargon that nobody except experienced giffers understands. This is for the person that I was when I first started out: someone who wants to make gifs, for free, without having to learn the entirety of a new program. As such, if you're already familiar with the basics, this probably won't be super helpful to you.
In this, I'll cover the basics of actually capturing a gif, the how-to of color correction (though without getting into the nitty-gritty detail of it), some basic text effects, and some more decorative effects like overlays and ~fancy coloring. I'll also show you the program I use to resize gifs.
I don't have a fun quip to lead us into the next part, so, uh, let's just dive in.
Tools*:
A PC capable of handling heavy processor loads (I use a mid-range gaming laptop; it's a little slow sometimes, but it works)
Whatever you're giffing (obviously...)
ScreenToGif (a free, basic screencapture program)
Photopea (a free, in-browser Photoshop dupe)
RedKetchup (a free file resizer/converter)
*Note: These are not the end-all, be-all of gifmaking. They may not even be the best tools for the job! But they're free, they work well, and they're relatively intuitive.
Step 1: Capture your gif.
I'm going to use ScreenToGif for this. The first thing I do is open the program and click Recorder, which opens the recording interface.

I click and drag (or manually input dimensions in the boxes next to the recording button in the lower right corner) to set my dimensions, and then I press record. The red "Record" button will change to a blue square that says "Stop," and a timer will appear in the upper right corner, showing how many seconds your gif is.
Generally, I'll pause the video 5-10 seconds before my desired start time, to give myself a buffer (you'll be able to delete those frames later), start the recording, and then start the video. You'll probably find a system that works for you once you do it a few times.
Once the scene that I want to capture is done, I'll click the blue "Stop" button, and the overlay will close itself. A few seconds later, depending on how long/complex/large your gif is, the program will pop up with a new window where you can edit. Here's what it looks like:
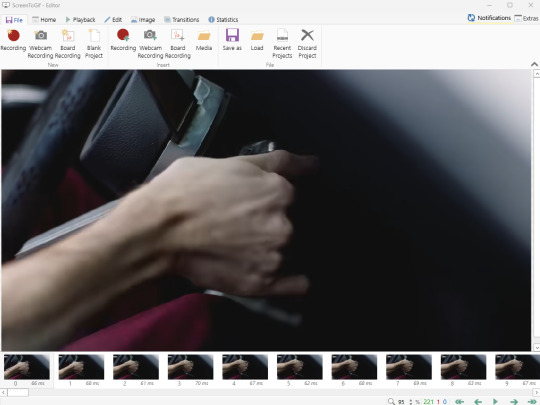
You can do a lot with ScreenToGif, but we'll be using the dead simple stuff today. Click the "Edit" tab, fourth from the left, and this will show up.

"Delete All Previous" and "Delete All Next" are our friends here. Go to the FIRST frame that you want in your gif, using either your arrow keys or just dragging the slider, and select it. Then hit "Delete All Previous." This will make that frame the first frame of your gif. Then, go to the LAST frame of your gif, and hit "Delete All Next." This makes the last frame of the scene that you want the last frame of the gif. You can also use the "Delete" option to delete frames by selecting them with your cursor if you want a more manual option.
Now you have your raw gif! Go to the "File" tab, the first one on the left, and select "Save As" from the menu. You want to make sure that it's saving as a .gif file, not an .mp4 or .apng --- you can check this up at the top. Don't worry, though, as .gif is the default, so unless you change it, you should be golden. Select whatever folder you want to put it in, name it, and save it.
You could absolutely stop here. It is by no means required to color your gifs or slow them down or any other number of things associated with giffing. But if you want to, here's how I do it.
Step 2: Edit your gif.
Head on over to Photopea. You'll see this:
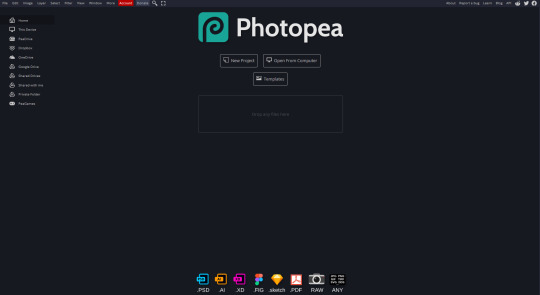
What we want is the "Open From Computer" option. Click it, and your File Explorer will show up. Navigate to whatever folder you saved your gif in and select it by double clicking or clicking once and hitting "Open."
It'll open in a new workspace that looks like this.
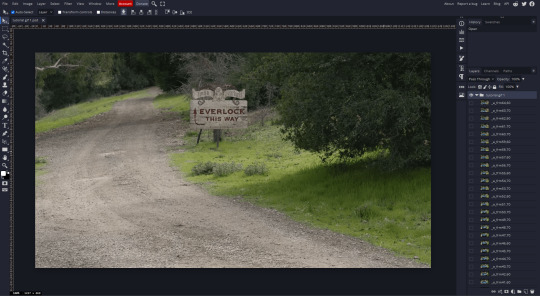
You may be saying, "Gee, Poe, that sure looks a lot like Photoshop!" Yes, it absolutely does. If you're familiar with Photoshop, you will most likely be able to find your way around Photopea just fine, and can probably go from here. But if you're not familiar with Photoshop, here's the basics.
First thing's first: gifs are frequently pretty fuzzy/blurry. Luckily, sharpening them is easy.
Select all your frames (the list on the right with all the numbered layers) by clicking one end, scrolling up/down, holding Shift, and clicking the other end. Then go up to the tabs and do Filter > Sharpen > Smart Sharpen. This will automatically sharpen each frame using a percentage; the default is, I believe, 150%, and this is usually what I use because I am fundamentally lazy.
If you don't select all your frames, only the one that you're currently on (the one highlighted in a lighter color) will get the effect applied to it. This goes for basically anything you do, so it's good to get in the habit of selecting all.
Now that it's sharpened, we can color it. Go up to the tabs again, and go to Layer > New Adjustment Layer > [whatever you want to adjust]. Most commonly in Escape the Night, you'll have to adjust brightness, because there's a lot of dark, moody scenes; Season 3 is also especially yellow/orange tinted, so you'll probably want to color correct it, too, using the Color Balance adjustment layer. This is a total guessing game based on the exact scene you're doing and my method is just selecting random things and adjusting sliders until it looks good (remember: fundamentally lazy). Honestly, I'm not an expert in coloring gifs, so I won't pretend to be — especially since people can and do write entire posts just dedicated to it. For this gif, I'm just lightening it a little.
And if this is all you want to do — no text, no effects — you're done! Go to File > Export As > GIF. It will take a few moments to load, so don't panic when your page freezes. A new window will pop up that allows you to do things like set looping, time, etc. but you can also just "Save" and you're done!
But let's say you want something fun. Maybe you'd like to overlay a quote or make it a cool color. If that's the case, continue on...
Step 3: Make your gif shine.
Three parts in this: text, fun colors, and overlays. You can combine these three to do some awesome things, and they're all very simple to do, once you know what you're doing. Think of them less like steps and more like a mix-and-match deal. You can use one, two, or all three!
So, here we go.
Option 3a: Add some text.
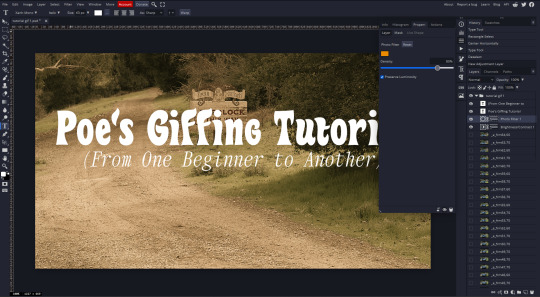
The easiest option of the three, this one works exactly like you think it does. The uppercase T symbol on the sidebar will create a new text layer where you can type something and set a font, size, and color.

I'll spare you the lecture on typography that I could give you — you can find better ones than I could make. Generally, though, you have a decorative/display font for headings and emphasis, and then a different, more generalized font for subheadings and other things. In this, the display font is Heavy Heap, which was used on the Season 3 tarot cards, and the general font is a relatively generic serif font.
(Sidenote: you can load fonts into Photopea! Just go to a font website like Dafont, download the font you want, and then open it as you would any other file by going to File > Open and selecting it from your files. You should get a message that says "Font [Your Font Name Here] Loaded," and then you'll be able to use it in your design. That's how I got Heavy Heap in there.)
You can change size and color with these, which will show up at the top when you select the text tool. Keep in mind that if you're making changes after you type something out, you will need to select (highlight) the text you want to change — it won't do it automatically.

I will admit that Photopea's text editor is not the cleanest, simplest, or nicest to use, especially at first. I came from Canva where it was much faster and easier. The downside, of course, is that Canva is highly limited with what you can do.
There are also ways to warp the text, change the blending, and do outlines, but I'll leave that for another time as to avoid making this any longer than it already is.
Option 3b: Make it a cool color.
You have a couple different ways to do this. Probably the most intuitive is to go to Layer > New Adjustment Layer > Photo Filter. Select the color box, pick the color you want using the picker or a hex code, select your desired density, and click OK. Boom, color over your gif.
It defaults to this vintage-y orange, but you can pick whatever color your heart desires.
However, I usually use a different method using Gradient Maps. This is also pretty easy; Layer > New Adjustment Layer > Gradient Map. If you leave it black and white, by the way, you get a B&W gif (you can also just select the Black and White option in the Adjustment Layer menu). Click on the gradient, select the white square on the right side of the gradient line, and then select the square down at the bottom of the window and change it to whatever color you want.

For this gif, I'm leaving it B&W.
(You can have a lot of fun with gradient maps. Play around with them!)
Option 3c: Overlay another gif on top.
Ooookay, so, this is the most advanced and tedious of effects to do (at least of the ones documented in this post), but it's worth it, I promise. For this, you'll need at least one other gif. I usually use a base gif that's relatively neutrally colored, oftentimes B&W but sometimes just faded or pastel, plus one (or more than one) colored, brighter gif. These are, of course, just guidelines — combine whatever gifs you want. The only real requirement, per se, is that they have the same amount of frames. If they don't, it'll look weird. (But if you do end up with two gifs that have different amounts of frames, you can delete the difference right in Photopea, so I don't stress about it too much.)
You also generally want to add text after this step, so if you're planning on doing this, save the text for last.
First things first: color your gifs the way you want and then save both of them. Then re-open them both in Photopea. Yes, this is annoying. I did say it was tedious.

So now I have both of them in my navbar, labeled as "tutorial base" and "tutorial overlay."
Go to your overlay gif and right-click on the gif folder. This is the top layer with a little arrow and folder icon next to the name of the gif.

Select "Duplicate Into" and then pick your base gif in the popup. In my case, it's named "tutorial base."

Now you'll click over to your base gif, and you'll see that your accent has been put on top of your base. Now you get to have fun with blending!
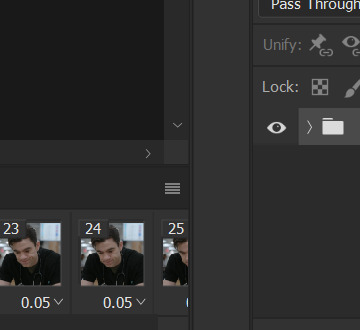
Right click on the overlay gif's folder again. Then, select Blending Options, which is the first menu item. It'll bring up a popup with all sorts of options for styling your layer.

The default setting is Pass Through, which is what we see here. If you want, you could just change the opacity to get your desired effect.
You could also play around with blending options such as Overlay, Color Burn, Lighten, and Screen. Every gif is different, and every gif will look different with different options, so experiment and see what looks best! You may have to go back and recolor it a few times, so I recommend just keeping the project open in your navbar for easy access.
For this gif, I think I'll go with Darker Color at 67%.
One last step, and then you're done with blending!
Go to Layer > Animation > Merge. This will merge each frame of your animation (the gifs) with each other, meaning that they'll play at the same time. If you forget this step, as I do frequently, you'll go to save your gif and find that it plays as a sequence.
Once you've merged your gifs, you can add texts, more effects, PNG overlays, whatever you want! Congrats! You did it!
Step 4: Resize your gif (if necessary).
Maybe you've made a gif, and it's beautiful, and it's amazing, and you wanna show everyone...but it's five million megabytes and you can't send or post it anywhere. Tumblr's max file size is 10 MB, while Discord's (standard) max file size is..7 MB, I think? Either way, if you try to upload something bigger than that, you'll get an error message and the familiar taste of disappointment.
Never fear, Redketchup is here!

This is Redketchup, and it's super simple.
Go to "GIF Resizer" under Animation Tools. Upload your gif, then scroll until you see the Resize GIF section. Input the percentage you'd like to reduce it by (presets are 25%, 50%, and 75% smaller, but you can set it manually, as well).
This is also the step where you can slow it down if you desire if you didn't do it in Photopea — it's in the next section down. Set the speed, if you'd like, and then go down to the bottom and hit Download.

It'll take you to a preview tab where you can check if your gif is small enough. If it is, hit Download again up in the top left, and that's that! Go share your gif with the world!
Conclusion:
Thank you for reading! I am by no means an expert gifmaker, but I want to spread the love and give other people the option to do it. I wouldn't know any of this stuff without the people who taught me, and I'll put a list of tutorials down at the bottom that I referenced when I was first learning to make gifs.
At any rate, if you use this post to make a gif, feel free tag me or send it to me so I can see! And for those of you who are on the fence about learning or starting to gif...
Do it. I double-dog dare you.
:)
References:
Blending Gifs by @the-mother-of-lions
Photopea Coloring Tutorial by @heroeddiemunson
Merging in Photopea by @bellamyblakru
And, though not a specific reference, I frequently browse @usergif for inspiration (they have tutorials there, as well, but I haven't checked them out yet).
#gifset#giffing#gif tutorial#how to gif#how to make a gif#photopea#escape the night#etn#I wrote this instead of socializing at my family's thanksgiving dinner#because that's just who I am
150 notes
·
View notes
Note
Would you be able to share some of your gif making process/programs you use to make them? They look great! 💕
Omg thank you,,, 🥺💕💖💕 And yes ofc! I'm going to write down everything I can think of about my gif making process but if I forget anything/you have questions about something specific let me know! ✨
(Long post ahead)
Emulators & Recording
I use different emulators and recording programs, depending on the game I want to play/record:
DesMuMe: This is the one I use for DS games, and it comes with a neat “Record AVI” feature under the “File” tab. Just click it, choose a location for the file and click OK (make sure the Compressor is set to “Full frames (No compression)”). Recordings have a limit of 2 minutes/2GB, but when it reaches it, the program will automatically create a new file and keep recording until it reaches 2 minutes, and the process will repeat (the next recordings will have “part_X” in the name file). When you’re done recording, just lick on File > Stop AVI. Also! The recordings will always have the original resolution. My DesMuMe is set to be 2x its size with a gap between the screens, but all recordings are 256x384 pixels with no gap.
VisualBoyAdvance: Like DesMuMe but for GBA games. Also has a recording feature in Tools > Record > Start AVI recording. The resolution of the video will be that of the original game but I think there’s no limit on how long the recording can be. I’d still recommend stopping and restarting the recording every 5 minutes or so.
Other games & OBS Studio: For 3DS games I use Citra, and Dolphin for Wii ones. They both have Recording features but I don’t use them because they create weird files. Instead, I record them with OBS Studio. Open the program, click on "Start Recording" and then on "Stop Recording" when you’re done. Pretty simple, just remember OBS records your screen so obviously if your emulator window is minimized it won’t record it. You can change your OBS settings to only record the emulator window but I’m too lazy to tinker with OBS so I just record the whole screen lol. There’s always a slight loss of quality with OBS. If you’re recording games with 3DS models then it won’t be too noticeable, but I do not recommend using OBS for pixel/pixelated games like Nintendo DS and Game Boy ones.
Misc: Before OBS, I used to use Camtasia Studio 8. Also does the trick, but instead of saving a .mp4 file it creates its own type of file and it requires you to manually export it as a .mp4 (it's a hassle). It has some editing features too, which OBS does not as far as I can tell. Also, besides DesMuMe I have MelonDS. Highly recommend it if you need to use the multiplayer option (to trade pokemons between games for example) and most importantly for the better mic feature (you WON’T get past the Nintendogs tutorial on DesMuMe). Also the 3D model graphics are of higher quality, but it doesn’t have a recording feature so you will have to rely on OBS and as I said it lowers the quality.
As for video file types, both .avi and .mp4 are allowed in Photoshop. However, .mkv (mostly used for TV shows and movie files) is not, so if you want to edit, say, an anime episode in that format you’ll need to convert it to .mp4. I use Format Factory for that, although I think here’s a slight quality loss.
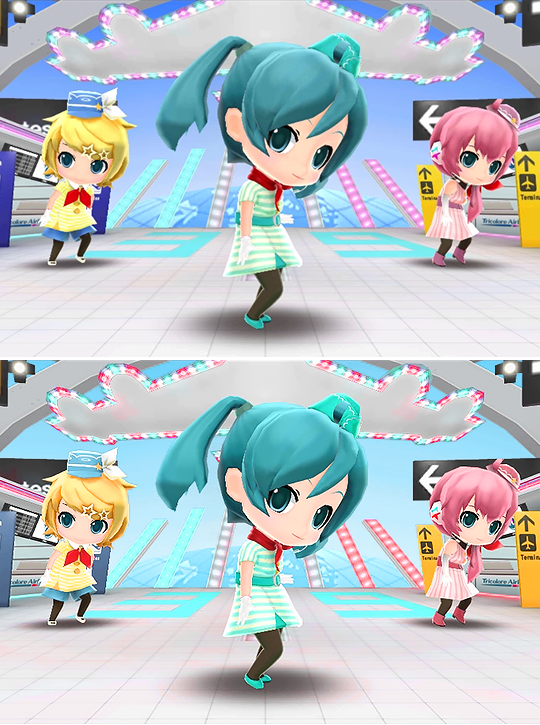
Here's a comparison of a pixel game recorded with OBS vs with DesMuMe. It's tiny but it will have you shaking the screen violently when you notice it.
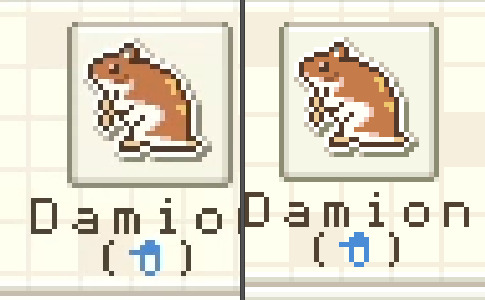
OBS recording vs. DesMuMe recording
Do not delete or move the video file until you’re done making gifs of it. Even if you save the file as a .psd, you will get an error message if the video file is gone from its original location and you'll have to start over again.
Editing (I)
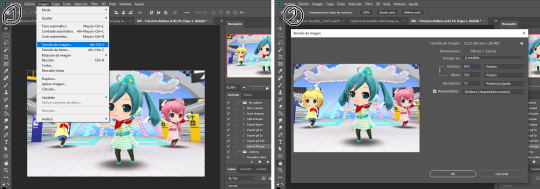
I exclusively use Photoshop 2020. If you use CSP, GIMP or other editing program you’ll have to find the equivalent features or look at other tutorials, because I’m only familiar with Photoshop. Other PS versions should have either the same or similar features. Here are the steps I usually follow (names might be wrong because my PS is in Spanish “OTL):
Importing: Drag and drop your file into PS. You should have your Timeline window on the bottom part. If you import a .mp4 or .avi file you should get the Video Timeline, which is what we will work with. If you export a .gif you will get the Frame Animation Timeline; in that case you need to convert it to a single timeline. Click on “Convert to Timeline Video”, then select all the layers (click on Layer 1 and then hold Shift+Click on the last layer) and then right-click on the last layer > “Convert to Intelligent Object”. This is what your PS window should look like for both cases:
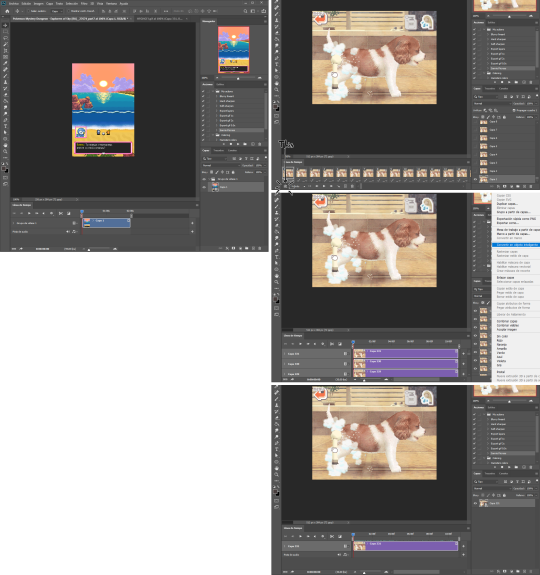
avi/mp4 file (has a Video Timeline) vs. gif file (has a Frame Animation Timeline)
Cutting and resizing: Often your file will either be the wrong size or have unnecessary parts. To resize your video, go to Image > Image Size (NOT Canvas size) and change the resolution. For good gif quality, the image resolution should always be 540 pixels wide (Tumblr’s image size), height doesn’t really matter. PS will change the height proportionally if you change the width. So, for example, a 1440x1080 video will be 540x405 after the conversion. Similarly, you can crop out parts with the Selection tool + Image > Crop. Making pixel games bigger requires a different method (more on this later).
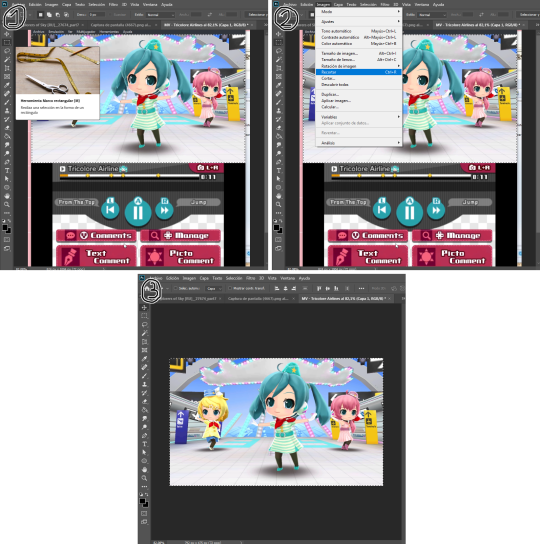
Cropping vs. Resizing
Cutting the timeline: Your gif will likely be too long, or you might need to stitch two parts together. In the Timeline window, move the vertical red line to the part where you want to make the cut. You can precisely move frame by frame with the arrows next to the play button. You can also zoom in and out the timeline with the slider at the bottom. Once you’ve placed the red line on the part where you want to make a cut, click on the scissors. You’ll get two layers – delete the one you don’t need and repeat until your gif is the right length. Similarly, you can click on either end of the timeline and drag it left and right to extend/reduce the length, but it’s less precise. I recommend moving the gif layer out of the video group in the Layer window, especially if you’re going to stitch parts together or add new layers that aren’t Color adjustment layers (like your watermark). If you do so, you’ll notice that each layer occupies a different line in the timeline, while if it’s in a group, it will all be in the same line (this means that all layers will be one after the other, you won’t be able to overlay them).

Cutting the timeline (1-3) + Moving the gif layer out of the video group (4)
Color adjustments: The fun part! You can get hella crazy with this one. If you want to go for really fancy stuff, I recommend checking out @/usergif, they have lots of tutorials and gifsets you can use as inspiration. I am however a simple man and will mostly use the same tools: Sharpen, Hue/Saturation, Gradient Map and Curves.

Soft sharpen in the Filters tab + Curves, Hue/Saturation and Gradient Map in the Layer window
Editing (II)
Can't make a bullet list of a bullet list so here's each adjustment layer explained. Note that this part is very personal so feel free to tinker with the settings for each tool until you get what you like:
Sharpen: Used only with non pixel media, aka for 3D models and series/movies. It makes the image look sharper. You'll notice that the video layer can have two icons: a movie film or a folded paper (in the "Import" section, the Pokémon gif has a movie film icon, while the converted Nintendogs gif has a folded paper icon). If your layer has the former, the sharpen tool will only be applied to one frame. To avoid that, right-click on the layer > Convert to intelligent object. Resizing the image will also do the trick. Filters are always applied to the layer, they don't create a new one (this is what the rest of the following adjustments will do). As for settings, this is what I usually have:
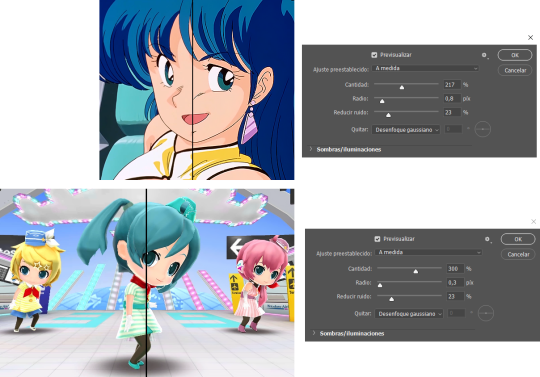
Two types of Sharpen settings (original on the left)
Hue/Saturation: Changes both the global colors and specific hues. To do the latter, open the menu right above all three sliders (by default it's set to "All") and then choose the color you want to change. Be careful! Sometimes you might accidentally edit the wrong hue, for ex a bluish green if you are editing blue hues. If you want to see what parts of the gif you're targeting, set the saturation to the max. Colors play a heavy role on gif size: the more diverse and brighter the color palette, the bigger the file. Gif size will be the ruin of your gif making process, so don't go too overboard with this. More on gif size later, but for now, I recommend "unifying" the color palette (aka making some hues similar).
Two examples of Hue/Saturation adjustments (Original above)
Gradient map: Adds a gradient overlay to the image. When you open the Gradient Map window, click on the gradient and you'll be able to edit it or create a new one. To do so, click on the tiny boxes with colors (only the lower ones, the upper ones won't work), then on the slightly bigger box to change the hue. To add a color, click anywhere below the gradient; to move the colors around, drag the tiny boxes and move them, and to edit the limit between each hue, drag the tiny diamond. The way gradient maps work is by editing the colors from lighter (right) to darker (left). So if you have blue on the right of the gradient, light hues will be blue, and if you have pink on the left of the gradient, dark hues will be pink, with mid tones being a mix of pink and blue (either purple, or bluish purple or pinkish purple). The image will look weird when you add a gradient map, but don't mind that for now. Just create the gradient you want and click OK. Now, select the new layer that has been created and play with the blending modes and the opacity of the layer until you get something you like. For blending modes, I usually go for the ones in the second and third sections. To edit either the Hue/Saturation layer or the Gradient Map one, click on the black and white icons (left to the mask, aka the white box) in the Layer window.
Video showing how Gradient map works

Two examples of Gradient maps, with a readjustment of the Hue/Saturation layer (Original above)
Curves: Edits the light, dark and mid tones. Click any point in the curve/line and then drag it around to see what it does. You can make more than one point in the curve. Afterwards, change the blending mode and the opacity.
An example of a Curve and the same example with the Curves layer at 40%
Gaussian blur: Sometimes I add a blurry/fuzzy effect to certain gifs. To do so, duplicate the gif layer (right-click > Duplicate layer), then, while selecting the new layer, go to Filters > Gaussian blur and pick a small numer (0,4-1). Click OK, set the blending mode of the new layer to Darken and lower the opacity.
Two examples of images with Gaussian blur applied (Original above)
Watermark: Add a watermark to your image. Click on the Text tool, create a text box, pick the font, the size, the color and the placement, and then click the ✔ button. Change the blending mode and opacity of the text layer. Personally, I have a .png image of my watermark that I just import to the gif and then edit, instead of creating a text box everytime. Regarding watermarks, I get that they are annoying but it's going to be far more annoying when someone reposts your gif without credit or crops the watermark out. Tumblr sucks when it comes to reporting this kind of stuff and you deserve to have your work respected (you've spent time and effort on this!!), so I highly recommend putting a watermark on your gifs. If you want to avoid having someone crop it, put it towards the middle of the image and not in a place that can be edited easily. Also, I usually save gifs without a watermark and add it afterwards.
Red: Danger zone, can get cropped easily. Blue: Also Danger zone, can be edited out. Green: Too obtrusive. Yellow: Perfect place, can't be edited out and it's not on the main focus of the image
Exporting
This is the "hell on earth" part. To export a gif, go to File > Export > Save for Web (Legacy), then once it loads (may take some time), play the gif a couple of times to make sure it looks good and save it. These are my settings:
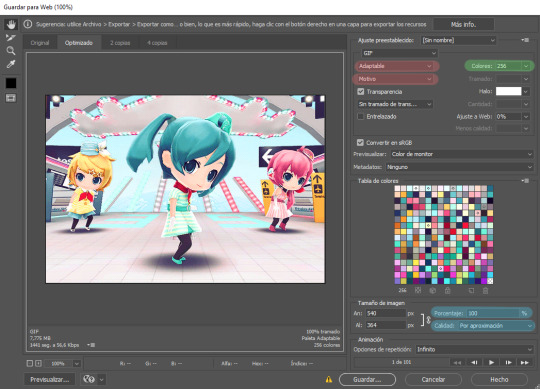
Settings for the Save for Web (Legacy). You'll only need to tinker with the settings on the right.
However, there's one thing to keep in mind: Tumblr has a size limit of 10MB per gif, meaning your gif won't be uploaded if it's larger than that, and you'll be surprised how easily you can surpass that limit. Also, gifs can't be longer than 500 frames, aka 8 seconds (to check the duration of your gif, zoom in in the Timeline Window, you can see the seconds at the top). Here are some pointers regarding gif size:
Pixel games and anime have a smaller size than life-action and 3D models: This is because the former have limited color palettes and the latter has way more colors. For example, Pokémon Mystery Dungeon or Sailor Moon will rarely pose problems, but Arcane, Breaking Bad, Nintendogs or Baldur's Gate 3 will.
The more complex the animation/motion, the bigger the size: This is because complex animations/motions, like a fight, have more unique frames than, say, someone moving their head up and down and nothing else, and that means there's more information to store.
The longer the gif/the bigger the resolution, the bigger the size: Kind of self-explanatory, longer gifs or gifs with big resolutions means more information stored in the file.
Bright and diverse color palettes increase the gif size: As explained in the first point, more colors means more information and thus a bigger file size.
The more it exceeds the limit, the bigger the changes you'll have to make: If it's 10.5MB you can get that number down easily. If it's like 20MB, you might need to cut the gif in half.
How do you solve this? There are a couple of methods:
Make the gif shorter: In the Timeline window, cut parts of your gif until it's short enough. If you don't want to delete certain parts, you can divide your gif in two separate ones.
Make the colors less bright/unify the color palette with an Hue/Saturation layer: If you haven't done this in the editing process and your gif exceeds 10MB, it's time to edit the gif colors.
Reduce the color palette: In the Save for Web (Legacy), you'll see that there's "Colors: 256" on the left (marked in green in the screenshot). 256 is the max amount of colors you can have, but you can reduce it. PS will automatically get rid of colors that have a smaller presence first (for example, in the anime gif above, if I reduced the colors it would get rid of the reds and magentas before the yellows or the blues).
Change the settings in the Save for Web (Legacy) window: Besides the color palette, there's a setting on the right side, marked in red in the screenshot above (the first one). I have it set to "Adaptable", which is the highest setting, but you can change it to "Perceptual", "Selective" or "Restrictive". This will lower the quality and thus the size, but sometimes it might mess up the gif. Similarly, you can change the setting below that one (set to "Motive" in the screenshot) to "Noise", "Difusion" or none at all to change the quality and size.
Optimize the gif: I use ezgif.com for this. Click on "Optimizer", upload your gif, make the Compression level smaller, click on "Optimize" and then save your gif. This will inevitably lower the quality, so I usually don't go lower than 35. Also, try to get your gif right below the 10MB limit, so if a compression level of 20 gets your gif to 9.5MB but a 15 gets it down to 9.9MB, choose 15. ezgif also has other cool features like one to slow down your gif's speed, so check it out!
Don't make gifs of media that causes problems: If you regularly find yourself being frustrated with gifs of X media exceeding the size limit, you might need to find something else. It sucks to think that you might not be able to make gifs of your favourite piece of media, but gif making should be fun, not ruin your day. Of course, it's up to you to decide how much effort you're willing to put on a gif, but don't overexert yourself either.
The Save for Web (Legacy) window is also where you can make your gif bigger in the case of pixel/pixelated games like Pokémon Mystery Dungeon or Nintendogs. In the "Image Size" section, set the quality to "Nearest Neighbor" and the percentage to 200% to double its size (it will be somewhat close to 540 pixels wide). You can make the gif three, four or even more times its size wih this method.
Closing thoughts and results
Managing a gif blog would require a whole new post with some advice so I'll leave that out for now. There are other things I've also left out like actions (highly recommend learning about them) but these are the basics methinks. Again, if you have any questions, my ask box is open ✨
And here are the gifs with a comparison to the original 🎉
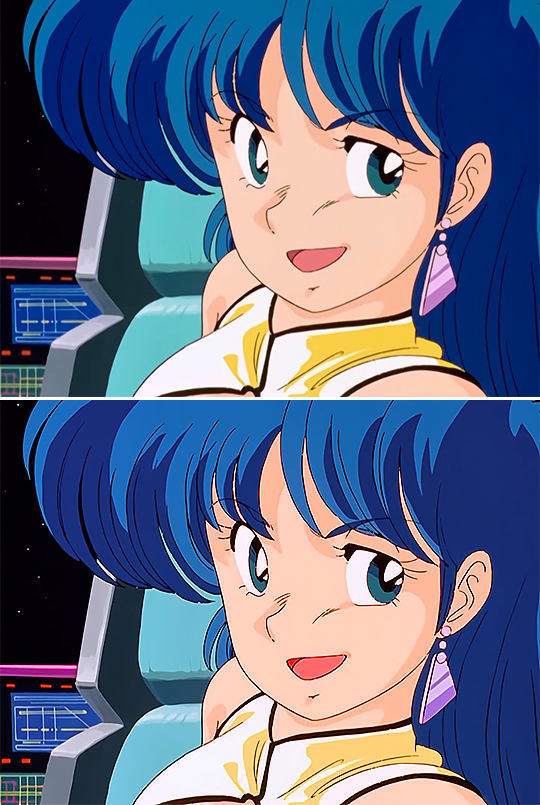
Sharpen, Hue/Saturation, Gradient map and Gaussian blur

Sharpen, Hue/Saturation, Gradient map, Curves and Gaussian blur
Hue/Saturation and Gradient Map
#ysiposting#whew this took a while#now if you'll excuse me I'm going back to studying for exams. regrettably
34 notes
·
View notes
Note
Hi! Happy 4k celebration 🥰 Can you share how you make your gifs or make a gif tutorial?
hi !! tysm <3 i'm more than happy to give you a little tutorial on how i make my gifs ! of course, my process is not the same to other gifmakers and may not always work for everyone but i hope it helps !
for this tutorial, i'm using the most recent edition of photoshop (2023) on my mac. full explanation under the cut.
full disclaimer: most of what i've learnt about photoshop and the giffing process is through pure trial and error. this won't work for everyone and others may think it's a little weird, but this is just how i make my gifs !!
1.find your scenes.
finding your scenes is sometimes very time consuming but you want to get it right the first time !! for this tutorial, i'm using a music video in mp4 format.
2. loading your scenes.
to load your scenes, you want to go: 'file' > 'import' > 'video frames to layers'. i know that this step varies on the user because some people like to go to timeline first, but i'd advise starting in frames first !
after that, a screen like i've depicted below will pop up. i've also annotated everything for you as well.
so, select your desired range, press 'ok' and then it will all load into ps !
3. setting up your gif.
i'm grouping this all into one step, but it's broken down into a few things.
the first part of this is: cropping. the recommended dimensions i follow are on this guideline here, but for the sake of this tutorial i'm just going to crop my gif 540x540 (as a w x h setting). the crop tool is on the left hand tool bar.
now, my gif looks like this. from here, i'm going to click on the timeline (the space along the bottom that has every frame). from there, click on the three lines to get this menu (i've circled where to go + what you'll click):

from there, go 'select all frames' and then click on any of the frames NUMBERS (where it says 0.04 with an arrow besides it, or whatever yours says) then change the frame rate. with most youtube videos i will use 0.08 as my desired frame rate, but when i'm gifing a show or something, it loads in as 0.02, so i change it to 0.05. 0.05-6 on any normal screen cap should be fine, but obviously you can change it depending on if it looks right or not.
from there, you've basically done the first half of the basics. now, you'll want to click on this button:
and now you'll be taken to the video timeline ! from here, select command + option + a (this is for mac, i think it would be control if you're on another device) then, right click on your layers and go 'convert to smart object'.
from here, i'll sharpen my gif before i colour. for this step i have two alternative sharpening settings first one by anyataylorjoy (rb to download !) and the other by maygrant (please ask !). the first one is tuser maygrant's and the second one is tuser anyataylorjoy's. i typically use morgan's for all my basic gifs but anyataylorjoy's for creative sets. every user has a different preference but just find what's good for you !

4. colouring your gif.
definitely the most tedious, this can be a little bit of a hassle depending on the scene. if the colouring isn't riddled with heavy yellows or cyans, colouring is usually a breeze but if it is, it can be hard.
CURVES

the circle with the arrow dropdown and that's half grey-white is the circle you want to click on to find curves. it'll open a menu and curves will be at the top.
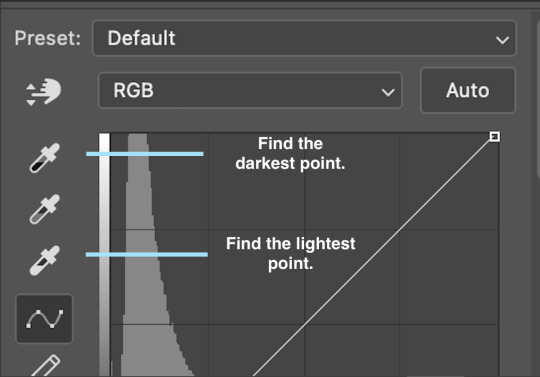
you'll see a little menu like above appear. now, select the dropper i've indicated as being the "light point" and then, using the zoom tool, we're going to zoom in and find the brightest point on the gif. this is typically where the light source is.
in this section here, i can see a couple of bright points. using the dropper, i'll click on the closest to white (note: i find that white rarely changes the colouring of the gif, so if there's like, a really really light yellow, for example, click on that) and then i'll do a similar process with the "dark point" dropper, finding the darkest spot, which is usually in shadows or in the corners. unlike with the light dropper, you want the closest to black, whether that's a dark dark brown or dark dark blue.
now, we can see how the colouring has changed:

optional: you can change the white line on the curves menu, which can make it lighter, or darker in different points of the gif.
LEVELS
levels is an optional step, but i recommend it on very light gifs, or if you want to add a little more depth. probably don't do it on an already very dark gif.
the levels menu looks like this:
the far left slider adds shadows and the far right slider makes it lighter. on this particular gif, i only need a little bit of depth to her face and i only need to contrast that a little bit. by just dragging the slider a little bit:
this is the result:
with levels, it can very quickly alter skin tone/make your gif look bad !! with levels, i don't think you need to go above 1-12 in adding depth.
OPTIONAL: BRIGHTNESS/CONTRAST
brightness/contrast is optional !! only add it if it's necessary :)
COLOUR BALANCE
a colour balance layer is great for fixing the tones for the gif !!

this one's pretty self explanatory. if you want it to be more yellow, slide it towards yellow. if you want it to be more red, slide it more towards red, etc etc. i've attached some gifs showing how i change tone:
but just play with it until it looks right. be very careful with skin tone !! colour balance can very easily whitewash/colour wash and that is not something encouraged, in the slightest.
SELECTIVE COLOUR
a selective colour layer is basically a "final touch" to colouring. where colour balance just kind of does an overall change of the gif, selective colour allows you to alter your specific tones, ie. reds, magentas, blues, etc. for me, i'll do the bulk of getting my desired colouring with colour balance, but if it overcorrects reds, for example, i'll add some cyan to red tones in selective colour, to diffuse that.
currently, in my gif, it's very red/yellow heavy. to balance that out, i want to add cyans. so, on the drop down list of the selective colour menu, i'll select 'red' and then i'll ADD cyans (so move the slider to the right, not the left to decrease) and then repeat that on other tones that i want to correct, with different colours.
with each of the sliders, just add or decrease how much of that colour is in that tone. once again, be mindful of skin tone and whether it is appropriate or not.
with selective colour, if there are any standout colours (eg. in my gif, there's a big patch of cyan) that don't interrupt their face (eg. reds and yellows are always in faces) and change the way the subjects look, you can change those colours to make it more vibrant. so, in this gif, i'll enhance the cyans and blues and magentas to make the colours pop more.
5. saving your gif
once your happy with the colouring of your gif and done what you need to do with it, save it as a smart object with all your colouring layers, then go to 'file' > 'export' > 'save for web (legacy)...' . play back your gif, and it should be all good !! congrats on making your gifs !
i've included a playback of each layer, which is staggered to show each layer come into effect.
in order: nothing -> curves -> levels-> brightness/contrast -> colour balance -> selective colour.
hope this helped !!
#*tutorial#gif tutorial#ps help#ps tutorial#userriel#userautie#userraffa#usernorah#userrsun#usercats#thingschanged#**l.myeditss
129 notes
·
View notes
Note
How do you make gifs?
Hi! The process I use is done completely online using several websites (which will be attached here). In fact my process probably makes things a bit more complicated than it really should but tbf I don't know how else to do it pff
First of all, you'll need to download whatever you want to make gifs from in a mp4 format. If you're grabbing a video off of YouTube there are plenty of YouTube to mp4 websites available online. However, if you were to download from a different website (such as Newgrounds, for example) then you'll likely have to install a browser extension to download videos. For example, since I use Firefox I use the Video DownloadHelper extension.
Once I have the video I need I drop it into Canva, though any video editing website/software works. All you need is a program that allows you to crop videos and export them in a gif format. If not then you can export the cropped video in an mp4 format and use a website/program that allows you to convert mp4 files to gif. I recommend the following sites: Ezgif CloudConvert FreeConvert
However, I'm going to use Canva for this tutorial since it's how I work.
First of all, you gotta upload your video to Canva (it will appear beside the blank 'canvas').
Once you've uploaded the video(s) you want to make gifs with, all you need to do is drag and drop them onto the blank canvas. It should automatically fit it to fill the whole canvas if you drag the video to the edge of the canvas instead of the middle.
All you have to do from here is figure out which part you want to crop out! The great thing about Canva (and some other programs, though not all) is you can search through the timeline frame by frame with the arrow keys to make sure you get the exact part you want (just make sure you click on the timeline before you start touching the arrow keys, because if the video is still selected you'll just end up moving the video across the canvas pixel by pixel).
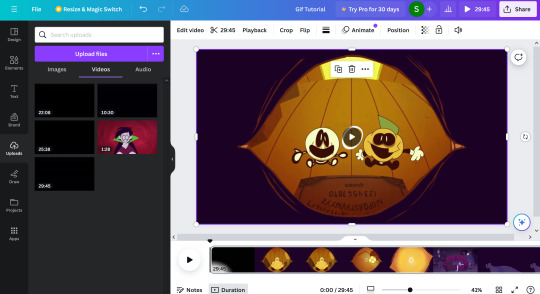
Once you've cropped out the part you want, all you have to do is export it as a gif. You do this by going to 'share', 'download', and choosing gif under the 'file type' dropdown.
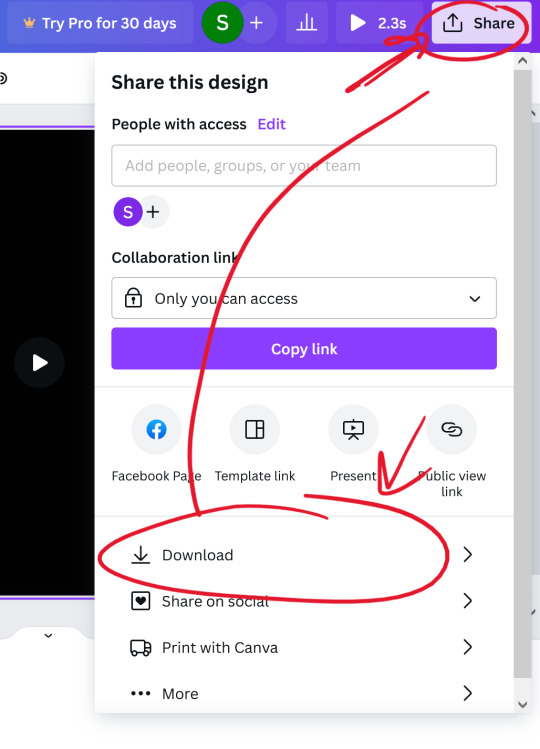

(Once you select the gif option, don't worry about adjusting the size of the video.)
Once you have your gif you can stop there! Unless you want to crop the gif to focus on a specific character or section of the scene, for example. If you plan on making a gifset just remember to keep the same aspect ratio for each gif.
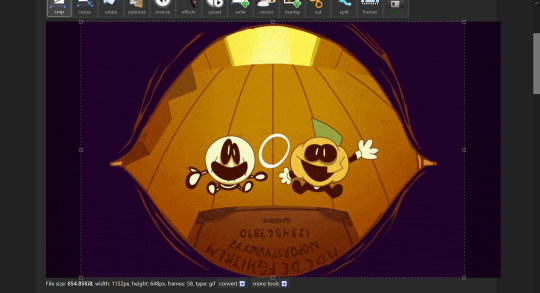
I use Ezgif to crop my gifs. It makes the process extremely simple and has several presets for the aspect ratio too!!
And yeah! That's about it! I hope this tutorial makes sense,, it's my first time making one qwq but if you have any questions just lmk!!
11 notes
·
View notes
Text
Gif tutorial by Alinelovelace
Alright, I'll be doing 3 things here today:
1.) Sharing the programs and websites I use
2.) Showing y'all a tutorial on how I make my gifs (this is my first tutorial, so if anything doesn't make sense, don't hesitate to message me, send me an ask, or comment on this post!!!!!)
3.) Sharing some resources by insanely talented gif makers (because I learned how to make gifs by following tutorials)
It's probably important(?) to mention that I use a Windows laptop
A.) Programs and websites:
ezgif: to make my gifs and do light editing
You can make gifs with video clips or screen caps. I'm not advanced enough to use screen caps, though they're supposed to make gorgeous gifs. I use ezgif to make the actual gif and edit the timing (which I end up having to tweak on Photoshop but...)
I also like ezgif because no watermarks!! I will do anything in my power to get rid of watermarks from websites and editing programs because they bother the hell out of me!
Photoshop: for the rest of my editing
This is where I recolor and add text.
A great alternative to Photoshop is Photopea, which I've used before I "obtained" Photoshop. It's FREE and online, so you don't have to download anything! I highly recommend it if you really want to get into gif coloring !!!!
Currently, I get my videos from torrents (bc I have a wide selection for my family to watch on our tv). But I used to use the Xbox game bar on Windows to record the clips I wanted on online streaming sites (unfortunately there's not a whole lot up and running anymore), then cropped and cut them. If anyone's interested in that, I could probably post a separate tutorial for that another time :)
There's also screen cap websites out there and YouTube. And probably dozens of other ways to get videos that I don't know about!
Video cutter
If you use full length episode videos and don't know how to crop them on your laptop (like me)
★★★★★★★★★★★★★★★★★★★★★
B.) Tutorial:
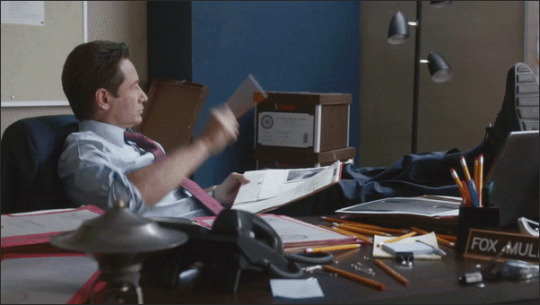
I'll be remaking the first gifset I ever made since I've learned A LOT since then! It should be pretty simple since there's only one set of subtitles.
Another time, I could do an edit tutorial like my That 70s Show ones. It's just taking the same concepts as this tutorial though, and playing around with colors, fonts, and font placement.
1.) Find your video/screen caps:
Since I no longer have the video from my first gifset, I just googled "Mulder throwing pencils season 10" on YouTube. After finding the video, I copied the link and pasted it into a YouTube to MP4 site ((this site has never given me popups or tried to get me to download something that isn't my video file)).
2.) If your downloaded video clip is short enough, you can just stick it into ezgif. If not, you may have to cut it using a website or a computer program.
Ezgif.com -> video to gif -> browse -> select your file -> upload video
3.) After clicking upload video, you should find yourself on this page:
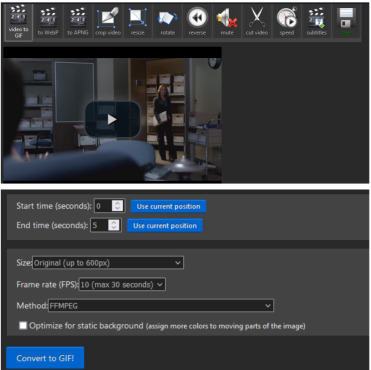
If you need to do any kind of video editing (cropping, rotating, resizing, etc) this is the place to do it! This is also where you make your gifs.
For the first gif, I don't need to change the start time, since I'm starting at the beginning of the video. 0 seconds is fine. But for the stop time, I'm going to play the video, pause where I want my first gif to end, then press "use current position" by end time.
I don't usually touch the settings for size, FPS, or method. If the gif doesn't have a lot of movement, I check "optimize for static background"
Then press convert to gif.
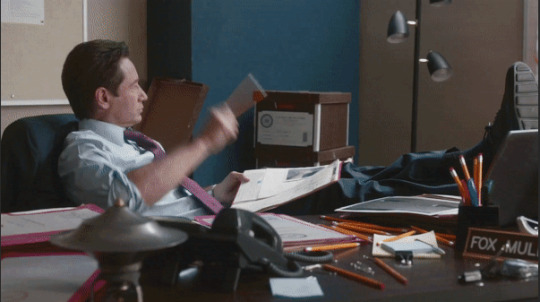
Here's the product I got. Since it's such a short clip, it moves a little fast for me.
I'm going to click "speed" which is below the gif. You're brought to this page:
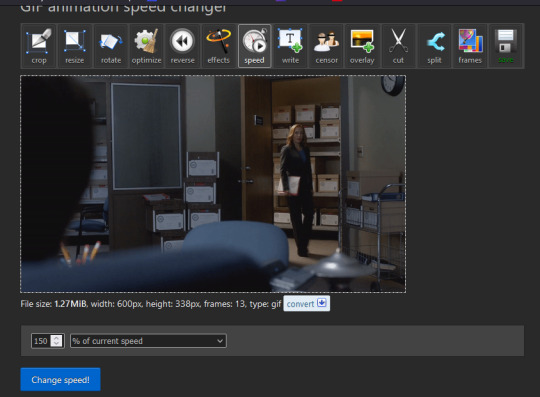
This is completely up to you for speed, but I find that between 60% and 85% end up looking good. If you don't like it, just change the number in the box and press "change speed". I ended up with mine at 65% of current speed.

A little better, right? The gifs that turn out best are 3 seconds to 10 seconds in my experience. This one is 1.5 seconds, so it's a little fast.
After that, rinse and repeat for every gif you need to make.
4.) Editing time! This is for Photoshop (if you use Photopea, I very much recommend this tutorial. It's very well explained!)
Go ahead and open all of your gifs once Photoshop is booted up. Then click window -> timeline
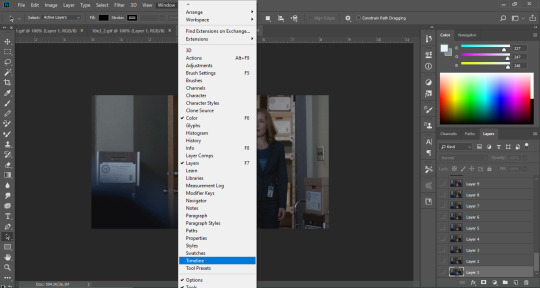
Now you have a handy dandy little timeline on the bottom.
The first thing you're going to do click play and decide whether or not your gifs are running at the speed you want. If yes, move on to next step.
If not: click on the three lines -> select all frames -> little drop down arrow. You should have a variety of times available to choose. Usually, I click other, then put somewhere between 0.04 and 0.08 seconds. Click play again. If you don't like it, try this step again.
If you need to crop your gif, three lines -> select all frames. Press "c" on your keyboard and crop accordingly.
4a.) Color editing
This is where things get complicated. Just remember coloring is subjective and everyone does it differently. This is just an intro to the different tools most gif makers use to alter color.
You don't have to use all of these! I definitely pick and choose depending on how I want the coloring to look. When I'm making a gif set, my coloring isn't as adventurous as when I'm making an edit. It doesn't feel worth it to give away my settings for this gifset since it changes depending on the coloring and lighting of the scene.
All of these tools can be found under "create new filter adjustment layer"
• Brightness/Contrast
This one is the easiest in my opinion. It's pretty straightforward. The more you drag brightness the right, the brighter your gif gets. The more you drag contrast to the right, the higher the contrast is.

• Curves
This adjusts lighting with color values. It's another tool that's hard to explain. I just drag the little circles on the chart until it looks good

• Color Balance
Like every other setting, exactly what you do with this tool is up to you. Color Balance adjusts the overall tint of your gif. I recommend editing highlights, shadows, and midtones for the best results.
• Channel mixer
This one is one of the most complicated tools when making gifs in my opinion. It's best for getting rid of weird colored tints (think the blue coloring in Twilight). I'll just link a tutorial here for it. I don't make enough gifs to know how to explain it.
• Selective color
Hands down my favorite tool, though not only specifically for gif making. This tool allows you to select a color (reds, yellows, greens, cyans, blues, magentas, whites, neutrals, blacks) and edit each color group. For example: my skin in photos usually has a weird red tint. I can edit the reds in my photo using this tool to make it look less abrasive.
You just play around with the different colors and bars for each color until each color group looks good. I recommend hitting the highest value to see how the color changes/what parts of the gif are affected by the change.
In the instance below, I wanted to see how magenta affected the blue colors, so I dragged magenta to 100. Now, knowing what kind of color changes magenta will make to blue, I can adjust accordingly.
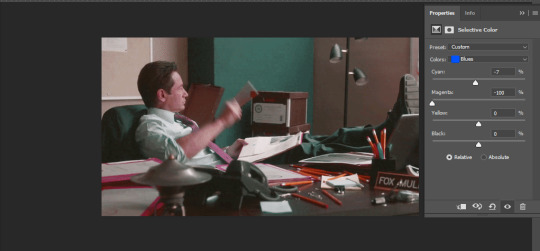
Messing around with the each color put me here:
• Vibrance
Another pretty self explanatory tool! Vibrance and saturation bars make the gif colors more colored and vibrant.
• Applying the filters to all frames
Shift click to select all the filters, and drag them above all the layers. They should now be applied to all the frames.
If not, select all frames with the three lines menu drop down like before -> click the little eye to turn off visibility, then click it again to turn it back on. You should be able to see everything now.
In order to carry the same colors from gif to gif, I take pictures of each setting and edit each filter adjustment layer accordingly. I side by side compare and make adjustments if the coloring doesn't match quite right. I'm sure there's a better way to do this, but I'm not experienced enough yet.


4b.) Subtitles
This part isn't too bad. For subtitle text, I use Calibri. Myriad pro bold italic and Arial are also really good options though!
• Text
Go to the sidebar and select text. Drag yourself out a box approximately where you want your subtitles. Type whatever you want. If you don't like where it is, click the move tool and drag it wherever you'd like.
Here are my text settings:

• Blending options
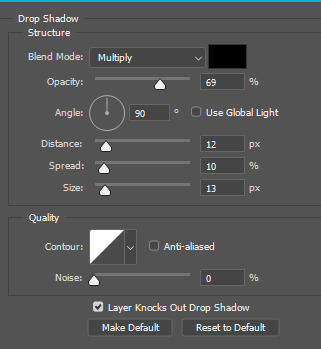
Right click your text layer and select "blending options" at the top. I edit stroke, which adds an outline. I also edit drop shadow, just because it adds a little depth to the text

• Applying to all frames
Drag the text layer to the top, just like you did with the adjustment filter layers when coloring. The same troubleshooting applies.
5.) Exporting
I know there's other ways to do this, but this is the way that makes the most sense to me.
Select all frames on the timeline -> file -> export -> save for web (legacy) -> save
With everything together, you go from:
To:

I had the subtitles in two parts because my first one had the subtitle in two parts (consistency).
Happy giffing!~~
★★★★★★★★★★★★★★★★★★★★★
C.) Resources:
This is a collection of resources both for Photopea and Photoshop
Photopea Resources:
Photopea giffing tutorial by @heroeddiemunson
Photopea gif coloring tutorial by @heroeddiemunson
Photopea removing yellow tint tutorial by @lacebird
Photopea gif making tutorial by @aragarna
Photopea gif making tutorial by @ashleyolsen
Photopea changing background color of gifs by @benoitblanc
Photoshop tutorials:
Giffing tutorial by @dqmeron
Subtitle tutorial by @itsphotoshop
Blurring gif backgrounds by @clubgif
Inverted colored text tutorial by @spaceslayer
Gradient text tutorial by @tawaifeddiediaz
Gif coloring tutorial by @logangarfield
Color consistency tutorial by @clubgif
Channel mixer tutorial by @zoyanazyalensky
11 notes
·
View notes
Note
https://www.tumblr.com/kinnporsche/717285264449519616/kpappreciation-week-4-favorite-romantic
hi, cld u pls do a tutorial on this gifset?💗💞it looks so good!
omg thanks! and sure thing—luckily i actually had the base of the top gif in this gifset saved as a .psd file, so i was able to recreate it way more closely than i would have otherwise, lmao. also, i figured you meant like the glitch/transition effects on the top and bottom gifs, so that’s mainly what i’m going to be focusing on here! (tutorial below the cut):
first things first, you need to choose which scenes you want to glitch between. obviously, in this gif i chose to parallel the scenes from episode five & seven where kinn is leaning into porsche’s space all sexy and intimidating lol. if you’re looking to make a gifset that focuses on parallels, you want to use scenes that closely resemble one another—this will make for a more seamless look. however, this glitch effect can definitely be used for transitions between any scenes you want—for example, i used the same general glitch effect in this gifset!
now, using whatever method you usually use (screencaps & ‘load files into stack,’ mp4 & ‘video frames to layers,’ etc.), upload each scene into its own project—make sure to convert from frame animation to video timeline if you haven’t already. resize the gifs (i’m using 540px by 600px), and sharpen them like you usually would. i also like to label my smart objects as ‘scene 1’ and ‘scene 2’ just to make things more organized.
next, drag the second scene onto the first, and fiddle with it until you’re happy with how the scenes switch between one another:

once you’ve got it the way you like it, color your gif however you want. keep in mind, however, that when making the glitch, it’s far easier to manipulate the colors of the glitch (for example, changing it from the typical red/cyan to yellow/green, like it is in my gifset) if you make the gif black & white. it’s possible to change the colors of the glitch on a non-black & white gif, but it really depends on the scene. if you aren’t going to change the colors of the glitch, you don’t have to worry about any of this!
when you’re happy with your coloring, convert all of your layers (‘scene 1,’ ‘scene 2,’ and all coloring adjustment layers) into one smart object—i renamed this smart object ‘combined gif’ for organizational purposes, but it’s not necessary to do that.

remember, once you’ve done this, you can’t edit your adjustment layers on your base gif—if you’re worried about losing these adjustment layers for whatever reason, i suggest saving a duplicate of your current .psd file just in case.
after you’ve combined everything into one smart object, it’s time to convert your project from video timeline back to frame animation, as this is where we’re going to apply our glitch effect. go to the timeline menu > ‘convert frames’ > ‘flatten frames into clips,’ as shown below:
after this, click the button in the bottom left-hand corner, and click ‘continue’ if a dialogue box pops up saying ‘this will convert the timeline to a frame animation.’ then go back to the timeline menu and select ‘make frames from layers,’ as shown below:
make sure to delete the first frame of your gif (the one that is not timed to ‘0 sec.’) as it is essentially just a long still image, and we don’t want that. now we have our frame animation.
now, in your frames, find the frame where your gif switches scenes—for me, that happens at frame 22. what i like to do is make the glitch span from two frames before to two frames after the cut (so, four frames in total). this means that the first glitch frame will be on frame 20 of my gif.
for my gif, i now want to find the corresponding layer to frame 20. the layer number is not going to be the same as your frame number due to converting from video timeline + deleting the first frame that was not ‘0 sec.’ that’s why it’s important to look for the toggled visibility icon—the little eye next to the layer. on my gif, the corresponding layer is called ‘frame 19,’ as shown below:

to make the glitch effect, i’m going to duplicate this layer, then right click on the duplicated layer (named ‘frame 19 copy’), and click ‘blending options.’ in the blending options panel, uncheck the ‘r’ (a.k.a. ‘red’) channel under ‘advanced blending,’ as shown below:

then, nudge the duplicated layer using your arrow keys to create the glitch effect. for my first glitch frame, i tend to do a simple nudge to the right by 4px, and sometimes i’ll either nudge up or down by an additional 3px. there are no rules for this, however, so feel free to play around.
then, highlight both layers (for me that's ‘frame 19’ & ‘frame 19 copy’) and right click > ‘merge layers.’ i like to rename this newly merged layer as ‘glitch 1’ (once again, just to be organized):
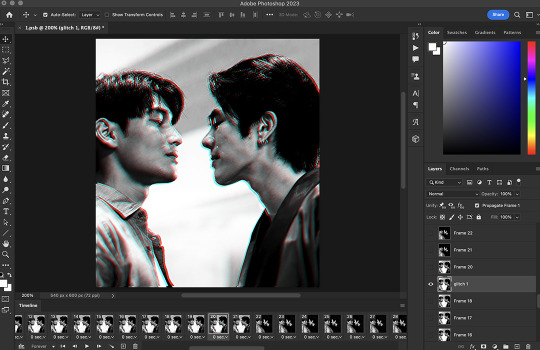
make sure that this new layer’s visibility icon (the little eye) is only toggled for the frame where the glitch is supposed to occur. sometimes this merged layer will appear toggled for all frames for some ungodly reason, so be sure to check and toggle/untoggle accordingly.
for the next glitch frame i like to use a trick to make the glitch look even messier and broken up. so, follow the same steps as before on the following frame/corresponding layer (for my gif that is frame 21 and layer 20)—but before nudging the duplicated layer, we’re going to utilize the ‘rectangular marquee tool’ (found in the top left-hand corner). holding down the shift key, use the ‘rectangular marquee tool’ to create boxes of all random shapes and sizes on top of your duplicated layer. make as many as you want:

after you’ve made all these boxes, switch back to the ‘move tool’ (the one right above the ‘rectangular marquee tool’) and then you may nudge the duplicated layer however you wish—you will notice that the glitch will now appear like it’s been broken up into these boxes! i suggest nudging the duplicated layer in the opposite direction on this frame, this way the overall glitch will look more realistic (so instead of nudging the duplicated layer to the right, nudge it to the left, etc.)—after this, merge the layers.
repeat this process for the following two frames! feel free to play around with the glitch, and do whatever you like best. you can even add a small mini-glitch in between the scene transitions (for this i used three frames instead of four, so it wasn’t as long as the transitional glitches).
once again, we’re going to convert our project back to video timeline. so, highlight all your layers/frames, click ‘convert to video timeline’ in the bottom left-hand corner, right click your layers, and select ‘convert to smart object.’ this is where we make our final adjustments, such as changing the colors of the glitch, adding grain, text, and even overlays if you’re so inclined.
to change the colors of the glitch, add a hue/saturation adjustment layer to your gif. there are two colors in our glitch, cyan & red—so, we are going to target the cyan & red channels on our hue/saturation layer. you can basically mess around with this to get whatever colors you choose. for my gifset, i changed the cyan to dark green and the red to a yellowy-gold by using the hue & lightness sliders:

then, of course, you can do whatever else you wish to your gif! after adding grain and some text, here is how mine turned out:

and that’s all! hopefully this long-winded explanation makes sense—but if you have any follow-up questions, feel free to hit me up again!
8 notes
·
View notes
Note
How do you make your gifs?
Hello hello! I love talking about gifmaking, so thank you for giving me the chance to ramble.
Instead of a detailed step-by-step walkthrough, I will link tutorials and resources written by the wonderful Tumblr creators on here along the way. Everyone has their method and preferences, and there’s no right or wrong way to make gifs. I’m going to share techniques and resources I picked up along the way that work best for me—they may or may not be suited to your preferences, but I hope you’ll find some helpful things here.
(Warning: screenshot/image heavy)
USEFUL TUTORIALS AND RESOURCES
Here are some tutorials and resources that I found very useful when I got back into gifmaking:
Gifmaking tutorial using video timeline by @hope-mikaelson is identical to my own process
Gifmaking and coloring tutorial by @kitty-forman, whose process is very similar to my own
Giffing 101 by @cillianmurphy, an incredibly detailed tutorial that covers everything you need, including a step-by-step guide to using HandBrake
Gifmaking and coloring tutorial with 4K HDR footage by @sith-maul, another incredibly detailed tutorial with many useful tips
Gifmaking tutorial by @jeonwonwoo, incredibly comprehensive and covers so many aspects of gifmaking from basics, sharpening, captioning, and text effects
Gifmaking/PS tips and tricks by @payidaresque
Action pack by @anyataylorjoy, the Save action is especially a true life-saver
@usergif and @clubgif are amazing source blogs with many tutorials on gifmaking, color grading, and gif effects, can’t be thankful enough for the members for their work curating and creating for these blog!
TOOLS
Adobe Photoshop CS6 or higher, any version that supports video timeline. @completeresources has many links to download Photoshop, have a look!
Photopea is a free alternative to Photoshop, but it has a slightly different UI, check out these tutorials for gifmaking with Photopea
HandBrake or any other video encoder, especially if you’re working with .MKV formats
4Kvideodownloader for downloading from YouTube, Vimeo, Instagram, etc.
OBS Studio or any other similar screen capturing software. To prevent duplicate frames in gifs that prevents your gifs from looking smooth, try to match the recording frame rate (FPS) with the source.
IMPORTING FOOTAGE AND WORKING IN VIDEO TIMELINE
I work exclusively in video timeline instead of importing video frames to layers or loading files into stack. For videos that don’t require converting/encoding using HandBrake, especially ones that are already in .MP4 format, I tend to open the video directly on Photoshop, and trim the videos around directly.
As mentioned above, this gifmaking tutorial using video timeline is exactly how I make gifs. I find it more efficient, especially if you’re making multiple gifs from the same video/the same scene with little to no change in lighting conditions You can simply slide around sections of gifs you want to save, and they will all be the same length.
Another thing also covered in the tutorial linked is the ability to change video speed in video timeline mode. Right click on the video and set the speed before proceeding with cropping/resizing. This is also very useful when you’re making blended gifs where you need the footage to have the same length.
Slowing footage down.
As mentioned in this post, changing the FPS before slowing down the gif results in smoother gifs. Doubling the frame rate before slowing down your gifs usually yields the best result.
Speeding footage up.
I love using this to speed up slow motion B-rolls to make the speed slightly more natural. It will result in nice, smooth gifs:

(B-roll footage, normal broadcast speed)
(200% speed)
Subject won’t stay in frame?
Another feature of the video timeline mode. Keyframes are your best friend. This tutorial by @kangyeosaang covers everything you need to know about panning gifs. I use this technique regularly, it’s a life-saver.
COLORING
Here are some coloring tutorials I found very useful:
Coloring tutorial by @brawn-gp beloved, their coloring style is second to none
Mega coloring tutorial by @yenvengerberg, for stylized /vibrant coloring
Understanding Channel Mixer by @zoyanazyalensky
Coloring rainbow gifs by @steveroger, which delves deep into Channel Mixer
I tend to go for neutral-saturated coloring in general, especially for minimalist gifsets with no effects (blending/isolated coloring/overlays etc.), but the possibility is endless for stylized coloring. Here’s what my adjustment layers look like for the example gifs above.
The base footage for this Charles gifset is incredibly desaturated. I started with a Curves layer to bring contrast to the gif, as well as do some color-correcting to bring the base footage to a more neutral tone. To bump contrast, I also like to add a black and white Gradient Map layer with a Soft Light blending mode at 10%-30% opacity:
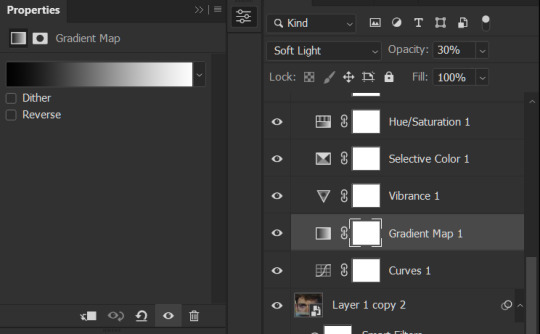
The Vibrance layer is then used to lift the saturation of the base footage, with the Selective Color, Hue/Saturation, and Channel Mixer layers to help remove the green/yellow tint to his skintone.
An underrated adjustment layer/preset in my opinion is the Color Lookup. You can layer in pre-loaded .LUT color grading presets to help speed up your process. For this gif, it’s simply a base preset Soft Warming Look to achieve a warm, pink-tinted tone.
In hindsight I feel like this gifset is too saturated, his skintone is skewing very red/pink, I could’ve bumped down the lightness of the reds with a Selective Color layer or a Hue/Saturation layer. Try to err on the side of neutral for skintones. Experiment with layer orders—there’s no right or wrong! Remember that each layer build up on the one before it.
The base footage of the Jalen gif is already quite nicely color-graded, but it’s still muddy and underexposed. As with the Charles gif, I started with a Curves layer to bring the gif to a better baseline contrast. Then I focus on brightening the gif with the Brightness/Contrast and Exposure layers.
The Hue/Saturation and Selective Color layers are to color-correct Jalen’s skin tone—it’s something I spend most of my time coloring gifs and focus a lot on, especially when color grading BIPOC skintones. Putting a Vibrance layer, upping the Vibrance and Saturation, and calling it a day would make his skintone skew very, very yellow/orange.
Focus on the reds and yellow for skintone, play around with the Saturation and Lightness sliders, use the Hue slider with caution.
It can be tricky to achieve the right skin tone when working with sports footage vs the higher quality, higher dynamic range footage of films or TV shows, but I try to keep it as close to the subject’s natural skintone as possible.
Here are some of tutorials with tips and tricks on coloring BIPOC:
How to fix orange-washed characters by @zoyanazyalensky
How to prevent pink-washing and yellow-washing by @jeonwonwoo
Coloring tutorial by @captain-hen
Changing lighting conditions?
Fret not—this is why I love working in video timeline. I’ll take this gifset as an example: it’s a deceptively difficult one to color. The footage is 720p and the sunlight shifts throughout the video, so matching across gifs was tricky.
My solution was to split the clips in sections with consistent lighting, and apply adjustment layers to the individual sections before applying general color grading layers on top of everything.
We can make use of the Fade Transition effect for sections where the lighting changes within the gif section we want to color.

(without vs with Fade on the Brightness/Contrast layer)
The difference is subtle in this example, but the brightness in the right gif is noticeably more consistent throughout. You can also add the Fade Transition effect to the beginning for a fade in, of course.
SHARPENING AND OPTIMIZING GIF QUALITY
This tutorial by @anya-chalotra covers everything you need to know about optimizing gifs for Tumblr.
Sharpening.
Sharpening is essential to making crisp gif images. Here’s another ask I answered re: my own sharpening settings and maximizing gif quality.
(base footage, unsharpened)

(color graded, unsharpened)
(color graded, sharpened)
The final gif is sharpened with Smart Sharpen, 500% at 0.3px and 10% at 10px (my standard sharpening settings).
Here are some tutorials and resources on sharpening:
Sharpening process by @anya-chalotra
Sharpening tutorial with added gaussian blur by @haleths
Sharpening action by @daenerys-stormborn
Size your gifs for Tumblr correctly.
This is essential: full width gifs are 540px wide.Two side-by-side gifs should be 268px wide. Here’s a handy post on gif size guide for Tumblr.
Incorrectly sizing your gifs will take away the quality of your gifs: undersizing your gifs will especially make them grainy, blurry, and /or pixelated, and won’t display correctly on many people’s desktop theme. Oversizing usually isn't as dramatic as undersizing, but it will make the gifset glitch when displayed, and the file size will be unnecessarily bloated.
Work with HD footage if possible.
Media fandoms (films/TV shows) are luckier than us in the sports trenches—we have to work with what we have. Broadcast footage is usually subpar: lacks contrast, pixelated, very desaturated, the list goes on. But it’s possible to still make high quality gifs from subpar footage. Here are a couple of tutorials to mask low source footage quality:
low quality video ➜ “HD” gifs tutorial by @nickoffermen
Sharpening low quality footage by @everglow-ing
(This gifset I made is from a 480p footage with horrendous lighting conditions and colors, and the end result is decent I’d say)
Save for Web (File > Export > Save for Web (Legacy) or Ctrl + Alt + Shift + S) settings.
I default to Adaptive + Diffusion but also use Adaptive + Pattern from time to time. Any combination of Adaptive or Selective + Diffusion or Pattern will give you a good result. In my experience some gifs will need the Selective color table for the colors to display correctly.
Here are my default settings:
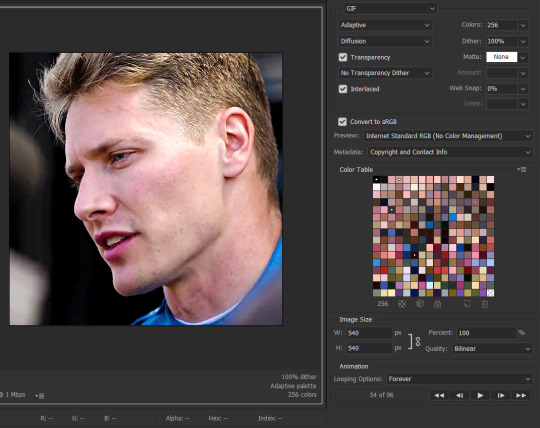
SAVING AND EXPORTING FOR TUMBLR
Converting to frames and adjusting the gif speed.
If possible, avoid exporting your gif and reopening it to adjust the frame speed. I used to do this sometimes when I’m lazy, I have to admit, but this is where this Action as mentioned at the beginning comes in very handy. It converts all visible layer into smart object, then converts it back to frame animation.
Step-by-step:
1. Select all layers
2. Right click > Convert to Smart Object
3. Go to the Timeline menu (≡) > Convert Frames > Flatten Frames into Clips
4. Go to the Timeline menu again (≡) > Convert Frames > Convert to Frame Animation
5. In the same menu (≡), select Make Frames from Layers
6. Delete the first frame (it’s a duplicate) then set your frame speed

Now you can adjust the frame speed before exporting it (Save for Web).
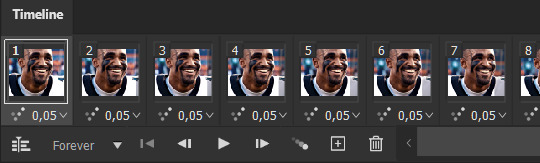
Pay attention to the source framerate.
The frame delay of 0.05 s is usually the default to make gifs for TV shows and films, and it is preferred by most gifmakers. This stems from the fact that most movies and TV shows are 24 or 25 FPS. This may not be the case for all source videos: you might get 30 FPS footage, and sports or gaming footage can be 50 or 60 FPS. Gif speed also depends on the FPS of your original file. Play around with gif speed and see what feels most natural to you.
My rule of thumb is the frame delay Photoshop gives you + 0.01 s. For example, 50 FPS footage will give you 0.02 s frame delay (25 FPS gives you 0.04, 30 FPS gives you 0.03, etc.), so set it to 0.03 s. I usually err on the side of a faster frame delay for smoothness in in-game sports footage, anything else (interviews, press conferences, B-rolls) can get away with being slowed down. Again, experiment and see what you think looks best!
Keep gifs under the Tumblr file size limit (10 MB).
Cut down the number of frames. My gifs are usually around 60-70 frames for 540px full-width gifs, but depending on the coloring, sometimes you can get away with more. 268px gifs can go up to 200+ frames.
Crop your gifs. Remember to keep full-width gifs at 540px wide, but if necessary, you can crop the height. My go-to sizes are 540x540, 540x500, 540x450, and 540x400.
Amp up the contrast of your gifs. Flat colors like black cut down gif size.
The Grain filter or Noise filter, though beautiful for aesthetics or simply necessary sometimes to mask low source footage quality/pixelating, may bloat your gif size.
Play your gifs back before exporting.
Pay attention to duplicate frames or glitches, you might need to get rid of them!
Hope this is helpful! Don’t hesitate to send an Ask or DM if you need any help, I will happily answer all your questions and send over PSDs. (I’m also on Discord—just shoot me a message if you need my tag!) Happy creating :]
#tutorial#PS asks#gif tutorial#Photoshop tutorial#I guess this is more of a resource link dump than tutorial but. Hey. Why reinvent the wheel...#Sorry for the late answer I hope you see this Anon :]#completeresources#allresources#userxoames#userbarbi#usernrzr
1K notes
·
View notes
Text
How to Make High Quality Gifs
A few people have asked me for a gif tutorial, so here we go! As a disclaimer, there are many parts of gif-making that are subjective, and this is just my personal process/preferences. If anyone is confused about a particular step, or wants more in-depth info about something, just message me!
Tools: ✧Laptop/computer ✧Adobe Photoshop 2024 ✧External Hard Drive (mine is 250GB) ✧Video Downloader (I use the Video Downloadhelper extension on Firefox)
PHASE ONE: Make Animated Gif
1. Download high quality video This is very important! You should download the highest quality of the video you can find. I use the free Video DownloadHelper extension on Firefox, but it doesn't download audio sometimes (it could be me not using it properly, or they want you to pay to get audio). No audio is fine for gifs, but if I'm doing a video edit, I either need to record the audio separately with Quicktime or use a free online downloader for youtube, twitter, or instagram videos.
For this gif, I downloaded an HD interview from the F1 website with the Video DownloadHelper extension on Firefox.
Tip: Make sure your video file is an .mp4 -> photoshop can struggle with .mov files bc they're larger
2. Import: Video Frames to Layers...
File -> Import -> Video Frames to Layers... -> Open your video -> Selected Video Range -> Make Frame Animation
If photoshop has to load a while to make the frames, it means you should select a smaller portion of the video to animate.
Tip: If you discover that there are duplicates of every frame or that there are way too many frames for the portion of video you want to gif, you may need to re-import and check the "Limit to Every _ Frames" box, and write in "2". This will import every other frame of the video and get rid of duplicates or too many frames.
Once your frames are imported, make sure you're working in the "Motion" workspace by going to the top to Window -> Workspace -> Motion.
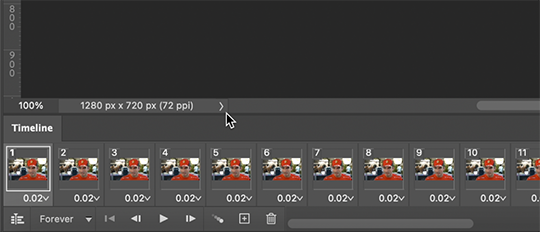
Now, all your frames should appear at the bottom in the Timeline. Make sure that the box in the left corner is set to "Forever", and now it should play the frames and loop back to the beginning each time.
3. Choosing your frames I usually aim for around 60 frames total for a gif, but sometimes I'll go under or over that number. This particular gif is 55 frames in total. In general, I want my gif to be around 3 seconds in length bc under that feels too short and over that starts to be a large file size. Totally subjective, though! (edit: I have started to experiment with up to 80 frames for some gifs, which comes out to about 4 sec.)
Play through your frames and if you want to delete some, select them and click on the trashcan icon, which you can see in the screenshot above. (If you don't delete them this way, you'll have issues later.)
4. Set Frame Delay

Once you're happy with your frames, select all of them and click on the part that says "0.02", then go to "Other..." I usually choose 0.05 or 0.06, to land my gif around 3 seconds, but it depends on the video and how many frames you have. This particular gif is set to 0.06 because it looked good and brought me to around 3 seconds.
You can always choose a delay and if you don't like it, go back and change it! Just do what looks good to you.
5. Convert to Video Timeline
Click on the symbol that looks like 4 lines stacked, and choose "Convert to Video Timeline". Now is usually when I play through the gif to see what the speed is looking like/if I like the frame delay and it's landing somewhere around 3 seconds. If not, you can just Undo and adjust anything when it's still in the frame animation stage.
Next, scroll through the Layers on the right side and delete any layers that don't have the "eye" symbol next to them -> these are frames you deleted in the frame animation stage, but they need to be deleted in the timeline stage as well. Lastly, select all your remaining layers (which should all have the "eye" symbol) so they're all highlighted.
6. Convert to Smart Object
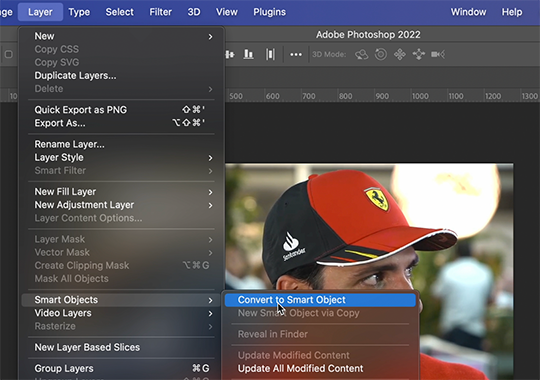
With all layers selected, go to the top to Layer -> Smart Object -> Convert to Smart Object. Ta da! You have a gif.
I always make sure to save my file at this point (you can do it before, but it just depends on how fast you work). Remember to frequently save your progress while gif-making: sometimes, photoshop gets overwhelmed and quits while you're mid-color correction 🥲. You never want to start over from scratch...
Now, some people like to crop & resize their gifs first. Or do sharpening before color. Or color, resize, then sharpen. It's really up to you. The order I like to do is Color, Sharpen, Crop, Resize, Export.
PHASE TWO: Color & Sharpening (the fun part!)
1. Brightness/Contrast
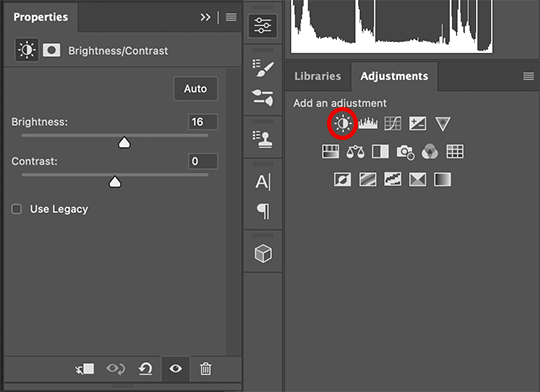
So here's where we start getting into the really subjective stuff. I always use the Brightness/Contrast and the Selective Color adjustment layers to do my coloring. I rarely touch the contrast bc that can be adjusted in selective color, but almost always, the gif needs overall brightening.
Tip: Even when I think a video looks bright to my eyes, sometimes I post the gif and they look dark once they're in the app. My advice is to always brighten a little bit, even when you don't think it's needed...
Here shows the very subtle shift in brightness I did for this gif. It can be a lot more intense depending on the video quality/lighting. The difference will also look a lot more stark after the color layer is applied.
2. Selective ColorNext is color. This is totally up to you and what looks good to your eyes. Make sure you have any software turned off that might change the color of your screen (like a nighttime filter or something that removes blue light).
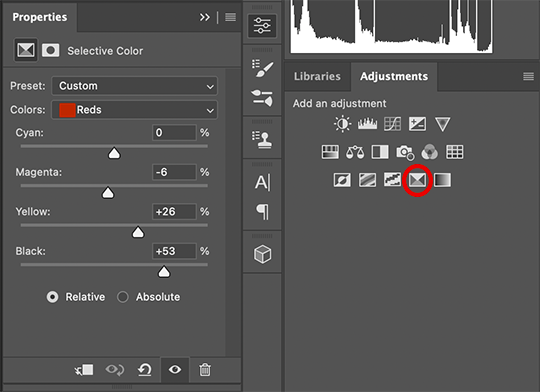
I use selective color bc you can adjust the levels of cyan, magenta, yellow, and black in each color channel independently. This is how I adjust the specific color of red that Charles and Carlos wear, or the amount of cyan in the blacks, etc. The "Neutral" layer effects the whole image, so I'll sometimes add some yellow there if I'm wanting a warmer image, or I'll add or remove black to brighten or darken the mid-tones.
Just play around! Sometimes, I'll take the slider from +100 to -100 back and forth just to see what it's doing to the gif. And I frequently turn on and off the color layer to see what the gif looked like before and after color. (I've found that most F1 content is really magenta-skewed, which you may not even notice until you've corrected it out).
Above is Color vs. No Color. It might look extreme to you presented this way, but when the whole gif is colored, no one questions it! As long as there's consistency across gifs, that's all that matters. I frequently copy and paste my adjustment layers onto another gif from the same interview/video so the look stays consistent.
Above is Color w/ Brightening vs. Without. This gives you a better idea of how much of a difference that Brightness/Contrast layer makes.
3. Sharpening I got my Sharpening routine of choice from this tutorial on gif-making. To be honest, I don't know if it's the best sharpening procedure bc I haven't taken the time to in-depth compare to other ways of doing it, but it looks good to me! So I've stuck with it. (edit: I've also added a Reduce Noise filter to my sharpening routine. But as always, just do what looks nice to you!)
I copy and past the sharpening from my other gifs onto new ones so I don't have to do all the steps again. There are quicker ways of doing this, like using quick actions and stuff, but how I do it is fast enough for me.
If you want to figure out your own Sharpening routine:
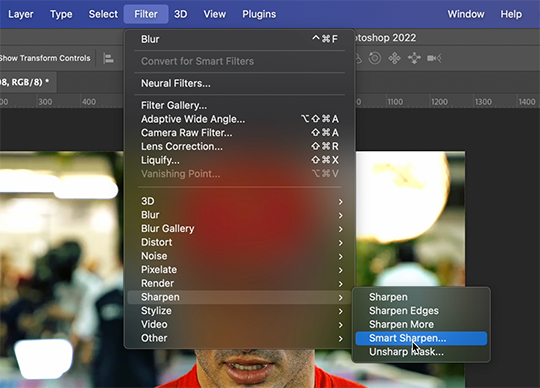
With the gif layer selected, go to the top to Filter -> Sharpen -> Smart Sharpen. It will bring up this window:
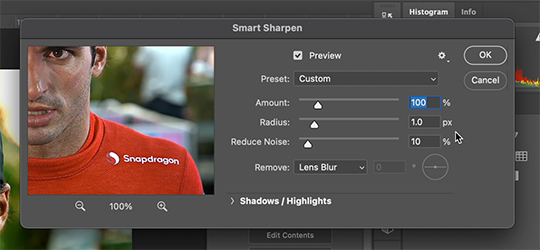
Here you can play around with the amount, radius, noise reduction, etc. and see what you like.
I also add a Gaussian Blur effect, which you'll find under Filter -> Blur -> Gaussian Blur.
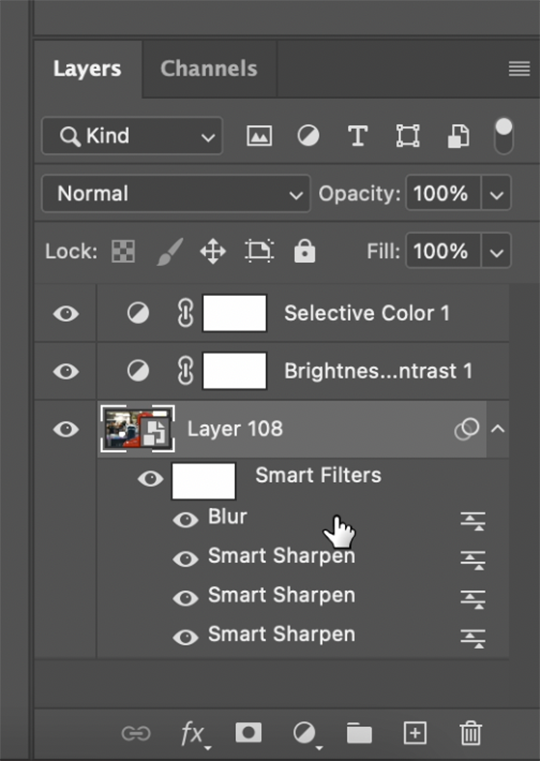
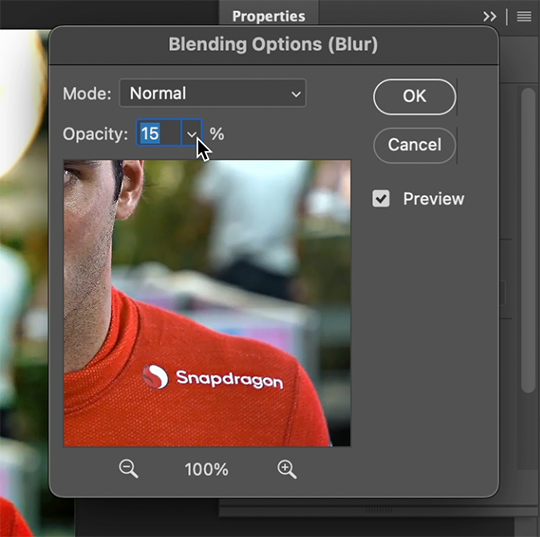
^All of your Sharpen and Blur effects will stack up underneath your gif layer like this. To adjust the opacity of one of these effects, double click on its adjustment/slider symbol to the right, and it'll bring up the Blending Options window.
If there's any sharpening or blurring layer you don't like, you can easily drag it into the trashcan symbol to get rid of it.
Above is a visual of Sharpened vs. None. You can really tell with the difference in the Snapdragon logo on either shoulder. But I also personally love how much more Carlos' eyes pop to me on the Sharpened side.
As you can see, it's up to your preference. Sometimes, I really love gifs I see that aren't sharp, but rather really smooth and almost painterly. It's up to the gif-maker!
PHASE THREE: Crop & Resize
1. Cropping
Go to the toolbar on the left and choose the Crop Tool. Above where it says "Ratio", you can choose from preset ratios that photoshop has, or you can make your own. I like to use the presets, or at the very least, clear numbers that you can apply to a whole gifset. Free transforming without a ratio makes it nearly impossible to maintain consistency across a gifset.

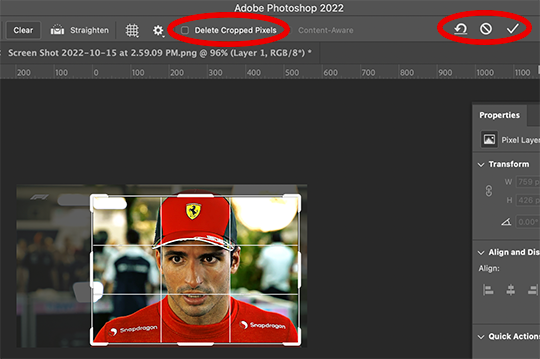
If it isn't already, uncheck "Delete Cropped Pixels". This will allow you to move the gif around inside the cropped area later if you want to adjust what's in frame. It also gives you the option to increase the frame later, if you want. You can also click the gear icon next to "Delete Cropped Pixels" and change how you view the gif during cropping.
When you're done, click the check mark or hit Enter. Now, you've got a cropped gif!
2. Resizing
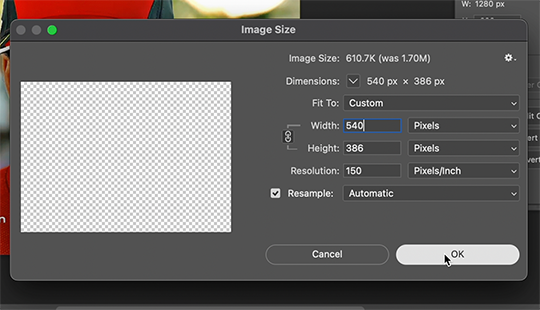
Go to the top to Image -> Image Size...
Make sure you have Pixels selected. For the Resample tab, I have it set to Automatic here, but sometimes I'll use Bicubic smooth or sharpen, depending on what I'm doing. Here's a cool post that compares the different settings. Just experiment with it.
(edit: I no longer change the resolution to 150. I've found that increasing the resolution, and therefore the size, before ultimately resizing down to 540 px means you are compressing even more (the larger something is, the more it has to be compressed within 540 px). I now leave the resolution at 72, which is what it's set at originally, and if the image composition allows it, try to crop in as close to 540 px as I can get so that when I resize, there's the least amount of compression happening.)
If I know a gif is going to be the full width of a tumblr post, I'll resize the width to 540 pixels (the height doesn't matter). But if I make a portrait-style gif which will be sharing a row with another gif, I'll resize anywhere from 270 px -> 350 px. If it's smaller than 270 px, tumblr will enlarge the gif and it'll look bad. If it's wider than 270 px, tumblr might reduce its quality a bit and it won't look as good. But personally, I prefer that if someone clicks on the gif to enlarge it, it looks better enlarged, so I usually will leave it around 345 px as long as the file isn't too big.
PHASE FOUR: Export (last one!)
Once you're happy with everything about your gif, it's time to export. (Remember to save your progress frequently!)
Go to the top to File -> Export -> Save for Web (Legacy)...
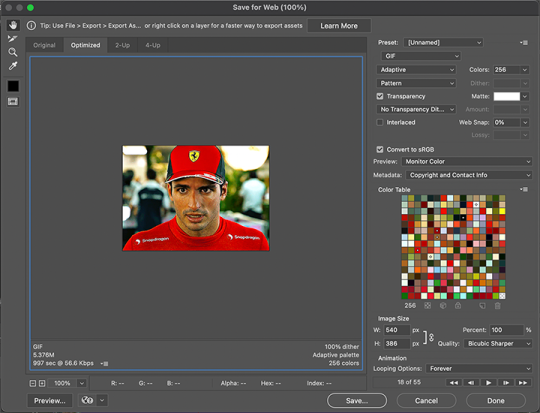
^It'll bring up this Save window.
These are the settings I like to use for gifs. You'll find a lot of differing opinions out there about Adaptive vs. Perceptual/Pattern vs. Diffusion, but you should always have "GIF" selected, "Transparency" checked with "No Transparency Dither" selected, Looping set to "Forever", and Colors set to "256". I like "Bicubic Sharper" for my Quality tab, but there are whole tutorials just about comparing those settings. The best thing to do though is to try them out and compare for yourself.
(edit: I've discovered that if a gif is slightly too large and I don't want to shorten it or resize it down, I can try to reduce the colors from 256 to 128 to get it under the limit. I'll never go below 128, and sometimes I will go to 200 or 170 to try to eliminate as little color variety as possible, but often there is not a noticeable difference in your finished gif. But always compare, of course, to make sure.)
On the bottom left is where the size of the gif is shown -> tumblr requires gifs 10MB and under, but in my experience, gifs load/play best on tumblr when they're around 6MB. I always leave a little growing room as well, bc it might say 5.8MB in this window, but after it saves, the file will have grown a little bit and will likely be over 6MB at that point. (edit: I now regularly post gifs that are around 9.5MB and tumblr seems to be able to handle it better.)
AND THAT'S ALL!
If you've made it this far...congratulations! haha
I know this is a whole lot of information and you might be feeling overwhelmed! But I hope, if anything, this shows you just how complex gif-making can be, and how it is absolutely an art! No one should be stealing anyone's gifs, as a lot of hard work and love goes into the process.
This doesn't include things like adding text to a gif, or more complex adjustments and corrections like masking or key frames. But I'm happy to do more of these if there are specific questions people have.

Let me know what you're curious about or if something is unclear! And happy gif-making! ❤️
#wooow this was a process to make lol#people can let me know if they're curious about adding text or more complex adjustments - i am at your service!#gif tutorial#ask
327 notes
·
View notes
Text

hello! an anon asked me to do a tutorial on how i do my gifs, so here is my attempt to do that but i'm so bad at explaining so bear with me
this tutorial is screenshot and link heavy!
vapoursynth
vapoursynth is really useful for resizing, clipping and sharpening gifs. i've learned how to use vapoursynth from this tutorial, if you're intrested in using it (the tutorial also explains how to set it up). with time i've started using different sharpening settings than the ones that are mentioned in the tutorial (these are settings i used to use). also you can download vapoursynth from here
i use photoshop 2020 to make my gifs
handbrake
nowadays i use handbrake for clipping, it’s super easy to use and free. upon opening the program, make sure your summary, dimensions, filters and video settings are set to this:
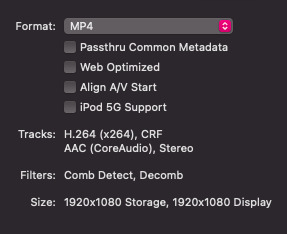
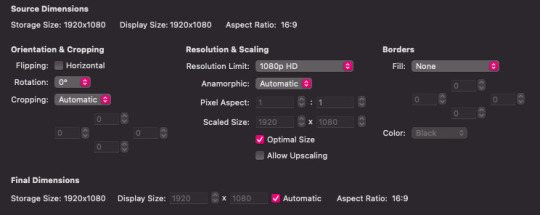
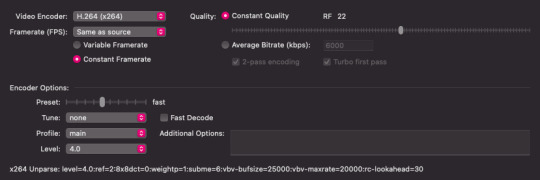
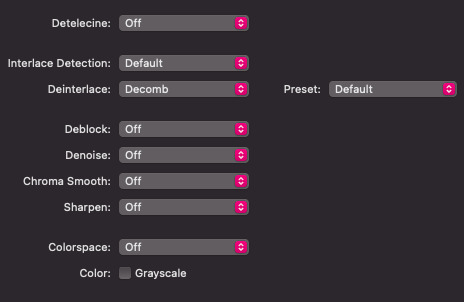
tbh the audio, subtitles and chapters don’t really matter. change the range from chapters to seconds, and find the time of your scene. type it into the boxes:

name your file at the bottom. make sure it ends with .mp4 then click the green start button. as soon as it’s finished, you can open it up in photoshop and start giffing!
i'll start with the very basics of my gif process, so if you know the basics of gif making, you can skip these few steps.
making the gif
first of all you go to file>import>video frames to layers
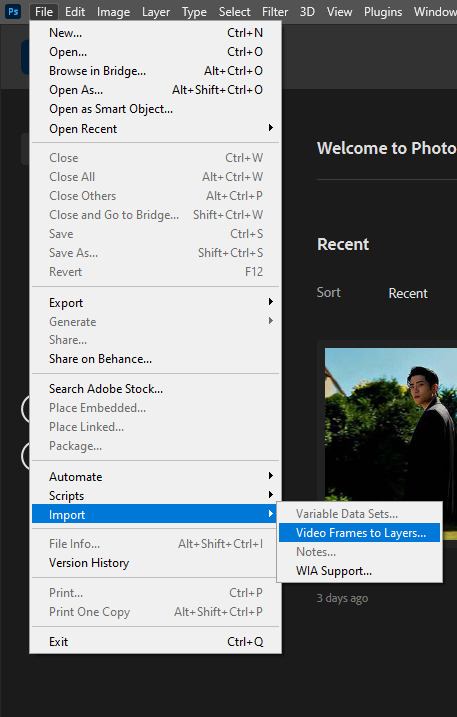
once you choose the video, a box will pop out (if you've chosen a video that has been encoded in vapoursynth or clipped in handbrake you can just click 'OK'. (if you're uploading a downloaded youtube video you'll have to trim the video with those two slides to your desired length)
i use the timeline to do my gifs (if you don't have it already opened go to window>timeline)
resizing
since I don't use vapour synth I crop and resize my gifs directly in photoshop. here you'll find a very helpful layout, made by @.dazzlingkai, with tumblr's dimensions for gifs and images. i usually do 540 x 450 for mvs. for cropping simply use the crop tool:

click on it and crop your gif. make sure you’ve set your dimensions at the top (this will help you with resizing):


after you’ve cropped it to your liking, click image at the very top then image size, and type in your dimensions:
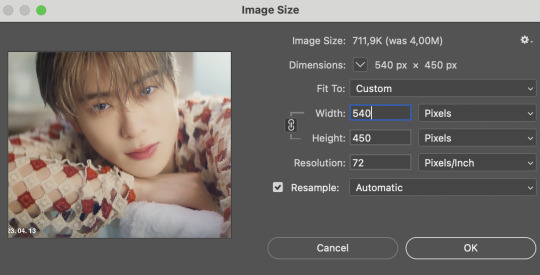
hit enter and your gif will be fully cropped and resized!
sharpening
before you should delete any frames that you don't want in your final gif. to do it choose the linear menu above your timeline and then delete frames

after deleting the unnecessary frames choose the same menu again and this time choose select all frames

once the layers are selected, click on the little chevron down to set the delay of the gifs. i choose other on the pop out menu and my delay setting is 0,05s (for vids resized in vapoursynth 0,04s might be better)
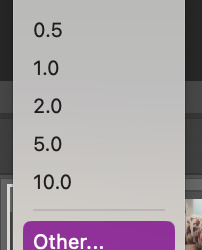

afterwards convert it to video timeline

now onto the sharpening itself.
the sharpening will depend on the quality of the file and/or how grainy it is if it happens to be.
select all your layers (hold shift and then scroll to the last layer that is visible, it has the little eye next to it, and the delete the ones you don't need)
then go to filter>convert to smart filters
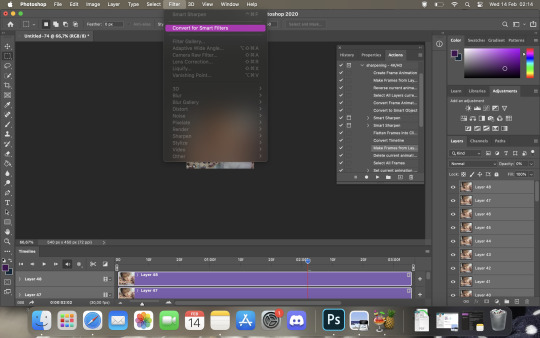
go to filter again, then select sharpen>smart sharpen
these are my first sharpening settings for 4k vids:

then i add another smart sharpen filter but with this settings to:
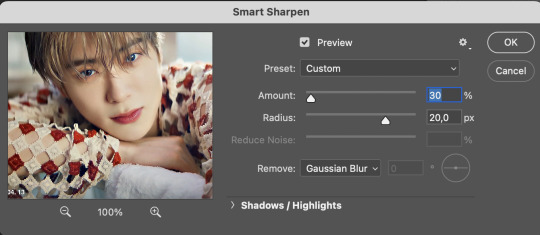
then I flatten the frames to clips.
click the linear menu>convert frames>flatten frames into clips

then convert it into timeline again and make frames from layers:
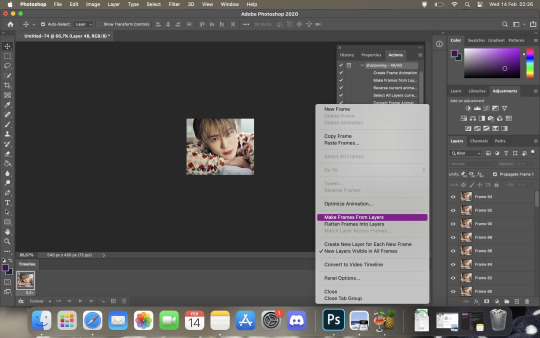
then delete the animation
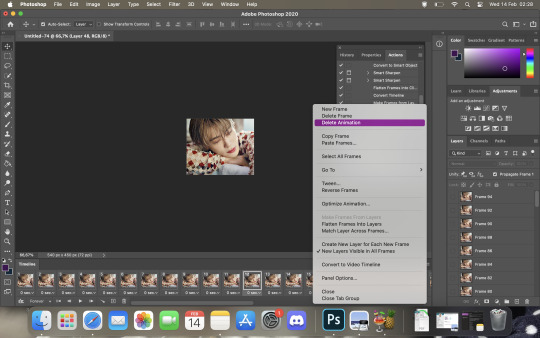
select all the layers again and set the delay to 0,05s as before
good news! to make the process of sharpening shorter you can use this action created by @.lildohnut
coloring
i adjust the colouring accordingly to the video, but i always include these adjustments:

in most cases:
i set exposure to +0,25
gradient map 1 is a white-black gradient with it's blend mode set to soft light and a 15% of opacity
gradient map 2 is basically a copy of the first one BUT reversed and the opacity set to 30% and fill to 70%
gradient map 3 is a rainbow gradient with blend mode set to saturation, 15% and fill to 50%
in selective color 2 under the blacks tab set the black +10
saving
to save your gif go to file>export>save for web (legacy)
this are my saving usual settings

hope you find this tutorial helpful! 💜
#allresources#itsphotoshop#userbru#usermich#useroptional#usersource#completeresources#resourcemarket#photoshop tutorial#gif tutorial
122 notes
·
View notes
Note
Good evening, could you possibly make a gif making process tutorial if you don't mind? I have tried to find tutorials but most of them are sadly outdated and I tried to make a gif going by them but it didn't work out well... I hope I'm not asking too much
Hey dear anon, I'm sorry I'm late with answering but have been a bit busy with some stuff and haven't been feeling well. Thanks for coming to me asking for a gif tutorial, even tho I'm not the best person at making gifs but it made me smile when you asked me. The way I do mine isn't that much of a process, I just do the basis if you want a more accurate and pro at gifing you should ask @yyh @mafuyuh @tanchirou @makiema @vyctornikiforov @invmaki @megumints @rubydragon16 and @hanae-ichihara they are very good at making gifs. So here is what I do:
GIF TUTORIAL!
1. You open Photoshop
2. You go to File option and click on "Import" then "Video Frames to Layers"

3. Then it should open you a window to your folders (these are mine lol don't mind)

4. Then you open the video you want to gif, but attention, the way I do gifs in this option, it only has to be a video file like avi or mp4, mkv doesn't work. For mkv's you need a software for you to make the videos turn into frames, like I said you should ask some of my mutuals, that make gifs through that software and then import to Photoshop).
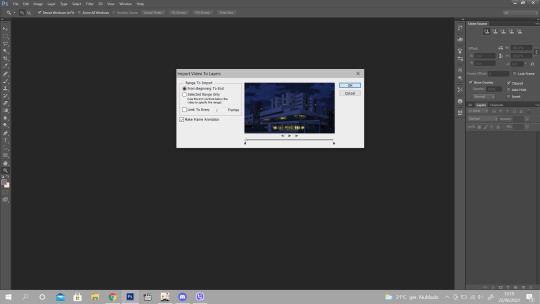
5. This is what appears when you select the video, now what I usually do is click on the "Select Range Only" and under it, it asks how many frames you want, I normally choose 2 like it's on there, and there's sometimes that I don't click it, I leave as it is. If you select the 2 frames he will decrease the number of frames, the more you choose the less frames will appear so I suggest you choosing only 2 or none.

6. Then, when you want to gif a scene, you need to choose which scene you want, like I have on the picture above, see the red circule? The lil black triangle is what helps you to select the part you wan to gif, when you find the scene and push the lil triangles between the scene you want, you click ok! (Photoshop will ask you something about how big the scene frames are but you click continue nonetheless)

7. So here it is all the frames of the scene I want, now you will only choose the particular part to gif, be careful not choosing too many frames or it will be too heavy and will not upload on tumblr. On the timeline under Dabi you select and then delete the parts you don’t want. You then select the time you want, it’s on each frame, you select all and add the time. Then you click on here:
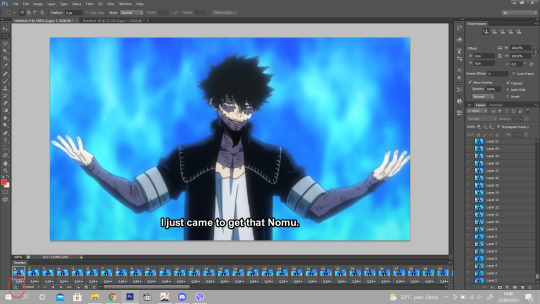
8. where the red circle is, so that you can make the animation.

9. On the right section, you have all the layer frames, the ones who doesn’t have the little eye, are to be deleted cause they were the ones you deleted earlier on the timeline, so those are to discard, like this:

10. Now you have to select all the layer frames on the right section,click on tight click of the mouse and choose the option “Convert to Smart Object”

11. Then you have your animation done

12. Now to do the frame so that it can be the right size to post in tumblr and to cut the subs lol XD You go to image, and choose the “Canvas Size” and it appear this

13. You go to the height and try to make it shorter on the height size so that you won’t let the subs be seen on the gifs. And you can do on the width too so that the gif frame won’t look too long. Like this, it has 25,4 on height and 45,16 on width, so I will add 22,5 on height and 38 on width and you click on the arrow like I have bellow

14. And with that it cuts a lil on the width and the height and it cuts the subs :D You then go to the Image option and select the “Image Size” you then put 540px on the size. the sizes of tumblr.

15. Now it’s the time we play a bit with colors haha XD I already have a psd so, I just add and play a bit with the colors and see how the quality looks
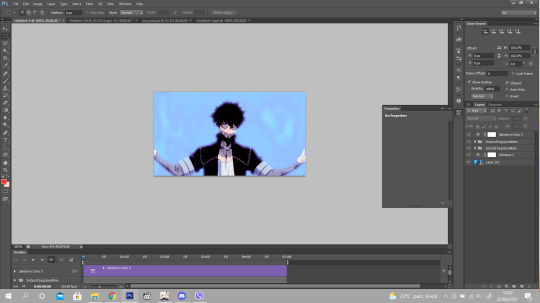
16. If it looks with some bad quality you just go to “Filter” then choose the option “Blur” and then “Surface Blur”
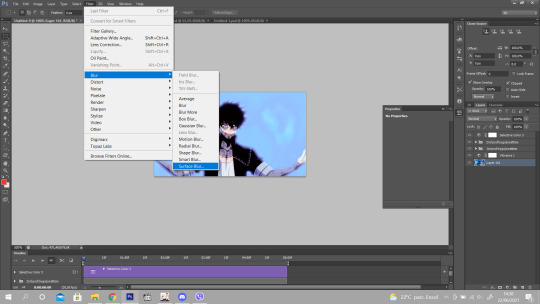
17. It opens this window and add the same option as I have, it’s sufficient for the bad quality ^^

18. And finally you go to filter again, go to “Sharpen” option and click on “Smart Sharpen” so the gif lines look more sharpen and gives a more quality and see more the details on the gif.
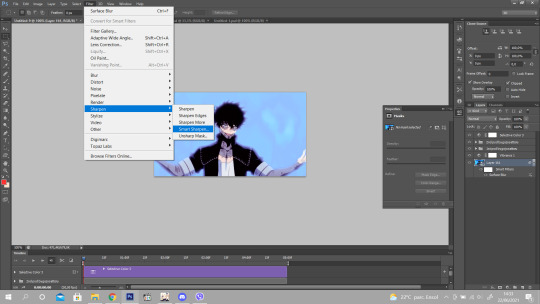
19. Add the same as I have and it’s finished! :)

20. To save you go to File and click on “Save for Web”
Done! ^^ Hope this helps you babe and that I was able to explain well since I’m bad at it lol! Anything you need just ask <3 Thank you again.
272 notes
·
View notes
Text

As requested here is a quick & easy tutorial on how I make my gifs! 🤗 Hopefully this helps and encourages you to make some gifs of your own!
For this tutorial I will show you how I made this adorable gif of Rei Ryugazaki from Free! I will be going through the basic steps on how to make the gif itself and I will be using Adobe Photoshop for this.
STEP 1
The first thing you will need to do is import your frames into photoshop. (Make sure you are using an mp4 video for this. (I like to use Quicktime Player to screen record my scenes beforehand.) To import your video into Photoshop go to File > Import > Video Frames to Layers

STEP 2
At this step you will want to import the part of the clip you want to gif. Move the little cursors at the bottom of the clip to get the part you want. Make sure you are on 'Selected Range Only' before you press 'OK'.
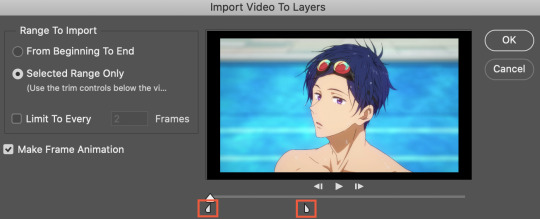
STEP 3
Now you have imported your video, you will see your layers on the right. At this stage I will delete unnecessary layers. If you click the eye icon, this will turn the layer’s visibility on and off. You will notice some layers repeat before the next movement happens. These are the ones you don't want and you can delete them.

STEP 4
Now that you've deleted unnecessary layers, you will go to your timeline and click the icon with the 3 dashes and click 'Select All Frames'. (If your timeline is not visible go to 'Window' on the top menu and make sure 'Timeline' is ticked.) With your frames selected, drag these into the trash at the bottom of the timeline.

STEP 5
Now go back to the 3 dashes icon and click 'Make Frames from Layers'. You will notice your frames now match the layers you have on your right.
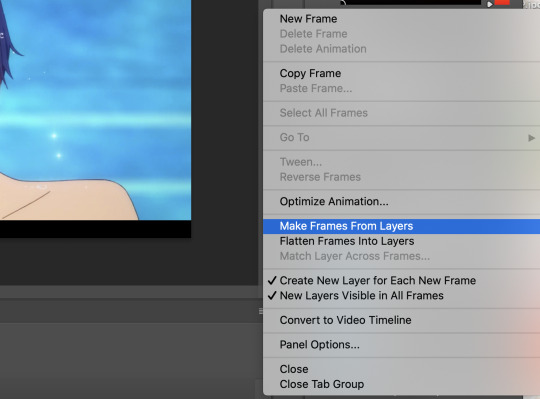
STEP 6
Here you will adjust the seconds of your frames to make sure it flows nicely. Select all your frames and click the arrow next to the seconds. This is where you can adjust your timing and I usually like to do '0.1 seconds'. You can play through the gif to make sure you're happy with the pacing!
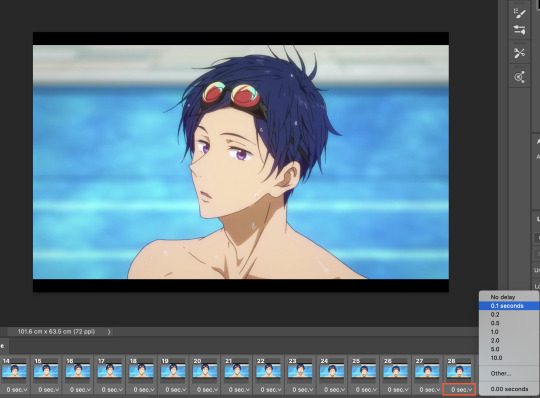
STEP 7
When you're happy with the timing, select all of your timeline frames and layers. After this go to the 3 dashes icon on the timeline and click 'Convert to Video Timeline'.
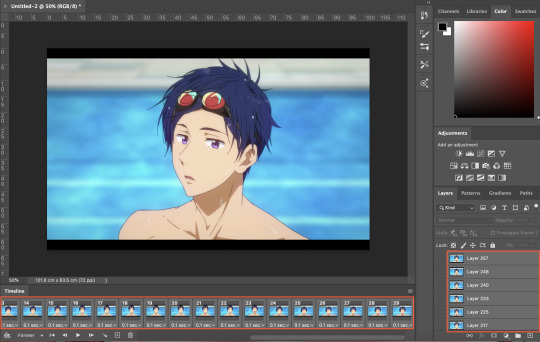

STEP 8
Once you've converted your frames into a video timeline, go to Filter > Convert for Smart Filters and click ‘OK’.

STEP 9
From here, I will crop and resize my gif! Just go to the crop icon and input your dimensions at the top left. I used ‘ratio’ 268x160 for this gif.
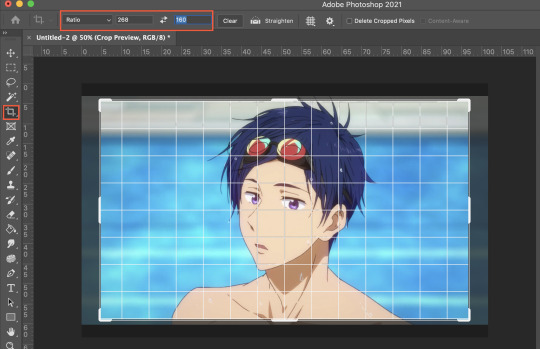
STEP 10
Now go to Image > Image Size and the image size menu will pop up. Input the same numbers you did for the crop ratio into the ‘width’ and ‘height’ and click ‘OK’.


STEP 11
Congrats the base of your gif is done! From here I will add my sharpening and colouring. If you would like to know how I sharpen my gifs check out my sharpening tutorial HERE. For colouring, I use adjustment layers such as ‘selective colour, hue/saturation, levels, gradient map’ to colour my gifs.

And you’re basically done! Here is my gif with sharpening and colouring. All that’s left to do is export your creation!

STEP 12
Go to File > Export > Save for Web and this menu will pop up. Simply click ‘Save’ and you’re done!

HAVE FUN!

completed edit can be found here
77 notes
·
View notes
Text
TOOL TUTORIAL 2
Gifski
GIF GENERATION AND OPTIMIZATION
Tool Type: GUI or Command line tool (there are two versions)
Difficulty: Easy (GUI); Moderate (CLI)
Operating systems: Mac, Windows, and Linux (CLI only—no GUI)
Input(s): Video files (MP4)
How much of a difference can you tell between these two gifs?
Both seem to give good results, but to me, in the top row, the one on the left looks better, but in the bottom, row, the one on the right looks better.
Gifs in the left hand column are converted and compressed to 500 px using the ffmpeg command from Tutorial 1; in the right column, using Gifski.
Gifski GUI Version (Mac and Windows)
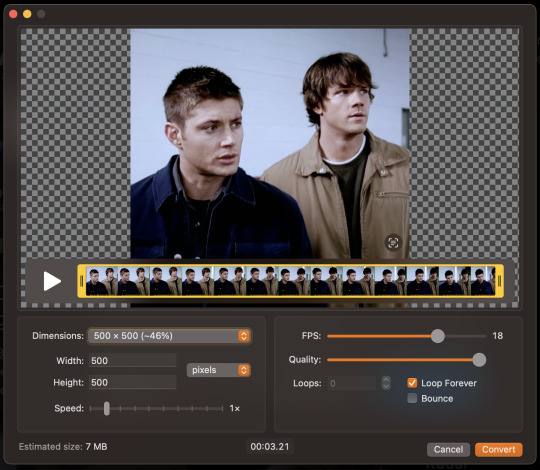
NOTE: Gifski is solely for converting MP4 clips to optimized gifs. If you need to caption or color, you have to do that externally.
Installation
The GUI version of Gifski is available in the Apple App store, but links to it and the Windows downloader can be found through the official site.
Using the GUI
After opening your MP4 file, in the bottom left corner, you can see the estimated size of your resulting gif. This estimate will auto-update as you adjust your compression settings. Remember: To upload your gif on Tumblr, it needs to be about 10MB or less. If it's already 10MB, just go ahead and click convert! If not (which is more than likely):
Adjust FPS to 18. I find this frame rate to be a good balance of compression and retained quality.
Decrease the dimensions of your gif as needed. Whether you use the drop down box or the dialogue boxes, Gifski will automatically scale to retain your gif's screen ratio rather than stretch it to fit, so you don't need to worry about keeping your gif proportional.
You can finely adjust the settings until your gif is exactly 10 MB if you want to keep the best quality, or just aim for a ballpark.
Cick "Covert" then save the resulting gif. Do this for all your .mp4 clips and then boom. You're done.
Gifski Command Line Version (Linux, Mac, Windows)
There is a command line version of Gifski just like there's a command line version of ffmpeg. While the GUI version isn't available for Linux, the command line version is also available for Linux.
Installation
This must be installed separately from the GUI version, via your system shell (Powershell on Windows, Terminal on MacOS). I recommend you install via Homebrew if you're on Mac or Linux by pasting this into your terminal (if/once Homebrew is installed):
brew install gifski
Windows users or other users who don't want Homebrew can follow directions on the Gifski website.
Converting one video file to GIF
This simple command will convert one .mp4 file to .gif (parts in red can be adjusted, parts in blue should be changed):
cd FilePathToYourMP4 gifski --fps 18 --width 500 --quality 100 -o output.gif input.mp4
Where input.mp4 is the name of the MP4 clip you want to make into an optimized gif and output.gif is the desired name of your gif on output.
How to adjust the options in the script:
Change the number frames per second (fps). Go to fps=18 and change “18” up or down.
Scale the gif up or down. Go to width 500 and change “500” up or down to scale the gif up and down by its pixel width.
Change the quality. Go to quality 100 and change “100” to any value between 0 and 100, where 100 is the highest quality.
Converting a folder of video files to GIF
Place all of your video clips into a folder called gifset1. Put an empty subfolder inside the gifset1 folder called gifs. Go to your system shell and copy and paste the following indented text:
Linux and Mac:
cd ~/Desktop/gifset1 for i in .mp4; do gifski --fps 18 --width 500 --quality 100 -o gifs/${i%.}.gif "$i"; done
Windows:
cd ~\Desktop\gifset1 for i in .mp4; do gifski --fps 18 --width 500 --quality 100 -o gifs\${i%.}.gif "$i"; done
Once the process is finished running (your shell prompt will reappear allowing you to type in commands again) if you go to to the gifs subfolder in your gifset1 folder, you will find an optimized gif of every video file has been rendered.
2 notes
·
View notes
Text
wench's very basic gif tutorial [photoshop]
@screechingtrashbarbarian asked me how I make my gifs, so I figured I'd throw together a little guide. ♥ This won't cover doing any kind of overlays, uniformed aspect ratio for gif sets, or adding text, but it should give the basics on converting a video into a semi-decent-quality gif.
What You Need:
Video capture software (I use the built-in screen capture from Nvidia, but there are so many free options available these days. I know Windows 10 also has an Xbox overlay you can use.)
Photoshop (I use the most recent version of it, but I've been using this process for about 5 years now. Some specific functions might be labeled slightly differently, but the gist of it should be the same.)
1. Record your video. The higher the quality your video, the higher the quality your gif, but you don't need to go nuts here. I record at my default HD screen resolution (1920x1080), but for smaller gifs, 720p will probably be fine, too.
2. In Photoshop, go to File > Import > Video Frames to Layers... and select your video. (If you don't see your video, it's probably not in a format that's compatible with Photoshop. I record in .mp4 just to keep it simple.)
3. When you get this popup, choose Selected Range Only and Limit to Every [#] Frames*. (Make Frame Animation should also be selected, but I think this is a default setting.)
Now use the sliders under the video preview to select the specific scene you want to gif. You don't have to be 100% precise here, and it's better to overshoot as you can delete the excess frames once it imports.
* Photoshop defaults this option to 2 frames, but depending on how long the scene is you want to gif, you might need to increase this to 3 or 4. My personal rule of thumb is that 540px shouldn't have more than 40 max frames, and anything smaller can go as high as 50 frames. Typically, though, I shoot for 20-30 frames per gif to keep the file size small while still keeping the quality decent.
However, if you find that skipping a lot of frames is making your animation look really choppy, you might want to consider breaking the scene up into 2 (or more) gifs.
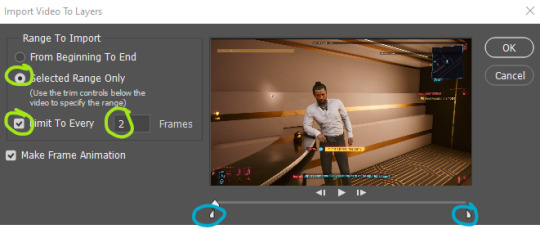
4. Once you're happy with your range and frame setting, click OK and your workspace will now look something like this (emphasis on the Timeline and Layers windows):
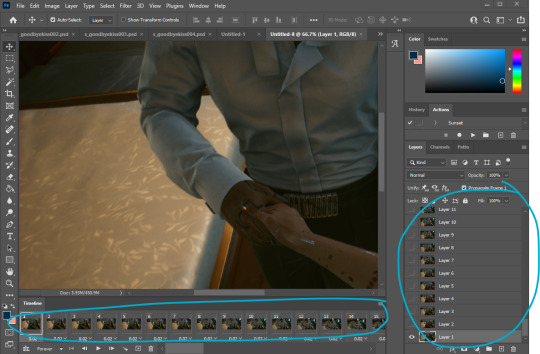
5. Now I play the frame animation (the little triangle icon at the bottom of the Timeline bar) to make sure 1) I got the scene I wanted and 2) to see how I need to adjust the speed.
Photoshop defaults to .02 seconds, which is usually way too fast. Typically, I set my speed around .12 to .15 seconds, but the exact speed can vary depending on each project--Somewhere between .1 and .2 is often the sweet spot. Use the playback option to get a feel for how fast it moves, but don't be deterred if it seems slightly too jerky when you slow it down--I find that it smooths out a bit once you export the gif.
(If you're really unsure about the speed, you can always preview the gif by going to Export > Save for Web (Legacy) and taking a look at how it generates.)
6. If you do have some excess frames in your animation that you want to delete, first select the frames. Then click on the Timeline menu and choose Delete Frames.

7. I also recommend deleting the layers that corresponded with the deleted frames. These layers won't do anything if you don't delete them (provided you don't do anything wonky by accident), but removing them helps keep the file size smaller and your workspace a little more manageable.
To delete the layers, simply select the layers and click the trash can icon.
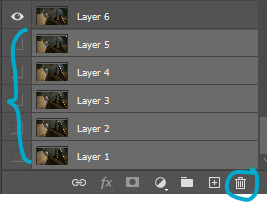
8. Now I resize the image to whatever I want the gif to be. You can also use the crop tool like normal if you want to adjust the aspect ratio. For the sake of simplicity, we'll just drop this down to 540px in width.
(If you notice that the quality of your images doesn't look right after resizing, play with the Resample options. Certain settings are more suitable for certain color palettes, graphics styles, etc.)
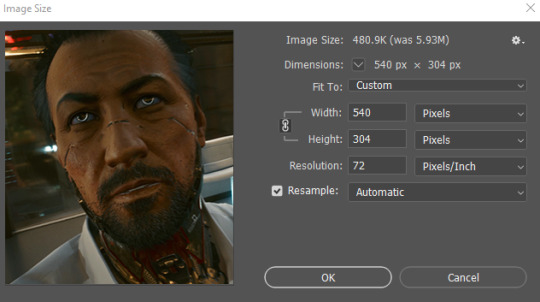
At this point, you have what you need for a finished gif. Just go to Export > Save for Web (Legacy) and choose the gif option that will suit Tumblr's size restriction while still looking good.
However, if you want to make a few more aesthetic changes, read on:
While you can technically edit frame-by-frame and adjust colors using Adjustment Layers stacked on top of all the frames and layers, it can be tedious and clunky and not always worth the effort.
So I prefer to use the Video Timeline/Smart Filter option:
9. In the Timeline menu, go to Convert to Video Timeline.
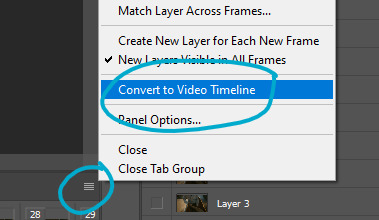
10. Now select all your layers, and go to Filter > Convert for Smart Filters. (Click OK if you get a popup explaining what the action will do.)
Your workspace should now look like this, with one single item under Timeline and one single item under Layers.
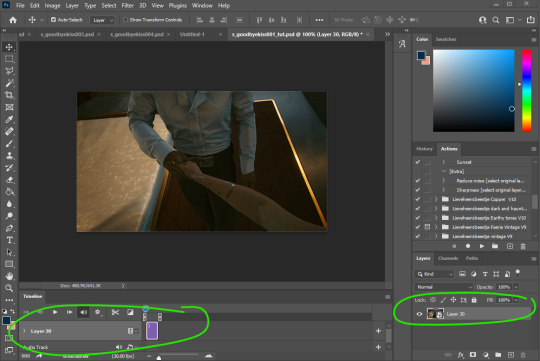
11. The first thing I like to do is run the Smart Sharpen filter: select your layer, go to Filter > Sharpen > Smart Sharpen. These are typically the settings I use, but this is another situation where you might need to tweak settings based on the type of gif you're making.
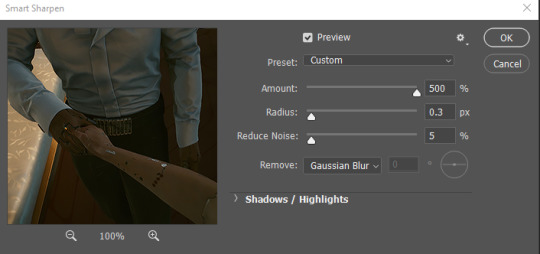
12. Now I play with some color correction. Again, the exact settings will vary on every project and can require a little trial and error, but I mostly use the Levels and Hue/Saturation options to make them a little brighter and more vibrant. (Lately, I've been on a kick of desaturating yellows a bit and increasing reds and blues. You can isolate the specific colors you want to edit in the dropdown menu of the Hue/Saturation module.)
If I'm doing a gifset, I also prefer to do these edits as layers (Layer > New Adjustment Layer) rather than as direct image adjustments, so I can just copy the layer over to my other gifs. But, since you converted these to a Smart Object, you can use the direct image adjustment options instead (Image > Adjustments > [Choose your poison]).
You do want to be cautious about having too many colors in your palette, however. A lot of color means a very large file size and often a lot of dithering if the gif file type can't support all the colors in your file. I did recently learn about this trick to help clean up color noise a bit, but it's kind of tedious and I don't know that the payoff is totally worth it. (I tried it with this set, and ehhhhh. You can be the judge.)
13. Once you're happy with your colors, you get to export! Go to Export > Save for Web (Legacy) and on this window, choose the 4-Up option to see the choices you have available:
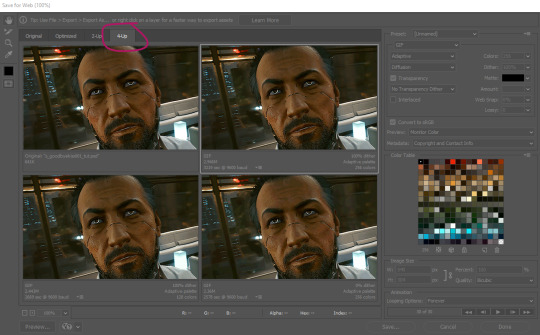
Usually, the choice in the top right is the best option, but not always. And if you're unhappy with all of them, you can cancel the export option and go back and tweak the colors.
This is the end result! It's actually a little faster than I would have liked (granted, that could also be because the scene I'm making a gif of is kind of fast-paced--little things like this can also affect gif quality), and the colors could probably be tweaked a little more, but that's the gist of it!

57 notes
·
View notes