#How check disk space mac
Explore tagged Tumblr posts
Visit Tumblr Blog
Explore Tumblr blogs with no restrictions, modern design and the best experience.
Last Seen Tumblr Blogs


Fun Fact
69% of Tumblr users are millennials.
Text
Session 2 Recap: Part 2/3
Chuck joined Prometheus in the next car. Geraldine and Dolly made their way out, but ran out of movement just before making it to safety, which left them trapped with the three ghouls that were near enough to dash into melee distance with them. In a moment of quick thinking, Dolly dumped an entire bag of ball bearings onto the ground just before making her escape, coating the floor except for a thin path Geraldine could use to slip away. The ghouls swung on Dolly, but between her quick movement and their unstable ground they were unable to land any attacks. Geraldine fired another explosive round, knocking one ghoul out of range of her and slipping into the dining car with the rest of the party.
The party had only seconds to recover as Mac slammed the door shut. The space between cars began to flood with ghouls, and the few that weren’t busy tripping on ball bearings managed to claw into the door and attempt to pry it open. Mac resisted, which led to 3 roll offs as they matched the same result on an athletic check twice (once being a crit on both sides). The ghouls clawed furiously at the door, and Mac practically burnt out his circuts resisting them. Eventually, he managed to force the door closed hard enough that only a few clawed fingers made it inside the car, though he had to continue to hold on tight to keep it that way.
As everyone took a moment to recover from terror and wounds (except for Geraldine, who was quietly elated), Prometheus caught the party up on what he had discovered. Everyone searched for an additional emergency lever, which Dolly spotted behind a shelf of alcohol. She squeezed herself behind the shelf and activated the lever, which revealed the second step in the convoluted evacuation process. A computer sparked to life on the wall, which Chuck wasted no time cracking into and ordering to make an emergency launch. Two valves began to glow at the back of a car (labeled “wing deployment”), and a steering mechanism emerged from the ground beneath the bar.
As the party realized what they needed to do, two ghouls burst into the car through the windows (which were quickly covered by emergency blast doors). Though the door was secured, the ghouls that were somehow managing to crawl along the outside of the interstellar train were preparing to breach. One cornered Dolly, and one intercepted Chuck as he sprinted towards the steering mechanism. Dolly struck down the ghoul in front of her, and ran forward to help prepare the car to detach. Prometheus sprinted forward in this moment, letting his glasses fall away as he whispered incomprehensible things at the ghoul attacking Chuck. Dolly, perceptive as she is, noticed immediately how strange her current company was: Prometheus with his deep red sclera, lack of iris, and barely visible black pupil. Chuck bleeding orange and holding a sword in the third arm he apparently possessed. Geraldine beamed with contentment as she and Chuck’s floating disk sprinted forward to deploy the wings. They were odd company, and she had many questions, but they could wait. For now, she was grateful that they could get her out alive.
The party managed to strike down the last of the ghouls in combat range and flee before any more could breach. The dining car had been fully converted into an independent cargo ship, and Chuck piloted them away from the crumbling train. They got one last glimpse of ghouls, ghosts, and the thing that had been tearing apart the train cars from underneath them: a massive, ethereal maw with fangs as large as ribs and a tongue made of ghostly arms. Finally, they had an actual moment to sit and process what was happening as they made haste towards the nearest habitable planet.
#dungeons & dragons#d&d#d&d 5e#ttrpg#tabletop rpgs#tabletop roleplaying#tabletop gaming#space western#space fantasy#fantasy horror#storytelling#writing#creative writing#yeehaw in magic space#the barley arc
5 notes
·
View notes
Text
How to Connect Cricut Bluetooth to Mac and Windows?

Have trouble connecting a crafting machine? Here, I answer how to connect Cricut Bluetooth on Mac and Windows computers. During my six-year crafting journey, I faced many challenges. Be it creating a project or setting up the machine, the journey was full of ups and downs.
Nothing can be worse for crafters than setting up this machine. It takes time, and many non-tech-savvy people do not like to do it—no worries; I know your pain😉! In addition, these years of experience have taught me a lot about this exceptional machine.
Hence, believe it or not, these overall steps can be fun. To learn more, delve into this tutorial and check out the blog. I will explain the system specs first, then show you how to connect Cricut to computer via Bluetooth.
System Specifications for Using Cricut Design Space
Alright, we are heading to learn how to connect Cricut Bluetooth. But before you connect, you need to check the system specs. As I said earlier, checking the system steps can prevent your PC from crashing and many other errors. Let’s take a look at a few important points provided below:
Mac
Supported Operating System: macOS 11 or later
RAM: 4 GB
CPU: 1.83 GHz
Display Resolution: 1024px x 768px
Internet: Minimum 2 – 3 Mbps Download & 1 – 2 Mbps Upload
Hard Disk Space: 2 GB required at least
Connection Type: Bluetooth wireless or wired USB
Offline Feature: Yes, it is available for Mac
Windows
Supported Operating System: Windows 10 or later
RAM: 4 GB
CPU: Intel Dual-Core or equivalent AMD processor
Display Resolution: 1024px x 768px
Internet: Minimum 2 – 3 Mbps Download & 1 – 2 Mbps Upload
Hard Disk Space: 2 GB required at least
Connection Type: Bluetooth wireless or wired USB
Offline Feature: Yes, it is available for Windows
How to Connect Cricut Bluetooth to Your Computer?
Here, I am going to connect your machine to Bluetooth devices such as Windows and Mac. By connecting this machine to your compatible device, you will be able to start your crafting journey in one go! Let’s delve into the steps given below:
Mac
Power on your machine and MacBook.
Cutting machine should be within 10-15 feet of your Mac.
After that, you will need to go to the Apple menu given in the upper left corner.
Next, choose System Preferences or System Settings.
Now, search for the Bluetooth option.
Turn on the Bluetooth.
Wait and see if your Mac detects your nearby machine.
When detected, select it and click on the Pair button.
Once done, return to your Design Space app and Cricut New Product Setup.
Then, your machine will show that your device is connected.
Windows
Turn on the PC and place it 10 to 15 feet away from the machine.
After that, press the Start button (Windows logo-like key) on the keyboard and select a gear icon, which is your Settings.
Once the Settings opens, you need to select the Devices option.
Now, you will need to find the Bluetooth option and check if it is on.
If your Bluetooth is off, turn it on.
Then, you have to add your machine by clicking on Add Bluetooth or other device.
On the next pop-up screen, you are required to select the Bluetooth option.
Also, your PC will start looking for the machine nearby.
Once it finds your machine model, click on it to pair.
Finally, you learned how to connect Cricut to computer. Afterward, you can open your Design Space and start setting up the machine. For setup, you will need to follow the on-screen prompts displayed on the Design Space app. Once done, you are all set to craft!
Final Words
So, yeah, that’s all in this blog tutorial. By now, you might have learned how to connect Cricut Bluetooth. Afterward, you are ready to proceed and complete the machine setup. To conclude, I explained the system specs so that you can understand your system’s compatibility before setting it up. After the system specs, I explained the steps for connecting the machine to the PC and Mac separately. Good luck with your crafting journey.
FAQs
How can I connect my Cricut to Bluetooth?
To create your machine to your Bluetooth device, check out the following points:
Go to your mobile device (Android or iOS).
Ensure Bluetooth is turned on.
Also, turn on the heat press.
Then, head to Google Play Store (on Android) or App Store (on iOS).
Search for the Cricut Heat app and download it.
Open the app and select the Cricut Setup button on the screen.
After that, your device will detect your nearby device.
Tap on the Connect button.
Finally, your heat press is paired now.
Which Cricut machine is Bluetooth enabled?
Several Cricut machines are Bluetooth enabled, such as the Maker, Maker 3, Explore Air 2, Explore 3, Joy, and Joy Xtra. These latest and smart cutting machines have built-in Bluetooth and are compatible with iOS, Android, Windows, and macOS. However, they can be connected via USB cable except for the Joy model.
How to install a Bluetooth adapter in Cricut?
In order to install a Bluetooth adapter in your Explore or Explore One machine, delve into the following quick steps:
Turn on the Explore machine.
Grab the Bluetooth adapter and remove its cap.
Insert the adapter into your Explore machine.
Ensure the text on the adapter is facing up
When you notice a blue light flashing, it means you have installed the adapter.
Source: How to Connect Cricut Bluetooth
#how to connect cricut bluetooth#how to connect cricut to computer#cricut design space download#cricut design space app#cricut design space software#cricut explore air 2 setup#Cricut setup on computer#how to setup cricut explore#cricut explore air 2 software#Cricut New Machine Setup#Cricut maker setup
1 note
·
View note
Text
How To Install VOCALOID 1 On a Modern Computer
Full tutorial is under the cut, but the basic steps for this process are:
Enable virtualization on your computer.
Install VirtualBox.
Use VirtualBox to create a Windows XP virtual machine.
Transfer the VOCALOID files into the XP virtual machine.
Install the VOCALOID program on the XP virtual machine.
You don't need to have a ton of space or RAM for this, it'll work on a garbage computer (like mine). It works on all common operating systems too (Windows, Mac, or Linux).
Step 1: Enabling Virtualiztion
This is the only step that varies based on which operating system you're using.
I'm covering the instructions for Windows 10 in this post (because that's what I use). If you don't use Windows 10, you'll have to look up a dedicated tutorial for enabling virtualization on whichever operating system you use.
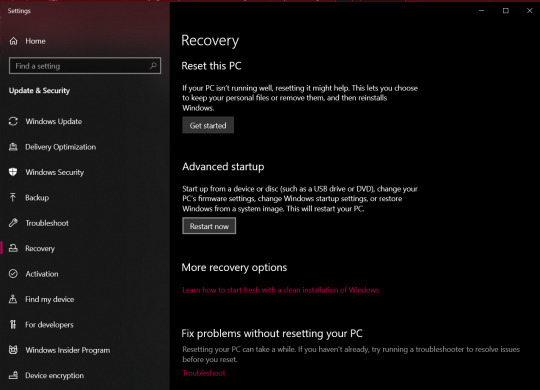
Locate "Advanced startup" in the regular system settings. Either use the start menu search bar to get there quickly, or click through "Settings" > "Update & Security" > "Recovery".
From there, hit "Restart now"
After the restart, you'll be brought to a screen asking you to choose an option.
Select "Troubleshoot" > "Advanced options" > "UEFI Firmware Settings"
You'll then be prompted to restart to change the UEFI Firmware Settings. Hit restart, and you'll be sent to your computer's BIOS.
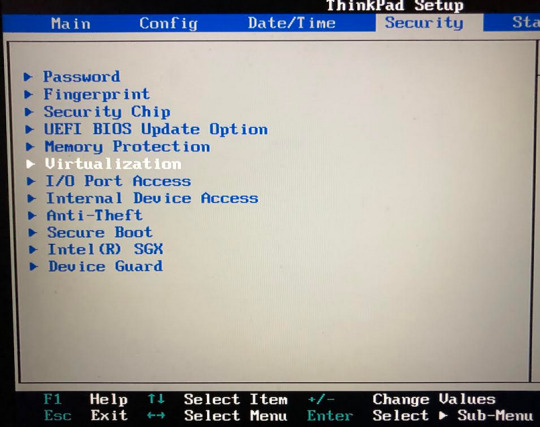
The specific menu will vary depending on what brand of physical computer you're using (Lenovo, Dell, Toshiba, etc). I'm providing the visual aide for a Lenovo here, but you can look up a visual guide to the BIOS for whatever brand computer you use.
Head over to the "Security" tab to find the virtualization setting.
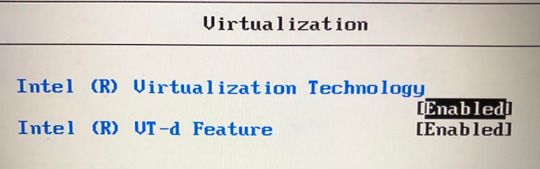
Once you enter the virtualization settings, switch both the options here to "Enabled".
Then you just need to save and exit by hitting F10, and your computer will restart normally.
You can see whether or not virtualization has been enabled by going into "Task Manager". Get to "Task Manager" by right-clicking the task bar, or search it up through the start menu.
Once you're in "Task Manager", click over to the "Performance" tab, and it will say "Virtualization: Enabled" or "Virtualization: Disabled."

End of Windows 10 specific instructions here, everything after this will apply to all operating systems.
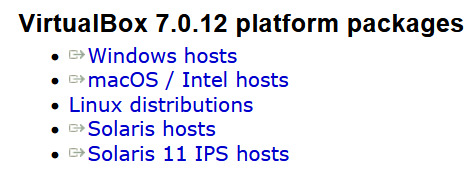
Step 2: Install VirtualBox
VirtualBox can be downloaded from here (on virtualbox.org). Just pick the right package for your operating system.
Once the EXE file is downloaded, run it to go through the VirtualBox installation process.
Step 3: Create a Windows XP Virtual Machine
First, you need to get an ISO of Windows XP. (Digital equivalent of an installation disk basically). I acquired my copy through Internet Archive here.
Just hit "ISO IMAGE" under "DOWNLOAD OPTIONS". Don't worry if it's downloading super slowly, that's normal on Internet Archive.
Open VirtualBox, and select the "New" option to create a virtual machine.

From there, go under the "ISO Image" tab and find your XP ISO. VirtualBox will be able to detect that you picked Windows XP.
"Skip Unattended Install" will be unchecked by default. I recommend keeping it unchecked so you don't have to go through the XP installation process manually.
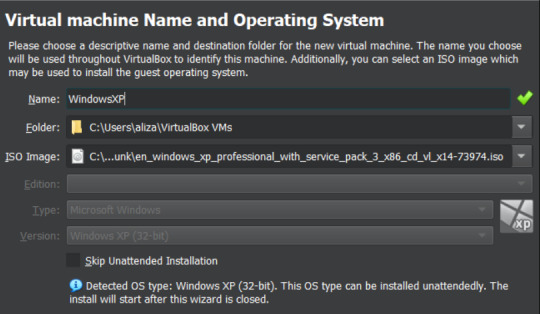
The Internet Archive page provides this working product key you can copy-paste: MRX3F-47B9T-2487J-KWKMF-RPWBY
"Guest Additions" will be unchecked by default, but I recommend checking it. This is a surprise tool that will help us later 😉
(You could still install Guest Additions later, but checking the box here is less work).
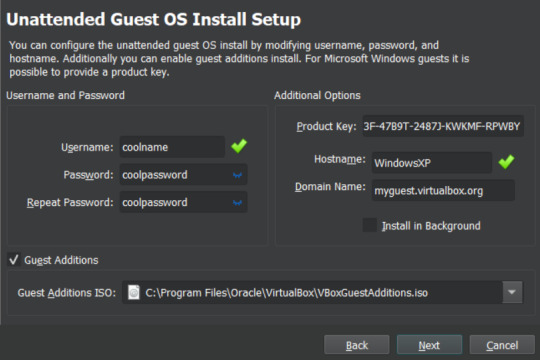
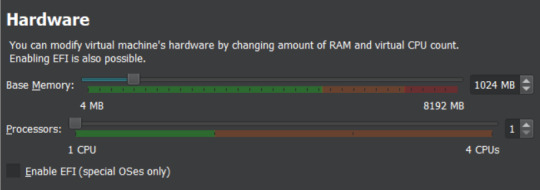
512 MB of RAM is the minimum you can away with for VOCALOID, but a full 1 GB (1000 MB) is recommended for better performance.
No need to adjust CPU count.
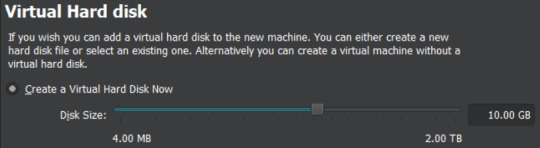
Choose "Create a Virtual Hard Disk Now".
Now you get to pick how much storage space the virtual machine will have. VOCALOID files aren't very big, so they don't require too much space.
I'm not sure about the true minimum size required for this, so I recommend just leaving it at the default of 10 GB. It's unlikely that you'll actually fill/use all of that space, it's just the maximum that the virtual machine will be hypothetically capable of holding. XP with V1 installed took up less than 4GB for me, but it won't let you install the program without extra space available.
There's an easy way to add more storage later if you accidentally make it too small in this step (info at the end of this post).
Make sure all of the settings you chose are correct.
The summary should say "Skip Unattended Install: false", "Product Key: true", "Install Guest Additions: true".

Now VirtualBox will create the machine and install XP on its own. Just leave the window open and don't interact with it until it's finished.
It'll be left on the Windows XP desktop once installation is complete.
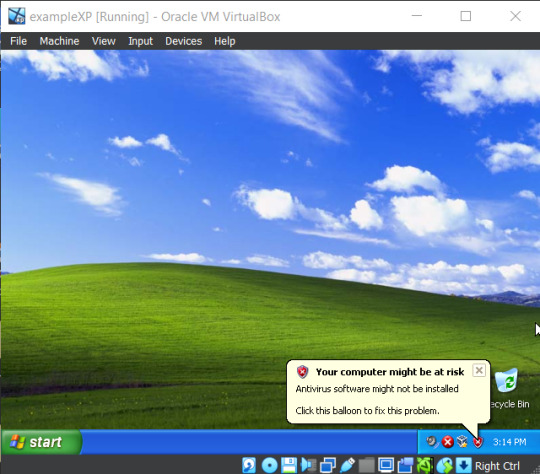
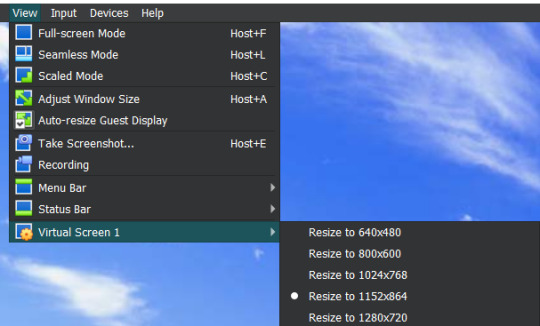
Before doing anything else in XP, I recommend changing the screen resolution so it isn't a ridiculously tiny window you need to squint at.
View > Virtual Screen > Resize to whatever looks best on your screen.
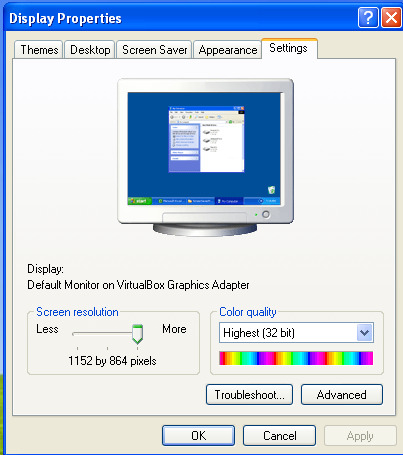
Alternatively, you can right click the XP desktop and select "Properties", then go to the "Settings" tab. Increase the screen resolution and hit "Apply" to see how it looks. You'll get a popup asking if you want to keep those changes or not.
Step 4: Transfer VOCALOID Files Into XP
I acquired a usable copy of VOCALOID from Internet Archive here. That folder includes everything you need to install and activate any V1 voicebank without an official activation code.
(I unfortunately have yet to find a similar resource for VOCALOID 2. For info on using V2 voicebanks, check the end of this post.)
Before returning to VirtualBox, go to the location you saved the VOCALOID folder too, and right-click the folder.
Select "Properties", then copy the location information.
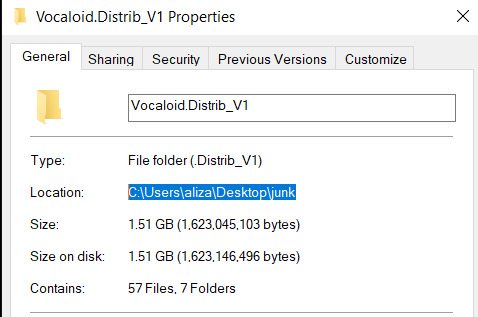
There's a really fast way to transfer small files in and out of the virtual machine (see the end of this post for an explanation on that), but the VOCALOID folder is too big for that, so you need to turn it into a VISO (virtual ISO) instead.
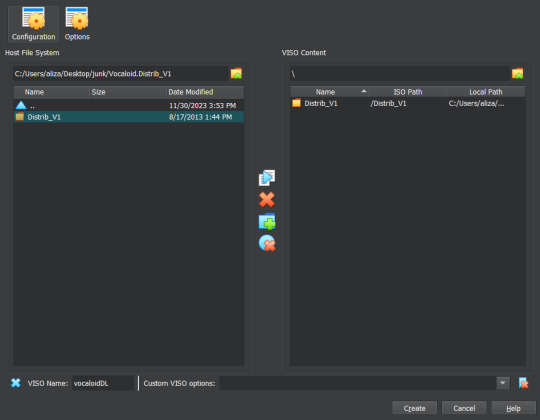
To make a VISO, open VirtualBox, and select the "Tools" icon.
Move to the "Optical disks" tab, then select the "Create" icon.

Now you can paste the location information text you copied into the textbox on the upper left side.
Alternatively, you can hit the folder icon and manually sift through your computer files to reach the VOCALOID folder, but that's annoying.
Make sure the folder is selected (just click on it), the hit the paper icon in the middle to "Add Item(s) to VISO".
Then hit the "Configuration" icon in the upper left to make a textbox appear in the bottom left. Enter a VISO name there.
Make sure the VOCALOID folder has actually appeared under "Viso Content" on the right, then you can hit "Create"
Now go back into XP to insert the VISO into the virtual disk drive.
"Devices > "Optical Drives" > whatever pops up there > "Remove disk from virtual drive" if something is currently in there > The VISO you made should appear as an option.
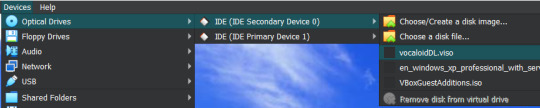
XP will ask what you want to do with the disk, choose "Open folder to view files".
Then drag the VOCALOID folder onto the XP desktop. It should start copying files over.
You can remove the VISO from the virtual disk drive once everything is copied over.
Step 5: Install VOCALOID In XP
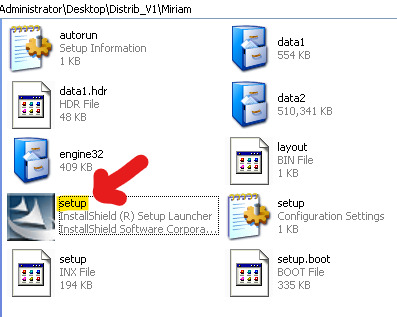
Open up "Distrib_V1", then go into the folder for whichever voicebank you want to install first. (The others can easily be added later.)
Now run the setup EXE within that folder. Windows XP doesn't show all file extensions by default, so the setup EXE file won't actually be labeled as such.
When the installer asks about "Setup Type", choose "Complete".
When it asks if you want to "Activate VOCALOID", select No. Don't say Yes.
Once it's installed, open up the "Vocaloid v1.1.2 Update & Patch" folder that's inside "Distrib_V1".
Run "setup". You'll be prompted to restart XP afterwards, agree to it.
After the restart, right-click the desktop icon for VOCALOID, and select "Properties".
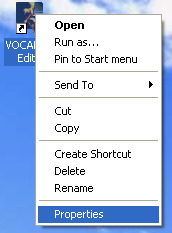
Hit "Find Target", and you be brought to the location the editor was saved to.

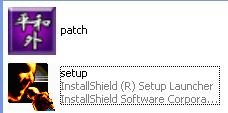
Open up the "Vocaloid v1.1.2 Update & Patch" again, then drag and drop "patch" into the folder containing VOCALOID.
Run "patch", hit the very obvious patch button, and then you'll be able to use VOCALOID 1 🎉
To add another voicebank, follow the same steps you went through to install the first one, but choose "Custom" for "Setup Type".
Deselect every component that doesn't have the specific vocaloid's name in it. (You don't really need to select the "SKIN" either if you don't want it, that's just an aesthetic option for the UI).
You won't need to run the updater and patch files again for each voicebank, unless you accidentally reinstalled the Editor.

Additional Info:
"How Do I Transfer Files Without Making a VISO?"
With Guest Additions installed (yes we're finally using it), you can use the super easy drag-and-drop file transfer method for most individual files. It just doesn't like transferring large folders. I recommend this method for sending instrumentals into XP and retrieving completed song files from XP.
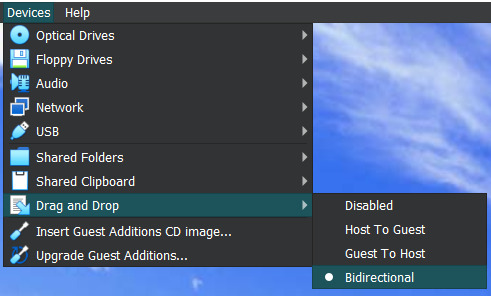
Enable it through "Devices" > "Drag and Drop" > "Bidirectional" or select the specific direction you currently need to send things in.
"I Didn't Give My Virtual Machine Enough Storage, How Do I Retroactively Increase It?"
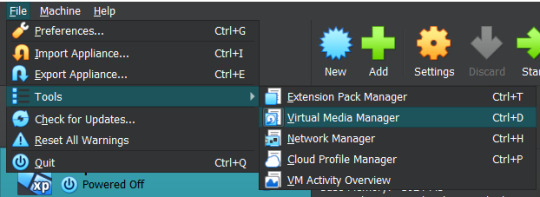
In VirtualBox, hit the keyboard shortcut Ctrl+D to access the "Virtual Media Manager".
Alternatively, you can find it by clicking through "File" > "Tools" > "Virtual Media Manager"
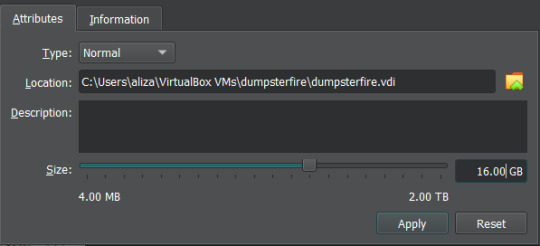
Select [whatever name you picked].vdi, and just adjust the size slider at the bottom.
"How Do I Actually Use VOCALOID Now That I've Downloaded It?"
The manual that comes with program is actually very informative!!! You should read it!!! It's available under the "Help" tab within the program.
The only video tutorial I found for V1 is this one by Zero G.
One drawback of V1 compared to newer Vocaloid programs is that the piano keys aren't fully labeled, so you need to actually know what order notes go in. There are lots of music crash courses on Youtube which can help you in that department.
"How Can I Get a Working V2 Voicebank?"
If you just want to use a V2 voicebank and don't care about using the V2 software specifically, this site offers a cracked V4 download and compatible versions of the V2 voicebanks ("legacy" versions that have been converted to V3 voicebanks, so they work on V3 or V4).
. . .
If you want to have an awful time, you could install V2 in the virtual machine in almost the same way you install V1. However, I haven't found a reliable way to bypass the activation process for V2, so you'll be stuck with the 14 day trial period (unless you torrent Pocaloid2 instead). You can just reinstall the voicebank in a fresh virtual machine if you want to continue using it after the 14 days are up though.
Download your preferred voicebank(s) from Internet Archive. This user (haru0l) has uploaded all of the V2s (non-legacy). If the one you want isn't already in ISO form, turn it into a VISO.
You unfortunately won't be able to install Rin/Len Act2, Miku Append, or Rin/Len Append if you don't have their originals installed and properly activated (can't be using the 14 day trial).
Installing a Japanese voicebank will give you a bunch of unreadable symbols in the UI, and not all of the English voicebanks on Internet Archive are bundled with the V2 software (for some reason), so you just need to run the English updater to fix that. English V2 update available on Internet Archive here.
(There is another method where you just delete/move/rename every Vocaloid file that says JPN or Japanese in the name, but that doesnt completely translate the UI and still has some unreadable garbage).
If you're installing one of the less ancient voicebanks first, you might not be able to run the updater. It will say you already have an up to date version of the software (I had this problem with Piko). You can avoid that by simply installing an older voicebank first.
Make sure you choose the "Custom" setup for additional voicebanks, same as with V1.
"I Have Another Question OP Didn't Anticipate"
Feel free to send an ask with any questions! There's a chance that I won't know the answer either, but I'll try my best.
Also, please let me know if the links on this post ever stop working so I can replace them.
#idk how to tag this#vocaloid#windows xp#tutorial#weird how they just completely ditched the original synthesis engine and switched to a different system btwn v1 and v2#v1 voicebanks cant be accurately replicated in other versions of vocaloid because of that#v1 meiko my beloved <3#also internet archive my beloved <3 <3
6 notes
·
View notes
Text

How to Fix MacBook Update Issue | Latest Guide 2025-26
Table of content
1. Introduction
2. Why Your Macbook is Not Updating: MacBook Update Issue 2025
You Don’t Have Enough Storage
WiFi Network is Not Active
Issues with Apple Servers
3. Tips to Fix Your Mac is Not Updating
Make Sure You Have Enough Space
Ensure Your WiFi is Connected
Install Your Update in Safe Mode
Reset Your NVRAM
Try Out the Combo Update
Set the Date and Time to Automatic
4. When Should You Visit a Professional?
5. Conclusion
6. FAQs
Introduction
We all agree that MacBook updates are very important. They bring new features, improve performance, and fix security issues. But many MacBook users know the pain when they click 'Update' and nothing happens. The MacBook update issue is very common nowadays, leaving users frustrated.
Don't worry! In this blog, We promise to give you simple and clear solutions that work. We will talk about why the Mac is not updating, and we will also share some easy steps you can follow at home. By the end of this guide, your MacBook will be ready for the latest update smoothly.
Why Your MacBook is Not Updating: MacBook Update Issue 2025
Sometimes, even though everything seems fine, your Mac refuses to update. It gets stuck or shows some error. This can happen due to different reasons. Let's understand some of the main reasons behind the MacBook update issue:
1️. You Don't Have Enough Storage

Many people think they only need space equal to the update size. But that's not true. Your Mac needs extra free space to unpack and install the update properly. If your storage is almost full, the update will fail to install. This is one of the most common reasons your Mac is not updating.
2️.WiFi Network is Not Active
A strong internet connection is needed to download the updated files. If your WiFi connection keeps dropping or is unstable, your Mac may fail to complete the update process. Many people don't realize this and keep trying again and again.
3️.Issues with Apple Servers
Sometimes, the problem is not with your Mac but with Apple itself. When Apple releases a major update, many users try to download it simultaneously. This loads Apple servers, causing slow downloads or even failures. But the good news is, this issue is usually temporary.
Tips to Fix Your Mac is Not Updating
Now that you know the reasons, let's discuss how to fix the MacBook update problem. Here are some easy and practical tips that can help you solve the issue:
1️.Make Sure You Have Enough Space
The first thing you should do is check your available storage space. Here's how you can check:
✔️ Click on the Apple Menu > About This Mac > Storage. ✔️ Let it load fully to show your available space.
If you are updating from older versions like Monterey to Ventura or Sonoma, you may need 25 GB or more. Always keep extra space for safety. If you are running low, delete some old files or move them to external storage. This will give your MacBook enough breathing room to install updates.
2.Ensure Your WiFi is Connected
If your internet connection is weak or keeps disconnecting, your update will fail. Make sure your WiFi is strong and stable. You can even try using a direct Ethernet cable for faster speed. Also, check Apple's System Status page to see if their servers face any issues. If servers are busy, wait for a few hours and try again.
3️.Install Your Update in Safe Mode
Sometimes, apps or background processes running on your Mac interfere with updates. Safe mode helps your Mac load only basic drivers and system files. Here's how you can enter Safe Mode:
For Intel Mac:
✔️ Shut down your Mac completely. ✔️ Wait for 10 seconds. ✔️ Press and hold the Shift key while restarting. ✔️ Release Shift when you see the Apple logo.
Once in Safe Mode, try updating again.
4️.Reset Your NVRAM
NVRAM (Non-Volatile Random Access Memory) stores some of your Mac's settings, like display resolution and startup disk information. Sometimes, bad data in NVRAM may cause update problems. Resetting it can help.
For Intel Mac:
✔️ Restart your Mac and immediately press and hold Command + Option + P + R. ✔️ Keep holding for about 20 seconds, then release.
After resetting, retry the update.
5️.Try Out the Combo Update
Apple offers Combo Update packages, which include all previous patches and updates in one file. Sometimes, these work better than regular updates, especially if you skipped past updates. You can download the combo update directly from Apple's official support page.
6️.Set the Date and Time to Automatic
Wrong date and time settings can block your update process. This may happen if you manually changed date settings in the past. Here's how you can correct it:
✔️ Go to System Preferences > Date & Time. ✔️ Tick the box saying Set Date & Time Automatically.
After this, restart your Mac and try the update again.
Also Read: How to Boost Your Mac's Performance: Here Are 6 Simple Tips
When Should You Visit a Professional?
If you have tried all these solutions and your MacBook software update problem is still not fixed, it might be time to get help from an expert. Sometimes, the issue may be related to hardware problems or deep software conflicts.
If you're searching for a MacBook service centre near me, you should always choose a reliable, experienced technician specializing in Apple products. There are many service centres, but not all handle Apple products properly. If you're in Bangalore, you can contact the trusted team at Green Apple Service Center, which is known for its professional services and customer care.
Also Read: Why Green Apple Service Center is the Best Apple Repair in Bangalore
Conclusion
The MacBook update issue can happen to anyone. It may feel frustrating, but as you have seen, there are many simple ways to fix it. Start by checking storage space and internet connection. Try Safe Mode, reset NVRAM, and don't forget to check Apple servers too. Combo updates and date-time settings can also do wonders.
If nothing works, don't panic. Search for a MacBook repair near me and get help from trained professionals who know Apple devices inside and out. With the right approach, your Mac not updating problem will be solved, and your MacBook will run like new.
Frequently Asked Questions
Where can I get professional help for MacBook update problems in Bangalore? You can contact Green Apple Service Center, a trusted MacBook service centre near me.
Is it safe to reset NVRAM? Yes, resetting NVRAM is safe and often helps solve update-related issues.
Can WiFi issues stop Mac updates? Yes, unstable WiFi can interrupt the download and cause the update to fail.
How much storage is needed for MacOS update? Generally, major updates need around 20-25 GB of free space, but it's better to keep at least 30 GB free.
Why is my Mac not updating even after trying everything? It could be a mix of low storage, poor internet, corrupted NVRAM data, or server issues. If none of the solutions work, you may need professional help.
#MacBookUpdateIssue#FixMacUpdateError#MacBookSoftwareUpdate#MacOSUpdateProblems#MacUpdateFix2025#AppleUpdateError#MacBookNotUpdating#GreenAppleService#MacBook Repair Bangalore#MacBook Pro Repair Service Center Bangalore#Best Apple Service Center in Bangalore#MacBook repair services in Kammanahalli#MacBook Repair Kammanahalli#MacBook Pro Repair Service Center Kammanahalli
0 notes
Text
Optimize Your Mac: Fix Common Issues
Introduction to Mac Performance Challenges
Every Mac user eventually faces performance hiccups that can disrupt their workflow. Two common issues that arise are running out of storage space and browser crashes. These problems can slow down your system, cause frustration, and hinder productivity. Fortunately, with the right approach, you can resolve these challenges and keep your Mac running smoothly. This article explores practical solutions for addressing storage shortages and browser errors, ensuring your device performs at its best. By following these steps, you can reclaim space, stabilize your browsing experience, and maintain a seamless user experience.
Addressing Storage Shortages
One of the most frequent notifications Mac users encounter is a warning about limited disk space. How to Fix Your Startup Disk Is Almost Full on Mac is a critical skill to master. When your startup disk is nearly full, your system struggles to function efficiently, leading to sluggish performance and potential crashes. To resolve this, start by assessing what’s consuming your storage. Navigate to the Apple menu, select "About This Mac," and click on the "Storage" tab. This provides a breakdown of your disk usage, highlighting areas like documents, apps, and system data.
Begin by deleting unnecessary files. Check your Downloads folder for old installers, PDFs, or media files you no longer need. Empty the Trash afterward to free up space permanently. Next, consider offloading large files to an external drive or cloud storage. Photos, videos, and backups often take up significant space, and relocating them can make a big difference. For a deeper clean, use the built-in storage management tool to identify and remove redundant system files, such as old caches or logs. Regularly clearing these files prevents your disk from filling up again.
Another effective strategy is to uninstall unused applications. Some apps, especially those with large data files, can occupy gigabytes of space. Go to the Applications folder, drag unneeded apps to the Trash, and empty it. If you’re unsure about an app’s dependencies, use a third-party uninstaller to ensure no residual files remain. By consistently managing your storage, you can prevent the startup disk from reaching capacity and maintain optimal performance.
Stabilizing Your Browser Experience
Browser issues can be equally disruptive, particularly when you rely on the web for work or leisure. How to Fix Safari Web Content Quit Unexpectedly on Mac is a common concern for users facing frequent crashes. This error occurs when the browser’s web content process fails, often due to corrupted data, conflicting extensions, or insufficient system resources. Resolving this issue requires a systematic approach to identify and eliminate the root cause.
Start by clearing your browser’s cache and cookies. These files accumulate over time and can cause instability. Open your browser, go to the History menu, and select "Clear History." Choose to clear all data, including cookies and cache, to reset the browser’s temporary files. This simple step often resolves crashes caused by corrupted data. Next, disable or remove unnecessary extensions. Extensions enhance functionality but can conflict with web pages or consume excessive resources. Access the Extensions menu in your browser’s preferences and turn off or delete any you don’t actively use.
If crashes persist, check for software updates. An outdated browser or operating system may struggle with modern web content. Go to the App Store or System Preferences to ensure both are up to date. Updates often include bug fixes that address stability issues. Additionally, consider resetting your browser to its default settings. This removes custom configurations that might be causing conflicts. Be aware that resetting erases saved passwords and preferences, so back up any critical data beforehand.
Preventing Future Issues
To avoid recurring storage and browser problems, adopt proactive habits. Regularly monitor your disk space using the storage management tool and delete unnecessary files monthly. Schedule backups to an external drive or cloud service to keep your startup disk lean. For browser stability, limit the number of open tabs and clear cache periodically. Avoid installing unverified extensions, as they can introduce vulnerabilities or performance issues.
Advanced Optimization Techniques
For users comfortable with advanced tools, consider using disk utility software to analyze and repair file system errors. These programs offer detailed insights into storage usage and can identify redundant data that manual methods might overlook. Similarly, monitoring system performance can help identify resource-heavy processes that impact browser stability. Activity monitoring tools built into macOS can identify processes consuming excessive memory or CPU, allowing you to terminate them and prevent crashes.
0 notes
Text
How Do I Install TurboTax on My Computer?
Filing taxes can feel overwhelming, but software like TurboTax has made the process much easier for individuals and businesses alike. Whether you're preparing your taxes for the first time or you’ve used TurboTax before, knowing how to install TurboTax on your computer is the first step toward a smooth filing season. In this comprehensive guide, we’ll walk you through every detail of installing TurboTax, optimizing your system, troubleshooting common issues, and ensuring you’re ready to go.
If you're searching for a hassle-free way to install turbotax, this blog is tailored just for you.
What Is TurboTax?
Before diving into the installation process, it’s important to understand what TurboTax is. TurboTax is a user-friendly tax preparation software developed by Intuit. It’s designed to help individuals and small businesses accurately file federal and state taxes, offering features like:
Step-by-step guidance
Automated data import
Audit support
Real-time error checking
TurboTax is available in both online and desktop versions. In this guide, we focus on installing the desktop version of TurboTax on your Windows or Mac computer.
System Requirements to Install TurboTax
Before you install TurboTax, make sure your computer meets the minimum system requirements. Installing TurboTax on a system that doesn’t meet these specs can lead to performance issues or failed installations.
For Windows:
Operating System: Windows 10 or later
Processor: 1 GHz or faster
RAM: Minimum 2 GB (4 GB recommended)
Hard Drive Space: 1 GB free space
Internet Connection: Required for updates and e-filing
Display: 1024x768 or higher resolution
For Mac:
Operating System: macOS Monterey 12 or later
RAM: Minimum 2 GB (4 GB recommended)
Hard Drive Space: 1 GB free space
Internet Connection: Required for updates and e-filing
Display: 1024x768 or higher resolution
Always update your operating system before starting the installation to prevent compatibility issues.
Where to Get TurboTax
You have two main options to get TurboTax:
Buy a physical CD/DVD from a retail store or online marketplace.
Download TurboTax directly from the official website:
While the CD version is convenient for those with slower internet connections, downloading TurboTax is the fastest and most reliable method.
How to Install TurboTax on Windows
Here’s a detailed guide on how to install TurboTax on a Windows PC:
Step 1: Download TurboTax
If you bought the software online:
Go to
Sign in with your Intuit account.
Click on “Downloads.”
Find the version of TurboTax you purchased and click “Download.”
If you have the CD version:
Insert the TurboTax CD into your computer’s disk drive.
If the installation doesn’t start automatically, open "My Computer" or "This PC."
Double-click on the TurboTax CD icon to launch the installer.
Step 2: Run the Installer
Locate the downloaded file (usually in your “Downloads” folder).
Double-click on the installer file (e.g., TurboTax2024Installer.exe).
When prompted, click “Yes” to allow changes to your system.
Follow the on-screen instructions to install TurboTax.
Step 3: Activate TurboTax
Enter your license code when prompted (this can be found in your confirmation email or on the CD sleeve).
Click “Continue” to activate the software.
Step 4: Update TurboTax
Once installation is complete, TurboTax will check for updates.
It’s important to install all available updates to ensure you have the latest tax laws and forms.
How to Install TurboTax on macOS
Installing TurboTax on a Mac is also straightforward. Follow these steps:
Step 1: Download or Insert the CD
For a digital download:
Visit turbotax.intuit.com
Sign in to your account and download your product.
For CD installation:
Insert the TurboTax CD into your Mac’s drive or use an external drive.
Step 2: Open the Installer
Locate the .dmg file (if downloaded).
Double-click to open the disk image.
Drag the TurboTax icon into your “Applications” folder.
Step 3: Launch and Activate
Open the Applications folder.
Click on TurboTax to launch.
Enter your license code when prompted.
Step 4: Install Updates
Just like with Windows, TurboTax for Mac will check for and install updates automatically after the first launch.
Common Installation Issues and Fixes
If you're trying to install TurboTax but run into problems, here are some solutions:
Problem 1: Installation Freezes or Fails
Solution: Disable antivirus software temporarily and run the installer as administrator. Ensure all other programs are closed.
Problem 2: License Code Not Working
Solution: Double-check for typos, ensure you're using the correct version, and contact TurboTax support if the code still fails.
Problem 3: Error Messages During Installation
Solution: Restart your computer and try again. If the problem persists, visit the TurboTax support page for specific error codes.
Tips to Ensure a Smooth TurboTax Experience
After you install TurboTax successfully, follow these tips to make the most of it:
Create a backup of your tax files. Always save your files to an external drive or cloud storage.
Keep the software updated. TurboTax regularly updates its database with tax law changes and new forms.
Use the Import Feature. Connect your financial accounts to automatically import W-2s, 1099s, and other relevant data.
Use TurboTax Tools. Features like “ExplainWhy” and “Audit Risk Meter” provide insights and improve accuracy.
Alternatives to Installing TurboTax
If you don’t want to install TurboTax on your computer, consider using the TurboTax Online version. It allows you to file your taxes directly from your browser without any software installation.
Pros of TurboTax Online:
No installation required
Access from any device
Automatically saves your progress
Secure cloud storage
Uninstalling TurboTax (If Needed)
If you ever need to remove TurboTax:
On Windows:
Open Control Panel.
Click on “Programs and Features.”
Select TurboTax from the list.
Click “Uninstall.”
On macOS:
Open your Applications folder.
Drag the TurboTax icon to the Trash.
Empty the Trash to complete the uninstallation.
Final Thoughts: Install TurboTax with Confidence
Installing TurboTax is a straightforward process that opens the door to simplified tax filing. Whether you’re using a Windows PC or a Mac, this guide ensures that you can install turbotax without any confusion. Once installed, the software provides a reliable and user-friendly environment to manage your taxes from start to finish.
Always make sure to keep your software updated, use secure internet connections, and store your files safely. With TurboTax on your side, you can file with confidence and peace of mind.
1 note
·
View note
Text
Prevent Data Loss: How Regular Hard Disk Health Checks Can Save Your Files
Introduction
Data loss can be devastating, whether it’s personal documents, business files, or multimedia content. Hard drives, like any hardware, degrade over time, leading to potential failures. Regular hard disk health checks can help detect early signs of failure and prevent data loss. In this article, we’ll discuss the importance of hard disk monitoring, methods to check its health, and best practices to keep your data safe.
Why Regular Hard Disk Health Checks Are Important
Hard disks store critical data, and any failure can lead to permanent loss. Monitoring your hard disk health can:
Detect Issues Early: Identifying bad sectors, overheating, or mechanical failures in advance allows you to take action before a complete failure.
Improve System Performance: A failing hard drive can slow down your system and cause errors.
Prevent Unexpected Data Loss: Regular health checks allow for timely backups and disk replacements.
Common Causes of Hard Disk Failure
Understanding what leads to hard disk failures can help you take preventive measures. Some of the most common causes include:
Physical Damage: Drops, shocks, or exposure to high temperatures can damage the disk.
Bad Sectors: Over time, sections of the hard disk can become unreadable, leading to data corruption.
Power Surges: Sudden power cuts or voltage fluctuations can corrupt or damage a hard drive.
Software Errors and Malware: Virus attacks and corrupted system files can impact disk health.
Age and Wear: Traditional hard drives (HDDs) typically last 3-5 years, while SSDs can last longer but still degrade with use.
How to Check Hard Disk Health Regularly
1. Using SMART Monitoring
Most modern hard drives come with Self-Monitoring, Analysis, and Reporting Technology (SMART), which provides real-time diagnostics about disk health.
Windows Users:
Open Command Prompt (Win + R, type cmd, press Enter).
Type: wmic diskdrive get status and press Enter.
If the result is “OK,” your disk is healthy. If it says “Pred Fail,” consider replacing the drive.
Mac Users:
Open Disk Utility (Applications > Utilities > Disk Utility).
Select the drive and click First Aid to scan for errors.
Linux Users:
Open Terminal and type: sudo smartctl -H /dev/sda
Look for “PASSED” or “FAILED” status.
2. Running CHKDSK in Windows
Windows includes a built-in tool called Check Disk (CHKDSK) to scan and fix errors.
Open Command Prompt as Administrator.
Type: chkdsk C: /f /r /x (Replace C: with your drive letter).
If errors are found, follow the on-screen instructions to fix them.
3. Monitoring Temperature and Performance
Overheating can cause hard drive degradation.
Windows Users: Use built-in Task Manager (Ctrl + Shift + Esc > Performance Tab) to monitor disk usage.
Mac Users: Use Activity Monitor (Applications > Utilities > Activity Monitor).
Linux Users: Use iostat or hdparm commands for disk performance insights.
Best Practices to Prevent Data Loss
Regular Backups: Use external drives, cloud storage, or backup software like Acronis, Macrium Reflect, or Google Drive.
Keep Your System Updated: OS updates include security patches that protect against disk corruption and malware.
Use a UPS (Uninterruptible Power Supply): Protects against sudden power failures.
Avoid Overloading the Drive: Keeping at least 10-15% of free space allows the drive to function efficiently.
Replace Aging Drives: If a drive is over 5 years old and shows warning signs, replace it before failure occurs.
Conclusion
Regular hard disk health checks are essential for detecting problems early and preventing unexpected data loss. By using built-in tools like SMART monitoring, CHKDSK, and Disk Utility, you can ensure your drive remains in good condition. Implementing best practices such as regular backups, monitoring drive temperature, and replacing aging drives can further safeguard your data. Prioritizing hard disk maintenance today can save you from costly data recovery efforts in the future.
0 notes
Text
How to install Office 365 from portal.office.com on Mac?
Microsoft Office 365 is an essential suite of productivity applications that includes Word, Excel, PowerPoint, Outlook, and more. If you own a Mac and need to install Office 365, the process is straightforward and can be completed via the official Microsoft portal: portal.office.com. This guide will walk you through the steps required to install Office 365 on your Mac efficiently.
System Requirements for Office 365 on Mac
Before installing Office 365, ensure that your Mac meets the minimum system requirements:
Operating System: macOS Monterey (12), macOS Big Sur (11), macOS Catalina (10.15), or later.
Processor: Intel or Apple Silicon (M1/M2) with Rosetta 2.
RAM: At least 4GB.
Storage: Minimum of 10GB of free disk space.
Internet Connection: Required for downloading and activating Office 365.
You can check your macOS version by clicking Apple Menu > About This Mac.
Step-by-Step Guide to Installing Office 365 on Mac
Step 1: Sign in to Your Microsoft Account
Open your preferred web browser (Safari, Chrome, or Firefox).
Navigate to portal office com.
Enter your Microsoft account credentials (email and password) associated with your Office 365 subscription.
If prompted, complete the multi-factor authentication (MFA) process.
Note: If you do not have an active Office 365 subscription, you must purchase one before proceeding. You can subscribe through Microsoft 365 plans.
Step 2: Download the Office 365 Installer for Mac
Once signed in, you will be redirected to the Office 365 homepage.
Click on the Install Office button in the top-right corner.
Choose Office 365 apps to begin downloading the installer.
The download will start automatically, saving a .pkg file in your Mac's "Downloads" folder.
Tip: If the download does not start, refresh the page or try using a different browser.
Step 3: Install Office 365 on Mac
Open Finder and navigate to the Downloads folder.
Double-click the Microsoft_Office_Installer.pkg file.
The Microsoft Office installer will launch. Click Continue.
Read and accept the license agreement, then click Continue.
Select the Install Location (default location is recommended).
Click Install and enter your Mac’s administrator password if prompted.
Wait for the installation to complete.
Click Close once the installation is finished.
Tip: If you encounter a security warning, go to System Preferences > Security & Privacy and allow the installation under the "General" tab.
Step 4: Activate Office 365 on Mac
Open any Office application (e.g., Word, Excel, or PowerPoint).
A welcome screen will appear; click Sign In.
Enter the Microsoft account credentials used to purchase the subscription.
Follow the on-screen instructions to complete activation.
Once activated, click Start Using Office.
Note: If you see an error stating that your subscription cannot be verified, ensure you are connected to the internet and try signing in again.
Troubleshooting Common Installation Issues
1. Office 365 Installation is Stuck or Not Starting
Restart your Mac and try installing again.
Ensure that your internet connection is stable.
Clear your browser cache and try downloading the installer again.
2. macOS Blocks the Installation
Go to System Preferences > Security & Privacy > General.
Click Allow next to "Microsoft Corporation."
Restart the installation process.
3. Unable to Sign in to Activate Office 365
Double-check your Microsoft credentials.
Try signing in through a different browser.
Ensure that your Office 365 subscription is active.
Updating Office 365 on Mac
To keep Office 365 updated with the latest features and security patches:
Open any Office application (e.g., Word or Excel).
Click on Help in the menu bar.
Select Check for Updates.
Follow the on-screen prompts to install available updates.
Uninstalling Office 365 from Mac
If you need to remove Office 365 from your Mac, follow these steps:
Open Finder > Applications.
Locate Microsoft Office apps (Word, Excel, PowerPoint, Outlook, etc.).
Drag each app to the Trash.
Open Finder > Go > Go to Folder.
Type ~/Library and delete the following folders:
Containers/com.microsoft.*
Group Containers/UBF8T346G9.Office
Empty the Trash and restart your Mac.
Final Thoughts
Installing Office 365 on a Mac is a simple and quick process when done through portal.office.com. By following this guide, you can successfully download, install, and activate Microsoft Office 365 on your Mac.
If you encounter any issues, Microsoft's support team is available to help resolve installation or activation problems.
Now that you have Office 365 installed, you can enjoy seamless productivity and collaboration with its suite of powerful applications!
0 notes
Text
Common MacBook Issues and How to Spot Them Early
Apple’s MacBook lineup is known for its sleek design, powerful performance, and durability. However, like any other device, MacBooks can develop issues over time. Recognizing these problems early can save you from costly repairs or even data loss. Whether you’re dealing with slow performance, battery problems, or screen glitches, spotting these issues at an early stage is crucial. If you need professional assistance, Mac Repairs Melbourne offers expert solutions to keep your MacBook running efficiently.
1. MacBook That Won’t Turn On
This is one of the most frustrating MacBook issues, especially when you rely on your device for daily tasks. A MacBook that won’t turn on can stem from various underlying causes. Some of the most common issues include a dead battery, faulty power adapters, issues with the logic board, or even problems with the display.
Signs to Look Out For:
No response when pressing the power button
No startup chime or fan noise
A black screen with no signs of power
The charger LED doesn’t light up
Possible Causes:
Faulty power adapter or battery: If your charger is damaged or your battery is completely drained, your MacBook may not turn on.
Corrupt macOS installation: Software issues can sometimes prevent the device from booting.
Logic board failure: A faulty motherboard can cause power-related issues.
Damaged internal components: If your MacBook has suffered physical damage, internal components may be affected.
What You Can Do:
Check the power source – Try using a different charger or plugging the device into a different outlet.
Perform an SMC reset – Resetting the System Management Controller (SMC) can resolve many power-related issues.
Check for signs of life – Listen for fan noises or see if the keyboard lights up when pressing the power button.
Contact a professional – If your MacBook still won’t turn on, it’s time to seek help from Mac Repairs Melbourne for a thorough diagnosis.
2. Slow Performance and Freezing
MacBooks are known for their speed and efficiency, but over time, you may notice a slowdown in performance. This can be frustrating, especially when working on tasks that require quick processing. Slow performance can result from various factors including outdated software, lack of storage space, or even hardware issues such as a failing hard drive.
Causes of Slow Performance:
Too many background apps – Excessive open applications can consume system resources.
Low storage space – A nearly full SSD can impact system speed.
Outdated macOS – Running an older version of macOS may cause performance issues.
Malware or viruses – Although rare, malware can slow down your system.
Early Warning Signs:
Longer boot-up times
Unresponsive apps
Frequent crashes or freezing
How to Fix It:
Close unnecessary apps – Use Activity Monitor to identify and close resource-heavy applications.
Free up disk space – Delete unused files and consider upgrading to a larger SSD.
Update macOS – Ensure you’re running the latest version of macOS for better performance.
Run a malware scan – Use reliable security software to check for malicious software.
If the problem persists, professional Mac technicians at Mac Repairs Melbourne can help optimize your system and improve its speed.
3. Battery Draining Quickly
Battery life is one of the most critical factors in a MacBook’s performance. If your MacBook is several years old, you might start to notice that the battery doesn’t last as long as it used to. Apple provides a battery health feature, which allows you to monitor your battery’s condition directly from the system preferences. If your battery health is below 80%, it’s probably time to consider a replacement.
Common Causes:
Aging battery – Over time, batteries lose their capacity.
Background applications – Apps running in the background can consume power.
High brightness levels – Keeping your screen brightness at maximum drains battery life.
Malfunctioning hardware – A faulty battery or charging system may be the cause.
Warning Signs:
Rapid battery percentage drop
MacBook shuts down unexpectedly
Battery doesn’t charge fully
Solutions:
Check battery health – Go to “About This Mac” > “System Report” > “Power” to check battery cycles.
Reduce brightness and close unused apps – Adjusting brightness and quitting unnecessary applications can help conserve battery life.
Reset PRAM and SMC – This can resolve battery-related issues.
Get a battery replacement – If your battery cycle count is too high, consider getting a replacement from Mac Repairs Melbourne.
4. Overheating and Fan Noise
MacBooks are designed to be quiet and efficient, but excessive fan noise and overheating can indicate a deeper issue.
Causes of Overheating:
Dust buildup – Over time, dust can clog internal fans.
Running intensive apps – Apps like video editors or gaming software can push your MacBook to its limits.
Malfunctioning cooling system – A faulty fan or thermal paste degradation can cause overheating.
How to Spot It Early:
Hot surface temperature
Loud or constantly running fan
Unexpected shutdowns due to overheating
How to Fix It:
Keep your MacBook on a hard surface – Soft surfaces can block ventilation.
Clean dust from vents – Use compressed air to remove dust from fans and vents.
Close CPU-intensive apps – Check Activity Monitor for apps consuming excessive resources.
Visit a repair expert – If the issue persists, Mac Repairs Melbourne can diagnose and fix cooling system problems.
5. Display and Screen Issues
A faulty screen can make your MacBook unusable, affecting productivity and usability.
Common Screen Problems:
Flickering screen
Dead pixels
Screen discoloration
Black screen with no display
Possible Causes:
Loose display connections – Internal wiring issues can cause display malfunctions.
Faulty graphics card – Hardware failures can lead to screen distortions.
Physical damage – Drops and impacts can crack or damage the screen.
How to Fix It:
Restart your MacBook – A simple restart can resolve minor screen glitches.
Check for software updates – Sometimes, a macOS update can fix display issues.
Reset PRAM and SMC – This can recalibrate display settings.
Consult a professional – If the problem persists, Mac Repairs Melbourne offers screen replacements and repairs.
6. Keyboard and Trackpad Malfunctions
Keyboard and trackpad issues are common in MacBooks, particularly in older models.
Symptoms:
Unresponsive keys
Sticky or repeating keys
Trackpad not clicking properly
Possible Causes:
Dust and debris – Small particles can obstruct key movement.
Software bugs – Certain macOS updates may cause input issues.
Physical damage – Drops or spills can damage the keyboard and trackpad.
Solutions:
Clean the keyboard – Use compressed air to remove dust and debris.
Check system preferences – Adjust settings in System Preferences > Keyboard/Trackpad.
Reset SMC and PRAM – This can restore normal functionality.
Seek professional repairs – If cleaning and resets don’t work, contact Mac Repair Melbourne for expert assistance.
Conclusion
Early detection of MacBook issues can save you time, money, and frustration. Whether your device is overheating, running slow, or refusing to turn on, addressing the problem quickly can prevent further damage. Mac Repairs Melbourne provides expert solutions for all MacBook-related issues, ensuring your device stays in top condition
0 notes
Text
Do you remember the first time when you started up your Mac? Hearing that stunning tone you thought could never get irritating and seeing the perfectly designed Apple-driven Boot Image. It beyond any doubt was an exceptional moment. With time, this first impression can be a bit ruined, because as any other machine, a Mac can get slower and slugger with time. In case you're experiencing just that, there are some tricks that can help you get your Mac in shape. Here are some useful tips that will help to maximize your machine: Update Your MacOS It's quite a usual situation to not updated Mac for quite a while. However, each and every OS update brings a bundle of useful features and security improvements, some of which may boost performance. To get to them, you need to upgrade the system on your Mac. Open the App Store, tap Updates and install. Delete Or Move Large Media Files You can easily improve your Mac’s hard drive work with a quick disk clean-up solution or by moving large media files to an external drive. All things considered, big files and documents are the ones that take up an enormous amount of your Mac's storage. Ordinarily, those are movies, pictures, music, games, and so forth. For more selectable Menu > About This Mac, at that point click Storage to perceive what consumes up the room on your hard drive. In case you are not cool with deleting your huge collection of TV series, for example, yet at the same time, you need the disk space, at that point consider getting an external drive to store these sorts of files. Uninstall Rarely Used Apps Go through the applications that you have installed on your Mac. Odds are that some of them have been sitting on your drive for a very long time with no use. Some applications tend to consume up real space while other basically mess your Mac with temporary files and documents and even unnecessary folders.Just delete unnecessary apps from your Mac and see how much space this frees. Using Activity Monitor Activity Monitor shows how your Mac is running. Take a look at the CPU and Memory segments to check whether you can recognize an application that is by all accounts demanding a considerable amount of memory from your system. On the off chance that there is, then just stop that application until the next time you need it. Limit The Visuals Macintoshes are awesome for visuals. To improve the performance of your MacBook, you might need to switch some of those effects off. Go to System Preferences>Dock, uncheck the accompanying segments: Animate opening applications Automatically hide and show the dock Set minimize windows using the scale effect And Magnification You may likewise need to lessen transparency effects. This you can do in Settings> Accessibility > Display, check Reduce Transparency. So, these are some basic tips on how you can improve your Mac’s performance. Take good care of your device and it will serve you long and well.
0 notes
Text
Download the Latest Version of OrcaSlicer
Hey 3D printing enthusiasts!
If you're looking to enhance your 3D printing experience with a top-notch slicing tool, OrcaSlicer is an excellent choice. Here's a quick guide on how to download and install the latest version of orcaslicer from their official website.
What is OrcaSlicer?
OrcaSlicer is a powerful and user-friendly 3D printing slicing software developed to optimize the conversion of 3D models into G-code. It offers advanced features like an innovative slicing algorithm, easy-to-use interface, compatibility with a wide range of 3D printers, and more. Whether you're a beginner or an expert, OrcaSlicer helps you achieve high-quality prints with minimal effort.
Key Features:
Advanced Slicing Algorithm: Reduces printing time and efficiently converts complex models into G-code.
User-Friendly Interface: Designed to make your 3D printing tasks simpler and more enjoyable.
Wide Compatibility: Works with numerous 3D printers, including those from Bambu Lab.
Auto Calibration Tools: Includes tests for temperature, tolerance, flow rate, and retraction.
Remote Printer Control: Allows you to control your printer from your PC or laptop.
Free and Open Source: OrcaSlicer is free to use and licensed under the GNU Affero General Public License.
How to Download:
Visit the OrcaSlicer Download Page.
Select Your Operating System:
Windows: Download the .exe installer or .zip file.
Mac: Download the .dmg file compatible with Intel or Apple Silicon (M1/M2) with Rosetta 2.
Linux: Download the .AppImage file for various Linux distributions.
System Requirements:
Windows: Windows 7 or later, 64-bit processor, 4 GB RAM (8 GB recommended), 500 MB free disk space, OpenGL 2.0 or higher.
Mac: macOS 10.13 or later, Intel-based Mac or Apple Silicon, 4 GB RAM (8 GB recommended), 500 MB free disk space, OpenGL 2.0 or higher.
Linux: Modern Linux distributions, 64-bit processor, 4 GB RAM (8 GB recommended), 500 MB free disk space, OpenGL 2.0 or higher.
Installation Guides:
Windows: Run the .exe file and follow the on-screen prompts.
Mac: Open the .dmg file and drag the OrcaSlicer icon to the Applications folder.
Linux: Make the .AppImage file executable and run it from the terminal.
For more detailed instructions and troubleshooting, check out the FAQ section on the OrcaSlicer website.
Join the 3D printing revolution and download OrcaSlicer today to unlock a universe of next-level 3D printing!
Happy printing! 🚀
Source:
OrcaSlicer Download Page
OrcaSlicer FAQ
About OrcaSlicer
1 note
·
View note
Text
How to Boost Your Laptop's Performance: Tips and Tricks for Speeding up Your Device
Over time, laptops—whether they’re used for work, study, or entertainment—can become sluggish. Slow boot times, laggy applications, and overall performance dips can be frustrating, especially when you rely on your device for daily tasks. Fortunately, there are several strategies you can use to speed up your laptop without having to invest in costly upgrades. In this guide, we'll cover practical tips and tricks to boost your laptop's performance and get it running like new again.
1. Close Unnecessary Background Applications
One of the most common reasons your laptop feels slow is that too many applications are running in the background. Even if you're only using a few programs, others might be silently consuming system resources like CPU, memory (RAM), and storage.
How to fix it:
Check Task Manager (Windows): Press Ctrl + Shift + Esc to open Task Manager. Under the "Processes" tab, look for apps that are using a lot of resources and close them.
Check Activity Monitor (Mac): Go to "Applications > Utilities > Activity Monitor." You can sort by CPU usage, memory, and disk to see which programs are taking up the most resources.
Disable Startup Programs: Some apps automatically start when your laptop boots, which can slow down startup times. Disable unnecessary startup programs via Task Manager (Windows) or System Preferences > Users & Groups > Login Items (Mac).
2. Free Up Hard Drive Space
As your laptop fills up with files, apps, and updates, it can lead to slower performance. Operating systems need free space to work efficiently, especially when using virtual memory or paging files.
How to fix it:
Clear Temporary Files:
On Windows: Use the built-in Disk Cleanup tool. Type "Disk Cleanup" in the search bar, select the drive you want to clean, and click "OK."
On Mac: You can manually clean up caches or use a third-party app like CleanMyMac to clear system junk.
Uninstall Unused Programs: Check your installed applications and remove programs you no longer use. On Windows, go to "Control Panel > Programs > Uninstall a program," and on Mac, drag unused apps to the Trash.
Move Files to the Cloud: Store large files such as photos, videos, and documents on cloud services like Google Drive or iCloud to free up local storage.
3. Upgrade to an SSD
If your laptop is still using an old Hard Disk Drive (HDD), upgrading to a Solid-State Drive (SSD) is one of the best ways to see a dramatic improvement in speed. SSDs offer much faster read and write speeds compared to traditional HDDs, which means faster boot times, quicker file transfers, and improved overall performance.
How to upgrade:
Check your laptop’s compatibility: Some laptops have an easily accessible storage compartment for upgrades. Others may require more complex disassembly.
Consider cloning your current system: If you're switching to an SSD, use software like Macrium Reflect (for Windows) or Carbon Copy Cloner (for Mac) to clone your current operating system to the new SSD.
4. Add More RAM
RAM (Random Access Memory) plays a crucial role in multitasking and handling resource-intensive applications. If your laptop has 4GB or less, upgrading to 8GB or 16GB can provide a noticeable performance boost, especially when using memory-heavy programs like web browsers, video editors, or virtual machines.
How to upgrade:
Check your laptop's RAM capacity: Visit your laptop's manufacturer website or consult the manual to see how much RAM it supports.
Install additional RAM: If your laptop has a removable panel, you can purchase and install additional RAM sticks yourself. If not, you may need to take it to a professional technician.
5. Keep Your Operating System Updated
Operating system updates often include important performance improvements, bug fixes, and security patches. Running an outdated version of Windows or macOS can cause compatibility issues and performance slowdowns.
How to update:
On Windows: Go to Settings > Update & Security > Windows Update and click on "Check for updates."
On Mac: Open the App Store and check under the "Updates" tab.
6. Disable Visual Effects
While visual effects like animations and transparency look nice, they consume valuable system resources. Disabling these effects can help speed up your laptop, especially if you're working on a machine with limited resources.
How to disable:
On Windows: Type "Performance" in the search bar, then select "Adjust the appearance and performance of Windows." Under the "Visual Effects" tab, choose "Adjust for best performance."
On Mac: Go to System Preferences > Accessibility, and under "Display," check the box that says "Reduce motion" and "Reduce transparency."
7. Run a Full Virus Scan
Malware or unwanted software can significantly slow down your laptop’s performance. Viruses, adware, and other types of malware can use up resources and create unnecessary processes.
How to fix it:
Use antivirus software: If you don't already have antivirus software installed, it's crucial to do so. Programs like Windows Defender (Windows), Avast, or Bitdefender are great free or paid options.
Perform a full system scan: Run a comprehensive scan to ensure that your system is free of malware or potentially unwanted programs (PUPs).
8. Clean Your Laptop Physically
Over time, dust and debris can accumulate inside your laptop, especially around vents and fans. This can lead to overheating, which in turn causes the laptop to throttle performance.
How to clean it:
Turn off and unplug your laptop: Before you start, make sure the device is powered off.
Use compressed air: Gently blow compressed air into the vents to clear out dust and debris.
Clean the keyboard and screen: Use a microfiber cloth and a gentle cleaner for the screen and keyboard.
9. Reinstall the Operating System
If all else fails, performing a fresh installation of your operating system can give your laptop a significant speed boost. This process eliminates unnecessary files, software, and settings that may have accumulated over time.
How to reinstall:
Windows: Go to Settings > Update & Security > Recovery and select "Get started" under "Reset this PC."
Mac: Restart your Mac and hold down Command + R to enter macOS Recovery mode. From there, you can reinstall macOS.
10. Use Lighter Software Alternatives
If your laptop is struggling with resource-heavy software, consider switching to lighter alternatives. For example, instead of using Photoshop, you could try GIMP or Paint.NET for basic image editing. For web browsing, Opera or Brave are lighter alternatives to Chrome.
Conclusion
Improving your laptop's performance doesn’t always require expensive upgrades. By implementing these tips, you can speed up your laptop and extend its lifespan. Whether you choose to upgrade your hardware, optimize your software, or clean out unnecessary files, there are plenty of ways to give your device a performance boost. Regular maintenance and good habits, like keeping your system updated and freeing up storage, can help keep your laptop running smoothly for years to come.
Remember, if your laptop is still underperforming after trying these tips, it may be time to consult a professional technician for further diagnostics. Authorized Toshiba Service Centre in Nagpur provides professional services, maintenance, and warranty services for laptops, desktops, and other electronic products, ensuring genuine parts and expert support.
0 notes
Text
How to Boost Your Laptop's Performance: Tips and Tricks for Speeding up Your Device
Over time, laptops—whether they’re used for work, study, or entertainment—can become sluggish. Slow boot times, laggy applications, and overall performance dips can be frustrating, especially when you rely on your device for daily tasks. Fortunately, there are several strategies you can use to speed up your laptop without having to invest in costly upgrades. In this guide, we'll cover practical tips and tricks to boost your laptop's performance and get it running like new again.
1. Close Unnecessary Background Applications
One of the most common reasons your laptop feels slow is that too many applications are running in the background. Even if you're only using a few programs, others might be silently consuming system resources like CPU, memory (RAM), and storage.
How to fix it:
Check Task Manager (Windows): Press Ctrl + Shift + Esc to open Task Manager. Under the "Processes" tab, look for apps that are using a lot of resources and close them.
Check Activity Monitor (Mac): Go to "Applications > Utilities > Activity Monitor." You can sort by CPU usage, memory, and disk to see which programs are taking up the most resources.
Disable Startup Programs: Some apps automatically start when your laptop boots, which can slow down startup times. Disable unnecessary startup programs via Task Manager (Windows) or System Preferences > Users & Groups > Login Items (Mac).
2. Free Up Hard Drive Space
As your laptop fills up with files, apps, and updates, it can lead to slower performance. Operating systems need free space to work efficiently, especially when using virtual memory or paging files.
How to fix it:
Clear Temporary Files:
On Windows: Use the built-in Disk Cleanup tool. Type "Disk Cleanup" in the search bar, select the drive you want to clean, and click "OK."
On Mac: You can manually clean up caches or use a third-party app like CleanMyMac to clear system junk.
Uninstall Unused Programs: Check your installed applications and remove programs you no longer use. On Windows, go to "Control Panel > Programs > Uninstall a program," and on Mac, drag unused apps to the Trash.
Move Files to the Cloud: Store large files such as photos, videos, and documents on cloud services like Google Drive or iCloud to free up local storage.
3. Upgrade to an SSD
If your laptop is still using an old Hard Disk Drive (HDD), upgrading to a Solid-State Drive (SSD) is one of the best ways to see a dramatic improvement in speed. SSDs offer much faster read and write speeds compared to traditional HDDs, which means faster boot times, quicker file transfers, and improved overall performance.
How to upgrade:
Check your laptop’s compatibility: Some laptops have an easily accessible storage compartment for upgrades. Others may require more complex disassembly.
Consider cloning your current system: If you're switching to an SSD, use software like Macrium Reflect (for Windows) or Carbon Copy Cloner (for Mac) to clone your current operating system to the new SSD.
4. Add More RAM
RAM (Random Access Memory) plays a crucial role in multitasking and handling resource-intensive applications. If your laptop has 4GB or less, upgrading to 8GB or 16GB can provide a noticeable performance boost, especially when using memory-heavy programs like web browsers, video editors, or virtual machines.
How to upgrade:
Check your laptop's RAM capacity: Visit your laptop's manufacturer website or consult the manual to see how much RAM it supports.
Install additional RAM: If your laptop has a removable panel, you can purchase and install additional RAM sticks yourself. If not, you may need to take it to a professional technician.
5. Keep Your Operating System Updated
Operating system updates often include important performance improvements, bug fixes, and security patches. Running an outdated version of Windows or macOS can cause compatibility issues and performance slowdowns.
How to update:
On Windows: Go to Settings > Update & Security > Windows Update and click on "Check for updates."
On Mac: Open the App Store and check under the "Updates" tab.
6. Disable Visual Effects
While visual effects like animations and transparency look nice, they consume valuable system resources. Disabling these effects can help speed up your laptop, especially if you're working on a machine with limited resources.
How to disable:
On Windows: Type "Performance" in the search bar, then select "Adjust the appearance and performance of Windows." Under the "Visual Effects" tab, choose "Adjust for best performance."
On Mac: Go to System Preferences > Accessibility, and under "Display," check the box that says "Reduce motion" and "Reduce transparency."
7. Run a Full Virus Scan
Malware or unwanted software can significantly slow down your laptop’s performance. Viruses, adware, and other types of malware can use up resources and create unnecessary processes.
How to fix it:
Use antivirus software: If you don't already have antivirus software installed, it's crucial to do so. Programs like Windows Defender (Windows), Avast, or Bitdefender are great free or paid options.
Perform a full system scan: Run a comprehensive scan to ensure that your system is free of malware or potentially unwanted programs (PUPs).
8. Clean Your Laptop Physically
Over time, dust and debris can accumulate inside your laptop, especially around vents and fans. This can lead to overheating, which in turn causes the laptop to throttle performance.
How to clean it:
Turn off and unplug your laptop: Before you start, make sure the device is powered off.
Use compressed air: Gently blow compressed air into the vents to clear out dust and debris.
Clean the keyboard and screen: Use a microfiber cloth and a gentle cleaner for the screen and keyboard.
9. Reinstall the Operating System
If all else fails, performing a fresh installation of your operating system can give your laptop a significant speed boost. This process eliminates unnecessary files, software, and settings that may have accumulated over time.
How to reinstall:
Windows: Go to Settings > Update & Security > Recovery and select "Get started" under "Reset this PC."
Mac: Restart your Mac and hold down Command + R to enter macOS Recovery mode. From there, you can reinstall macOS.
10. Use Lighter Software Alternatives
If your laptop is struggling with resource-heavy software, consider switching to lighter alternatives. For example, instead of using Photoshop, you could try GIMP or Paint.NET for basic image editing. For web browsing, Opera or Brave are lighter alternatives to Chrome.
Conclusion
Improving your laptop's performance doesn’t always require expensive upgrades. By implementing these tips, you can speed up your laptop and extend its lifespan. Whether you choose to upgrade your hardware, optimize your software, or clean out unnecessary files, there are plenty of ways to give your device a performance boost. Regular maintenance and good habits, like keeping your system updated and freeing up storage, can help keep your laptop running smoothly for years to come.
Remember, if your laptop is still underperforming after trying these tips, it may be time to consult a professional technician for further diagnostics. A Lenovo Laptop Service Centre in Nagpur provides professional services, maintenance, and warranty services for laptops, desktops, and other electronic products, ensuring genuine parts and expert support.
0 notes
Text
Resolving Storage and Internet Issues
Computers are indispensable tools in our daily lives, but they can sometimes present frustrating challenges, such as running out of storage space or losing internet connectivity. These issues can disrupt productivity and cause significant inconvenience. This article explores practical solutions for two common problems: managing a nearly full startup disk on a Mac and addressing internet access issues on a Windows system. By following these steps, users can restore their devices to optimal performance and maintain seamless operation.
Addressing a Full Startup Disk on Mac
When a Mac displays a warning that the startup disk is nearly full, it signals that the primary drive, which houses the operating system and user files, is running out of space. This can lead to sluggish performance, application crashes, and an inability to save new files. How to Fix Your Startup Disk Is Almost Full on Mac begins with understanding the root cause and taking systematic steps to free up space.
The first step is to check how much storage is being used. Navigate to the system menu, select "About This Mac," and click on the storage tab to view a breakdown of space usage. This visual representation helps identify which file categories—such as applications, documents, or media—are consuming the most space. Once you have this overview, prioritize clearing out unnecessary files. Start by emptying the trash, as deleted files often linger there, taking up valuable space. Next, review the downloads folder, where temporary or forgotten files like installers or duplicates tend to accumulate. Deleting these can quickly reclaim space.
Another effective strategy is to manage large files, such as videos or archived projects, which often occupy significant portions of the disk. Use the built-in storage management tool to locate these files and consider moving them to an external drive or cloud storage. For users with extensive photo or video libraries, optimizing storage by enabling cloud-based syncing can offload files while keeping them accessible. Additionally, uninstall unused applications, as they not only consume disk space but may also run background processes that slow down the system.
Clearing system clutter is another critical step. Temporary files, caches, and logs can accumulate over time. Use trusted cleanup tools available in the Mac’s application store to safely remove these without affecting system stability. For advanced users, manually deleting cache files from the library folder can free up space, but caution is advised to avoid deleting essential system files. Regularly performing these maintenance tasks ensures the startup disk remains manageable, preventing future warnings.
Troubleshooting Internet Connectivity on Windows
Losing internet access on a Windows computer can be equally disruptive, whether it’s due to a misconfigured setting, hardware issue, or network problem. How to Fix No Internet Access in Windows involves a step-by-step approach to diagnose and resolve the issue, restoring connectivity efficiently.
Begin by verifying the physical connections. Ensure the Ethernet cable is securely plugged in or that the Wi-Fi adapter is enabled. Restarting the router and modem can resolve temporary glitches, as these devices sometimes encounter conflicts that disrupt connectivity. After rebooting, check the network status in the Windows taskbar. If the system indicates a connection but still shows no internet access, proceed to deeper troubleshooting.
Run the built-in network troubleshooter by accessing the network settings and selecting the option to diagnose problems. This tool automatically detects common issues, such as incorrect IP configurations or disabled services, and applies fixes where possible. If the troubleshooter doesn’t resolve the issue, manually reset the network settings. This can be done by navigating to the network and internet settings, selecting the reset option, and restarting the computer. Be aware that this resets all network adapters, requiring you to reconnect to Wi-Fi networks afterward.
Another potential cause of internet issues is outdated or corrupted network drivers. Visit the device manager, locate the network adapters, and check for any warning indicators. Updating drivers through the system or downloading the latest versions from the manufacturer’s website can resolve connectivity problems. If the issue persists, check for conflicts with security software. Firewalls or antivirus programs sometimes block connections inadvertently. Temporarily disabling these programs can help identify if they are the culprit, but ensure they are re-enabled after testing to maintain system security.
For persistent problems, consider external factors like network congestion or service provider outages. Contacting the internet service provider to confirm the status of the connection can clarify whether the issue is local or network-wide. Testing the connection on another device can also help determine if the problem is specific to the Windows system or a broader network issue.
Proactive Maintenance for Long-Term Performance
Preventing these issues from recurring requires proactive habits. For Mac users, regularly monitoring storage usage and setting up automatic cloud backups can prevent the startup disk from filling up. Scheduling monthly cleanups to remove redundant files and optimizing storage settings ensures the system runs smoothly. For Windows users, maintaining updated drivers and routinely checking network settings can prevent connectivity disruptions. Keeping security software updated and avoiding unnecessary applications also contributes to stable performance.
0 notes
Text
Sell MacBook Pro for the Best Price: A Comprehensive Guide

Selling your MacBook Pro can be an excellent way to make some extra cash, especially if you’re planning to upgrade to a newer model or simply decluttering your living space. However, getting the best price for your device requires careful preparation and an understanding of the market. Here’s a step-by-step guide to ensure you maximize your profits when selling your MacBook Pro.
1. Evaluate Your MacBook Pro’s Condition
The first step in selling your MacBook Pro is to thoroughly assess its condition. Buyers are typically looking for devices that are in good working order, both physically and functionally. Here’s what to look for:
Physical Appearance: Examine the exterior for scratches, dents, or any visible damage. Devices that look well-maintained will attract higher offers. Make sure to clean your MacBook Pro to improve its appearance before taking photos.
Functionality: Test all functions, including the keyboard, trackpad, ports, and speakers. Ensure that everything is operational, as any malfunction can reduce your selling price. Take note of any issues that you should disclose to potential buyers.
Battery Health: The battery's condition can significantly affect resale value. Use the "About This Mac" feature to check the battery cycle count. A lower cycle count indicates a healthier battery, making your MacBook more appealing to buyers.
2. Back Up Your Data
Before you sell your MacBook Pro, back up all your important data. Use Time Machine to back up your files to an external hard drive or cloud storage. This will protect your data and ensure you can transfer your settings and files to a new device when you’re ready to upgrade.
3. Perform a Factory Reset
To protect your privacy, performing a factory reset on your MacBook Pro is essential. This process removes all your personal data and restores the device to its original settings. Here’s how to do it:
Sign out of iCloud and other Apple services.
Restart your MacBook while holding down Command + R to enter Recovery Mode.
Open Disk Utility, erase your startup disk, and reinstall macOS.
This will ensure that the new owner receives a clean, fresh installation of macOS.
4. Research Current Market Prices
Understanding how much your MacBook Pro is worth is crucial for setting a competitive price. Check online marketplaces like eBay, Craigslist, and Swappa to see what similar models are selling for. Here are some key factors that influence pricing:
Model Year: Newer models typically command higher resale prices.
Specifications: Higher RAM and storage configurations can increase the value of your device.
Condition: Be honest about the condition, as it significantly affects the price. Listing comparable devices can give you a better idea of how to price yours.
5. Choose the Best Selling Platform
The platform you choose to sell your MacBook Pro can impact your final selling price. Here are some popular options:
Online Marketplaces (eBay, Craigslist): These platforms give you direct access to buyers and allow you to set your price. However, selling on these platforms may involve negotiations and the risk of scams.
Trade-In Programs (Apple, Best Buy): These services are convenient, but they often offer lower payouts compared to selling directly to consumers. They also may only provide store credit instead of cash.
Buyback Services (SellMac): SellMac is an excellent option for those looking for a hassle-free selling experience. They provide instant offers based on the condition of your device and free shipping, ensuring you get a fair price without the effort of negotiating.
6. Create an Attractive Listing
If you choose to sell on an online marketplace, an attractive listing is key to attracting potential buyers. Here are some tips:
High-Quality Photos: Take clear, well-lit photos of your MacBook Pro from various angles. Highlight any unique features and include images of any accessories included in the sale.
Detailed Description: Provide a comprehensive description that includes the model, year, specifications, and condition. Be transparent about any defects to build trust with potential buyers.
7. Secure Payment and Shipping Arrangements
Once you’ve found a buyer, arrange for payment and shipping. If you’re selling locally, meet in a safe public place. For online sales, use secure payment methods like PayPal or Venmo to protect yourself from scams.
If you use a buyback service like SellMac, they’ll provide a prepaid shipping label, making the process straightforward. Just pack your MacBook securely and send it off.
8. Enjoy Your Earnings!
Once the sale is complete, you can enjoy the financial benefits of selling your MacBook Pro. Whether you decide to reinvest in a new device or save for future expenses, selling your MacBook can be a rewarding experience.
Conclusion
Sell MacBook Pro for the best price doesn’t have to be overwhelming. By assessing its condition, backing up your data, researching market prices, and selecting the right platform, you can maximize your return. Services like SellMac simplify the process with instant offers and free shipping, ensuring a hassle-free experience. Follow these steps, and you’ll be well on your way to a successful sale!
0 notes
Text
The Importance of Regular NVMe Health Checks for Protecting Your Data
NVMe (Non-Volatile Memory Express) SSDs have revolutionized data storage with their high-speed performance and efficiency. However, like any storage device, NVMe SSDs are not immune to wear and failure. Regular NVMe health checks are essential to ensuring data integrity, preventing unexpected failures, and prolonging the lifespan of your drive. This article explores why routine NVMe health monitoring is crucial and how you can effectively check your SSD’s condition. Why NVMe Health Checks Matter1. Prevents Data LossNVMe SSDs have a limited lifespan, measured in TBW (Terabytes Written) and DWPD (Drive Writes Per Day). Regular health checks allow you to monitor these metrics and back up important data before a drive fails.
Detects Early Signs of Drive Failure:SSDs provide early warning signs before total failure, such as increased bad sectors, slow performance, and overheating. Running health diagnostics helps identify these issues before they become critical.
Optimizes Drive Performance:Over time, excessive writes, temperature fluctuations, and firmware issues can impact NVMe SSD performance. Health checks help diagnose slowdowns and suggest optimizations like TRIM, firmware updates, or freeing up disk space.
Monitors SSD Lifespan and Wear Leveling:Health monitoring tools track wear leveling counts, TBW, and NAND endurance, helping users predict when a drive is nearing its end of life.
Ensures Data Security and Stability:A failing SSD can lead to corrupted files and system crashes. Regular health checks help maintain data stability and reduce the risk of sudden drive failures. How to Perform an NVMe Health Check1. Use Built-in OS ToolsWindows: Use the wmic command (wmic diskdrive get status) or Optimize Drives tool. Linux: Use smartctl (sudo smartctl -a /dev/nvme0) to check SMART attributes. Mac: Use diskutil info diskX to check SSD health.
Use Third-Party Monitoring ToolsCrystalDiskInfo – Displays NVMe health status and temperature. Samsung Magician – Ideal for Samsung NVMe SSDs with detailed diagnostics. HWMonitor – Monitors SSD temperature and performance. Intel Memory and Storage Tool – Provides NVMe health reports for Intel SSDs.
Check SMART Attributes:Self-Monitoring, Analysis, and Reporting Technology (SMART) data provides key information about SSD health. Look for: Wear Leveling Count – Indicates NAND endurance. Power-On Hours – Tracks drive usage over time. Bad Blocks Count – High numbers indicate possible failure. Temperature – Overheating can degrade SSD performance.
Monitor Drive Temperature:NVMe SSDs operate best below 70°C. Regularly monitoring temperature prevents thermal throttling and extends lifespan.
Perform Regular Backups:Even with regular health checks, always maintain backups of important data using cloud storage or external drives to prevent data loss. Conclusion:NVMe SSDs offer fast and reliable storage, but they require routine health monitoring to prevent failures and data loss. Regularly checking your drive’s health, monitoring SMART attributes, and taking preventive measures can significantly improve SSD longevity and data security. By staying proactive, you can ensure your NVMe SSD continues to deliver optimal performance while keeping your valuable data safe.
0 notes