#How to free space on hard drive ubuntu
Explore tagged Tumblr posts
Visit Tumblr Blog
Explore Tumblr blogs with no restrictions, modern design and the best experience.
Last Seen Tumblr Blogs


Fun Fact
The most popular pages on Tumblr are about Minecraft, GIFs, and David J. Peterson.
Text
HOW TO BACK UP YOUR SHIT ON A FUBAR PC
So, I have a lil linux know how. Someone I know's Windows Boot SSD died on em. I helped unfuck it, but it still got me thinkin. "Do people know how to back up stuff after their PC commits seppuku?"
So What you'll need is:
-A friend's PC to create the usb tool -A USB drive (preferably USB 3.0) with 16 GB or more of storage -An external hard drive to store the backup image -An internet connection.
FIRST
Borrow your friend's pc or laptop.
Download balena-etcher or Rufus
Download a copy of ubuntu linux. Get a coffee, eat a sandwich. This'll take a while.
Once it's done, use Etcher or Rufus to install Ubuntu on the flash drive. Eject the usb, thank your friend, and go back to your malfunctioning compy and plug the usb in.
NOTE: THIS PRESUMES THAT THERE IS A SOFTWARE ERROR PREVENTING YOUR MACHINE FROM BOOTING. IF THE HARDWARE ITSELF IS BROKEN, THIS WONT WORK.
Ok, you're going to boot your PC into BIOS. How? Depends on who made the computer. Google "How to open bios on a [Blank] pc", and you should be able to find the answer pretty quick. Its usually by either spamming the delete key or f10 while your computer turns on.
Once you're in the BIOS, there should be a menu with boot options. Select the usb. It will boot your computer into ubuntu linux, running off that lil usb stick. Neat, huh? You'll get the option to try or install ubuntu as an operating system. You want to click "try".
Plug in the external drive you're putting the backup image of your drive on.
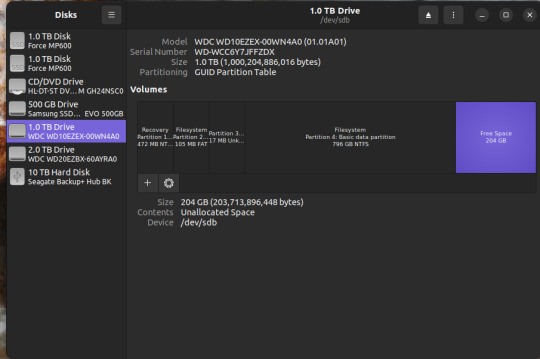
Hit the windows key and it should pull up a search bar. type "Disks" or "Gparted". it's the same program either way so, open it.
You should see something like this.
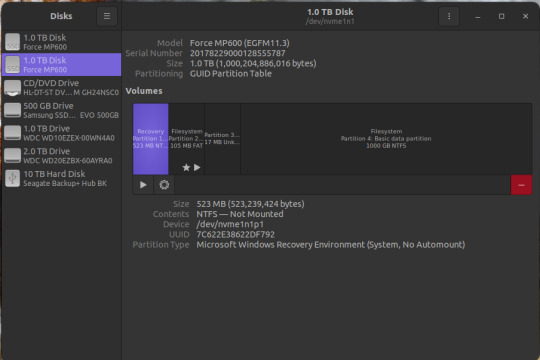
Depending on the size of your Boot SSD in windows, you may need to shrink the partition a bit. like If you have a 500gb drive handy, but the drive you need to back up is 1TB. So click on the bit that says "basic data partition"
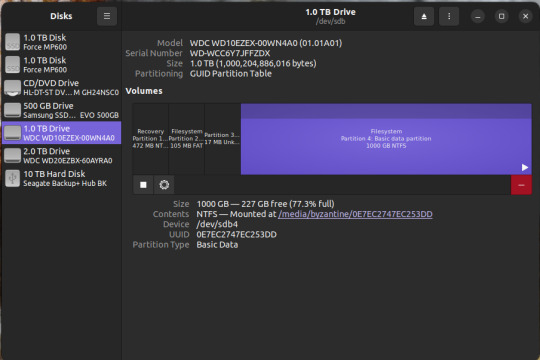
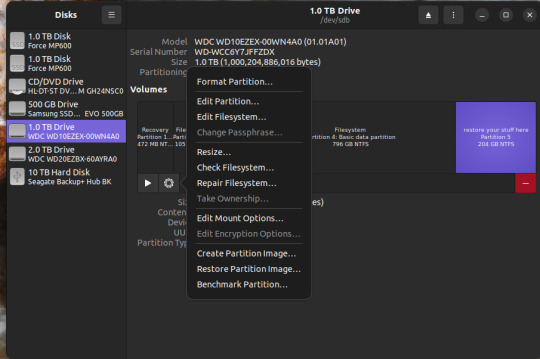
click the gear icon
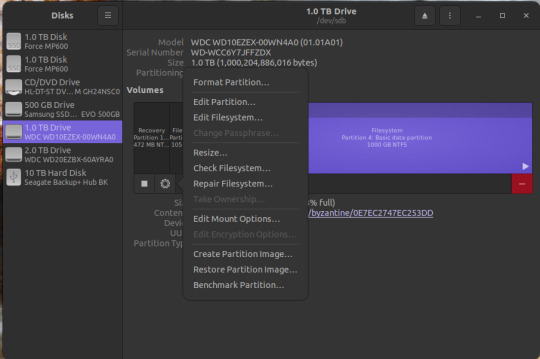
Click "Resize..."
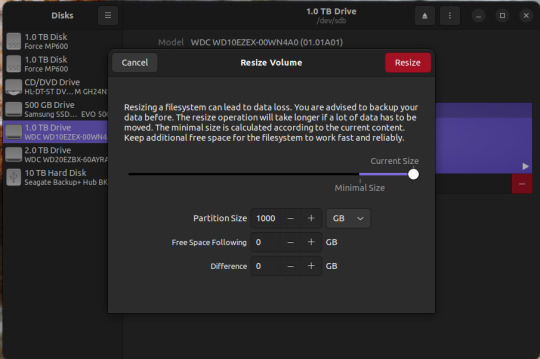
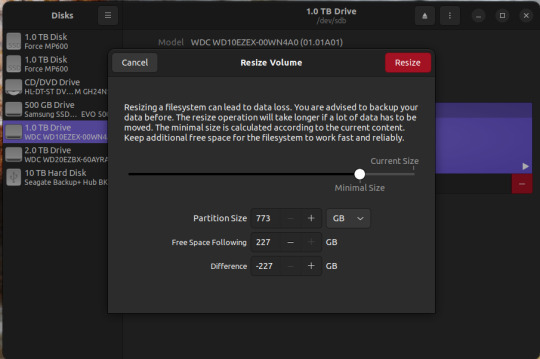
Resize. if the external drive you're backing up to is BIGGER than the boot drive you're trying to back up, you can skip this.
Now there's two things you can do. The first is to simply create an image of the basic data partition where all your files are. The second is to back up the whole disk.
To back up the partition,
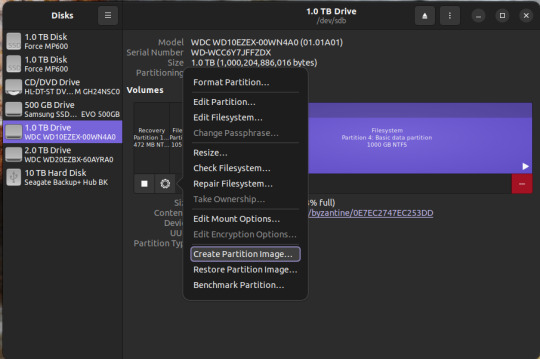
Select the basic data partition, click the gear icon, and select "create partition image"
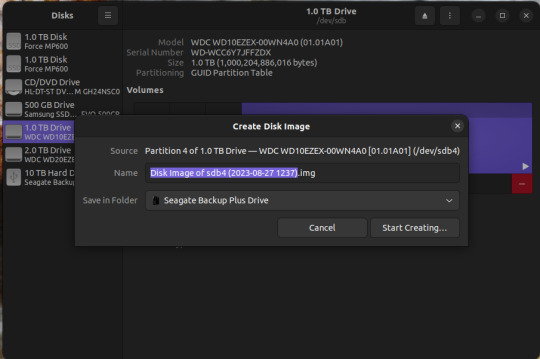
Name it whatever you want, save it on the external drive. Go get another coffee and a sandwich, this may take awhile as well.
To make a backup of the whole disk, click on the three vertical dots in the upper right corner, and select "create disk image"
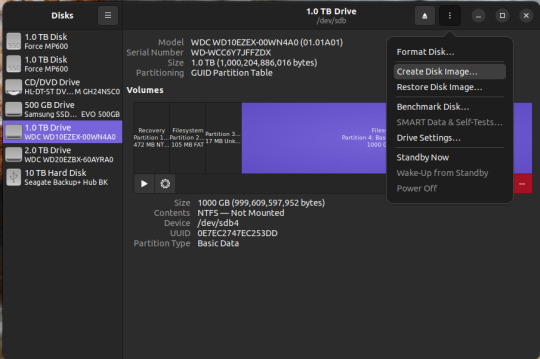
Same as before. name it what you want, save it to the external drive.
There you go.
To access the data, you need to restore that image to a new SSD or hard drive. You can do this using the same program. I recommend doing this AFTER you've done whatever was needed to fix windows.
if you're just restoring a partition image, not the whole disk, here's what you do.
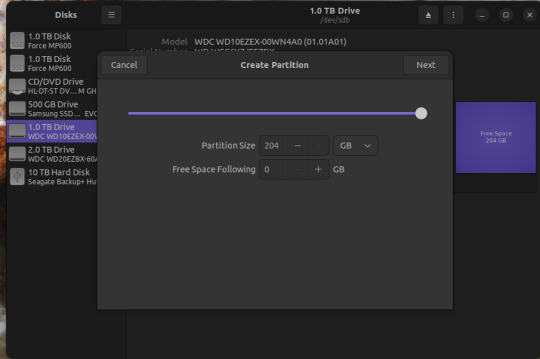
If you have FREE SPACE on a drive, or new drive, you can click on the "+" button, create a new empty partition
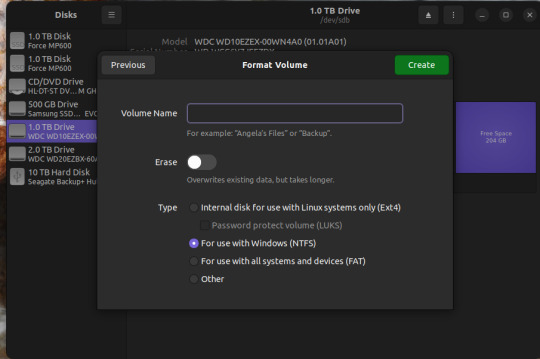
and click "restore partition image" to make it readable. Then you can mount it as a new drive in windows and copy your stuff over. WARNING: THE PARTITION YOU'RE RESTORING TO MUST BE AS BIG OR BIGGER THAN THE PARTITION IMAGE
For a disk image, similar steps.

Three vertical dots on the upper right, select "restore disk image".
Select the full disk image from wherever you saved it and restore.
WARNING: Restoring a disk image will nuke anything already on the drive you're restoring it TO. So don't restore the disk image to your fixed boot drive, or to the drive you saved the disk image on.
Anywhomst. I hope this helps someone save their stuff or avoid being charged out the nose by a computer repair shop.
16 notes
·
View notes
Text
How to free space on hard drive ubuntu

#How to free space on hard drive ubuntu how to
#How to free space on hard drive ubuntu software
#How to free space on hard drive ubuntu free
The command ‘apt autoremove’ might not remove the orphaned package in this case. But imagine the case where you had manually installed mylib before installing myprogram. Now, the command listed in point 1 removes such orphaned packages. Thus mylib, in this case, becomes an orphaned package. When you delete ‘myprogram’, mylib might still remain in the system. This lib will be usually installed automatically with ‘myprogram’. But this package has a dependency on the library ‘mylib’. Suppose you installed a package ‘myprogram’. I am not a fan of this method and I advise you to avoid it.įirst, let’s see what is an orphaned package in Ubuntu. This step is best avoided if you are a beginner. This way, you will have at least one/two other kernels to boot with, if for whatever reason the latest kernel you are unable to boot with. My recommendation is to keep at least two or preferably three kernels including the latest. Note: Replace VERSION with the version of the kernel you want to remove. It will prompt you with a list of packages that will be removed, so you can double check the list before continuing. I’m using shell expansion for the version numbers to save typing. Removing the old kernels is the same as removing any other package. List all installed Linux kernels first: sudo dpkg -list 'linux-image*' So, if you manually installed a Linux kernel, perhaps you can manually uninstall it as well. But removing old, unused Linux kernels will still save you plenty of space. But it won’t work if you manually installed the kernel in Ubuntu. The command discussed in the point 1 removes old Linux kernel. Remove old Linux kernels that were manually installed The script removed the older Snap packages and freed over half of the 5 GB space used by Snap. Give it execute permission, run the shell script with sudo and see the magic. Snap remove "$snapname" -revision="$revision" What you have to do here is to create a new shell script and use the following lines in your script: #!/bin/bash du -h /var/lib/snapd/snapsĪlan Pope, part of Snapcraft team at Canonical, has created a small script that you can use and run to clean all the older versions of your snap apps. On top of that, Snap stores at least two older versions of the application (in case, you want to go back to the older version). You probably already know that Snap packages are bigger in size. Remove older versions of Snap applications When you are almost out of space, this 500 Mb can make a lot of difference.ĥ. You can see the size of this cache with the du command below: sudo du -sh /var/cache/aptĪs you can see, I have over 500 Mb of cache storage. Over time, this cache can grow quite large and hold a lot of packages you don’t need. The APT package management system keeps a cache of DEB packages in /var/cache/apt/archives.
#How to free space on hard drive ubuntu software
Ubuntu uses APT (Advanced Package Tool) for installing, removing and managing software on the system, and in doing so it keeps a cache of previously downloaded and installed packages even after they’ve been uninstalled. You can remove a program in Ubuntu from the software centre or using the command below with particular app name: sudo apt-get remove package-name1 package-name2 3. Clean up APT cache in Ubuntu If you need space more getting rid of the unused or lesser used applications is always a good idea. Maybe you installed them on the back of an awesome review, out of nosiness, or to handle a particular task. You can find installed apps in Software CenterĬhances are that you have a number of apps installed that you seldom use.
#How to free space on hard drive ubuntu free
Once you know the state of free space on your disk, it’s time to clean up your system and make some more free space here. You should see the disk space used and the free space remaining in here: It’s always a good idea to check the free disk space in Linux first.
#How to free space on hard drive ubuntu how to
I’ll also share some advanced tricks so that you’ll have choice.īut before that, let’s see how to find the free space remaining on Ubuntu. In this article, I’ll show you some of the easiest tricks to clean up your Ubuntu system and get more space. But if your hard disk has limited space, like I have a 128 GB SSD laptop, freeing up disk space becomes a necessity. If you have like a TB of storage capacity, you might not bother to clean up Ubuntu to make some disk space. Over time, any operating system can become cluttered as programs are added and removed. Brief: Running out of space on your Linux system? Here are several ways you can clean up your system to free up space on Ubuntu and other Ubuntu based Linux distributions.
0 notes
Text
virtual server 8
Panels Available NEW interworx
Supports CentOS Allows for multiple Admin and User level access Includes unlimited accounts Fixed price of $12.00/month
Features NodeWorx (to manage a server) and SiteWorx (to manage a website, email, and databases). Interworx makes it easy to migrate from other control panels such as SiteWorx, cPanel, DirectAdmin, Ensim, and Plesk 7-8. cpanel
Supports CentOS and CloudLinux Only allows for single Admin and User level access The number of accounts is dependent on the tier type ? Starts at $8.88/month for Solo tier
Simplify the management of your website from one single dashboard. cPanel lets you upload and manage files, create email accounts, and check the statistics of your website (e.g. the amount of visitors). Supports cPanel to cPanel website migration. VPS Server Management
Simply select your preferred type of management during the purchase phase.
User-Responsible FREE (default)
Basic $10.00 /mo
Complete UPDATED $25.00 /mo Security enhancements ?
Quasar (CXS license installed)
Pulsar (Free CXS server scans upon request) Restore Server Failure ? $10.00
flat rate per each restore Core Software Changes ? 1 hr - $15.00
flat rate 1 hr - $10.00
flat rate Fix Server Failure Cause ? 1 hr - $15.00
flat rate 1 hr - $10.00
flat rate
Complete management includes the CXS license installation for the VPS Quasar plan only — due to the resource limitations of Pulsar plans. Free scans upon request are available for the Basic management and VPS Pulsar plan. A CXS license or scan can be ordered at an additional fee for User-Responsible plans. Learn more about CXS license →
Your business, your call Namecheap's VPS vs. VPS Competitors
The choice is clear. Namecheap - Quasar GoDaddy - Grow Bluehost - Enhanced Cores
4
3
2 RAM
6 GB
6 GB
4 GB Disk Space
120 GB
150 GB
60 GB Bandwidth
3000 GB
Unmetered
2000 GB Price
$19.88/mo
$44.99/mo
$59.99/mo VPS Hosting Features
Why it’s the right hosting option. Complete Customization Complete Customization
Depending on your level of technical expertise, your VPS is completely customizable. Get root access to your server, choose your Operating System (CentOS, Ubuntu or Debian), and decide if you want to install a cPanel. Top-Level Security Top-Level Security
Keep your “virtual” hosting environment in the safest of hands thanks to state-of-the-art hardware and software firewalls, alongside our internal security package. Routine server backups also mean further peace of mind. Beyond Fast Beyond Fast
Enjoy 20X faster storage with pure Solid State Drive (SSD) storage, designed to enhance performance over the traditional Hard Disk Drives (HDD) preferred by VPS competitors. The result? Significant improvements to your website's speed, performance, and loading times. World-Class Support World-Class Support
Have any questions, want to discuss your customization options or upgrade your Server Management? With Namecheap, you can count on us to help you out — no matter what. Tech Specs Monthly Quarterly Yearly
Pulsar
$9.88/mo
$11.88/mo
Quasar
$15.88/mo
$19.88/mo Plan Features CPU ?
2
4 RAM ?
2048 MB
6144 MB Disk Space ?
40 GB SSD Raid 10
120 GB SSD Raid 10 Bandwidth ?
1000 GB/mo
3000 GB/mo Uptime ?
99.9%
99.9% Backups ? 100 GB Backup Storage ?
Included with Complete Management
Included with Complete Management Dedicated IP ?
1 IPv4
Up to 2 IPv4 Access Level ?
Root / Reseller depending on Server Management type
Root / Reseller depending on Server Management type Customized Configuration ? Streaming Audio/Video ? Money-Back Guarantee ?
30 days
30 days No Contract Required ? Operating System Software Add-Ons Support Features Pricing Scales with Your Business Scales with Your Business
If your business scales in size, your VPS is ready to act. Easy scalability lets you start as small as you can afford and grow as you expand — whether that’s additional disk space, CPU power or bandwidth. Stay In Control Stay In Control
Since you don’t depend on your virtual neighbors, your resources are fully isolated in their virtual environment to allow you greater stability and performance. Whether it’s installing a custom application or configuration, you control exactly how your website is run. Power with the Right Prices Power with the Right Prices
Let your business skyrocket, not your budget. By offering you all the necessary resources at a lower cost, you only pay for what you actually need. namecheap logo Web PanelsmanagementUPDATEDcompetitor chartFeaturestech specsbenefits buy now Why Namecheap? Privacy and Security
Your online security and privacy come first at Namecheap, and we will always support the rights of individuals and consumers online. It’s our mission to keep the Internet open, free, and safe for everyone. Your Business Online
Boost your business with industry-premium products and services, at prices that won’t break your budget. If it doesn’t provide you with a better Internet experience, we simply don’t offer it. Customer Service
You’re covered by a Support Team that’s renowned for being one of the most knowledgeable, friendly, and professional in the business. Real people are ready to assist you with any issue, any time, 24/7. Frequently Asked Questions What is VPS Hosting? How do I set up VPS Hosting? How should I choose the right VPS Hosting plan for my website? Why should I choose VPS Hosting from Namecheap? What’s the difference between VPS Hosting, Shared Hosting, and Dedicated Server Hosting? Disclaimers
Only first-time VPS Hosting customers are eligible for our 30-day money-back guarantee. For example, if you previously created an account with Namecheap, subsequently canceled and signed up again, unfortunately, you are ineligible for a refund. The same scenario applies to those who have already opened a second Namecheap account. Namecheap does not charge an additional fee to transfer an existing website and/or a VPS. Please note that a cPanel to cPanel transfer is fully supported while other transfer options may need to be checked by our Technical Team. The details in the comparison table were correct as of September, 2019 and the information for each competitor may not include certain features, functionalities or quantities and is subject to change. The number of cPanel accounts you can create is dependent on your tier type. Learn more about our tier-based cPanel pricing → By default, the latest stable OS template version is installed. If you prefer to change this OS to another template, please do so using your Solus VM management panel. Learn more →d=0
1 note
·
View note
Text
DreamHost VPS and Dedicated Servers Hosting Services
Is it accurate to say that you are thinking about facilitating your new site or blog with a dependable web facilitating organization? DreamHost VPS, Dreampress 2 and the DreamHost Dedicated Servers facilitating administrations can help give your site the security, speed and straightforwardness it merits. The sort of organization that has your site has a method of deciding how far your site can contend with the top dogs and how much traffic and cash you get over the long haul. With DreamHost, your webpage makes certain to contend well with the hotshots on the web.
Situated in Brea, California, DreamHost was established by Josh Jones, Sage Weil, Dallas Bethune and Michael Rodriguez. The organization was dispatched in 1996 and has stayed an excellent and solid web facilitating specialist co-op for designers and business visionaries from that point onward. With three server farms in downtown LA, Ashburn (Virginia) and Irvine (California) in the United States of America, and with a distributed computing stage, the issue of speed and information security are taken care of viably.
This organization has needed to battle with some crucial issues before. One of those issues was the worker personal time of 2006 which came about because of two blackouts at their server farms, and the second was the hacking of their webpage in 2007 which came about in around 700 sites records and FTP accounts having a place with around 3500 destinations being undermined. In any case, DreamHost appears to have gotten the past unequivocally behind them and are currently giving quality, continuous administrations to their clients. They have won the PC Mag's Best Web Hosting Service for the second year straight. They've been facilitating more than 1,500,000 sites since 1997.
Why Choose DreamHost VPS and Dedicated Servers Hosting?
DreamHost has four significant bundles which incorporate Shared Hosting, DreamHost VPS facilitating, DreamHost Dedicated Server facilitating administrations, and DreamPress 2 Hosting mostly for WordPress sites and online journals.IT Support Company We should quickly investigate the four distinctive facilitating bundles accessible for you as a website admin.
Mutual Hosting: $7.95
DreamHost shared facilitating begins at $7.95 month to month (whenever charged every third cycle). It has the accompanying highlights:
Boundless transmission capacity every month
Boundless circle space
1 free area
Facilitated on Solid State Drives (SSDs)
Boundless areas facilitating
Boundless MySQL 5 information bases
Boundless email accounts
Debian Linux working framework
97 Day unconditional promise
DreamHost VPS: $15 to $120
The DreamHost VPS DreamVPS facilitating cost from $15 to $200 month to month. The VPS facilitating bundle is useful for internet business, Business, engineers, and originators. The bundle accompanies some significant highlights among which are:
Exclusively Built Control Panel
Adaptable Up to 8GB of RAM
From 30GB to 240GB SSD stockpiling
Boundless SSH/SFTP/FTP/Full shell clients
Boundless MySQL 5 information bases
Boundless spaces facilitating
Boundless email accounts
Ubuntu 12.04 LTS
Debian Linux working framework
DreamHost Dedicated Server facilitating: $109 to $249
The DreamHost devoted worker facilitating contain six bundles, and they incorporate the accompanying:
New Moon 2: $109 month to month. The highlights incorporate 2GB RAM, 500GB Disk, and Desktop grade CPU.
Half Moon 2: $129 month to month. The highlights are 2GB RAM, 500GB plate space, and Server grade CPU.
Half Moon 4: $139 month to month. It accompanies the accompanying highlights: 4GB RAM, 500GB Disk space, and Server grade CPU.
Blue Moon 4: $169 month to month. Its highlights incorporate 4GB RAM, 500GB Disk space, 1 RAID, and Server grade CPU
Blue Moon 8: $209 month to month. It accompanies the accompanying highlights: 8GB RAM, 1TB Disk space, 1 RAID, and Server grade CPU
Blue Moon 16: $249 month to month. Its highlights are 16GB RAM, 1TB Disk space, 1 RAID, and Server grade CPU
Aside from the individual bundles recorded over, all devoted worker facilitating bundles have the highlights recorded for the VPS facilitating above. Get quality facilitating for your site right currently by buying in to one of the devoted worker facilitating bundles.
DreamPress 2 (Managed WordPress Hosting): $16.95
The DreamPress 2 is a bundle that is explicitly implied for facilitating WordPress sites or sites. Also, it is the quickest and most solid approach to do as such. It goes for $16. The highlights of this bundle are:
Facilitated on Virtual private Servers (VPS)
Improved WordPress Installation
30GB of SSDs stockpiling
PHP 5.6 with OPcache and Optional HHVM
Programmed WordPress Install and Core Updates
Utilize any WordPress Theme or Plugin
all day, every day WordPress Ninja Support.
More DreamHost Features
Simple to explore control board: DreamHost VPS and Dedicated worker facilitating or some other of their facilitating bundles have a control board that is anything but difficult to explore by clients, making it very simple to design and survey alternatives to your administration, and furthermore deal with your facilitating account with no issue.
Programmed Updates: In request to shield you from all types of security chances, DreamHost utilizes the most recent stable adaptation of WordPress to stay up with the latest.
Boundless E-sends: You can make the same number of email addresses as you wish for your record. You can likewise utilize their new atmail web customer to access and read your messages.
Unshakable security: DreamHost makes your site/blog security involves main concern. They utilize a WordPress-explicit firewall to obstruct savage power assault and different types of weaknesses.
Online business Ready: DreamPress 2 offers you a private IP address. A mix of the private IP address, free Let's Encrypt declaration, and the eCommerce module prepares your site for eCommerce.
Simple Installation: DreamHost has a speedy establishment of bundles like WordPress, Joomla, eCommerce, Moodle, Wikis, phpBB, Drupal and client discussions.
Astounding Bandwidth: There is in every case enough data transmission to deal with the traffic spike from your site at whatever point you run a giveaway or challenge.
My take:
DreamHost has solid and powerful bundles. DreamHost VPS, DreamPress 2 and the DreamHost devoted Servers facilitating are totally trusted and ready to convey on a guarantee. The bundles are useful for designers and financial specialists. Backing is incredible and accessible every minute of every day aside from the way that phone uphold is deficient. I would encourage you to likewise do a touch of examination with different audits before making your buy. All things considered, in the event that you decided to go for their bundle, visit their site and get more point by point data with respect to their items.
Professionals
A few facilitating bundles to look over.
A free 2-week preliminary.
Boundless areas per facilitating plan.
97-day unconditional promise.
Cons
Facilitating bundles are somewhat costly.
Backing is delayed to react to tickets.
cPanel is somewhat hard to comprehend.
No telephone uphold
DreamHost Affiliate Program
Aside from the DreamHost VPS, DreamPress 2 and the DreamHost Dedicated Server facilitating, there are unique projects that Dreamhost plans for the individuals who are keen on utilizing their administrations to bring in cash. They permit you to join their partner program for nothing and bring in cash as you allude clients to them. You make $97 in the event that you allude a client for every month (in the event that they pay for DreamHost Dedicated Server facilitating). In the event that you can proceed with that for an entire year, you win an aggregate of $1,164. You don't need to claim a facilitating account before taking an interest in the subsidiary program.
Notwithstanding, if the client purchases a Shared facilitating plan, you win a one-time installment of $30. The VPS additionally acquires you $30 while the DreamPress 2 procures you $50. Note that the repetitive associate installment has been halted since February 16, 2016. For the partner to be equipped for installment, the alluded client must keep up a functioning record for the free time for testing and/or unconditional promise periods appropriate. In the event that the client drops his facilitating plan, gets a discount or gets suspended, the subsidiary loses his partner reward. You will be paid after the 97-day holding period.
When you are enrolled for their associate program, they will give you limited time materials like standards, subsidiary connections, and so on which you will put on your site/blog. In the event that any of your site guests taps on the connections to buy a facilitating bundle, you will be paid a commission in light of the fact that the deals came through your site.
It is very simple to make deals by educating your webpage clients regarding the DreamHost VPS administration or the DreamHost Dedicated Servers facilitating, all in light of the fact that many individuals are searching for where to get those administrations on the web. Since DreamHost is a believed web facilitating specialist organization, it is simpler to persuade your perusers to visit and purchase facilitating bundles from their website.
1 note
·
View note
Video
youtube
been thinking about how one can get started on linux with minimal resources too. i think using virtualbox is one good way to get started.
virtualbox is a pretty neat tool, it’s an app/software that emulates computers. one can create “virtual machines” within virtualbox... and... it’s sort of like running another (virtual/emulated/simulated) computer inside your own current computer/laptop/desktop. it’s really a great tool to run and test out all the different operating systems out there not only linux. it’s available for microsoft windows and macosx and it’s free and open source too!
things you need to get started with virtualbox is a computer/laptop/desktop with a 64 bit processor intel or amd, and although not necessary but good to have the processor should support virtualization. you’ll also need at least 16gigs or so of free hard drive space. and finally you’ll need the installation medium of the linux distro you want to install.
here’s the link to virtualbox’s main site
https://www.virtualbox.org/
here’s the download link:
https://www.virtualbox.org/wiki/Downloads
so far the above video via youtube by SavvyNik looks to be the best tutorial on how to get started with virtualbox. he also has follow up videos on how to install various different linux distros, all listed in the description. i’ll keep looking for more...
the linux distros i personally recommend for those who are just starting out are debian, ubuntu, linux mint. fedora and lately elementary os.
for ubuntu, i recommend the ubuntu “mate” flavor of ubuntu. or Xubuntu, the ubuntu flavor with the XFCE4 desktop enviornment installed and set up ready to go. both are relatively light on resources and run quick even in a virtual machine environment. both are similar to the windows microsoft desktop environment as well. i personally use ubuntu mate on desktops and xubuntu on laptops.
link to ubuntu mate download page:
https://ubuntu-mate.org/download/amd64/bionic/
link to Xubuntu:
https://xubuntu.org/download/
you’ll need to download the iso image and have it ready for virtualbox. for example the ubuntu mate image file will look something like this with .iso file extension:
ubuntu-mate-18.04.4-desktop-amd64.iso
other resources:
ubuntu flavors: https://ubuntu.com/download/flavours
fedora linux: https://getfedora.org/
linux mint: https://linuxmint.com/
elementary os: https://elementary.io/
article on how to install ubuntu linux under microsoft windows: https://itsfoss.com/install-linux-in-virtualbox/
well, i really suck at writing tutorials but i hope this is enough to get started. and if you really really want to transition to linux please don’t hesitate to contact me and ask me questions or get help... i have a lot of time lately. and i really really do wish more and more people move away from microsoft and apple to linux or other alternative open source operating systems! @arms-a-kimbo
3 notes
·
View notes
Text
Dedicated Server Cost in India - A Womans Perspective
Get your Web server up and running on a solitary click, with our unique immediate provisioning system. click here for info Take pleasure in power-packed performance with our SuperMicro Blade Servers as well as Intel Xeon hyper-threaded processors. Personalized services are the backbone of handled hosting solutions. With a devoted web server, committed for your service web site, you can rest assured of undisturbed solutions. has come true.We are the best Web site Hosting Company in India offering reputable and low expense webhosting services. We possess the very best webhosting web server for the smooth working of your site. Cybex Hosting keep low-cost specialized web server in India, US, Germany as well as Netherlands datacenters. So we can offer the most effective web server holding at low-cost price. However, the sources of the web server are split in a dealt with percentage between customers, so your allocation of resources along with some software application, develops a VPS. The sources of the VPS will not be shared. In contrast, when you utilize a dedicated web server, the physical server is alloted to just one user, you. The sources of the web server are all yours, so you get more resources than VPS holding. The factor for this is that cloud holding includes making use of clusters of web servers located all over the world. Must an individual need a lot of sources, various other servers are constantly there as back-ups. Possibilities of closed down when overwhelmed are, consequently, slim to zero possibility. Business-- Their Business strategy comes with unlimited internet sites, unmetered transmission capacity, 1-click installs, totally free SSL certificates, free committed IP, as well as totally free Search Engine Optimization devices to name a few.
What are the best servers?
Without further trouble, let's study the very best servers for small businesses. Dell PowerEdge T30. Dell PowerEdge T20 [barebones] Lenovo ThinkServer TS150. Supermicro SuperWorkstation 5039A-IL. Fujitsu Primergy TX1310 M1. HP Proliant Microserver Gen8. Lenovo ThinkServer TS460. HP ProLiant ML350 G9 5U. More products •.May 8, 2019 All our Singapore-based servers come currently preconfigured with the effective SoftRaid to significantly increase the sheer performance and essential dependability of your data storage. Numerous fascinating licenses are provided with our Dedicated Servers, so please make your method Click on this link to explore the information. Till a few years back, yes, the specialized servers were very extremely priced. Nonetheless, like with several various other items, with enhancement in innovation as well as the increase in competitors, the dedicated web server rate in India has boiled down as well as come to be even more inexpensive.
What is the cost of server in India?Self Managed Servers Hard Drive Cost Per Month Intel Core i7-4770 Quadcore Hybrid Server(SSD+SATA)Overall 4 Drives (1 IPv4 & 1 IPv6 )Plan 4 2x240 GB SSD (SoftwareRaid) 2x2 TB HDD SATA $250/ Rs.15000 Intel Core i7-3930 Quad-Core(1 IPv4 & 1 IPv6 )Strategy 5 3 TB SATA$250/ Rs.15000 3 even more rows You will have the option of choosing in between CentOS, Ubuntu, and also the Windows Server 2016/2012 OS, with the completeness of our South Africa based Dedicated Web servers. One (1) IP address (IPv4) is included with each Dedicated server located within the South Africa. This offers to significantly improve both the performance as well as reliability of your information storage space. We offer backups par excellence. Thus, we provide to you an excellent 500GB of free of charge Back-up Storage with these Dedicated web servers. low cost dedicated server hosting in India Read More about these back-up solutions. Naturally, every Dedicated Web server that remains in France will feature one (1) IP address (IPv4), which will be consisted of with no additional expense to you or your organisation. Our group of experts has experience in moving hundreds of websites easily with no downtime. They always make sure that your website functions perfectly on our hosting atmosphere. We'll move all the needed data and also databases from your old dedicated holding provider to your new and completely handled holding supplier. It is constantly enjoyable to have little side hustle, isn't it?
How much does web server holding cost?
For a brand-new website, shared holding is probably adequate. Yet as your web traffic starts to grow, so will your hosting requirements and budget. While shared hosting can be as low as $50 annually, relocating to a VPS (digital private web server) or a dedicated server can quickly bump up the annual price tag to over $1,000.Jan 21, 2019
Dual Cpu Dedicated Servers.
We use a proprietary provisioning system which ensures that your committed hosting server is ready instantaneously. Yes, you read that right - your web server is available for usage right away. No 24 hour delay, no arrangement costs. In fact, a node in a cloud computer service is normally not a lot more reputable than a solitary committed web server. This is why little in addition to huge scale businesses must buy dedicated web servers. We understand that speed is essential to make an essential application run smoothly. When you select a dedicated server from Ricoh, we make certain broadband and enhanced efficiency. Given that we make use of branded equipment from reputed firms like HP, IBM or Dell, we make sure guaranteed services. , if you need we will include extra disk space on your web server or we will certainly migrate your web server within Indian data center. . All the web servers supplied by us comes pre-installed with RAID and also it can be altered in providing the various RAID options.
#dedicated server hosting in India#cheapest dedicated server hosting in India#low cost dedicated serv
1 note
·
View note
Text
How To Convert An MP4 To Avi In Ubuntu (And Watch On A DVD Participant)
In the event you've ever tried to search for software that may convert audio and video information on Home windows, you would possibly understand how hard it may be to seek out devoted options which are truly free and performance as advertised. Begin the video converter. Add MP4 files into the interface by drag and drop. You can add single or a number of files for batch conversion. Appropriate for home users and firm customers to convert AVI video format to WMV video format. The Movavi converter helps you to easily extract audio from video and do virtually prompt conversion between a hundred and eighty+ completely different media formats. Obtain Movavi Video Converter for Home windows or Mac and convert your MOV recordsdata to MP3 very quickly. Xilisoft Audio Converter comes with a flexible media participant constructed-in able to playing information in all kinds of codecs. Step four: After that you would be able to press the "Convert" button to start changing MP4 to MP3. It simply takes a few minutes to get the files with ease. Convert your favourite YouTube videos to varied codecs using our YouTube Converter. Convert and obtain in these formats: MP3, AAC, OGG, M4A, WMA, FLAC, WAV, MP4, AVI, MOV, MPG, FLV, WMV and M4V. Our premium YouTube Converter provides excessive pace downloads and superior high quality conversions. You can convert any audio file supported to Audacity to 3 files types: MP3, WAV, and Ogg Vorbis.

Step 4: You'll be guided into Save File" window, the place you'll want to choose an output folder and rename the output MP3 file. Once you're executed, click on Save and you'll be again to the earlier display. In case you've converted your music to MP3, you might not need the AAC version of the track taking on space on your laborious drive. In that case, you possibly can delete the track from iTunes You'll be able to even use features in iTunes to search out all duplicate variations of songs to make the cleansing-up course of easier. Step 4: Choose file location and Convert MP4 video to MP3. It's essential to want "Free Music Download app" & in that Tap the Share button and Faucet the Download button. To make this app a music player you may really use, there's a playlist function as well. You can add a music to a playlist using the Share button. Go to the Information part to view your downloaded songs. MP3 Video Converter is a device that permits users to transform any video file into an audio. It really works perfectly on Android units without any fees, means you will get it completely free from PlayStore. There are many tools that provides converting video to audio but this device that I have chosen is an extraordinary device that gives us a high-high quality audio. I recommend you to download this software as a way to listen to a high-quality music.
Are you an avid downloader of movies and movies (legally) online? Do you favor to observe films on your DVD participant? It seems, many people want to expertise a great movie while enjoyable on a settee and watching it on a tv screen. Unfortunately, when you have an older DVD player, you will not be capable of play MP4 movies straight from a USB or different exterior media. ConvertXtoDVD will first convert your MP4 video file to DVD format and then burn it to DVD. This may take some time. The amount of time it takes is determined by your computer's hardware, the software, most pace capacity of your DVD, and the file measurement of the video. Chances are you'll want to think about changing from one file format to a different if your cellphone or other playback system only supports one kind. In any other case, audiophiles truly concerned about sound high quality should probably disregard any MP3 vs. MP4 dialogue and go for FLAC, WAV, or other files which are lossless." They're going to take up quite a lot of cupboard space attributable to an absence of compression, however they're going to usually sound better than the rest of the web's alphabet soup. Combining this trick with the Easy Youtube Video Downloader (save asmp4 file type) in Firefox means changing will probably be much simpler than waiting for the typically flaky save as 128 mp3 choice in Easy Youtube Video Downloader. On-line Converter is a fast and safe technique to convert your videos from one format to another format. With this excellent online converter, you shouldn't have to obtain knowledgeable program but achieve your targets to transform the MP4 video to AVI. Edit MP3 or any audio format: trim audio file, split audio file, modify audio codec, volume, etc. Step 2: Click "to MP3". And you then flip the MP4 recordsdata into MP3. Our FREE YouTube converter makes changing streaming videos to MP3 online simpler and sooner than ever! Get the final word listening experience with our music downloader. Free Audio CD to MP3 Converter robotically fills the tags and the artwork, which could be seen in iTunes, Winamp or just a Home windows Explorer folder. You can adjust the video's effects on this interface, reminiscent of saturation, mp3 mp4 converter free hue and volume, and you may add watermarks. After that you can click the "Convert" button to transform mp3 mp4 converter free to MP4 file format.Allowing the streaming service to compress and convert your audio recordsdata would not necessarily imply the standard will degrade, however some compression algorithms increase peak signals sufficient that the audio can sound distorted. While you use a trusted program to transform your information to the correct format for each platform, you'll be able to listen to every one to get a good idea of what it should sound like as soon as it's published. If you want to add extra options to your information, say add an album cover or band image, just import the images to the software program and drag it to the video timeline. Then make sure that the image exposure timeframe is precisely so long as the music file.Most video functions can export movies in the MP4 format, but they normally can't export in the WebM format. You need a instrument to convert these MP4 recordsdata to WebM. Supported Output formats: MP3, 3GP, MP4, and others. This may install and construct FFmpeg with help for the libraries required to convert movies to the WebM format. If you happen to're on Linux, discover the suitable FFmpeg package deal to your distribution and install it with help for the libraries mentioned above. Freemake Audio Converter helps several common audio formats and is extremely simple to make use of. Nonetheless, it only helps audio files which can be shorter than three minutes.
1 note
·
View note
Text
How To ConvertFLAC ToMP3 In Ubuntu
Dont know anything about APE. Additionally supported, MP3 to MP3 - to convert to a unique bitrate. Choose your APE file(s). Convert APE to lossy audio codecs, like changing APE to MP3, to AAC, OGG, WMA, and so on. Suggestions. It's also possible to merge audio by clicking on the + merge button" and alter the audio bitrate under Settings. What's extra, HD Video Converter Factory Pro also works as an audio compressor that allows you compress WAV file and different giant measurement audio formats like ALAC, FLAC to MP3 and similar compressed audio codecs. Monkey's Audio's chief opponent is FLAC, which has more options than Monkey's Audio (streaming assist, for instance) and hardware assist to its edge, although its efficiency in compression is not as great. We also show you find out how to play Flac recordsdata on iPhone (with out converting). A cue sheet, or cue file, is a metadata file which describes how the tracks of a CD or DVD are laid out. Cue sheets are saved as plain textual content files and generally have a ".cue" filename extension. Added changing APE to Ogg information.
Within the late 1990s, one of the unique moveable music file formats - the MP3 - was causing quite a little bit of trouble mainly attributable to user's unlawful sharing over Napster. Whereas MP3 ultimately prevailed, there's a fair more sensible choice for prime-quality music downloads, and it's playable on your favorite system. It is even in your music streams. Hamster Free Audio Converter is alleged to work with Windows 7, Vista, XP, and 2000. Audio Converter is extraordinarily fast thanks to full-scale computation squeezing the most out of your CPU - nevertheless many cores it has. You possibly can configure this behavior in Preferences. Lossless format implies that little to no audio high quality throughout the encoding course of. This ensures that the digitial file will seemingly be nearly an identical to the source audio. Lossless formats are usually rather a lot larger in file measurement, which although beautiful sounding, can deter some people if they've restricted area for storing. Lossless formats have gotten more and more extra widespread as know-how advances whereas the price of memory and hard drives continues to drop. Click the "Open folder" button to entry the converted FLAC files by way of Windows Explorer. I can't verify this answer one hundred% as a result of I deleted the unique MP3 profile throughout my mad experimentation, however I am able to convert MP4 to Mp3 at no matter bitrate I selected. Subsequent edits to the profile do not seem to trigger issues. The app can convert a number of recordsdata simultaneously in a batch, saving them in a ZIP archive to hurry up downloading. Rework videos to MP3, M4A or different media format. The program helps over 500 standard and rare video codecs: MP4, AVI, FLV, MKV, DVD, WMV, HD, H.264, MOV, VOB, SWF, TS, WebM, Xvid, and so on. Save soundtracks and extract music from a video in seconds. Authentic audio high quality is preserved. The distribution comes with CUERipper , a straightforward-to-use instrument for ripping CDs to audio recordsdata plus cue sheets, with non-compulsory native or EAC-fashion logging. Like CUETools, it checks the rip towards the AccurateRip and CUETools databases. It additionally contributes to the CUETools database. In the next step, you'll be able to select a folder in your future FLAC recordsdata. As to APE recordsdata associated with Cue, if there is no such thing as a Cue file, it will probably't select the tune when playing the file. Open the Cue file with Notepad program, you will see that it data the singers of complete album in APE information, album title, APE file name, monitor number, every track title, artist, begin time and end time. Thus it's so essential for you when you want to burn CD with the APE file, or to split single APE file into individual songs. Allplayer - a popular media player that supports most of multimedia formats including FLAC, MP3, OGG, AC3 in addition to video formats like MP4, MOV, FLV and so forth. Also, this program includes a smart perform can match subtitles mechanically when watching films. This tutorial will stroll you through the steps to split and convertape tomp3, it also applies to converting APE to WAV, FLAC, OGG, AIFF, ALAC, AAC, WMA, AU, RA,M4A, and and so on on Windows or Mac. Considering the storage space and multiplatform help, it is such an ideal idea to convert APE file to MP3. That's what the video is all about. online free Ape to flac converter APE to MP3 Converter is multilingual and translated into 38 different languages. APE to FLAC Converter helps prevalent operation techniques. It could actually join CDA information to 1 massive AAC, ALAC, FLAC, WAV, M4A, M4B, MP3, OGG or WMA. Audio Converter Studio is a sophisticated model of on-line audio converter which incorporates all talked about functions above of On-line Audio Converter. It allows conversion between any two in style audio codecs including APE, MP3 and AC3, and many others. With an inlaid software, it guarantees the maximum velocity to do the conversion, which makes the process of conversion a rapid thing.Step 3: Wait for a while to complete changing APE to MP3. Then, download the output information onto your computer. Added help of format APE (Monkey's Audio). Furthermore, this APE to FLAC converter is equipped with some editing operate like trim, merge or cut up audio file, change audio channel, regulate audio birate, compress audio to a smaller measurement, and many others. A: The APE to FLAC Converter obtain for COMPUTER works on most present Home windows working systems. Unlike conventional strategies such as mp3, ogg, or lqt that completely discard quality to avoid wasting space, Monkey's Audio doesn't unfastened information throughout the encoding course of, and encoded audio information are usually lowered to about half of their authentic measurement.Another reason is methods to play audio files of format which is not supported by your mobile gadget or automotive player. OGG. Together with the lack of seek table lack of ability to tell whether an OGG web page is the target one makes in search of in OGG the most troublesome task in comparison with all different formats. Because the OGG header isn't sufficient to get the overall audio size, it is required to read from the end of file. This is essentially the most annoying downside of OGG format.
1 note
·
View note
Text
Kodi 17.3 download for windows 10 64 bit

KODI 17.3 DOWNLOAD FOR WINDOWS 10 64 BIT HOW TO
KODI 17.3 DOWNLOAD FOR WINDOWS 10 64 BIT MAC OS
KODI 17.3 DOWNLOAD FOR WINDOWS 10 64 BIT APK
KODI 17.3 DOWNLOAD FOR WINDOWS 10 64 BIT INSTALL
KODI 17.3 DOWNLOAD FOR WINDOWS 10 64 BIT 64 BIT
KODI 17.3 DOWNLOAD FOR WINDOWS 10 64 BIT 64 BIT
With this tool, you can easily create on Windows your own autorun file to open Kodi and enjoy all the functions and features of one of the best media centers out there. Kodi Film Songs freeload Kodi 64-bit Download Download Kodi On Iphone 10 Download Mashup For Kodi 2015 Mobdro For Kodi 17.6 Download Exodus Wont Download Kodi 17 Download Kodi 17.1 In Windows Kodi Download Italiano Windows 10 Kodi Download For 64 Bit Download Kodi 17.
Cualquier HTPC x86 (64 bits) with Intel, AMD or NVIDIA GPU.
KODI 17.3 DOWNLOAD FOR WINDOWS 10 64 BIT INSTALL
This app is one of the most popular Video apps worldwide Install Kodi latest full setup on your PC/laptop Safe and Secure. This is the list of devices that LibreELEC is compatible with: Kodi 18 64 Bit Download And Install Kodi 18 64 Bit Download Will Start Jump to: Key Features of Kodi Media Player Download and Install Kodi 18.2 on Windows 10 Whats New on Kodi 18. Kodi app for Windows 10 Download Kodi for Windows 10/8/7 64-bit/32-bit. With this tool you can download from Malavida, you yourself can create a USB stick or an SD card with the version of the operating system that you need depending on your device. Make the most of an operating system focused on multimedia playbackįor the development of this operating system, its creators took into account the possibility to use it on embedded devices of the likes of Raspberry Pi and its subsequent versions 2 and 3. Follow the prompts as you would with any other software installation. In any case, the best thing you can do is download the image and burn it onto a LIVE CD, DVD or USB device.LibreELEC is an operating system based on OpenELEC, the Linux distribution that in turn is based on Kodi and is aimed at playing multimedia contents without consuming too many resources, by running it straight from a flash memory unit. Use the following commands in your Linux/Ubuntu terminal to install Kodi 18.3. That means that, although it's not the most recommendable method, you can run it using a virtual machine of the likes of VirtualBox. The installation file, that offers us 32 and 64-bit versions, comes along in ISO format.
At least 8 GB of free space on your hard drive.
ATI, NVIDIA or Intel video card with OPENGL 2.0 support.
KODI 17.3 DOWNLOAD FOR WINDOWS 10 64 BIT MAC OS
XBMC is a cross-platform and open source software (GPL) available for Linux, Mac OS X, Windows and the Xbox game-console. Its graphical user interface (GUI) allows the user to easily browse and view videos, photos, podcasts, and music from a harddrive, optical disc, local network, and the internet using only a few buttons. Kodi (64-bit) is a media player jukebox and entertainment hub for all your digital media. It should instead have been named 'Kodi for Windows 64-bit is almost here', or 'Kodi for Windows 64-bit alpha builds available for testing' or something like that. That's the reason why it's a great way of turning an old computer into a device to watch movies downloaded from the Internet or on a CD or DVD on our computer screen or TV set. It uses a 10-foot user interface designed to be a media player for the living-room, using a remote control as the primary input device. (, 15:38) RockerC Wrote: So comes down to a bad choice of title for that news-post IMHO. This distribution is really a Linux version fully focused on running Kodi and all its features, aiming all its resources at running the app and not at other unnecessary functions.Īll your computer's resources will be focused on playing multimedia files.
KODI 17.3 DOWNLOAD FOR WINDOWS 10 64 BIT APK
Kodi, previously known as XBMC, is one of the best multimedia centers that we can download to different platforms (also for iOS and in APK format for Android), that offers us a wide range of options and possibilities to play multimedia files. Focused on the Kodi application, it intends to offer us a method to turn our computer into a media center without any further complications. Ubuntu is one of the easiest-to-use distros that has brought this operating system closer to many users, and this Kodibuntu is based on the latter. Easily turn your computer into a media center
KODI 17.3 DOWNLOAD FOR WINDOWS 10 64 BIT HOW TO
any suggestions on how to install 64 bit ver 17. The Steps are very simple and easy to follow to get kodi on Windows 10. Download and install Kodi for Windows 10/8/7 with the help of this article. if I install the 64 bit it installs ver 18 and works but I want to install ver 17.5. How to Install Kodi on Windows 8.1 Now, if you are using Windows 8.1 on your device, you can install Kodi using anyone of the three methods: Download the software from Kodi’s official website. That's obviously possible thanks to its open-source nature that allows any particular user or company to carry out its own developments. When i install the (x86) version when i start kodi o get a message windows stop working. Kodi (formerly known as XBMC) is an award-winning free and open source (GPL) software media player and entertainment hub that can be installed on Linux, OSX, Windows. One of the greatest advantages of Linux regarding Windows or macOS is the possibility to develop distributions focused on a specific use of our PC. A new version Kodi 17.6 freeload on.
0 notes
Text
Ubuntu hardware monitor

#Ubuntu hardware monitor how to
#Ubuntu hardware monitor install
#Ubuntu hardware monitor Pc
#Ubuntu hardware monitor free
#Ubuntu hardware monitor how to
How to configure a static IP on Linux 15501 6.
#Ubuntu hardware monitor install
How to Install a Desktop and VNC on Ubuntu 16.04 15587 13.
#Ubuntu hardware monitor free
11 Ways to free up disk space on cPanel servers 16310 8.
Install packages in Arch Linux from AUR 17280 15.
Give it a try and feel welcome to give us your feedback. This ensures that the CPU doesn’t overheat and lead to the malfunction of your system. We have covered two applications that help users monitor temperature readings of the CPU cores. Unfortunately, Checking CPU temperature doesn’t work on virtualized instances such as a VPS or managed cloud server since the CPU and other hardware resources are virtualized. You can click on the thermometer symbol to keep tabs on the temperature readings of your CPU cores and hard drive. Next click on the “ launch session startup” option.Īnd this is what you get. To pin the application on the top bar, click on ‘ Psensor‘ and click on ‘ Startup‘. Therefore, the window below will be displayed: Once the installation is complete, you can use the application to search for the Psensor application and launch it. Once you have installed lm_sensors install the Psensor application using the command: $ sudo apt install psensor So ensure that you have installed lm_sensors first. Psensor is a graphical tool that relies on the lm_sensors program to display temperature readings in a graphical format. This will display the temperature of your CPU cores as shown below. When the configuration is done, check the CPU temperature by invoking the sensors command. This will take a couple of minutes as the program continues probing your hardware components. Several other questions will follow upon which you will answer “Yes”. Do you want to scan for Super I/O sensors?” Just like the first question, choose “Yes” to allow Lm_Sensors to scan. We have to write to standard I/O ports to probe them. Type out “ Yes” in the prompt to begin.Īfter selecting “YES,” the second question states, “ Some Super I/O contain embedded sensors. Do you want to scan for them? This is totally safe”. You will be presented with the first question: “ Some south bridges, CPUs or memory controllers contain embedded sensors. The configuration process begins with a couple of questions. The program will begin to scan your processor and memory modules. To achieve this, run the sensors-detect command with sudo privileges if you are running as a regular user as shown to begin the configuration $ sudo sensors-detect $ sudo dnf install lm-sensors Configuration of Lm_SensorsĪfter the installation of the lm_sensors package, some configuration is required to ensure that the application can gather temperature readings from the CPU cores on your PC. Lm sensors program is installed on Ubuntu using the apt package manager as shown: $ sudo apt install lm-sensors hddtempįor Arch distros use the Pacman package manager to install as shown in the command below $ sudo pacman -S lm-sensors On CentOS / RHEL & Fedoraįor RedHat distributions such as CentOS & Fedora, use the dnf package manager to install the lm_Sensors tool. You can install the lm_sensors program on various Linux distributions as shown: On Ubuntu / Debian Incase Lm_Sensors command is not installed in your distribution, use the distributions package manager to install the Lm_Sensors package on your Linux PC. The lm_sensors tool is a command-line utility used to keep a watch on your CPU core and hard disk drive temperature. Let’s explore each of these tools: Method 1. There are two ways that you can use to check your CPU temperature: Using the lm_sensors tool or the Psensor graphical tool. How to check the CPU temperature on Ubuntu systems In this guide, we will explore various ways that you can employ to check the CPU temperature on Ubuntu. In addition, elevated temperatures can be due to blocked ventilation vents and sometimes running multiple applications with high power consumption. The same cannot be said of older systems whose cooling systems may not be as efficient. Modern PCs usually have a sound cooling system that keeps the temperature in check and prevents overheating.
#Ubuntu hardware monitor Pc
Overheating can be detrimental to your PC and If not kept in check, it can damage other motherboard components. Keeping your CPU temperature at an optimum level is crucial for the smooth running of your system.
0 notes
Text
How to install windows on mac as the only os

How to install windows on mac as the only os how to#
How to install windows on mac as the only os full#
How to install windows on mac as the only os pro#
How to install windows on mac as the only os software#
We want to force OS X to do a clean installation, not to just ‘repair’ or ‘restore’ itself. This should not take long – it took seconds on my Air.Īnd that’s it! Windows is now gone. The next screen should show how your hard drive will look once the Windows partition has been returned to the Mac partition. Select Remove Windows 7 or later version and click Continue. Your Mac data and istallation will be untouched, and the free space created will be added to the Mac partition.īoot OS X. This will remove the Windows partition, and restore your Mac back to its one-partition state. We can use Boot Camp Assistant to remove Windows first. This process assumes you have OS X Yosemite installed, though the process should be similar for other modern versions of OS X. There is no one-click solution to wipe and restore your Mac. This is a drastic solution that I only recommend if, for example, you are selling your computer. This will obviously remove all of your personal data, so make sure you’ve backed everything up you want to keep, because it will all be gone by the end.
How to install windows on mac as the only os how to#
UTM not only lets you install the latest Windows 11 on your M1 Mac, but you can also virtually install older Windows iterations and other OS’ like Ubuntu, Debian, and Arch Linux.Are you looking to wipe your Mac back to factory settings, and have a Windows installation you also want removing? This guide will show you how to restore a Mac back to its as-new state, with the Bootcamp Windows installation and its partition gone. Will I only be able to run Windows OS on M1 Macs with UTM? So, UTM is great, but not for intensive gaming.
How to install windows on mac as the only os software#
Also, it lacks support for DirectX and OpenGL.īut it is worth noting that you will be able to play older titles using software rendering options. That being said, you can run the Windows apps, but it won’t let you play new games since it doesn’t support GPU virtualization as of yet. Unlike Parallels, which actually offers smooth gameplay of Windows games on Mac virtually, the UTM software only helps you get a taste of the latest Windows on your system. But if you want to run free apps and experiment with the latest Windows 11 on your M1 Macs, then it is a great tool. The software that you’d install using UTM won’t offer as high performance as Parallels. However, since it’s free, it does have certain limitations. UTM is an easy-to-use open-source software that brings easy installation and lets you run Windows apps on your M1 Macs for free. UTM is completely free, so it is a great alternative to Parallels and VMware. Well, in case you don’t want to pay a hefty price for running virtual machine software on the new M1 Macs, UTM is best for you. On the other hand, VMware, which is currently free, comes with a very limited set of options, and also the performance is slower than UTM.
How to install windows on mac as the only os pro#
Parallels, which is one of the most-used apps for running VM software on Macs, only offers 14 days of a free trial.Īfter the free trial, users need to pay $79.99 for the standard edition and $99.99 per year for the pro edition. However, running virtual machine software on Mac devices comes at a price. Parallels and VMware are two popular apps for running VM (virtual machine) software on your Mac. That’s how you can easily run Windows 11 virtually on M1 Macs using UTM for free. There you go! Now, you’ll see the full-fledged Windows 11 installed on your M1 Mac. Lastly, restart Windows on the virtual machine.
How to install windows on mac as the only os full#
Now, press Control + option on your keyboard to bring up the mouse cursor and make it full screen by clicking on the green maximize button.Ĥ.
0 notes
Text
Can you install linux on a mac

#Can you install linux on a mac how to#
#Can you install linux on a mac install#
#Can you install linux on a mac windows 10#
This will differ depending on which distro you are trying to install. Some distros also let you try out the OS before installing it here. Warning: Changing BIOS settings can damage your computer if you don’t know what you’re doing. If your computer reboots Windows, there was either an issue with your drive, or you might have to change settings in your BIOS. If you don’t see your drive, choose EFI USB Device, then pick your drive from the next screen. This will take you into the Windows Recovery Environment.
Then hold down the SHIFT key while clicking Restart.
This is the button in the lower-left corner of your screen that looks like the Windows logo.
#Can you install linux on a mac how to#
Now that you have your Linux distro on a USB, here’s how to Warning: This will erase all the data on your drive, so make sure to back up any important files. Might take some time, so be patient if the progress bar gets stuck. Then wait for Rufus to mount your ISO file onto your drive. If you get a pop-up message asking you to select a mode that you want to use to write the image, choose ISO.
Under Boot Selection, click the Select button and choose the ISO file you downloaded earlier.
If you don’t know which drive to use, eject all other drives until you only have one to choose from.
Open Rufus and select your USB drive from the Device list.
You can find the latest version of the application here. This will erase all the data stored on your drive, so make sure to back up your files before you begin.
Insert the USB drive into your computer.
They are free to download from each distribution’s main website. Some of the top options are Ubuntu, Mint, or Fedora.
Download a Linux distro in ISO format.
Here’s how to do that: How to Make a Linux Bootable USB
#Can you install linux on a mac install#
Once you have a designated space to install Linux, you’ll need to write a Linux Distro onto a USB thumb drive or external drive 4GB or larger. It is recommended that you set aside at least 20GB (20,000MB) for Linux. Then choose how much you want to shrink your drive.This will usually be labeled as the C: drive. If you have more than one drive, make sure to choose the one that says Primary Partition. Right-click on your main hard drive and select Shrink Volume.Then type “DISKMGMT.MSC” in the search bar and hit enter.This is the magnifying glass-shaped icon in the bottom-left corner of your screen.
#Can you install linux on a mac windows 10#
Here’s how to do that: How to Partition a Hard Drive in Windows 10 In order to do this, you will have to partition your main hard drive. If you want to dual boot Linux and Windows, you will need to create a space for your Linux OS to live. Here’s how to install Linux on a Windows 10 PC. They can be installed on either a Mac or Windows computer. They are based on the Linux kernel and are free to download. Linux is a family of open-source operating systems.
0 notes
Text
Does carbon copy cloner work with windows

#DOES CARBON COPY CLONER WORK WITH WINDOWS HOW TO#
#DOES CARBON COPY CLONER WORK WITH WINDOWS SOFTWARE#
I ALWAYS make use my boot drive is "Disk 0" & the other drive is "Disk 1". JUST choose the defaults all the way through AND set up your hard drives correctly in the BIOS first. It IS made for the more "LINUX Geek" types though, so there are lots of choices for things to get off & cause problems. Once the disc is burnt & you're ready to clone your hard drive, you just need to remember which disc is which. I used the Ubunitu 64-bit "alternative stable release" & chose ISO. Just remember that underneath our cool looking Desktop beats a heart of UNIX/LINUX. Clonezilla is open source so they keep coming out with new versions all the time & there's a 32-bit & 64-bit version made with Ubuntu LINUX & the same from Debian LINUX, so it can be a bit confusing if you're no a UNIX/LINUX geek & you're just looking for something that works on a Mac. I think it's a bit faster because it calculates the bland space on the disc & knows it doesn't have to copy it to the other drive. I used Clonezilla on my last clone & it took a little over 2 hours to do a 1.5TB disc, that has 3 slices. It is LINUX based, is free for individual use & can be found here:
#DOES CARBON COPY CLONER WORK WITH WINDOWS SOFTWARE#
I promise) for home use & they make a whole line of Professional IT, server type software too. These guys make a whole line of free stuff (I don't work for them OR get any commission. I've been using it for years without any problems.
#DOES CARBON COPY CLONER WORK WITH WINDOWS HOW TO#
There are also instructions on how to make a bootable CD/DVD so you can make a true Clone of any disc. I've used it MANY times on my Mac, my Hackintosh (that I built with help from the site we're on) & Linux HDD too. I use their Windows Products for my Windows systems & their version that says "copy any File system" does just that. Not just almost clone the disc.ĮaseUS Disk-Copy is free for home use. It does a sector by sector copy of the disc, a true clone of the disc: give you an EXACT copy of the original disc. It may take a bit longer to do the whole disc booting from a CD, but when you're done, you're done. I use EaseUS "Disk-Copy", but there are a few others that one can burn to a bootable CD/DVD & use that way. The thing to do then is to boot from something else & truly "clone" the drives. The problem is most likely that the since the system is up & fully running, it can't copy the boot block. Here are a couple of other apps that I've used that work great too.Īs a long time engineer with a few years of disc cloning experience, UNIX experience & as a user on the tonymacx86 site, I have to say that "technically" if you're not getting the boot block you're not actually cloning the disc. Building a CustoMac Hackintosh: Buyer's Guide
0 notes
Text
How to use winebottler on steam mac

#HOW TO USE WINEBOTTLER ON STEAM MAC HOW TO#
#HOW TO USE WINEBOTTLER ON STEAM MAC LICENSE KEY#
#HOW TO USE WINEBOTTLER ON STEAM MAC INSTALL#
#HOW TO USE WINEBOTTLER ON STEAM MAC SERIAL#
#HOW TO USE WINEBOTTLER ON STEAM MAC FULL#
As we’ve said, you will be able to run Mac and Windows apps side by side.
#HOW TO USE WINEBOTTLER ON STEAM MAC FULL#
VirtualBox is the best option if you need a full Windows experience within your Mac environment.
#HOW TO USE WINEBOTTLER ON STEAM MAC LICENSE KEY#
You need a Windows license key for this method.Performance is lower when compared to Boot Camp.You can’t run Windows games through Steam with Virtual Box.In a way, you can run Windows and Mac apps side-by-side.You don’t have to reboot the computer to access Windows.Depending on the Mac performance and storage space, you will be able to create as many virtual machines as you want.
#HOW TO USE WINEBOTTLER ON STEAM MAC SERIAL#
Once you have provided the serial key, it lets you run Windows apps seamlessly. There is also Dynamic Setting, where the system would consume the required amount of storage space.Īfter this, you have the standard Windows installation procedure. In the upcoming sections, allocate the amount of virtual RAM and Virtual hard-disk space. You will have to provide the Windows 10 ISO file to proceed.
#HOW TO USE WINEBOTTLER ON STEAM MAC INSTALL#
You can download and install the program on your Mac and launch it.
#HOW TO USE WINEBOTTLER ON STEAM MAC HOW TO#
For now, let’s talk about how to use VirtualBox for running Windows apps on Mac. For instance, if you want to install Ubuntu within the Mac environment, VirtualBox is the perfect option. You can install it on your Mac and create a virtual machine that runs on various platforms, not just Windows. Now, VirtualBox is not only powerful but also hassle-free. Read: 5 Best Ways to Password Protect Folder on Mac If you want better UI, go with VMware, though it’s paid. It has to be noted that we are using the popular, free and open source software, VirtualBox. Whenever you want to use Windows apps, you can simply launch the virtual machine and start working. Because you are running a system inside your Mac environment, there is no need to reboot the computer. Making a virtual machine inside your Mac will let you run Windows apps. #2 Windows on MacBook Pro using VirtualBox As we said earlier, there are some downsides. If you want to play some Windows-only games or run some heavy-duty Windows apps, this option is the best. Installing Windows on Mac using Boot Camp is the best choice when you need performance. It doesn’t require a Windows license key for setting up Boot Camp.You have to reboot the system every time to access the other OS.It doesn’t let you run Windows apps and macOS apps side by side.Since you are not sharing your resources with other OS, the performance will be better.You can use the Mac for playing Windows-only games.You are run Windows games through Steam with Boot Camp.Read: How to Automatically Mute your Mac When it Wakes Up From Sleep From there you can select Windows or macOS. Once done, restart your Mac and hold down the Option key until you see the boot manager. Then, you have to go through the standard Windows installation procedure. Your Mac needs at least 2GB of RAM (most newer models have 8 GB) and at least 30GB of free hard drive space to properly run Boot Camp. Depending on the size of your Mac HD, you can allocate the sufficient amount of space to the Windows installation. At one point, you have to partition the hard disk accordingly. Just launch the Boot Camp app on your Mac and proceed with the instructions. How To install Mac on Windows with Boot Campīefore you start, you will need a 16 GB flash drive and Windows ISO file, to create a bootable drive to install Windows. Then, Boot Camp is the best option, indeed. Suppose you want to play some Windows-only games. It should be noted that when you create a dedicated Windows partition inside your Mac, you get complete hardware support. Since there is a Boot Camp assistant, you can easily shift between the two OSs. Of course, when compared to using an entirely different Windows PC, this method makes sense.īoot Camp lets you install Windows alongside macOS, by creating a different hard disk partition. So, you have to reboot your device for accessing Windows apps. The catch here is that you can run either macOS or Windows at a time. Mac, on the other hand, can easily dual-boot Windows and macOS using a built-in tool called Boot Camp Assistant. Read: Top 10 Free macOS Apps to Boost Your Productivity Put Windows on MacBook Pro and iMac #1 Windows on MacBook Pro with Boot Camp Assistant You will have to check aspects like storage space, processing power, and memory before proceeding. Not all these methods will work on every Mac out there. So, will address MacBook Pro and iMac only. The following methods also work on MacBook Air, but the performance is less than satisfactory. In this article, we have listed some of the best ways on how to run Windows apps on MacBook Pro and iMac. It is, in fact, handy, because one method would not be suitable for everyone, you know. As it happens, there are a number of solutions to run Windows on MacBook Pro.
0 notes
Text
Installation of OS
7.Create your Linux partitions
Follow the installer until you get to the installation type screen, and then select ‘Something else’.

You might want to research Linux partitioning schemes at this point - you may find the Ubuntu wiki helpful - but essentially you will want your available drive space split into at least three partitions:
/ (root) - where all your system files and most programs are stored
/swap - what your system will use for extra memory when you run out of RAM (Random Access Memory)
/home - where all your other files and documents are stored
If you are installing Linux on a new hard drive, find and select it on this screen. Otherwise, find the free space that you created earlier.
Create your / (root) partition
Once you have selected your new drive or the free space on an existing drive, click the ‘+’ sign. This will open a ‘Create partition’ window, which will let you create your main Linux partition. You will need to assign enough space for this partition to store the operating systems and all your other programs. You will want to have at least 10GB for this, but depending on how many programs you are planning to install, you might want anything up to 50GB. The size is entered in megabytes, so remember that one gigabyte is roughly 10,000 megabytes.
The options you need to select are:
Size: 10000MB (or up to 50000MB)
Type for the new partition: Primary
Location for the new partition: Beginning of this space
Use as: Ext4 journaling file system
Mount point:

Create your swap partition
Click the ‘+’ sign again. You will now need to create the partition your operating system uses as swap - temporary memory for when your RAM is full. It’s recommended that you make this roughly the same size as your RAM. For example, if you have 6GB of RAM, assign 6GB or about 6000MB for this partition.
The options you want for your swap partition are:
Size: 6000MB
Type for the new partition: Primary
Location for the new partition: Beginning of this space
Use as: swap area

Create your home partition
Click the ‘+’ sign again. You will now need to create the home partition, which is where all your files and documents are stored. This is going to be your largest partition, and you’re free to assign all the remaining free space on your drive to this.
The options you want for your home partition are:
Size: 20000MB (or all the remaining free space on your drive)
Type for the new partition: Primary
Location for the new partition: Beginning of this space
Use as: Ext4 journaling file system
Mount point: home
Once you are happy with your partitions, click ‘Install’.
8.Install Linux
You can now complete the rest of the installer according to your own preferences. On Mint you will be asked to choose your time zone and keyboard layout, as well as creating a new username and password.
9.Use the boot manager to switch between Windows and Linux
Once you have finished the Linux installation process, whenever you restart your computer you will boot up to the GRUB screen. GRUB (Grand Unified Bootloader) is Linux Mint’s preferred boot manager, and it allows you to choose whether you want to boot up Mint or Windows. Just use the Up and Down arrow keys to navigate and press Enter to boot into your chosen OS. Most other Linux distributions will also use GRUB.
0 notes
Text
EASEUS Data Recovery Wizard 14.2 Crack + License Code {2021}
EASEUS Data Recovery Wizard 14.2 Crack is a tool that can help you recover lost data when you accidentally delete lost information or a PC crash. The interface is simple, clean at first glance, easy to use, and wholly deleted data can trace anywhere. EASEUS Data Recovery Wizard Free Download is a strategy that you can use to recover previously deleted files from your computer.
EaseUS Data Recovery Wizard Pro Patch is a skilled data recovery software package used to recover lost data. It comes with the latest tools. This software works to recover lost data on disk or fully transportable media in a highly secure and comprehensive environment. This software package is standard because it lacks connectivity or commonly uses by laptop professionals throughout the world. You will recover all your data in the form of files, videos, music, texts, and various types of them.
EASEUS Data Recovery Wizard Crack Free Download
EASEUS Data Recovery Wizard Pro Serial Key Data to resolve all data loss cases and restore files from hard drive, external hard drive, USB drive, memory card, digital camera, mobile phone, music player, and other storage The best data recovery program. Due to media deletion, formatting, computer crash, disk destruction, virus attack, distribution loss, or other unknown reasons. Just three levels and a few clicks to recover the lost data. EaseUS Data Recovery can quickly recover files, photos, documents, videos, etc., from the scenarios of deleting formatting errors, distribution loss, operating system crashes, malware attacks, and other lost data.
EaseUS Data Recovery Wizard Pro Keygen supports not only Fit32 and NTFS but also EXT2 and EXT3 file systems in Linux. It rarely sees in similar areas, but it is a shame that EXT4 does not offer support. If you are unique to Ubuntu and have essential files on Linux, the EXT3 file format is the right choice.
EASEUS Data Recovery Wizard Crack Key Features:
Rapid analysis of files that automatically bounce off bad sectors
Once you make a purchase, you will not need to download or search a second time.
Retrieve empty or deleted files from the Trash.
Recover files after formatting by mistake, even reinstall Windows.
Disk Recovery After Hard Disk Failure
Recover files after partitioning error.
Recover data from raw hard drives.
Compatible with Windows 10 and 8.1 (Recover all data in One10 / 8.1).
Supports FAT12, FAT16, FAT32, NTFS / NTFS5 file systems
New user interfaces for a more intuitive data recovery process
HDD supports up to 10TB.
Specify file types before retrieving files so you can quickly find lost files.
Retrieve office documents, photos, images, videos, music, emails, etc.
Retrieve from hard drive, USB drive, memory card, USB drive, camera card, Zip, floppy disk, or other storage media.
What’s New?
Supports repairing PDF, Word, Excel files.
Supports repairing PNG, GIF, BMP files.
Support for retrieving files
Better recovery quality.
System Requirements:
Operating System: Windows 10, Windows 8.1, Windows 8, Windows 7, Windows Vista, Windows XP, Windows Server 2012, Windows Server 2008, Windows Server 2003
File system: FAT (FAT12, FAT16, FAT32), exFAT, NTFS, NTFS5, ext2, ext3, HFS +
CPU: with a minimum of x86.
RAM: At least 128 MB.
Disk Space: The minimum space for the installation of the Data Recovery Wizard is 32 MB.
Software Info:
Title: EASEUS Data Recovery Wizard 14.2 Crack
Os Working: ( Windows 10, 8, 7, XP, Vista ) Both 32 / 64 Bit
File Size: 9.7 MB
Language: English
Category: Recovery
License: Download Cracked
Latest Version: 14.2
Download: ShanPc
How to install EASEUS Data Recovery Wizard 14.2 Crack?
Download the software from the link provided.
Open the downloaded configuration and run the setup.
After installation, copy the crack and paste it into the installed folder.
Now restart the computer system and run the software.
If the software does not work, you should use the serial keys to activate the software.
Enjoy EASEUS Data Recovery Wizard Full Version.
0 notes