#How to use Cricut Autopress
Explore tagged Tumblr posts
Visit Tumblr Blog
Explore Tumblr blogs with no restrictions, modern design and the best experience.
Last Seen Tumblr Blogs


Fun Fact
69% of Tumblr users are millennials.
Text
How to Use Cricut Autopress: Your Get Started Guide
If you are reading this blog, it’s because you want to learn how to use Cricut Autopress. Ever since I started my crafting journey, I have created a lot of crafts. But for the long term, I decided to start my own venture, which is a custom T-shirt business. Through this business, I have sold thousands of T-shirts using my press.

Since Cricut Autopress is designed for industrial purposes, it offers incredible features compared to conventional heat press machines. Since I am an expert in using this machine, I can guide you in getting started with your Cricut Autopress machine. Plus, I will show you how to make your first project using this heat press.
After reading this blog, you will be able to use it without anyone’s help. So, whether you want to make a bunch of T-shirts for your family or tote bags, this Cricut machine has you covered!
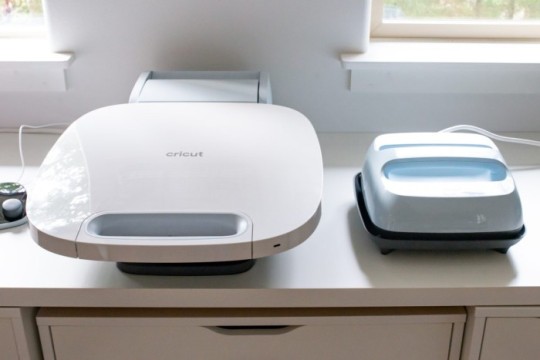
What Can You Do with Cricut EasyPress?
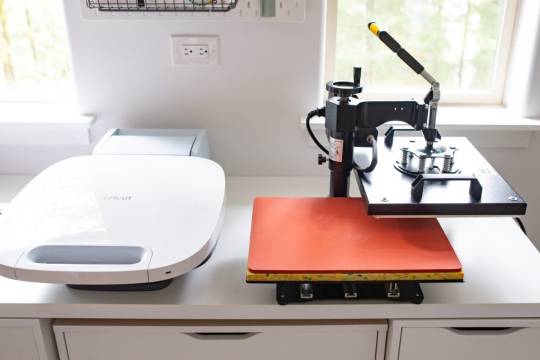
Earlier, we had a traditional heat press, which was not very user-friendly. That used to be so heavy, making it difficult to place it somewhere else. But Cricut launched its new version of heat-press which is called a Cricut Autopress. With this press, you can stick iron-on vinyl, Cricut Infusible Ink, and sublimation prints on a wide range of flat blanks. These blanks include T-shirts, coasters, tote bags, and much more.
I know you might be thinking about Cricut EasyPress, such as why we can’t use EasyPress instead of buying this bulky machine. After all, they both do the same things as EasyPress.

But, being the owner of a T-shirt designing business, I know the utmost importance of having an Autopress. In contrast, it was not made for personal use but for industrial use so that it could handle massive projects quickly. But for smaller projects, EasyPress is always a good option.
Steps for Cricut Autopress Setup on Your Computer
Before we move to how to use Cricut Autopress, every machine needs to be set up. However, setting up an Autopress is relatively easy. Follow the steps below to set your Cricut Autopress heat press:
First of all, unbox the machine by removing the black handles.
Take out the USB cord to connect your Autopress Control Pod to your computer.
Go to the Cricut Setup and follow the steps given on the screen to set up your heat press.
If you want to set it up via Design Space, then just go to the top left menu and select the New Product Setup.
Note for Mac users: Newer computer users who do not have a Standard USB driver will need to use a USB-to-USB converter. But if you have a Cricut Mug Press, then you must already have this converter.
How to Use Cricut Autopress for Making an Iron-on Project?
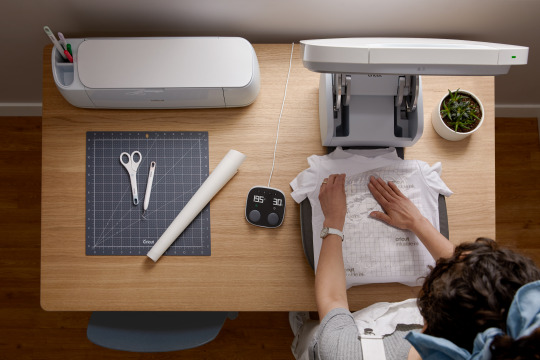
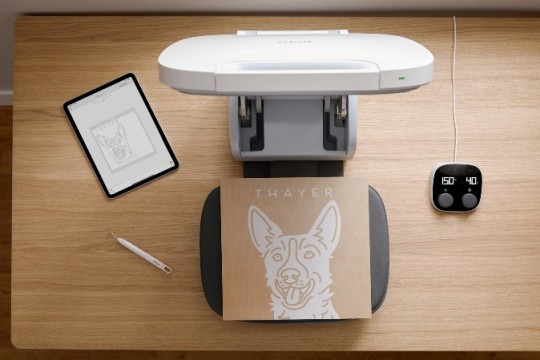
Let’s take an example to understand the usage of Autopress. In this example, I am going to use a Cricut Infusible Ink on my customer’s T-shirt. Before we use this press, we will first need to create a design on Design Space. Afterward, cut the same design using your Cricut cutting machine. After cutting the design, move to the step-by-step instructions given below to apply the design to the T-shirt:
Step 1: Set the Time & Temperature
First of all, I am going to switch on my Cricut Autopress. Next, I am going to preheat my blanks. For this, we need to set the time and temperature for our compatible materials based on a heat guide. For my blank, I have set the temperature to 400° for 15 seconds. You can modify your temperature and time according to your materials using the Cricut Heat Guide.
Step 2: Preheat the Blank

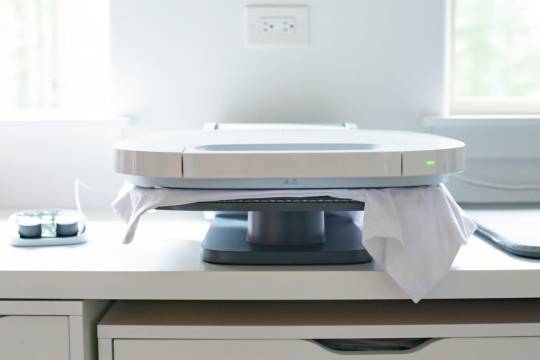
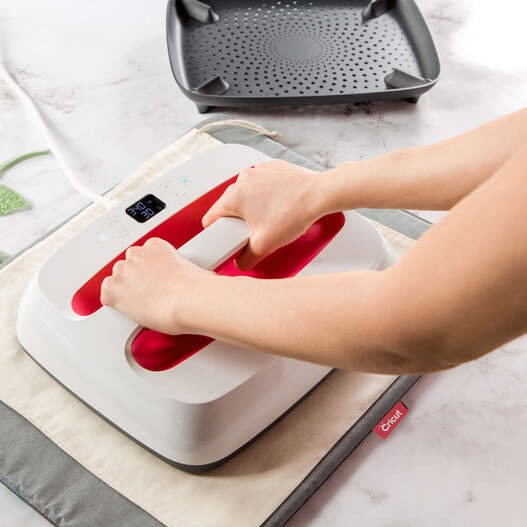
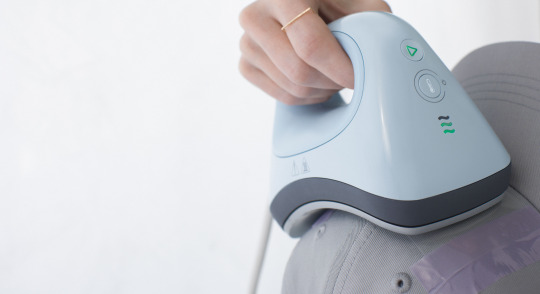
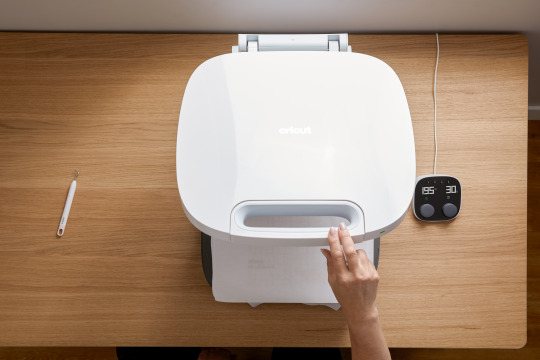
Let’s learn how to use Cricut Autopress for preheating. In order to preheat my blank, I simply put my shirt on the base of the heat press. Afterward, I close the Autopress and try to press the handle downward until it gives a click sound.
After closing it, the timer will start counting down. Then, the press will open up automatically once the timer reaches zero. Since it might be too hot, do not try to touch it very soon, and leave it to cool down.
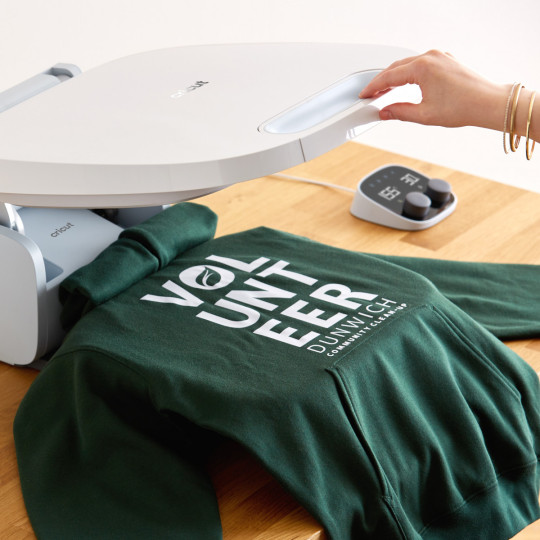
Step 3: Place Your Design on the Blank T-shirt
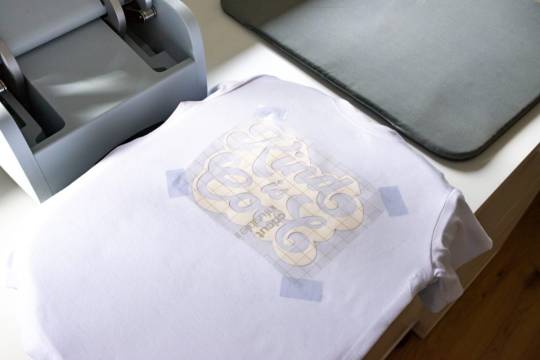
I always do preheat because it removes the crease, and the surface becomes evenly flat, making it an ideal surface for your design. So, after preheating, I place a cardstock inside my blank and then place the Infusible Ink design on my blank.
As you can see in the above image, I have used heat-resistant tape to keep the design in the center. Also, my design is facing downward. Afterward, I place the butcher paper on the top of my T-shirt blank.
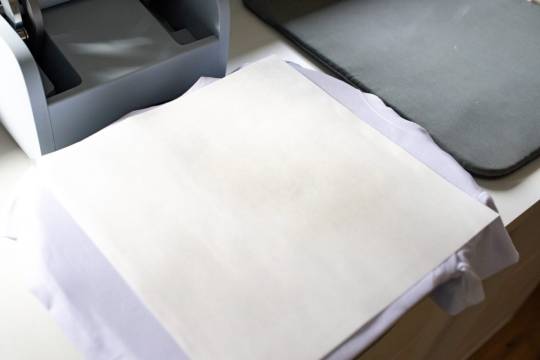
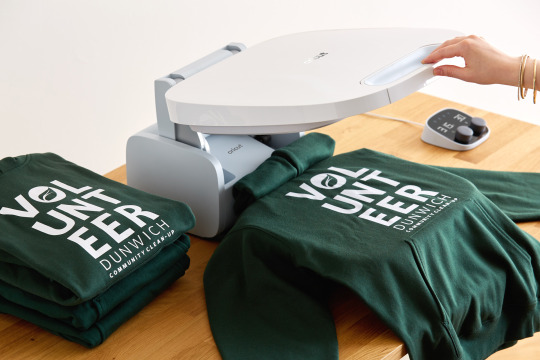
Step 4: Apply the Pressure to Your T-shirt
Before applying the pressure, I reset the Pod for 45 seconds. Then, pull the handle down to apply the pressure until it produces a click sound. Once your countdown reaches zero, you should leave it for a while to cool down. Later on, you can remove the transfer!
Finally, our guide on how to use Cricut Autopress comes to an end. Here’s what my Infusible Ink design looks like on a white T-shirt.

FAQs
Question 1: What projects can I make with Cricut Autopress?
Answer: the upgraded version of the traditional heat press, Cricut Autopress, is mainly designed for bigger projects. However, the possibilities are endless with this advanced heat press. These projects include clothing such as T-shirts, tote bags, and any other oversized clothes. Besides, you can also make home Decor, e.g., personalized address sign plate/board and ceramic coasters.
Question 2: Should I use Cricut Autopress without the mat?
Answer: You can only use Autopress without a mat when you are using a thicker blank. However, thin blanks require you to use the mat. Then, just adjust the heat and temperature for your compatible materials and place the design onto your blank. Afterward, you can pull down the handle to press the heat press. As a result, your design will adhere to the blank. Make sure you do not touch it just after applying the design. Let it cool down and take it out.
Question 3: Can I adjust the pressure on Cricut Autopress?
Answer: No, you don’t need to apply pressure yourself, as Cricut Autopress comes with an automatic pressure feature. Thus, it can apply the necessary pressure automatically on any project with up to 2 inches of thickness. However, you just need to lower the heat plate and press down the handle so that the motor engages properly. Finally, the in-build mechanism will do the rest to adjust the pressure.
Conclusion
In a nutshell, I have written this guide on how to use Cricut Autopress for beginners. Using this guide, they can make their first project easily. To help the beginner, I have added points like what you can do with your Cricut Autopress. Further, I discussed the setup procedure of the press. Without this setup, we cannot get started with this device. Last but not least, the step-by-step tutorial to make your first project can help you apply your design on a T-shirt or any other blank effortlessly.
1 note
·
View note
Text
How to Use Cricut Autopress? [A Complete Guide]
Heat press machines are the most widely used tool for people who want to create customized shirts and other apparel designs. If you are looking for a commercial heat press, then Cricut Autopress would be the best fit. It is Cricut’s newest launch, and it is the largest heat press machine. But newbies find it challenging to use in the beginning. Therefore, we brought a simple and easy-to-follow guide to help you create your first project with the Autopress machine.
This post will guide you on how to use the Cricut heat press (Autopress), and you will also explore why this is special.
What is a Cricut Autopress?
In simple terms, this is the largest heat press you can use for your home. It is quite similar to its smaller version, i.e. EasyPress 3. As a result, you get a desirable result, and it distributes heat evenly on your projects. Also, it is called a grade version of the old traditional heat press. The common use of heat press is to adhere to the Cricut Infusible Ink, sublimation prints, and iron on vinyl. You can use the press for a variety of flat projects, including tote bags, coasters, t-shirts, and more. This AutoPress is an apt tool for small business owners.
Why is Cricut Autopress Special?
Some smart features are added to this heat press, making it so special for every crafter. Let us have a look at them:
No Attention Needed
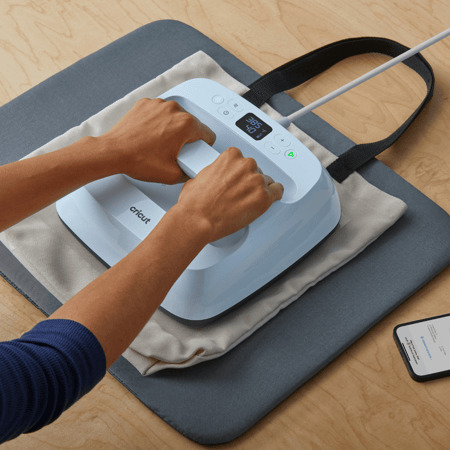
Yes, you read that right. You really don’t need to pay constant attention in order to use Cricut Autopress. Because there is a control pod, you can use it for setting your required time and temperature. However, with its zero-effort operation, you can use just two fingers to adjust the pressure it applies to your projects. Hence, you don’t need to press it like you do with EasyPress.
Even Heat Distribution
Since the heat plate of AutoPess is made from ceramic-coated platen, it helps in the even distribution of heat throughout the project surface. Plus, AutoPress can open automatically after the timer goes off. In addition, there is no risk of overheating. The size is also enough for escalating your production.
Fits Easily Anywhere
Suppose you lack space to store your AutoPress. Then, you can shift the machine somewhere else by folding it easily. However, it can be kept vertically almost anywhere.
How to Use Cricut Autopress?
We will discuss the use of Autopress by making a project. To use this press, you can start designing, cutting and weeding infusible ink, iron-on (HTV) or sublimation material.
Follow the instructions given in the Heat Guide, and preheat your base material.
Place the base materials on the plate. Then, make sure your design with a shiny surface should face up.
To press the garments, always use a Cricut pressing mat. The Silicon side should face down. In case of thicker material, you can skip the mat.
Use dials, and add timer and heat settings.
Slowly bring down the top of the press.
Press the handle gently until the pressure motors engage.
Cricut can adjust the pressure automatically.
You can lift the handle to disengage the press.
You will hear a beep sound when the timer goes off, and the AutoPress will open its top automatically.
Before removing the finished project, ensure the blank, mat and transfer material is cooled down.
Finally, turn off the machine by pressing the power button.
Now, you are good to go!
Conclusion
Overall, you might have understood the basic purpose of Cricut Autopress. It is larger than EasyPress, and it does the same thing that your EasyPress will do. However, it is good for small businesses to make customized t-shirts. Further, this Autopress has many attractive features that make it special and unique. However, we have discussed all these unique features along with the use of Cricut Autopress. With this easy guide, you will understand everything about AutoPress.
Frequently Asked Questions (FAQs)
Question 1: What do we get in the box of Cricut Autopress?
Answer: After opening a box, you will find two small boxes. In the first box, you will get a USB cable, a User Guide document and a Control Pod. In the second box, you will see the power cord, warranty-related documents, and safety guidebook. That’s all included in the Cricut AutoPress Box.
Question 2: How long do I need to wait to heat up the Autopress?
Answer: Approximately Autopress will take 8 minutes to completely heat up the surface (up to 400° F). Therefore, it is recommended to turn on the heat press in advance. So, while it warms up, you can do things like cutting your designs and prepping the transfer.
Question 3: What project should I try on Cricut Autopress as a beginner?
Answer: There are many projects for beginners that you can find on the internet. However, as a beginner, we recommend you try a T-shirt as your first project. It would be an easy and great way to understand the features of Cricut Autopress. So buy your new project and learn it today.
#How to use Cricut Autopress#Cricut Autopress#cricut design space login#cricut.com/setup#cricut explore air 2#cricut.com/setup windows#cricut setup
0 notes
Text
How to Activate Cricut Autopress and Start Pressing? (Full Guide)
The Cricut Autopress is a powerful, professional-grade heat press designed to simplify your crafting and small business projects. Whether you're working with iron-on vinyl, infusible ink, or sublimation materials, this machine brings consistency, ease, and precision to your heat transfers.
When I received my Cricut Autopress in the morning, I couldn’t wait to try my first design that evening. Its sleek look made it even more appealing. If you're as excited as I was, follow this simple guide on how to activate Cricut Autopress and start creating today.
This guide includes the full activation process, along with registration instructions, in a simple, step-by-step format to ensure beginners have no difficulty or confusion completing it.
Step 1: Power on Your Machine
Activating your Cricut Autopress means connecting the machine to your Cricut account and ensuring it has the latest software and features. This step connects your machine to your account for software updates and management.
Step 2: Connect to Design Space
To activate your Cricut Autopress, you'll need to set it up in Design Space. Follow the simple steps in the section below to connect and register your machine easily.
Step 3: Connect to Your Computer
Now, it’s time to connect your heat press to your computer for activation. Follow the instructions below to plug in the Control Pod and complete the setup process through Cricut's official portal.
Step 4: Visit the Official Setup Portal
To activate your machine, visit the Cricut official website - cricut.com/setup on your computer. This will automatically download updates and register your machine to your account.
Step 5: Connect Pod to Autopress
Connect the Pod to the Autopress via the USB port near the power cord; the display will show progress and confirm when the update reaches 100%.
Step 6: Complete Device Registration
The machine updates its firmware with stored data. Restart the machine, and when the Control Pod displays “UPD 100%,” it's fully activated and ready.
This blog provides a full guide on how to activate Cricut Autopress. From unboxing and setup to connecting with Design Space and completing device registration, it covers everything beginners need to get started. Follow the above steps to ensure your heat press machine is ready for smooth and precise heat transfers.
Frequently Asked Questions
Is Cricut Autopress Bluetooth-enabled?
No, the Cricut Autopress is not Bluetooth-enabled. It uses a USB connection for setup and updates, and the control pod has convenient presets that can be reprogrammed.
While some Cricut machines, such as the EasyPress 3, support Bluetooth for connecting to the Cricut Heat app, the Autopress requires a USB connection and does not have Bluetooth capabilities.
How to reset Cricut Autopress?
To reset your machine, locate the reset button on the bottom of the control pod and follow these steps:
Why is my Cricut Autopress vinyl not sticking to surface?
If your heat press machine vinyl is not sticking, check the following reasons:
Visit: www.cricut.com/setup login
Source: https://cricricutdesigncut.wordpress.com/2025/07/09/how-to-activate-cricut-autopress-and-start-pressing-full-guide/
#HowtoActivateCricutAutopress#cricutcomsetup#cricutdesignspace#wwwcricutcomsetuplogin#cricutexploreair2setup#designcricutcomsetup#cricutdesignspacelogin#cricutsetup#cricutdesigns#cricutsoftware#cricutsetupforpc#cricutdesignspacesetup#designcricutcomdownload#cricutdesignspacedownload#cricutdesignspaceonline#cricutdesignspaceapp#cricutdesignspacedesktop#cricutaccountsubscription#cricutaccess#Cricutexploreair2setuppdf#cricutexploreair2download#howtousecricutexploreair2withphone#howtosetupcricutexploreair2oniphone#cricutexploreair2bluetooth#cricutcomsetupmac#cricutcomsetupforwindow#supportcricutcom#cricutnewmachinesetup#cricutaccountlogin#cricutsoftwareapp
0 notes
Text
Cricut Heat Press: Get Fast and Perfect Heat Transfer Results
Are you considering starting a craft business but need clarification about choosing the best among many variations? Choosing the right Cricut Heat Press is tricky since most of this decision rests on what one wants to make. If you know the answer to this question, your confusion is half removed already.
This guide will help you learn about every variation of a heat press and how to set them up. Let's get right into it and make your business journey decision easier!
What Is a Cricut Heat Press?
These machines are used for applying heat transfers to different types of products, such as T-shirts and mugs. They quickly apply heat transfer vinyl and infusible ink to a range of fabrics, along with other materials like mugs, shoes, and hats. These tools feature precision temperature control for consistently successful transfers compared to a household iron. These machines do heat transfer work by consistently maintaining a certain temperature required for both materials.
Different Types of Cricut Heat Press Machines
Cricut offers many heat press machines. With so many options, one has the flexibility to choose whichever machine is best for them. Some of the most popular ones are in the section below:
Cricut EasyPress
It was the first of Cricut's heat machines released in 2017. With its 9 in x 9 in heat plate, this amazing tool is speedy, convenient, and produces lasting heat transfer results, even after regular washes.
Cricut EasyPress 2
Cricut EasyPress got its updated version in 2018, which is suitable for a variety of iron-on projects. It allows users to choose various products in 3 sizes: 6 in x 7 in, 9 in x 9 in, and 12 in x 10 in, giving more flexibility to users. It was an upgrade to the original model and, therefore, is faster and can bear higher temperatures than its predecessor.
Cricut EasyPress Mini
In 2019, Cricut added a new member to the heat press family: a mini version of EasyPress. This latest model is perfect for transferring heat to unusual and hard-to-reach places like caps, hats, shoes, and more. With its precision tip, it is also ideal for working around zippers and buttons.
Cricut EasyPress 3
This is the latest in Cricut's series of heat presses. To use this product, one needs to install the app and connect it via Bluetooth. This model comes with a ceramic-coated heat plate. It also has an auto-off feature and an easy-to-grip handle. It works with nearly all major brands of iron-on, infusible ink, and sublimation materials.
Cricut Mug Press
This machine allows you to make custom-designed mugs with compatible ceramic mugs and infusible ink. You can use their Maker, Explore Air 2, or Joy to cut projects and apply them on a blank mug.
As this machine requires no manual temperature or pressure settings, customizing infusible ink-compatible mugs with unique art or text makes it easy to create a perfect sublimation mug anytime. One can also use this machine for infusible ink products, and it serves as the ideal choice for any cutting machine or heat press.
Cricut Hat Press
This unusual machine is perfect for designing hats. It comes with a heat plate, allowing heat up to 400ºF for consistency. Also, the machine comes bearing a hat-pressing form, which is best for making a firm pressing surface for almost any hat. Compatible with the app, one can send the suggested settings directly to your press and get the steps from your mobile device with the help of Bluetooth.
It also has an auto-off feature, which lets users not worry about the fabric getting destroyed. Its comfortable grip and safety base make it easier to use. It works with almost all major iron-on (HTV) brands, infusible ink, and sublimation products and can serve as the best thing for all cutting machines.
Cricut Autopress

This one-of-a-kind Cricut Heat Press machine is ideal for professionals and has a large ceramic-coated heat plate (15" x 12"). With edge-to-edge heating, it can raise the temperature up to 400 degrees and is the most advanced machine of all. It can adjust materials up to 2 inches thick and auto-releases when the transfer is done.
This amazing machine allows users to transfer designs on T-shirts, tote bags, pillows, and more. Like others in the Cricut Heat Press series, it also works with iron-on, infusible ink, and sublimation materials.
Download Cricut Heat App on a Mobile for Using Your Machine
One can download and install the app on their mobile device, which will reduce the manual work and burden of operating the press machine. To get the software, you must go to the Google Play Store (if you are using an Android device) and App Store (for iOS devices). Let's start the process with your Android device here:
The following steps are for downloading the app on Android. Please follow them word by word, as failing to do so will result in insufficient results.
Hop on to the Play Store app from your home screen or by searching for it.
Once inside the app, search for the Cricut Heat app and click the Search button. If you find the app, select the Install button and wait for the installation to finish.
This EasyPress 3 comes with warranty details, a user guide, and some test materials. After buying the product, one needs to download the app onto your mobile phone. Once you have downloaded it, follow the steps on your screen to set up the EasyPress 3. The firmware updates for your machine will be completed at the same time. If a Bluetooth icon appears on your machine, then it means that your app and the machine are now ready to use.
Along with the app, the heat press can also be used manually using the buttons on the machine. If you want to change the temperature manually, look for a wave button on the machine, press it once, and use the plus or minus keys to increase or decrease the temperature until the desired temperature is reached.
Now, press the heat button once more to set that particular temperature. The timer changes the same way, but in order to do that, you must press the stopwatch button instead. Upon reaching the desired heat and temperature, the play button on the app will turn green, and a beep will sound.
How to Control Cricut Heat Press Using Cricut Heat App?
You can also use the heat press machine through the app. First, make sure that the machine is on, and then open the app. Now, follow the steps below:
After opening the app, look for your machine model, and it will automatically connect via Bluetooth to your phone.
Once you connect it, you can move on to select a new project.
After opening it, search for the drop-down menu, which lets you set the transfer material type and what material you should apply to.
After selecting these, click the Next button. Upon tapping it, a project overview screen will appear, telling you about the details, the settings to press your project and the materials.
Also, you will need to send those settings to your device by hitting the send settings button on your heat press machine.
The next screen will tell you how long it will take for your heat press to reach the desired temperature. Set those things onto the machine and wait for it to reach that temperature. Once done, your machine's play button will turn green and make a beep sound.
How to Use a Cricut Heat Press: Quick and Easy Steps
After learning about the settings for your press machine, now it is time to know how you can use the machine by following these steps:
First, turn the machine on and look for a comfortable, flat, heat-resistant surface. (You must not use any ironing board that can be easily damaged.)
Now, set the time and temperature required by reviewing the Cricut Help Guide for your project.
Next, press the timer/watch button as per your suggested time. The orange light shows a rising temperature, while the green light means that you have reached the threshold temperature.
Once the temperature is reached, place your machine on the fabric for a time, as suggested by the app. It is crucial that the shiny, clear carrier face up.
After that, you will need to apply the heat.
Also, you must put your machine on the base material and then press the Go button in order to start the timer.
Now, hold the press machine and apply the amount of pressure.
To remove the carrier sheet, you can use the Cricut Heat app.
Following the above steps, one can have a seamless, hassle-free experience setting up and using their heat press machines.
Final Thoughts
Cricut Heat Press machines are wonderful for starting your craft business. After reading this blog, one can have a general idea about which heat press to start your business with and how to set them up. With these various machines available, you are now aware of how to start your iron-on project.
Visit here to Know More:" Cricut.com/setup
Twitter
Pinterest
0 notes
Text
Is Cricut AutoPress Right for You in 2024?
You’ve heard of the Cricut AutoPress if you want to focus more on crafting and less on heat transfer. But if you’re concerned about whether this machine is right for you, this helpful guide is for you. I have tested various projects and researched this machine in detail. Then, I prepared this easy guide to help you decide whether you need to buy it.
Read my guide and learn about the features, performance, price, setup, specifications, security measures, and design of AutoPress, and I will share my personal experience. As soon as you’ve completed this guide, you’ll know if it suits your crafting style or not. So, let’s get started; follow this guide until the end; otherwise, you will only have half of the confusing information.
What Is Cricut AutoPress?
The first thing you need to do is know what an auto press is. If you already know about it, then you can skip it. “The AutoPress is a Cricut heat press machine that can automatically apply pressure and heat up to 2 inches thick simultaneously. Its ceramic-coated heat plate covers 15 inches by 12 inches and can heat up to 400 degrees.” It is used for adhering iron-on vinyl, infusible ink, or sublimation print to various flat blanks, such as T-shirts, tote bags, coasters, and more.
Cricut AutoPress Design & Build Quality
I know you’re curious about the design, build quality, and how it differs from the Cricut EasyPress and other heat presses. In fact, every Cricut heat press machine is different and is used according to the need. However, AutoPress shines when we want to do a large number of projects and large surface projects with consistency and ease.
Additionally, it uses a hinge system when moving the heat plate and applies pressure autonomously depending on the thickness of the material, making it the easiest heat press on the market.
Features & Performance of Cricut AutoPress
I’m a full-time crafter and have done different projects with this machine. I found the heat press to be the easiest to close because it applies pressure automatically. As far as the project outcome is concerned, you will get visually attractive results.
First, this machine offers a zero-effort system that allows us to close the iron with just two fingers.
Moreover, it has an Intelligent pressure system that adjusts the pressure simultaneously to heat according to materials.
Subsequently, an AutoPress has a ceramic-coated heat plate that ensures clean results and heats up to 205°C.
Next, we will get an Automation power-off function to ensure safety.
Last but not least, it offers a large opening angle and fan-assisted ventilation for larger projects.
Cricut Auto Heat Press Safety Measures
As we know, it is a heat press, so it is important to know the safety measures before investing in the Cricut AutoPress heat press machine.
Firstly, an LED indicator on the machine informs us what is going on.
Secondly, the press will turn off automatically after 13 minutes
Third, the AutoPress has an internal fan that keeps the handle cool.
Fourth, it is made with certified temperature plastics that resist heat.
Cricut AutoPress Setup
Trust me, as I mentioned below, setting up AutoPress after purchasing it is very easy.
First and foremost, remove the machine from the box and place it on the table.
After that, we will plug the power cord into the power outlet and turn it on.
Then, connect one end of the USB to the computer and the other end to AutoPress.
Moreover, download and install the Cricut Design Space from cricut.com/setup.
Finally, select the heat press> AutoPress and complete the on-screen prompts.
Finally, select the heat press> AutoPress and complete the on-screen prompts.
Cricut AutoPress Price: Should You Buy or Not
Frequently Asked Questions
HTVRONT auto heat press vs Cricut, which one is best?
So, both the Cricut and the HTVRONT are heat press machines, but the HTVRONT is lighter and can reach higher temperatures than the Cricut. However, the Cricut is perfect and better for those who like manual controls and customer support, like me. Additionally, we also produce stunning results on the Cricut Machine and can offer the Cricut Heat App and the Cricut Heat Site.
How to use Cricut AutoPress?
Below, I have mentioned a brief step on how to use Auto Press Cricut easily.
Initially, set the machine and cut the design on HTV or infusible ink sheet.
Then, position the base material on the heat mat, follow the Cricut Heat Guide, and adjust the time and temperature.
Moreover, apply the heat on the surface until the design is infused.
Finally, switch off AutoPress and leave the project to leave cool down.
What is the heat setting on the Cricut AutoPress?
A Cricut auto heat press machine can heat from 170° to 400°F (75° to 205°C), and it is mostly used to transfer heat on big projects. The following are the steps to get exact time and temperature information.
First, go to the cricut.com/heatguide and select this machine.
After that, we will select the heat transfer material & also choose your base material.
Finally, select the Apply option; detailed information will appear on the screen.
Final Thoughts
If you do many HTV, sublimation, and infusible ink projects with Cricut, you will face difficulties as it takes time and more energy. Cricut has introduced the Cricut AutoPress machine, a perfect machine made for home use. Above, I have told you everything about this machine that you will need to know. If your budget and project requirement match this machine, then you should invest in this machine.
Source Url :- Cricut heat press machine
Visit here for more Information:- Cricut AutoPress
cricut autopress machine
cricut autopress machine 2024
Cricut heat press machine
#Cricut AutoPress#CRICUT AUTOPRESS MACHINE#cricut design space#cricut design space login#cricut.com/setup#help.cricut.com#cricut.com/register#cricut machine setup
0 notes
Text
How to Use Cricut Autopress for DIY Projects?
Crafting is undoubtedly fun. When your crafting skills are paired with a perfect machine, all you get is an outstanding project. Have you been crafting for a long time? Do you love experimenting with new projects? Here, I will tell you how to use Cricut Autopress based on my experience. Thus, you will find joy in creating projects. Last time, I was making a T-shirt for a team retreat, and I felt thrilled working with this Cricut machine. I also loved to print custom designs on fabric and wooden surfaces. In this write-up, I will explain everything, all the valuable tips and tricks about using this totally redesigned heat press.
If you are excited about going through every step of using this incredible Cricut machine, you can find it helpful. Since I have done many more projects, I will explain my experience here. But, before talking about it, let us understand the machine first.
What is Cricut Autopress and What’s Special About It?
It is obvious for a crafter to be curious about the Cricut machines and their functions. Thus, if crafting is your hobby, like me, get to know the machine here. Autopress is a traditional heat press that you can use to craft a broad range of flat blanks. The machine works excellently for creating coasters, T-shirts, tote bags, wooden signs, etc. The machine easily adheres to sublimation prints, iron-on vinyl, and Cricut infusible ink. In addition, it comes with several new features that make it special among other heat press machines.
With all these features, Cricut Autopress is easy to set up and use. I am amazed at its safety features.
Setting Up a New Cricut Autopress
I found my shipping box approximately 58 lbs. Since it was a bit heavy for me, I asked my sister to help me lift it. Once I found a proper palace, I unboxed the box. Below, I am sharing some simple steps to set up the machine. You will need to go with this process before learning how to use Cricut Autopress.
Note: If you don’t have a standard USB drive, you will need to buy a USB to USB-C converter.
How to Use Cricut Autopress for the First Time?
If you are excited about making print designs, Autopress is the best option. I have completed my favorite designs on several wooden and fabric surfaces. Here, we will share everything to help you get started with this machine. Before you get into the steps, make sure to have an Autopress, Cricut, weeding tool, and Standard grip mat.
Once you remove the carrier sheet, your complete design will come out. Thus, next time you want to try out some projects, go along with these steps. After you learn how to use a Cricut Autopress machine properly, you can start making numerous projects.
Conclusion
Crafting becomes fun when you have a suitable set of materials, skills, and the machine to get started. If you are a hobby crafter or small business owner, you can find Autopress helpful in creating several handmade projects. The machine features several tools and automatic presets to make crafting convenient. Moreover, it is easy to learn how to use Cricut Autopress and create the first project. So, next time, surprise your loved ones with fantastic DIY projects.
Frequently Asked Questions
Q.1 Is Cricut Autopress Best for Beginners?
Autopress is an excellent machine for all levels of crafting. Therefore, whether you are a beginner or experienced, you can use it to create a DIy project. Beginners can save their time, and pro crafters can speed up their printing process. One of the best things about this machine is that it creates projects fast. So, it is the best for projects with limited time.
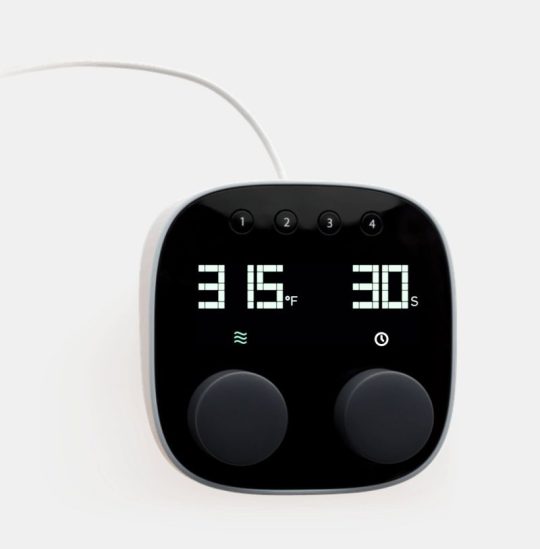
Q.2 What is the Control Pad in Cricut Autopress?
Control pad dials are used to adjust the temperature and time in the machine. It allows an easy way to set the needed time and temperature for your project. Follow the steps below to set them in your Autopres machine.
● Switch on the left dial to adjust the temperature as per your material.
● Turn on the right dial to set the timer.
Q.3 What are the Basic Steps of Using Cricut Autopress and Making Crafts?
Do you need to learn how to use Cricut Autopress? If you have purchased a new machine, you will need to go through these steps.
Visit: cricut create connect to computer
Source: https://cricuts-mart.com/how-to-use-cricut-autopress-for-diy-projects
#cricut create connect to computer#install cricut design space app#cricut.com/setup#www.cricut.com/setup#cricut setup
1 note
·
View note
Link
How to Use Cricut Autopress for DIY Projects? by cricutdesign
0 notes
Text
The Ultimate Guide to the New Cricut Autopress Machine
Cricut is not only famous for its cutting machines but also for its heat press machines. These press machines are usually an addition to the main cutting machine. These heat press machines are essential for projects involving vinyl, iron-on, infusible inks, etc. They help transfer the material onto the project’s surface with heat to provide permanency to the finished project. Cricut has several heat press machines. In this blog, we will talk about the new Cricut Autopress machine and its features.

What are the Features of Cricut Autopress?
The new Cricut Autopress machine comes with a lot of great features. Now, let us take a look at a few of them.
First, the machine closes all the way and will get locked. It is a really important feature as it allows you to utilize the handle and the back pocket of the press to lift and move it.
Also, the machine weighs about 58 pounds, making it easily hold on both ends.
The machine takes zero effort to operate. Just by using two fingers, you can close the top.
Further, the design of the machine is sleek and minimalist, which blends perfectly well with the other Cricut machines. Moreover, the compact feature allows easy storage when not in use.
It features an adjustable handle, built-in safety features, and set temperature control up to 400 degrees Fahrenheit.
Another very important feature is that it has an automatic pressure control system. The system adjusts the pressure based on the thickness of the material you are using. This ensures an even heat distribution and reaches optimal results for all the materials.
Furthermore, the machine is easy to use. The setting up of the machine is straightforward. Also, it works smoothly with the Design Space.
In terms of performance, the machine delivers impressive results while maintaining high precision and quality of transfers.
How is Cricut Autopress Different from Other Heat Presses?
After discussing the features of the machine, now we will briefly compare it with other Cricut heat press machines. Let us look at what makes it stand out.
The first aspect of why it is different from others is that the new Cricut Autopress machine opens like a clamshell. Also, it opens up to almost a full 90 degrees, which helps keep your hands safe.
Another difference is that the machine is closed parallel to the surface. It doesn’t push the blank away since it closes parallel to the surface and starts right on top of it. It means you can press the blanks up to two inches thick without issues.
Moreover, another aspect that truly makes it stand out is the auto pressure feature. Once you close the machine, it will automatically engage the motor and automatically set the pressure.
What Materials Can You Use with the Cricut Autopress?
Now, look at all the materials you can use with the machine. Also, what projects can you make with it?
The machine works beautifully with HTV material. You can use the machine to transfer the vinyl onto fabrics, wood, and more surfaces.
Also, you can use the machine for projects involving materials such as printable iron-on, Cricut iron-on, and more.
Further, you can use the new Cricut Autopress machine for the materials like infusible ink and sublimation projects.
Moreover, since the machine has an auto pressure feature, it works with many materials and accordingly adjusts the pressure.
Conclusion
The Cricut Autopress, built with steel and high-quality components, is elegant. It also delivers high professional-level results. It is perfect for those looking to make bulk projects with its auto pressure control system, aiding in the perfect transfer of the materials with less effort. So, the new Cricut Autopress machine is revolutionary and a great addition to its list of heat press machines.
FAQs
What is in the Cricut Autopress box?
The Cricut Autopress box contains the machine itself and two other boxes. The first box includes the quick start guide, a control pad, and a USB cord connecting the pod to the machine. Also, in the other box, you will find the warrant information for the product—also the power cord to power the machine.
Do I need to register for Cricut Autopress?
You need to register the AutoPress machine after buying and using it. While you are activating, it automatically gets registered. To activate the new Cricut Autopress machine, open the Cricut.com/setup site on your Windows or Mac computer. After that, you must follow the on-screen prompts and activate the machine. So, it is important to activate and register in order to use it.
Does Cricut Autopress work with the Cricut Heat app?
No, you can’t use the Cricut Heat app. The machine is not enabled with Bluetooth. However, you can visit the online heat Guide on Cricut’s site and look at all the recommended time and temperature settings. You can also find step-by-step instructions for a variety of heat-transfer. Also, the control pod of the machine has 4 convenient presets for frequently used settings.
#New Cricut Autopress#Cricut.com/setup#cricut design space#cricut explore air 2#design.cricut.com#cricut new machine setup#cricut design space login
1 note
·
View note
Text
How To Use The Cricut Autopress- Everything You Need To Know!
How To Use The Cricut Autopress- Everything You Need To Know!
This post and photos may contain Amazon or other affiliate links. As an Amazon Associate I earn from qualifying purchases.If you purchase something through any link, Hello Creative Family may receive a small commission at no extra charge to you. Any supplies used may be given to me free of charge, however, all projects and opinions are our own. Learn everything you need to know about the Cricut…

View On WordPress
0 notes