#JoinTables
Explore tagged Tumblr posts
Visit Tumblr Blog
Explore Tumblr blogs with no restrictions, modern design and the best experience.
Last Seen Tumblr Blogs


Fun Fact
Mobile Tumblr US users spend an average of 4.04 minutes per session on the app.
Text

SQL INNER JOIN Explained: A Beginner’s Guide with Examples
In the world of relational databases, data is often stored in multiple related tables to maintain structure, efficiency, and normalization. To retrieve meaningful insights from this distributed data, we need to combine these tables, and that’s where SQL JOINs come in. Among the different types of JOINs, the SQL INNER JOIN is the most commonly used and powerful tool for combining data.
This beginner-friendly guide will walk you through the concept of SQL INNER JOIN, explain when and why to use it, and provide clear examples to help you learn how it works step by step.
What is SQL INNER JOIN?
SQL INNER JOIN is a clause used to combine rows from two or more tables based on a related column between them. It returns only the records that have matching values in both tables.
In simple terms: INNER JOIN fetches data where there is a match in both tables.
Basic INNER JOIN Syntax
SELECT columns FROM table1 INNER JOIN table2 ON table1.common_column = table2.common_column;
table1 and table2: The tables you're joining.
common_column: The column used to establish a relationship between the two tables (often a foreign key in one table and primary key in the other).
Example Scenario: Employees and Departments
Let’s say we have two tables:
Table 1: employees
employee_id name department_id 1 Alice 10 2 Bob 20 3 Charlie 30 4 David NULL
Table 2: departments
department_id department_name 10 HR 20 IT 30 Finance 40 Marketing
INNER JOIN Example
To get a list of employees along with their department names: SELECT e.name, d.department_name FROM employees e INNER JOIN departments d ON e.department_id = d.department_id;
Result:
name department_name Alice HR Bob IT Charlie Finance
Note: David is not included in the result because he does not have a matching department_id. This is the key behavior of INNER JOIN—it excludes unmatched rows.
Why Use INNER JOIN?
To combine data from related tables: It helps retrieve a complete view from normalized database structures.
To enforce data integrity: Ensures you’re working only with rows that have proper relational context.
To avoid redundancy: By joining normalized tables, you keep your schema clean while still accessing all needed information.
INNER JOIN vs Other JOINs
JOIN Type Returns INNER JOIN Only matching rows in both tables LEFT JOIN All rows from the left table + matched from right RIGHT JOIN All rows from the right table + matched from left FULL OUTER All matched and unmatched rows from both tables
INNER JOIN is typically faster and more commonly used when you’re only interested in rows that exist in both tables.
Multiple INNER JOINs Example
You can join more than two tables using INNER JOIN:SELECT o.order_id, c.customer_name, p.product_name FROM orders o INNER JOIN customers c ON o.customer_id = c.customer_id INNER JOIN products p ON o.product_id = p.product_id;
This will return a detailed list of orders including customer and product information.
Common INNER JOIN Mistakes to Avoid
Forgetting the ON clause: This will lead to a Cartesian product (every row joined with every other row).
Ambiguous column names: Always use table aliases or prefixes to avoid confusion when column names are the same.
Missing indexes: Make sure the join columns are indexed to improve performance.
Assuming NULL values will match: NULL ≠ NULL in SQL. INNER JOIN will exclude rows with NULL in join columns.
Performance Tips for INNER JOIN
Use INNER JOIN instead of subqueries when possible for better performance.
Always ensure the join columns are indexed.
Limit your SELECT clause to needed columns instead of using SELECT *.
Use EXPLAIN or Query Plan to analyze the performance of your JOIN queries.
Use Cases of INNER JOIN in Real-World Applications
E-commerce: Joining orders with customer and product tables to generate invoices.
HR Systems: Joining employees with departments, salaries, or attendance records.
Inventory Management: Linking products with suppliers and stock levels.
Education Systems: Mapping students to courses, grades, or teachers.
Practice Task for Beginners
Try this query:SELECT e.name, d.department_name FROM employees e INNER JOIN departments d ON e.department_id = d.department_id WHERE d.department_name = 'IT';
What does this return? → All employees working in the IT department.
Conclusion
Understanding and mastering SQL INNER JOIN is a fundamental step in becoming proficient in SQL. It enables you to query relational databases efficiently and extract powerful insights from structured data. By practicing different join scenarios and experimenting with real data, you'll build confidence and improve your query-writing skills.
Whether you’re preparing for an SQL interview, managing business reports, or developing applications, INNER JOIN is a tool you’ll use often. Start with small examples, understand the logic behind the join, and build your way toward handling complex data relationships with ease.
0 notes
Text
Railsガイドめも
Ruby on Rails ガイドをちょぼちょぼ読んでいて、知らなかったことを5つほど。
(1)中間テーブル用のジェネレータがある
bin/rails generate migration CreateJoinTableCustomerProduct customer product
こんな感じで、���前の一部に JoinTable を含めると、中間テーブルを生成するマイグレーションの雛形になる。
(2)bin/rails db:setup に冪等性を持たせた bin/rails db:prepare コマンドがある
bin/rails db:setup は、以下とかをやってくれるやつ:
データベースの作成
スキーマの読み込み
seedデータを用いたデータベースの初期化
(3)マイグレーションのログ出力は抑制できる
ActiveRecord::Migration.suppress_messages を使ってできる。
そもそも抑制したい場面ってあるのかなぁと思ったが、CI/CD内でマイグレーション部分のログ出力を抑制することで、ログを簡潔にしたい場合もあるかも。
(4)sqlファイルとしてスキーマダンプを生成できる
MCでは schema.rbだけど、db/structure.sqlにすることも設定次第で可能。この場合、sqlファイルになるため、データベース固有の項目も、そのファイル上で表現できる。シーケンス、ストアドプロシージャとかね。
(5) toggle という属性に反対のブール値を割り当てるメソッドがある
公式ドキュメントそのままだけどuser = User.first user.banned? #=> false user.toggle(:banned) user.banned? #=> true
という感じ。toggle!とした場合は、Railsのバリデーションはスキップされる。
0 notes
Photo

ジュンプランニング スーパースリー ザ・インポッシブルズ マルチマン スペシャルパッケージ ジョインタブル フィギュアリン JUN Planning The Impossibles MULTI-MAN Special Package Jointable figurine #ハンナバーベラ #HannaBarbera #アメトイ #アメリカントイ #フィギュア買取 #アメトイ買取 #おもちゃ #おもちゃ買取 #vintagetoys #ActionFigure #中野ブロードウェイ #NakanoBroadway #老玩具 #中野百老匯 #中野百老汇 #나카노브로드웨 #ロボットロボット #ROBOTROBOT #WeBuyToys https://instagr.am/p/CSBfnyznoId/
0 notes
Photo


LED poster
LED Poster, LED Poster Display, LED Poster Panels, LED display stand, LED Banner, Jointable LED Poster
AP Series
LED Poster
5mm(Outdoor),4mm(Indoor),2.5mm(Indoor) Available
Lower Power Consumption
The power consumption for a LED Poster is only 1/10 of the consumption in LCD panel. ( Comparable with same size)
Easy Move & Maintenance
Easy transportation and moved by using strong wheel.
Easy raplacement of Power supply and LED panels.
Smart Asynchronous control
Group Intelligent Control(GIC System).
Location Precise Advertising .
Advertising Management System 3G/4G/WIFI/USB control.
GPS real-time monitoring.
We can make customized size as per request
NSE supply the LED display: taxi top LED display, LED poster, Flexible LED display. It is a professional portable LED sign manufacturer full of experience and creativity.
If you want to know more, please click here
0 notes
Text
Spring Boot + Spring Security + H2 Database
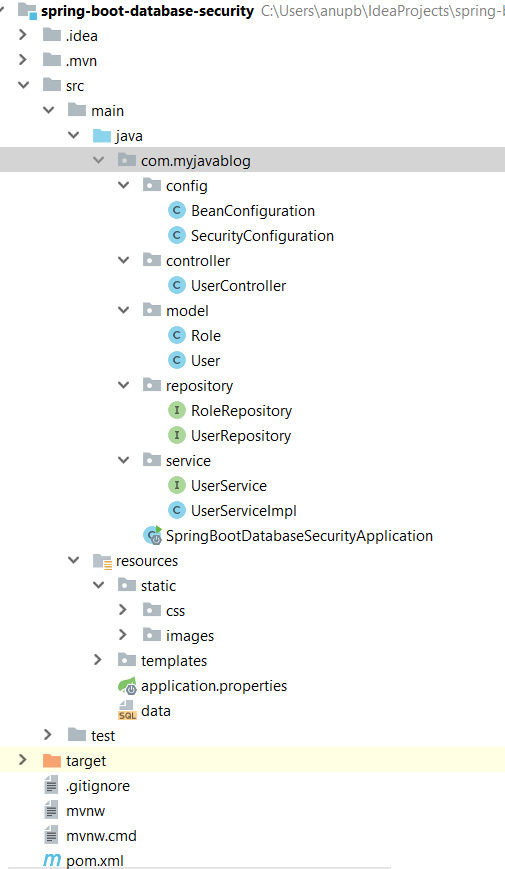
In this tutorial , we will see how to secure your web application by authenticating and authorizing users against database. User and role information is stored in database . GitHub Link:Code for this example can be found on below gitHub link- Download Tools : Spring Boot 2.1.1.RELEASESpring MVCSpring Security MavenIntelliJ IDEALombok Step 1: Create a simple spring boot application in Intellij IDEA editor as shown in below link - Project Setup Our final Project structure will look like -

Step 2:Define all dependencies required in pom file as below - 4.0.0 org.springframework.boot spring-boot-starter-parent 2.1.1.RELEASE com.myjavablog spring-boot-database-security 0.0.1-SNAPSHOT spring-boot-database-security Demo project for Spring Boot 1.8 org.projectlombok lombok true org.springframework.boot spring-boot-starter-web org.springframework.boot spring-boot-starter-security org.springframework.boot spring-boot-starter-jdbc org.springframework.boot spring-boot-starter-data-jpa org.apache.tomcat tomcat-jdbc org.springframework.boot spring-boot-starter-thymeleaf org.springframework.boot spring-boot-starter-test test org.springframework.security spring-security-test test com.h2database h2 org.apache.tomcat.embed tomcat-embed-jasper javax.servlet jstl org.springframework.boot spring-boot-maven-plugin In addition to spring-boot-starter-security dependency ,we will be using lombok third party library to reduce boilerplate code for model/data objects, e.g., it can generate getters and setters for those object automatically by using Lombok annotations. The easiest way is to use the @Data annotation. Step3: Now create a configuration for creating beans for BCryptPasswordEncoder and H2 database . Also we need to configure security mechanism through database using configuration file - package com.myjavablog.config; import org.h2.server.web.WebServlet; import org.springframework.boot.web.servlet.ServletRegistrationBean; import org.springframework.context.annotation.Bean; import org.springframework.context.annotation.Configuration; import org.springframework.security.crypto.bcrypt.BCryptPasswordEncoder; import org.springframework.web.servlet.config.annotation.WebMvcConfigurer; @Configuration public class BeanConfiguration implements WebMvcConfigurer { @Bean public BCryptPasswordEncoder passwordEncoder() { BCryptPasswordEncoder bCryptPasswordEncoder = new BCryptPasswordEncoder(); return bCryptPasswordEncoder; } @Bean ServletRegistrationBean h2servletRegistration() { ServletRegistrationBean registrationBean = new ServletRegistrationBean(new WebServlet()); registrationBean.addUrlMappings("/console/*"); return registrationBean; } } package com.myjavablog.config; import org.springframework.beans.factory.annotation.Autowired; import org.springframework.beans.factory.annotation.Value; import org.springframework.context.annotation.Configuration; import org.springframework.security.config.annotation.authentication.builders.AuthenticationManagerBuilder; import org.springframework.security.config.annotation.web.builders.HttpSecurity; import org.springframework.security.config.annotation.web.builders.WebSecurity; import org.springframework.security.config.annotation.web.configuration.EnableWebSecurity; import org.springframework.security.config.annotation.web.configuration.WebSecurityConfigurerAdapter; import org.springframework.security.crypto.bcrypt.BCryptPasswordEncoder; import org.springframework.security.web.util.matcher.AntPathRequestMatcher; import javax.sql.DataSource; @Configuration @EnableWebSecurity public class SecurityConfiguration extends WebSecurityConfigurerAdapter { @Autowired private BCryptPasswordEncoder bCryptPasswordEncoder; @Autowired private DataSource dataSource; @Value("${spring.queries.users-query}") private String usersQuery; @Value("${spring.queries.roles-query}") private String rolesQuery; @Override protected void configure(AuthenticationManagerBuilder auth) throws Exception { auth. jdbcAuthentication() .usersByUsernameQuery(usersQuery) .authoritiesByUsernameQuery(rolesQuery) .dataSource(dataSource) .passwordEncoder(bCryptPasswordEncoder); } @Override protected void configure(HttpSecurity http) throws Exception { http. authorizeRequests() .antMatchers("/").permitAll() .antMatchers("/login").permitAll() .antMatchers("/registration").permitAll() .antMatchers("/admin/**").hasAuthority("ADMIN").anyRequest() .authenticated().and().csrf().disable().formLogin() .loginPage("/login").failureUrl("/login?error=true") .defaultSuccessUrl("/admin/adminHome") .usernameParameter("email") .passwordParameter("password") .and().logout() .logoutRequestMatcher(new AntPathRequestMatcher("/logout")) .logoutSuccessUrl("/").and().exceptionHandling() .accessDeniedPage("/access-denied") ; } @Override public void configure(WebSecurity web) throws Exception { web.ignoring() .antMatchers("/resources/**", "/static/**", "/css/**", "/js/**", "/images/**", "/console/**"); } } Step 4: Create a model classes for User and Role As we are using lombok libarary , we dont need to create setter and getter in model class . Also it helps in building mock objects at runtime for unit testing. package com.myjavablog.model; import lombok.AllArgsConstructor; import lombok.Builder; import lombok.Data; import lombok.NoArgsConstructor; import org.hibernate.validator.constraints.Length; import javax.persistence.*; import javax.validation.constraints.Email; import javax.validation.constraints.NotEmpty; import java.util.Set; @Data @Builder @AllArgsConstructor @NoArgsConstructor @Entity @Table(name = "USER") public class User { @Id @GeneratedValue(strategy = GenerationType.AUTO) @Column(name = "USER_ID") private int id; @Column(name = "EMAIL") @Email(message = "*Please provide a valid Email") @NotEmpty(message = "*Please provide an email") private String email; @Column(name = "PASSWORD") @Length(min = 5, message = "*Your password must have at least 5 characters") @NotEmpty(message = "*Please provide your password") private String password; @Column(name = "NAME") @NotEmpty(message = "*Please provide your name") private String name; @Column(name = "LAST_NAME") @NotEmpty(message = "*Please provide your last name") private String lastName; @Column(name = "ACTIVE") private int active; @ManyToMany(cascade = CascadeType.ALL) @JoinTable(name = "USER_ROLE", joinColumns = @JoinColumn(name = "USER_ID"), inverseJoinColumns = @JoinColumn(name = "ROLE_ID")) private Set roles; } package com.myjavablog.model; import lombok.AllArgsConstructor; import lombok.Builder; import lombok.Data; import lombok.NoArgsConstructor; import javax.persistence.*; @Data @Builder @AllArgsConstructor @NoArgsConstructor @Entity @Table(name = "ROLE") public class Role { @Id @GeneratedValue(strategy = GenerationType.AUTO) @Column(name = "ROLE_ID") private int id; @Column(name = "ROLE") private String role; } Step 5: Create Service layer - package com.myjavablog.service; import com.myjavablog.model.User; import org.springframework.stereotype.Service; public interface UserService { public User findUserByEmail(String email) ; public User saveUser(User user); } package com.myjavablog.service; import com.myjavablog.model.Role; import com.myjavablog.model.User; import com.myjavablog.repository.RoleRepository; import com.myjavablog.repository.UserRepository; import org.springframework.beans.factory.annotation.Autowired; import org.springframework.security.crypto.bcrypt.BCryptPasswordEncoder; import org.springframework.stereotype.Service; import java.util.Arrays; import java.util.HashSet; @Service public class UserServiceImpl implements UserService { private UserRepository userRepository; private RoleRepository roleRepository; private BCryptPasswordEncoder bCryptPasswordEncoder; @Autowired public UserServiceImpl(UserRepository userRepository, RoleRepository roleRepository, BCryptPasswordEncoder bCryptPasswordEncoder) { this.userRepository = userRepository; this.roleRepository = roleRepository; this.bCryptPasswordEncoder = bCryptPasswordEncoder; } @Override public User findUserByEmail(String email) { return userRepository.findByEmail(email); } @Override public User saveUser(User user) { user.setPassword(bCryptPasswordEncoder.encode(user.getPassword())); user.setActive(1); Role userRole = roleRepository.findByRole("ADMIN"); user.setRoles(new HashSet(Arrays.asList(userRole))); return userRepository.save(user); } } Step 6: Create JPA repositories for User and Role to interact with the databse - package com.myjavablog.repository; import com.myjavablog.model.Role; import org.springframework.data.jpa.repository.JpaRepository; import org.springframework.stereotype.Repository; @Repository public interface RoleRepository extends JpaRepository { public Role findByRole(String role); } package com.myjavablog.repository; import com.myjavablog.model.User; import org.springframework.data.jpa.repository.JpaRepository; import org.springframework.stereotype.Repository; @Repository public interface UserRepository extends JpaRepository { public User findByEmail(String email); } Step 7: Create a controller to save the user and navigate package com.myjavablog.controller; import com.myjavablog.model.User; import com.myjavablog.service.UserService; import org.springframework.beans.factory.annotation.Autowired; import org.springframework.security.core.Authentication; import org.springframework.security.core.context.SecurityContextHolder; import org.springframework.stereotype.Controller; import org.springframework.validation.BindingResult; import org.springframework.web.bind.annotation.RequestMapping; import org.springframework.web.bind.annotation.RequestMethod; import org.springframework.web.servlet.ModelAndView; import javax.validation.Valid; @Controller public class UserController { @Autowired private UserService userService; @RequestMapping(value={"/", "/login"}, method = RequestMethod.GET) public ModelAndView login(){ ModelAndView modelAndView = new ModelAndView(); modelAndView.setViewName("login"); return modelAndView; } @RequestMapping(value="/registration", method = RequestMethod.GET) public ModelAndView registration(){ ModelAndView modelAndView = new ModelAndView(); User user = new User(); modelAndView.addObject("user", user); modelAndView.setViewName("registration"); return modelAndView; } @RequestMapping(value = "/registration", method = RequestMethod.POST) public ModelAndView createNewUser(@Valid User user, BindingResult bindingResult) { ModelAndView modelAndView = new ModelAndView(); User userExists = userService.findUserByEmail(user.getEmail()); if (userExists != null) { bindingResult .rejectValue("email", "error.user", "There is already a user registered with the email provided"); } if (bindingResult.hasErrors()) { modelAndView.setViewName("registration"); } else { userService.saveUser(user); modelAndView.addObject("successMessage", "User has been registered successfully"); modelAndView.addObject("user", new User()); modelAndView.setViewName("registration"); } return modelAndView; } @RequestMapping(value="/admin/adminHome", method = RequestMethod.GET) public ModelAndView home(){ ModelAndView modelAndView = new ModelAndView(); Authentication auth = SecurityContextHolder.getContext().getAuthentication(); User user = userService.findUserByEmail(auth.getName()); modelAndView.addObject("userName", "Welcome " + user.getName() + " " + user.getLastName() + " (" + user.getEmail() + ")"); modelAndView.addObject("adminMessage","This Page is available to Users with Admin Role"); modelAndView.setViewName("admin/adminHome"); return modelAndView; } @RequestMapping(value="/user/userHome", method = RequestMethod.GET) public ModelAndView user(){ ModelAndView modelAndView = new ModelAndView(); Authentication auth = SecurityContextHolder.getContext().getAuthentication(); User user = userService.findUserByEmail(auth.getName()); modelAndView.addObject("userName", "Welcome " + user.getName() + " " + user.getLastName() + " (" + user.getEmail() + ")"); modelAndView.addObject("userMessage","This Page is available to Users with User Role"); modelAndView.setViewName("user/userHome"); return modelAndView; } } Step 8: Create a UI layer using Thymleaf templates . Step 9: Run the application and go to H2 database console by navigating to http://localhost:8081/console
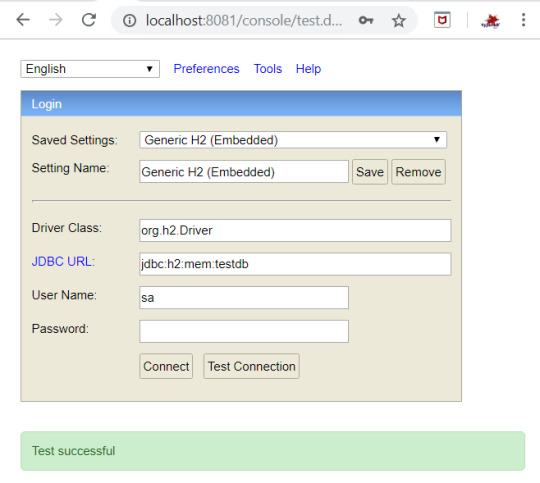
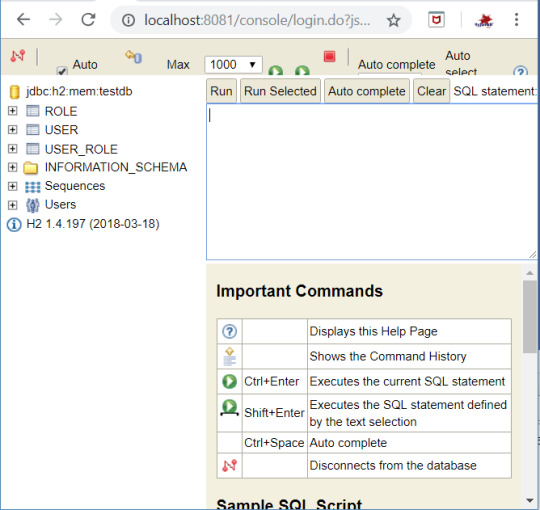
Once the application is up and running , H2 database will be automatically started. You can navigate to http://localhost:8081/console to see the tables created as shown below-

Also you need to insert few roles initially. INSERT INTO ROLE VALUES (1, "ADMIN"); INSERT INTO ROLE VALUES (2, "USER"); Step 10: Now go to application http://localhost:8081/

You can navigate to registration page by clicking on "Go to registration page " at the top .
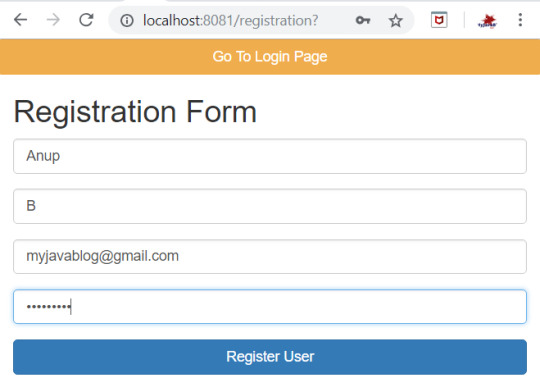
Once you register , User details will be saved to USER table -

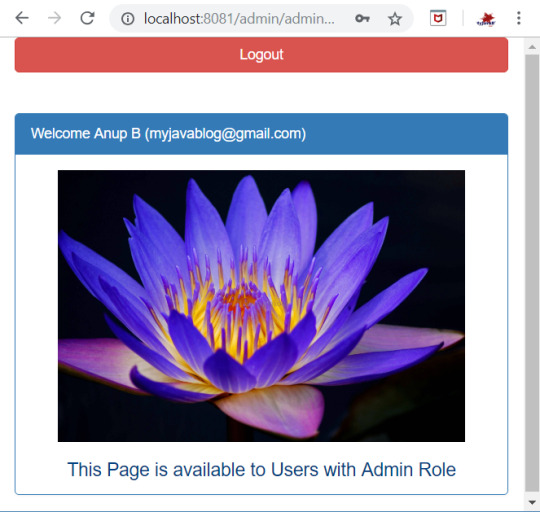
Now when you login with registered user details then you can see the admin page . As registered user is ADMIN role, Admin page will be displayed.

Read the full article
0 notes
Photo

Do you know plants vs Zombies game? My kids like this game, so I bough game. There is a mat - just simply cheap mat, but anyway its interesting to have something to put your zombies. :D and we choose two plants and two zombies figure. Zombies have jointable arms and head, some accessories can be removed. I like the plants, you need put small ball into the hole, and push - the plant chooting the ball. Do you have this game on your phone? And figures? Whish figures do you like the most? #plantsvszombie #zombiegame #plantsvszombiesheroes #plantsvszombiesgame #plantsvszombies #plantvszombie https://www.instagram.com/p/Bzx-flqoCiu/?igshid=4oeaxbunyoq4
0 notes
Link
Envato Tuts+ Code http://j.mp/2CZd6IK
In this article, we’re going to review PDO CRUD—a form builder and database management tool. PDO CRUD helps you build forms for your database tables with just a few lines of code, making it quick and easy to bootstrap a database application.
There are plenty of extensions available for database abstraction and specifically CRUD (create, read, update, and delete) generation for PHP and MySQL. And of course, you’ll also find commercial options that provide ready-to-use features and extended support. In the case of commercial options, you can also expect quality code, bug fixes, and new enhancements.
Today, we’re going to discuss the PDO CRUD tool, available at CodeCanyon for purchase at a very reasonable price. It’s a complete CRUD builder tool which allows you to build applications just by providing database tables and writing a few lines of code.
It works with multiple database back-ends, including MySQL, Postgres, and SQLite. In this article, we’ll see how to use PDO CRUD to build a CRUD system with the MySQL database back-end.
Installation and Configuration
In this section, we’ll see how to install and configure the PDO CRUD tool once you’ve purchased and downloaded it from CodeCanyon.
As soon as you purchase it, you’ll be able to download the zip file. Extract it, and you will find the directory with the main plugin code: PDOCrud/script. Copy this directory to your PHP application.
For example, if your project is configured at /web/demo-app/public_html, you should copy the script directory to /web/demo-app/public_html/script.
Next, you need to enter your database back-end details in the configuration file. The configuration file is located at /web/demo-app/public_html/script/config/config.php. Open that file in your favorite text editor and change the following details in that file.
$config["script_url"] = "http://my-demo-app"; /************************ database ************************/ //Set the host name to connect for database $config["hostname"] = "localhost"; //Set the database name $config["database"] = "demo_app_db"; //Set the username for database access $config["username"] = "demo_app"; //Set the pwd for the database user $config["password"] = "demo_app"; //Set the database type to be used $config["dbtype"] = "mysql"
As you can see, the details are self-explanatory. The $config["script_url"] is set to the URL which you use to access your site.
Once you’ve saved the database details, you’re ready to use the PDO CRUD tool. In our example, we’ll create two MySQL tables that hold employee and department data.
employees: holds employee information
department: holds department information
Open your database management tool and run the following commands to create tables as we’ve just discussed above. I use PhpMyAdmin to work with the MySQL database back-end.
Firstly, let’s create the department table.
CREATE TABLE `department` ( `id` int(11) UNSIGNED NOT NULL AUTO_INCREMENT PRIMARY KEY, `department_name` varchar(255) NOT NULL DEFAULT '' ) ENGINE=MyISAM DEFAULT CHARSET=utf8;
Next, we’ll create the employee table.
CREATE TABLE `employee` ( `id` int(12) UNSIGNED NOT NULL AUTO_INCREMENT PRIMARY KEY, `dept_id` int(11) UNSIGNED NOT NULL, `first_name` varchar(255) NOT NULL DEFAULT '', `last_name` varchar(255) NOT NULL DEFAULT '', `email` varchar(255) NOT NULL DEFAULT '', `phone` varchar(255) NOT NULL DEFAULT '' ) ENGINE=MyISAM DEFAULT CHARSET=utf8;
As you can see, we’ve used the dept_id column in the employee table, which holds the id of the corresponding department stored in the department table.
Once you’ve created the tables in your database, we’re ready to build a CRUD application interface using the PDO CRUD tool!
How to Set Up Basic CRUD
In this section, we’ll see how you can set up a basic CRUD interface using the PDO CRUD tool by writing just a few lines of code.
The Department Table
We’ll start with the department table.
Let’s create department.php with the following contents. If your document root is /web/demo-app/public_html/, create the department.php file at /web/demo-app/public_html/department.php. Recall that we’ve already copied the script directory to /web/demo-app/public_html/script.
<?php require_once "script/pdocrud.php"; $pdocrud = new PDOCrud(); echo $pdocrud->dbTable("department")->render();
And now, if you point your browser to the department.php file, you should see something like this:
Phew! With just two lines of code, you have a ready-to-use CRUD UI which allows you to perform all the necessary create, read, update, and delete actions on your model. Not to mention that the default listing view itself contains a lot of features, including:
search
built-in pagination
print
export records to CSV, PDF or Excel format
bulk delete operation
sorting by columns
Click on the Add button on the right-hand side, and it’ll open the form to add a department record.
Let’s add a few records using the Add button and see how it looks.
As you can see, this is a pretty light-weight and neat interface. With almost no effort, we’ve built a CRUD for the department model! Next, we’ll see how to do the same for the employee table.
The Employee Table
In this section, we’ll see how to build a CRUD for the employee table. Let’s create employee.php with the following contents.
<?php require_once "script/pdocrud.php"; $pdocrud = new PDOCrud(); echo $pdocrud->dbTable("employee")->render();
It's pretty much the same code as last time; we just need to change the name of the table. If you click on the Add button, it also brings you a nice form which allows you to add the employee record.
You might have spotted one problem: the Dept id field is a text field, but it would be better as a drop-down containing the name of the departments. Let’s see how to achieve this.
<?php require_once "script/pdocrud.php"; $pdocrud = new PDOCrud(); // get departments $data = $pdocrud->getPDOModelObj()->select("department"); $options = array(); foreach($data as $record) { $options[$record['id']] = $record['department_name']; } // change the type of the dept_id field from textfield to select dropdown $pdocrud->fieldTypes("dept_id", "select"); $pdocrud->fieldDataBinding("dept_id", $options, "", "","array"); echo $pdocrud->dbTable("employee")->render();
In this code, we've accessed the department table through PDO CRUD so that we can associate the department name with the department ids. Then, we've updated the binding options for the department id field so that it will render as a dropdown (select) list.
Now, click on the Add button to see how it looks! You should see the Dept Id field is now converted to a dropdown!
Let’s add a few employee records and see how the employee listing looks:
That looks nice! But we have another small issue here: you can see that the Dept id column shows the ID of the department, and it would be nice to display the actual department name instead. Let’s find out how to achieve this!
Let’s revise the code of employee.php with the following contents.
<?php require_once "script/pdocrud.php"; $pdocrud = new PDOCrud(); // change the type of the dept_id field from textfield to select dropdown $data = $pdocrud->getPDOModelObj()->select("department"); $options = array(); foreach($data as $record) { $options[$record['id']] = $record['department_name']; } $pdocrud->fieldTypes("dept_id", "select"); $pdocrud->fieldDataBinding("dept_id", $options, "", "","array"); $pdocrud->crudTableCol(array("first_name","last_name", "department_name", "email","phone")); $pdocrud->joinTable("department", "employee.dept_id = department.id", "INNER JOIN"); echo $pdocrud->dbTable("employee")->render();
Here, we've created a join between the employee and department tables with $pdocrud->joinTable, and then told PDO CRUD to render only the employee name, department name, and contact info with $pdocrud->crudTableCol.
And with that change, the employee listing should look like this:
As you can see, the PDO CRUD script is pretty flexible and allows you every possible option to customize your UI.
So far, we’ve discussed how to set up a basic CRUD interface. We’ll see a few more options that you could use to enhance and customize your CRUD UI in the next section.
Customization Options
In this section, we’ll see a few customization options provided by the PDO CRUD tool. Of course, it’s not possible to go through all the options since the PDO CRUD tool provides much more than we could cover in a single article, but I’ll try to highlight a couple of important ones.
Inline Edit
Inline editing is one of the most important features, allowing you to edit a record quickly on the listing page itself. Let’s see how to enable it for the department listing page.
Let’s revise the department.php script as shown in the following snippet.
<?php require_once "script/pdocrud.php"; $pdocrud = new PDOCrud(); $pdocrud->setSettings("inlineEditbtn", true); echo $pdocrud->dbTable("department")->render();
As you can see, we’ve just enabled the inlineEditbtn setting, and the inline editing feature is there right away!
This is a really handy feature which allows you to edit records on the fly!
Filters
As you might have noticed, the department listing page already provides a free text search to filter records. However, you may want to add your own custom filters to improve the search feature. That’s what exactly the Filters option provides as it allows you to build custom filters!
We’ll use the employee.php for this feature as it’s the perfect demonstration use-case. On the employee listing page, we’re displaying the department name for each employee record, so let’s build a department filter which allows you to filter records by the department name.
Go ahead and revise your employee.php as shown in the following snippet.
<?php require_once "script/pdocrud.php"; $pdocrud = new PDOCrud(); $data = $pdocrud->getPDOModelObj()->select("department"); $options = array(); foreach($data as $record) { $options[$record['id']] = $record['department_name']; } $pdocrud->fieldTypes("dept_id", "select");//change state to select dropdown $pdocrud->fieldDataBinding("dept_id", $options, "", "","array");//add data using array in select dropdown $pdocrud->crudTableCol(array("first_name","last_name", "department_name", "email","phone")); $pdocrud->joinTable("department", "employee.dept_id = department.id", "INNER JOIN"); $pdocrud->addFilter("department_filter", "Department", "dept_id", "dropdown"); $pdocrud->setFilterSource("department_filter", $options, "", "", "array"); echo $pdocrud->dbTable("employee")->render();
We’ve just added two lines, with calls to addFilter and setFilterSource, and with that, the employee list looks like the following:
Isn’t that cool? With just two lines of code, you’ve added your custom filter!
Image Uploads
This is a must-have feature should you wish to set up file uploads in your forms. With just a single line of code, you can convert a regular field to a file-upload field, as shown in the following snippet.
I'll assume that you have a profile_image field in your employee table, and that you’re ready to convert it to a file-upload field!
<?php require_once "script/pdocrud.php"; $pdocrud = new PDOCrud(); $pdocrud->fieldTypes("profile_image", "image"); echo $pdocrud->dbTable("employee")->render();
That's it! Users will now be able to upload an image to the profile_image field.
CAPTCHA
Nowadays, if you want to save your site from spamming, CAPTCHA verification is an essential feature. The PDO CRUD tool already provides a couple of options to choose from.
It provides two options: CAPTCHA and ReCAPTCHA. If you select the CAPTCHA option, it presents a mathematical puzzle for the user to solve. On the other hand, if you select the ReCAPTCHA option, it presents a famous I’m not a robot puzzle!
If you want to add a simple CAPTCHA puzzle, you need to add the following line before you render your CRUD.
$pdocrud->formAddCaptcha("captcha");
On the other hand, if you prefer ReCAPTCHA, you can achieve the same by using the following snippet.
$pdocrud->recaptcha("your-site-key","site-secret");
You just need to replace the your-site-key and site-secret arguments with valid credentials from Google.
So far, we’ve discussed options that enhance the functionality of your application. Next, we’ll see how you could alter the skin and thus the look and feel of your application.
Skins
If you don’t like the default skin, you have a couple of options to choose from. The PDO CRUD tool provides dark, fair, green and advanced skins as other options to choose from.
For example, the following listing is based on the green theme.
It looks nice, doesn't it?
Pure Bootstrap
Although the default skin already supports responsive layouts, the PDO CRUD tool also supports Bootstrap library integration!
You need to use the following snippet should you wish to build your layout using the Bootstrap library.
<?php require_once "script/pdocrud.php"; $pdocrud = new PDOCrud(false, "pure", "pure"); echo $pdocrud->dbTable("department")->render();
And here’s what it looks like:
Conclusion
Today, we reviewed the PDO CRUD advanced database form builder and data management tool available at CodeCanyon. This is a CRUD application interface builder tool at its core. It provides a variety of customization options that cover almost everything a CRUD system requires.
As I said earlier, it’s really difficult to cover everything the PDO CRUD tool provides in a single article, but hopefully the official documentation should give you some insight into its comprehensive features.
I hope you’re convinced that the PDO CRUD tool is powerful enough to fulfill your requirements and allows you to get rid of the repetitive work you have to do every time you want to set up a CRUD in your application. Although it’s a commercial plugin, I believe it’s reasonably priced considering the plethora of features it provides.
If you have any suggestions or comments, feel free to use the feed below and I’ll be happy to engage in a conversation!
http://j.mp/2TFLhdX via Envato Tuts+ Code URL : http://j.mp/2etecmc
0 notes
Text
Spring Boot + Spring Security + H2 Database
In this tutorial , we will see how to secure your web application by authenticating and authorizing users against database. User and role information is stored in database . GitHub Link:Code for this example can be found on below gitHub link- Download Tools : Spring Boot 2.1.1.RELEASESpring MVCSpring Security MavenIntelliJ IDEALombok Step 1: Create a simple spring boot application in Intellij IDEA editor as shown in below link - Project Setup Our final Project structure will look like -
Step 2:Define all dependencies required in pom file as below - 4.0.0 org.springframework.boot spring-boot-starter-parent 2.1.1.RELEASE com.myjavablog spring-boot-database-security 0.0.1-SNAPSHOT spring-boot-database-security Demo project for Spring Boot 1.8 org.projectlombok lombok true org.springframework.boot spring-boot-starter-web org.springframework.boot spring-boot-starter-security org.springframework.boot spring-boot-starter-jdbc org.springframework.boot spring-boot-starter-data-jpa org.apache.tomcat tomcat-jdbc org.springframework.boot spring-boot-starter-thymeleaf org.springframework.boot spring-boot-starter-test test org.springframework.security spring-security-test test com.h2database h2 org.apache.tomcat.embed tomcat-embed-jasper javax.servlet jstl org.springframework.boot spring-boot-maven-plugin In addition to spring-boot-starter-security dependency ,we will be using lombok third party library to reduce boilerplate code for model/data objects, e.g., it can generate getters and setters for those object automatically by using Lombok annotations. The easiest way is to use the @Data annotation. Step3: Now create a configuration for creating beans for BCryptPasswordEncoder and H2 database . Also we need to configure security mechanism through database using configuration file - package com.myjavablog.config; import org.h2.server.web.WebServlet; import org.springframework.boot.web.servlet.ServletRegistrationBean; import org.springframework.context.annotation.Bean; import org.springframework.context.annotation.Configuration; import org.springframework.security.crypto.bcrypt.BCryptPasswordEncoder; import org.springframework.web.servlet.config.annotation.WebMvcConfigurer; @Configuration public class BeanConfiguration implements WebMvcConfigurer { @Bean public BCryptPasswordEncoder passwordEncoder() { BCryptPasswordEncoder bCryptPasswordEncoder = new BCryptPasswordEncoder(); return bCryptPasswordEncoder; } @Bean ServletRegistrationBean h2servletRegistration() { ServletRegistrationBean registrationBean = new ServletRegistrationBean(new WebServlet()); registrationBean.addUrlMappings("/console/*"); return registrationBean; } } package com.myjavablog.config; import org.springframework.beans.factory.annotation.Autowired; import org.springframework.beans.factory.annotation.Value; import org.springframework.context.annotation.Configuration; import org.springframework.security.config.annotation.authentication.builders.AuthenticationManagerBuilder; import org.springframework.security.config.annotation.web.builders.HttpSecurity; import org.springframework.security.config.annotation.web.builders.WebSecurity; import org.springframework.security.config.annotation.web.configuration.EnableWebSecurity; import org.springframework.security.config.annotation.web.configuration.WebSecurityConfigurerAdapter; import org.springframework.security.crypto.bcrypt.BCryptPasswordEncoder; import org.springframework.security.web.util.matcher.AntPathRequestMatcher; import javax.sql.DataSource; @Configuration @EnableWebSecurity public class SecurityConfiguration extends WebSecurityConfigurerAdapter { @Autowired private BCryptPasswordEncoder bCryptPasswordEncoder; @Autowired private DataSource dataSource; @Value("${spring.queries.users-query}") private String usersQuery; @Value("${spring.queries.roles-query}") private String rolesQuery; @Override protected void configure(AuthenticationManagerBuilder auth) throws Exception { auth. jdbcAuthentication() .usersByUsernameQuery(usersQuery) .authoritiesByUsernameQuery(rolesQuery) .dataSource(dataSource) .passwordEncoder(bCryptPasswordEncoder); } @Override protected void configure(HttpSecurity http) throws Exception { http. authorizeRequests() .antMatchers("/").permitAll() .antMatchers("/login").permitAll() .antMatchers("/registration").permitAll() .antMatchers("/admin/**").hasAuthority("ADMIN").anyRequest() .authenticated().and().csrf().disable().formLogin() .loginPage("/login").failureUrl("/login?error=true") .defaultSuccessUrl("/admin/adminHome") .usernameParameter("email") .passwordParameter("password") .and().logout() .logoutRequestMatcher(new AntPathRequestMatcher("/logout")) .logoutSuccessUrl("/").and().exceptionHandling() .accessDeniedPage("/access-denied") ; } @Override public void configure(WebSecurity web) throws Exception { web.ignoring() .antMatchers("/resources/**", "/static/**", "/css/**", "/js/**", "/images/**", "/console/**"); } } Step 4: Create a model classes for User and Role As we are using lombok libarary , we dont need to create setter and getter in model class . Also it helps in building mock objects at runtime for unit testing. package com.myjavablog.model; import lombok.AllArgsConstructor; import lombok.Builder; import lombok.Data; import lombok.NoArgsConstructor; import org.hibernate.validator.constraints.Length; import javax.persistence.*; import javax.validation.constraints.Email; import javax.validation.constraints.NotEmpty; import java.util.Set; @Data @Builder @AllArgsConstructor @NoArgsConstructor @Entity @Table(name = "USER") public class User { @Id @GeneratedValue(strategy = GenerationType.AUTO) @Column(name = "USER_ID") private int id; @Column(name = "EMAIL") @Email(message = "*Please provide a valid Email") @NotEmpty(message = "*Please provide an email") private String email; @Column(name = "PASSWORD") @Length(min = 5, message = "*Your password must have at least 5 characters") @NotEmpty(message = "*Please provide your password") private String password; @Column(name = "NAME") @NotEmpty(message = "*Please provide your name") private String name; @Column(name = "LAST_NAME") @NotEmpty(message = "*Please provide your last name") private String lastName; @Column(name = "ACTIVE") private int active; @ManyToMany(cascade = CascadeType.ALL) @JoinTable(name = "USER_ROLE", joinColumns = @JoinColumn(name = "USER_ID"), inverseJoinColumns = @JoinColumn(name = "ROLE_ID")) private Set roles; } package com.myjavablog.model; import lombok.AllArgsConstructor; import lombok.Builder; import lombok.Data; import lombok.NoArgsConstructor; import javax.persistence.*; @Data @Builder @AllArgsConstructor @NoArgsConstructor @Entity @Table(name = "ROLE") public class Role { @Id @GeneratedValue(strategy = GenerationType.AUTO) @Column(name = "ROLE_ID") private int id; @Column(name = "ROLE") private String role; } Step 5: Create Service layer - package com.myjavablog.service; import com.myjavablog.model.User; import org.springframework.stereotype.Service; public interface UserService { public User findUserByEmail(String email) ; public User saveUser(User user); } package com.myjavablog.service; import com.myjavablog.model.Role; import com.myjavablog.model.User; import com.myjavablog.repository.RoleRepository; import com.myjavablog.repository.UserRepository; import org.springframework.beans.factory.annotation.Autowired; import org.springframework.security.crypto.bcrypt.BCryptPasswordEncoder; import org.springframework.stereotype.Service; import java.util.Arrays; import java.util.HashSet; @Service public class UserServiceImpl implements UserService { private UserRepository userRepository; private RoleRepository roleRepository; private BCryptPasswordEncoder bCryptPasswordEncoder; @Autowired public UserServiceImpl(UserRepository userRepository, RoleRepository roleRepository, BCryptPasswordEncoder bCryptPasswordEncoder) { this.userRepository = userRepository; this.roleRepository = roleRepository; this.bCryptPasswordEncoder = bCryptPasswordEncoder; } @Override public User findUserByEmail(String email) { return userRepository.findByEmail(email); } @Override public User saveUser(User user) { user.setPassword(bCryptPasswordEncoder.encode(user.getPassword())); user.setActive(1); Role userRole = roleRepository.findByRole("ADMIN"); user.setRoles(new HashSet(Arrays.asList(userRole))); return userRepository.save(user); } } Step 6: Create JPA repositories for User and Role to interact with the databse - package com.myjavablog.repository; import com.myjavablog.model.Role; import org.springframework.data.jpa.repository.JpaRepository; import org.springframework.stereotype.Repository; @Repository public interface RoleRepository extends JpaRepository { public Role findByRole(String role); } package com.myjavablog.repository; import com.myjavablog.model.User; import org.springframework.data.jpa.repository.JpaRepository; import org.springframework.stereotype.Repository; @Repository public interface UserRepository extends JpaRepository { public User findByEmail(String email); } Step 7: Create a controller to save the user and navigate package com.myjavablog.controller; import com.myjavablog.model.User; import com.myjavablog.service.UserService; import org.springframework.beans.factory.annotation.Autowired; import org.springframework.security.core.Authentication; import org.springframework.security.core.context.SecurityContextHolder; import org.springframework.stereotype.Controller; import org.springframework.validation.BindingResult; import org.springframework.web.bind.annotation.RequestMapping; import org.springframework.web.bind.annotation.RequestMethod; import org.springframework.web.servlet.ModelAndView; import javax.validation.Valid; @Controller public class UserController { @Autowired private UserService userService; @RequestMapping(value={"/", "/login"}, method = RequestMethod.GET) public ModelAndView login(){ ModelAndView modelAndView = new ModelAndView(); modelAndView.setViewName("login"); return modelAndView; } @RequestMapping(value="/registration", method = RequestMethod.GET) public ModelAndView registration(){ ModelAndView modelAndView = new ModelAndView(); User user = new User(); modelAndView.addObject("user", user); modelAndView.setViewName("registration"); return modelAndView; } @RequestMapping(value = "/registration", method = RequestMethod.POST) public ModelAndView createNewUser(@Valid User user, BindingResult bindingResult) { ModelAndView modelAndView = new ModelAndView(); User userExists = userService.findUserByEmail(user.getEmail()); if (userExists != null) { bindingResult .rejectValue("email", "error.user", "There is already a user registered with the email provided"); } if (bindingResult.hasErrors()) { modelAndView.setViewName("registration"); } else { userService.saveUser(user); modelAndView.addObject("successMessage", "User has been registered successfully"); modelAndView.addObject("user", new User()); modelAndView.setViewName("registration"); } return modelAndView; } @RequestMapping(value="/admin/adminHome", method = RequestMethod.GET) public ModelAndView home(){ ModelAndView modelAndView = new ModelAndView(); Authentication auth = SecurityContextHolder.getContext().getAuthentication(); User user = userService.findUserByEmail(auth.getName()); modelAndView.addObject("userName", "Welcome " + user.getName() + " " + user.getLastName() + " (" + user.getEmail() + ")"); modelAndView.addObject("adminMessage","This Page is available to Users with Admin Role"); modelAndView.setViewName("admin/adminHome"); return modelAndView; } @RequestMapping(value="/user/userHome", method = RequestMethod.GET) public ModelAndView user(){ ModelAndView modelAndView = new ModelAndView(); Authentication auth = SecurityContextHolder.getContext().getAuthentication(); User user = userService.findUserByEmail(auth.getName()); modelAndView.addObject("userName", "Welcome " + user.getName() + " " + user.getLastName() + " (" + user.getEmail() + ")"); modelAndView.addObject("userMessage","This Page is available to Users with User Role"); modelAndView.setViewName("user/userHome"); return modelAndView; } } Step 8: Create a UI layer using Thymleaf templates . Step 9: Run the application and go to H2 database console by navigating to http://localhost:8081/console

Once the application is up and running , H2 database will be automatically started. You can navigate to http://localhost:8081/console to see the tables created as shown below-
Also you need to insert few roles initially. INSERT INTO ROLE VALUES (1, "ADMIN"); INSERT INTO ROLE VALUES (2, "USER"); Step 10: Now go to application http://localhost:8081/

You can navigate to registration page by clicking on "Go to registration page " at the top .

Once you register , User details will be saved to USER table -

Now when you login with registered user details then you can see the admin page . As registered user is ADMIN role, Admin page will be displayed.
Read the full article
0 notes