#Lumion Exterior Tutorial
Explore tagged Tumblr posts
Visit Tumblr Blog
Explore Tumblr blogs with no restrictions, modern design and the best experience.
Last Seen Tumblr Blogs


Fun Fact
Kazakhstan’s Minister of Communications and Informatics has blocked the Tumblr site because it contained 60 sites of terrorism, extremism, and pornography in 2015.
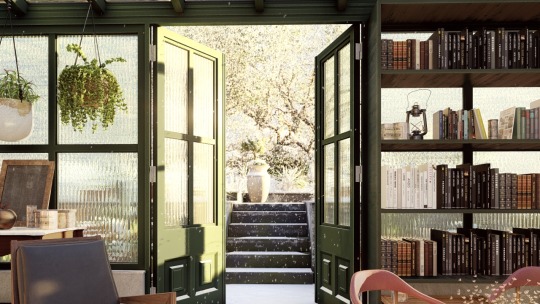
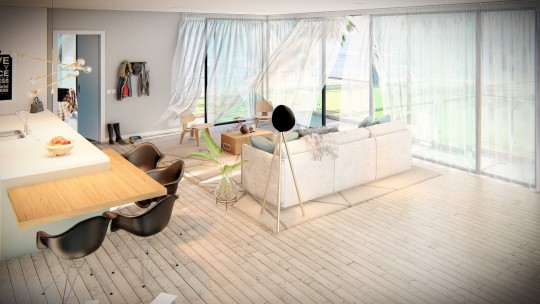
Photo

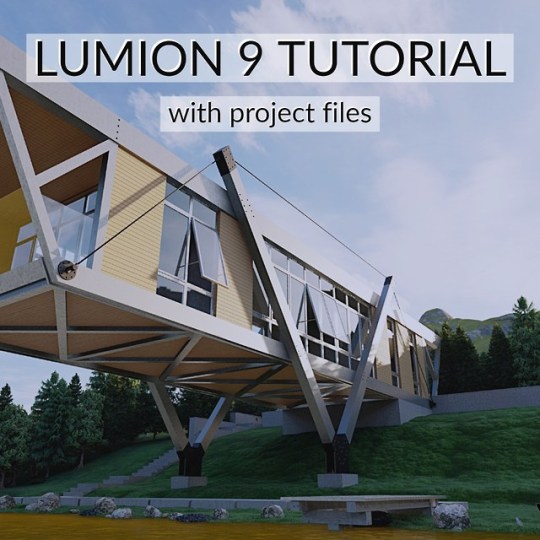
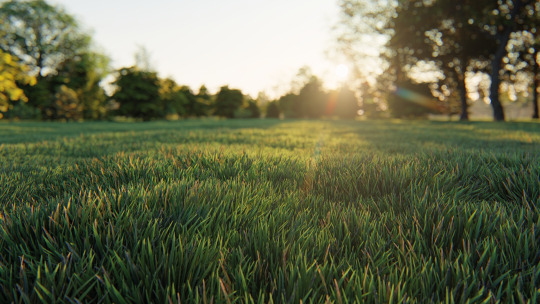
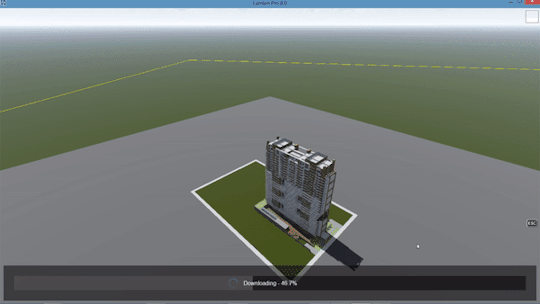
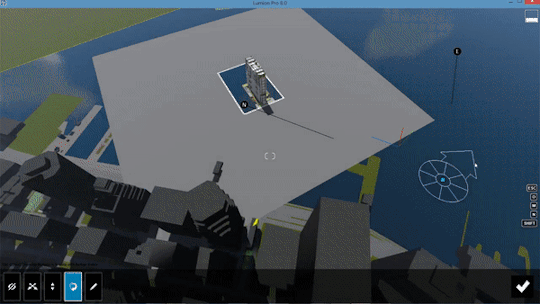
Lumion Exterior Tutorial https://ift.tt/2YZWXey
0 notes
Text
10 amazing new video tutorials for better, faster rendering in Lumion 9 (part 2)
To access the first five videos of the 10-part Lumion 9 tutorial series, including rendering lessons about objects, materials, context and weather, make sure to check out Part 1.
Lesson 6 — Creating Images
youtube
Lesson 6 demonstrates how to create absolutely breathtaking images in Photo Mode. Whether realistic or conceptual, creating amazing images of your 3D project requires just a few steps and can be done in minutes!
Lesson 7 — Creating Movies
youtube
Ever wanted to sit in the director's chair? In Lesson 7, you'll learn how quick and easy it is to create cinematic, fully amazing animations. Capture the hearts and minds of your audience, and discover the impact that animated renders can have on your clients!
Lesson 8 — Creating 360 Panoramic Images
youtube
Immerse yourself into the beauty of your 3D projects. In Lesson 8, you'll learn how to create outstanding panoramic images right in Lumion. Whether for the Oculus Go, HTC Vive, you can quickly create 360° images and transport your clients to the heart of your designs.
Lesson 9 — Using Lights
youtube
Shadows, Hyperlight, Sky Light, oh my! In Lesson 9, you'll learn how to quickly create light objects and use lighting features and effects to capture the real beauty of your 3D project.
Lesson 10 — Animating Objects
youtube
Truly bring some life and energy into your Lumion 9 videos! In Lesson 10, you'll discover how to animate objects in your Lumion scene, including cars, people, birds, the sun, doors opening, and clouds.
Capture the beauty of your design, without losing a second of your time
With the right guidance, mastering Lumion doesn’t require too much time, and these 10 lessons can be applied to whatever project you might be working on, from residential to interiors to landscapes and more.
Looking to add Lumion 9 to your architectural and design workflows? If so, you can upgrade to Lumion 9 or buy a new license here.
#lumion#lumion 9#architect#architecture#architectural#architectural rendering#render#renders#3d#3d rendering software#3d architectural software#video tutorials#lumion tutorials#tutorials#exteriors#interiors#design#interior design#interiordecor#landscape#landscape design#urban planning#revit#sketchup#archicad#autodesk#vectorworks#rhino3d
5 notes
·
View notes
Video
New tutorial is cooming soon Subscribe my channel at YouTube "Visualworks Studio" #instalike #igers #instadaily #architecture #building #architexture #design #minimal #architecturelovers #instagood #exterior #lumion #lumion9 #jasadesain #jasarender #render #3dvisual #3dmax #sketchup #d_signers #cgartistlab #cgrecord #arssketch #render_contest #cgaxis #instarender #arsitekJakarta #cluster #nesianarchitects (at Jakarta, Indonesia) https://www.instagram.com/p/CAXciNvHO0R/?igshid=12w6qryw13y1u
#instalike#igers#instadaily#architecture#building#architexture#design#minimal#architecturelovers#instagood#exterior#lumion#lumion9#jasadesain#jasarender#render#3dvisual#3dmax#sketchup#d_signers#cgartistlab#cgrecord#arssketch#render_contest#cgaxis#instarender#arsitekjakarta#cluster#nesianarchitects
2 notes
·
View notes
Text
10 3D Architectural and Animation Online Courses You Should Really Consider
3darchitecturalandanimationcourses Modeling, texturing, rendering - from an unfinished mockup to a lifelike architectural visualization, the artist needs a little bit more than talent to create something truly stunning and thus beat the odds. The process, as always in art, is long and elaborate, compelling architects to rely not only on their skills but also on technology. Enter intuitive, though equally complicated visualization software. These days, learning how to model, texture, and render professional-looking architectural imagery is completely impossible without learning how to master the intricate user interfaces of 3ds Max, AutoCAD, and Vray first (just to name a few). The course on architectural rendering is actually a tutorial that breaks down the many powerful features and rendering settings of these designer tools.
Without further ado, let us introduce you to the best architectural rendering courses in the online world. There’s a tutorial for everyone’s skill level, as well as everyone’s favorite tool and scene type. Beginner or advanced, interior or exterior, everything you need to become a (better) rendering artist is right here.

1. 3D Architectural Modelling Course for Beginners (Duration: 6 Months):
Understanding of 2D Architectural Drawings: Here in this phase we will learn some 2D Elements understating of CAD/PDF and standards of Architectural Signs with modelling from provided Plan & Elevation of Property(high-Poly & low-Poly) using 3Ds Max & Sketch up.
Interior & Floor Plan Area Modelling: In this Phase we will learn architecture design Modelling course of Interior Side areas. A floor plan is a drawing to scale, showing a view from above, of the relationships between rooms, spaces, traffic patterns, and other physical features at one level of a structure. Architectural Exterior Modelling: Using Plan & Elevation, Exterior Model will be prepared in Sketch Up or 3Ds Max by importing details into software.
Product Modelling: We are explaining the best prototypes for different products by efficiently development as per standard market – High Poly & Low Poly..
2. Photoshop for Architects
Another one of Udemy’s bestsellers, Photoshop for Architects won’t tell you how to render your architectural models, but it will help you transform your existing 3D render into a masterpiece. This course makes sense only after you’ve learned to render passes with VRay and use the Photoshop UI.
And since all renders eventually end up in Photoshop, knowing which tools and techniques to use in post-production is just as essential for your portfolio. Not only will this course teach you how to produce renders faster, but it will also significantly increase the quality of your presentation designs.
3. 3ds Max, Vray, Photoshop: Making of the Museum
Whether you’re a student who’s only starting with 3D rendering or a professional who’s looking to advance their skills, Making of the Museum is one of the best tutorials out there. In 19 lectures and only 2 hours, this crash course offers useful tips for producing stunning 3D renders and visualization.
Making of the Museum is designed in a way that doesn’t require you to be familiar with 3ds Max basics before you enroll, though some background experience will only make you more successful in mastering the complete rendering workflow of 3ds Max, which goes from basics to high-end imagery.
4. Rhino and V-Ray: Architectural Rendering
If Rhino is your modeling tool of choice, this course will help you hone your skills and jump from a beginner to intermediate level in less than 4 hours. Architectural Rendering teaches everything you need to know about rendering photorealistic interior architectural scenes with both Rhino and V-Ray.
Created by Dave Schultze, the course taps into different components that add a sense of depth and realism to professional designs, including lighting systems, various materials, and exterior elements like trees, grass, and people. It also shares tips on how to use a camera and composting techniques.
5. 3D Architectural Interior Design Course (Duration: 6 Months)
Plan-Elevation & Camera Angle Understanding: Here in this phase we will learn some 2D Elements understating of CAD/PDF and standards of Architectural interior design courses with modelling from provided Plan with a specific Camera Angle using 3Ds Max & Sketch up.
Interior Model with Grey Scale: Based on Phase 1, we will learn how to start modelling of Interior Area with detailing of each space & Separation between 3d interior design modelling & texturing. Interior Texturing & Lighting + V-ray/Corona Lighting: Texturing & Lighting is the next stage of creating a realistic Rendering. Texturing needs to apply on Everything in Render with a Natural Feeling Lighting in Vray OR Corona.
Compositing & Editing: Compositing is the combining of visual elements from separate sources into single images using various types of Passes - often to create the illusion that all those elements are parts of the same scene in Photoshop.
6. Unreal Engine: Architectural Visualisation
Originally aimed at game developers, Unreal Engine has grown so powerful that it is now used for creating professional architectural designs too. This 4-hour tutorial will walk you through its intuitive, though highly detailed UI and rendering settings, which should launch you to the intermediate level.
The author, Adam Crespi, works with Unreal Engine’s robust lighting, physically based elements, and terrain tools to showcase all the amazing rendering capabilities of this software and explain different techniques for achieving interactive, lifelike visualizations and finetuning 3D renders for publication.
7. 3ds Max: Advanced Lighting
There are many brilliant courses for mastering the sophisticated rendering tools featured in 3ds Max, but this one takes the cake when it comes to one especially important element of realistic architectural visualization - photometric lighting. Level-wise, this course cultivates advanced 3D skills.
Architectural rendering is all about an ability to create convincing illusions, according to author Aaron F. Ross, and that’s exactly what this course teaches. After a conceptual overview, the tutorial goes on to demonstrate exterior and interior daylight, artificial lighting, light exclusion, as well as lens effects.
8. 3D Architectural Exterior & Landscape Course (Duration: 6 Months)
3D Architect Exterior Design Institute - Plan-Elevation & Camera Angle Understanding: Here in this phase we will learn some 2D Elements understating of CAD/PDF and standards of Architectural Signs with modelling from provided Plan with a specific Camera Angle using 3Ds Max & Sketch up. Exterior Model with Grey Scale: Using Plan & Elevation, Exterior Model will be prepared in Sketch Up or 3Ds Max by importing details into software.
Exterior Texturing & Lighting + V-ray/Corona Lighting: Texturing & Lighting is the next stage of creating a realistic Rendering. Texturing needs to apply on Everything in Render with a Natural Feeling Lighting in Vray OR Corona. Landscaping in Exterior Rendering: Next Phase will be to add in-door & Out-door Plants, Trees & Bushes. 3D landscape design is the ideal way to help you visualize completed Model In realistic way using 3Ds Max & Some Ready Libraries.
Compositing & Editing: Compositing is the combining of visual elements from separate sources into single images using various types of Passes - often to create the illusion that all those elements are parts of the same scene in Photoshop. 9. Complete AutoCAD 2018 Course with 2D and 3D Projects
If you are an absolute beginner in the fine art of architectural rendering, then this is a course for you. Being the ultimate, most comprehensive tutorial for creating 2D drawings and 3D models using the latest version of AutoCAD, it requires no previous experience with designer and rendering software.
Created by Awais Jamil, the Complete AutoCAD 2018 Course boasts 13 hours of on-demand video. The in-depth tutorial opens with a lesson on basic operations, features, and workspaces of AutoCAD, after which it moves smoothly to a step-by-step training class on complex 2D and 3D house projects.
10. Diploma In Architectural Visualization Course (Duration: 12 Months)
3D Modelling from Architectural Drawings: Here in this phase we will learn some 2d Elements understating of CAD/PDF and standards of Architectural Signs with modelling from provided Plan & Elevation of Property using 3Ds Max & Sketch up.
Texturing & Lighting Understanding & Implementation: With our Institute Learn how to achieve realism in 3D models using the free and open source tool, Blender
Landscaping | Interior - Exterior Rendering: Next Phase will be to add in-door & Out-door Plants, Trees & Bushes. 3D landscape design is the ideal way to help you visualize completed Model In realistic way using 3Ds Max & Some Ready Libraries.
Camera & Props Animation Learning: A 3D modelling in reference to animation will be built to have the function to animate. A 3D prop will be added assets/objects designed and or created to fill a scene/shot sequence.
Compositing & Editing: Compositing is the combining of visual elements from separate sources into single images, often to create the illusion that all those elements are parts of the same scene in After Effect & Photoshop.
Virtual & Augmented Reality – Real Time Rendering: Latest Technology in current Real Estate Industry is VR & AR and here we will learn Real Time software like Unreal, Unity & Lumion.
#3darchitecturalandanimationcourses#architectdesigninstituteahmedabad#architecturalsoftwaredesigncourses#architecturaldesigncourses#3darchitecturaldesigninstitutegujarat#top3deducationinstituteinindia#architecturecoursesonline#3darchitecturalrenderingcourse#architecturalinstitutegujarat#3darchitecturalanimationtrainingonline
0 notes
Photo
[building] Lumion Exterior Tutorial 3 with project files via /r/architecture https://ift.tt/2Jfa9FU
0 notes
Link
This exclusive Lumion tutorial is presented by Minh from Architecture Inspirations. The tutorial focuses on some crucial tricks to generate realistic materials in Lumion.
Applying materials is a vital feature to perform in Lumion. If there are not the simplest material assigned to a surface while importing the 3D model in Lumion, it is required to apply Lumion’s materials.
The materials should be used to each surface; these materials range from simple colors or a material with diffuse texture. Initially, a model is created in sketchup and brought to Lumion through Lumion LiveSync.
Lumion LiveSync is a useful sketchup extension that can be used for real-time, photorealistic rendering of your SketchUp model. It is possible to visualize your sketchup model in Lumion’s real time surroundings. Besides, instantly set up a live connection for concurrent modeling & rendering.
In Lumion materials library, there are 1019 materials as follow :-
a. Landscape (soil, water, rocks, grass etc.) b. Interiors (fabric, glass, leather, metals, plastics, etc) c. Exteriors (concrete, bricks, roofing, asphalt, wood etc.)
To learn how to produce realistic materials in Lumion, watch the following video tutorial.
Video Source Architecture Inspirations
0 notes
Photo
Lumion Exterior Tutorial 12 https://ift.tt/2LSuYK4
0 notes
Photo
Lumion Exterior Tutorial 8 https://ift.tt/2NzuhrG
0 notes
Photo
Lumion Exterior Tutorial 6 https://ift.tt/2xpg8Cr
0 notes
Photo
Lumion Exterior Tutorial 3 https://ift.tt/2xfMj7c
0 notes
Text
10 amazing new video tutorials for better, faster rendering in Lumion 9 (part 1)
Learn helpful tips and tricks to quicken your rendering workflows, and pull the most power out of Lumion for heightening the beauty and effectiveness of your renders.
Whether you’re a new user or you’ve been around since Lumion 1, you can improve your rendering processes with 10 new video tutorials covering everything from importing a 3D model to animating objects. You can look at them as the A to Z of Lumion functionality. New users will be given the complete Lumion walkthrough, and existing users will undoubtedly find some new tips and tricks.
Below, you can find the 10 new tutorials available on our YouTube channel, where there are heaps of other tutorials, beautiful rendered videos and more!
Lesson 1 — Getting Started and Importing a Model
youtube
In the first video lesson, you'll learn how to navigate the new, speed-focused interface and instantly import your 3D model from your favorite modeling software.
Lesson 2 — Adding Objects
youtube
In Lumion 9 Pro, you can complete your scenes with over 5,000 objects in the content library, including trees, cars, decorations for interiors and exteriors, people and so much more! In Lesson 2, you'll learn about the content library and how it can help you quickly and effectively create full environments and interiors.
Lesson 3 — Applying and Modifying Materials
youtube
Beautiful materials have the ability to transform bland 3D models into realistic, stunning buildings and structures. In Lesson 3, you'll learn everything you need to know to effectively, and efficiently, apply and modify Lumion materials.
Lesson 4 — Creating Context
youtube
Context is crucial when communicating the intent of your designs. In Lesson 4, you'll learn how you can quickly and effectively create beautiful context around your 3D designs. From urban centers to enthralling forests, you'll be creating jaw-dropping context in no time!
Lesson 5 — Modifying the Weather
youtube
To truly capture your 3D project in its best possible light, then you need to know how to effectively modify the weather conditions in Lumion. In Lesson 5, you'll learn how to quickly change the weather in Lumion to get the ideal environment for your design.
To continue with the 10-part Lumion lessons series, including videos tutorials on images, movies, panoramas, lights and animating objects, head over to part 2.
#lumion#lumion 9#architect#architecture#design#architectural#architectural design#3d#3d render#3d rendering#tutorial#lumion tutorial#video tutorial#3d rendering software#architektura#interior design#landscape architect#urban planning#revit#sketchup#archicad#rhino3d#autocad#autodesk
10 notes
·
View notes
Text
Lumion 9 feature spotlight: customizable 3D grasses and furry materials
Gardens, parks and lawns. Blankets, rugs and other textiles. See how the customizable 3D grasses and furry materials can help ground viewers to the reality of your design.
In Lumion 9 Pro, the new customizable 3D grass* and furry materials* can transport your audience right into the heart of your design. For sprawling lawns, gardens, parks and more, the 3D grass materials highlight the look and the “feeling” of your exterior landscapes, all while heightening beauty and providing a sense of the design’s real-life location.
The same goes for the new fur materials. Whether it’s a blanket, a rug, bedsheets or even a stuffed animal, such as a teddy bear, the new 3D fur material adds a softness and a charm that immediately communicates a feeling your audience is familiar with.
In this blog post, we’ll take you through the innovative new material features in Lumion 9 Pro — Customizable 3D Grass and Furry Materials — and we’ll show how they can pull viewers into the world you’ve created while suspending their sense of disbelief.
No matter the intent of your render, the new 3D grass and fur materials can help convey the real-life atmosphere of a space and communicate the essential points of your design.
Customizable 3D Grass (Pro only)
Creating realistic grasses is one of the more challenging tasks when making professional-quality architectural renders. Now, with the new customizable 3D grass material in Lumion 9 Pro, giving any surface a jaw-dropping, realistic grass requires merely a few clicks.
In the following video tutorial, we’ll discuss a few key uses of the new grass material.
youtube
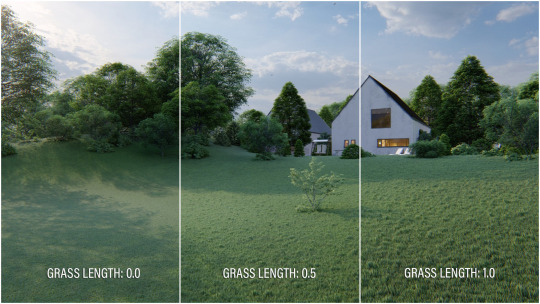
In previous versions of Lumion, there were two grass options. For example, you could achieve a type of 3D grass by applying landscape grass in the Landscape editor. The other option was to apply the 2D grass material on a surface of your choosing.
In Lumion 9 Pro, the customizable 3D grass material has taken a quantum leap in its ability to realistically resemble a real-life lawn or landscape. Here are the three grass options compared:
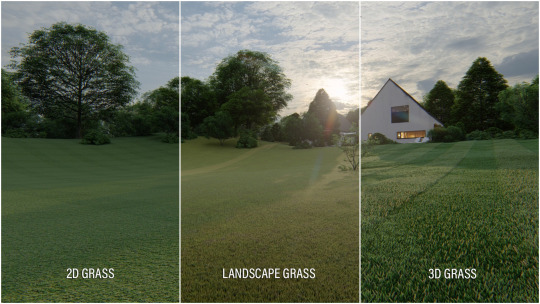
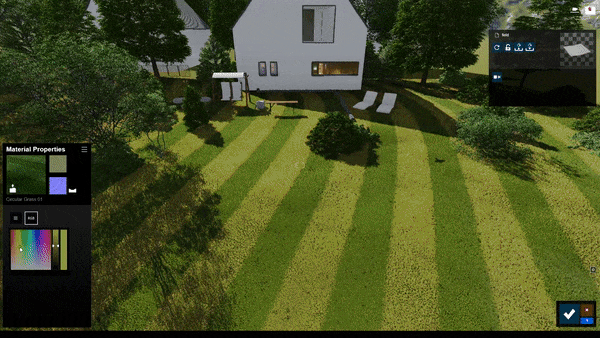
The customizable 3D grass is located under the Nature tab of the Materials library. From here, you can take advantage of 14 different grass presets. A few options include:
Circular grass patterns
Farm grass
Wild grass
Clean cut grass
...And many others
Not really satisfied with one of the presets for your project? Every 3D grass preset is entirely customizable (hence the name!). By double-clicking on a 3D grass material, you can open up the material’s properties, as shown here:
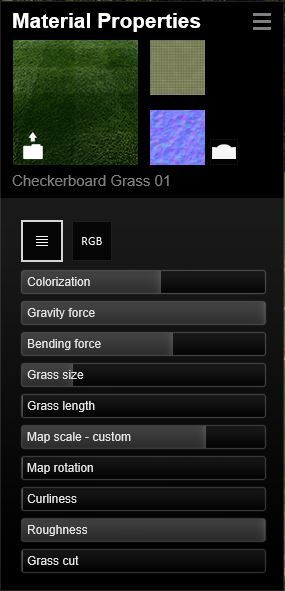
Tuning these sliders will have an impact on the look and feel of the entire grass material. For instance:
Colorization
Bending force
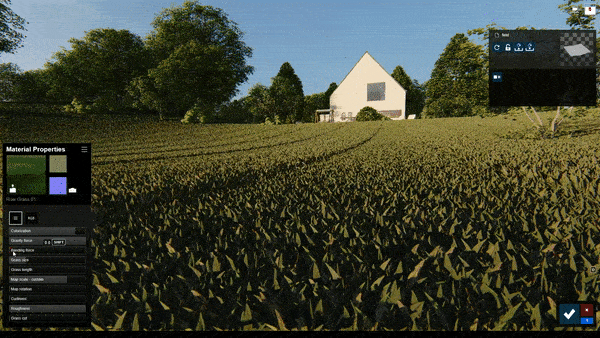
Grass length
Having complete control over the grassy surfaces in your 3D design can help assure realistic, recognizable landscapes, no matter the location of your project’s future site.
Furry materials (Pro only)
Like the customizable 3D grass, the new furry materials in Lumion 9 Pro utilize the same, groundbreaking technology that gives the material its soft, so-real-you-can-almost-touch-it appearance.
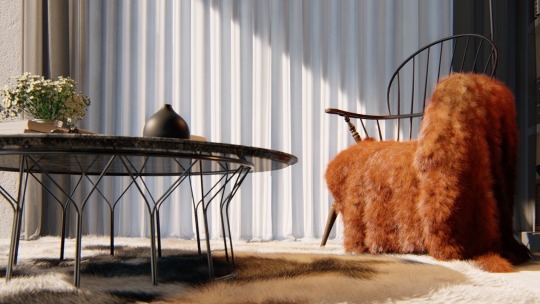
And while the customizable 3D grass is optimal for exteriors, the furry materials are positively perfect for interiors. Blankets, rugs and other textiles immediately look and feel like they’re soft and fluffy.
There are 10 different types of preset fur materials found under the Nature tab of the Materials library. These include:
Black and white fur
Black velvet fur
Brown and grey fur
Green fur
Rainbow fur
Warm white fur
And several others...
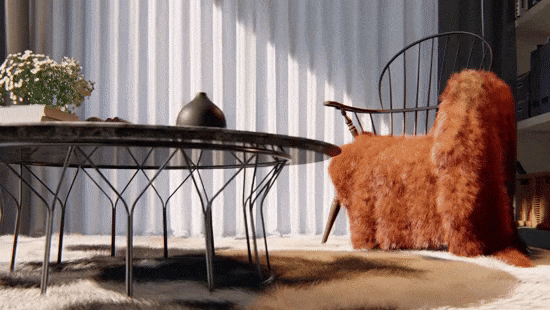
Like the 3D grass materials, the fur materials are entirely customizable. You can adjust the impact of gravity on the fur strands, the curliness of the individual strands of fabric, the length of the fur, its color and much more.
Below are a few different furs with varying material settings:
Brown fur (medium length)

Dark grey fur (short fur length and size)
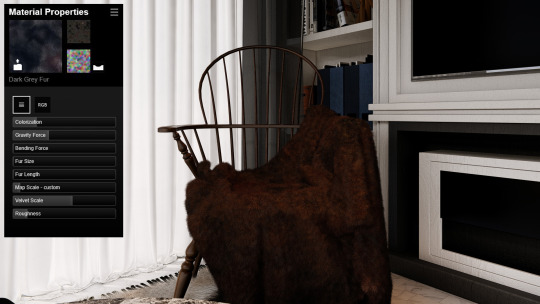
Rainbow fur (high velvet scale)
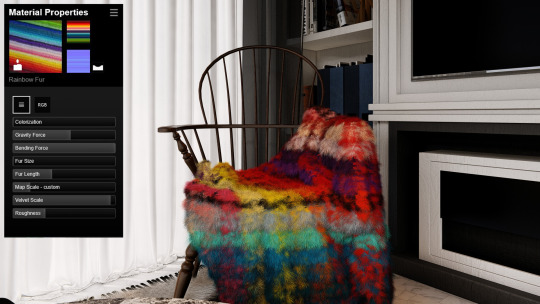
Warm white fur (high gravity force and map scale)
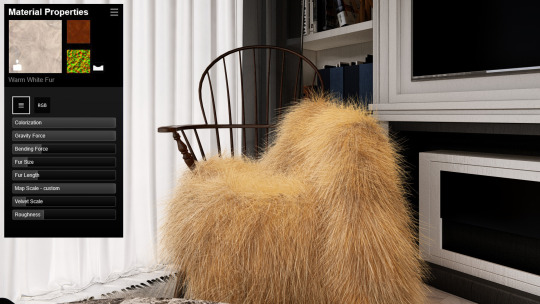
Whether for bedrooms, living rooms, chairs, blankets, rugs and so on, the new furry materials are amazing when it comes to giving any material a soft, extremely comfortable look and feel.
Create living environments to show the beauty of your projects
The smallest details in a render can have an enormous impact, especially when it comes to materials and grasses. With the addition of the customizable 3D grass and the furry materials in Lumion 9 Pro, it’s now easier than ever to give any surface the beauty of highly realistic, soft-looking materials.

Want to make Lumion 9 a permanent part of your workflow? Head over to the buy page for purchasing options!
*Customizable 3D grass and the furry materials are only available in Lumion 9 Pro.
#lumion#lumion9#architect#architecture#architectural#render#rendering#3d#3d model#3d render#3d rendering#archilovers#architecturelovers#architectureporn#buildings#home#modern homes#modern houses#design#interior design#interior#interior architecture#landscape#lands#grass#parks#lawns#landscape design#landscape architecture#3d rendering software
1 note
·
View note
Text
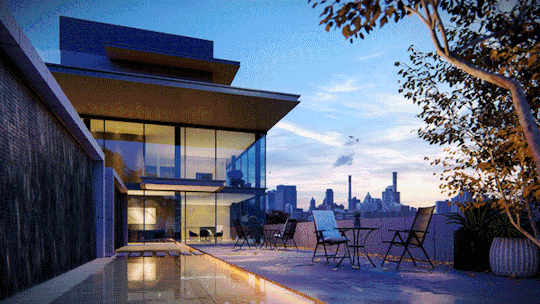
Lumion 9 feature spotlight: Real Skies and Atmospheric Rain and Snow
A combination of beautiful Real Skies, Sky Light 2 and atmospheric rain and snow heighten the “living” look of the environments surrounding your designs.
Location, location, location...
It may be an old, overused cliche but there’s definitely some truth to it in the architectural world. Buildings are inseparable from their locations, and when communicating your design to the outside world, making sure the viewer understands the design’s context is everything.
Something as simple as the look of the sky can act as an anchor, grounding you to the reality of your project’s environment. Weather such as rain and snow beautifully demonstrates how your design will endure through both climate and season.
Renders of the luxury city apartment throughout the year.
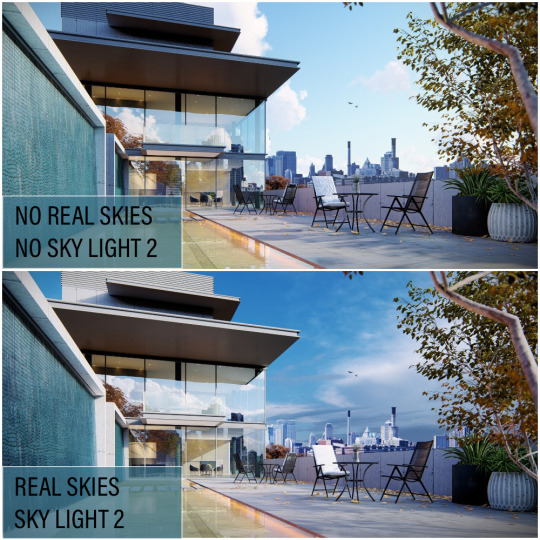
With Lumion 9 Pro, achieving this “living environment” look is surprisingly easy with new features such as Real Skies (w/ Sky Light 2) and Atmospheric Rain and Snow.
In just a few clicks, you can give your design the strong, blue light of a clear, sunny day, or you can present a more dramatic look with heavy shadows as thick rain clouds roll in.
Here is an example of how Real Skies and Sky Light 2 make a subtle (but highly effective) impact on your scene’s lighting.
With the new Atmospheric Rain and Snow, it’s now possible to show the different phases of precipitation as if falls.
For instance, imagine you’re designing a building for a location that’s known for its bouts of wild weather. By configuring the Precipitation effect with keystrokes, it only takes a few minutes to make a video of your project going from an all-out downpour to a stunning, calm day.
To show your building design in a brutal, northern winter, simply add the Precipitation effect, tune the slider to the snow option and let the flurries fly.
In this blog post, we’ll take you through two of the biggest new features in Lumion 9 Pro — Real Skies and Sky Light 2 and Atmospheric Rain and Snow — and we’ll show how they can provide a living element to your 3D renders.
Sky Light 2 and Real Skies (Pro only)
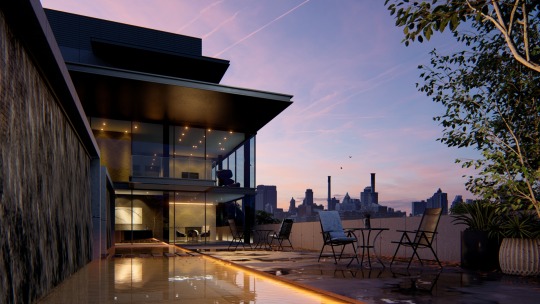
The relationship between the sky and your design is central to showing the reality of its future construction. From the exterior, the sky is what shapes the look and the feel of the building. From the interior, it’s a major part of what the building’s inhabitants will look out and see day after day.
Exterior

Interior

With the 39 new, pre-configured Real Skies effects in Lumion 9 Pro, you can instantly dress your render with a beautiful, realistic sky in Photo, Movie and 360 Panorama mode.
In the short video tutorial below, you can learn the basics of using Real Skies.
youtube
As you saw in the video, heightening the beauty of your scene with the Real Skies is likely one of the easier parts of creating your render. Below, we’ll go through the different sky categories and demonstrate a couple things you can do right away to customize your render’s look and get the ideal sky for your design.
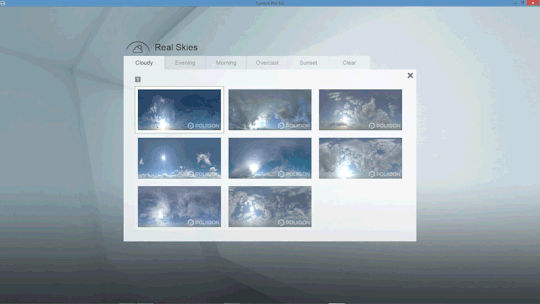
Real Skies Categories
There are 39 new Real Skies covering several different categories, including Cloudy, Evening, Morning, Overcast, Sunset and Clear.
And within each of the categories, you can find a number of different skies. The Real Skies possibilities are shown in the gif below.
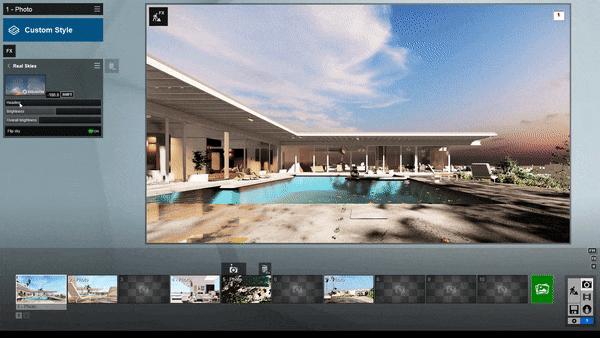
Applying the Real Skies effect
In addition to the 39 Real Skies options, you can achieve an almost limitless variability by opening the effect and moving the sliders around. You can change the heading, the sky’s brightness and the overall scene brightness. You can even flip the sky for a different look.
Here are a few examples of the Real Skies effect sliders in action.
Changing the heading of a Real Sky:
Changing the brightness of a Real Sky:
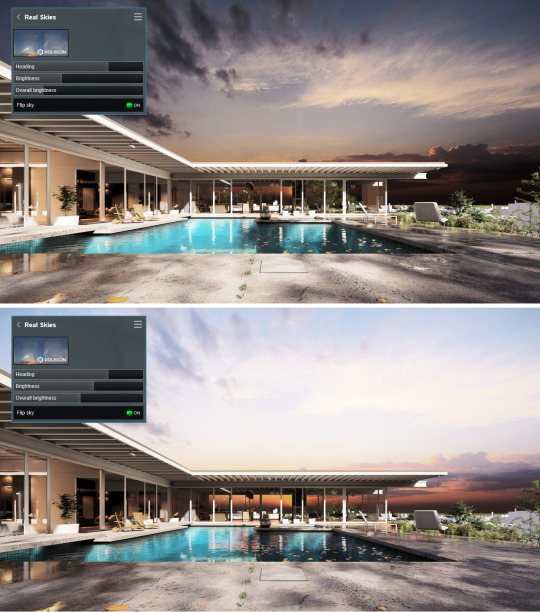
Comparison of dark and light Real Sky settings
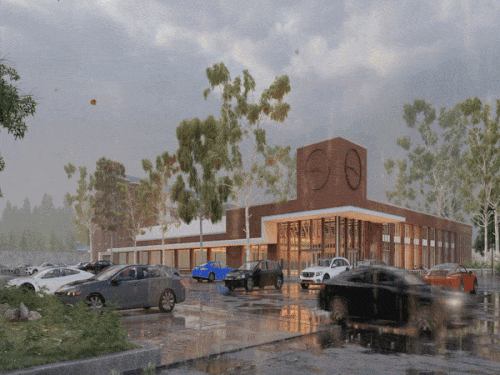
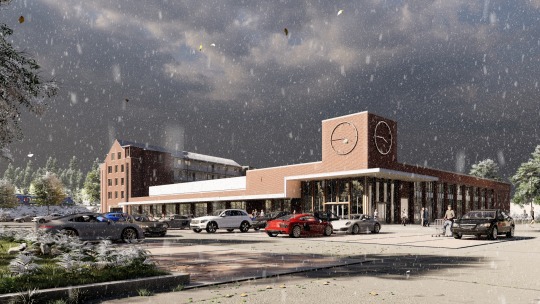
Atmospheric Rain and Snow (Pro only)
While the Real Skies and Sky Light 2 have the most impact when applied to exteriors, this feature can also be highly effective when attentively applied to your interior renders.
The same is true for the new atmospheric rain and snow feature under the Precipitation effect in Lumion 9 Pro.*
Exterior
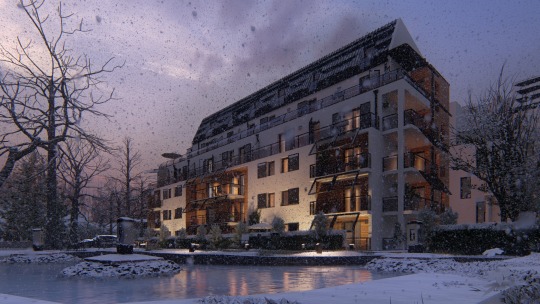
Interior
The new atmospheric rain gives your structure a soothing, relaxing backdrop. The atmospheric snow reinforces the cozy, wintery environment that may be a crucial part of the building’s setting.
To get a good overview of this effect, watch the tutorial video below:
youtube
Applying the Atmospheric Rain and Snow
Here’s how to get the most out of the atmospheric rain and snow in the Photo and Video modes.
To start, click on the “FX” icon and simply go to the Weather and Climate category. Click on the Precipitation effect to add it to your effects stack. From here, click on the effect again to access its customization options. Here you will see a range of sliders, including Rain / Snow, precipitation phase, particles quantity, particles size, blocked by plants, blocking distance, extra fog addition and block bias.
To create an atmospheric, rainy look for your designs, make sure the Rain / Snow slider is positioned to the left (moving it to the right will transform your rain into snow).
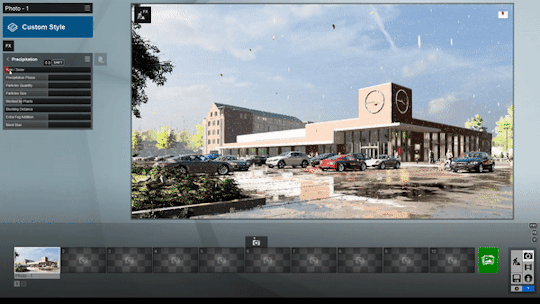
To give your scene the look of a cozy, winter wonderland, you can simply shift the Rain / Snow slider to the right. The rain will change to snow, and you can customize the exact look of the falling snow and the snow on the ground by moving the effect’s sliders around.
You can easily change the look of the rain and snow on the ground, as well as the level of precipitation, by tuning the “phase” slider.
For instance, with an earlier phase (meaning the slider is tuned to the left), you can have rain and dry ground, as shown here:
At a later phase (moving the slider to the right), the rain has been falling for some time and has formed puddles on the ground, as shown here:
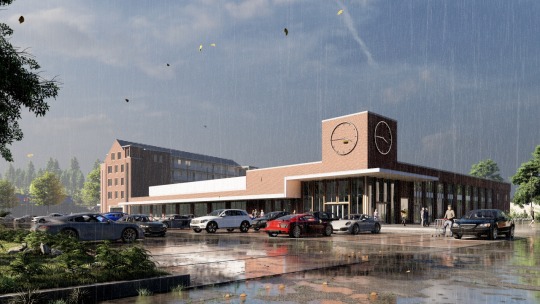
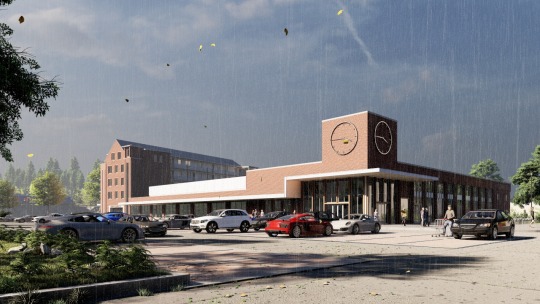
Additionally, if you want to change the size and amount of the individual raindrops or snowflakes, you can adjust the particles quantity and particles size sliders.
Here is the supermarket scene with rain quantity and size turned up:
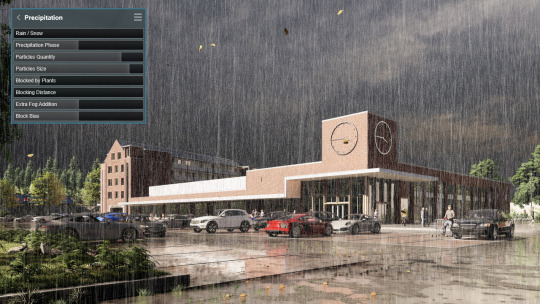
And here is the supermarket scene with rain quantity and size turned down:
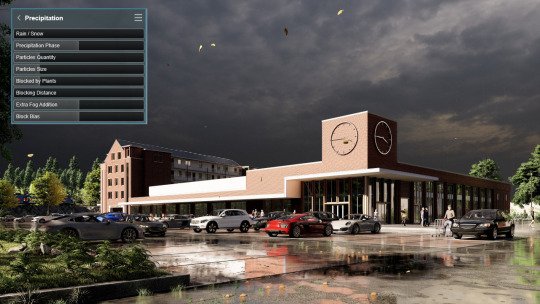
Also in Lumion 9, the rain and snow are blocked by buildings, overhanging objects and other objects that would block precipitation in real life. You can even adjust some of these settings with the blocking sliders.
*If you have Lumion 9 (not the Pro version), you will still have the Precipitation effect in photo, video and panorama mode; however, you won’t have the new atmospheric rain and snow updates.
Living environments to deliver new levels of realism
To get the most impact from your 3D architectural renders, it can help to show the beauty of the location’s skies and then give an atmospheric perspective as your design stands in all sorts of weather.
And the best part is that any architect can effectively apply the Real Skies and the new Precipitation effect, surrounding their designs with stunning, realistic context that’s as living as the building itself.
Can’t wait to try Lumion 9? Head over to the website for purchasing options!
#lumion#lumion9#lumion 9#architecture#architect#architectural#archilovers#architecturelovers#architectureporn#cozyplaces#cozy#design#designer#visualizer#3d#render#3drendering#rendering#architecturalrendering#exterior#interior#interiordesign#interiorarchitecture#luxury#luxuryhomes#decor#modernhome#sketchup#revit#archicad
1 note
·
View note
Text
5 new tools for saving time and energy in Lumion 8
Less time spent rendering means that you’ll have more time to focus on perfecting your design.
At its core, Lumion 8 is a serious upgrade when it comes to your render’s image quality and visual attractiveness.
Features such as Sky Light and the Soft and Fine Shadows made this dramatic quality boost possible, but it’s important to remember the other pillars of Lumion rendering: speed and ease-of-use.
By applying these five time-saving features new in Lumion 8, you can tighten your rendering workflow and start knocking out amazing renders in a quick, efficient manner.
An example of a Lumion workflow
Before jumping into these time-saving features, it can be valuable to take a step back and consider workflow for a second.
In his recent webinar about Lumion 8, Lumion aficionado Mike Brightman described his process for rendering a demo model.
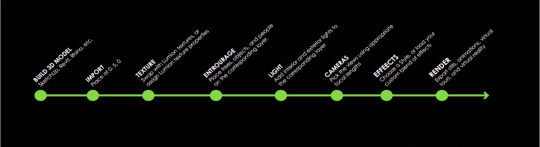
An example Lumion workflow, from building a 3D model to rendering.
The above image serves as a great example of a workflow that you can use for your own designs.
The text of the image is as follows:
Build 3D model - SketchUp, Revit, Rhino, etc.
Import - Place at 0,5,0
Texture - Swap with Lumion textures, or assign Lumion texture properties
Entourage - Place trees, objects and people on the corresponding layer
Light - Add interior and exterior lights to the corresponding layer
Cameras - Pick the views using appropriate focal lengths
Effects - Choose a Style, or load your custom blend of effects
Render - Export stills, animations, virtual tours and virtual reality
Keep in mind that you may have your own rendering workflow that works best for you, but if you’re ever unsure of where to start with your render, this list can serve as a quick way to get back on track.
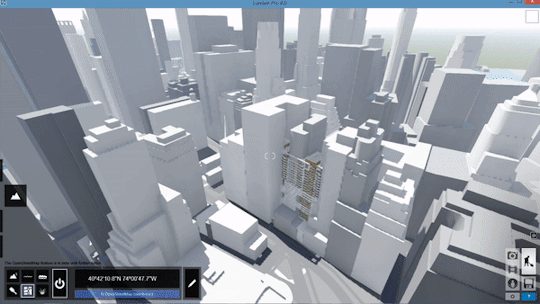
Instant urban context with OpenStreetMap
To get a better idea of how the improved OpenStreetMap (OSM) feature can help you work faster and smarter, let’s take a peek at the following image.
Here’s a nice residential building that’s been texturized and optimized for rendering. However, there’s just one critical problem: the green horizon and how it gives the building an eerie, otherworldly background.
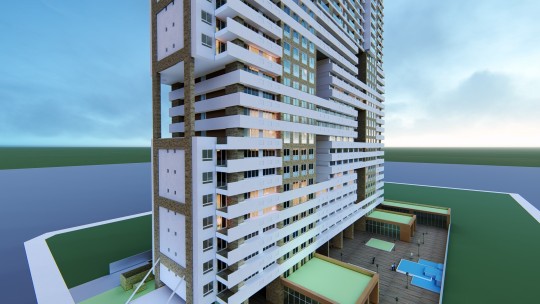
While the above render is certainly capable of communicating the building’s design, the green horizon makes it difficult to place this building in a real-life setting. Will the building fit with its surroundings? Is it planned for construction along the waterfront, in a large city or somewhere more obscure, like in the desert or the mountains?
When surrounding your design with urban context, the OpenStreetMap (OSM) feature instantly places it in a real-life setting, whether that’s New York, Los Angeles, Toyko or elsewhere.

With a series of improvements made to this time-saving functionality for Lumion 8, it’s now even easier to control the context and ensure that your model fits precisely within the environment you want.
Adding the OSM building data is surprisingly easy. First, locate the OSM feature in the lower left-hand corner of your Landscape options in Build Mode. Click the On/Off switch and voila - instant city.
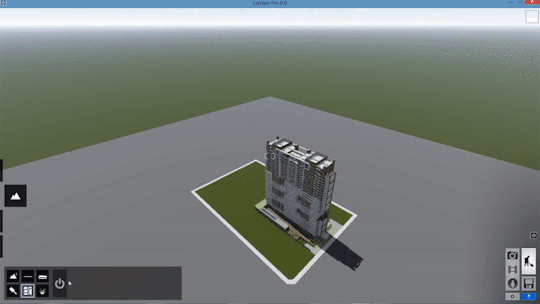
Okay, maybe it’s not that easy. But pretty close.
After turning on the OSM, the first step is generally to click on the GPS coordinates and then choose a place on the map. For this example, we used the southern tip of Manhattan.
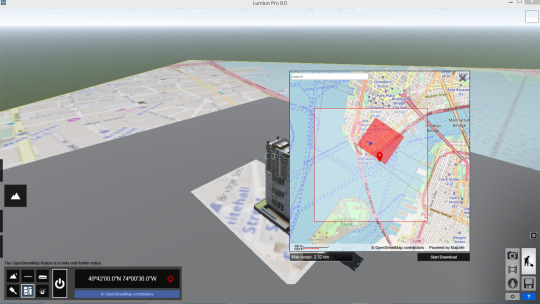
Click Start Download and OSM will then import the building height data of the selected area.
If you look closely at our residential building, you’ll notice that the OSM building data and the model have overlapped. Where OSM stops and the building begins, who can really tell?
This is where the new OSM improvements for Lumion 8 are helpful; you can now take complete control of the imported context. Simply locate the Edit button next to the OSM coordinates and you can take advantage of several editing features, including:
Hiding buildings
Moving the map
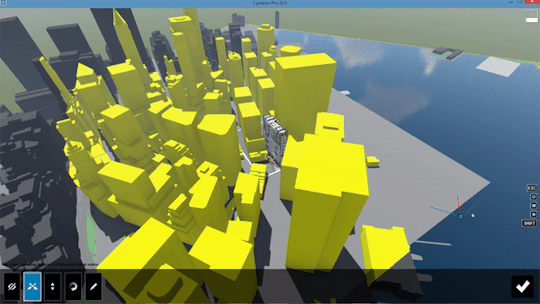
Change the map’s height
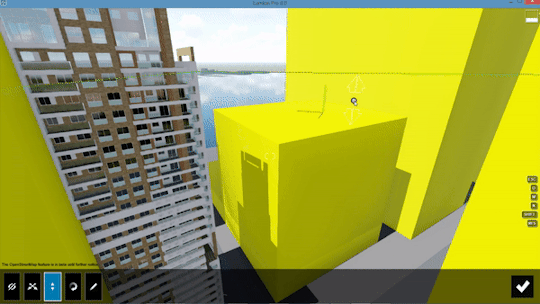
Rotating the map
Other possibilities with OSM include changing the appearance of the buildings, editing the minimum building height and randomizing building height. For more on OSM, check out the tutorial below:
youtube
Compare material and model options with the Variation effect (Pro Only)
Animations are a powerful tool when guiding your audience through your design. In many ways, a great video helps people feel the spaces you’ve created in a way that’s just not possible with a static image.
In Lumion 8, you can use animations to show multiple design options with the new Variation effect.
youtube
Available only for Lumion 8 Pro, the Variation effect makes it mind-blowingly easy to assign multiple designs to different points in the animation. For instance, with the camera circling a residential building, you can show how the different design iterations fit within the scene you’ve created.
The three building designs in question include:
Design #1
Design #2
Design #3
So, which will you choose? Perhaps seeing these designs in a video will help:
youtube
Whether showing multiple options to your client or comparing the models for yourself to get the insight you need, the Variation effect gives you more information to help you easily choose the right model.
Move, rotate and scale multiple objects with the new grouping function
Trees, plants, cars, people. Furniture, lights, decorations and more. Setting up a scene to make your design look “lived-in” and located in a real-life environment used to take a considerable amount of time.
And there are few things worse than spending the time building a scene, only to have a small nuisance send you back to Step 1.
Take this living room assortment, for instance:
After showing the renders to your boss, she decides that it’s best to turn the entire living room arrangement around. “Literally, if you could just rotate this whole part, it’d be finished,” she says.
Without Lumion 8, this would be a hair-raising request. Fortunately, the new grouping feature lets you bunch these objects together and move the arrangement with its spatial integrity intact.
To group and rotate the living room arrangement, make sure you’re in Move Mode and select the objects you want to group together. Next, group the objects by clicking the “Create group” button.
The objects will then be organized into a single group that you can move, scale and rotate. Additionally, a “Group” dialogue will appear on the bottom of the screen, allowing you to:
Add another object to the group
Edit the objects that are already in the group
Ungroup the objects
With the living room grouped together, it’s time to rotate. Simply locate and select the blue “tool” icon for the group and choose the “Rotate object” option.
...and render.
Instantly achieve curved shapes with mass placement
Ever since it was featured for the first time, mass placement has remained a widely popular tool that’s perfect for building context, fast.
New in Lumion 8, the mass placement tool underwent a makeover and it can now achieve curved shapes with smooth curves and corners.
With easy drag-and-drop functionality, placing multiple items of an object in a curved manner is fast and easy.
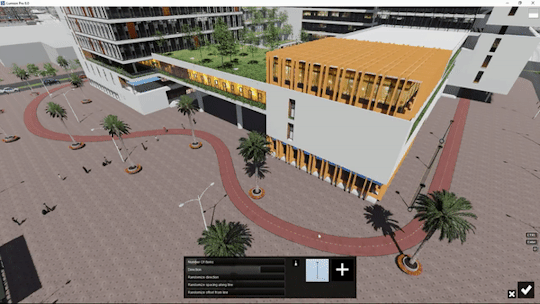
To use this tool, simply hold the CTRL key as you place mass placement nodes. After adding the nodes, click on each of the nodes and adjust the corner smoothness, thus giving you a clean and smooth curvature.
For more information regarding the new mass placement tool, refer to the tutorial video below.
youtube
Design iteration with the new measuring tools (Pro Only)
Real-time rendering is one of Lumion’s strong suits, giving you an inherent ability to fly throughout the model you designed and explore the spaces you created. CAD models imported into Lumion take on the specified parameters that you established in your modeling program, and, as a result, massing remains accurate.
By using the new measuring tool in Lumion 8 Pro, you can make quick measurement checks without needing to go back to your modeling software.
For instance, in the above image, you worry that the door behind the desk might not be tall enough. According to your 3D model, the door should be about 1.9 meters, but in the render, it just looks too small.
This is where the measuring tool comes in handy.
While in Build Mode, you can access the measuring tools as part of the “Lights and Special Objects” setting.
Open up the “Lights and Special Objects” dialogue box and choose the Utilities tab. Here, you’ll find the measuring object.
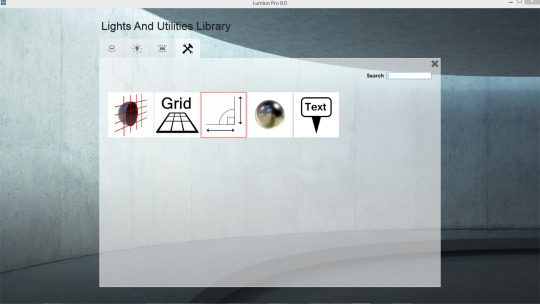
To use the measuring object, add the first node, click on the “Move object” icon and locate the measuring dialogue on the righthand side of the screen.
By clicking the “+” button on this dialogue, you can then grab the first node of your measurement and pull it to the desired height. The measurement readings will automatically appear.
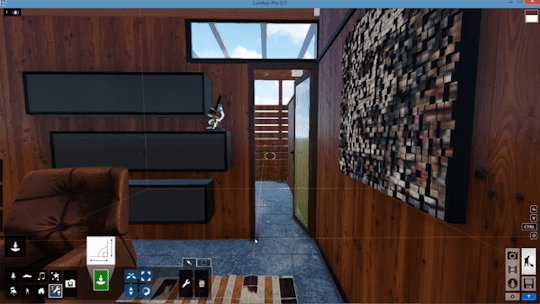
According to the measurements, the height of the door is 1.9 meters; no need to go back to your modeling software for measurements checks!
Continue adding nodes where needed, such as when measuring the width of the door.
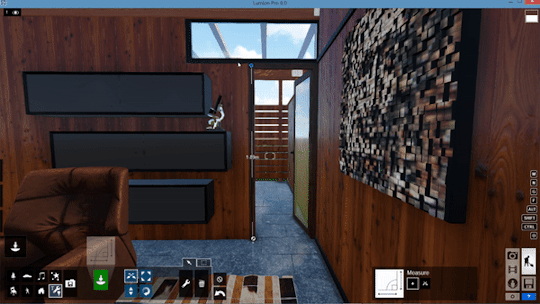
As workflow improvements, the on-screen measuring object and the grid object are super helpful for verifying distances as well as ensuring the precision and scale of your model.
Improve your render production with Lumion 8 tutorials and more
Making high-quality renders on Lumion 8 is only half the story. By leveraging these new workflow features, you can start making beautiful renders in record time.
Approach tight deadlines with comfort and confidence, and learn how you can render even faster by checking out other Lumion 8 tutorials or getting involved with the Lumion community on our forum.
#lumion#lumion8#architecture#architect#architecturelovers#architecturelife#design#interiordesign#workflow#efficiency#rendering#render#3drender#building#luxury#luxuryhomes
1 note
·
View note
Text
Learn how to make amazing renders in Lumion 8 with this video tutorial by Mike Brightman
Discover how Lumion 8 can help you transform exteriors, interiors, landscapes and more into incredibly realistic renders with this recorded webinar tutorial from avid user Mike Brightman.
youtube
The Styles button, Sky Light, soft shadows, rounded edges and so much more!
From its breathtaking render quality to its easy-to-use interface that empowers architects to quickly make amazing images and videos, Lumion 8 is certainly a rendering force to be reckoned with.
In the above tutorial, Lumion expert user Mike Brightman walks you through the new features in Lumion 8. Mike also explores various usage cases so that you can leverage these features to achieve the best result.
Learn more about the new Lumion 8 features with our specially made tutorials
Looking for a little extra rendering insight so that you can start producing striking images and videos? Check out our wide range of video tutorials:
Styles button
Soft and Fine Detail Shadows effect
Sky Light effect
Architectural outlines effect
New color correction sliders
Model and material variations
Hyperlight in animation
New water and presets
Two-point perspective slider
Tilt shift
Fixed point camera
New mass placement curves
Measurement tool
Place grid
New open street map improvements
Time warp effect
Soften edges
New Poliigon materials
New content in the library
Expand the way you render with Lumion 8
Lumion 8 marks some major changes in everything from UI to the Styles presets to advanced features for exceptional image quality. The links above will take you to Lumion’s video tutorials, and you can further explore the new features on our What’s New page.
You’ll also come across new images, animations and media capturing architecture in its best light on our social pages, including:
Facebook
Twitter
Instagram
LinkedIn
Stay tuned in the coming weeks for more tutorial blogs and videos providing in-depth guides to using Lumion 8.
#lumion#lumion8#architecture#architects#render#3drender#building#exteriors#interior#landscape#architecturelovers#architecturelife#design
1 note
·
View note