#MagicMirror² software
Explore tagged Tumblr posts
Visit Tumblr Blog
Explore Tumblr blogs with no restrictions, modern design and the best experience.
Last Seen Tumblr Blogs


Fun Fact
Tumblr was the first site to host the blog for President Barack Obama in 2011.
Text
How to Build a Raspberry Pi-Powered Smart Mirror
Building a Raspberry Pi-powered smart mirror is an engaging project that combines hardware assembly with software configuration. Here’s a step-by-step guide to help you create your own smart mirror: Materials Needed: Raspberry Pi: A Raspberry Pi 3 or newer model. Monitor: A monitor with HDMI input; the size depends on your preference. Two-Way Mirror Acrylic: This allows the display to show…
0 notes
Text
Apptober 2019 Day 25
Now that we have all of the calculated values shown, the last thing to do is find the user's Avatar image! That way users can see their cool armor and weapons! No problem! The Habitica API exposes a call that returns the avatar rendered as a png image!

Oh, that doesn't work anymore. According to a GitHub issue that's been broken since 2017.

But that is ok, because there is a separate call that produces all of the HTML needed to display the avatar image. So we will just use that!
Waaait.... that doesn't work either. Ok. Maybe I'm using it wrong.

The nice thing about open source code is you can always look under the hood and see what is really happening. So, let's take a look there and...

Oh. that's broken too. Ok, well we can always look at the Habitica website and its code, and see how they are getting the avatar image.
After just a bit of research we can tell that they are displaying a lot of images on top of each other in a specific order to make up the entire avatar. The armor, weapons, face, accessories, etc are all loaded separately and when nested together make up the entire picture. Each element is named after the piece of armor, so we can look at the users inventory and just find the corresponding image to display...
Oh. It looks like we can't actually reference each image separately. They combine them all into a collection of sprite sheets, and then reference the individual locations on those sprite sheets using CSS...

Ok, that makes sense, lots of games and websites use sprite sheets to improve performance. Except, they have like 6 different sprite sheets, so it is hard to know which one(s) have the images we want.
WAIT - the CSS file automatically knows all of the sprites and their locations, and the names of the css classes matches the name of the inventory item keys! So all we need to do is download the css file used by the website and....
NOPE. The CSS file is rebuilt every time they update the website, and is given a different name each time.

Aaaaand since Habitica regularly adds new seasonal outfits, that means we would have to manually update our module to use the name of the new css file every few months. Not ideal.

Hmm... The mobile app is displaying the avatar image, and we already have the source code for that from our project earlier in the month. Lets look through the code there and see what they are doing to render the avatar!
WHOA! They have a custom URL that they are using to load images for the mobile apps, and they can reference each one individually as a png! That could be exactly what we need....
Or we could just redesign our UI and toss out using the Avatar altogether.

This one works a little bit better with the Magic Mirror aesthetic anyway:
So we will implement that tomorrow!
#Software development is like that sometimes#open source development#habitica#magicmirror#javascript#css#ui design#MY HONOR
25 notes
·
View notes
Photo
Yay! We did it!
Apptober `19: Day THE LAST
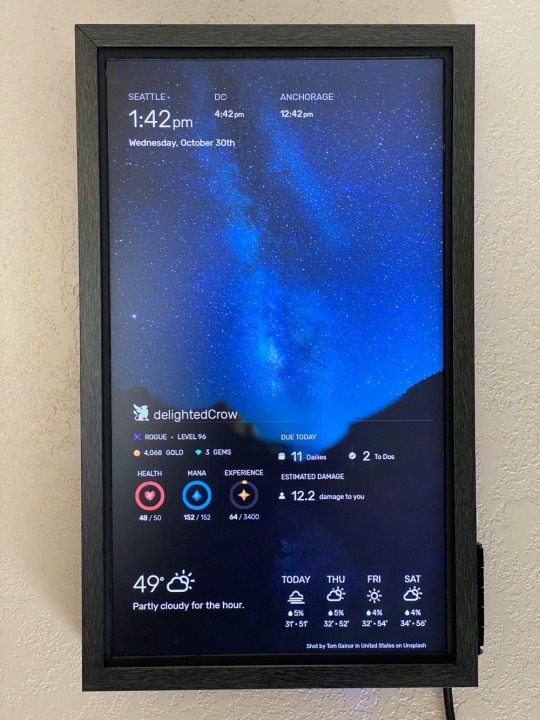
This is it, the FINAL Apptober post! I snapped a quick photo earlier today of our Habitica module running on my Wallberry display, and I gotta say I’m pretty happy with how it all turned out! @array-of-frost and I have officially released our module on GitHub, so go check it out!
Project Summary
A quick recap for anyone just seeing this post!
Our project this month was to create a Habitica integration (using javascript and SASS) for MagicMirror, an open source platform for creating smart wall and mirror displays. Habitica is an app that turns your daily todos and tasks into an RPG game, so you can gamify your chores. We thought it would be fun if we could see our Habitica game stats (like health, mana, and number of to-do tasks due today) displayed up on a Magic Mirror; hence, our MMM-HabiticaStats module!
Go Forth and Play!
Go check out our module code on GitHub: https://github.com/delightedCrow/MMM-HabiticaStats
Go play Habitica and level up your life (accounts are free!): https://habitica.com
Go Build a MagicMirror: https://magicmirror.builders
That’s All Folks
A huge thanks to @habitica and everyone who liked/reblogged/supported us over the month!
#apptober#habitica#magicmirror#programming#coding#javascript#html#css#open source software#open source development
27 notes
·
View notes
Text
Apptober Day 1
Now that I’ve got my Rasberry Pi Wall Display built and up on the wall, I figure Apptober is the perfect time to commit to finishing the software side of the project! This month I’m going to be hacking around with MagicMirror2 (a wonderful open source NodeJS app built for the RasberryPi) to make my little Wallberry the fairest wall display of them all.
Magic Mirror, On The Wall
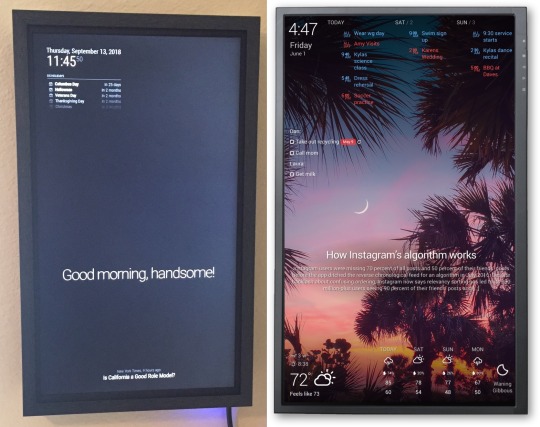
The design aesthetic of MM2 is originally intended to turn a raspberryPi and a two-way mirror into a sleek, space-ship-worthy HUD. While I do love the minimalist mirror look, I’d prefer to give Wallberry a more classic, picture frame display look. Basically I want to go from the image on the left (Wallberry with a vanilla install of MM2) to something like the design to the right:
I’ve got a lot of tweaking ahead of me 😊
BTW - the image on the right there is from a company called Dakboard and they make GORGEOUS wall displays and I’d almost consider using their wall display software but alas I’m a fool for open source and MM2 has stolen my heart.
Project Requirements
Too many of my projects get abandoned unfinished due to feature creep so I’ve challenged myself to start REALLY small this time. To begin with I want my display to have the following features:
Current local time + date
Current time for at least two other cities in different timezones (I can’t do timezone math help me Wallberry)
Current local weather + temperature
Local weekly weather forecast
A gorgeous, high-resolution background photo that periodically changes
Exciting New Tech
I’m anticipating learning a ton of new stuff for this project, including:
NodeJS - finally, an excuse to learn Node 😄
SASS - cool cool, if I can’t avoid writing CSS forever then at least I can put variables in it
How to extend and theme MagicMirror - yay MM2 Modules!
The Unsplash photo API - because this seems like a really fun way to get great background photos
A ton of stuff that seems obvious but somehow isn’t when it comes to the UX design of wall display web apps
Some RaspberryPi-specific development things that’ll definitely pop up to bite me when I least expect it because nothing ever works in production like it does on your development machine
Tomorrow
Gonna get my dev environment all set up wish me luck 🙃
8 notes
·
View notes
Text
Using Magic Mirror 2 to Create a Dynamic Display / Dashboard
New Post has been published on https://planet-geek.com/2019/08/09/hacks/using-magic-mirror-2-to-create-a-dynamic-display-dashboard/
Using Magic Mirror 2 to Create a Dynamic Display / Dashboard

The “Magic Mirror” craze got pretty big in the hacker community a few years ago. For those who may not be familiar with them, a Magic Mirror is setup using a small display behind a 2 way mirror to add text and information to your bathroom (or wherever) mirror. It’s pretty cool, and can be done at very low cost and with only a little bit of tech know-how.
My display isn’t actually ‘mirrored’, but many people build things like this one.
I’ve always loved having ‘displays’ around my workspace – showing information that doesn’t need to sit on my ‘work’ monitors, but is handy to be able to glance at. Being able to quickly glance oer and see dashboards showing system status, or even something showing date, time, and the weather outside.
A few months ago I decided to take one of my spare monitors at home mounted on the wall over my desk and turn it into a permanent display. It would show my current calendar, weather, stock prices, stuff like that. I got to work.
The Hardware
This part is probably the easiest. I used a spare 24″ LCD monitor I had originally mounted to be a sort of TV display. It wasn’t showing anything yet, so I just co-opted it for the Mirror display. It had an HDMI port on it, so it was perfect.
The second component is a Raspberry Pi3 I had lying around from some other project. This particularly Pi is pretty old, so using it just drive a mostly static display seemed great. This one has a case and power supply. I was able to just stick it to the back of the monitor, coil up a HDMI cable next to it, and I was all set.

A small note here. A second display I built for our Makerspace actually uses the monitor itself to power the Pi, since the monitor had a USB port on it. A USB -> MicroUSB cable meant as soon as the monitor was powered up, the Pi would boot and start displaying information. Pretty handy.
When building up these systems, I highly recommend having a keyboard and mouse to plug into the Pi. You can use an ‘all in one’ wireless keyboard/mouse from Amazon – these are great because you don’t have to deal with the cables (particularly when the monitor is mounted on a wall), and you can just unplug the USB adapter and use the keyboard on another project at any time.
The Software
The needed packages are pretty straightforward:
Raspbian – the default Linux installation for the Raspberry Pi. Get this installed and up to date (Run the package manager updater after the install to make sure you have the latest and greatest of everything)
Using a command line or the package manager, make sure you have the following secondary tools installed (these are not installed by default):
Chromium (apt-get install chromium-browser)
npm
xdtotool
Magic Mirror 2 – This is the core software that will run your display. Follow the directions on installation carefully. Clone the repository and get it ready for use. I use the manual installation procedure , it works best for how I build systems. YMMV.
Configuring the Host
At this point, I’m assuming the manual configuration of the software above has gone correctly, and you’re able to either use the Raspbian browser or Chromium to connect to http://localhost:8080/ on the Pi and view something approaching the display you want.
Now, this is where I’ve seen a lot of tutorials and other reference material fall down. How do you go from a desktop showing your display to something that will survive reboots, auto-configures itself, etc. Well, here’s what I did to make my display boards stable and rebootable without user intervention.
Some of these things are convenience items, some are mandatory.
For the love of all that is holy, set your password. The default ‘pi’ password is well known, please reset it. This device will be running unattended for days/weeks/months. Please change the password.
Rename the host – this is super handy so you can ssh to it easily. Edit the /etc/hostname file and give it a nice name (mine is ‘mirror’). Once you do this, from your local network, you’ll be able to ssh into the pi via ‘ssh [email protected]’ – neat trick, huh?
Create an autostartup script for the Pi that starts the browser in full screen mode just after the desktop loads. Best way to do this is to edit /etc/xdg/lxsession/LXDE-pi/autostart and put the following code in that file:
@xset s noblank @xset s off @xset -dpms @lxpanel --profile LXDE-pi @pcmanfm --desktop --profile LXDE-pi @xscreensaver -no-splash @chromium-browser --app=http://localhost:8080 --start-fullscreen
Create a cron job entry that will cause the magic mirror server software to restart on reboot. Easiest way to do this is use the ‘crontab -e’ command to make a new entry. Add the following line to the bottom of file (note, this assumes that the Magic Mirror software is installed in /home/pi/MagicMirror – adjust if that’s not the case)
@reboot cd /home/pi/MagicMirror;node serveronly > /home/pi/nodeserver.log 2>&1
On reboot, your mirror software should come up cleanly. Here’s a small trick though that makes remote maintenance easy. If you make a change to the config of the server – add a new module, change sources, etc, and you’re like me and have long since detached the keyboard and house from the unit, this little command will force the Chromium browser to do a reload, bringing in the changes you make to your config file. No need to reboot!
DISPLAY=:0 xdotool key F5
Conclusions / Sum-up
I’ve been running my display at home, and the second display up at the lab for a few months now. I’ll write some more on a few of the modules I’ve used (hooking up to my home automation stuff has been interesting), but that’ll be in a future article. I love having the date, time, calendar, stock prices, and weather always visible. The news ticker at the bottom has been sort of ‘cute’, but I really don’t watch it that much.

There are literally hundreds of third party modules available for the mirror software. You can configure the layout of the screen to do just about anything – from showing phases of the moon to displaying the next time a bus will stop in front of your office. Enjoy!
0 notes
Photo


Latest project, in progress, a voice controlled Magic Mirror. 5/4/2018 worked on this instead of going out for Gringo de Mayo. (#NotAMexicanHoliday).
As I got planning, research turned up someone who had already built something just like this: https://medium.com/@aallan/a-magic-mirror-powered-by-aiy-projects-and-the-raspberry-pi-e6a0fea3b4d6
But unlike that solution, I’d like to keep the button and probably recognize the hotword with some basic machine learning on the RPi itself.
Supplies:
Raspberry Pi 3B ($35) Microcenter
10x20 Shadow box from JoAnn Fabrics. ($21)
Old Screen recovered from 17″ Laptop (free) I preserved the back panel and cut it to fit with a jigsaw
Controller board and power for Screen ($36)
Sugru ($10)
18″ HDMI cable ($5) Amazon
12″ x 24″ Acryllic Two Way Mirror ($37) Amazon
Google AIY Voice Kit ($10) Old version on Blowout Microcenter
Hot glue gun, double sided tape
Electrical tape (screen edges, random black out.)
32 GB MicroSDHC card (free) Microcenter
3D printed pieces:
Custom base for Raspberry PI (didn’t want to glue board to the screen)
Custom base for the LCD controller
Likely still needed
A replacement button if I want to turn off voice activation unless a button is pressed (the Google AIY Button is too big and too bright. I’d like something subtle.)
An acrylic backing if I want to create a clear back to show off the internals.
Software:
MagicMirror2 (Node JS) https://github.com/MichMich/MagicMirror
Google AIY included Examples
Notes so far:
An OLED screen would be a massive improvement over this cheap laptop tft, mostly because the backlight is the part that breaks the “magic” if the screen is on.
The mirror coating is easily damaged, next time I might keep the original glass behind the mirror. It now has several scratches :-(
Get an aryllic scoring tool. I used a cutting knife but a tool would have led to less chipping.
Give up
Tried to save the nice back of the shadow box, and keep the lid opening, but in the end decided spacing was better without either.
Display Rotate: https://www.raspberrypi-spy.co.uk/2017/11/how-to-rotate-the-raspberry-pi-display-output/
New Google AIY Voice kit is $50 with a Pi Zero W, it’s significantly slower than getting the older kit and a Pi3 at $35. But is also significantly smaller. So it’s price vs. size really.
Really want to fit a battery pack inside so I can run it at least for a few minutes without power! (Imagine, removing the cable and scaring kids at a Halloween party!)
0 notes
Photo

#Magicmirror #software for small #retailers with limited in store display & warehouse without waiting for the dressing room. http://bit.ly/25vd8l4
0 notes
Photo

Apptober 2019 Day 18
Lots of tedious fiddling with html and css today, but the Habitica module for Magic Mirror is coming along! We added our animated rings into the static page today, and did a lot of little styling changes.

We'll spend a little bit longer getting this looking right, and then integrate with Habitica's API to load dynamic data.
#apptober#habitica#magicmirror#ui design#design#css#html#nodejs#raspberry pi#programming#open source software
17 notes
·
View notes
Photo
Apptober ‘19, Day 28
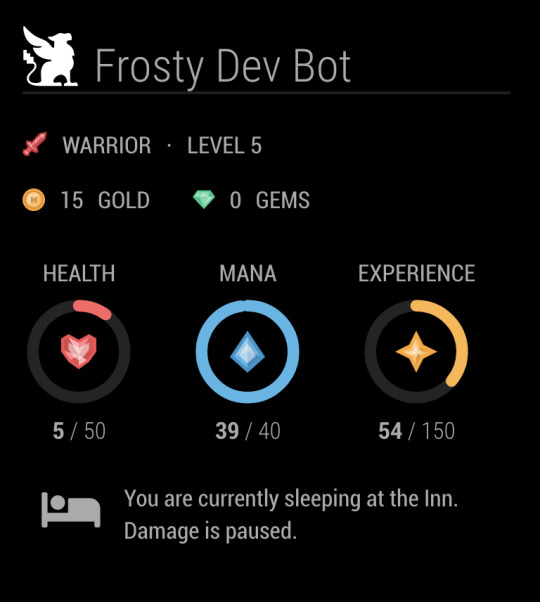
One of the cool features in Habitica is the Inn. When you go on vacation, or are just burnt out, you can have your little habit hero rest at the Inn to avoid taking any damage from missed dailies or boss fights.
Today we updated our design to check for sleeping heroes, and added a cute message to indicate when they are checked into the Inn. Since you can’t take damage in the inn, we also hid the “Due Today” and “Estimated Damage” sections so you don’t stress about them.
#habitica#magicmirror#magicmirror2#javascript#css#ui design#nodejs#programming#open source#open source software#apptober#apptober 2019
13 notes
·
View notes
Photo

Apptober 2019 Day 20
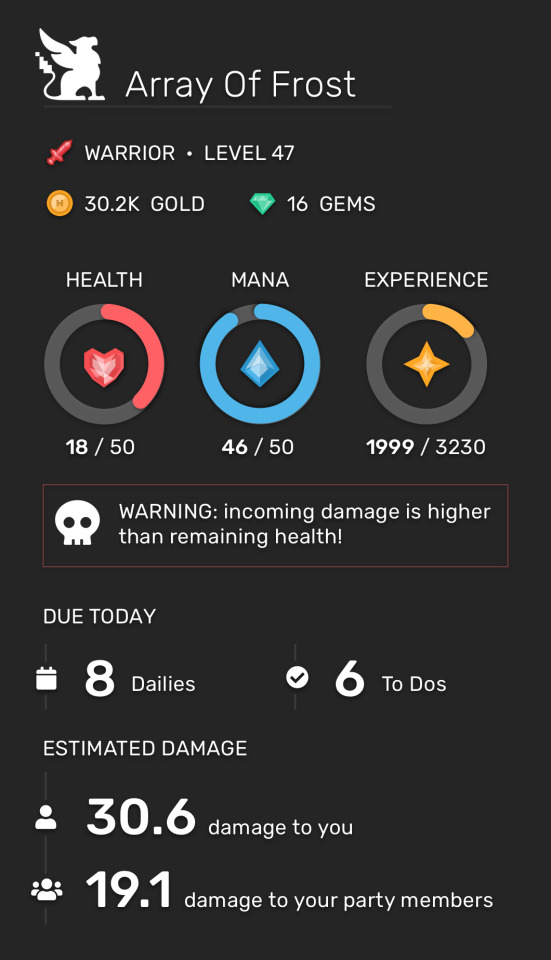
API integration begins! We are pulling data from Habitica, and showing the actual name, class, level, currency, and the colored ring stats. We still need to figure out the API calls to find the tasks that are due and the estimated damage coming in. Then we can implement the logic for whether to show the great big WARNING message, and the little "buffed" message.
Oh yeah, and we have been using a screenshot/png image for the avatar up until this point. We will still need to figure out how to display the user's real avatar. This might not be easy, as on the habitica website the avatar is actually made up of a whole bunch of separate images layered over each other to combine into your current outfit.
#apptober#habitica#magicmirror#javascript#ui design#nodejs#programming#open source software#apptober 2019
13 notes
·
View notes
Photo
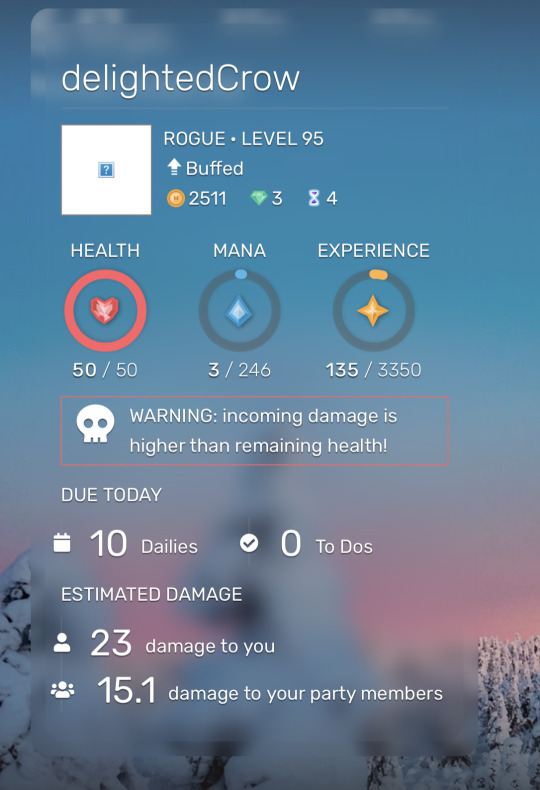
Damage calculation is working! We also are correctly listing the number of Daily tasks left to do today. We still need to figure out when ToDos are due, and calculate whether to show or hide the contextual elements like the "Warning" and "Buffed" messages. Then the last piece should be to stitch together the avatar from the various equipment images, and whatever finishing touches we can think of!
#apptober#habitica#magicmirror#magicmirror2#open source#open source software#javascript#nodejs#ui design
12 notes
·
View notes
Text
Apptober 2019 Day 21
Lots of API research today. It turns out that we can get basic stats pretty easily, as well as the list of dailies and ToDos due. Calculating the damage is going to be difficult though; We are sleuthing through the Habitica website code, as well as the source of the Habitica User Data Display Tool to figure out how. Good thing everything is open source!
10 notes
·
View notes
Text
Apptober 2019 day 11

Setup is complete! @delightedcrow and I have our Node.js environments setup, have cloned copies of the Magic Mirror repository, and created an initial repo to hold our custom module. 'Crow created the basic boilerplate for the module and added some calls to the Habitica API so we could test retrieving the data and see the response:

Next we will start building the UI, and play with different API calls to get all of the data we need to replicate what we had in our mockups!
#apptober#node.js#javascript#design#ui design#habitica#magicmirror#programming#open source#open source software#github
8 notes
·
View notes
Text
I think this will actually be really fun. I haven't had a chance to work with Magic Mirror before, and it will be nice to get more practice with Node.js. Since we'll still be doing Habitica related design it feels like a good fit with the work we have done so far, and it won't be too much of a context switch if the Habitica team gets back to us about our design mockups.
Apptober ‘19: Day 4
Been mulling over other projects to do during Apptober just in case Habitica isn’t able to process pull requests this month for their iOS app, and was thinking it might be fun to do a crossover between this year and last year’s project and create a Habitica themed MagicMirror mod.
Gotta go ponder, more tomorrow 🧐
4 notes
·
View notes
Photo
It’s kinda funny because I will probably never be standing in front of my Wallberry display waiting for it to refresh so I can see the little animation and yet it’s like my fav part of our design so far 🤣
Apptober 2019 Day 18
Lots of tedious fiddling with html and css today, but the Habitica module for Magic Mirror is coming along! We added our animated rings into the static page today, and did a lot of little styling changes.
We’ll spend a little bit longer getting this looking right, and then integrate with Habitica’s API to load dynamic data.
#apptober#habitica#magicmirror#ui design#design#css#html#nodejs#raspberry pi#programming#open source software
17 notes
·
View notes
Photo
That turned out so good I’m so proud of this 👏
Time to ship it 😄
Apptober ‘19, Day 28
One of the cool features in Habitica is the Inn. When you go on vacation, or are just burnt out, you can have your little habit hero rest at the Inn to avoid taking any damage from missed dailies or boss fights.
Today we updated our design to check for sleeping heroes, and added a cute message to indicate when they are checked into the Inn. Since you can’t take damage in the inn, we also hid the “Due Today” and “Estimated Damage” sections so you don’t stress about them.
#habitica#magicmirror#magicmirror2#javascript#css#ui design#nodejs#programming#open source software#apptober
13 notes
·
View notes