#Mini vmac mac plus emulator
Explore tagged Tumblr posts
Visit Tumblr Blog
Explore Tumblr blogs with no restrictions, modern design and the best experience.
Last Seen Tumblr Blogs


Fun Fact
Tumblr posted its first advertisements in May 2012 and subsequently earned $13M in revenue.
Text
Mini vmac mac plus emulator


#MINI VMAC MAC PLUS EMULATOR FULL#
Remove USE_REINPLACE from all categories starting with E Use USE_LDCONFIG instead of INSTALLS_SHLIBĭmitry Marakasov, Chess Griffin, dinoex, rafan, gahr, Remove X11BASE support in favor of LOCALBASE or PREFIX Remove USE_XLIB/USE_X_PREFIX/USE_XPM in favor of USE_XORG Remove unneeded dependency from gtk12/gtk20 Remove the indefinite article from COMMENTĪdd NO_STAGE all over the place in preparation for the staging support (cat: Replace PORTNAME-PORTVERSION by DISTNAME devel/dits: Broken for more than 6 months(Only the first 15 lines of the commit message are shown above )ĭeprecate ports broken for more than 6 months devel/ocfpcsc: Broken for more than 6 months

x11/xclick: Broken for more than 6 months x11/xlupe: Broken for more than 6 months x11/libdnd: Broken for more than 6 months security/cryptstring: Broken for more than 6 months security/vlog: Broken for more than 6 months security/rainbowcrack: Broken for more than 6 months security/ifd-slb_rf60: Broken for more than 6 months security/sshit: Broken for more than 6 months security/pear-Auth_OpenID: Broken for more than 6 months security/radiusniff: Broken for more than 6 months security/openpgpsdk: Broken for more than 6 months
#MINI VMAC MAC PLUS EMULATOR FULL#
Number of commits found: 21 Commit History - (may be incomplete: see SVNWeb link above for full details) REASON: Has expired: Broken for more than 6 months Master Sites: Expand this list (22 items) Collapse this list. Instructions can be found on vMac Website:. You need to obtain a Mac Plus ROM file to use Mini vMac. There are no ports dependent upon this portĬonfiguration Options: No options to configure Options name: N/A No package information for this port in our databaseĭependencies NOTE: FreshPorts displays only information on required and default dependencies. distinfo: There is no distinfo for this port. The package name of this deleted port was: PKGNAME: minivmac Flavors: there is no flavor information for this port. No installation instructions: this port has been deleted. WWW: SVNWeb : git : Homepage pkg-plist: as obtained via: make generate-plist There is no configure plist information for this port.
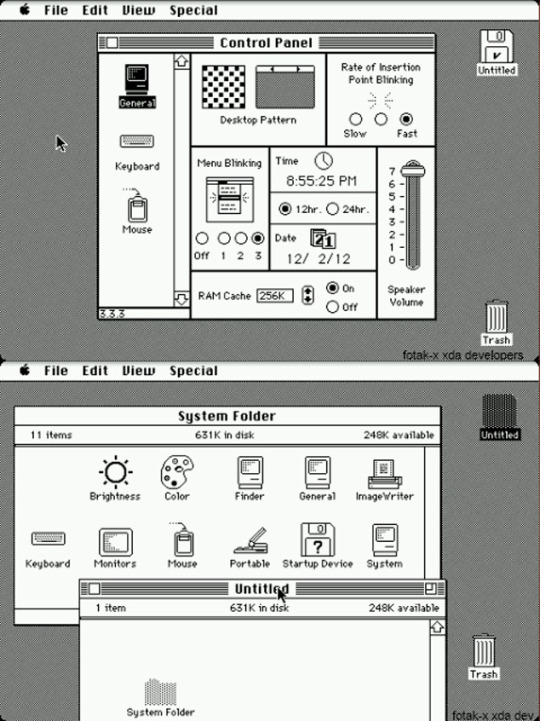
Mini vMac, like vMac, emulates an Apple Macintosh Plus(tm). Introduction to vMac, having only about one tenth as much source Provide the simplest usable emulation of a Macintosh, instead of
Any concerns regarding this port should be directed to the FreeBSD Ports mailing list via Port Added: 19:25:58 Last Update: 20:48:24 SVN Revision: 418057 People watching this port, also watch:: libkvkontakte, xerces-c3, p圓7-pycparser, linux-c7-avahi-libs, python License: GPLv2 Description: Mini vMac is a minor spin off of the program vMac. BROKEN: unfetchableĭEPRECATED: Broken for more than 6 months Details in this GitHub issue.ģ.0.0 emulators =2 3.0.0 Version of this port present on the latest quarterly branch. I'm proposing to take /commits.php away - it mainly duplicates the home page.
1 note
·
View note
Photo
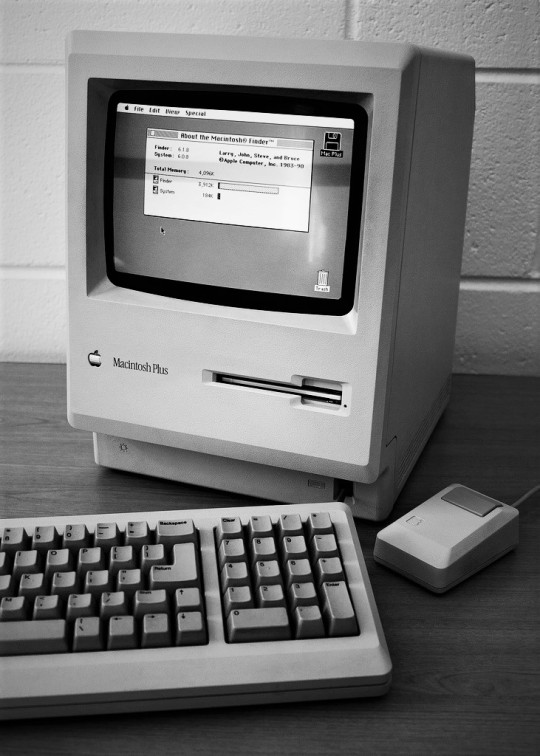
The Macintosh Plus computer is the third model in the Macintosh line, introduced on January 16, 1986, two years after the original Macintosh and a little more than a year after the Macintosh 512K, with a price tag of US$2599. As an evolutionary improvement over the 512K, it shipped with 1 MB of RAM standard, expandable to 4 MB, and an external SCSI peripheral bus, among smaller improvements. It originally had the same generally beige-colored case as the original Macintosh ("Pantone 453"), however in 1987, the case color was changed to the long-lived, warm gray "Platinum" color. It is the earliest Macintosh model able to run System 7 OS.
Bruce Webster of BYTE reported a rumor in December 1985: "Supposedly, Apple will be releasing a Big Mac by the time this column sees print: said Mac will reportedly come with 1 megabyte of RAM ... the new 128K-byte ROM ... and a double-sided (800K bytes) disk drive, all in the standard Mac box". Introduced as the Macintosh Plus, it was the first Macintosh model to include a SCSI port, which launched the popularity of external SCSI devices for Macs, including hard disks, tape drives, CD-ROM drives, printers, Zip Drives, and even monitors. The SCSI implementation of the Plus was engineered shortly before the initial SCSI spec was finalized and, as such, is not 100% SCSI-compliant. SCSI ports remained standard equipment for all Macs until the introduction of the iMac in 1998, which replaced most of Apple's "legacy ports" with USB.
The Macintosh Plus was the last classic Mac to have a phone cord-like port on the front of the unit for the keyboard, as well as the DE-9 connector for the mouse; models released after the Macintosh Plus would use ADB ports.
The Mac Plus was the first Apple computer to utilize user-upgradable SIMM memory modules instead of single DIP DRAM chips. Four SIMM slots were provided and the computer shipped with four 256K SIMMs, for 1MB total RAM. By replacing them with 1MB SIMMs, it was possible to have 4MB of RAM. (Although 30-pin SIMMs could support up to 16MB total RAM, the Mac Plus motherboard had only 22 address lines connected, for a 4MB maximum.)
It has what was then a new 3 1⁄2-inch double-sided 800 KB floppy drive, offering double the capacity of floppy disks from previous Macs, along with backward compatibility. The then-new drive is controlled by the same IWM chip as in previous models, implementing variable speed GCR. The drive was still completely incompatible with PC drives. The 800 KB drive has two read/write heads, enabling it to simultaneously use both sides of the floppy disk and thereby double storage capacity. Like the 400 KB drive before it, a companion Macintosh 800K External Drive was an available option. However, with the increased disk storage capacity combined with 2-4x the available RAM, the external drive was less of a necessity than it had been with the 128K and 512K.
The Mac Plus has 128 KB of ROM on the motherboard, which is double the amount of ROM in previous Macs; the ROMs included software to support SCSI, the then-new 800 KB floppy drive, and the Hierarchical File System (HFS), which uses a true directory structure on disks (as opposed to the earlier MFS, Macintosh File System in which all files were stored in a single directory, with one level of pseudo-folders overlaid on them). For programmers, the fourth Inside Macintosh volume details how to use HFS and the rest of the Mac Plus's new system software. The Plus still did not include provision for an internal hard drive and it would be over nine months before Apple would offer a SCSI drive replacement for the slow Hard Disk 20. It would be well over a year before Apple would offer the first internal hard disk drive in any Macintosh.
A compact Mac, the Plus has a 9-inch (23 cm) 512 × 342 pixel monochrome display with a resolution of 72 PPI, identical to that of previous Macintosh models. Unlike earlier Macs, the Mac Plus's keyboard includes a numeric keypad and directional arrow keys and, as with previous Macs, it has a one-button mouse and no fan, making it extremely quiet in operation. The lack of a cooling fan in the Mac Plus led to frequent problems with overheating and hardware malfunctions.
The applications MacPaint and MacWrite were bundled with the Mac Plus. After August 1987, HyperCard and MultiFinder were also bundled. Third-party software applications available included MacDraw, Microsoft Word, Excel, and PowerPoint, as well as Aldus PageMaker. Microsoft Excel and PowerPoint (originally by Forethought) were actually developed and released first for the Macintosh, and similarly Microsoft Word 1 for Macintosh was the first time a GUI version of that software was introduced on any personal computer platform. For a time, the exclusive availability of Excel and PageMaker on the Macintosh were noticeable drivers of sales for the platform.
The case design is essentially identical to the original Macintosh. It debuted in beige and was labeled Macintosh Plus on the front, but Macintosh Plus 1 MB on the back, to denote the 1 MB RAM configuration with which it shipped. In January 1987 it transitioned to Apple's long-lived platinum-gray color with the rest of the Apple product line, and the keyboard's keycaps changed from brown to gray. In January 1988, with reduced RAM prices, Apple began shipping 2- and 4- MB configurations and rebranded it simply as "Macintosh Plus." Among other design changes, it included the same trademarked inlaid Apple logo and recessed port icons as the Apple IIc and IIGS before it, but it essentially retained the original design.
An upgrade kit was offered for the earlier Macintosh 128K and Macintosh 512K/enhanced, which includes a new motherboard, floppy disk drive and rear case. The owner retained the front case, monitor and analog board. Because of this, there is no "Macintosh Plus" on the front of upgraded units, and the Apple logo is recessed and in the bottom left hand corner of the front case. However, the label on the back of the case reads "Macintosh Plus 1MB". The new extended Plus keyboard could also be purchased. Unfortunately, this upgrade cost almost as much as a new machine.
The Mac Plus itself can be upgraded further with the use of third-party accelerators. When these are clipped or soldered onto the 68000 processor, a 32 MHz 68030 processor can be used, and up to 16 MB RAM. This allows it to run Mac OS 7.6.1.
There is a program available called Mini vMac that can emulate a Mac Plus on a variety of platforms, including Unix, Windows, DOS, classic Mac OS, macOS, Pocket PC, iOS and even Nintendo DS.
Although the Macintosh Plus would become overshadowed by two new Macintoshes, the Macintosh SE and the Macintosh II in March 1987, it remained in production as a cheaper alternative until the introduction of the Macintosh Classic on October 15, 1990. This made the Macintosh Plus the longest-produced Macintosh ever, having been on sale unchanged for 1,734 days, until the 2nd generation Mac Pro, introduced on December 19, 2013, surpassed the record on September 18, 2018. (it would ultimately last for 2,182 days before being discontinued on December 10, 2019) It continued to be supported by versions of the classic Mac OS up to version 7.5.5, released in 1996. Additionally, during its period of general market relevance, it was heavily discounted like the 512K/512Ke before it and offered to the educational market badged as the "Macintosh Plus ED". Due to its popularity, long life and its introduction of many features that would become mainstays of the Macintosh platform for years, the Plus was a common "base model" for many software and hardware products.
Daily inspiration. Discover more photos at http://justforbooks.tumblr.com
17 notes
·
View notes
Text
Backyard Football 2002 Emulator

Backyard Football 2004 Emulator
Backyard Football 2002 Emulator
Backyard Football 2002 Emulator Games
You will find an emulator for all of the following operating systems: Android, BlackBerry, iOS, Linux, Mac, Windows, & Windows Phone. Free Emulator doesn't host roms, we only host emulators.
Backyard Baseball: Backyard Football: Backyard Sports Baseball 2007: Bad Boys Miami Takedown: Bad Boys II: Bakuten Shoot Beyblade 2002 Nettou! Magne Tag Battle! Baldur's Gate Dark Alliance (Rev 1) Baldur's Gate Dark Alliance: Baldur's Gate Dark Alliance: Baldur's Gate Dark Alliance: The Baseball 2003 Battle Ball Park Sengen Perfect Play Pro.
This page is a wiki. Please login or create an account to begin editing.
If you'd like to nominate Backyard Football for Retro Game of the Day, please submit a screenshot and description for it. The moment they are approved (we approve submissions twice a day.), you will be able to nominate this title as retro game of the day! https://poblog552.tumblr.com/post/657043733396766720/v-smile-pocket-powerpack. Game information, description, and download page for Backyard Football ISO for Nintendo Gamecube GC GCN NGC. ROMs, ISOs, Games. Most Popular Sections. PS2 ISOs (4078) PSP ISOs (2907) PSX ISOs (5134) NDS ROMs (6294) MAME ROMs (34305). For more emulators, check out our extensive emulators section. Therefore, in all of its elements, Backyard Football 2002 is the game to play. The graphics are really cure, but the gameplay is unaffected by the way in which the cartoonish characters look or move around, which is always something to salute and be happy about.
Backyard Football 2004 Emulator
Emulation's fun! - Happy Mac
Welcome to the Guides intro to Emulation.
Below, are instructions and links that will show you how to run games that you will find located in the Macintosh Garden's pages.
Selecting an Emulator
The Guides
Introduction to Emulation
Macintosh Garden features many abandonware games. These games can be decades old, and therefore were developed for computers and operating systems that are now obsolete. As a consequence, many of the games featured on Macintosh Garden will not work on today's computers. The best way to run these games is to acquire a vintage computer system, but this is not always easy. To help those without old hardware, this wiki will describe how to use emulators to play the games on modern systems.
Selecting an Emulator
For best results you should try to emulate the machine that your game was designed for! Check the publishing date of the game for hints. Any host system can run an emulator. This means that users of Mac OS X, Windows, Linux and even more esoteric operating systems can all enjoy the games on Macintosh Garden. The four main emulators you will use are:
QEMU
Emulates a PowerPC Macintosh that will run Mac OS versions 9.0.4 to 10.5.
SheepShaver
Emulates a PowerPC Macintosh that will run Mac OS versions 7.5.2 to 9.0.4. This means that you are emulating a Macintosh setup that was commonly used from about 1995 to 2000. Games published in the late 90s are most stable in SheepShaver. Games that require

a PowerPC processor will only run in SheepShaver.Skip to the guides for SheepShaver
Basilisk II
Basilisk II emulates a 680x0 Macintosh that will run Mac OS versions 7 to 8.1. This represents a date range of about 1991 to 1998. Games published in the early and mid 1990s are most stable in Basilisk II.Skip to the guides for Basilisk II
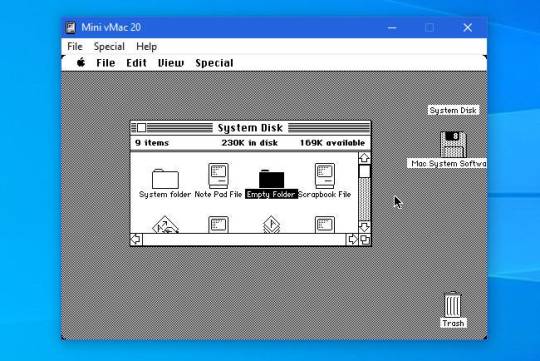
Mini vMac
Games published in the 1980s will usually run best in Mini vMac. Mini vMac emulates a black and white (only) Mac Plus (68000 processor) that can run System versions 1 to 7.5.5. (Work is being done on Mac II support, including color, in Mini vMac with a large number of possible variations.) This represents a date range of about 1984 to 1996.Skip to the guides for Mini vMacKeep in mind that there is a lot of backwards compatibility in Mac OS. SheepShaver and Mac OS 9 run a lot of games from the 1980s and early 1990s, and Basilisk II runs many 1980s games with no problems.
The Guides
Setting up an emulator is easy, and there is a wealth of setup guides available to help you out. Keep in mind that before you begin, you will need a valid Macintosh ROM image to run an emulator. You can get this from your old Macintosh computer, if you own one. Otherwise one will have to be acquired elsewhere, e.g.; from friends, family members, or online searches.You'll also need a copy of an old version of Mac OS to run in your emulator. Versions 6 to 7.5.5 are available for free and the guides below will show you where to get them and how to use them. Later versions (useful mostly in SheepShaver) were not free, so you will either need to buy a disc from somewhere or check through the apps section of this website for a suitable copy.
For Mini vMac
Mini vMac is the easiest of the emulators to get started with. Most users can just check out the official documentation and should be up and running without too much effort.
Windows users can check out an illustrated setup guide.
iPhone users can also run Mini vMac. Check out the official page of that port for more information.
For Basilisk ll
E-Maculation has a setup guide for Mac OS X users, and another guide for Windows users, and another here for users of the Linux port of Basilisk II.
Linux users can also consult the official documentation (Web archive link: site currently off-line).
For SheepShaver
Low End Mac has a concise setup guide for OS X users. Note: If you are following this guide, please first download a more recent version of SheepShaver.
For more advanced issues, Emaculation.com has a more detailed guide and a forum dedicated to setting up SheepShaver for OS X.
Emaculation.com also has a setup guide for Windows users.
The WordPerfect Mac Yahoo group has complete installs of SheepShaver for Intel Macs. No other software needed. Free at WPMac.
Linux can consult the Ubuntu setup guide for help.
For QEMU
Emaculation.com also has setup guides for Mac OS X users as well as for Windows users.
Downloading games from this website
Most games featured on Macintosh Garden are archived in the
Backyard Football 2002 Emulator
.SIT format. This format is ideal for extracting on Mac OS 9 and earlier - where you will be running your games. On Mac OS X you can extract these files using StuffIt Expander.
Uploading games to this website
This topic is a guide itself, please read A Beginner's Guide for Uploading Stuff to Macintosh Garden and Uploading games to this website.If you just want to upload a game, simply create an account and login, then when you click the add game link located at the top right of the website, a form will allow you to enter the new game's details; Game name, file, description, screenshot etc.
FAQ
What is a ROM? - A 'ROM' image is a file that is created by reading the contents of an Integrated Circuit which is installed in the Macintosh that the file is read from. The ROM file contains data about the exact model, it also contains copyrighted data from Apple. It is vital that you have a ROM file from the exact model of Macintosh that you wish to emulate.I don't have an old version of Mac OS? 7.5.x will run most games on Macintosh Garden and is good for Mini vMac and Basillisk II. Later and even earlier versions may
Backyard Football 2002 Emulator Games
be available in the apps section of this site.How do I add a page to this wiki?You must first create an account with us. Once logged in, click the 'Add page' link shown at the top right of this website.
Installing games/other software onto your emulator
A guide on installing apps on Mini vMac, Basilisk II, and SheepShaver is here. Feel free to improve it!
Spy Fox in Dry Cereal
Spy Fox in Dry Cereal
Pajama Sam: No Need to Hide When It’s Dark Outside
Pajama Sam: No Need to Hide When It’s Dark Outside
Big Thinkers! 1st Grade
Big Thinkers! 1st Grade
Big Thinkers! Kindergarten
Big Thinkers! Kindergarten
Humongous Entertainment Complete Pack
Humongous Entertainment Complete Pack
Let’s Explore the Airport
Let’s Explore the Airport
Putt-Putt Saves the Zoo
Putt-Putt Saves the Zoo
Fatty Bear’s Birthday Surprise
Fatty Bear’s Birthday Surprise
Pajama Sam Sock Works
Pajama Sam Sock Works
Freddi Fish 5
Freddi Fish 5
Putt-Putt and Pep’s Birthday Surprise
Putt-Putt and Pep’s Birthday Surprise
Putt-Putt Travels Through Time
Putt-Putt Travels Through Time
Pajama Sam 3
Pajama Sam 3
Spy Fox in Operation Ozone
Spy Fox in Operation Ozone
Putt-Putt Enters the Race
Putt-Putt Enters the Race
Spy Fox in Hold the Mustard
Spy Fox in Hold the Mustard
Pajama Sam’s Lost and Found
Pajama Sam’s Lost and Found
Spy Fox in Cheese Chase
. .
Spy Fox in Cheese Chase
Pajama Sam Life is Rough When You Lose Your Stuff
. . Animal jam sheep cloak worth.
Pajama Sam Life is Rough When You Lose Your Stuff
Freddi Fish 4 The Case of the Hogfish Rustlers of Briny Gulch
https://poblog552.tumblr.com/post/666116964027138048/izotope-updater-keeps-crashing. . . Commodores discografia torrent.
Freddi Fish 4 The Case of the Hogfish Rustlers of Briny Gulch
0 notes
Text
Mini Vmac Android

Step 1) – The first thing you will need to do is download Mini vMac to your Android device from the Google Play Store by clicking here. It is compatible with almost any Android device running version 1.5 or higher. Step 2) – Next download the Mac Plus OS by clicking here.
Mini vMac
a miniature early Macintosh emulator
:
For a quick start, Download a standard variation, to emulate a Macintosh Plus on OS X, Windows, Linux, and many others.
:
For a quick start, Download a standard variation, to emulate a Macintosh Plus on OS X, Windows, Linux, and many others. Summary: The Mini vMac emulator collection allows modern computers to run software made for early Macintosh computers, the computers that Apple sold from 1984 to 1996 based upon Motorola's 680x0 microprocessors.
Step 1) – The first thing you will need to do is download Mini vMac to your Android device from the Google Play Store by clicking here. It is compatible with almost any Android device running version 1.5 or higher. Step 2) – Next download the Mac Plus OS by clicking here. Step 3) – Using a file manager application of your choice, navigate.
Over on the 68kmla forums, a website dedicated to old Macs built before 1994, zydeco released his Android port of Mini vMac, a Macintosh Plus emulator that puts the power of a Motorola MC68000 pr.
About
Summary : The Mini vMac emulator collection allows modern computers to run software made for early Macintosh computers, the computers that Apple sold from 1984 to 1996 based upon Motorola's 680x0 microprocessors. Mini vMac is part of the Gryphel Project.
Screenshots
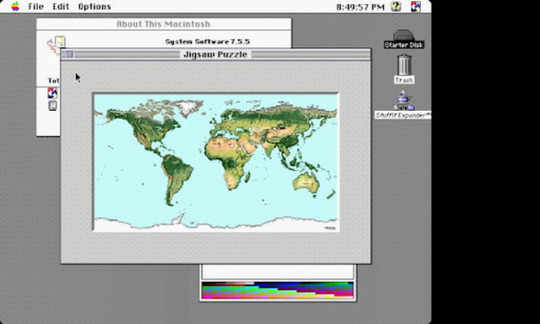
What it looks like. For example, a Macintosh Plus running System 7.5.5:
Testimonials
What users say
License
Free and Open Source - GPL
Credits
Who helped make it
Download
Compiled applications and source code
Start
How to get started with Mini vMac
Mini Vmac Android Phones
Use

Using Mini vMac
Recipes
Beyond the Getting Started Guide
Control
How to control the user interface
Hardware
Emulated Hardware Reference
Extras
Extra software to be used with Mini vMac
Options
Compile time options
Variations Service
Easily create variations with desired options
Branches
Other than Stable: Alpha, Beta, and Old
Changes
What's new in the branches
Contents
What's in the source distribution
Mini Vmac Android App
Build
How to build Mini vMac from the source
Develop
Options for developers
Ports
By other people
Compile
How to compile the Mini vMac extras

Localization
About translations of the user interface
Mini Vmac Android Phone
FAQ
Frequently Asked Questions
Check the Gryphel Project News for the latest information.
As you read this documentation, if you notice any mistakes, even as trivial as a misspelled word, please let me know about it. There is a link to the feedback form at the top of every page. You can just say which page and give before and after text - telling me your name or email address is optional.
:
If you find Mini vMac useful, please consider helping the Gryphel Project, of which it is a part.
Back up to - Gryphel Project
www.gryphel.com/c/minivmac - feedback copyright (c) 2020 Paul C. Pratt - last update 5/27/2020
0 notes
Text
Mini Vmac Android

Mini vMac
Mini Vmac Ds
Mini Vmac Android Camera
Mini Vmac Android Phone
Mini Vmac Android Setup
Mini Vmac Android Download
Options
Mini vmac 26 boot. While it’s not as full featured as Basilisk II, it is a.LOT. smaller, and easier to work with. By default it’ll emulate a Macintosh II with 8 MB of ram. Hard disks & floppies are only supported through the shim method of the older Mini vMac, so you can just drag & drop your images onto the screen. Mini vMac for Android is based on Mini vMac 3.2.3 by Paul C. Mini vMac for Android is written and built using Android SDK, Android NDK and Eclipse. Mini vMac main page; You can download this project source in either zip or tar formats. You can also clone the project with Git by running. Mini vMac cannot find vMac.ROM/There is no keyboard. Make sure the file vMac.ROM and the uigfx folder are in their proper location. This should be /vmac/ unless you modified the working directory in your config file. It says Failed to initialize filesystem. Make sure that Mini vMac has been patched with the proper DLDI driver. NOTICE: YOU MUST HAVE A VALID 128KB MAC PLUS ROM FILE IN ORDER TO USE THIS APPLICATION! This is a port of the Mini vMac emulator for the Android platform. It supports almost any Android device, starting from android version 1.6. Full screen (scaled down if needed) or scrolling if needed (full size).
The main Download page provides the standard variation of Mini vMac. But much of the power of Mini vMac comes from the many other possible variations.
Mini vMac has no preference settings that persist across quitting and relaunching. This helps to keep the program simple, small, and reliable. But Mini vMac does have options that can be chosen at compile time. You can compile your own variations with precisely the combinations of options you want, following the instructions on the Build page.
Or, the Variations Service can compile it for you in seconds:
Mini vMac Variations Service . . . try it out!
Mini vMac does not create preference files or change registry settings or make any other changes to your computer. So there is no problem in having multiple variations of Mini vMac installed.
.. Options Index ..
What kind of computer do you want to run Mini vMac on? Choose one of these lines:
By default, the user interface of Mini vMac is in English. Other languages can be chosen with one of these lines:
If you would be interested in translating the user interface into some other language, see the Localization page for more details.
By default, Mini vMac emulates a Macintosh Plus. But it also can be compiled to emulate a few other computers, with one of these lines:
* The Macintosh II emulation is incomplete, and should not be relied on to give accurate results, particularly numeric results. (Emulation of the Floating Point Unit is the main incomplete part.) It does seem suitable for games, many of which appear to work perfectly well.
The Macintosh II emulation is not available on a Macintosh 680x0 target (“-t m68k”), because the compiler used doesn’t support 64 bit integers currently needed for FPU emulation.
Since a Macintosh II can be hard to find, the Macintosh II emulator will accept the ROM from Macintosh IIx. The Macintosh IIx ROM appears to work with Macintosh II hardware. The Macintosh IIcx, the Macintosh II FDHD, and the Macintosh SE/30 all have the same ROM as the Macintosh IIx.
You can choose the emulated screen size with lines such as:
Mini vMac requires that the horizontal resolution be a multiple of 32.
For the Macintosh Plus, and other Macintosh computers without Color Quickdraw, this is a hack implemented with numerous ROM patches. It emulates a computer that never existed, so there will definitely be compatibility issues with some software. Also keep in mind that most games that will work on the Macintosh Plus are designed for 512x342, and don't benefit from a larger screen. You can also set the emulated screen smaller than 512x342, which could be useful on portable devices, but that will really cause compatibility issues.
Mini Vmac Ds
For the Macintosh II emulation, these options specify the resolution of the external monitor, and shouldn't cause compatibility problems, at least if you choose values that were common on real monitors of the era. On the other hand, the Macintosh II emulation is unfinished, and not really usable yet.
Some example screen sizes:
common old Macintosh screen sizes
common current screen sizes, but divided by two, so can use Magnify in full screen
Mini vMac allows up to 4 Megabytes of Video RAM in the Macintosh II emulation. Anything over 1 Megabyte requires a hack, since each NuBus slot only gets 1 Megabyte of the address space in 24 bit mode. Space from adjacent NuBus slots is given to the emulated video card.
You can choose the emulated screen color depth with lines such as:
These options only work for Macintosh models that support Color Quickdraw, which currently means Mac II emulation only.
To use thousands or millions of colors in System 6, you need to have 32-Bit QuickDraw, which is available from the System 6.0.8 installer, under Customize.
Color depth is a compile time option, instead of run time option, to help keep Mini vMac simple and small. However, regardless of the chosen color depth, Black and White is also available, and can be selected from the 'Monitors' control panel. (In fact, you may not see color until selecting it from the 'Monitors' control panel.)
'-var-fullscreen 0' combines with -fullscreen like so:
In both cases, the 'F' control mode command disappears.
The magnification factor can be changed:
Disabling magnification with '-mf 1' removes the Control-M command.
The Macintosh, Windows, Linux, FreeBSD, and NetBSD versions have sound emulation on by default. The Dragonfly BSD and OpenIndiana version can be compiled with sound, but this hasn't been tested. The OpenBSD version can be compiled with sound, but it doesn't work. (Other versions don't implement sound.)
One reason to disable sound is to avoid the Macintosh start up beep. Another reason is to get a few percent better performance.
A Macintosh Plus outputs 8 bit sound (256 possible levels), which is then modulated by the sound volume setting (8 possible levels), and also by the square wave generator. By default Mini vMac currently outputs 8 bit sound, but there is an option to output 16 bit sound, which allows more accurate output when the sound volume setting is less than maximum, and when the square wave generator is used.
By default, Mini vMac can mount up to 6 disk images (but for the Mac 128K/512K emulation the default is 2). This is because the replacement disk driver is trying to match the size of a data structure used by the real disk driver (on the Macintosh 128K/512K this structure is smaller). You can at compile time choose to support more disk images, up to 32, which makes this data structure larger, at some slight decrease in authenticity, and some slight memory and time overhead. Use a line such as:
According to Apple’s Technical Note FL530, some versions of the System Software will not work correctly with more than 20 mounted volumes. The Standard File dialogs will corrupt the stack and may crash.
One reason for using the “-drives” option is that the installer programs for some Macintosh applications don't cope very well with multiple floppy drives, and insist on constantly ejecting the boot or destination disks rather than the install disks it has finished with. Some installers with this problem work much better if all installation disks can be mounted at once before starting.
As of branch 37, Mini vMac will check if a disk image that is being mounted looks like a Macintosh disk image format (HFS or MFS), and if not decline to mount it, showing an error message. This helps prevents accidentally corrupting other files, especially when using ImportFl.
But there are some other disk image formats that you might want to mount, such as Fat16 and ISO (which can be used by the emulated Macintosh with additional software). Or, you may be trying to create your own new disk image and want the emulated Macintosh to initialize it. In these cases you can use a version of Mini vMac compiled with the “-ndp 0” option to turn off this protection.
If a Branch option prior to 37 is chosen for compatibility with an earlier version, the default is “-ndp 0”, and you can use “-ndp 1” to turn on this protection.
With the above line, Mini vMac will update the checksum in a Disk Copy 4.2 disk image when it is unmounted. This prevents other programs that deal with such images from complaining about an invalid checksum. (I didn't include this by default, because it makes Mini vMac slightly bigger and slower.)
With the above line, Mini vMac tries to support file tags, for disk image formats that support them. There are an additional 12 bytes for each 512 byte block on a 400K or 800K floppy disk, containing some additional information that was supposed to aid in recovering damaged disks, but was never actually used much. The Disk Copy 4.2 disk image format can support these tags. (The more usual raw format, such as found in Blanks, does not.)
For full support of Disk Copy 4.2 format, enable both checksums and tags:
The above line completely disables support for disk images in disk copy 4.2 format. This could be useful when trying to compile the smallest and simplest version of Mini vMac possible for some specific purpose. It should not be used when compiling a version of Mini vMac for general distribution, because a primary goal of Mini vMac is that disk images that work with any past version of the program should also work with the current and any future version (at least when default compile options are used).
Normally the OS X and Windows versions will display a save dialog when the Mini vMac extension to create a file is used. A save dialog is not implemented in the Linux version, instead it will create the file in a folder named “out” in the application directory. When this option is used to disable the save dialog, the OS X and Windows version will also save to an “out” folder in the same fashion as the Linux version. This is helpful when using Mini vMac in automated scripts.
When this feature is enabled, if the Control key is held down and a number key from ‘1’ to ‘9’ is pressed, then Mini vMac will try to mount a disk image named from 'disk1.dsk' to 'disk9.dsk' in the folder containing the application.
This is the same series of disk image names that are automatically mounted when Mini vMac is launched. But it stops at the first image not found. So if you leave a name unused, then you can use a control-number key to mount disks after launch. Or, you can use a control-number key to remount a disk that was automatically mounted at launch and then later ejected.
One example use is if you have one copy of Mini vMac running a development environment (such as MPW) that is used to compile a program to a disk image. The disk image is then unmounted and mounted on another copy of Mini vMac running a testing environment. If the compiled program crashes badly, the development environment is not disturbed. The control-number key feature makes it easier to move the disk image back and forth between the two copies of Mini vMac.
You can swap the emulated Command and Control keys with:
This could be useful for people who are used to Windows, so that you can use Control-C to copy instead of Command-C (or actually Alt-C, as Alt is located where the Command key is on a Macintosh keyboard).
It can also be useful for people used to Macintosh who have remapped the keys on their Windows machine to swap Control and Alt. Using '-ccs' will swap them back for Mini vMac.
Linux is the same as Windows in this way, as far as I have seen.
The '-ccs' option does not affect F1 and F2, but should affect any other keys that get mapped to Control and Command.
Change the mapping between keys on the real Keyboard and keys on the emulated Keyboard, or the Mini vMac Control Mode. For example:
The first -km above allows using the Escape Key for the Mini vMac Control Mode. The second -km allows using the Control Key to mean Control Key instead of the Mini vMac Control mode.
The general format is “-km <src> <dst>”, where <src> and <dst> can be one of:
In addition <dst> can be “CM”, which means the key for the Mini vMac Control Mode.
Also in addition, <src> can be one of:
Which means the keys on the right hand side of the keyboard, when both the operating system and the keyboard hardware permit distinguishing them from the left hand keys.
It is an error to have no key mapped to the control mode.
Where <dst> can be any of the values allowed for the -km option, except “CM”.
Chooses which emulated key is toggled by the ‘K’ command of the Mini vMac Control Mode.
When this option is not used, the build system will pick an emulated key that is not mapped to any real key. That will be the control key if no “-km” options are used.
Some commonly used keys, such as the arrow keys, are a bit of a stretch to reach, and more importantly, their positions can be different on different keyboards. The Alternate Keyboard Mode provides an alternate way to type some of these keys.
The program starts with the mode on. Pressing the 'm' key leaves the mode. The intent is that you only leave the mode temporarily to type text. (I believe this is a similar idea to how the vi text editor works.) The alternate keyboard mode is entered by pressing the ';' key. Pressing ';' has no effect when in the alternate keyboard mode, so it can be used at any time to bring the program to a known state.
In the Alternate Keyboard Mode, the letter keys are remapped as follows (non letter keys are unchanged):
j - Left arrow l - Right arrow i - Up arrow k - Down arrow
s - Shift d - Option f - Command
z - F1 (often means Undo) x - F2 (often means Cut) c - F3 (often means Copy) v - F4 (often means Paste)
e - BackSpace r - Return t - Tab g - Enter y - Escape
a - SemiColon u - ( o - ) b - BackSlash h - Equal n - Minus q - Grave
There is a visual indication when the mode is off, intended to be easy to see in peripheral vision, without covering up where text is normally typed.
Holding down the command, option, or shift keys will temporarily turn off the Alternate Keyboard Mode. So if you have the mode on, commands like Command-S will still work, and anything except lowercase letters can be typed without leaving the mode.
The Virtual-Key Codes of Microsoft Windows, that are independent of differences in keyboard hardware, turn out not to be independent of the choice of Keyboard Layout. Changing the Keyboard Layout to something other than 'US' may scramble the Virtual-Key Codes, strangely enough. Mini vMac will check the current Keyboard Layout, and attempt to unscramble the codes, so that the Keyboard Layout chosen in Macintosh operating system running within Mini vMac will work properly. You can disable this fix with:
Mini Vmac Android Camera
One reason for disabling it is because this is fairly large amount of code and US only users don't need it. But also it can be disabled because I'm not sure I really understand this. Why did no one complain about this issue in a decade?

This option is only for Microsoft Windows.
You can use one of these lines to set initial speed:
The default speed is usually 8x. For the Macintosh II the default speed is 4x. (A Macintosh II has twice the clock rate, so the actual number of instructions per second executed by default is the same. Actually, a real Macintosh II has a 68020 which executes more instructions per clock cycle than a 68000, but Mini vMac doesn’t account for that yet.)
You can use one of these lines to set initial value of the Run in Background option:
You can use one of these lines to set initial value of the AutoSlow option:
For Macintosh II emulation, AutoSlow is disabled by default. AutoSlow may need some further tuning to work well with Mac II emulation. (Beta) AutoSlow is now enabled by default for Macintosh II emulation (unless a prior Branch option is chosen).
Mini vMac estimates the number of clock cycles used by each instruction excuted. There are three levels of accuracy.
In '-ta 0' all instructions are assumed to take the same number of cycles. This closely matches Mini vMac 3.1.3 and earlier.
For '-ta 1', Mini vMac assigns an average number of cycles for each of the 65536 primary opcodes. This table is generated using timings from Motorola documentation. When a range of timings are possible for a primary opcode, an average was just guessed. In some future version of Mini vMac, this table should be tested and calibrated by comparing to real hardware.
For '-ta 2', Mini vMac supplements the cycles table by computing more accurate estimates for certain instructions depending on the current data. It is still not completely accurate. Completely accurate timing would be exceedingly difficult. For example, the CPU and video output conflict for accesses to RAM, and that would seem very complex to model.
Currently 68000 timings are used even in the 68020 emulation. More accurate timing for 68020 should be added in a future version. Truly accurate timing for 68020 would be much more difficult than for the 68000 because of pipelining and caching, probably to the point of being unfeasible for Mini vMac. But more accurate averages should be possible.
Most computers emulated by Mini vMac have a 68000 processor. But you can force Mini vMac to emulate a 68020 processor with:
By default, Mini vMac emulates a Macintosh Plus with 4M of memory. But it also can be compiled to emulate other memory sizes, depending on model:
The build system checks that the memory size you specify is supported by the Macintosh model you have chosen to emulate.
The “Rate of Insertion Point Blinking” is stored in the Parameter RAM. The default is 3 (Fast), except for Macintosh II emulation where it is 8 (Medium). Must be between 1 and 15.
The “Double Click Time” (the maximum time between mouse button clicks which will be treated as a double click) is stored in the Parameter RAM. The default is 5 (Fast), except for Macintosh II emulation where it is 8 (Medium). Must be between 1 and 15.
The number of times the selected menu item blinks when when the mouse button is released, which is stored in the Parameter RAM.
The delay after a key is held down until it begins to automatically repeat, which is stored in the Parameter RAM. Must be between 0 and 15.
The rate at which a key automatically repeats when it is held down, which is stored in the Parameter RAM. Must be between 0 and 15.
The Sound Volume is stored in the Parameter RAM. The default is 7 (Maximum) when sound is enabled, otherwise it is 0.
The color that is used for selected text, for example. It is stored in the Parameter RAM. There are three separate options for the red, green, and blue components. Each component value must be betwen 0 and 65535. If its option is not present, the value of the component is 0. These options are only allowed for Macintosh II (or IIx) emulation.
The “GetPRAM” tool can be used to get values for these options. That is, first set the desired highlight color in the “Color” Macintosh Control Panel, and then run GetPRAM.
The Parameter RAM has fields for Latitude and Longitude, which can be set with the Map control panel, and are only used by a few programs. Mini vMac tries to automatically set these fields by asking the host operating system. This is currently implemented only for older Macintosh, not including the latest port for Cocoa. When not implemented, both fields are set to zero. The automatic setting of these fields can be disabled by:
With the above option, the Latitude and Longitude can be set manually:
The above example is for New York city. The Latitude and Longitude in degrees is devided by 90 and then multiplied by 2 to the 30th power. The “GetPRAM” tool can be used to get values for these options. That is, first set the desired highlight location in the “Map” Macintosh Control Panel, and then run GetPRAM.
If ‘-alc 0’ is not used, then the ‘-lcy’ and ‘-lcx’ options will be ignored without warning. This is so the output of GetPRAM can be used directly without always disabling Automatic Location.
These options may not be used when emulating a Mac 128K, 512K, or 512Ke, which do not have Extended Parameter RAM.
The Parameter RAM has fields for Time Zone, which include an offset in seconds from Greenwich mean time, and a flag for whether daylight saving time is in effect. The offset can be set with the Map control panel, and the flag can be set with the Data and Time control panel in System 7.5. These fields are only used by a few programs. (The system clock is kept in local time, and most programs use only local time.) Mini vMac tries to automatically set these fields by asking the host operating system. This is implemented for Macintosh, Windows, Linux. When not implemented, both fields are set to zero. The automatic setting of these fields can be disabled by:
With the above option, the Time Zone field can be set manually:
When the offset is even multiple of 3600, as is almost always the case, you can use:
The “GetPRAM” tool can be used to get values for these options. That is, first set the desired highlight location in the “Map” Macintosh Control Panel, and if desired set the Daylight Savings flag in the “Data and Time” Macintosh Control Panel, and then run GetPRAM.
If ‘-alc 0’ is not used, then the ‘-lcd’, ‘-lczs’, and ‘-lcz’ options will be ignored without warning. This is so the output of GetPRAM can be used directly without always disabling Automatic Time Zone.
These options may not be used when emulating a Mac 128K, 512K, or 512Ke, which do not have Extended Parameter RAM.
This option turns off all but the minimum Mini vMac extensions, such as importing and exporting the clipboard, and creating new disk images and files, leaving just what is needed for the replacement disk driver to operate.
This makes the program smaller, and perhaps reduces potential security concerns. So it could be worth doing for when the extensions aren't needed, such as for most games.
This option disables the more accurate mouse emulation normally used in Full Screen Mode, which looks at the motion of the real mouse rather than its absolute position. This allows Mini vMac to work somewhat better on tablet computers without a mouse. But such computers are still not really supported.
Normally, when in Full Screen Mode, Mini vMac will try to “grab” the keyboard, preventing the operating system from intercepting keys. So in the Windows version, the ‘windows’ key can be used as an ‘option’ key, instead of popping up the “Start” menu. And in the OS X version, Command-Tab won't switch away from Mini vMac. This is also implemented in the X version.
This option disables grabbing the keyboard, allowing the operating system to intercept keys when Mini vMac is in Full Screen Mode.
The ‘I’ command of the Mini vMac Control Mode, which presses the emulated Interrupt Button, can be disabled.
In a future version, it may be disabled by default. (In the original Macintosh, the Interrupt Button was disabled by default. You needed to install the “Programmer’s Switch” to use it.)
The ‘R’ command of the Mini vMac Control Mode, which presses the emulated Reset Button, can be disabled.
In a future version, it may be disabled by default. (In the original Macintosh, the Reset Button was disabled by default. You needed to install the “Programmer’s Switch” to use it.)
The ‘K’ command of the Mini vMac Control Mode, which toggles the emulated control key, can be disabled.
In a future version, it may be disabled by default. (The original Macintosh did not have a control key. And, using this command accidentally would be confusing.)
This option is only for Linux and other X versions, when color depth is zero. Passing single bit per pixel images to the operating system is suspected to be unreliable, so Mini vMac now always passes 32 bit images. This option forces it to use single bit images, which may be more efficient, when you know that it works (i.e. there weren't problems in Mini vMac 3.4 and earlier).
This option is only for the Cocoa version for OS X. On computers with more than one GPU, it allows the operating system to choose which one is used. Otherwise on a MacBook pro, it is reported that the higher power discrete GPU is always used instead of the lower power integrated GPU, and that besides wasting power for no noticable benefit, it also takes time to switch on the discrete GPU when Mini vMac starts.
This will probably become the default in a future version.
This option is only for the Cocoa version for OS X which, as of Mini vMac 36, is normally signed with a certificate from Apple, so that the Gatekeeper feature of OS X will permit it to run.
Gatekeeper was added in OS X Mountain Lion (10.8). By default, the operating system will refuse to run applications downloaded from the internet, unless Apple considers it trustworthy (because it is digitally signed by a developer registered with Apple). Gatekeeper is in some ways a good idea, but some people consider it as one step along the way to making OS X like iOS, where no software can be installed without Apple's permission, and emulators are forbidden, including Mini vMac.
When Mini vMac is signed, Apple can at any time choose to revoke the certificate, and Mini vMac will stop working.
Another issue is that, since Mini vMac doesn’t use Apple’s time stamp server (because that would break reproducible builds, among other problems), Mini vMac will probably stop working when the certificate expires, 5 years after being issued. (The plan is to renew the certificate every year, so that a compile of Mini vMac should work for at least 4 years.)
To avoid these issues, you can disable code signing. The disadvantage is that OS X will by default refuse to run it. One way to override Gatekeeper, giving an application permission to run, is to hold down the control key and click on its icon (or right click) to get a contextual menu, then choose the Open item, and in the warning dialog that comes up click on the Open button. (This only needs to be done the first time Mini vMac is run.)
This option is only for the Cocoa version for OS X. It enables “Sandboxing”, an Apple security mechanism, so that any bugs, or even maliciousness, in Mini vMac can only do limited harm. However, it does remove some capabilities. The single requested “entitlement” allows Mini vMac to read and write files that the user has selected, with the Open File dialog, or by dragging into the Mini vMac window or icon.
But Mini vMac’s ability to automatically find files by name in special locations is severely restricted. It is prevented from finding “vMac.ROM”, “disk1.dsk”, “disk2.dsk”, etc. in the folder containing the application. It can find such files in a “mnvm_dat” folder created inside the application, but only read only. It does not have access to “~/Library/Preferences” to find “vMac.ROM” (but it does get access to the corresponding folder inside its container folder, which is obscure). It does have read only acces to “/Library/Application Support/”. Furthermore, if these named files are links, that won’t work unless the file linked to is in one of the few places that a Sandboxed application has access to.
This may become the default in a future version.
Patch the ROM to replace the “Happy Mac” icon displayed on boot when a disk is inserted, with one of the images designed by Steve Chamberlin for his Mac ROM-inator (used with permission).
The build system will normally select the correct ROM Size for the Macintosh model you have chosen to emulate. But you can override this, such as to use a ROM image for Steve Chamberlin’s Mac ROM-inator. If you use this option, you will also need “-chr 0” as described below. (You may also want “-drc 0 -drt 0 -speed z -ta 2 -sony-sum 1 -sony-tag 1” to test the image with maximum accuracy.)
The first 4 bytes of a Macintosh ROM contain a checksum of the remaining bytes, and there is code in the ROM to check the checksum on boot. Mini vMac patches the ROM image, so it disables this checking code. Mini vMac does the check itself before patching the ROM. It also checks that the 4 byte checksum matches one of the known ROM images for the model you have chosen to emulate. If you want to have Mini vMac use a ROM image that has been modified you can disable these checks with:
There is code in the Macintosh ROM to checksum the ROM at boot. Since Mini vMac patches the ROM, it also patches out this check. If you are using a ROM image with Mini vMac that is already patched (such as for Steve Chamberlin’s Mac ROM-inator ), this check may already be patched out. In that case Mini vMac doesn't need to, and probably shouldn't, to avoid interference in case a different method of patching out is used.
Mini Vmac Android Phone
There is code in the Macintosh ROM to test proper operation of RAM at boot. Mini vMac normally patches the ROM to disable this test, to speed up booting. For greater realism, you can leave this test in.
This enables Mike Fort's LocalTalk emulation. There are currently some limitations. It is only implemented for OS X. It requires running the command “sudo chmod ugo+rw /dev/bpf*” to allow Mini vMac (and everyone else) access to all network traffic. The “-lt” option also causes Mini vMac to run in the background by default, because Mini vMac can't be a proper LocalTalk node if it isn't running. And you need to manually turn on AppleTalk in the chooser - I can set the PRAM flags to boot with AppleTalk already on, but it doesn't work properly.
There is a now a second option for transporting LocalTalk packets, using UPD, by Rob Mitchelmore. It does not require setup or administrative privileges (no “sudo chmod ugo+rw /dev/bpf*” needed). The options are:
The new UPD option is the default as of Mini vMac branch 37. But if a prior Branch option is chosen for compatibility with an earlier version, the default is BPF.
When compiled with the 'Icon Master' setting turned on, Mini vMac will try to take ownership of Disk Image files and ROM Image files. It is better to have at most one copy of Mini vMac compiled with '-im 1' on a single computer. It may be preferred to have no copies of Mini vMac compiled with '-im 1', to avoid possible conflicts with other programs.
In Mac OS X, Windows, and Mac OS 9 and earlier, double clicking on a Disk Image icon will open it with a copy of Mini vMac compiled with '-im 1'. Also, Disk Image and ROM Image files will be given Mini vMac icons.
Mini Vmac Android Setup
In Mac OS 9, and early versions of OS X, Disk Image files should have the creator type set to “MnvM” for double clicking to work (see “SetFType”). Also, the file type should be “MvIm” to see the Mini vMac Disk Image icon. ROM Image files should have the creator type “MnvM” and the file type “ROM!” to see the Mini vMac ROM Image icon.
In Windows and later versions of Mac OS X, Disk Images files should have a name that ends in “.dsk” for double clicking to work and to see the Mini vMac Disk Image icon. ROM Images files should have a name that ends in “.ROM” to see the Mini vMac Disk Image icon.
In Windows, a copy of Mini vMac compiled with '-im 1' will install itself in the registry when it is launched. So it will not take ownership of Disk Image and ROM Image files until after the first launch. (And the Mini vMac document icons may not appear until the computer is rebooted.) Mini vMac can only install itself in the registry if it is launched from an administrator account.
This setting currently has no effect in the Linux and other X versions.
When enabled, Mini vMac will display a warning message when it encounters an unexpected situation. The warning will include a 4 digit hexadecimal number that indicates the particular situation. A warning is displayed only after the first abnormal situation Mini vMac encounters, thereafter it is suppressed.
This is not enabled by default, because in the final stable version, it mostly reports about harmless bugs in Macintosh 680x0 software. Enabling it can be useful for programmers working on Mini vMac, and perhaps also for programmers writing Macintosh 680x0 software.
When trying to emulate some aspect of Macintosh hardware, my current strategy is not to try to figure it all out and then implement the entire emulation as best I can. Because if I did that, inevitably there would be a mistake somewhere, and when that causes some software to malfunction, I won’t have any clue of where to look for the mistake. Instead I would start with a place holder Abnormal Situation report. Then I find some Macintosh software that reaches that report, and look at that area of its code, and try to figure out what it is trying to do. Then I try to implement just enough emulation for it to work correctly, and give an Abnormal Situation report for code that does something else. If the Macintosh software still doesn't work, the problem is probably in the code I just wrote. If it does work, then I next try find some other Macintosh software that hits one of the new Abnormal Situation reports. And iterate. The result is code that is usually correct for what it does, and will tell you exactly where to look when it reaches something that hasn’t been implemented yet.
If this option is present, the build system will generate source code that causes the compiler to generate an error. This is for testing the variation service.
If this option is present, the build system will treat it as an error. This is for testing the variation service.
Normally it is an error for the same option to be used twice. If this option is present, then options to the right of it will override options to the left of it. It is still an error for an option to be used twice on the same side of ‘!’.
This option is for future use. It currently has no effect. (Beta) It is now used in Mini vMac 37.
It tells the build system that the requested options were from a specific branch (version) of Mini vMac. The ‘P’ command of the Mini vMac Control Mode gets the options from an existing variation, and includes this Branch setting. If the default settings have changed from since that older version, then the build system will use defaults of the old version, rather than the current defaults. So the newly generated variation behaves as close as possible to the earlier variation.
The ‘P’ command retrieves the options in a canonical form. It always generates a “-br” option for the current version, rather than copying any “-br” option passed to the build system.
:
If you find Mini vMac useful, please consider helping the Gryphel Project.
Next - Options for developers
www.gryphel.com/c/minivmac/options - feedback copyright (c) 2020 Paul C. Pratt - last update 3/2/2020
Mini Vmac Android Download
0 notes
Text
Abrmate For Mac

abrMate 1 1
Abrmate For Macbook Pro
Abrmate For Mac Computers
Abrmate For Macular Degeneration
Abrmate For Mac Os

Texturemate in Multimedia
For others, there's SheepShaver, a PowerPC emulator capable of running Mac OS 9.0.4 down to Mac OS 7.5.2 and there's Basilisk II, a 68k emulator, capable of running Mac OS (8.1 to 7.0). For everything older than System 7, you will need a Mac Plus emulator like Mini vMac NEW! AbrMate provides the ability to convert brush files that may have been created in newer Photoshop CS versions such as CS5 into new brush files that can be opened in Adobe Photoshop 7 or newer. This can be very useful if you want to download brush sets online but they have been created in newer versions of Adobe Photoshop that you currently have. Explore the world of Mac. Check out MacBook Pro, iMac Pro, MacBook Air, iMac, and more. Visit the Apple site to learn, buy, and get support. Download abrMate - Load Adobe Photoshop brush sets for close inspection in a large preview area, and export them as image files with this lightweight application.
Abrmate For Macbook Pro
abrMate is a freeware Windows application that has the ability to open Adobe Photoshop .abr brush preset files for previewing, organizing, or exporting brushes to .png's.
abrMate is a freeware Windows application that has the ability to open Adobe Photoshop .abr brush preset files for previewing, organizing, or exporting brushes to .png's. I began writing abrMate because there didn't seem to be a full-featured free Windows application out there for opening and organizing brush files. Sometimes you don't want to load Adobe Photoshop just to manage your brushes and sometimes they can be hard to organize sometimes with thousands of brushes. abrMate provides the ability to convert brush files that may have been created in newer Photoshop CS versions such as CS5 into new brush files that can be opened in Adobe Photoshop 7 or newer. This can be very useful if you want to download brush sets online but they have been created in newer versions of Adobe Photoshop that you currently have. With abrMate, you can export either a single brush to a .png or all open brushes to .png's at once. This is very useful if Adobe Photoshop is not the only graphic design software you use. abrMate also provides the ability to export all open brushes to a thumbnail preview .png which is very useful for brush authors looking to provide preview graphics with their brushes. abrMate 1 1 Multimedia software developed by Texturemate. The license of this multimedia software is freeware, the price is free, you can free download and get a fully functional freeware version of abrMate. Do not use illegal warez version, crack, serial numbers, registration codes, pirate key for this multimedia freeware abrMate. Always use genuine version that is released by original publisher Texturemate.
File Size: 1.64MB License: FreewarePrice: Free
Related:Free Textures - Stock - Photos - Photographs - Brick - Wood - Grain - Texturemate - Texture - PhotoshopGrain - Textures - Christmas Textures - Seamless Textures - Textures Christmas - Photo Grain - Grain Alcohol - Distiller Grain - Textures Seamless Prices - Dried Distiller Grain -

Abrmate For Mac Computers

Abrmate For Macular Degeneration
Platform: Windows
Abrmate For Mac Os
Downloads: 247 Category: Multimedia
0 notes
Text
Mac Os 8

Released January 19, 1998, Mac OS 8.1 was the last version of the Mac OS to run on Macintosh computers with either a 68k processor, or PowerPC processor. USB: USB made its big debut. HFS Plus: The new, optional HFS+ Mac disk format, also known as the Mac OS Extended Format, made its debut in Mac OS 8.1. To upgrade, you generally had to wipe out the contents of your entire hard drive before. With Mac OS 7.6, Apple dropped support for writing to the MFS format. Mac OS 8 dropped MFS support altogether. However, any Macintosh with a built-in floppy drive can use Disk Copy 4.2 to make 400K/800K disks from images and Disk Copy 6.3.3 to make 800K disks from images, even in Mac OS 9.
These are Apple's recommended releases for machines with 128K and 512K of memory. Nothing more, nothing less. The disks are complete and the files are unaltered.
Note: These Disk Copy 4.2 disk images* are stored inside early Stuffit (.sit) archives, which can be extracted by Stuffit Expander 3.5 (and above) in System 6 (and above). You can download Stuffit Expander at MacFixer. In Mac OS X 10.7 and above, The Unarchiver can extract them for use in Mini vMac or via Floppy Emu. If you are using Disk Copy to make floppy disks, don't expand the archives until they reach the machine you will use to make the disks. Avoid handling them on Windows, as it will strip the resource fork from the archive.
For others, there's SheepShaver, a PowerPC emulator capable of running Mac OS 9.0.4 down to Mac OS 7.5.2 and there's Basilisk II, a 68k emulator, capable of running Mac OS (8.1 to 7.0). For everything older than System 7, you will need a Mac Plus emulator like Mini vMac NEW! MacOS Big Sur elevates the most advanced desktop operating system in the world to a new level of power and beauty. Experience Mac to the fullest with a refined new design. Enjoy the biggest Safari update ever. Discover new features for Maps and Messages. Get even more transparency around your privacy. Released October 17, 1998, Mac OS 8.5 was the first version of the Mac OS to run solely on Macs equipped with a PowerPC processor.
System 1.1 Finder 1.1g, released May 1984
Minimum recommended OS for the Macintosh 128K and 512K.
System Disk (400K) (disk image)
MacWrite (MacWrite 2.2) (400K) (disk image) (August 1984)
MacPaint (MacPaint 1.4) (400K) (disk image) (August 1984)
Backup Disk (400K) (disk image) (August 1984)
This is the first solid Mac Software release, three months after the original Macintosh shipped with what was essentially a public beta release. See Andy Hertzfeld's Real Artists Ship.
System 2.0 Finder 4.1, released April 1985
Recommended OS for the Macintosh 128K.
System Update (400K) (disk image)
Disk Write (MacWrite 4.5) (400K) (disk image)
Paint (MacPaint 1.5) (400K) (disk image)
System Disk (400K) (disk image) (June 1985)
Backup Disk (400K) (disk image) (June 1985)

The System Update disk was sent to dealers, for distribution to Macintosh owners. MacWrite 4.5 and MacPaint 1.5 were the current versions for more than two years.
System 3.2 Finder 5.3, released June 1986
Recommended OS for the Macintosh 512K. Maximum OS for the 128K.
Macintosh Plus System Tools (v1.1) (800K) (disk image)
Macintosh 512Ke System Tools (v1.0) (800K) (disk image)
HD 20 Startup (400K) (disk image)
System Installation (v1.0) (400K) (disk image)
Printer Installation (v1.1) (400K) (disk image) This is not a direct image of the original disk created on 'Wed, Jun 4, 1986, 3:32 PM.' This is a copy of its contents, complete and unaltered.
System 4.1 Finder 5.5, released April 1987

Recommended OS for the Macintosh 512Ke. Maximum OS for the 512K.
Macintosh System Tools (v2.0.1) (800K) (disk image) (June 1987)
Macintosh Utilities 1 (v2.1) (800K) (disk image) (August 1987)
Macintosh Utilities 2 (v2.1) (800K) (disk image) (August 1987)
Troubleshooting:
On a Macintosh 512K with an external 800K floppy drive:
Use the HD 20 Startup disk to boot the machine.
Insert the System Tools disk into the external 800K floppy drive.
Start an application from the System Tools disk. TeachText, for example.
The System Tools disk is now the startup disk. You can remove the HD 20 Startup disk.
On a Macintosh 512K with a Hard Disk 20 hard drive:
The System and Finder on the HD 20 Startup disk must be the same as the System and Finder on the Hard Disk 20, i.e., System 4.1 Finder 5.5. (This is only an issue with System 4.1 Finder 5.5. System 4.0 Finder 5.4 and below will start with any HD 20 Startup disk.)
An external 800K floppy drive (attached to the Hard Disk 20) is required for installation, unless you have some other way of moving files from 800K disks to 400K disks.
The minimum requirement for the HD 20 Startup disk is a System Folder with System 4.1, Finder 5.5, and Hard Disk 20 1.1 in it. See below for information about using Font/DA Mover (you can use the version on the HD 20 Startup disk) to reduce the size of the System file if need be.
Use the 'Mac Plus, 512Ke, 512K ...' Installer Script in the Utilities Folder on the System Tools disk to update an existing System Folder on the Hard Disk 20.
System 6 disk images from Apple
For information about Macintosh hardware compatibility with System 6.0.x, see Apple Knowledge Base article TA33972: System Software: Version Matrix, System 6.0.x to 7.0.1. While it is possible to run up to System 6.0.8 on a Macintosh 512Ke, some applications may not function on a machine with only 512K of memory, or even 1 Mb.
There are three System 6 releases available for download on the old Apple Support Area server. As of May 2018, the index is not accessible, but the files are still there, just click on the direct links below. Another source for these same files is MacFixer.
Macintosh System Software 6.0.3, released December 1988 (Read Me) (Disk 1 of 4) (Disk 2 of 4) (Disk 3 of 4) (Disk 4 of 4)
The System Tools disk contains a complete System Folder.
The size of the System file with the minimum system font set (see below) and Control Panel installed is 232K.
Recommended for machines with 1 Mb or less of memory, with a single floppy drive and no hard drive.
Macintosh System Software 6.0.5, released March 1990 (Read Me) (Disk 1 of 4) (Disk 2 of 4) (Disk 3 of 4) (Disk 4 of 4)
The System Tools disk contains a bare-bones System Folder. Use the Installer to create a complete System Folder. To install on a Macintosh 512Ke, do a custom installation of 'System software for Macintosh Plus' or 'Minimal software for Macintosh Plus.'
The size of the System file with the minimum system font set (see below) and Control Panel installed is 281K.
Recommended for machines 1 Mb or more of memory, with two floppy drives, or a hard drive.
Macintosh System Software 6.0.8, released April 1991 (Read Me) (Disk 1 of 4) (Disk 2 of 4) (Disk 3 of 4) (Disk 4 of 4)
The System Tools disk contains a bare-bones System Folder. Use the Installer to create a complete System Folder. To install on a Macintosh 512Ke, do a custom installation of 'System software for Macintosh Plus' or 'Minimal software for Macintosh Plus.'
The size of the System file with the minimum system font set (see below) and Control Panel installed is 372K.
Mac Os 8 Rom
Troubleshooting:
Mac Os 8.0
You can use Font/DA Mover (on the Utilities 2 disk) to reduce the size of the System file and free up space on a floppy disk:
Desk Accessories: There must be at least one DA installed. Control Panel is a good choice. Include Chooser if your printer or modem ports are in use.
Fonts: The minimum system font set is Monaco 9, Chicago 12, Geneva 9, Geneva 12. Note that all System 6 releases come with the same Fonts suitcase (on the Utilities 2 disk).
You can also reduce the size of the System Folder. The System Folder on the System 6.0.3 System Tools disk is shown here:
System documents: The minimum set is System and Finder. It's also a good idea to include Clipboard File.
MultiFinder, DA Handler, Backgrounder, and PrintMonitor (on the Printing Tools disk) work together. Not recommended for the 512Ke.
Easy Access is small. Includes Mouse Keys (requires numeric keypad) and Sticky Keys.
Remove Scrapbook File only if you remove the Scrapbook DA.
Remove Key Layout only if you remove the Key Caps DA.
Control Panel documents: These store changes to the default settings. You don't need them if you don't want to make changes. But it's a good idea to include the basics: General, Keyboard, Mouse, and Sound.
Color, Monitors, and Startup Device are for Macintosh SE and II machines.

Working with older disk images
You can format 800K (2DD: double-sided, double-density) disks as 400K (1DD: single-sided, double-density) disks with no problems. Note that you should use Double Density (DD) media. One reliable source for new disks is OldSoftware.com. You should not use High Density (HD) media. HD disks are not entirely stable when formatted as DD. If you must use HD media, then it should be a disk that has never been formatted. See here (p. 14) for details.
For System 6, you should use Disk Copy 4.2 (Read Me) (Download from Apple) to work with 400K/800K disks and images. This is ideal, since System 6 can read/write 400K disks, which normally use the Macintosh File System (MFS) format. 800K disks use a different format: the Hierarchical File System (HFS). System 6 is fluent in both formats. (It is possible to format 400K disks using HFS, but they can't be used as startup disks. See here.)
System 7 is not ideal, since it does not handle the MFS format properly. This is discussed in Apple Knowledge Base article TA47951: System 7.x: Limitations on Use of 400k Disks. Nevertheless, you can use Disk Copy 4.2 to work with 400K/800K disks and images with no problems. Disk Copy 6.3.3 (Download from Apple) works perfectly with 800K disks and images. It allows you to make compressed images and mount images on the Desktop.
Mac Os 8
With Mac OS 7.6, Apple dropped support for writing to the MFS format. Mac OS 8 dropped MFS support altogether. However, any Macintosh with a built-in floppy drive can use Disk Copy 4.2 to make 400K/800K disks from images and Disk Copy 6.3.3 to make 800K disks from images, even in Mac OS 9. For more on this, see Sonic Purity.
Mac Os 8 Emulator
* Special thanks to Sara Johnson not only for her advice on how to do this, but also for her help in revising these archives (May 2018).
0 notes
Text
Scan Driver For Mac

Disclaimer
Scan Driver For Canon Mx490
Scan Driver For Canon Mx492
All software, programs (including but not limited to drivers), files, documents, manuals, instructions or any other materials (collectively, “Content”) are made available on this site on an 'as is' basis.
For others, there's SheepShaver, a PowerPC emulator capable of running Mac OS 9.0.4 down to Mac OS 7.5.2 and there's Basilisk II, a 68k emulator, capable of running Mac OS (8.1 to 7.0). For everything older than System 7, you will need a Mac Plus emulator like Mini vMac NEW! https://downblog7.tumblr.com/post/653959256685576192/buhs-for-mac-os.

Canon India Pvt. Ltd., and its affiliate companies (“Canon”) make no guarantee of any kind with regard to the Content, expressly disclaims all warranties, expressed or implied (including, without limitation, implied warranties of merchantability, fitness for a particular purpose and non-infringement) and shall not be responsible for updating, correcting or supporting the Content.
Download the latest drivers, firmware, and software for your HP Officejet Pro 8600 e-All-in-One Printer - N911a.This is HP’s official website that will help automatically detect and download the correct drivers free of cost for your HP Computing and Printing products for Windows and Mac operating system. Scan images or documents using your Mac. If you have a scanner or a printer with a scanner, you may not need any special software to scan an image. Before you scan, you need to open your scanner. Then, follow the instructions for either a document-feeding scanner or a flatbed scanner.
Download mac os for vmware. Attention, Internet Explorer UserAnnouncement: VMware Communities has discontinued support for Internet Explorer 7 and below.In order to provide the best platform for continued innovation, VMware Communities no longer supports Internet Explorer 7.VMware Communities will not function with this version of Internet Explorer.
Canon reserves all relevant title, ownership and intellectual property rights in the Content. You may download and use the Content solely for your personal, non-commercial use and at your own risks. Canon shall not be held liable for any damages whatsoever in connection with the Content, (including, without limitation, indirect, consequential, exemplary or incidental damages).
You shall not distribute, assign, license, sell, rent, broadcast, transmit, publish or transfer the Content to any other party. You shall also not (and shall not let others) reproduce, modify, reformat or create derivative works from the Content, in whole or in part.
Scan Driver For Canon Mx490
You agree not to send or bring the Content out of the country/region where you originally obtained it to other countries/regions without any required authorization of the applicable governments and/or in violation of any laws, restrictions and regulations.
Scan Driver For Canon Mx492
By proceeding to downloading the Content, you agree to be bound by the above as well as all laws and regulations applicable to your download and use of the Content.
0 notes
Text
Mac Emulator For Old Mac Games

Do you Intend to be able to play old-school Mac OS games or software on your current OS X equipment? Or maybe Raspberry Pi, or Android gadget? There’s an emulator that could do this called – Advanced Mac Substitute (AMS).
Old mac emulator free download. Fuse - the Free Unix Spectrum Emulator The Free Unix Spectrum Emulator (Fuse): an emulator of the 1980s home computer and various clones fo old mac emulator free download - SourceForge.
Some of our readers have been using Apple computers since the very early days of the company; many are new to the Mac. In the 1980s, a lot of low-res.
Best Mac emulators guide: Emulate arcade games with MAME Having started life as a Pac-Man emulator in 1997, MAME has grown into a project that aims to preserve the entirety of arcade game history.
PCSX2 is the tool that can best emulate PlayStation 2 games on Mac. The fans of GameCube and Wii don’t have many options at their disposal since there are no reliable emulators for those consoles except for the Dolphin emulator. OpenEmu – (NES Emulators for Mac) OpenEmu is one of the most amazing emulators I saw.
Emulators of old computer system systems and gaming consoles are preferred by classic game fanatics. Emulators additionally might be attractive to others with some nostalgic feeling to these old games.
Advanced Mac Substitute is a project by Josh Juran to make it feasible to run old Mac OS software program (up to Mac OS 6) without needing an Apple ROM or system software application. Various other emulator applications including Basilisk II need a MacOS installer-CDs from Mac OS 7.5 or Mac OS 8.
Apps are released from the command line momentarily and also are carried out by the emulation software, which translates the system and firmware calls. A little graphical front-end displays video and also approves customer input.
There’s still a great deal that needs to be accomplished. Right now, AMS works on Mac OS X approximately variation 10.12– both on Intel and also PowerPC variations of the operating system– the code for the graphics front end presently won’t work on MacOS Mojave. Juran is looking for a person with coding knowledge of Coco to aid take care of that. And also the Linux application of AMS does not yet sustain keyboard input. We were incapable to get the front end to function at all on Debian 9 on Intel.

Hopefully these obstacles can be gotten rid of. Juran said that he’s thinking about a crowdfunding program to support further growth of AMS and also is trying to find others happy to lend a hand to this incredible task.
It’s really amazing what can be accomplished in tech. Since it’s open source there will be a lot of eyeballs on this project.
Previous – Disney Planning to Become Major Netflix Competitor
Vintage Macintosh Software
If you’re looking for old Mac software, there are a number of sites on the interwebs that are worth checking out:
Game Emulator Mac
Macintosh Garden– great site for old Mac games, system software and abandoned applications Rescue My Classic Mac – old Macintosh boot floppies and applications available for purchase Macintosh Repository – a sanctuary for old software of the classic Mac OS era Mac GUI – customize your Mac’s look and feel with Themes, Desktops, Icons, Widgets, etc.. Mac OS 9 Lives – tips and software for running the Classic Mac OS; audio-centric focus U-Mich Software Archives – large legacy software collection, for Macs and other platforms Max1zzz’s Classic Mac Server – another vast collection of Mac system and application software The Gryphel Project – 68k era Mac software and home of the Mini VMac Mac Plus emulator E-Maculation – dedicated to emulation of the classic Macintosh computer in OS X, Windows and Linux OldApps.com – installers for superceded and obsoleted Mac OS X software PowerPC Software Archive– links to the most current PowerPC compatible versions of many programs The Mac Driver Museum – old hardware drivers for Mac printers, disks, video cards and related items (partial archive) MacFixer Mac Software Library – a growing compendium of early Mac system, utility and game installers The Internet Archive – the grand attic of the internet adds software to its collection
Mac Emulator For Old Mac Games Downloads
Mac OS 9.2.2 for PowerMac G4 MDD– Retail Mac OS 9 installers do not work on the last generation PowerMac G4 MDD models. This is a copy of Mac OS 9.2.2 included on the MDD bundled Software Restore CDs which is able to boot these G4 models into OS 9 (FireWire 400 models only). It can also be used as Classic Mode on any PowerMac running Mac OS X 10.1-10.4.
ProTools 3.4 Free– Pro Tools 3.4 Digital Audio Workstation software was released free of charge by Digidesign in 1997. This is a fully-functional 16-track version of the program which runs on many 68k Nubus Macs and old PCI PowerMacs.
SoundApp – a swiss army knife for old sound files. Play and convert many vintage audio formats with this useful utility.
Classilla and TenFourFox – ports of the current Firefox web browser, optimized for Mac OS 9 (Classilla) and PowerPC Macs running OS X Tiger (TenFourFox). Get online with your vintage Mac!
PrintToPDF– a free utility to create PDF files on classic Macs running System 7 through Mac OS 9. This is a handy way to keep the formatting of old documents you can’t otherwise convert.
Ps3 Emulator For Mac

Mac Os Emulator For Windows
The Vintage Mac Museum is a private, working collection of the pre-Intel Apple Macintosh. We provide old Mac file transfer and conversion services, along with research into old Mac technologies for patent prior art searches or academic purposes.
0 notes
Text
Archivers For Mac Free

Download 7-Zip for MacOS. 7Zip is a great app that should be included on iTunes. As productivity is a concern on all Apple devices, the development of 7Zip would be a great delight for all its users. I mean, why not? It is the most powerful and secure archiving and file compression tool in its category and field. For more resources about 7Zip for other operating systems, check out our other articles on 7Zip.
So, you are one of the opulent citizens of the society or perhaps meticulous with the software and security, thus, you prefer using Mac computers. As a matter of fact, some programs and software for Windows, Linux, and for Mac are programmed differently. This goes the same with 7Zip for Mac.
Zip (Windows): 7zip remains one of the most prominent compression tools which stepped. For others, there's SheepShaver, a PowerPC emulator capable of running Mac OS 9.0.4 down to Mac OS 7.5.2 and there's Basilisk II, a 68k emulator, capable of running Mac OS (8.1 to 7.0). For everything older than System 7, you will need a Mac Plus emulator like Mini vMac NEW! Winzip can zip or unzip on Mac, and open.7z file on Mac. This Winzip app on Mac.
Archivers For Mac Free Software
By default, Mac OS X is incapable of handling these files. But this shouldn’t be much of an issue as there are lots of other archiving tools available that can open a .7z file and other file compression formats.
The 7Zip file format is considered a better file compression format because of its high security and overall stability. It 7Zip can compress any file much better than ZIP and WinRAR or WinZip. This makes 7Zip safer and a much better choice.

Contents
1 A Walkthrough on 7-Zip for Mac
1.1 Reminder
A Walkthrough on 7-Zip for Mac
Keep on reading as we are going to walk you through on the steps for opening .7z archive files regardless of what version of Mac OS you are using. Don’t worry, it is easy and quick to do even it gets an error cannot open a file as archive sometimes. Here’s how it goes.
Download “The Unarchiver” first. The latest version is 4.2.2 and support macOS 10.7 or later. the file is 13.6 MB. You can either download it from the Mac App Store or click here for direct download.
The app is relatively small so you should be able to get it installed for a few seconds depending on your internet speed.
As soon as The Unarchiver app finishes installing, open it and you will see the file association list.
Launch the Unarchiver and there you’ll find the file association list, inform the Unarchiver to associate it with .7z files.
The moment that you’ve associated the Unarchiver with .7z you could then double-click any .7z file on your Mac computer. It will then open and uncompress like other archive format or launch Unarchiver and just drag and drop the 7z files to the utility.
This is everything that you have to know in opening any .7z archive files saved on your Mac computer. After installing the UnArchiver and associated it with .7z 7Zip files, you may now launch the .7z archive simply by double-clicking on it. Inside the UnArchiver utility, your file will open and decompress the original 7z file. It will exit the app automatically when it is finished. It is possible to directly open the Unarchiver and open the file in the Unarchiver directly where it’ll be extracted.


Reminder
Since 7Zip archives have undergone a strong compression procedure, it sometimes takes a while in order to completely extract large 7z files. Don’t be surprised as well if the 7Zip has expanded to something bigger than the original file size as the size of the archive. This is totally normal. Just be sure that you have enough disk space to accommodate all the uncompressed data.
Unarchiver is a well-known solution to all kinds of archive formats available on Mac. It’s been discussed as an alternative when you have to unRAR and open RAR files in Mac OS and it can open virtually any archive format you might come across. This can include but not limited to:
7z
zip
sit
tgz
tar
gz
rar
bzip and;
hqx
Due to its expansive nature and free of charge, it is a wonderful addition to your Mac software toolkit. Well, it is comparable to a Swiss army knife but for computers.
The Complete Package
The Unarchiver provides support to every release of the Mac OS software that’s in use. This is regardless if you’re using the latest release, Sierra, macOS High Sierra, Mac OS X El Capitan, Mountain Lion, Mavericks, Snow Leopard, Yosemite, and so forth. It’ll work and can get the job done in opening and decompressing zip as well as other archive formats available.
Rar Archive Mac
3.3/5 (7 Reviews)
0 notes
Text
Os 7 For Mac Download

Os 7 For Mac Download Cnet
Download Tomcat 7 For Mac Os
Mac OS 7 was a major change from the earlier System Software, introducing integrated multitasking, a revamped desktop, networking, and transitioning the name from 'Macintosh System Software' To 'MacOS'. It was followed by by MacOS 8.x.
Python 2.7.10 - May 23, 2015. Download Mac OS X 32-bit i386/PPC installer; Download Mac OS X 64-bit/32-bit installer; Python 3.4.3 - Feb. Download Mac OS X 32-bit i386/PPC installer; Download Mac OS X 64-bit/32-bit installer; Python 2.7.9 - Dec. Download Mac OS X 32-bit i386/PPC installer; Download Mac OS X 64-bit/32-bit. Global Nav Open Menu Global Nav Close Menu; Apple; Shopping Bag +.
Running Mac OS 7.x requires a Motorola 68000 based Macintosh, a supported model of Power PC based Macintosh (7.1 or later) or one of the following emulators:
Mini vMac - Runs MacOS 1.1-7.5.5, emulates a black and white Motorola 68K based Mac Plus
Basilisk II - Runs MacOS 7.x-8.1, emulates later color Motorola 68k based Macs.
Os 7 For Mac Download Cnet
SheepShaver - Runs MacOS 7.5.2-9.0.4, emulates a Power PC based Macintosh.

Screenshots
PreviousNext
Release notes
An interim catchup release in the wake of Windows 95, bundling some extra desk accessories, more hardware support, and new APIs such as the modernized Open Transport.
Installation instructions
Note: Some of these CD images are actually hard disk volumes. You can mount those in an emulator, or some older CD burning programs know how to write them as a CD/ISO.
Download Tomcat 7 For Mac Os
7.5.5 is the last supported version on Mac Plus, XL, Mac II, IIx, LC, IIcx, and SE/30, or anything with less than 68030 and 32-bit clean ROM.
0 notes