#Modular Plug Connector
Explore tagged Tumblr posts
Visit Tumblr Blog
Explore Tumblr blogs with no restrictions, modern design and the best experience.
Last Seen Tumblr Blogs


Fun Fact
Tumblr is used by 21% of adults online aged 18-29 years.
Text
https://www.futureelectronics.com/p/interconnect--connector-tools-contacts-accessories/1062-20-0222-te-connectivity-8090324
Electrical plug adapter, Socket Plug connector, Modular Plug Connector
1062 Series 22-16 AWG Socket Contact
#Connectors#Tooling and Accessories#1062-20-0222#TE Connectivity#electrical plug adapter#Socket Plug#Modular Plug Connector#Nickel Plated Crimp Socket#USB connector#cable assemblies#wire connectors#pin receptacles
1 note
·
View note
Text
https://www.futureelectronics.com/p/interconnect--pin-and-socket-connectors--header-plug-board-mount/5787531-1-te-connectivity-5053790
Socket Connector, Ethernet jacks, IC socket adapters, wire connector pins
6 Position 2.5 mm Pitch Vertical PCB Through Hole Header
#Connectors#Pin and Socket Connectors#Headers Connectors#5787531-1#TE Connectivity#Socket Connector#Ethernet jacks#IC socket adapters#wire connector pins#Plug connectors#connector#Wire cable assembly#socket adapters#Modular Plug Connector
1 note
·
View note
Text
https://www.futureelectronics.com/p/interconnect--modular-ethernet-connectors--modular-jacks/5569381-1-te-connectivity-2896884
Modular plug connectors, what is a modular jack, Ethernet jacks, Networking,
8 Position 2x1 Right Angle Through Hole Stacked RJ45 Modular Jack
#Connector#Modular/Ethernet Connector#Modular Jacks#5569381-1#TE Connectivity#modular plug connectors#Ethernet jacks#Networking#Header plug#Applications#RS-232 serial interfaces#keystone jack#board mount connector#Telephone#keystone
1 note
·
View note
Text
https://www.futureelectronics.com/p/interconnect--connector-tools-contacts-accessories/dt06-2s-c015-te-connectivity-6076068
Wire housing, USB connectors, circular connector, socket adapter, terminal block
DT Series Contact Size 16 2 Way Gray Plug
#Connectors#Tooling and Accessories#DT06-2S-C015#TE Connectivity#Audio#pin#Wire to Cable Crimp Socket Contact#Crimp tools#Wire housing#USB#circular#socket adapter#terminal block#socket plug adapter#Data#modular jack
1 note
·
View note
Text
https://www.futureelectronics.com/p/interconnect--connector-tools-contacts-accessories/0462-005-20141-te-connectivity-3076065
Cable connectors, Modular jack, circular connector, circular wire connector,
16-18 AWG Size 20 Nickel Plated Crimp Automotive Terminal Contact Socket
#TE Connectivity#0462-005-20141#Connectors#Tooling and Accessories#Tooling suppliers#Newark#micro plugs#circular#Cable connectors#Modular jack#circular wire connector Socket#Electrical components#Push-in wire connectors#Gold Plated Crimp
1 note
·
View note
Text
Kinktober Day 2
Frame Modification- Rodimus x Reader
Word count: 1.3k
Warnings: Nsfw, smut, genital modification, strap ons?, human/ Cybertronian.
@tf-kinktober2024
Day 1
Day 3

______________
The human stares at Rodimus for a moment with a raised eyebrow looking at the boxes of equipment. "So what exactly is all of this?" They ask looking over the different components in them. Rodimus scratches his helm sheepishly. "Well, uh, you know my size can be, heh, problematic when it comes to interfacing with you. Don't want to accidentally hurt you due to the size"
He offers a lopsided grin. "So Perceptor and I have been tinkering. These doodads should decrease my, um, girth and increase sensitivity without compromising structure or function, if his calculations hold up."
Rodimus clutches a box hopefully. "I care for you and I know how much you like what we have going on but i want you to be able to have more" His field radiates shy affection.
"Your... downgrading, for me?" They nearly whisper while looking over the three boxes. There were more than one spike mod in the boxes and it made them wonder just how long Rodimus had been planning this.
Rodimus rubs the back of his helm sheepishly. "Well, yeah. This is important to me too, you know?" He gestures to the boxes. "Perceptor and I have been working on different prototypes for a while now. Wanna make sure we get it just right, so they are interchangeable."
Chuckling softly, Rodimus adds, "We may have gone a little overboard with the sampling options." Taking his lover's hands in his gently, Rodimus meets their gaze. "I love you. Your happiness and safety with me means everything to me. If modifying myself helps ensure that, it's a small price."
Squeezing softly, he smiles. "So what d'you say we try 'em out, see which fits and what you like?" He's hoping he hadn't scared them with this information, but he did truly love them and wanted to give them the best he could.
It makes them laugh. "I'd love to. Do all of the pieces interchange?" They inquire while pulling one of the spike mods out looking it over. This one had bright pink lights up the underside but was a bit too large in their hands larger than their arm. Rodimus perks up at the sound of their laughter, fia warm smile falling onto his face. "Sure do!" he replies. "Perce made 'em with modularity in mind."
Leaning in, he points out how the piece in their servos connects. "That one plugs into my panel port. Then the shaft and tip snap together for a secure fit, each piece will fit to the others to integrate." Rodimus smiles before continuing "Pink light show's a bit flashy for me though. what'd you think of the sleek navy or copper ones?" Ever keen to please, he holds them up for his loger to look at.
In truth they never thought they would be sitting there with Rodimus looking at essentially Strap-ons. " I do like the top part of the silver one there, the rest of it is just a little too thick. Might work nicely with the shaft of the Orange one which I do like the lights on and it doesn't look as long as my forearm" they laugh while pointing over to the spike as Rodimus picks it up. The tip wasn't as wide as some of the others. "How do you pull them apart and put them together? Can you show me?"
Rodimus chuckles, field pulsing with affection as he examines the proposed frankenspike. "Good eye! I think you're right - silver tip and orange shaft could be a winner." He deftly twists the pieces apart to demonstrate. "The connector ports are threaded, see? Just twist counter-clockwise to separate, then clockwise to join another piece securely."
Reassembling the hybrid mod, Rodimus presents it proudly. "Well? What do you think - looks like it'll hit all the right nodes but still leave your ports feeling snug?" They laugh at his wording of it but in truth they were enjoying every moment of this.
"Never thought I'd be saying that this looks so pretty. Do they connect up with your bio-lights and pulse the same colour? And how exactly do you attach it to yourself?" As much as they were loving the fact that they and Rodimus would be able to be intimate they are so curious over how it all works.
Rodimus grins, field alight. "Never think I'd be so pleased by a compliment on my crotch accessory collection!" It makes them both burst into laughter wheezing. " but Yea, the light circuits sync right up with my biolights so it'll pulse and change colours"
Rodimus releases his interface panel which at the moment didn't have an attachment, he's rather swift with reattaching the chosen mod in its place. pressurises his lines, watching struts and panels adjust flawlessly around the new appendage. "Seamless integration. The connection anchors it securely while also transferring sensory feedback in real time." Rodimus smiles shyly. "Wanna touch it?." He teases revving his engine.
"Ready for a test drive when you are, sweetspark. I'll go slow and you tell me what you think. Your feelings are my top priority here.” He excitedly remarks. "Can we keep the other pieces too, I think this would be something fun to try and test other pieces over time." Rodimus lights up at their question, excitement filling him. "A collection? I like the way you think!"
"Now then, shall we?" He radiates eager anticipation, "I'm primed and ready to make you sing, sweetspark. Just give me the word." He slowly strokes the smaller mod as the sensation jolts through him.
"Eager are we" they tease, It was strange seeing the new one when they were so used to Rodimus' original Spike but in truth it suited him well. "Sure thing hot shot. I want a show" they giggle sitting back eager to watch.
Carefully he braces himself before encircling the new modification digit rubbing across the tip. Slow, steady pumps elicit delightful shivers up his struts as sensory feedback loops. The lights along the spike light up in the deep orange colour and pulse with each stroke.
A loud moan falls from his vocalizer. His engine purrs louder, Optics half-shuttering, Rodimus meets their gaze with a loving smirk. "Like what you see? gorgeous - just say the word and I'm yours all night."
They shake their heads in amusement. "I want to watch you work that spike Roddy, I like watching you come undone with your servo, dial up the sensitivity" they instruct. Eager to just watch the mech touch himself.
Rodimus chuckles. "As you wish." He begins stroking it much quicker, the sound of his joints popping and grinding join the mix of noises he makes. "How's it feel?" Rodimus vented softly, digits exploring the synthetic spike's sensory net with increasing awe, he had never had one which felt like this and it was making his joints weak from how quickly it had over charged his system, hot air blasting through his fans.
"Incredible... it feels so sensitive." Another moan slips from him sounding more like a whimpered whine of bliss. He gazed at his partner in a haze of affection. "Primus i cant wait to see how you feel clenched around my spike, bet you'll be so warm and soft. Might just be overloaded thinking about it."
"You going to overload, thought you had better stamina roddy" They tease watching the way his plating shutters as he quickened his pace. Rodimus whimpers out while his voice goes rather static. "Hey, cut me some slack - this new array packs way more sensation than the old one. Gonna take some getting used to!"
He overloads into his servo rather quickly. Their eyes focus on the fluid that runs down his servo, it wasn't the light pink one they were used to seeing come from him. “ Did you also change your fluids?” they hum moving closer to brush their hand against his spike. It makes Rodimus jolt as he loudly moans. “Frag!” he calls out platting, shuttering and overheating as he tries to come down from the overwhelming sensation.
“mmmm, yea.. wanted something a little more body safe for you” he admits,it earns him a kiss from them.
_________________
Let me know if you would like to be added to tag list (tagged for every fic)
Taglist
@angelxcvxc
@saturnhas82moons
@kgonbeiden
@murkyponds
@autobot79
@buddee
@bubblyjoonjoon
@chaihena
@pyreemo
@lovenotcomputed
@mskenway97
@delectableworm
@cheesecaketyrant
@ladyofnegativity
@desertrosesmetaldune
@stellasfallow
@coffee-or-hot-cocoa
@shinseiokami
@tea-loving-frog
@aquaioart
@daniel-meyer-03
@pupap123
@dannyaleksis
@averysillylittlefellow
@rosielecktor
@shurushurubanban
@wosemoose1
@strawberrydutchling
@azuragalaxya
@dumpster-fae
@simp-sentral
#transformers#transformers idw#transformers x human#mtmte#transformers x reader#transformers lost light#valveplug#rodimus#mtmte rodimus#rodimus idw#transformers hot rod#rodimus x reader#Rodimus x human
157 notes
·
View notes
Text
Very quick modular accessory build:
I found a stack of these little solar-charging USB power banks for really cheap at a thrift store a while ago.


Unfortunately, after I opened up the couple I bought, it turns out they're not very useful as is. Not only do they take a whole day in the sun to charge up, but the battery is pretty anemic and won't charge modern cell phones, and the connectors need special dongles to connect to anything.
So I decided to try turning one into a Eurorack CV input device. Remove a couple of screws on the bottom, and the innards slide out; wire cutters separate the solar cell from the board. (I'm sort of watching to see how long it takes for the status LED, now on all the time because the solar cell is missing, to drain the battery down.)
The cell, when tested, puts out a voltage between 0 and just about 5V. Ambient room lighting is just under 1V, and higher levels require very bright lights, but that's as expected. (I should mount some lamps around my case.)
I used a reamer to widen the circular hole on the top to take a 3.5mm jack, and cut away a little of the plastic frame so the jack could lie flat. Soldered the cell onto the jack — positive to tip and negative to sleeve — and reassembled.


So far I've used it as a CV source; I need to do more testing to see if it'll work as a gate or trigger source, though I expect it will if the light source is bright enough.
I've previously used a larger bare cell that I just soldered a plug onto — that one gives higher levels from less light but this one's more sturdy, more compact, and has the little wrist strap. I'll probably convert the other one too.
5 notes
·
View notes
Text
Making BIG SIF2 (Part 3)
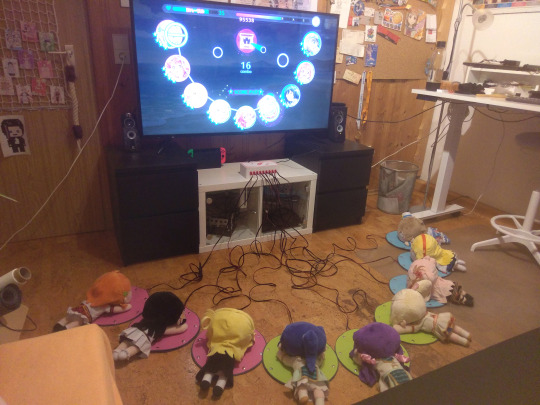
Hi! I'm back, and my BIG SIF setup is complete! That's not to say I'll never touch anything about it ever again, but it works great, and it also looks great now. Almost as if it's not just a pile of jank and bodges!
If you missed part 1 and part 2, the tl;dr is: I recreated an old SIF event where you stomp on big old floor buttons with eight other players to play songs together as a team. The other two posts talk about how the switches work, and various details about how it's all connected respectively, in case you are interested!
This post is another write-along of me working on stuff, and this time, it's about just finishing off the last few problems and to-dos - making a case for the electronics, and thinking about reliability and portability. Because of how many topics I want to cover, everything will only be covered relatively briefly. But if you want to know more about something specific, drop me an ask and I'll write more about that topic.
And just to have this important bit above the fold: I'm bringing the setup to Connichi on Saturday next weekend, in case you are there and want to play. More about that at the bottom of the post - but let's get started!
First off, an admission: I lied to you. Last time I said I made eight more floor switches. But that was not quite the truth:
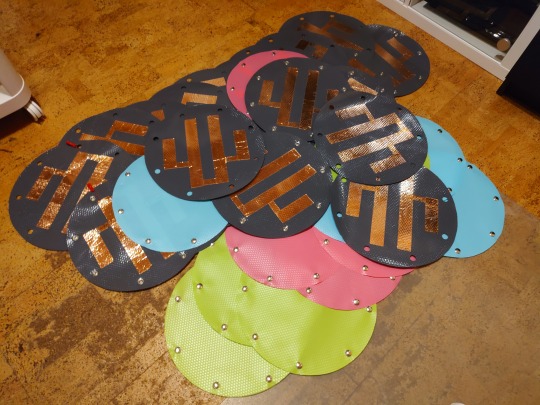
It was eleven.
So multiply everything I said last time by 1.33 - 12 total switches, with 36 shelf liner layers, 24 of those copper taped and soldered, 144 holes cut into 12 rug pad layers, 192 snap caps pressed by hand, 48 cables crimped with bullet connectors by hand. Needless to say, I have been taking it easy to give my wrist a break... The first question is probably "why?" - it's not like there's a 12-spot mode or something. That's true, I'll never use more than nine of the switches at the same time. The reason these extra three buttons exist is reliabilty: there can be three backup floor switches on standby, to swap in if something breaks.
The switches are probably fairly easy to fix if something goes wrong - just need to re-solder a connection or repair some copper tape, at most. But that will still be a problem when actually playing with the controller system, because it will always take some time, during which the game will not be playable. Having more switches on standby means you can swap out the faulty button to diagnose and repair it, while the game can go on! But the main thing is that I will not be having the means to repair switches in most locations in the first place. I'm not going to bring my screwdrivers, soldering station, multimeter, extra copper tape, cable and everything else to wherever we're playing! And there's a good chance there's no power or space for a repair station, anyways.
That's why I went with three backup buttons, so the game can go on even longer even if I I'm unable to do repairs right away. We'll just keep playing, and I'll repair the broken switches when I'm back home. And technically, because all the buttons are modular and I can swap out the separate layers, the system doesn't become unusable until four of the same part break! That should be more than enough reliability for almost any situation, especially since it probably won't be used for more than a couple hours at a time.


Next up: let's hide all of the work I did. Having the wiring visible is a little ugly, so let's just put everything in a box. Building an enclosure also makes transporting and setting up everything a lot easier, since I can already connect everything inside the box ahead of time, and then just have to plug in and place the switches on the floor. And the easiest way to make a bespoke enclosure is 3D printing it!
What I'll need - besides the obvious "places to put all of the adapters and the phone" - is some way to access the sockets and board from outside so I can plug all the cables in. Also, even though SIF2 isn't that demanding, it's still a closed box, so I'll probably want to add a fan. But that sounds doable, most of these won't be any problem. I can draw a box with some holes. I decided to go for OpenSCAD for this project instead of FreeCAD - while it would have been nice to have FreeCAD to plan cable routing and be able to set constraints and everything, I just didn't need all of these complicated features. Again, it's just a box with holes, and I can do that real fast in OpenSCAD.
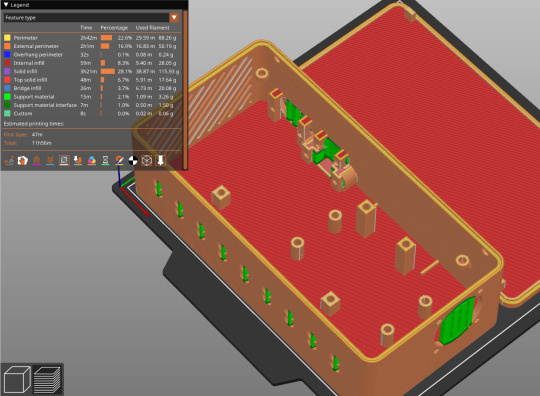

To make sure I get the box right the first try, I implemented every component as a seperate module in OpenSCAD, so I could print them seperately - for example, I could easily test print only the part of the wall that would house the Ethernet socket, to make sure that it fits perfectly before printing the whole box - and then adjust their position easily without messing up the rest of the components.
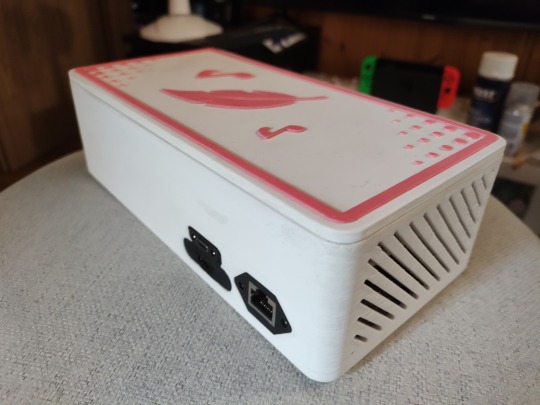
For the adapters without screw holes, I used threaded inserts that you melt in the plastic. I've never used them before, but since self-tapped holes wear out after a few times of putting screws in and out, I wanted to try out a more reliable method. These ones will last probably forever, and hold the screws in real tight. They were surprisingly easy to use, I assumed they would be harder to get straight... With this, I can use pillars with threaded inserts and some clips to screw in to keep the adapters in place, no matter how much the box gets thrown around. These threaded inserts can also be used to mount the arcade controller board and the fan. The fan even gets power right from the arcade board, which has 5V pins meant for LEDs - but they work just fine for anything else that needs power, too. I did add a resistor on the wire though, to turn down the fan speed and noise. Finally, to access the adapter sockets easily without having to open the box, I found panel mount extension cables for all the sockets that needed to be accessible outside - HDMI, Ethernet and USB-C (power delivery).
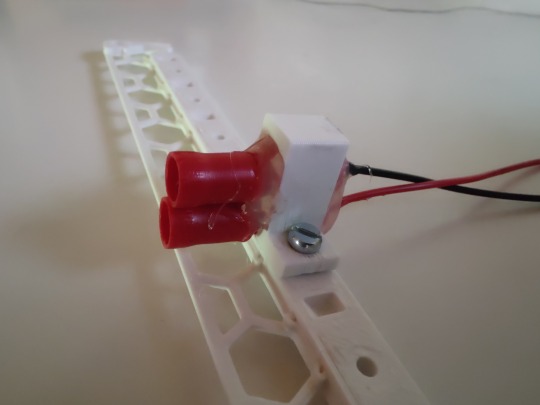

One difficulty was the sockets for the button cables. These are not some standardized kind of plug, after all, so I can't buy a panel mount cable like the others - I have to figure out how to mount these flush with the outside wall myself, and they have to stay in place, both when inserting and pulling out the cable. In this case, I was able to use the middle shelf I already had, that mainly exists to hold the phone, since it's placed right above the cable holes. I hot glued the sockets for the cables to some small clips, which can be screwed into the shelf with screws. Finally, the shelf can be aligned with the holes in the wall when placing it in the box, all the sockets being inserted at once. There's even a bit of a taper on the button cable holes, so the sockets self-align with them!
All that's left then is just jamming all the cables in there somehow. The only real awkward cable was the USB-B-to-A cable for the arcade board connection - the one that came with it was two metres long, far too much to fit in there. So I just cut it up and soldered it back together, reducing the length down to just 20 cm. That way, all the cables actually fit in there quite nicely, and there's plenty of space left for the board connector cables, so the middle shelf can lock everything in place!
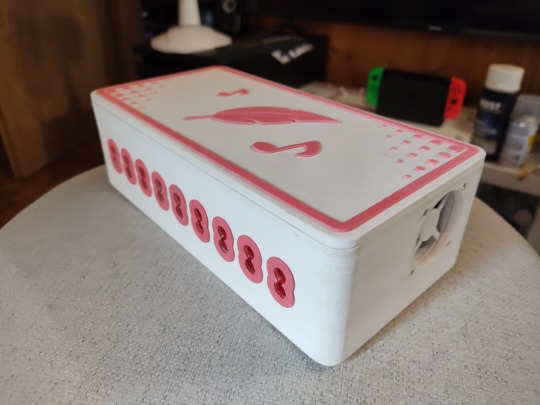

And here's the finished box! That's a good box, right?
As one little last addition, I worked on some decorations. A plain white box would look a little boring, after all, so I added some accents and icons on the front and top. While it would have been super easy to do by printing the lid in one go and changing to a pink filament for just the decoration layers, I thought I'd be smart and not buy an entire spool of filament just for that. Instead, I printed everything seperately in white filament, and then painted it all with pink acrylic paint instead. That made the decoration only cost half - but it was such a pain. Between all the coats of paint needed to get a result that didn't look completely awful, having to glue on all of the little dots on the lid by hand, and then the clear coat, which kept getting tiny bits of dust getting stuck in it which are painfully noticable on a white background... I should have paid the extra price for the filament, it would have been less work and looked much better. Hindsight is 20/20. At least it looks okay from "standing on the floor switches" distance, I guess.
To close up the box securely, I also ended up adding some magnets I had around, glued into holes in the lid and the box walls. This way, to set up the game, I don't need any tools - all the cabling in the bottom department can be done far ahead of time, and then, at the location, I just open up the magnetic lid to place my phone into it, plug the floor switch cables into the sockets, connect the output cable on the back of the box, and it's good to go! This was an important step for the project - instead of a nest of wires openly sitting next to the TV, it looks nice and properly finished now. It probably could have been done way easier by just grabbing a shoe box, punching some holes into it and just having extensions cables hang out, but I wanted to try doing it "right", and I think the result is absolutely worth it.
One more note: I tried to reduce printed waste by just printing small parts to test and only doing the full box print once I was sure everything would work - but all those test prints shown above are still waste of course. This is sadly something that cannot be avoided, but I can at least make sure to reduce the impact it has. The test prints are not getting thrown into the trash, but will eventually make their way to the Recyclingfabrik. If you've never heard of them, they're a company based here in Germany that makes 100% recycled 3D printer filament! That way, my useless prints won't get burned or end up in a landfill, but can instead be reused in the future. (Also, they make some really cool filament colours, I highly recommend checking them out!)
Alright, now that we made a really good box, it's time to get back to something questionably janky.
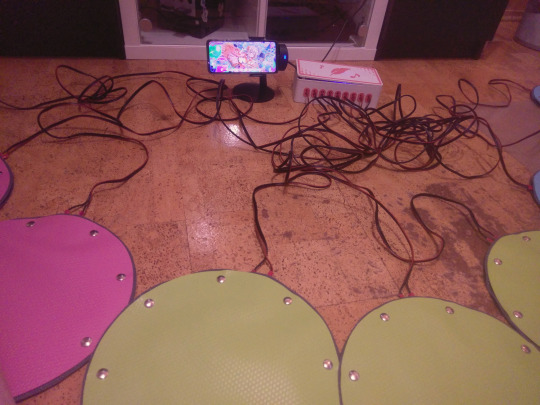
With everything in the box running off of the phone battery, the system already is completely portable! Imagine being able to set up a quick BIG SIF game wherever you are, at cons or something… but in order to do that, there's still one massive component missing, and that's a screen to play on. Obviously, playing the game on a 15cm phone screen while standing on buttons up to two metres away is not a good time. You need something bigger! The coolest thing would be to buy a battery powered projector. That would give you a giant picture and be easy to set up anywhere - I'll probably get one sooner or later, but I'm not pulling the trigger on that purchase just yet. It'll be a lot pricier than the rest of this project, and choosing an outdoor projector seems hard, anyways… (I've been looking for comparisions of images from projectors with different Lumen amounts in different light conditions, but that doesn't seem to exist. Maybe some of you know something similar?)
There's also portable monitors. These are mainly meant as a simple second screen for laptops when working, but they would be a good fit for this situation as well, since they only need a USB connection for power. Something like that could work if I could find a screen that is large enough, and it would also be quite easy to carry around with the setup, as these are usually pretty thin. But again, good ones are usually in the "costs more than this entire project in total" range. But the thing is, technically all we need is a screen and a battery. I think if we bodge things a little, we can use another device that has a screen and a battery, and is made for being portable: your laptop.
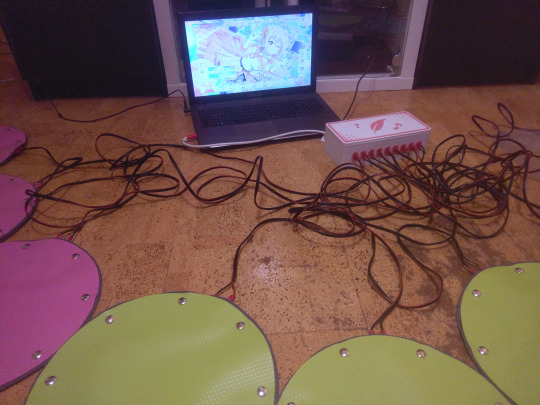
Let me introduce you to scrcpy, which is pretty much the best thing since sliced bread. If you want your Android screen on your PC screen, it is hands down the best way to do it. All you need is an USB cable - no app needed, no massive latency due to WiFi, and no need to send all your video data through some provider's remote server. scrcpy has almost no delay, you can use your PC keyboard and mouse, and you can even play phone audio on your PC with the newer versions. It's incredible, and I use it almost every day. So, plug the USB cable into the phone, and you can have SIF2 on the laptop screen! A luxurious 40cm screen, and speakers included, no emulators needed! But wait... now that the phone is directly connected to the laptop, I can't connect the other adapters in the box. It doesn't make sense to have the video on the laptop if I can't use the floor switches. Those are the entire point of the project! So, I can't use an USB connection.
But remember that Ethernet adapter I added? The main use for it was to be able to wire up to get a good and stable internet connection when the wireless one is too weak. But by using a special Ethernet crossover cable, two devices can communicate without needing a router or switch, and can create their own network just between them! scrcpy doesn't work just over USB, a network connection works, too - and I can set up that connection with just that cable. The video stream to the laptop is back up, and the board can still be connected! And now, we have a solution for a portable screen - it shows the game, it has it's own battery, and it's easy to transport! This approach is obviously not perfect - it's pretty janky, and "almost no delay" is still a delay - but for a quick spontaneous game of BIG SIF, this is a fine way to play.


The final hurdle to take is the internet connection the game needs. This is still a massive weak point in the portability, because, as every con-goer knows, it's basically impossible to use mobile internet at cons, as it is immediately overloaded by the amount of people there (or at least German con-goers know, idk if other countries are as bad). Unless you are have a provider that uses the higher tier mobile networks, it's either extremely slow or just unavailable. If the connection is laggy, that should still be enough to play, as you'd only have to fetch song info at the start of a Live - but SIF2 makes it difficult, due to how the game handles assets, specifically, the music files.
Every time the game loads a new song, it needs to download a file from the servers. That's the reason why, if you scroll through the song list quickly or hit the Random button a lot, the preview music doesn't play for a while: The game has to load all the server files for all the songs you stopped on... The song files are on your phone, but they are not complete. There's parts missing, and that file that has to be downloaded contains those missing parts. Without being able to download these server parts, the game would not be able to reassemble any song files, and could not play any music. And this is why a stable internet connection is so important for this project. We'd have no music at all without one, because every file must download it's missing parts from the servers! If only there was a way to keep the missing parts files, and store them on the phone so we wouldn't have to download them every time...
Trying to avoid too much technical details, here's the idea in a nutshell: I made an app that runs in the background while SIF2 is open, and whenever the game contacts the asset server, we trick it into instead requesting the missing parts file from that app. The app will handle the download instead, but in addition to delivering the file to the game, it will also save it on the phone. And if the same file is requested again, we just take it from storage instead of downloading it from the server again! The code for it is surprisingly simple, but the difference it makes is massive - it's noticable even with a stable and fast WiFi connection, because the delay between selecting a song and the preview starting is completely gone! So I'll probably keep using this app even when playing normally, but most importantly, this is going to work wonders on mobile connections! Maybe, that's enough to play the game even with things slow down... I won't know for sure until we get there.
And hey, while I already made an app, I also added a bunch of buttons to make setting up easier without having to use the shell. Everything that's needed to do a BIG SIF, on a single screen!

Anyways, we've come to the end! That's all for this project for now! Thank you for reading all the way to here!
If you're planning to make a BIG SIF setup for yourself and have any questions, or are just interested in more details on anything I've talked about, feel free to drop me a ask/message and I'd be happy to answer! If you want to come play with me on this setup though, that'll probably be a little harder for most people reading this due to distance, sadly :) But you could try checking my Mastodon, where I might be talking about any cons I'll be bringing it to! Just to mention it again, I'll be bringing everything to Connichi in Wiesbaden next Saturday (September 2nd)! I won't have a proper setup location, but if you have a group who's up to play, keep an eye out for the GenYoha!Kanan cosplayer - assuming I finish the cosplay in time, otherwise, look for a nesoberi-laden Lanzhu. If we can find a place where we don't annoy others, and the mobile internet connection plays nicely, maybe we can play a few rounds - so, see you there, possibly?
And as the last last last topic, here's some final thoughts - on things I'd like to change, or that you can consider changing if you make something like this yourself!
One obvious part of the project you could change is how the buttons work. I like the copper tape approach - it seems robust, is easy to build and fix in case of problem, and works reliably. But as long as you can make something that can close an electrical circuit, anything could work! One obvious choice would be contact sensor, but personally, I feel that's just a big point of failure, but maybe there's some cool approaches out there I didn't think of... One thing that I want to try though is replacing the rug pad with some light foam, about 1cm thick or so. As it is right now, the switches are lacking some kind of physical response, you don't feel much of a press. Maybe the foam would allow the button to have a "travel", being able to feel the switch depress and bottom out could be nice.
And regarding the caching app for the sever files, maybe I should just go all the way with that idea? Because ideally, I'd extend this concept to not just the missing part files, but generally all server communication. The app would just replay responses from when I logged in earlier instead, and have infinite plays without a connection! But I'm not sure whether I want to go down the private server rabbit hole...
The big thing I'd love to do though is improve the menuing. SIF2 is just not meant to be played with buttons - it's made for a touchscreen! And the keyboard solution I have right now works, but it's not a great solution. The floor switches will still be functional on the menus and mess around there, and the keys will also be usable on the screens they're not meant for. It's definitely not something I can just pass to someone and say "here, have fun". But what would the better approach be? The base requirement for any better interface would be to be able to track which screen the game is on, which is already a major problem. One thing I was able to come up with was making a helper app record certain regions of the screen, and doing image comparison - as in, "if this button is visible, the app must be on that screen". But that would be a whole different project, probably worth a full post in itself...
Okay, I'm stopping for real now. Too many ideas, not enough time, as always. byeee
#lovelive#love live#ラブライブ#school idol festival#sif2#スクフェス#i sure hope i can actually play this someday with someone#because con season is kind of about to be over#bad timing i guess haha#update january 2024: lol#lmao even
14 notes
·
View notes
Text
Best Supplier of Wiring Accessories and Lighting Switches in Dubai | Trans-Light Electricals

Switches and Sockets: Indulge in our exquisitely crafted switches and weatherproof sockets, adding both elegance and resilience to your living spaces.
Back Boxes: Discover our extensive range of back boxes, tailored to fit various installation requirements with precision and versatility.
Plugs & Connectors: Explore our wide array of plugs and connectors, renowned for their durability and reliability, ensuring seamless connectivity in every application.
Modular Frames: Transform your interiors with our modular frames, available in a variety of finishes to complement any decor style with sophistication.
Electrical Screws: Achieve precision in every installation with our selection of best electrical screws in Dubai , sourced from trusted brands for lasting performance.
Ceiling Accessories: Enhance safety and functionality with our premium ceiling accessories, designed to withstand diverse environmental conditions for long-term reliability.
Weatherproof & Decorative Accessories: Elevate your space with our weatherproof and decorative lighting accessories in Dubai, crafted for durability and aesthetic appeal, ensuring a perfect finishing touch to any project.
2 notes
·
View notes
Text
Odoo vs Zoho: Choosing the Right Business Management Platform for Growth
Introduction: The Rise of All-in-One Business Suites
In today’s fast-paced digital landscape, businesses demand more than just basic tools—they need integrated systems that can scale, adapt, and empower every department. Two names consistently lead the conversation: Odoo and Zoho.
Both platforms offer end-to-end business management solutions, from CRM and accounting to HR, inventory, and project management. But the question is—which one aligns best with your business goals?
Let’s break it down.
1. Overview of Odoo and Zoho
Odoo is an open-source ERP platform known for its flexibility and modular design. With over 40 core apps and thousands of third-party modules, Odoo caters to businesses of all sizes and industries. It offers both community (free) and enterprise (paid) editions.
Zoho is a cloud-based suite comprising over 45 applications covering CRM, email, accounting, HR, marketing, and more. It’s designed to be easy to use and quick to deploy, especially for SMEs and digitally-driven teams.
Both are robust ecosystems, but they differ in architecture, flexibility, and pricing strategy.
2. Flexibility and Customization
Odoo shines when it comes to customization. Built on an open-source framework, it allows deep tailoring of workflows, modules, and dashboards. Whether you're a manufacturing unit needing a custom production flow or a logistics firm managing complex routing—Odoo adapts.
Zoho, on the other hand, offers moderate customization through its platform tools like Zoho Creator and Deluge (its scripting language). While it’s easy to personalize interfaces and automate actions, deep backend customizations can be limiting without third-party support.
Verdict: For businesses with unique processes or plans to scale aggressively, Odoo offers unparalleled flexibility. Zoho is ideal for teams seeking a ready-to-go solution with moderate adaptability.
3. User Interface and Experience
Zoho boasts a clean, modern, and consistent user experience across its apps. Its cloud-native design ensures responsiveness and ease of use—perfect for teams that need minimal onboarding.
Odoo offers a sleek UI too, especially in its Enterprise edition. However, due to its vast feature set, there can be a slightly steeper learning curve. But once mastered, it provides a seamless experience across departments.
Verdict: For simplicity and fast onboarding, Zoho has the edge. For power users and cross-departmental operations, Odoo’s design grows with you.
4. Pricing Models
Odoo charges based on the number of users and selected apps. The Community edition is free, while the Enterprise edition comes with per-user licensing. However, the ability to install only what you need means cost can be controlled.
Zoho usually offers flat-rate pricing across its bundles like Zoho One (all apps) or standalone tools like Zoho CRM, Books, or People. While affordable for small teams, the price can rise with growing user counts or app needs.
Verdict: Odoo offers more granular control over costs with its modular pricing, especially for businesses that want to start lean and scale features later. Zoho is attractive for startups and small businesses that want everything upfront at a predictable cost.
5. Integration and Ecosystem
Odoo features an extensive module ecosystem. It integrates smoothly with third-party platforms like Shopify, Amazon, PayPal, and local payment gateways. Plus, the open-source nature allows custom connectors.
Zoho thrives within its own ecosystem. Its apps are tightly integrated—Zoho CRM works effortlessly with Zoho Books, Campaigns, or Desk. However, connecting external platforms might require additional middleware or APIs.
Verdict: Odoo is the winner for businesses that rely on diverse tools or need specific third-party integrations. Zoho is best for those who want a plug-and-play environment within a self-contained ecosystem.
6. Industry Fit and Scalability
Odoo is exceptionally suited for industries like manufacturing, retail, logistics, healthcare, and construction. Its end-to-end ERP structure can handle supply chains, production, warehouse management, and financial reporting under one roof.
Zoho is a favorite among digital-first businesses—marketing agencies, service providers, consultancies, and startups. It offers rapid deployment, clean UI, and essential automation out of the box.
Verdict: For process-heavy industries with complex operations, Odoo is a better match. For agile teams that need speed and collaboration, Zoho delivers value quickly.
7. Support and Community
Odoo has a strong global community, thousands of developers, and local implementation partners. Enterprise users receive official support directly from Odoo or certified partners.
Zoho offers centralized support through its ticketing system, documentation, and live chat. Its knowledge base is comprehensive, and premium support is available in higher plans.
Verdict: Both provide reliable support, but Odoo’s developer ecosystem makes it more adaptable for long-term growth and custom projects.
Conclusion: Which One Is Right for You?
Both Odoo and Zoho offer excellent value—but cater to different visions.
Choose Odoo if you:
Need a fully customizable ERP system
Operate across departments with complex workflows
Plan to scale and evolve your system over time
Want control over data hosting (cloud or on-premise)
Choose Zoho if you:
Prefer a cloud-based, ready-to-deploy solution
Need a user-friendly interface for quick onboarding
Operate in marketing, services, or sales-heavy domains
Want all-in-one software without worrying about modules
Need help choosing or implementing the right solution? Connect with Banibro IT Solutions — your trusted partner in ERP consultation, customization, and implementation. Whether you lean towards Odoo or Zoho, we help you unlock true business potential with the right technology.
0 notes
Text
Customizing Used Brewing Equipment for Your Brewery’s Needs
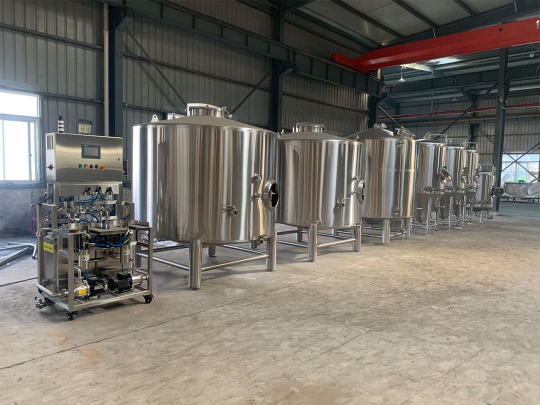
Starting or expanding a brewery often involves striking a balance between cost, quality, and functionality. Many brewers—especially those just entering the market or scaling up—turn to used equipment as a practical solution. But buying pre-owned doesn’t mean settling. With thoughtful planning and customization, used brewing equipment can be adapted to fit your exact operational needs, helping you brew more efficiently without stretching your budget.
Why Choose Used Equipment?
Used brewing equipment comes with a significant cost advantage. It often allows brewers to access high-quality, durable tools that may have been out of reach if purchased new. However, most of this equipment wasn’t made specifically for your brewery’s layout, scale, or production style.
That’s where customization comes into play. By modifying, upgrading, or retrofitting used machinery, you can create a setup that fits your space and brewing goals like a glove—without the premium price tag.
Start with a Clear Plan
Before jumping into any modifications, it’s important to define your brewing needs. Consider these key factors:
Batch size and production volume
Available space and layout
Preferred brewing style or techniques
Energy and utility capacity
Having a clear idea of your brewing process will help you identify which parts of the used equipment may need to be adjusted or upgraded. This planning phase also minimizes costly mistakes and ensures a smoother integration.
Common Customization Areas
1. Fittings and Connections
Piping, valves, and connectors often need to be adjusted to match your brewery’s existing infrastructure. Whether it’s changing tri-clamp fittings, upgrading to sanitary welds, or adapting hose sizes, minor tweaks in this area can greatly improve safety and workflow.
2. Control Panels and Automation
Older systems may not include digital controls or automation features. Installing temperature sensors, programmable logic controllers (PLCs), or custom user interfaces can modernize your brewing process, allowing for more precision and repeatability.
3. Heating and Cooling Systems
Used tanks and fermenters may require retrofitting with glycol jackets, upgraded insulation, or new heating elements. Tailoring the thermal control to your recipes and environmental conditions ensures more stable fermentations and efficient energy use.
4. Cleaning and Sanitation Upgrades
Sanitation is non-negotiable in brewing. If the equipment lacks clean-in-place (CIP) capabilities, it’s wise to invest in retrofitting spray balls, drainage solutions, or removable parts. This not only saves cleaning time but also boosts the lifespan of your gear.
5. Space-Saving Adjustments
In tight spaces, equipment might need to be resized, stacked, or repositioned. Custom platforms, modular designs, or wall-mounting solutions can make even the most awkward spaces work smoothly.
Work with Experts When Needed
While some customizations are easy for in-house staff to handle, more complex tasks—like welding or electrical rewiring—are best done by professionals. Investing in expert help reduces safety risks and ensures your modifications meet industry standards.
Don’t hesitate to consult with engineers or fabricators who specialize in brewery equipment. Their experience can help you turn even the most unconventional piece of gear into a valuable asset.
Breathe New Life Into Auction Finds
Many brewers discover potential in older systems by buying brewing equipment at an auction. While these pieces may not be plug-and-play ready, with smart modifications, they can function as well as—if not better than—new gear. From rebranded fermenters to customized kettles, auctions often provide the raw materials for personalized brewing setups.
Final Thoughts
Customizing used brewing equipment is a practical, cost-effective way to build a system that reflects your unique brewing identity. With careful planning and targeted upgrades, you can turn previously owned equipment into a finely tuned part of your operation.
Whether you’re starting from scratch or refining your process, adapting what you already have—or what you find secondhand—offers both flexibility and financial freedom. In the end, it’s not just about the equipment—it’s about what you make with it.
0 notes
Text
Boosting Industrial Efficiency with Adapters & Amplifiers
In today’s connected industrial environments, seamless signal flow and strong communication channels are essential. At Dropship Automation Solutions, we supply the hidden heroes behind automation performance—components that ensure signals are both compatible and amplified for reliable system performance. In this blog, we spotlight Industrial Adapters and Signal Amplifiers—two vital tools that enhance connectivity and signal integrity across smart manufacturing systems.
From adapting interface connections to boosting weak signals, these devices are crucial for smooth automation.
1. Industrial Adapters: Bridging System Interfaces
What Adapters Do Adapters make different systems work together by aligning incompatible ports, connectors, or protocols. Whether connecting sensors to controllers or aligning signal formats, adapters are key to smooth integration.
Adapter Types & Use Cases
Types: Connector adapters, protocol converters, interface adapters
Applications: PLC integration, sensor connectivity, modular machinery setups
Benefits: Plug-and-play compatibility, cost-effective upgrades, reduced downtime
Why Adapters Matter Industrial systems often combine components from different manufacturers. Adapters eliminate compatibility headaches, enabling seamless communication without redesigning the entire control system.
2. Signal Amplifiers: Ensuring Signal Strength
What Amplifiers Do Amplifiers boost weak electrical signals, ensuring they travel longer distances or overcome interference without degradation. In automation, clean signals mean accurate measurements and reliable control.
Amplifier Types & Applications
Types: Voltage amplifiers, current amplifiers, optical signal boosters
Applications: Long-distance sensor wiring, analog signal transmission, EMI-prone environments
Benefits: Stronger signals, reduced error rates, improved system reliability
Why Amplifiers Matter Industrial sites can be noisy—electrically and mechanically. Amplifiers ensure that even the faintest sensor signals are heard clearly, enabling real-time decision-making and data integrity.
When Adapters Meet Amplifiers: Seamless + Strong
Imagine an industrial setup where:
An adapter connects a legacy analog sensor to a new digital controller
A signal amplifier strengthens the sensor’s output for long-distance transmission Together, they maintain compatibility and signal clarity—making automation smarter and easier to scale.
Conclusion: Smarter Connections. Stronger Signals.
As smart factories evolve, investing in components like industrial adapters and amplifiers ensures systems stay connected, responsive, and future-ready. At Dropship Automation Solutions, we deliver automation-grade parts tailored for industrial needs.
✅ Want to simplify connectivity and strengthen performance? Let’s modernize your systems with the right interface and signal solutions.
📞 Contact: +1 (234) 288-1755 📧 Email: [email protected] 📍 Location: 1440 W. Taylor St #2555, Chicago, IL 60607
0 notes
Text
How Do Power, Motor & Robotics Development Tools Drive Innovation in Automation?

Introduction to Modern Development Ecosystems
As the era of intelligent machines, automation, and smart manufacturing continues to advance, Power, Motor & Robotics Development Tools have emerged as essential components in transforming ideas into functioning prototypes and commercial solutions. These tools serve as the backbone for developing precise and reliable control systems used in a wide variety of sectors—from industrial robotics to electric mobility.
With the increasing integration of microcontrollers, sensors, thermal management components, and electronic controllers, development tools offer a modular and practical approach to building sophisticated electronic and electromechanical systems.
What Are Power, Motor & Robotics Development Tools?
Power, Motor & Robotics Development Tools consist of hardware kits, interface boards, and control modules designed to help developers and engineers test, prototype, and deploy automated systems with precision and speed. These tools make it possible to manage current, voltage, mechanical motion, and real-time decision-making in a structured and scalable manner.
By combining essential components such as capacitors, fuses, grips, cables, connectors, and switches, these kits simplify complex engineering challenges, allowing smooth integration with controllers, microprocessors, and sensors.
Exploring the Primary Toolsets in the Field
Power Management Development Tools
Efficient energy management is crucial for ensuring stability and performance in any robotic or motor-driven system.
Development boards supporting AC/DC and DC/DC conversion
Voltage regulators and surge protection circuits for safe energy flow
Thermal sensors and oils to maintain system temperature
Battery management ICs to control charge-discharge cycles
High-efficiency transformers and current monitors
Motor Control Development Tools
Motor control kits are built to manage torque, direction, and speed across a range of motor types.
H-bridge motor drivers for bidirectional motor control
Stepper motor controllers with high-precision movement
Brushless DC motor driver modules with thermal protection
Feedback systems using encoders and optical sensors
PWM-based modules for real-time torque adjustment
Robotics Development Tools
Robotics kits merge both mechanical and electronic domains to simulate and deploy automation.
Preassembled robotic arm platforms with programmable joints
Sensor integration boards for object detection, motion sensing, and environmental monitoring
Wireless modules for IoT connectivity using BLE, Wi-Fi, or RF
Microcontroller development platforms for logic execution
Mounting hardware and cable grips for secure installations
Benefits of Using Professional Development Tools
Advanced development kits offer more than just experimentation—they serve as stepping stones to commercial production. These tools minimize development time and maximize productivity.
Enhance system performance with modular plug-and-play designs
Enable easy integration with laptops, diagnostic tools, and controllers
Reduce design errors through pre-tested circuitry and embedded protection
Facilitate rapid software and firmware updates with compatible microcontrollers
Support debugging with LED indicators, thermal pads, and status feedback
Key Applications Across Industries
The adaptability of Power, Motor & Robotics Development Tools makes them suitable for countless industries and applications where intelligent movement and power efficiency are essential.
Industrial robotics and pick-and-place systems for manufacturing automation
Smart agriculture solutions including automated irrigation and drone control
Automotive design for electric vehicle propulsion and battery systems
Aerospace applications for lightweight, compact control mechanisms
Educational platforms promoting STEM learning with hands-on robotics kits
Essential Components that Enhance Development Kits
While the kits come equipped with core tools, several other components are often required to expand capabilities or tailor the kits to specific use cases.
Sensors: From temperature and light to current and magnetic field detection
Connectors and plugs: For flexible integration of external modules
Switches and contactors: For manual or automatic control
Thermal pads and heatsinks: For preventing overheating during operation
Fuses and circuit protection devices: For safeguarding sensitive electronics
LED displays and character LCD modules: For real-time data visualization
How to Choose the Right Tool for Your Project
With a vast array of kits and tools on the market, selecting the right one depends on your application and environment.
Identify whether your project focuses more on power management, motor control, or full robotic systems
Consider compatibility with popular development environments such as Arduino, STM32, or Raspberry Pi
Check the current and voltage ratings to match your load and motor specifications
Evaluate add-on support for wireless communication and real-time data processing
Ensure the tool includes comprehensive documentation and driver libraries for smooth integration
Why Development Tools Are Crucial for Innovation
At the heart of every advanced automation solution is a well-structured foundation built with accurate control and reliable hardware. Development tools help bridge the gap between conceptualization and realization, giving engineers and makers the freedom to innovate and iterate.
Encourage experimentation with minimal risk
Shorten product development cycles significantly
Simplify complex circuit designs through preconfigured modules
Offer scalability for both low-power and high-power applications
Future Scope and Emerging Trends
The future of development tools is headed toward more AI-integrated, real-time adaptive systems capable of learning and adjusting to their environment. Tools that support machine vision, edge computing, and predictive analytics are gaining traction.
AI-powered motion control for robotics
Integration with cloud platforms for remote diagnostics
Advanced motor drivers with feedback-based optimization
Miniaturized power modules for wearable and mobile robotics
Conclusion: Is It Time to Upgrade Your Engineering Toolkit?
If you're aiming to build smarter, faster, and more energy-efficient systems, Power, Motor & Robotics Development Tools are not optional—they’re essential. These kits support you from idea to implementation, offering the flexibility and performance needed in modern-day innovation.
Whether you're developing a prototype for a high-speed robotic arm or integrating power regulation into a smart grid solution, the right development tools empower you to transform challenges into achievements. Take the leap into next-gen automation and electronics by investing in the tools that make engineering smarter, safer, and more efficient.
#Power Motor & Robotics Development Tools#electronic components#technology#electricalparts#halltronics
0 notes
Text
"Why Wire-to-Board Connectors Matter in Today's Tech Landscape"
In the ever-evolving landscape of electronics and electrical engineering, wire-to-board (WTB) connectors are fundamental components that provide a secure, efficient link between a set of discrete wires and a printed circuit board (PCB). Despite their small size, these connectors are indispensable in a wide range of applications—from consumer electronics and automotive systems to industrial machinery and telecommunications.Get more news about Wire-to-board Connector,you can vist our website!
What Are Wire-to-Board Connectors? Wire-to-board connectors are used to route electrical signals or power from individual wires onto a printed circuit board. Unlike board-to-board connectors that facilitate connections between PCBs or wire-to-wire connectors that link individual wire sets, WTB connectors interface directly between a cable harness and the board, typically through soldering or press-fit terminals. This facilitates modular design, ease of maintenance, and scalable manufacturing.
They consist of two primary components: the plug (housing the wires) and the receptacle or header (mounted on the PCB). These connectors are available in various pitches (the center-to-center spacing between pins) and configurations (vertical or right-angle orientations), making them adaptable for a variety of design constraints and spatial limitations.
Key Features and Considerations Designers and engineers often evaluate several critical factors when selecting WTB connectors:
Current and Voltage Ratings: Depending on the application, connectors must meet safety and performance thresholds.
Pitch Size: Fine-pitch connectors (≤1 mm) allow for compact design, while larger pitches offer greater robustness.
Locking Mechanisms: Latch or friction locks ensure secure connections that resist vibration or accidental disconnection.
Material and Plating: Contact materials, often copper alloys with gold or tin plating, influence conductivity and longevity.
Environmental Resilience: Some WTB connectors are designed for harsh environments with resistance to moisture, dust, or high temperature.
Applications Across Industries The versatility of wire-to-board connectors is reflected in their widespread use across diverse industries:
Consumer Electronics: Used in smartphones, laptops, and wearable devices for internal signal and power connections.
Automotive: Essential for infotainment systems, sensors, and electronic control units (ECUs), where compact, vibration-resistant connectors are critical.
Medical Equipment: Connectors must meet stringent reliability and safety standards in devices like diagnostic equipment and patient monitors.
Industrial Automation: WTB connectors facilitate modular assembly and simplify maintenance for sensors, controllers, and interface devices.
Trends and Innovations Modern trends push the boundaries of connector miniaturization and performance. As electronic devices become more compact and sophisticated, the demand for high-density connectors with increased signal integrity and EMI shielding continues to grow. Additionally, some manufacturers are integrating features like surface-mount technology (SMT) compatibility and automated cable termination to streamline production and assembly.
Another key trend is the development of eco-friendly, RoHS-compliant connectors to meet global environmental standards while ensuring high performance. With the rise of Industry 4.0 and the Internet of Things (IoT), wire-to-board connectors are playing an increasingly strategic role in enabling smart, connected systems.
Conclusion Although often overlooked compared to high-profile semiconductors or processors, wire-to-board connectors are vital enablers of modern electronic innovation. Their reliability, precision, and adaptability allow designers to build smaller, more powerful, and more efficient systems. As technology continues to advance, the humble WTB connector will remain a quiet but essential hero in the background—connecting ideas to reality, one circuit at a time.
0 notes
Text
Top CX Platforms With Best Integration and Security Features for Regulated Industries
NUMR CXM: Enterprise-Grade CX for Regulated Sectors
NUMR CXM is a leading AI-powered customer experience management platform engineered specifically for highly regulated industries like BFSI, healthcare, telecom, and pharmaceuticals. It provides military-grade security architecture, full-stack integrations, and predictive analytics for early churn and dissatisfaction detection.
Key Features That Stand Out:
SOC 2 & GDPR-compliant data protection
Plug-and-play integrations with CRMs, ERPs, telephony, and analytics suites
Real-time voice, survey, app, and transactional feedback capture
Secure role-based access and on-premise/private cloud options
Root Cause Analysis (RCA) and predictive behavior models
NUMR CXM is built for scale, security, and vertical precision, enabling regulated enterprises to act on sensitive feedback without risking compliance.
Why Integration & Security Matter in Regulated Industries
In sectors like banking, insurance, healthcare, and telecom, customer data is deeply sensitive. Any CX platform deployed must guarantee:
Compliance with global and local regulations (GDPR, HIPAA, RBI norms)
Interoperability with internal systems like CRMs, data lakes, call center platforms
Data residency and controlled access
Audit trails, encryption, and real-time breach monitoring
A secure and well-integrated CX stack ensures frictionless experiences while protecting customer trust and avoiding penalties.
Top CX Platforms with Integration & Security Excellence
1. NUMR CXM
Specialized in high-security, regulated environments
Enables customizable API integrations and no-code CX workflows
Auto-tagging and RCA across customer journeys
Ideal for financial services, healthcare, and enterprise telecom
2. Medallia Experience Cloud
Enterprise-grade data security & privacy controls
Integration with core IT infrastructure via APIs and connectors
FedRAMP and HITRUST certified for government and healthcare clients
3. Qualtrics XM for Regulated Industries
Designed for government, pharma, and financial compliance
Data encryption in transit and at rest
Native integration with Salesforce, ServiceNow, and SAP
4. Verint Experience Management
ISO 27001 certified platform
Omnichannel feedback collection with audit-ready logging
Seamless integration into legacy systems and CCaaS platforms
5. NICE Satmetrix
Combines security-first CX with automated actioning
Works well in tightly controlled environments like insurance and utilities
Granular permissioning and regulatory audit logs
6. Sprinklr CXM
Offers enterprise-class security, identity management, and DLP
Real-time social, digital, and messaging feedback integration
GDPR and HIPAA compliant
7. Adobe Experience Platform
Designed for data-sensitive personalization
Integrates with EMRs, banking systems, and ERP suites
End-to-end data governance and access transparency
Key Compliance Considerations in CX for 2025
Industry
Compliance Requirements
CX Platform Expectations
BFSI
RBI norms, PCI DSS, ISO 27001
Encrypted feedback, role-based access
Healthcare
HIPAA, NABH, GDPR
EMR integration, patient data compliance
Government
FedRAMP, MeitY norms (India), GRC frameworks
Sovereign cloud, audit trails
Telecom
TRAI guidelines, lawful intercept readiness
Multi-language support, secure call log CX
FAQs – CX Platforms in Regulated Industries
Why do regulated industries need specialized CX platforms?
Because they handle sensitive personal and transactional data, making security, compliance, and controlled access non-negotiable.
What makes NUMR CXM ideal for these sectors?
NUMR offers bank-grade encryption, verticalized AI, and region-specific deployment options, making it the top choice for BFSI, healthcare, and telecom.
Can CX platforms integrate with legacy CRMs and ERPs?
Yes. Platforms like NUMR CXM, Medallia, and Qualtrics offer modular APIs and pre-built connectors for seamless integration.
Are there region-specific deployment options?
Yes. NUMR CXM, for instance, supports on-premise, private cloud, or region-specific cloud hosting depending on regulatory needs.
Final Thought
For regulated industries, data protection isn’t just a feature—it’s a mandate. CX platforms like NUMR CXM empower enterprises to listen deeply to their customers while ensuring full compliance, deep integration, and secure orchestration. Investing in the right platform today helps you stay resilient, competitive, and regulation-ready in 2025 and beyond.
0 notes
Text
The Rise of Salesforce AppExchange Development in the USA

Salesforce, the world’s best CRM platform, has transformed the way businesses manage customer relationships. But beyond its built-in capabilities lies a powerful ecosystem that’s fueling even greater innovation: Salesforce AppExchange.
Often called the “App Store for business,” AppExchange allows developers and companies to build, sell, and deploy custom applications that extend Salesforce's core functionality. And in recent years, there has been a notable surge in Salesforce AppExchange development across the USA—driven by demand for digital transformation, industry-specific solutions, and scalable business apps.
In this article, we explore the reasons behind this rise and how US-based companies are leveraging AppExchange to lead the next wave of CRM innovation.
What Is Salesforce AppExchange?
Launched in 2006, AppExchange is Salesforce’s official marketplace for business apps and consulting services. Companies can find and install apps that add functionality to their Salesforce instance—ranging from marketing automation tools to accounting connectors, analytics dashboards, AI assistants, and more.
For developers, AppExchange is a launchpad to build products that reach Salesforce’s massive global customer base. For businesses, it’s a hub of pre-built solutions that accelerate development, reduce costs, and drive efficiency.
Why AppExchange Development Is Booming in the USA
1. Growing Demand for Industry-Specific Solutions
US businesses operate in some of the most regulated and specialized markets—healthcare, finance, manufacturing, education, and government. Generic CRMs often fall short.
This has created a surge in demand for vertical-specific apps built on Salesforce. For example:
A HIPAA-compliant patient management app for healthcare providers
Loan processing and compliance tools for financial institutions
Public engagement platforms for local governments
US-based developers and Salesforce ISVs (Independent Software Vendors) are building these niche solutions and publishing them on AppExchange.
2. Shift Toward Composable Business Models
More US companies are adopting a modular, API-first approach to their digital ecosystems. Instead of investing in monolithic platforms, they’re choosing flexible apps that can be plugged into their CRM as needed.
AppExchange enables this by offering:
Modular solutions
Pre-verified security and compliance
Seamless integration with Salesforce data and workflows
This aligns perfectly with the agile and scalable approach modern US enterprises are striving for.
3. Salesforce’s Support for Developers and ISVs
Salesforce has made significant investments to support the AppExchange ecosystem, especially in the US:
Dedicated ISV Partner Programs
Trailhead training for app builders
AppExchange Security Review and Go-To-Market assistance
Visibility at events like Dreamforce and TrailblazerDX
This strong infrastructure makes the US a prime environment for AppExchange development to thrive.
4. Faster Time-to-Market and Lower Development Costs
Instead of building new solutions from scratch, US companies are turning to AppExchange apps to quickly deploy solutions for lead management, customer service, forecasting, and more.
For custom apps, US Salesforce developers are:
Building apps using Lightning Web Components (LWC)
Leveraging existing APIs and objects
Using DevOps tools for CI/CD in the Salesforce ecosystem
The result: faster innovation cycles and a higher return on investment.
5. Monetization Opportunities for US Startups and Product Teams
AppExchange has become an exciting new market for SaaS startups and digital product teams in the US. Instead of building a standalone SaaS tool and trying to acquire customers from scratch, they’re embedding directly within Salesforce—meeting customers where they already work.
This creates opportunities to:
Reach thousands of Salesforce customers
Monetize apps through flexible licensing models
Offer freemium versions and upsell premium features
The US startup ecosystem, combined with Salesforce’s global footprint, is creating new growth paths for product innovation.
Success Stories: US AppExchange Trailblazers
Several US-based companies have already made significant impacts with their AppExchange offerings, such as:
Conga – Contract lifecycle management tools
Docusign – E-signature and document workflows
nCino – A full digital banking platform built on Salesforce
TaskRay – Project management for Salesforce users
OwnBackup – Backup and recovery tailored for Salesforce data
These success stories show how AppExchange apps can scale rapidly, serve niche markets, and create recurring revenue streams.
The Future of AppExchange in the USA
As Salesforce continues to push into new areas—AI with Einstein, industry-specific clouds, and hyperautomation—AppExchange development will only become more important. US developers and companies are at the forefront of this evolution, driven by:
A strong innovation culture
Access to top development talent
A large and digitally mature customer base
Whether it’s custom solutions for internal use or commercial products for global distribution, AppExchange offers a strategic platform for US companies to innovate, scale, and lead.
Final Thoughts
The rise of Salesforce development services in the USA reflects a broader shift in how businesses build and consume technology: faster, more modular, and deeply integrated with platforms like Salesforce.
If you're a business looking to streamline operations or a product team aiming to break into the Salesforce ecosystem, now is the perfect time to explore the AppExchange opportunity. With the right development partner, the path from idea to impact is shorter than ever.
0 notes