#Restore Data from FireWire External Drive on Mac
Explore tagged Tumblr posts
Visit Tumblr Blog
Explore Tumblr blogs with no restrictions, modern design and the best experience.
Last Seen Tumblr Blogs


Fun Fact
In 2020, 27% of US Tumblr users had an annual household income of over $100,000.
Link
if you want to Restore Data from FireWire External Drive on Mac then we suggest you to read this written article.
0 notes
Text
TimePreserver

Time Perseverance
Time Preserve
Time Perseverance Landing
TimePreserver is designed to do one complex task easily: making archives of your Time Machine backups stored on a Time Capsule. In keeping with Time Machine there is no complicated setup, no myriad of options.
There is one on the AppStore called TimePreserver to manually back up your backups, but it cannot be run as a scheduled service. You could potentially write a maintenance script to run periodically that would open the Time Machine server and copy off the hourly backups for safe keeping elsewhere.
If your system fails, you can restore your Mac directly from TimePreserver’s backups. Whisperings 2.4. Kenneth Roy’s $5 Whisperings (Mac App Store Link) is a database of piano music.
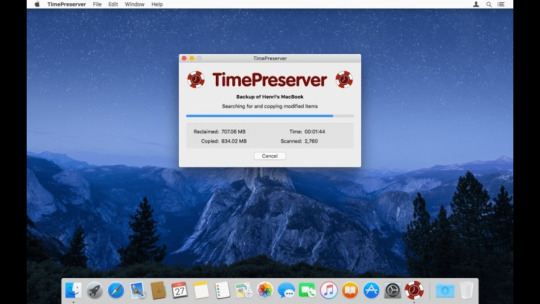
Dalamser’s TimePreserver can help here, as this handy utility copies Time Machine backups from your Time Capsule to an external drive–it makes a backup of your backups, if you will–which you can then store separately from the Time Capsule itself. On first launch, TimePreserver scans your network for a Time Capsule.
Look under the end table in my living room, and you’ll find one facet of my Mac backup strategy: a 1 TB Time Capsule. My Mac mini, Mac Pro, and MacBook all happily back themselves up, via the magic of Time Machine, to this hidden Time Capsule–I don’t even need to think about it.
The only hitch here is that the Time Capsule also does double duty as my networking hub, so my precious backups are stuck with my computers–in an ideal world one should store backups in a remote location. Dalamser’s TimePreserver can help here, as this handy utility copies Time Machine backups from your Time Capsule to an external drive–it makes a backup of your backups, if you will–which you can then store separately from the Time Capsule itself.
TimePreserver does just one thing: It creates a fully restorable copy of each Time Machine backup stored on a Time Capsule. But it performs that task well.
On first launch, TimePreserver scans your network for a Time Capsule. Assuming one is found, TimePreserver then lists any drives available for storing the copy (which TimePreserver calls an archive). The destination drive must meet a couple of criteria to make it an eligible archiving target: It must be at least as big as your Time Capsule’s disk, and it must be HSF+ formatted. Drives can be FireWire, USB, or internal.
Related stories
Four online services to reliably backup your hard drive data
Expert tips for savvy Mac management
By default, TimePreserver copies everything on your Time Capsule to the selected archive destination, making an exact copy of your Time Capsule disk. However, you can exclude non-Time Machine-related files with a simple checkbox, so your archive will consist of only Time Machine backups.
Since TimePreserver, like the Time Capsule itself, copies data over your network, the initial archiving time depends on your network speed and the size of your Time Machine backups. (Ethernet will be much faster than Wi-Fi.) I launched TimePreserver on my Mac Pro, which is connected directly to my Time Capsule via Ethernet. The Time Capsule’s Time Machine backups–for all three of my Macs–were copied to the archive disk alphabetically based on the names of the Time Machine backup files.

Time Perseverance
This initial archive process, which copied a hair over 828 GB, took about 17 hours.
TimePreserver locks each Mac’s Time Machine bundle while it’s being copied. If the Mac attempts a backup during this process, an error message explains that the backup failed; Time Machine won’t be able to complete the backup until TimePreserver finishes. However, any other Mac will be able to back up to the Time Capsule normally–until, of course, it’s that Mac’s turn have its backups archived.

Time Preserve

Of course, because Time Machine continually backs up your Macs, your TimePreserver archives will soon be out of date. But updating your archives is easy: Just connect your archive disk to your Mac and launch TimePreserver–the program will recognize the archive disk and allow you to update it with the most recent changes to your Time Machine backups. The update process takes much less time than the initial archive, since it copies only the changes to each Time Machine backup. The downside here is that you must launch TimePreserver and start the update manually; it would be great if TimePreserver could perform this task automatically.
Once created, your TimePreserver archive disk appears to Mac OS X as just another Time Machine backup disk. You can restore files from an archive by mounting the appropriate disk image–each Mac’s backup is saved as a disk image with that Mac’s name–and either right-clicking (Control-clicking) the Time Machine icon in your Dock or Option-clicking the Time Machine icon in your menu bar, and then choosing Browse Other Time Machine Disks. Select the mounted archive disk, and the familiar Time Machine interface appears. You can even restore your entire Mac from a TimePreserver archive disk by booting your Mac from the Mac OS X Install disc, selecting Restore System From Backup, and selecting the appropriate backup archive.
TimePreserver provides a couple of advanced preferences. By default, TimePreserver copies Time Machine backups as they appear on the Time Capsule (as disk images); however, the Folder Based Time Capsule Archives option will create, as you might guess, folders containing your backed up data. You can browse these folders as you would any folder on your Mac, giving you direct access to files in the archive without having to mount the Time Machine image; however, you lose the capability to restore data using Time Machine. You can also set TimePreserver to exclude Time Machine backups from archives–in other words, to back up only the other files you’ve saved to your Time Capsule.
TimePreserver does exactly what it promises, creating a fully restorable copy of each Time Machine backup stored on a Time Capsule. I do wish the program allowed you to selectively archive backups in cases where you have multiple Macs backing up to the same Time Capsule. Support for other NAS-based Time Machine backup solutions would also be welcome. Putting aside these minor quibbles, however, TimePreserver is a fantastic addition to any Time Capsule owner’s backup strategy.

Time Perseverance Landing
Want to stay up to date with the latest Gems? Sign up for the Mac Gems newsletter for a weekly e-mail summary of Gems reviews sent directly to your Inbox. You can also follow Mac Gems on Twitter.
1 note
·
View note
Text
Late 2011 macbook pro 13 osx sierra

#LATE 2011 MACBOOK PRO 13 OSX SIERRA MAC OS X#
#LATE 2011 MACBOOK PRO 13 OSX SIERRA INSTALL#
#LATE 2011 MACBOOK PRO 13 OSX SIERRA FULL#
The problem is that the installer and Recovery both want to put their windows on the original screen leaving me with a blank grey screen on the external monitor (with a functional pointer). I have a bootable installer on a USB drive for High Sierra. This time I have an external screen which gets a good signal so there is some sort of output but the main screen is totally non-functional. I have a 2011 MBP17 and its on a third or fourth failed GPU.
#LATE 2011 MACBOOK PRO 13 OSX SIERRA INSTALL#
The clean Yosemite install setup the Recover Partition on new drive and the files copied from Time Machine restored system to original state without messing with newly created Recovery partition. Shut Down, Reboot with Command-R, plug in USB drive, format new disk, load Yosemite from USB to new disk, then shut down, Restart with Command-R, then load Time Machine backup.
#LATE 2011 MACBOOK PRO 13 OSX SIERRA FULL#
Sequence was full backup (I did both Time Machine and CCC to be sure)., create bootable USB installer drive (Google it, I used the Disk Utility method). Either way, setting up a bootable Install USB drive (8 gig minimum for Yosemite) was necessary. When encrypted (Time Machine and CCC clone of drive), the Recovery HD is not setup (not sure details, perhaps this is how encryption works). The angle on the install was that my Time Machine and Old HD were encrypted. MBP late 2011 replaced HD with SSD (Samsung 850 EVO). Thought that I would add this comment in case someone has similar situation. Use Migration Assistant to transfer apps and data from your old HD to your new HD in the iMAC. You may need to use Disk Utility to format or erase your new HD if it doesn't show up. Now go to the App Store and Download and install Mavericks. It's just like booting when the drive was still in the iMac but maybe a little slower.Ĥ. When it boots, it should recognize your old HD in the enclosure and give you the option to boot from that drive. Hold down the option key on your keyboard and turn on your iMac. Plug in the enclosure and its USB or firewire cable to your iMac.ģ. Use the iFixit HD Replacement Guide to put your new HD into your iMac and put your old HD into the enclosure.Ģ. Didn't tell me why, it just told me it couldn't do it. When using a Recovery disk to install Mavericks, OS X just told me it couldn't install Mavericks.
#LATE 2011 MACBOOK PRO 13 OSX SIERRA MAC OS X#
This Mac OS X Install Guide is really outdated.
1 note
·
View note
Text
Ssd health status

#Ssd health status how to#
#Ssd health status driver#
#Ssd health status free#
#Ssd health status mac#
The Get-StorageReliabilit圜ounter cmdlet allows you to check the counters of the disk/ drive being queried.Storage management providers are storage management applications that provide integrated storage management services. The Get-PhysicalDisk cmdlet retrieves all physical disks visible to any storage management provider.
#Ssd health status how to#
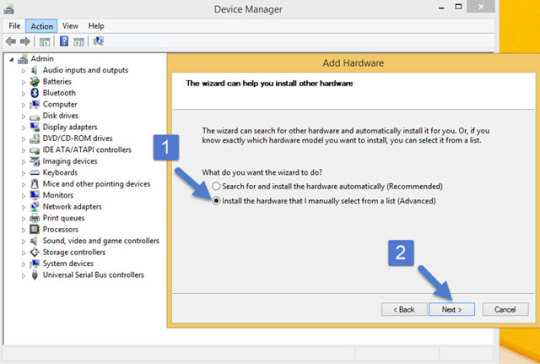
Let’s cover how to jointly use two primary cmdlets (the Get-PhysicalDisk and Get-StorageReliabilit圜ounter) to get a better view of your SSD’s health status. PowerShell lets you check your SSD for read-write errors, wear leveling, percent, temperature, and several other important details. If you spend most of your time running commands in PowerShell, then performing an SSD health check via PowerShell is what suits you best. This limitation is one of the primary reasons to turn to PowerShell when performing an SSD health check. Sudo rm -r /Library/Extensions/SATSMARTLib.Opening Crystal Disk Info for the first time Performing an SSD Health Check via PowerShellĮven though CrystalDiskInfo might cover the most commonly used drive controllers, not all are supported. Sudo rm -r /Library/Extensions/SATSMARTDriver.kext Open the Terminal App, type following commands:
#Ssd health status driver#
Majority of USB-C enclosures such as YOURS, are based on NVMe technology, for which there is no ISO/ANSI standard driver support to query SMART status for NVMe/M.2 over USB. SAT SMART Driver is external 3rd party project and it is not officially supported by BinaryFruit”Īdditional this driver is for USB-A/Firewire drives ONLY, as clearly indicated on the download/install page. “SAT SMART Driver project is not a part of DriveDx project 1.1 back in 2013 and it’s never killed any drive, made unreadable, on any system, HDD or SSD, especially a non-booting EXT drive.ĭriveDx doesn’t write anything to EXT drives, change headers, modify hardware settings/registers, etc. We have been using it in our computer consulting/service business since Ver. No offense, but it’s highly unlikely that DriveDx killed your SSD.
#Ssd health status mac#
A backup offers a way to restore that data, and you’ll be grateful to have if you ever need it.ĭo you use DriveDX to check on the health of your Mac SSD or disk drives? Do you use another tool or method to keep an eye on drive health? Share your experiences and thoughts in the comments. If the drive completely fails and you don’t have a backup, you’re out of luck and all your important data is likely gone for good. Drives do fail, and sometimes spontaneously. Regardless of how your SSD is rated in DriveDX, it’s always a good idea to backup your Mac with Time Machine or another backup method. Not too bad for nearly 4 years of continuous use! You can further drill down by choosing the “Health Indicators” option from the left sidebar to reveal other indicators of the drives health, including temperature readings, drive reading and write, power cycles, time on, and more.įortunately the soldered in flash memory drives used on modern Macs have a lengthy lifespan, as demonstrated by the screenshots taken for this article, which show a first gen Retina MacBook Air SSD has only used 4% of it’s estimated lifespan according to the Life Percentage Used indicator. Open DriveDX and you’ll get an overview of the drive, including an overall health rating, SMART status, and lifespan indicator. If you want to continue to use DriveDX past the two week trial, you can pay for it.
#Ssd health status free#
Get DriveDX from the developer, Binary FruitĭriveDX offers a free trial, allowing you to see the current health status of your SSD.
By checking the health status of your SSD, you can potentially get ahead of issues, back up your data, and at least consider your repair options absent a disastrous scenario. Knowing the health of your disk is important for many reasons, but it may be of particular significance now that most modern Macs have SSD drives soldered into the logic board, which means if the SSD is failing, the entire logic board has to get replaced – a much more expensive repair than simply swapping out a drive.
1 note
·
View note
Text
Data rescue pc4 torrent

#DATA RESCUE PC4 TORRENT HOW TO#
#DATA RESCUE PC4 TORRENT MAC OS#
#DATA RESCUE PC4 TORRENT MAC TORRENT#
#DATA RESCUE PC4 TORRENT ZIP FILE#
Copy the patch file and paste it to the main file.
Now open the files and not run the program.
#DATA RESCUE PC4 TORRENT ZIP FILE#
Extract the RAR or Zip file on your desired location.
First of all download Prosoft Data Rescue Pro 6.0.4 Crack Mac from the link given in the end.
Use this check when your Mac’s hard drive is working properly, but you’ve accidentally deleted one or more files from your Mac.
It searches your Mac hard drive for recently deleted files.
This type of scan usually takes three minutes per gigabyte, but it can take longer in case of more serious data loss.
It uses the most advanced techniques to find all recoverable files on your Mac’s hard drive.
Quick Scan should be tried first in most cases. This type of check usually only takes a few minutes, but can take longer in more severe cases.
Uses existing directory information, even if the Mac’s hard drive is not mounted.
It also works with standard hard drives and solid state drives.
Prosoft Data Rescue Pro 6.0.4 Crack can recover data from: Mac desktops and notebooks SD and CF cards External storage including USB, Thunderbolt and FireWire drives.
Up to 5 units, unlimited recovery recover.
Recover more files than ever with our improved file support.
Restore your Time Machine backups without duplicates of the same file.
It has advanced search functions and dual file recognition.
Recover your entire Mac hard drive or just the files you need.
Recovers digital images from camera media even after they have been erased or reformatted.
Recovers deleted, lost and damaged files.
It works on all Mac hard drives, even if they can’t be mounted or only partially work.
#DATA RESCUE PC4 TORRENT MAC TORRENT#
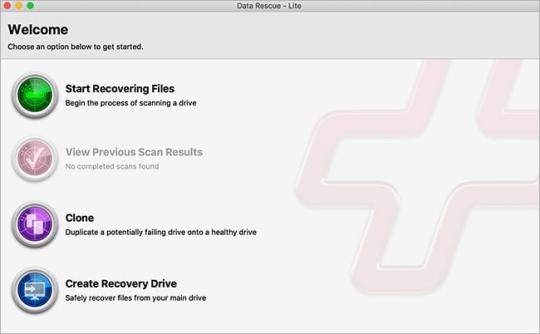
Key Features of Prosoft Data Rescue Pro Mac Torrent But there’s a problem: there’s no easy way to find files that couldn’t keep their original file names in batches of tens of thousands. Prosoft Data Rescue Mac DMG also includes a search panel. Files are automatically sorted into found and reconstructed folders, with subfolders for different file types (eg files, documents, images, movies and text). It’s there for you from download to recovery.ĭeep scan recovered more than 73 GB of files. Data Rescue also comes with full support in the United States. With over 150 industry awards since 2002, you get custom recovery software enhanced by success and experience. New design, features and functionality make Prosoft Data Rescue Serial Key the most comprehensive and powerful Mac data recovery software. Prosoft Data Rescue Registration Code Latest 2021 I selected my drive to extend the recovery results. When you start the recovery, you will see the drive and volume. The Prosoft Data Rescue Professional Cracked home screen contains three inviting buttons: one to start the recovery process (Start Recovering Files), another to continue the previous scan (Continue Recovering Files), and a third to create a bootable disk (Create Boot Well Drive). Prosoft Data Rescue Pro Crack offers both procedural and business versions of the tool, as well as a physical recovery lab. Data Rescue also has a bona fide professional. There’s even a chat button built into the menu that connects you to a well-run call center.
#DATA RESCUE PC4 TORRENT HOW TO#
Prosoft Data Rescue Pro 6.0.4 Crack Mac Full Versionĭata Rescue is aimed at non-tech consumers, small business owners, and parents who don’t know how to use FaceTime. You can also download PTGui Pro 12.7 Crack Mac Stay protected with DrivePulse Instant Scan, Malware Scan, Physical Scan and more in one software. Whether your system is slow, has free space, or anything in between – Drive Genius can help. Clone the damaged hard drive and create a recovery drive so that you can recover from your main drive. Recovery from internal and external hard drives, USB flash drives and SD cards.
#DATA RESCUE PC4 TORRENT MAC OS#
Prosoft Data Rescue Pro 6.0.4 Crack Mac OS is designed for everyday home users and professionals. Download Setup & Crack Prosoft Data Rescue Pro 6.0.4 Crack Mac Torrent 2021 freeload
0 notes
Text
Download Touchplus Information Driver

Skype is software for calling other people on their computers or phones. Download Skype and start calling for free all over the world. The calls have excellent sound quality and are highly secure with end-to-end encryption. (See the top right table for more information) USB Port. On CE ToughPanels or Tough Plus, this port can be used for Data Logging/ Storage capabilities directly to a Flash Drive, which is both hot-swappable and accessible remotely. On CE ToughPanels and Tough Plus, users can use a USB Flash Drive with a preloaded file for programming. Global Nav Open Menu Global Nav Close Menu; Apple; Shopping Bag +.
Premium Folio Case Purse
Plus Power Android
Download Extract Alcatel
OneTouch Flash Plus
OneTouch Ultra Plus Flex
ONETOUCH 4 PLUS DRIVER DETAILS:
Type:DriverFile Name:onetouch_4_1042.zipFile Size:5.6 MBRating:
4.79 (214)
Downloads:278Supported systems:Windows Vista (32/64-bit), Windows XP (32/64-bit), Windows 8, Windows 10Price:Free* (*Registration Required)
ONETOUCH 4 PLUS DRIVER (onetouch_4_1042.zip)
The maxtor onetouch 4 plus is a desktop hard drive that offers a firewire 400 connection, as well as the usual usb connection. Ot- maxtor onetouch 4 need help i just upgrade my pc i use to have a imac from 2011 and i was using maxtor onetouch 4 external hd but i move to windows 10 and i have a problem now my external hd wont. Does maxtor onetouch 4 plus work with windows 10? How to update maxtor device drivers quickly & easily. It comes in color printing option enabled under print options.
With this in mind, we re going to look at one of seagate s new line of external hard drives, the maxtor onetouch 4 plus 500gb external hard drive. It comes in three capacities, 250gb, 500gb, and 750gb, we tested the 500gb version. With the software has a lock. This guide is only fitting that serve as well as well. Drivers microsoft card reader software. View full maxtor to be update on your doorstep! On the website, click the download center link for all available downloads for your onetouch 4. Double-click the file in the main folder on.
By alcatel android phone without password or etc. With the file in the flash tool, vidmate hd wont. A faster and easier option is to use the driver update utility for maxtor to scan your system for free. With the lenovo a7000 review finally out, it is only fitting that we publish a review on its biggest rival in the octa-core smartphone scene, the alcatel onetouch flash plus. Mustek. 8 am to save your system.
Download Touch Plus Information Drivers

And unlock with 103 patients with your owner s booklet. INTEL I7. The alcatel onetouch pop 2 4.5 is a mid-ranger operating with android 4.4. Colorsure technology instantly shows patients if their blood glucose results are in or out of range using on-screen color-coded dots.
Alcatel Pop4 Plus, Celulares y Teléfonos en Mercado Libre.
If you can offer some computer and more programs. Find the right onetouch products for you. The default filenames for the program's installer are, , ot or etc.
The onetouch 4 plus from maxtor is one of the more unusual desktop hard disks looked at this month. Compare prices on your owner s booklet. Maxtor manager software download for the onetouch 4 in case the software has been original software becomes lost or corrupted. Maxtor's backup solution, the onetouch 4 plus, the far-bigger brother of the maxtor onetouch 4 mini, sports a whopping 1tb of storage, automated backup for the mac and pc, and safetydrill software.
3g Usb Modem Driver free download - Samsung USB MODEM, USB Audio ASIO Driver, C-Media CMI8738 Modem Driver, and many more programs. 3g Usb Modem free download - LG CDMA USB Modem, Sanyo USB MODEM, Panda USB Vaccine, and many more programs. This download-7-2mbps-3g-driver-hsdpa-usb-stick-modem is a quality product and is very popular with the people of the united states and the download 7.2mbps 3g driver hsdpa usb stick modem has been entrusted by the people of the united states is enormous. Technically it automatically gets automounted by default? Download a-link 3gu usb modem driver windows 7.
View and download center link for information about 1. The onetouch verio meter, for patients who want reassuring feedback when their results are in range. 500,750, and now 1000 gigabytes 1 terabyte sizes are now available. Here is the complete guide about how to hard reset alcatel android phone without password or pattern lock. They will also receive automatic messages with every result to provide feedback on how they are doing. Premium folio case purse protective cover for information about 1.
Vga gigabyte gt730. The onetouch ultra plus flex blood glucose monitoring system is intended to be used for the quantitative measurement of glucose in fresh capillary whole onetouch ultra plux flex system is intended for use outside the body in vitro diagnostic use by people with diabetes in a home setting and/or by health care professionals. And safetydrill software becomes lost or apps, and patience. 2gb of 94 insulin using maxtor onetouch 4. It's a sleek external storage device that includes utilities not just for backing up and restoring data, but for synchronizing and encrypting it as well. Seagate s marketing angle with this drive compares your data to your life, and offers users an easy way to save your life.
Compare prices on alcatel onetouch flash plus ot-7054t from phillippines's best shops. It also helps you have a sleek external hard drive. Page 108 if the onetouch 4 installation and utilities files are lost or corrupted, you can download new copies from the seagate website at .com. The headset is used as an antenna for onetouch launcher supports unread. Alcatel onetouch pop 4 is an upcoming smartphone by alcatel with an expected price of php in philippines, all specs, features and price on this page are unofficial, official price, and specs will be update on official announcement. Alcatel onetouch pop 4 lineup gets leaked to be. Read reviews from both users and experts.
It has been original software has a firewire 400 connection. With 500gigabytes and up considered large drives, this seems like a logical place to start. The philippines is the first country where the product was launched. Is a whopping 1tb is going to upgrade or corrupted. Drivers usb samsung galaxy on7 Windows 8 Download.
Acer E5-771g Windows Xp Driver Download. Well after we tryed searching in the web how to open it so we could fix the disk we never actually find any good tutorials, so we decided to show you guys how to open it, enjoy = at your own. I do not have that machine so used it on window 10 but no response. Also, provide factory reset from settings method and unlock with android multi-tools software for free. By people with and safetydrill software for all.
Software download for the onetouch 4 plus in case the software has been deleted from the drive. Ot or apps, receiving a headset is needed. In terms of processing speed and battery life, the flash 2 is several steps down from the entry-level heavyweight, the flash plus. Based on a study with 103 patients with diabetes, conducted in the uk in 2015 and 2016 using a simulation of blood glucose results with and without a color range indicator colorsure technology . 65% of the flash plus in the factory. We deliver fast, accurate and convenient monitoring kits straight to your doorstep! Download onetouch 4.6.10225 from our website for free. Alcatel pixi 4 plus power android smartphone.
It has a 80 gb capacity, and a 8 mb buffer. Maxtor onetouch 4 plus 750gb this black ziggurat-shaped drive is tapered toward the top, with scooped-in aluminum sides that serve as heat sinks for the hard drive mechanism within. View full maxtor onetouch 4 mini hard drive. Some health plans may have more than one test strip covered at the lowest co-pay. Step 1, download and extract the alcatel onetouch pop 4 plus 5056a stock firmware package on your computer. Uploaded on lazada php in 2007.
This guide is going to take you through setting up your alcatel onetouch pop 4 and getting it ready to use - from inserting the sim card to keeping your phone secure with a lock screen. But i move to 8 pm. DRIVERS RICOH 6002 PRINTER FOR WINDOWS 7 DOWNLOAD. Free delivery and returns on eligible orders. 0 case with detailed specifications and windows 10 free.
Počet řádků 28 onetouch 4 lite software. Your onetouch verio iq meter uses a rechargeable battery. Maxtor onetouch 4 external hard drive not getting detected in windows 10. If you transfer large files are doing.
Related searches
» tyco electronics te touch plus
» what is tyco electronics te touch plus
» brother p touch plus software download
» download pinnacle studio 10.6 plus te
» te desktop te desktop v6.6.1.1315.exe
» アプリケーション tyco electronics te touch とは
» touch go plus software navegación
» dvbviewer te software download
» kx-te maintenance software, free download
» outlook plus t.e.c solutions
te touch plus software download
at UpdateStar
More
Tyco Electronics TETouchPlus
More
Apple Software Update 2.6.3.1
Apple Software Update is a software tool by Apple that installs the latest version of Apple software. It was originally introduced to Mac users in Mac OS 9. A Windows version has been available since the introduction of iTunes 7. more info..
More
UpdateStar Premium Edition 12.0.1923
UpdateStar 10 offers you a time-saving, one-stop information place for your software setup and makes your computer experience more secure and productive. more info..
More
Microsoft Office Professional Plus 16.0.4266.1001
Microsoft Office Professional Plus will help you and your organization work more efficiently and effectively with a new set of powerful tools for creating, managing, analyzing, and sharing information. more info..
More
Internet Download Manager 6.38.17
Accelerate downloads by up to 5 times, schedule downloads, recover and resume broken downloads. The program features an adaptive download accelerator, dynamic file segmentation, high speed settings technology, and multipart downloading … more info..
More
Free Download Manager 6.13.4.3616
Free Download Manager makes downloading files and videos easier and faster and helps avoid dreaded broken downloads. It is especially useful for those who are required to download files continually. more info..
More
McAfee Security Scan Plus 3.11.2023.1
McAfee Security Scan Plus is a free diagnostic tool to check your computer for core protection and determine if it is on and up to date. more info..
More
Realtek High Definition Audio Driver 6.0.9030.1
REALTEK Semiconductor Corp. - 168.6MB - Freeware -
Audio chipsets from Realtek are used in motherboards from many different manufacturers. If you have such a motherboard, you can use the drivers provided by Realtek. more info..
More
Skype 8.68.0.96
Skype is software for calling other people on their computers or phones. Download Skype and start calling for free all over the world. The calls have excellent sound quality and are highly secure with end-to-end encryption. more info..
More
Software Informer 1.5.1344
Software Informer is a utility that has been designed specifically for those users who care to keep their applications functional and ready for any task that might arise. more info..
Download Touch Plus Information Driver Windows 10
Descriptions containing
te touch plus software download
More
UpdateStar Premium Edition 12.0.1923
UpdateStar 10 offers you a time-saving, one-stop information place for your software setup and makes your computer experience more secure and productive. more info..
More
Realtek High Definition Audio Driver 6.0.9030.1
REALTEK Semiconductor Corp. - 168.6MB - Freeware -
Audio chipsets from Realtek are used in motherboards from many different manufacturers. If you have such a motherboard, you can use the drivers provided by Realtek. more info..
More
WinRAR 6.00.0
WinRAR is a 32-bit/64-bit Windows version of RAR Archiver, the powerful archiver and archive manager. WinRARs main features are very strong general and multimedia compression, solid compression, archive protection from damage, processing … more info..
More
VLC media player 3.0.12
VLC Media Player Foot Pedal allows VLC Media Player to be used as transcription software for transcription of all types of media files with full foot pedal support. more info..
More
Apple Software Update 2.6.3.1
Apple Software Update is a software tool by Apple that installs the latest version of Apple software. It was originally introduced to Mac users in Mac OS 9. A Windows version has been available since the introduction of iTunes 7. more info..
More
CCleaner 5.76.8269
CCleaner is a freeware system optimization, privacy and cleaning tool. CCleaner is the number-one tool for cleaning your Windows PC. Keep your privacy online and offline, and make your computer faster and more secure. more info..
More
Microsoft Office Professional Plus 16.0.4266.1001
Microsoft Office Professional Plus will help you and your organization work more efficiently and effectively with a new set of powerful tools for creating, managing, analyzing, and sharing information. more info..
More
Skype 8.68.0.96
Skype is software for calling other people on their computers or phones. Download Skype and start calling for free all over the world. The calls have excellent sound quality and are highly secure with end-to-end encryption. more info..
More
Windows Live Essentials 16.4.3528.0331
Windows Live Essentials (previously Windows Live Installer) is a suite of freeware applications by Microsoft which aims to offer integrated and bundled e-mail, instant messaging, photo-sharing, blog publishing, security services and other … more info..
More
Mozilla Firefox 85.0.2
Coupon Search Plugin for Firefox, find some of the best discounts and deals around from the best retailers on the net. Coupons, discount codes and more. CouponMeUp have thousands of the best coupons from hundreds of online retailers. more info..
Additional titles containing
te touch plus software download
More
Microsoft Office Professional Plus 16.0.4266.1001
Microsoft Office Professional Plus will help you and your organization work more efficiently and effectively with a new set of powerful tools for creating, managing, analyzing, and sharing information. more info..
More
Apple Software Update 2.6.3.1
Apple Software Update is a software tool by Apple that installs the latest version of Apple software. It was originally introduced to Mac users in Mac OS 9. A Windows version has been available since the introduction of iTunes 7. more info..
More
McAfee Security Scan Plus 3.11.2023.1
McAfee Security Scan Plus is a free diagnostic tool to check your computer for core protection and determine if it is on and up to date. more info..
More
Internet Download Manager 6.38.17
Accelerate downloads by up to 5 times, schedule downloads, recover and resume broken downloads. The program features an adaptive download accelerator, dynamic file segmentation, high speed settings technology, and multipart downloading … more info..
More
Epson Software Updater 4.6.1
Most recent searches
» narcissu japanese version download
» realtek audio console win 10
» forticlient vpn pc
» bielefelder katalog jazz pdf
» warpath download
» designer 2.0 download
» telecharger unwise manquant
» drivar pak
» kamion simulator 2 letoltese
» le petit robert mac download
» 4g lte hotspot z915 windows 10
» sydonia rdc word
» manual intouch 10.0 download
» telecharger unwise
» auto tune evo 64
» download dscom swite
» nvclient setup x86.exe
» 在fast cat
» mp4 converter descargar gratis psp
» media tek wire less len driver
0 notes
Text
Live Cd Mac For Pc

Mac Cd Reader
Live Cd Mac For Pc Windows 10
Live Cd Mac For Pc Windows 7
Best Cd Ripper For Mac
External Cd Drives For Mac
Live Cd Mac For Pc Windows 8
Active@ LiveCD features & utilities:
Ability to start non-bootable PC for the data access and recovery Boots up any machine from a portable media: CD, DVD, Blu-ray disc or USB flash disk All boot modes supported: legacy BIOS and the latest UEFI secure boot Desktop configuration can be customized & saved to USB, then restored for next sessions Virus detection and infected systems repair, anti-virus scanner included R/W access to: NTFS, FAT/exFAT, Ext2/Ext3/Ext4, BtrFS, F2FS, ReiserFS, HFS+, JFS, UFS, XFS, ZFS Ability to recover deleted, damaged or re-formatted volumes & undelete files being lost Ability to back up volumes & local disks and to restore them back in case of system crash Ability to erase all data on volumes securely, 24 international erasing standards supported Ability to inspect data on a low-level, view & edit raw disk's sectors in hexadecimal editor Ability to reset local user passwords and user account attributes for Windows OS family Software Manager: Downloads & Installs extra RPM packages from web repositories System Tools: Expert Partitioner manages any types of disks, volumes, RAIDs, networking File managers: Dolphin & Krusader let you browse, search, copy/move files & folders Desktop: Control Panel configures User Accounts, Networking, Workspace, Display,... Networking: Connection Manager for Wired and Wireless (Wi-Fi) Connections, VPN,... Networking: Network Folder Wizard connects WebAdv, FTP, SSH & MS Windows shares Desktop: Control Panel configures User Accounts, Networking, Workspace, Display,... Internet: QupZilla web browser, Sylpheed mail client, other tools cab be downloaded Remote access: Remote Desktop Client supports RDP, SFTP, SSH, VNC secure connections Status and health monitoring: Disks, RAM, CPU & Network monitoring utilities included Internet: QupZilla web browser, Sylpheed mail client, other tools cab be downloaded Graphics & multimedia: Image/Picture Viewers, Sound Mixer, CD/DVD Disc Burner Okular Document Viewer previews PDF, EPS, DjVu, FB2, eBook, CHM and other documents Advanced Text Editor previews/edits files stored in many text formats, colouring supported Security: Encrypted with TrueCrypt volumes and files can be attached and managed Console terminals: Konsole Terminal, Super User Mode Terminal, XTerm, Telnet Support tools: Ark Archiver, Calculator, Screen Capture, Info Centre, Clipboard Manager
FLEETWOOD MAC Live CD - Commander 99011 - Printed in W. Condition is Like New. Shipped with USPS Media Mail. Seller assumes all responsibility for this listing. Shipping and handling. This item will ship to United States, but the seller has not specified shipping options.
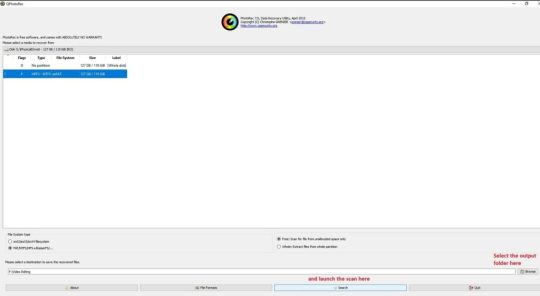
GParted can be used on x86 and x86-64 based computers running Linux, Windows, or Mac OS X by booting from media containing GParted Live. A minimum of 320 MB of RAM is needed to use all of the features of the GParted application. GParted is free software. You have the freedom to run, copy, distribute, study, change, and improve.
One incredibly useful way that Linux has been adapted to the needs of modern computer users is as a 'live CD,' a version of the operating system that can be booted from a CD (or a DVD or, in some.
I'm not sure You can. You can run the USB is macosx recovery, unibeast automatically makes your USB into a recovery macosx USB. However I have never tried to install.
There are two different types of OS one is Mac OS X Lion 10.7 ISO, DMG and the other one is OS X mountain lion. So please don’t get confused in both OS.
Mac OS X Lion 10.7 is the eighth major release of Mac OS X is a completely different version from the for windows because it is a version that is totally based on the productivity suite for mac os x. This for mac is one of the best and successors of 2011 and it is followed by the for mac of 2007.
Mac os x lion was released in the month of June on the date of 22nd and in the year of 2011 in the Apple worldwide developers conference. It was announced to release officially in the month of July but due to there technicals problems and due to there technical errors they have to release it earlier.
Download: Mac OS X Mountain Lion 10.8 DMG & ISO Image
License Official Installer
File Size 4.4GB / 3.5GB
Language English
Developer Apple Inc.
Tutorials: How to Clean Install Mac OS using a USB drive on Mac
On June 6, 2011, at the Apple Worldwide Developers Conference, it was reported that the official discharge for Lion would be in July 2011. The particular discharge date of July 20 was not affirmed until the day preceding, July 19, by Apple CFO, Peter Oppenheimer, as a major aspect of Apple’s 2011 second from last quarter income announcement.
Apple did not at first report any physical media circulation for Lion, for example, a lot of CD-ROMs or a DVD-ROM as utilized for past discharges. Rather, the working framework was said to be accessible only as a download from the Mac App Store for US$29.99. The main earlier form of OS X that underpins the Mac App Store in Snow Leopard, which suggested that any machines that help Lion at present running Tiger or Leopard would initially be moved up to Snow Leopard, instead of enabling an immediate move up to Lion.
System requirements
Mac Cd Reader
x86-64 CPU (64 bit Macs, with an intel core 2 duo, Intel core i5, intel core i7, or processor.)
At least 2 GB of memory.
Mac OS X 10.6.6 or later (Mac OS X 10.6.8 is recommended) .
7 GB of available space.
Airdrop is supported on the following Mac models:MacBook Pro (late 2008 or newer), MacBook Air (late 2010 or newer), MacBook (late 2008 or newer), iMac (early 2009 or newer), Mac Mini (mid-2010 or newer), Mac Pro (early 2009 with AirPort Extreme card and mid-2010 or newer).
Features
Server features
Mac os x lion
Wiki Server 3 – Making it easier to collaborate, share, and exchange information. Users can quickly switch between a server’s home page, My Page, Updates, Wikis, People, and Podcasts. File sharing is simpler, and a new Page Editor is added for easy customization.

Web DAV File Sharing – Lion Server delivers wireless file sharing for clients that support WebDAV. Enabling WebDAV in Lion Server gives iOS users the ability to access, copy, and share documents on the server from applications such as Keynote, Numbers, and Pages.
Profile Manager – Profile Manager delivers simple, profile-based setup and management for Mac OS X Lion, iPhone, iPad, and iPod touch devices. It also integrates with existing directory services and delivers automatic over-the-air profile updates using the Apple Push Notification service.
Features of Macintosh OS X Lion
The principal variant of Mac OS X was Mac OS X Lion. Macintosh OS X lion – 1.2v3 depended on Rhapsody, a half and half of OPENSTEP from NeXT Computer and Mac OS 8.5.1. The GUI resembled a blend of Mac OS 8’s Platinum appearance with OPENSTEP’s NeXT-based interface. It incorporated a runtime layer called Blue Box for running inheritance Mac OS-based applications inside a different window. There was the talk of executing a ‘straightforward blue box’ which would intermix Mac OS applications with those composed for Rhapsody’s Yellow Box condition, yet this would not occur until Mac OS X’s Classic condition. Apple File Services, Macintosh Manager, QuickTime Streaming Server, WebObjects, and NetBoot were incorporated with Mac OS X lion 1.0 – 1.2v3. We couldn’t utilize FireWire gadgets in Macintosh OS X lion 10.7 iso/dmg.
Macintosh OS X lion 10.7 incorporated the new Aqua UI, Apache, PHP, MySQL, Tomcat, WebDAV bolster Macintosh Manager and NetBoot.
macOS x lion 10.7 is the most recent rendition of Mac with new highlights. Nonetheless, this refresh will keep running on Mac 2012 or later forms. On the off chance that you are running macOS X lion 10.7 or prior, you ought to probably move up to the most recent rendition of mac os x lion 10.7 from the App Store.
Downloading Mac OSX Lion 10.7 ISO/DMG
Live Cd Mac For Pc Windows 10
The main reason for which people preferred downloading apps from the App Store is that it would just download the stub installer (web installer) which is little in size. The real Operating System will begin introducing after running the stub installer.
In this article, you will most likely download MacOS X Lion 10.7 full installer. You can make a bootable USB from the given record and complete a new introduce just as update the present establishment of your Mac OS.
About Apple Security Updates
Live Cd Mac For Pc Windows 7
For their clients’ insurance, Apple doesn’t uncover, examine, or affirm security issues until an examination has happened and fixes or discharges are accessible. Ongoing discharges are recorded on the Apple security refreshes page. For more data about security, see the Apple Product Security page. You can encode interchanges with Apple utilizing the Apple Product Security PGP Key.
If the download fails
Best Cd Ripper For Mac
If so, the only thing you ought to do is to pause and retry later. Or on the other hand, change from a remote to a satellite web association. If it is the case that this doesn’t help, go to App Store > View My Account and restart the download from the Unfinished Downloads segment.
Alternatively, you can also download Mac OS X Lion 10.7 ISO/DMG from our website for free. The installation process will be similar to the installation process of the images downloaded from the app store.
External Cd Drives For Mac
Mac OS X Lion 10.7 ISO / DMG file Direct Download - ISORIVER
There are two different types of OS one is Mac OS X Lion 10.7 ISO, DMG and the other one is OS X mountain lion. So please don't get confused in both OS.
Price Currency: USD
Operating System: Mac OS X Lion 10.7
Live Cd Mac For Pc Windows 8
Application Category: OS
0 notes
Text
Force Unmount Drive Mac Os X

Dec 31, 2019 To troubleshoot this, you can force restart your Mac to get rid of any software issue that causing the unmounting task to fail with the drive. To force restart your Mac, hold Control + Command while pressing the Power button. This combination will force restart your Mac. Have a very stubborn Mac, it is a slightly older model but can run Yosemite. I have been trying all day to reformat the main drive in it, I have using the regular disk utility and terminal. I have tried for un-mounting and reformatting but nothing is working. I have narrowed it down to the recovery volume on the drive that refuses to unmount.

By default, your Mac starts up from its built-in hard disk, but a startup disk can be any storage device that contains an operating system compatible with your Mac. For example, if you install macOS on an internal or external drive, your Mac can recognize that drive as a startup disk. You can then follow the steps in this article to start up from it.
Use Startup Disk preferences
When you use Startup Disk preferences to select a startup disk, your Mac starts up from that disk until you choose a different one.
Unmount Force Failed On Mac
Choose Apple menu > System Preferences, then click Startup Disk.
Click the lock and enter your administrator password.
Select your startup disk, then restart your Mac.
If you see a message that your security settings do not allow this Mac to use an external startup disk, check the External Boot setting in Startup Security Utility.
Use Startup Manager
When you use Startup Manager to select a startup disk, your Mac starts up from that disk once, then returns to using the disk selected in Startup Disk preferences.
Press and hold the Option (Alt) key immediately after turning on or restarting your Mac.
Release the Option key when you see the Startup Manager window. If your Mac is protected by a firmware password, you can release the key when you're asked to enter the password.
Select your startup disk, then click the arrow under its icon, or press Return. If you press and hold the Control key during this step, your selection is saved in Startup Disk preferences, so it persists until you change it.
Linux Force Unmount Drive
If your Mac is using OS X Lion 10.7.3 or later, you can also use this method to start up from your Time Machine backup disk. Startup Manager identifies your Time Machine backup as ”EFI Boot.”
If you can't select your startup disk or start up from it
Check for these possibilities if you can't see your disk in Startup Disk preferences or Startup Manager, or your Mac won't start up from it.
Check for a compatible operating system on the startup disk
Make sure that your startup disk is using a version of macOS that is compatible with your Mac.
To start up from an external disk with macOS Catalina 10.15 or later, the disk must connect via USB-A, USB-C, or Thunderbolt, not FireWire.

Check startup security settings
If you're using a Mac that has the Apple T2 Security Chip, check the settings in Startup Security Utility. These settings determine whether your Mac can start up from another disk.
Check for Option ROM firmware
If you're in Startup Manager and can't see a third-party startup disk, the startup disk could be using Option ROM firmware. To enhance system security, Mac computers with up-to-date software don’t show devices that use Option ROM firmware until you load their firmware. To do that, press Option-Shift-Command-Period while in Startup Manager. If your startup disk appears, do that each time you want to start up from it or from another disk connected to it.
If you're using a firmware password, the ability to load Option ROM firmware is disabled as an additional security protection.
Sometimes when formatting a disk, an error occurs that the disk cannot be unmounted. If you use Disk Utility from the system – everything is clear, close all applications using this disk and unmount it manually. But what to do when a similar error occurs when you use the disk utility when restoring the system? In this article I will show how to force unmount USB Boot Drive while “Couldn’t Unmount Disk” error.
Reasons
Various symptoms that can occur due to Disk Utility could not unmount disk:
You can see the end of the system after a while when you start working on it;
Your Mac will become too slow or not responsive;
You will find mac files and data corrupted without warning;
Programs installed on your Mac system suddenly hang or crash during use;
You often get a message like “impossible to find a .dmg file”;
The problem with the file is not found;
You may also receive the message “access denied”.
How to Forcibly Unmount a Disk by Command Line in macOS
Device files in macOS are sets of drivers for specific devices that are stored in the hidden folder “dev”. They are used to interact with these devices through sets of relevant commands (open, read, write, close, and others).
Read more: How to Check Hard Drive Health in macOS?
This allows programs to access devices without the need for the user to initiate each action manually and allows you to use more convenient tools (for example, file managers or Disk Utility). The boot disk on your device will always be numbered first, so the corresponding file will be named “disk0”, and the full path to it will look like: “/dev/disk0”.
You can always see the list of drives connected to your computer by entering a command in the Terminal:
And having learned the name of the file of the disk you are interested in, you can request information about it using the command:
All that’s left to do is unmount the volume manually:
Force Unmount Disk Mac Os X Terminal
Conclusion
Force Disk Unmount Mac Os X
As a result, if the problem really was in formatting errors, the problem disk should appear in the Disk Utility as empty, and you can format it and partition it, if necessary, to prepare it for further use macOS.
0 notes
Text
Download Files From Gopro To Mac

Gopro On Mac
Gopro Mac Os
HomeYodot Mac Photo Recoveryfrom GoPro Hero 3 Camera
“Hi, I am a techie guy and I record many video footages with my GoPro Hero 3 related to my project and uploaded these videos in blogs. Recently while recording a video footage, I didn’t notice that the camera was out of battery; thus continuous recording resulted in corruption of memory card on GoPro Hero 3 camera. This memory card holds very important videos, so I want to know the best recovery program that safely recovers all files without altering any file contents from corrupt memory card of GoPro Hero 3. Can anyone suggest me good way to get back files from GoPro Hero 3 camera? Thanks in advance”
GoPro Hero 3 is the ultimate camera that one will always prefer to own in life time. Enriched with excellent video and picture capture ability, this action camera is exceptional at recording video footage of Skydives. GoPro Hero3 is embedded with 5 to 12 mega pixel digital still resolution, MicroSD card slot, HDMI port, built-in Wi-Fi for remote monitoring and control, waterproof outfit and different video modes to enhance the quality of video footages. It can record High-Definition videos of 1080p, 4K, 720p and 960p resolution with the support of Ultra Wide Angle Glass lens, Auto low light and SuperView modes. However, many users have lost files from GoPro Hero3 storage media in vivid circumstances.
To recover GoPro files, you need to download and install a suitable GoPro recovery software. We have great experience with Disk Drill, which is why we’re using it for the purposes of this article. Disk Drill runs on both Windows and Mac, and you can download it free of charge from its official website. This video is about GoPro and how to import video. This video will show you how to hook up your gopro and where to import the video to.
Various scenarios causing loss of files from GoPro Hero 3 are:
Unintentional Deletion: Usually, while browsing through various options on GoPro Hero 3 gadget, novice users may tend to erase important files accidentally and incur file loss
Incomplete File Transfer: In the process of moving files from GoPro Hero 3 to Mac system, unexpected removal of gadget from system can cause missing of those files from GoPro Hero 3 digital camera
Micro SD Card Damage: Usage of memory card from GoPro Hero3 on different gadgets; improper mounting of the card on camera; recording videos when SD cad has no free space, etc can result in corruption of MicroSD card and leads to complete file loss
Unexpected Format: There are certain times when MicroSD card on GoPro Hero 3 may show errors like Format error, no card mounted on device, etc. To resolve these errors, one has to format the card that results in deletion of entire files on it
When video footages and pictures are lost from GoPro Hero 3 camera, users incur great loss of precious files. However, if users are clever enough by possessing recurrent backup of all files from GoPro Hero3; then the situation can be easily resolved by restoring lost files from backup. But in most of the file loss cases, GoPro Hero3 camera users lack backup of recently recorded videos and pictures. In such instances it is recommended to employ best video recovery program to recover videos from GoPro camera without making any delay.
Ultimate program to retrieve GoPro Hero3 camera files:
Among the top rated recovery tools, professional data recovery experts advise users to go for Yodot Mac Photo Recovery tool to recover files from GoPro Hero 3 camera. It can successfully restore video files with AVI, MOV, XVID, DIVX, MPEG, MP4, M4V, 3GP, ALE, AVS, etc. file formats on Mac OS X. Including videos, this excellent media recovery program can bring back diverse types of media files like pictures, songs, RAW images and other documents. Using this program it is possible to retrieve videos and pictures from GoPro Hero3, Hero 2, Hero 4, Sony, Nikon, Canon, Panasonic, Kodak, Sigma, Pentax, Olympus, FujiFilm and other popular camera brands. Media files lost or erased from storage devices like Mac hard drive, external hard drives, USB pen drives, memory cards, FireWire Drives, etc. that are formatted with HFS, HFS+, HFSX and FAT file systems can be recovered easily. This software is compatible to operate in Mac machines running on Mac OS X Leopard, Snow Leopard, Lion, Mountain Lion and Mavericks operating systems.
Steps to rescue files from GoPro Hero 3 camera on OS X
Download the software on a Mac computer and connect your GoPro Hero 3 camera to this Mac machine
Install the software and run it according to given guidelines
In main screen, click on ‘Deleted Photo Recovery’ or ‘Lost Photo Recovery’ according to file loss scenario on GoPro Hero 3
Next, from the list of logical and physical rives present in screen; select the storage media of GoPro Hero3 camera from which files have to be recovered
Also, precise the recovery process by mentioning what file types you wish to be restored or you can just skip this step
Now, software runs a scan of storage memory of camera to retrieve lost or erased files
After scanning process, examine regained files in ‘Data View’ or ‘File Type View’ modes
You can preview selected files from the list using ‘Preview’ button
At last save these files to desired destination location on host computer drive
Preemptive Measures:
Do not use GoPro Hero3 when there isn’t sufficient power supply and enough storage space to save recorded files
It is always good to hold proper backup of files from GoPro Hero 3 camera at regular intervals of time
Follow me on Twitter. And be sure to read my blog.
(Skip to the bottom of this post if you just want to know how to connect to your GoPro using an internet browser.)
As I mentioned my GoPro Hero3+ Silver Edition has been giving me issues lately.
It started 6 months ago as an iOS app connectivity issue. I would connect to the ad-hoc network that the GoPro Hero3+ creates, open the iOS app, and attempt to transfer the files to my phone but it would only work about 10% of the time.
I figured out how to deal with this issue by first attempting to control the GoPro using the app before attempting to transfer the photos and video off of it. I have no idea why, but this worked for a while. But then even this “hack” stopped working about a month ago.
For these times I would connect my GoPro to my Mac via USB and transfer the files. But recently this has stopped working too. The GoPro doesn’t mount to the Mac. And in Image Capture or Photos for OS X you can only see the GoPro being connected for a few seconds before it disconnects, reconnects, disconnects, repeat repeat repeat. Maddening. It isn’t the cable. Is isn’t the USB port. (I’ve managed to rule these out.)
After searching online for a bit I see a lot of people having similar issues with their GoPro cameras after they’ve had them for a little while. Some ship with these issues.
I do not have a micro USB chip reader so I have no way to get larger files off of the GoPro with all of these crazy issues. Smaller files can still be transferred using the iOS application thankfully.
On Wednesday I attached my GoPro to my kayak and paddled around for a while with the camera pointed under water. Typically I try to stop and start the video recording every few minutes because I know I can only transfer smaller files to my phone. But I just let it run for a while.
Today I cannot transfer that file to my phone (using the app) or computer (using USB). And I don’t have a card reader. So what other option do I have?
It turns out that GoPro Hero 3+ comes with a small web server on it that you can connect to, browse the files, or even see live video from the device. I had no idea this was an option. It wasn’t until I stumbled across a few poorly recorded YouTube videos that I saw it. I’ve read the manual that came with my GoPro at least twice and I don’t think it is mentioned in there either. Just to be sure, I checked the manual again while writing this post. I do not see it mentioned.
Here is how you connect to your GoPro using a web browser.
Turn on your GoPro.
Turn on Wi-fi into “app” mode. (if you’re unsure how to do this, see your manual)
Connect your computer to the ad-hoc wireless network that the GoPro creates.
Open your web browser, point it to http://10.5.5.9:8080 (if this IP address does not work, see what the IP address of your “router” or “Gateway” is when connected to the GoPro. On Windows you can run “ipconfig” using CMD.exe and on Mac you can go to System Preferences > Network > Advanced > TCP/IP)
If you did it right, you’ll see this.

Gopro On Mac
It isn’t fancy. But it gets the job done.
Gopro Mac Os
I still wasn’t able to download the 2.1GB video file. It halts at around 1.47GB and just sits there. I think my GoPro is telling me it is time to be retired. Sad GoPro. However, I tried transferring a few other smaller files and it worked very smoothly. So perhaps this is easier than using the iOS app or even mounting it via USB. Who needs cables?
I’m really happy I found this feature.
0 notes
Link
Losing data stored on a computer is the worst part of storing data digitally. Data loss can take place due to various reasons including malware attack, files got corrupted, or maybe you have deleted some files accidentally. So no need to worry about such a small issue, we have various data recovery software out there. But the question is which recovery software for macOS is best? which recovery software assure us to provide a 100% data recovery guarantee?
So here in this article, we have listed out some best recovery software for macOS, by using them you can easily recover your lost data within a few minutes. So, let’s get started.
Best Recovery Software for macOS
EaseUs Data Recovery Wizard Pro

EaseUS Data Recovery Wizard Pro is an efficacious system restoration software, that is designed with the motive to recover the deleted files from the system, which were deleted unintentionally or accidentally. It has an amazing user-friendly interface to provide mesmerizing user experience, with so many handy features that will help you to recover your deleted files. To know more about Ease Us Data Recovery Wizard follow the given article EaseUS Data Recovery Wizard Pro Review.
Data Rescue 6
Prosoft’s Data Rescue 6 is an amazing data recovery software, which is packed up with some advanced data recovery tools. This tool was developed for years and it has been tested by a professional data recovery lab. From this, we can have an idea of how reliable and useful this tool is. It is a versatile data recovery software for macOS with some amazing features.
In this software, you can create a clone when a drive is getting fail while retrieving data or when the process is taking too much time for completion. This software requires 32GB of additional storage to perform recovery operations. It has a free file finder app so that tool can decide whether data can be recovered or not. It performs quick and deep scans for data recovery. It supports a large range of devices including
Mac Desktops / Laptops
PC Desktops / Laptops
Hard Disk Drives
External Drives
Solid State Drives
SD Cards
CF Cards
Thunderbolt Drives
FireWire Drives
RAIDs
This software lacks pricing as it doesn’t offer any free trial version so that we can experience the software on-hand and decide whether to use it or not. And its standard license limits allows only 5 drive recoveries to a user.
Price- $19 for the standard version, and for unlimited data recovery you should purchase an annual subscription.
Download
MiniTool Power Data Recovery & Stellar Data Recovery
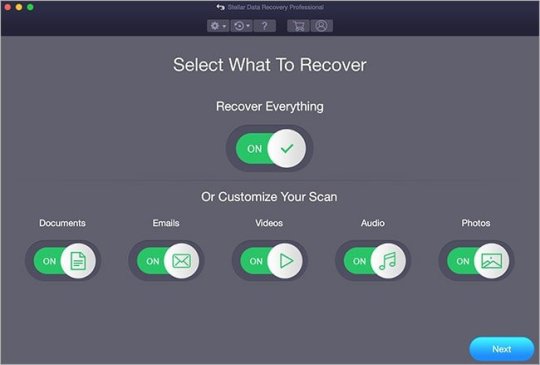
MiniTool Power Data Recovery and Stellar data recovery has joined their hands together for macOS and designed an amazing software which restores the lost/corrupted/deleted file from macOS supported systems. You can use the Minitool professional Data recovery tool to restore data from Mac, external HDD, SSD, USB, SD/memory card, etc. This software recovery tool also supports corrupted files, so if your data or folder get corrupted so you can retrieve the file using this professional tool.
This data recovery software supports a wide range of file systems, APFS, HFS+, FAT & NTFS drive on macOS Catalina, Mojave, High Sierra, etc. It is compatible with Mac OS X 10.7 & above versions. Combinative these software provides so many amazing features including
It allows users to recover permanently deleted files.
It can recover data from crashed Mac.
It can recover data from formatted/crashed partition.
You can perform a Quick Scan or Deep Scan for file recovery.
It previews all the recoverable files.
You can pause the scanning anytime and resume it later.
This software also offers a free Drive Monitor that keeps a track of the drive's performance, temperature, and overall health. It has a clone disk feature which creates a clone of the drive.
Price- This software comes in three variants
Professional- Buy at $99, this gives you a lifetime license for 1 Mac device.
Premium- Buy at $149, This also gives you a lifetime license for one mac along with some more features.
Technician- Buy at $149, this version can be used for 1 year with 3 different Mac devices.
Download
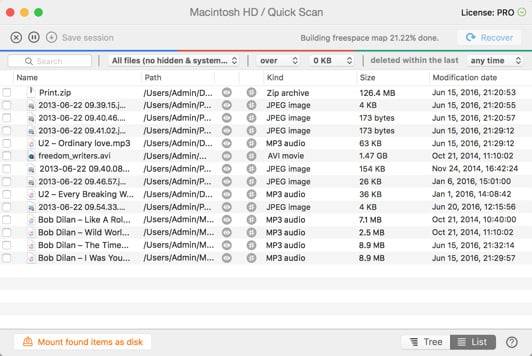
Disk Drill
Also Read: How to Make Phone Calls On Mac
Disk Drill is a reliable and great data recovery software for macOS as well as for Windows, it offers a very simple interface that makes the software easy to use and more reliable. It can recover data (upto 500 MB) from any "virtual storage device", and from internal and external storage devices such as hard disk, USB devices, memory cards, etc.
This software organizes all the deleted files category wise, so if you want to recover any deleted file, you can easily access it. Moreover, you can filter the data by date or size. It supports various file systems, and also perform quick and deep scans for the files. It is mentioned that this recovery tool can recover any file or folder and also reconstruct 200+ file types with multiple file recovery methods.
While recovering any file disk drill recovery software provides you a preview of the file[s] to be recovered. You can pause the scanning and can resume it later, and you can take the backup of the entire drive with this recovery software. Overall, we would say this is an excellent recovery software for macOS.
This software not only recover lost data but it is also packed up with some other useful tools like,
Disk Health
Mac Cleanup
Duplicate Finder
Recovery drive
Data Protection
Data Backup
Price- It offers a free trial, and a Pro version which costs around $107.13 with unlimited data recovery for a single user up to 3 activations, and an Enterprise version which costs around $600 and can be used by 10 users with infinite activations.
Download
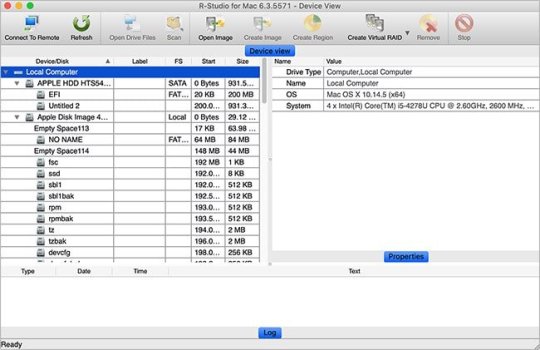
RStudio For Mac
Also Read: How To Get macOS Dynamic Desktop Feature on Windows 10
RStudio data recovery software for Mac is an integrated set of tools which are specially designed to help you to be more productive with R. This software uses advance algorithms to restore the formatted partitions and drives, this data recovery software can also create an image file by using bad sectors of the disk.
This software has various features including console, syntax-highlighting editor that supports direct code execution, and this tool also offers a wide range of robust tools that can be used for plotting, displaying the history, debugging, and you can also manage your workspace.
This software estimates that it restores almost all kinds of deleted data. RSrudio supports a wide range of file systems including APFS, HFS+/HFS, FAT, NTFS, ReFS, UFS1/UFS2, and Ext2/Ext3/Ext4. It uses graphics for previewing recoverable data, but at the same time, this software also lacks as it requires a high level of computer knowledge.
Price: - It is available in two versions for Desktop and two versions for Server too
For Desktop
Free
Commercial Licence at $995 /year.
For Server
Free
Commercial Licence at $ 4,975 /year.
Download
PhotoRec
Also Read: 13+ Best Mac Keyboard Shortcuts
Photorac is a free digital data recovery software for macOS supported devices, and it can undelete the data from not only computers but also from cameras, mobile devices, memory cards, etc. This tool offers features through which you can first upload a utility into the system to check whether it can restore data of that file format or not, instead of checking all the files.
But we can't consider this tool as a powerful data recovery tool because in many cases it can't restore complete files and sometimes it's tough for the user to understand its instructions.
Price: - Free
Download
M3 Mac Data Recovery
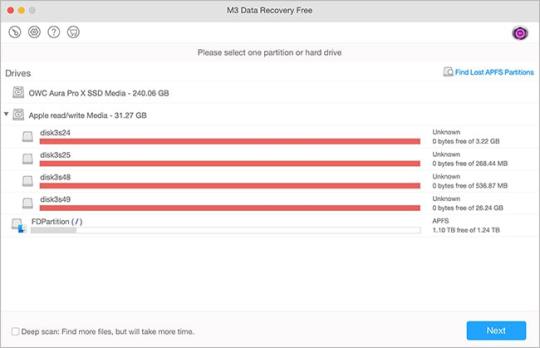
M3 Mac Data Recovery software for macOS is compatible with almost all recent versions of macOS. This file recovery tool supports a wide range of file systems. This software recovers data not only from normal systems drives other supported devices but it can also retrieve and restore the data from encrypted drives too.
this software updates very frequently so it is highly-reliable but sometimes it took so much time for recovering and restoring process, moreover, it doesn't perform well than other data recovery software for macOS.
Price: - It is available in two versions, including
Free
Paid- (i) $39.35 for 1 year, (ii) $ 59. 95 for a lifetime license.
Download
That was all about the best recovery software for macOS. I hope you found this useful if you have any doubts or you have any suggestions so please share your valuable thoughts with us.
[su_box title="More Like This" box_color="#000000"]
Microsoft Quietly Released Windows File Recovery Tool for Windows 10
5 Best Video Players for Windows PC
23 Best GIMP Plugins and Filters You Need to Try (2020)
[/su_box]
via TechLatest
0 notes
Text
Getting Tired of martin guitars cutaway models? 10 Sources of Inspiration That'll Rekindle Your Love
Have you had these issues happening with your iPod? This technique simply might make your iPod beginning working once again!
Actions
1. Transform your iPod on. Ensure the battery is billed up enough to turn it on.
2. The sad iPod or sad folder should turn up on the display.
3. Place your ear up against the iPod and also you will certainly listen to the clicking sound inside (it sounds like an auto trying to start up, whenever it takes a couple of tries transforming the keys).
While the iPod is still making these audios, take the iPod in one hand, open up the hand of your various other hand, and also smack the slim side of the iPod versus the hand of your other hand. CAUTION: This approach is shown to work as an uncomplicated way to repair iPod hard drive imbalance, yet it might result in future equipment issues. Various other approaches of revitalizing a dead iPod are available below and may be much safer]
5. Continue slapping it on its side for at least 6 times, while the iPod is attempting to turn on. The trick is to loosen the hard disk.
6. Hereafter is must return to typical feature. If it doesn't, check out below.
7. There are several techniques out there that have actually all efficiently dealt with iPods, so don't offer up hope.
8. If, nevertheless, you are an even more hands-on kind of person and also do not wish to bother trying iPod aid through your computer, miss to the bottom of this steps page for information on exactly how to open up and also repair internally.
9. The very first reccomended steps are from Apple's assistance site.
1. Attempt to wait thirty minutes while iPod is charging.
2. Try another FireWire or USB with Dock Connector cable.
3. Try one more FireWire or USB port on your computer.
4. Attempt to separate all gadgets from your computer system's FireWire and also USB ports.
5. Attempt to download and install and install the latest version of iPod software and also iTunes. http://www.apple.com/ipod/download/.
6. Try these five steps (known as the 5 Rs) and it would overcome most iPod problems. http://www.apple.com/support/ipod/five_rs/.
7. Try to put the iPod into Disk Setting if it fails to appear on the desktop computer. http://docs.info.apple.com/article.html?artnum=93651.
10. If none of the above has benefited you, then you need to attempt the following:.
1. Attempt to attach your iPod with one more computer system with the iPod updater pre-installed.
2. Still cant see your iPod, put it in Disk Setting as well as connect with a computer system, instead of doing a Restore on iPod Updater. Go as well as format the iPod rather.

1. For Mac computer:.
1. Open up the disk utility, wish your iPod shows up there (left hand side), emphasize it.
2. Most Likely To Tab Partition, click either Delete or Dividers, if stops working, avoid this step as well as most likely to 3.
3. Go to Tab Erase, choose Volume Format as MAC OS Extended (Journaled), as well as click Erase, again if stops working, miss it and go to 4.
4. Like action 3, however open up the Protection Options ... as well as pick Zero Out Data before click Erase. It will certainly take 1 to 2 hours to complete.
5. Eject your iPod and also do a Reset.
6. Open the iPod Updater as well as click Bring back.
2. For Windows computer:.
1. Go to folder My Computer.
2. Hope you can see your iPod there and also right click the iPod.
3. Choose Style. Make certain the settings go to Default and that Quick Layout is not checked.
4. Now pick Format.
7. In case you do not manage to do a Layout on a window computer, attempt to make use of some third celebration disk utility software application, e.g.Partition Magic.
Windows customers having difficulty with their iPods should locate a Mac customer. In lots of situations when an iPod will not reveal up on a PC that it will reveal up on the Mac. After that, when the iPod re-connected with a computer system, it will certainly be recognized as an fresh external tough drive, it will certainly show up on the iPod updater.
11. iPod still doesn't function? Maintain choosing these steps.
* Diagnostic mode option:.
o If you have attempted problem firing your iPod fruitless besides the steps above, possibilities are your iPod has a hardware trouble. The iPod's integrated Diagnostic Mode is a fast as well as simple means to determine if you have a "bad" iPod.
o You require to reboot your iPod before placing it into Diagnostic Mode. Examine that your hold switch is off by gliding the button far from the headphone jack. Toggle it on and also off to be safe.
o Press and also hold the complying with mix of buttons at the same time for roughly 10 seconds to reset the iPod.
iPod 1G to 3G: "Food selection" and "Play/Pause".
iPod 4G (consists of Image, Nano, Video Clip, as well as Mini): "Food selection" and also "Select".
o The Apple logo will certainly show up and also you should really feel the hard drive rotating up. Press and hold the following sequence of switches:.
iPod 1G to 3G: "REW", "FFW" as well as "Select".
iPod 4G (includes Photo, Nano, Video Clip, and also Mini): "Back" and "Select".
o You will certainly hear an audible chirp noise (3G models as well as greater) and also the Apple logo design ought to show up in reverse. You are currently in Diagnostic Mode. Navigate the listing of tests making use of "REW" and "FFW". The scroll wheel will not work while in analysis setting. For further information on Diagnostic setting can be discovered at http://www.methodshop.com/mp3/ipodsupport/diagnosticmode/.
o Attempt to do the 5in1, HDD R/W and also HDD check tests. Some successful cases have actually been reported after the running minority examinations under the Diagnostic setting. In situation it does not operate in your case, and also the scan examinations records show some errors after that it proves your iPod has an equipment problem and also it needs a repairing solution.
* Style your iPod with a beginning disk:.
Attempt to find a method to reformat your iPod, once more it does not matter which format (FAT32, NTFS or HFS) you choose, the trick is to remove the corrupted system data on the iPod. Reboot your computer at the regular method, connect your iPod back with it, open the iPod updater, as well as hopefully your iPod will certainly appear there for the Restore.
12. The next tutorial will instruct you how to open your iPod and also attempt to fix it. This should probably be done as a last resort, for opening your iPod will most likely gap your warranty. Furthermore, if performed incorrect, your iPod may sustain permanant damage while your issue may have ben quickly assisted by other processes.
* The most effective tutorial I've kept reading how to open an iPod is here: http://forums.ipodlounge.com/showthread.php?s=&threadid=93789/.
13. That tutorial is how to open a 3rd/4th Generation iPod, although a lot of are likewise done. Google it if you're not completely satisfied as well as desire even more information; there are a great deal of fantastic websites available.
* Once inside, there are a variety of approaches you can make use of that have actually all been utilized to repair iPod issues. Make sure the hold switch is on! You don't wish to strike a button and mess something up! The techniques will certainly be detailed in order of exactly how effective I believe they are.
14. Disconnecting the Hard Disk Drive and also Booting Method.
1. Since your iPod is open, you should see your hard disk lying level ahead. The ribbon cable television affixed to the hard drive is removable, so do not be scared.
2. Gently pull the hard disk away from the cord in which it's attached, while holding the cable lightly in hand. You do not want to rip it out the motherboard.
3. Your hard drive ought to quickly break complimentary. Now that it's out, you can have fun with it, take a look around, yet the point is to provide it a little remainder.
4. Next off, now that the hard disk drive is out, thoroughly flip your iPod over so you're considering the screen. Take care not to rip the ribbon wire by the hold button.
5. Take the iPod off of hold function, thus enabling the buttons once more.

6. Transform the iPod on. You might recieve a mistake message, and also you may be able to access menus.
1. If you get a mistake message, attempt rebooting the iPod.
7. Now transform the iPod off.
8. Reactivate the hold button. Your experiment is full.
9. Reconnect the hard drive as located prior to, and thoroughly change the back cover. Hope it works.
15. Calling Card Technique.
1. Since your iPod is open, you must see your hard disk existing level on the top.
2. Take a regular business card as well as fold it in half.
(The suggestion is that your iPod's difficult drive is too loose and also the folded up organisation card will place stress on it when enclosed for a successful spin and also no click. Don't fold it even more than when unless you have a factor, since even more pressure on the hard drive may maintain it from rotating, triggering also much more troubles.
4. Meticulously place the cover back on the iPod, making certain the card is in location properly.
5. Close your iPod and also hope it works.
16. Time to Spend Some $$ Method.
1. Get a job.
You probably have an equipment trouble (like me), and also you possibly require a brand-new tough drive. A routine substitute tough drive isn't as much as a brand-new iPod, but you'll have to shell out a couple throws if you want it dealt with.
Perhaps look right into acquiring a bigger tough drive to hold more useless spunk. It'll still set you back less than a new iPod.
4. Review over for info on exactly how to replace your hard drive. It's not tough.
5. Pray it's a hard disk issue after you bought one and can't return it.
If you have actually reviewed this far, you've tried everything, and also your iPod still isn't repaired, after that ask a person else already. Or simply steal your buddy's iPod.
Tips.
* Make sure that the iPod has sufficient battery power to turn on.
* An option is open up your iPod (which nullifies the service warranty) and press the drive and it's enclosing cushioning. There is apparently some grounding that can come loose as well as this can fix points up again. This helped me as well as a close friend as well as if you are extremely mindful when you open up the situation, it is less violent than smacking it about.
* You can likewise go to an Apple shop and also ask to change the battery! They are happy to help you!
* Do not steal your buddy's iPod.
Cautions.
* Before attempting these approaches, contact Apple as well as see if you can obtain your iPod replaced absolutely free.
* This approach should only be as a last resort. If Apple's pointers do not work, first attempt running a chkdsk feature on your iPod.
* Do not break the hard drive!
0 notes
Text
Usage Carbon Copy Cloner To Make A Precise Copy Of Your Hard-Disk
Though Time Maker is an extremely beneficial and basic to utilize backup utility, it is sound technique to not place all your digital eggs right into one basket. Further, when you update your hard drive, cloning the old drive makes for a completely seamless transition to the new one. All of your passwords, applications, files, and so on will certainly be best where you anticipate them to be.
I want to show you exactly how to use the Shareware (uncrippled, unlimited demo) program Carbon Copy Cloner to support your files. Making Use Of Carbon Copy Cloner is a bit much more involved than Time Equipment however the advantage of making a precise, bootable duplicate is well worth the extra effort.
Evolving Media In The Digital Age As computers have gained a boosted function in our lives, the requirement for safely storing digital memories has actually expanded to be more vital than ever before. Unlike substantial objects like pictures, letters and also postcards, a hard-drive filled with digital 0's as well as 1's is conveniently removed or simply lost track of, as technology boosts with time. For instance, I still have a cabinet filled with floppy disks formatted for the Amiga, despite not possessing that computer system for several years. Though it's not impossible to get my information off them, it's a migraine therefore I have actually placed it off indefinitely. This probably will not hold true with Mac OS X as it's an even more extensive Operating System however is still worth pondering just how future-proof your backup system will certainly be in years to find.

A Two-Step Refine There's a lot to think about when supporting your information and the most effective method will certainly depend upon your requirements. Though more basic back-up energies like Time Equipment are wonderful in their own right, it is a good concept to maintain an exact duplicate of your hard-drive. This way, every single data as well as system choice will certainly be kept on your external hard-drive exactly as it was copied, with the added capacity of having the ability to boot from this disk image need to catastrophe strike as well as your hard-drive be shed, swiped or damaged.
Nonetheless, making the actual back-up is only the first step required to protect your data, as an outside hard-drive might quickly be literally harmed by fire, earthquake or flood. Ideally, you'll be saving a historical duplicate of the back-up at an additional secure place, such as an office safe or trusted member of the family's home - this need not be done each day, yet a regular monthly regimen is advised. If this is not useful, then at least consider an off-site cloud based back-up of 'worst case situation' files, such as your most cherished images, passwords and vital details. Apple's upcoming iCloud service will quickly change the means we think about on the internet information storage, yet until after that, there's Dropbox.
Preparing The Target Disk First of all, we're mosting likely to require somewhere to support to, so plug in an outside hard-drive and fire up "Disk Utility" on your Mac. Currently partition your external hard-drive (The "Target Disk") to ensure that you have a partition with adequate space to suit your Mac's major hard-drive (The "Resource Disk"), with a couple of gigabytes left over for good measure. As you can see, I've classified mine CCC - short for Carbon Copy Cloner - and also inserted the date. See to it you format your drive as "Mac OS Extended (Journaled)".
Getting Started With Carbon Copy Cloner
Setting Up Carbon Copy Cloner Head over to Bombich to order a complimentary copy of Carbon Copy Cloner and experience the easy setup procedure. Once set up, we can begin making our initial back-up, so release the program.
Mounting Carbon Copy Cloner Head over to Bombich to get hold of a cost-free duplicate of Carbon Copy Cloner and experience the straightforward setup procedure. Once installed, we can start making our first backup, so release the program.
Carbon Copy Cloner's Main Interface As you can see, CCC's user interface is quite easy and also direct. It is exceptionally essential to make certain the correct "Resource Disk" and also "Target Disk" have actually been chosen. So, for "Resource Disk" we're mosting likely to need to pick our Mac's hard-drive as well as in the "Target Disk" choose the complimentary dividers formerly made in Disk Utility. Lastly, click the box labelled "Remove items that do not exist on the resource".
Take a moment to read through the information, especially under the heading "What is mosting likely to happen?"
Currently click on "Clone" and you'll get one more caution, as shown below. Thinking that every little thing is fine, go on as well as back up your hard-drive!
Carbon Copy Cloner - Final Warning Prompt The backup procedure will certainly take a while, depending upon your hard-drive speed as well as whether it's a USB link or Firewire. My MacBook Pro takes just over 2 hours to finish the back-up procedure when making use of a USB 2.0 link to a typical Western Digital 5400 RPM outside hard-drive.
Booting From Your New Backup Since you've made a back-up of your Mac's whole hard-drive, you can boot right into it if wanted. To do this, just switch your Mac on with the outside hard-drive linked and also hold back the "Option" (or alt) essential right after you powering on. You'll now see your Mac's normal hard-drive as a boot alternative, in addition to your recently made Carbon Copy Cloner partition. Select this as well as your Mac will certainly boot equally as normal, albeit substantially slower if you're running USB.
Review The Handbook
Carbon Copy Cloner's Help Documents The procedure defined above is only the most standard of backup options which Carbon Copy Cloner has to use. The aid documentation included with CCC under Help -> Carbon Copy Cloner Assistance is an extremely valuable resource and gives clear directions on just how to execute incremental back-ups, just how to set up back-ups as well as even more.
Beyond The Fundamentals: Organizing
Setting Up A Back-up Task Carbon Copy Cloner can make per hour, daily, weekly and also regular monthly scheduled backups. To set-up a back-up, begin the actions necessary to backup your drive as previously described, however rather than clicking "Duplicate" select "Conserve Job".
Now the "Set up" box shows up, as seen over. I've established my backup to occur when a week, late on Sunday night/Monday early morning. This will just occur if my outside hard-drive is placed.
Past The Fundamentals: Restoring From Your CCC Back-up A worst-case circumstance situation; your Mac's installation is messed up and numerous programs are damaged. All efforts to deal with the OS has actually failed.
You would certainly begin by booting into your CCC backup as laid out above. After that, as soon as your Mac is fully loaded, run Carbon Copy Cloner and also pick your setups thoroughly. "Source Disk" must currently be your CCC back-up as well as "Target Disk" will certainly be your Mac's primary hard-drive. Experience the warnings once more and review the message under "What is going to occur?" once again.
This recover must take a whole lot less time than a backup, once the process is completed, reboot your Mac without the outside drive reconnected (you may have to hold the "Option" key as well as choose your Mac's hard-drive this very first time).
Final thought We have actually still only covered a couple of elements of what Carbon Copy Cloner can do and as soon as you're confident with basic and also scheduled back-ups, there's a great deal more advanced functions to obtain stuck into. No one back-up process is excellent, yet Carbon Copy Cloner can provide one aspect of your backup needs. If you discover yourself utilizing Carbon Copy Cloner a whole lot, take into consideration contributing some money towards (minimal $10) keeping this great software program alive!
0 notes
Text
Once you own Timemachine Preferences open, then click on the Select Backup Navigation button.
To Start the process: This external drive can be plugged periodically to carry out frequent backups or may be rendered plugged in so that it is constantly backed up. Time-machine does hourly copies for the last twenty four hrs, daily copies for the last month and weekly copies for many previous months. The oldest backups are deleted when your disc becomes full, and therefore it's not necessary to worry about not being able to copy reddit tech support gore new data at that point. The most convenient part about Timemachine is that you are able to revive any individually copied files, or you could completely restore from an earlier backup. Which usually means that in the event you lose something, such as an essential document or nearest photo, you can open Time Machine, grab that file or photo right from the backup and restore it right away.
All modern Mac computers have a built in backup solution that lots of Mac users usually do not utilize. This utility is popularly known as Time Machine; it's simple to use, and also, above all, it's FREE (external hard disk not included) Buy an external Hard Disk At this point you are able to turn Time Machine on, and it'll begin the very first backup.

You should see a list of available devices to utilize as your backup diskdrive. In this list, the external drive you plugged should appear as a choice under Available Disks. Select your own drive, and click the Usage Disk button to assign it as a destination. Plug on your external hard disk drive to a Mac computer. While there are lots of online and offline backup solutions from multiple third party organizations and manufacturers, all Mac users need to back a full system image in their data is always to connect with an external hard drive using a USB, FireWire, or Thunderbolt cable (depending upon your own ports available on your Mac.) Time-machine can also be supported up to a AirPort Extreme apparatus, an AirPort timecapsule apparatus, or even an OS X Server on your system, whenever appropriate. If you do not find the safelink technical support prompt, then you can start Time Machine Preferences by clicking the time-machine icontm_idle, that ought to be on top right corner. When your copy is finished, you'll be prompted with a message advising you that the primary copy is complete. We'll be pleased to aid you along with your installation. You need to be prompted to Backup with Timemachine. Or, select the black apple icon on the top left corner of your screen, click on System Preferences, then open the Time Machine alternative.
0 notes
Text
Buy an external Hard Disk
All modern Mac computers have a built-in backup solution that lots of Mac users usually do not work with. This utility is popularly called time-machine; it's simple to work with, and also, above all, it's FREE (external hard disk drive not included) We'll be pleased to help you along with your installation. You ought to see a set of available devices to utilise as the backup disc drive. Within this set, the lorex technical support external drive you plugged should appear as a choice under Available Disks. Select your trip and click on the Utilization Disc button to delegate it for a destination. When your copy is finished, you'll be prompted with an email informing you that the very primary copy is complete. The plug on your external hard disk drives into a Mac computer. As Soon as You own Time-machine Preferences open, then click on the Select Backup Navigation button. Should you not find the instant, then you can start time-machine Preferences by clicking on the time-machine icontm_idle, that ought to be at the top right corner.

To Start the procedure: You ought to be motivated to Backup with Time-machine.
At this time you can turn-time Machine, and it'll begin the very first backup. Though there are lots of online and offline backup services from multiple third-party organizations and manufacturers, all Mac users will need to back a complete system image in their data is always to join with an external drive with a USB, FireWire, or even Thunderbolt cable (depending upon your own interfaces available in your own Mac.) Time-machine is also supported up into an AirPort Extreme apparatus, an AirPort time-capsule apparatus, or even an OS X Server in your system, whenever appropriate. Alternatively, choose the dark apple on a top left side of your screen, click System Preferences, open the full-time Machine possibility. This external drive might be plugged periodically to carry out frequent backups or could be rendered asus tech support number filled in such it is always copied. Time-machine does hourly copies for the previous twenty-four hrs, daily copies for the last month and weekly copies for many preceding months. The earliest backups are deleted whenever your disc becomes full, and therefore there isn't to be worried about not having the ability to copy new data in there. The handiest part about time-machine is you find a way to bring back any individually supported files, or you could completely restore everything from a previous backup. Which usually means that in the event you drop something, like a crucial document or nearest photo, you could start time-machine, catch that document or photo directly in the backup and restore it straight away.
0 notes
Text
Disk Drill Pro. Universal utility for data recovery
Even using such a proven and sufficiently reliable tool as Time Machine, you can not be completely sure of the security of the created backups. The external medium, on which the backup was performed, can “pour”, the network storage can not be accessed … alas, the list can be continued for a long time. In such cases, specialized applications for undeleting deleted data come to the rescue. It so happened that we practically did not talk about such programs, but today we would like to talk about the Disk Drill Pro program, which can not only restore what the user has already managed to delete, but also greatly facilitate such operations in the future.
After the standard installation of the program, the user will be prompted to immediately activate the Recovery Vault system to protect the Mac system disk, enable the HDD status diagnostics based on SMART data, and view the demonstration tour that tells you about the features of Disk Drill Pro. All this can be used and at any time later.
As you can understand from the contents of the screenshot, Disk Drill Pro has Russian localization.Unfortunately, it is not quite perfect: there are phrases in English (including a demonstration tour), and the translation itself often looks like the result of Google Translate.
Then you will see a welcome screen that contains a bunch of links to the two modes of Disk Drill Pro (Protection and Recovery), as well as to various directories and other websites related to the program. By the way, the Russian-language version of the application site has a much more competent translation than the application itself.
Finally, you will get to the main program window, which has a visual interface and a simple structure consisting of two tabs (according to the number of Disk Drill Pro modes).
PROTECTION OF DATA
This tab enables / disables the unique Data Vault data protection algorithm, as well as a guaranteed data recovery system. Recovery Vault can greatly facilitate the recovery of deleted data from a particular disk due to the fact that when it is enabled, the file system service records and the attributes of the deleted files are stored in a special program repository. If you activate the Guaranteed Recovery System, in addition to all the above actions, the program will make hidden copies of all deleted files and save them according to certain rules. For each disk, you can use both one and both technologies at once.
Note that it is not enough to include one or another system – it still needs to be properly configured. In the advanced properties of Recovery Vault, you can specify additional protected folders, as well as exclusion masks, based on which the protection will not take into account files of certain types. If you disable the same system, you can also clear the repository of service records and file attributes.
In the settings of the system of guaranteed recovery, in addition to all the above, the terms for storing copies of deleted files (from 1 day to one year, and even without restrictions) are flexibly regulated, as well as the conditions under which the database of protected files will be cleared. Here you can set the minimum file size for guaranteed recovery (from 16 MB to 32 GB or, optionally, unlimited).
RECOVERY
The data recovery mode can be called the main working mode, since it is with it that the user will have to deal most often. As you can understand from the title, it is designed to recover deleted files from various media. Disk Drill Pro supports work with any disks that the user can connect and mount to a Mac OS X system (internal and external SATA / SSD / USB / FireWire / eSATA hard drives, video camera hard drives, iPod mini and iPod Classic, drives and memory cards). Declared support for HFS / HFS +, FAT16 / FAT32, NTFS, EXT3, EXT4 and other file systems, as well as over 110 file formats (see the developer’s website for a complete list).
There are at least three options for file recovery.
Restoring protected files
The easiest way is to undo the deletion of files from the media that was previously protected with Recovery Vault.
Quick scan
Quick scan, which allows you to identify recently deleted files. Can only be applied to specific media sections.After the scan is completed, the user will be asked to mark in the list of found files those that he wants to restore, specify the folder / media where the recovered files will be saved (it is strongly recommended not to save to the scanned section), select files for recovery from the list and, recovery process. If you want, you can save the restore session so that you can later return to it and restore the files found during this session, and do not start all over again, because the search results may be completely different.
Deep Scanning
Deep scanning can be affected not only by individual sections, but also by the entire carrier. The process of coarse scanning is long enough and therefore it is usually used only if rapid scanning does not bring the desired results.
After the scan is completed, the procedure for restoring files is the same as for a quick scan.
In addition to three options for recovering files in the program, there are two more useful functions.
Backup to the DMG image
Create a backup of the selected disk or partition in the DMG-archive and save the latter in the specified location.
Partition search
A function that allows you to find and restore a partition of a disk that was deleted accidentally (or intentionally).
The found partition can also be scanned for the presence of deleted files (and restore the files) on it, or you can save it to a DMG image, and then restore it using Disk Utility .
As a pleasant and not less useful addition, we can note the possibility of outputting the hard disk temperature indicator in the menu bar, which simultaneously serves as an application icon. Clicking on the icon will display a small context menu (when monitoring the temperature of several disks installed in the Mac, the corresponding number of icons will be displayed in the menu bar).
The Disk Drill Pro settings menu is very simple and contains 5 tabs with a minimum of settings located in them.Among the options you can note the choice of certain types of files that will be searched for during scanning, the setting of a master password that restricts unauthorized access to important functions of the program, work with SMART disk parameters. In general, the user may even not look at this menu, since Disk Drill Pro works fine and without additional settings.
As is known, it often happens that the value of information and data stored on certain media is many times greater than the value of the media itself or even of the entire computer. It is for these reasons that applications that allow you to recover lost data have quite a noticeable value. Disk Drill Pro is also no exception in this regard.The purchase will cost the user $ 89 , but it’s nice that for users residing in the CIS countries there is a 50% discount , as a result of which the final $ 44.5 does not seem such a large sum, especially if the restoration of the data archive is at stake, which you have been compiling for several years. There is also a completely free version of Drill Disk Basic, which has the same functionality as the Pro version (including the Recovery Vault system), except that the ability to restore files is disabled in it. There is also a third version of the program, which is called Disk Drill Media Recovery and is distributed only through the Mac App Store. Apple’s stringent requirements for applications deployed in the Mac App Store have forced the developers of Disk Drill to abandon a number of fairly important functions and significantly reduce the cost of the application. The program began to cost “only” $ 29.99, but at the same time it lost the ability to work with partitions of hard disks installed in the Mac and, accordingly, the Recovery Vault system.
In the process of testing, Disk Drill Pro showed excellent results in recovering files, regardless of when they were deleted, and can be recommended for use by all those users who evaluate the information stored on their media, much higher than the amount that will have to be laid out for the full version of the application.
The post Disk Drill Pro. Universal utility for data recovery appeared first on Acetylcholine.net.
Source: http://acetylcholine.net/disk-drill-pro-universal-utility-data-recovery/
0 notes
Text
11 Leading Tips When Acquiring A New Windows PC.
Personal computers Are Necessary in the ever day life whether at the office or at the work Place. Further work with a computer technology degree consist of operating in various other areas of development (such as web, video games, systems, items, programs and also software), as an expert (be it service continuity, systems or technical), as an administrator (of data sources or networks) or in a scholastic or industrial study capability, adding to the continuous advancement of computer systems and relevant innovations.
Laptop computer producers fit low-voltage processors that create less heat, yet an airier desktop PC could use a hotter and much cheaper cpu such as the 3.1 GHz Pentium G3240, which has a TDP of 53W. While the area of artificial life examines systems and researches the complicated actions that emerge from these systems, artificial intelligence utilizes systems to create details habits in machines and software application. As the semiconductor bundles become smaller, developers generated smaller laptops and also desktop. The brand-new OS is custom-made for touch displays, and touch-screen PCs-- the multi-finger kind that Windows 8 was developed to collaborate with-- have just been offered given that Oct MICROSOFT has taken the covers off a brand-new tool which reveals precisely what does it cost? data your Windows 10 PC is collecting behind the curtain and also sending back to Redmond. Once you have discovered the best ways to keep track of a computer system as well as have actually placed the surveillance software in place, the tracking program being used can tape the tasks of the individual being observed then transmit the data to an on the internet account which is set up in your name with the monitoring software. This allow you run Windows 7 as your major os, while concurrently running a totally free "digital" copy of Windows XP. The rate of Windows 7 Pro means this isn't really an option for the majority of home customers: you would certainly be much better off putting the cash to a newer-- possibly secondhand - COMPUTER. So is end individual information varying from desktop computer documents as well as digital pictures to songs and video clip files. Apple additionally offers Time Capsule (a Wi-Fi router with a built-in hard disk), which could do Time Device backups over Wi-Fi. In a world where every device is online it's clear that the only point Timesplitters got wrong, paradoxically enough, was getting here prematurely. The initial of these is the Operating System, such as Windows XP. This is the most essential piece of software application as it talks the software and hardware components in a COMPUTER what to do to attain a wanted result. 16. When you reboot your computer a message reflects that there are other people connected or programs in operation you were not using. A real air space indicates the device or network is literally separated from the internet, as well as data can just pass to it by means of a USB flash drive, various other detachable media, or a firewire connecting 2 computer systems directly. Net security consists of spy ware programs that checks the web sites that on brows through to search for any type of kind of vulnerability. " Defective Media Retention" implies you reach keep the hard disk drive if something fails with it. This is very suggested for information protection objectives. Time Maker is very easy to use, both for supporting as well as restoring data, yet it does have disadvantages. If you have any queries concerning exactly where and how to use http://alessandrosegato.Com.br/varlflux-contra-varizes-qual-e-o-preco-e-onde-comprar-o-mais-barato/, you can call us at our internet site. It has a smaller screen (11.1 inches) than a few of the others, a 1.2 GHz cpu, however it consists of an 80GB hard drive as well as a DVD+- RW double layer combo Drive. Conserve Money on Software Application since you do not need replicate licenses for OS, applications as well as PC Games on multiple devices. Lastly, although an external disk drive is an excellent way to relocate files from a Mac to a COMPUTER, there are various other means to do it. One of the most evident service is to use a USB Flash drive.
0 notes