#SCA stuff
Explore tagged Tumblr posts
Visit Tumblr Blog
Explore Tumblr blogs with no restrictions, modern design and the best experience.
Last Seen Tumblr Blogs


Fun Fact
BuzzFeed published a report claiming that Tumblr was utilized as a distribution channel for Russian agents to influence American voting habits during the 2016 presidential election in Feb 2018.
Text
I was telling a non-SCA friend that I've been struggling a bit with my SCA persona's name, since as far as I've been able to find, Old French did not have the th sound. Am I willing to go by Caterine instead (not feeling it), or do I settle for being a leetle bit historically inaccurate?
And God bless him, he replied, "I think you mean creatively anachronistic."
97 notes
·
View notes
Text
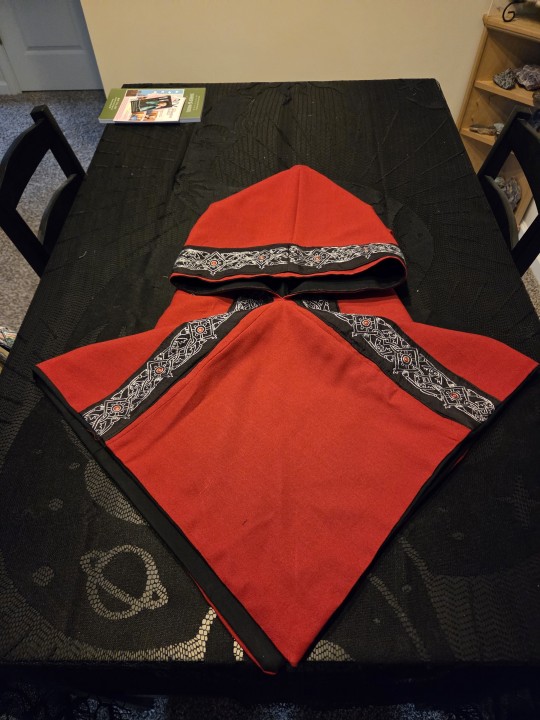


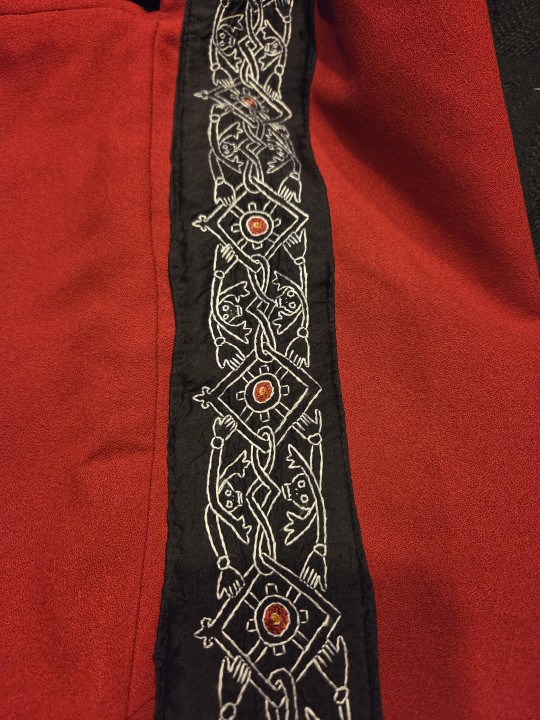
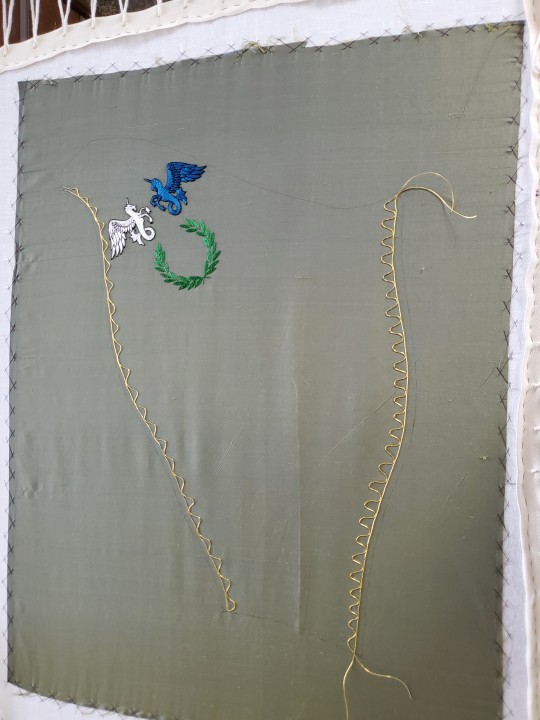
Hood I sewed and hand embroidered the trim for an SCA elevation to the new order. I can post now that it has been given to the recipient.
52 notes
·
View notes
Text
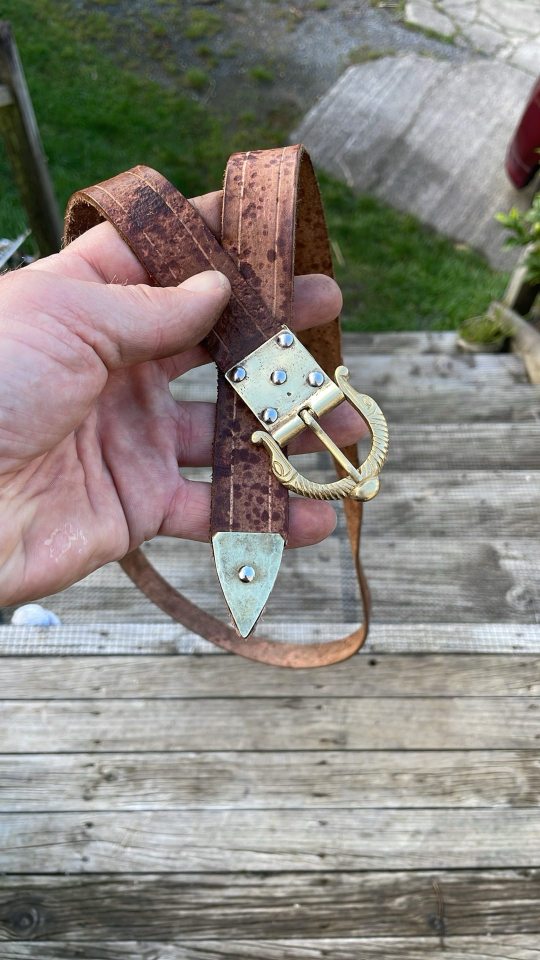
Noodling about test pieces: Early Medieval composite sewn belt, I did the belt plate to add to a buckle for a test belt piece (garter sized rather than full size belt) sewn by Aelfberga with wrapped pigskin around a leather core, sewn with two strand linen on boar bristle sewing points.
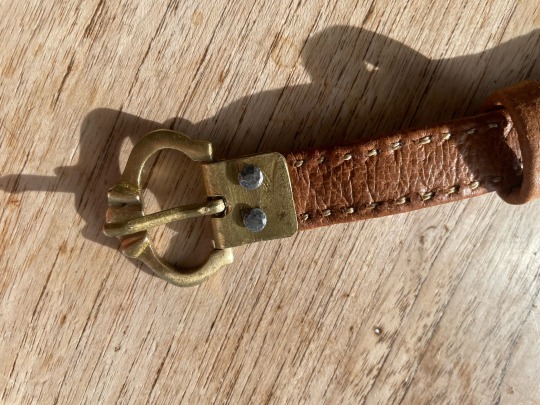


Edit: Actually, with that style of offset bar pointed D buckle, this one is probably more 12th-14th century, but we were wanting to try the composite wrapped core leather assembly for doing late migration era to early medieval composite belts.
10 notes
·
View notes
Text
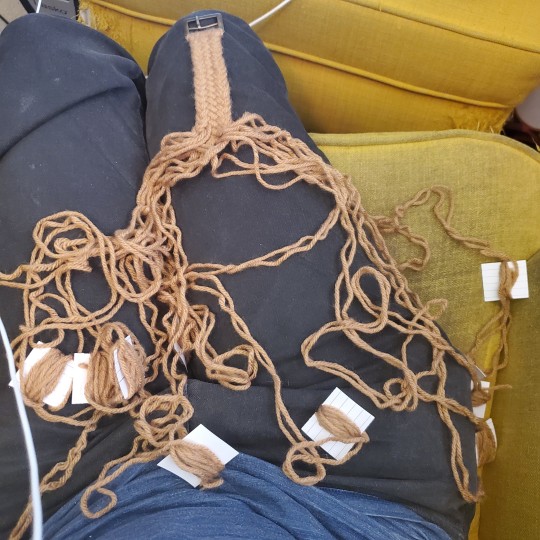
new fibercraft project just dropped
send help
[ID: photo of my lap with the start of a braided belt and many, many messy coils of yarn all over the place]
13 notes
·
View notes
Text
Since I'm about to make some garb, I was very happy to see this pop up in my kingdom's discord.
I did some additional digging on the subject and found this series of blog posts on neckline shape variations:
Tutorial: Sew a Keyhole Neckline with a Facing
Since I keep trying to explain facings to friends (and keep feeling like I’m failing miserably), I decided to do a longer tutorial, after all, about how to I use a facing to sew keyhole necklines on simple medieval-style tunics. This is an attractive and sturdy neckline for LARP/Dagorhir/SCA garb. I’ve used it on literally hundreds of tunics.
This tutorial ended up getting pretty long and scary, but don’t worry: this is not a complicated process. It’s just hard to explain over the internet. So– let’s go!
What is a facing, anyway?
A facing is just an extra bit of fabric that you sew to the edge of your garment and fold down to conceal a raw edge. I use them on necklines, instead of folding the edge down in a traditional hem. If you don’t get the concept, @vintage-aerith has a great tutorial here. Facings produce very sturdy, flat, and non-bulky edges.
For example, this tunic has a keyhole neckline finished with a self-colored green facing. The edge of the neckline is NOT folded over and hemmed: the facing is an extra piece of fabric that was stitched on to the edge and then folded to the inside. You can see the ‘lower’ edge of the facing– it’s the darker green line about 1.5″ in from the edge. I then tacked the facing down with embroidery. It’s a very clean, unobtrusive finish.

This tunic has a very fancy external orange facing, combined with a collar! The process is very similar to above, but the facing is flipped to the outside. This is an easy way to add color to a garment. (Forgive my dork-face and overlarge tunic– this was for a customer who’s about a foot taller than me!)

You should use facings because:
Hemming necklines is a pain. The curve will not want to fold down flat. Facings, on the other hand, are exactly the same size and shape as the neckline, so they automatically lay flat.
The point at the bottom of a keyhole is a nightmare to hem, and if you hem it badly, it will fray and rip, fast.
When you fold down a neckline to hem it, your neck-hole gets bigger. When we’re talking LARP/SCA/Dagorhir garb, a bigger neck-hole always means more sunburn. If you use a facing, you’ll get a neckhole exactly the size you planned.
Hemming stretches your neckline out. The more you handle a cut piece of fabric, the more it will stretch. A stretched out neckline = more sunburn, again. This facing method minimizes handling of cut edges, so the neckline stays nice and tight.
Facings are fast and easy once you understand what you’re doing and why. I can knock one out, start to finish, in about ten minutes. No lie.
Now that I’ve convinced you that facings rock, onward!
1. Make Your Facing Pattern
You’ll first need a pattern for your facing, and to make that, you need to know what size you’d like your finished neckline to be. I recommend a neckline that’s made of a circle that’s about 5.5″ in diameter and a 3″ slit, like this. This is juuust big enough that it will pull over most heads.

Draw your 5.5″ circle on a bit of scrap fabric. (I traced a saucer onto a sheet from a charity shop. Pure class, me.) This will be the hole your head goes through.

But, you protest, a 5.5″ circle only has a 17.25″ circumference! That’s way too small for anyone’s head! Well spotted: we’ll add a 3″ long slash down the center line so you can fit your head through.

Now we’ll mark the center and shoulder line. Since your tunic has a front half and a back half, you’ll be sorely tempted to put half your neck-circle on the front and half on the back.

But if you do this, your tunic will be really uncomfortable! Your neckline will constantly creep forward around your shoulders. This is because most of your neck is actually in front of the shoulder seam, so 2/3rds of your circle– about 3.66″ on a 5.5″ circle– should go in front of your shoulder.

Add 1.5″ around the edge of the hole and and around the slash.

Cut the fabric out along the outer line.
Cut out the center hole, and cut down the slash. Note that you’re just cutting the slash open with one pass of your scissors– you’re not trimming anything away.
Now you have a mock-up for your facing. It should look something like this. (Mine is super ugly because I’m traveling and only have terrible blunt scissors with me.)

Pull it on. Can you fit this over your head? Does it lie comfortably? If you can’t get this over your head, cut the slash a tiny bit longer and try again. If that doesn’t work, make the hole a tiiiiny bit larger. Remember that a smaller neckhole is better (sunburn!).

Don’t be fooled by my weird face– I am happy, because mine fits okay! I’ll now trace my mock-up onto a bit of sturdy poster board, making sure to mark the center front, back, length of the slit, and shoulder seams with notches.

The front white piece is my facing pattern, which I use to trace out the facing piece on fabric, ie, the background piece in olive green. Note that the fabric facing does NOT have the hole cut out. This is important!
Next, we’ll…
2. Cut Out Your Facing
Lay your new pattern on a bit of your fabric. Using chalk or a fabric-marking pencil, trace it all the edges and mark all the notches. Cut along the outer line until your facing piece looks like the dark shape in the photo above.

Here’s where it gets tricky, though: you won’t cut the interior circle, yet. This is because that inner edge isn’t really an edge at all: it’s your stitching line. When you’re stitching your facing onto your tunic, your needle will follow that inner line that you’ve chalked onto your fabric. See how in the photo above there’s a line marked in yellow chalk on the dark olive green facing? That’s the stitching line, so DO NOT CUT THE CENTER HOLE OUT IN YOUR FACING.
Similarly, DO NOT CUT A HOLE IN YOUR TUNIC YET. We won’t cut either hole until the facing is stitched to the tunic. That’s right– it will look and feel really weird, but trust me, there’s a good reason for it.
3. Finish the Edge of Your Facing
The outer edge of your facing will fray if you don’t do something to prevent that, so take a moment to serge or zigzag around the edge of your facing piece. It’s way easier to do this before you stitch the facing onto your tunic.
4. Stitch Your Facing Onto Your Tunic

Okay, so. I like to start by sew the neckline on my tunic before I do anything else. That way, if I screw it up, I haven’t wasted time (or fabric) by adding sleeves and gores and stuff.
Note how, in the picture above, no holes have been cut in the facing or the torso panel. This is not a mistake. Why aren’t you cutting the holes, you might ask? Well, fabric cut along curves stretches. Badly. This is bad news if you’re trying to match the hole you cut in your tunic to the hole you cut in your facing. Getting them to match requires a ton of pinning and fussying and delicate handling. I hate pinning and fussing, so I sew my facing to my tunic before I cut any holes. This way, everything is stabilized nothing can stretch out. Cool? Cool. Now, my torso panel is one long rectangle, which makes up the main front and back of my tunic– there’s no shoulder seam. Fold your tunic in half both ways and use your iron to crease these folds. These creases now mark your shoulder line and center lines. You’ll use them to line up your facing.
Lay your facing onto your tunic, right sides (ie, outsides) together. Make sure to match facing to the tunic’s center front, back, and shoulder seams. Remember how 2/3rds of your neckline will be on the front of your tunic? Check that, now. When your facing lays straight and flat and properly positioned on your tunic, pin it in place. You’ll now slowly stitch through both layers along the line you marked. The slash is a little different, though, so see the picture below for an explanation of how to stitch around it.

The stitching travels around the slash, with about 1/4″ to 1/8″ between the lines. The bottom of the slash should be crossed by just 1 stitch. If you use more stitches, this point will pucker when you try to flip it to the inside.

Once you’ve stitched along the entire stitching line, you’ll finally cut the neckline open.

Be extra careful cutting the slash open. You’ll cut through the gap between the two rows of stitching, stopping just shy of the stitch at the very bottom of the slash.

Okay. So, you’ve got your facing sewn to your tunic, but all the raw/cut edges are still exposed. To fix that, you’ll now fold the facing to the wrong side (ie, the inside), so the raw edge will be hidden inside the fold. This can be a little tricky, so be patient and use plenty of steam with your iron. To turn the points out, use something pointy but blunt, like a big bamboo knitting needle, to poke them right-side-out.

Once you’ve got your facing turned to the inside of your tunic, iron it well so the edge of the neckline is flat and crisp.
Hooray! All that’s left, now, is topstitching through the tunic and the facing in matching thread so your facing won’t creep back out to the right side. I like to use two lines of topstitching– one 1/8″ from the edge of the neckline, and another 1″ from the edge of the neckline. Make sure you’re catching the edge of your facing!

Hooray, you did it! That wasn’t so bad, was it? And look how sturdy and clean your tunic’s neckline now looks. That keyhole is never going to rip, I tell you that.
Huge thanks to Stellaria for writing the original tutorial that taught me how to do facings, and for putting up with my hare-brained innovations on her methods. Stell is the best.
2K notes
·
View notes
Text
Getting sick sucks so bad. But at least it's happening now so that I don't have a repeat of the Rowany Festival where I spent three straight days dying in my tent getting handed food and water through the zipper.
1 note
·
View note
Text

New thimble ring for sewing SCA things.
It feels weird.
If I wear it enough, it's going to stop feeling weird, right?
Right?
9 notes
·
View notes
Text


Finished sleeves for my friend's elevation in the SCA.
20 notes
·
View notes
Text
We're getting close to Pennsic. Feed and water your fighters!

Remember to stay hydrated!
724 notes
·
View notes
Text
New early medieval belt. Came out so nice that I regret that it's already sold. Good thing I have two more of the double snake head buckles!
#SCA stuff#leatherwork#early medieval belt#moderately generic style#buckle frame and pre-aged tooled leather courtesy slow moving Taika Waititi props auction kit disposals
17 notes
·
View notes
Text
Three weeks out from Gulf Wars, and I've got some sewing to do: - finish the loose gown, so i don't have to wear the pourpoint - finish my Johanna Ferrour kirtle (closures, hems, and sleeves) - finish the red kirtle (sleeve buttons + hem) - Booty shorts + optional shirt would be nice to churn out another set of hose too, but thats gonna be a bonus project
8 notes
·
View notes
Text
Whelp. I am once again a dues-paying member of the SCA, for the first time since 1994.
#musings of a very lapsed former scadian#society for creative anachronism#medieval stuff#sca stuff#vivat atlantia
9 notes
·
View notes
Text
I've found my vocation.
i think every medieval timesey ren fair type attraction should have a booth of pedantry where if you wanna know if something happening is Authentic or you wanna ask questions about real medieval times or whatever you can stop by and there's just a historian sitting on a throne of books eager to show you all their research
19K notes
·
View notes
Text
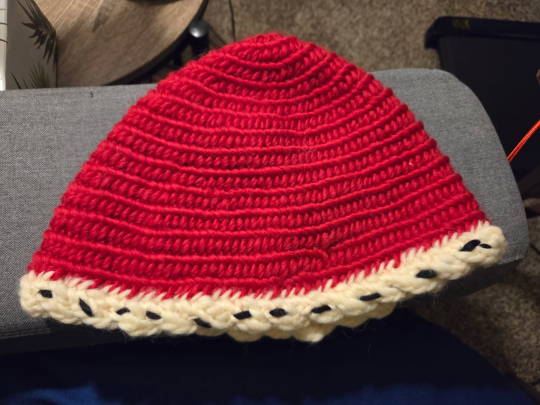
Naalbound hat i finished a couple months ago for an elevation in the SCA. I hope it was well received, I wasn't there. I was running gate at the event.
5 notes
·
View notes
Text
due to a statistical overrepresentation of the Roman Empire i am instituting a new tag game
reblog and tell me in the notes what time period/place(s) in history you think about multiple times a week to daily
i think about medieval western europe (~1250-1400, deeply approximately) and/or late renaissance (~1580-1620) around the mediterranean (also deeply approximately) all the time
#tag game#i'm aware this is a birds' eye view of many things but i need it#the first is for my sca stuff#and the second is for work
548 notes
·
View notes
Text
Holy carp that veil

Oh yeah - sneak peek at a rough version of what this veil will look like with the dress!! I’m also hoping to finish the circlet in time 🤞🤞
#awesome#medieval clothing#sca garb#sca stuff#the trouble with picking one persona is that different centuries have different cool clothes
214 notes
·
View notes