#SecurityProtocols
Explore tagged Tumblr posts
Visit Tumblr Blog
Explore Tumblr blogs with no restrictions, modern design and the best experience.
Last Seen Tumblr Blogs


Fun Fact
Forty percent of Tumblr users are between the ages of 18 to 25.
Text
JWT Explained in Depth | CyberSecurityTv
youtube
"JWT Explained in Depth" on CyberSecurityTv offers a comprehensive exploration of JSON Web Tokens (JWTs), a popular method for securely transmitting information between parties. This informative video delves into the intricacies of JWTs, detailing their structure, purpose, and cryptographic mechanisms. Viewers gain insights into how JWTs enhance security in web applications, APIs, and identity authentication processes. From understanding JWT components like headers, payloads, and signatures to grasping their role in single sign-on (SSO) and stateless authentication, this video equips viewers with valuable knowledge for navigating modern cybersecurity challenges. Whether you're a developer, cybersecurity enthusiast, or simply curious about digital security protocols, this insightful content demystifies JWTs, empowering you to leverage them effectively. #
#Cybersecurity#JWT#JSONWebToken#Authentication#SecurityProtocols#WebDevelopment#DigitalSecurity#Youtube
0 notes
Text
5 Ways Managing Multiple Brands with One POS System
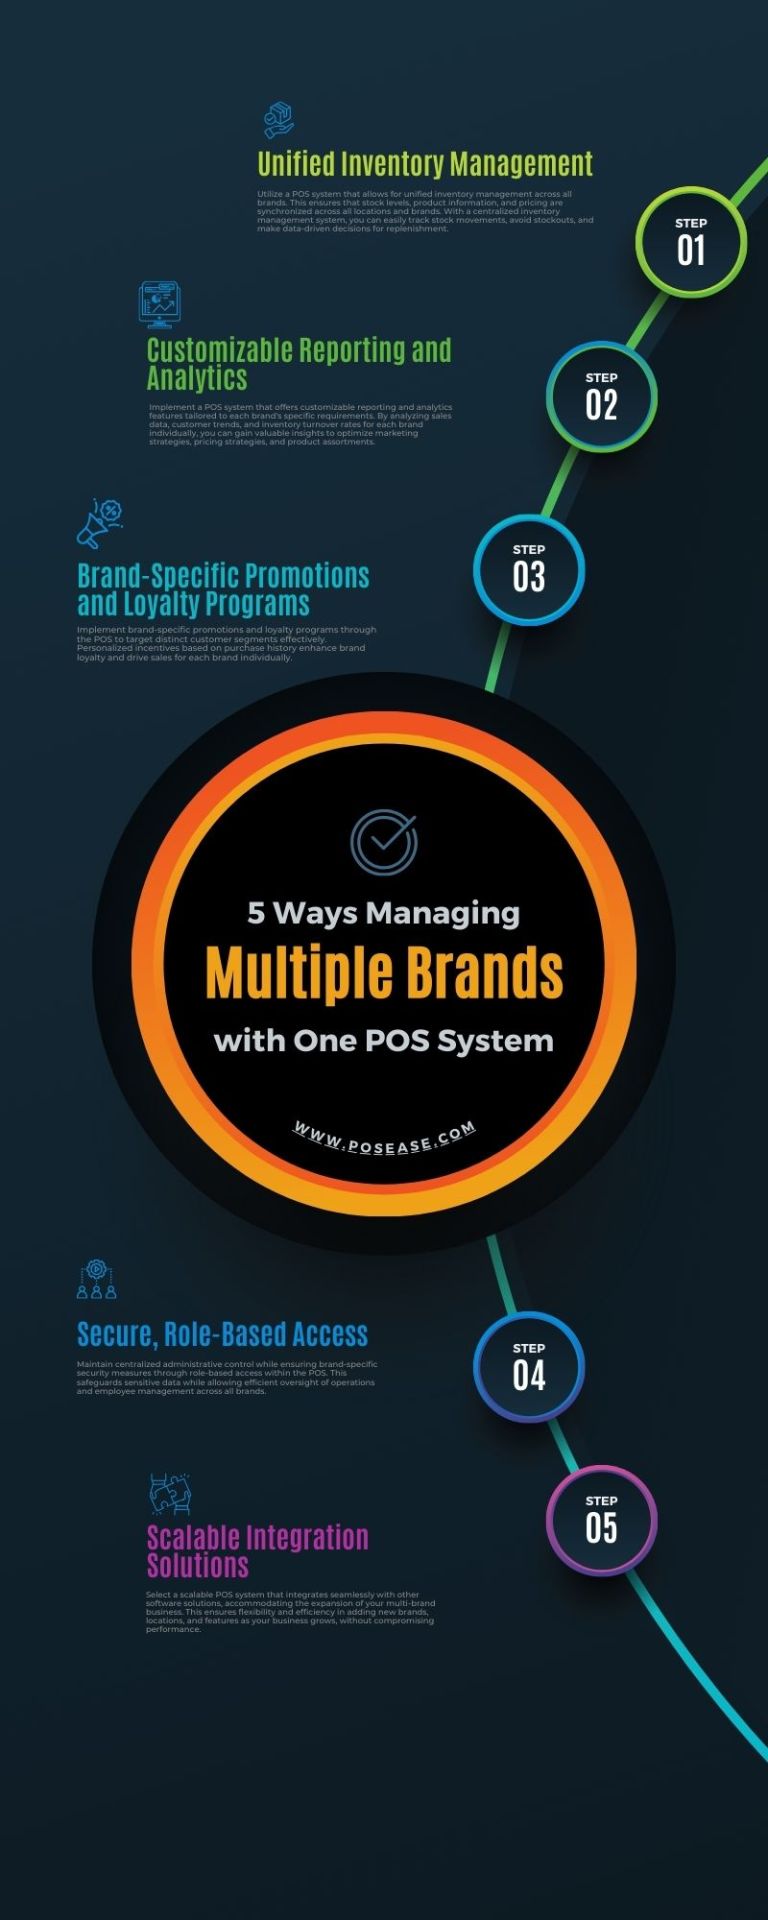
#MultiBrandManagement#POSIntegration#InventoryControl#DataAnalytics#BrandMarketing#SecurityProtocols#BusinessEfficiency#Scalability#RetailTech#BusinessOperations
0 notes
Text

#interestingfacts 95
Follow for what’s trending and interesting around the world 🌍
0 notes
Text
Secret Service Denies Resource Diversion in Trump Shooting Incident
The U.S. Secret Service has firmly rejected allegations that resources were diverted from protecting former President Donald Trump during a recent campaign rally, in order to provide security for First Lady Jill Biden. The controversy arose following claims made by Susan Crabtree of RealClearPolitics, who reported on social media that unnamed sources within the Secret Service suggested a shift in resources.

According to Crabtree, the sources indicated that the Secret Service's protective detail for Trump, who was shot during the rally, was compromised due to the diversion of resources to Jill Biden's event. Crabtree claimed that the reallocation was in line with agency protocols for former presidents and noted that supplemental agents from different field offices were used to cover Trump’s rally, citing overwork among Trump’s regular detail and a limited number of counter-snipers.
“The problem my Secret Sources have cited is that Secret Service resources were diverted to Jill Biden's event and away from Trump’s rally because they followed agency protocol applying to Trump as a former president,” Crabtree wrote on X (formerly Twitter). “There were also many supplemental agents from different field offices (not Trump's regular detail) providing security at the rally because Trump's regular detail has been overworked (some working 7 days straight), and only two counter-snipers… Who made the decision to divert the resources to Jill Biden’s event?”
In response, Anthony Guglielmi, the Secret Service’s chief of communications, issued a statement refuting Crabtree’s claims. Guglielmi asserted that the allegations were unfounded, emphasizing that resource allocation does not function as described. “We did not divert resources from FPOTUS Trump & protection models don’t work that way,” Guglielmi stated. He further explained that the additional agents mentioned by Crabtree were part of the candidate nominee operations teams, which are routinely deployed during election years to handle increased security demands due to heavy travel schedules.
The Secret Service’s rebuttal aimed to clarify that their protocols and resource management were adhered to appropriately, and no procedural changes were made that would have affected the security of former President Trump. The agency’s statement underscores the challenges and complexities involved in ensuring the safety of high-profile individuals amidst ongoing political events and heightened security demands.
The incident, which has captured significant media attention, continues to prompt discussions about the operational logistics of the Secret Service and the protective measures in place for both current and former U.S. leaders.
#SecretService#DonaldTrump#JillBiden#SecurityProtocol#ResourceManagement#PoliticalEvents#USPolitics#ElectionSecurity#MediaCoverage
0 notes
Text
*ಕರ್ನಾಟಕ ರಾಜ್ಯ ಪೊಲೀಸ್ ಪಡೆಯು ಹೆಚ್ಚು ಕ್ರಿಯಾತ್ಮಕವಾಗಿ ಸಜ್ಜಾಗಿದೆ*
21 ನೇ ಶತಮಾನದಲ್ಲಿ ಬದಲಾಗುತ್ತಿರುವ ಭದ್ರತಾ ಬೆದರಿಕೆಗಳ ಸ್ವರೂಪವನ್ನು ಪೂರೈಸಲು ಕರ್ನಾಟಕ ರಾಜ್ಯ ಪೊಲೀಸ್ ಹೆಚ್ಚು ಕ್ರಿಯಾತ್ಮಕ ಮತ್ತು ಪರಿಣಾಮಕಾರಿ ಪಡೆಯಾಗಲು ಸಜ್ಜಾಗಿದೆ. #KarnatakaNews #OmPrakash #KarnatakaPolice #latestNews #crimenews #karnatakagoldsmuggling #ranyaraocase #cidprobewithdrawn #itwebvideos #bengaluruairport #policeinvolvement #goldsmuggling #securityprotocol #dgpofficer #karnatakagovernment…
0 notes
Text
youtube
Super Bowl Security Overhaul Post-NOLA #shorts Super Bowl Security Overhaul Post-NOLA #shorts #SuperBowl #SecurityMeasures #PublicSafety #CrowdSecurity #TerrorismPrevention #SportingSecurity #NewOrleans #VehicleAttacks #EventSafety #SecurityProtocol #CrowdProtection #MajorEvents Full Podcast: https://youtu.be/RmsQpsbPDIk Subscribe👇: https://sub.dnpl.us/AANEWS/ - Want some Great Buys check out our List: https://viralbuys.vista.page
0 notes
Text
طريقة فعالة لتثبيت تطبيقات متعددة مرة واحدة على Windows 11

تثبيت التطبيقات يدويًا على جهاز Windows 11 قد يكون أمرًا مرهقًا، خاصة إذا كنت تقوم بإعداد جهاز جديد أو استعادة نظام التشغيل. بدلاً من قضاء ساعات في تثبيت كل تطبيق على حدة، يمكنك استخدام طرق ذكية لتثبيت جميع التطبيقات التي تحتاجها دفعة واحدة. هذه الطريقة ليست فقط أسرع، بل تضمن أيضًا توفير الوقت والجهد. في هذا الدليل، ستتعرف على خطوات تثبيت تطبيقات متعددة بسهولة وباستخدام الأدوات المناسبة.
إذا كنت تبحث عن تثبيت تطبيقات متعددة على جهاز الكمبيوتر الذي يعمل بنظام Windows 11، فيمكنك استخدام طريقة التثبيت المجمع لتوفير الوقت وتبسيط العملية. إليك خياراتك.
Winget
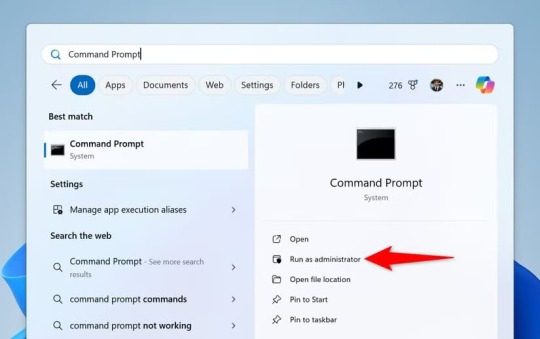
Winget هي أداة مساعدة مدمجة لإدارة الحزم في Windows تتيح لك العثور على التطبيقات وتثبيتها على جهاز الكمبيوتر الخاص بك. وهي تدعم تثبيت التطبيقات بالجملة. نظرًا لأن الأداة مدمجة بالفعل في نظامك، فيمكنك البدء في استخدامها على الفور. ستجد أولاً التطبيقات التي تريد تثبيتها، وتدوين معرفات تلك التطبيقات، ثم استخدام تلك المعرفات في أمر لتثبيت جميع التطبيقات مرة واحدة. ابدأ العملية بفتح بحث Windows (اضغط على Windows+S)، وكتابة موجه الأوامر، وتحديد "تشغيل كمسؤول". اختر "نعم" في موجه التحكم في حساب المستخدم.
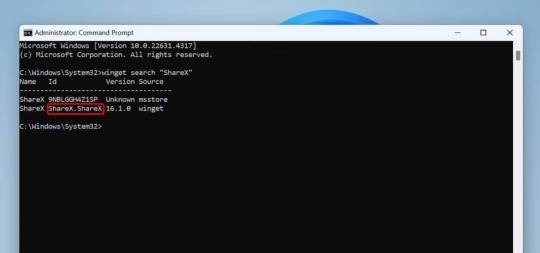
في نافذة موجه الأوامر، اكتب الأمر التالي. استبدل "AppName" بالتطبيق الذي تريد العثور عليه. winget search “AppName” على سبيل المثال، للعثور على ShareX، ستستخدم الأمر التالي: winget search “ShareX”

عندما ترى تطبيقك في نتائج البحث، لاحظ معرف التطبيق. ستستخدم هذا المعرف لتثبيت التطبيق.
قم بتشغيل أمر البحث أعلاه للعثور على معرفات جميع التطبيقات التي تريد تثبيتها. بمجرد جمع المعرفات المطلوبة، قم بتشغيل الأمر التالي. هنا، استبدل "App1" و"App2" و"App3" بمعرفات التطبيقات التي قمت بتدوينها. winget install --id=App1 && winget install --id=App2 && winget install --id=App3 نصيحة يمكنك إضافة المزيد من التطبيقات عن طريق توسيع تنسيق الأمر.

سيبدأ Winget في تنزيل التطبيقات المحددة وتثبيتها. قد يستغرق هذا من بضع دقائق إلى عدة دقائق، حسب سرعة اتصالك بالإنترنت وعدد التطبيقات التي اخترتها.
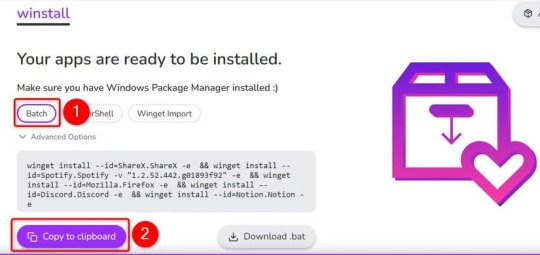
Winstall
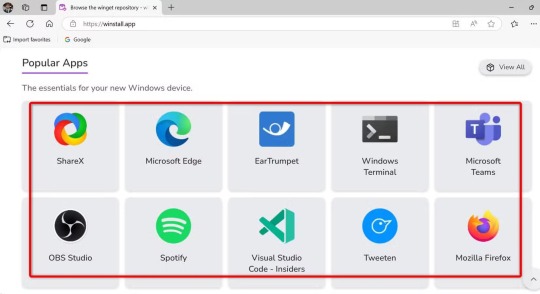
Winstall هو في الأساس إصدار Winget على الويب والرسومي. يسمح لك باختيار التطبيقات التي تريد تثبيتها ثم يقوم بإنشاء نص برمجي يقوم بتثبيت تلك التطبيقات عبر Winget. لاستخدامه، قم بتشغيل متصفح الويب المفضل لديك والوصول إلى موقع Winstall. في الجزء العلوي من الموقع، انقر فوق "تطبيقات" لعرض التطبيقات المتاحة. في قائمة التطبيقات، حدد التطبيق الذي تريد تثبيته.
في الصفحة التي تفتح، انقر فوق "تحديد التطبيق" لإضافة التطبيق إلى قائمة التثبيت الخاصة بك. ثم، عد إلى صفحة التطبيق من خلال تحديد "التطبيقات" في الأعلى وكرر العملية لجميع التطبيقات التي تريد تثبيتها. نصيحة يمكنك استخدام مربع البحث في الأعلى للعثور على تطبيقاتك المفضلة بسرعة.

عند الانتهاء من إضافة جميع تطبيقاتك، انقر فوق "إنشاء البرنامج النصي" في أسفل الموقع.

في الصفحة التالية، فوق مربع النص، اختر "دفعة". ثم، أسفل المربع، انقر فوق "نسخ إلى الحافظة". يؤدي هذا إلى نسخ الأمر الذي يقوم بتثبيت التطبيقات التي اخترتها. ملاحظة يمكنك أيضًا استخدام خيار PowerShell لإنشاء نص برمجي يقوم بتثبيت التطبيقات التي اخترتها عبر أداة PowerShell في نظام التشغيل Windows 11. قم بالوصول إلى بحث Windows (اضغط على Windows+S)، واكتب موجه الأوامر، وحدد "تشغيل كمسؤول". اختر "نعم" في موجه التحكم بحساب ا��مستخدم. في موجه الأوامر، اضغط على Ctrl+V للصق الأمر المنسوخ، ثم اضغط على Enter.
سيبدأ موجه الأوامر (عبر Winget) في تثبيت التطبيقات المحددة، وستكون جاهزًا.
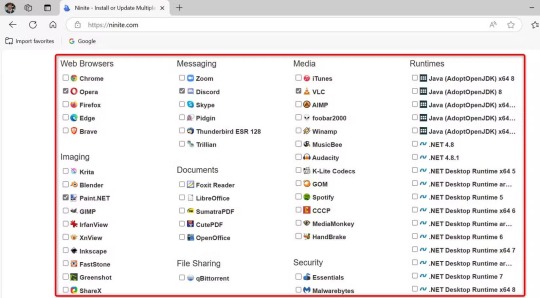
Ninite
على عكس تطبيقات التثبيت المجمعة الأخرى، لا يعتمد Ninite على سطر الأوامر. تتيح لك هذه الأداة اختيار التطبيقات التي تريد تثبيتها ثم إنشاء مثبت رسومي مخصص لتثبيت هذه التطبيقات على نظامك. يوفر ميزات ذكية مختلفة، مثل التأكد من تثبيت التطبيقات باللغة الافتراضية لنظامك. كما يرفض تلقائيًا عروض التثبيت غير المرغ��ب فيها وشريط الأدوات في تطبيقاتك. لا يطرح أي أسئلة أثناء تثبيت التطبيقات، مما يوفر لك الكثير من الوقت. لاستخدامه، قم بتشغيل متصفح ويب وانتقل إلى موقع Ninite. في الصفحة الرئيسية للموقع، انتقل إلى الأسفل حتى تصل إلى قسم "اختر التطبيقات التي تريدها" واختر التطبيقات التي تريد تثبيتها.
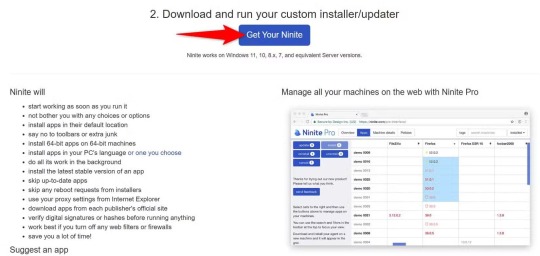
بعد اختيار التطبيقات، انتقل لأسفل إلى قسم "تنزيل وتشغيل برنامج التثبيت/التحديث المخصص". انقر فوق الزر "احصل على Ninite الخاص بك" لتنزيل برنامج التثبيت الذي سيقوم بتثبيت التطبيقات التي اخترتها.
قم بتشغيل برنامج التثبيت الذي تم تنزيله لبدء تثبيت التطبيقات المحددة. لاحظ أن هذه العملية قد تستغرق من بضع دقائق إلى عدة دقائق، حسب عدد التطبيقات التي اخترت تثبيتها.
Chocolatey Package Manager
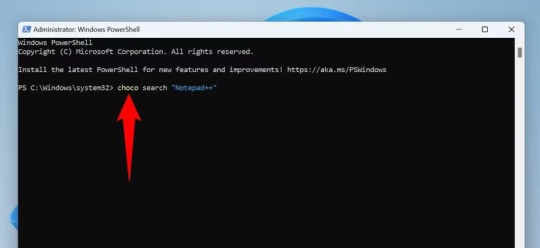
Chocolatey Package Manager هو مدير حزم متقدم يسمح لك بالعثور على تطبيقات متعددة وتثبيتها في وقت واحد من مكتبة التطبيقات الشاملة الخاصة به. لاستخدامه، افتح Windows Search (اضغط على Windows+S)، واكتب PowerShell، وحدد "تشغيل كمسؤول". حدد "نعم" في موجه التحكم في حساب المستخدم. في PowerShell، اكتب الأمر التالي (يسمى cmdlet) واضغط على Enter. يقوم هذا الأمر بتثبيت Chocolatey Package Manager على جهاز الكمبيوتر الخاص بك. Set-ExecutionPolicy Bypass -Scope Process -Force; ::SecurityProtocol = ::Tls12; iex ((New-Object System.Net.WebClient).DownloadString('https://community.chocolatey.org/install.ps1')) بعد اكتمال التثبيت، أغلق PowerShell وأعد تشغيله باستخدام حقوق المسؤول. ثم استخدم الأمر التالي للعثور على التطبيقات التي تريد تثبيتها. استبدل "AppName" باسم التطبيق الخاص بك. choco search “AppName” في نتائج البحث، ابحث عن تطبيقك. لاحظ اسم الحزمة الخاصة بالتطبيق، حيث إنها الحزمة التي ستستخدمها لتثبيت التطبيق.
استخدم الأمر أعلاه للعثور على أسماء حزم جميع التطبيقات التي تريد تثبيتها وتدوينها. ثم قم بتشغيل الأمر التالي مع استبدال "App1" و"App2" و"App3" بأسماء الحزم التي قمت بتدوينها. سيقوم الأمر بتثبيت جميع التطبيقات المحددة لك. choco install App1 App2 App3 -y يضمن معامل "y" في هذا الأمر قبول جميع مطالبات التثبيت تلقائيًا.

سيبدأ Chocolatey في تثبيت التطبيقات التي اخترتها على جهاز الكمبيوتر الخاص بك. وبهذه الطريقة يمكنك تثبيت تطبيقات متعددة دون الحاجة إلى المرور عبر مثبت كل تطبيق على جهاز الكمبيوتر الذي يعمل بنظام Windows 11. استمتع بالراحة التي توفرها مثبتات التطبيقات المجمعة هذه! تثبيت التطبيقات دفعة واحدة على Windows 11 هو خطوة ذكية تجعل عملية إعداد النظام أسرع وأكثر كفاءة. باستخدام الطرق التي قدمناها، يمكنك تنظيم جهازك بسهولة وتوفير الكثير من الوقت. جرب هذه الخطوات وشاركنا تجربتك، وإذا كان لديك أي استفسار، نحن هنا لمساعدتك. Read the full article
0 notes
Text
Bạn đang tìm kiếm cách để chặn quảng cáo trên Spotify nhưng không muốn tốn tiền nâng cấp tài khoản Premium? Hãy để AnonyViet giúp bạn với 3 phương pháp cực đơn giản dưới đây mà ai cũng có thể thực hiện được. Cách chặn quảng cáo trên Spotify Windows PC Lưu ý: 3 phương pháp sau đây đều áp dụng cho phần mềm Spotify tải từ trang chính thức chứ không phải bản được tải xuống từ Microsoft Store. Dưới đây là một số phương pháp bạn có thể sử dụng để chặn quảng cáo trên ứng dụng Spotify dành cho Windows mà không cần tài khoản Premium: Cách 1: Sử dụng BlockTheSpot với file .bat Bước 1: Tải xuống file BlockTheSpot.bat từ GitHub TẠI ĐÂY [caption id="attachment_60367" align="aligncenter" width="750"] Tải xuống file BlockTheSpot.bat từ GitHub[/caption] Bước 2: Chạy file .bat đó. [caption id="attachment_60368" align="aligncenter" width="750"] Chạy file .bat đó[/caption] Bước 3: Nếu bạn đã cài đặt phiên bản Spotify từ Microsoft Store, hệ thống sẽ yêu cầu bạn gỡ cài đặt. Nếu bạn đã tải Spotify từ website chính thức thì bạn gõ N (No). [caption id="attachment_60369" align="aligncenter" width="750"] Bạn gõ N[/caption] Bước 4: Chờ đợi ít phút và bạn sẽ không còn thấy quảng cáo nào trên Spotify nữa. [caption id="attachment_60370" align="aligncenter" width="750"] Đợi ít phút để chặn quảng cáo trên Spotify[/caption] Cách 2: Sử dụng lệnh PowerShell Ngoài cách trên, bạn còn có thể sử dụng PowerShell để cài đặt bản mod một cách tự động, cách làm như sau: Bước 1: Chạy PowerShell với quyền quản trị viên. [caption id="attachment_60371" align="aligncenter" width="750"] Chạy PowerShell với quyền quản trị viên[/caption] Bước 2: Sau đó sao chép đoạn script sau > Dán vào PowerShell, nhấn Enter: [Net.ServicePointManager]::SecurityProtocol = [Net.SecurityProtocolType]::Tls12; Invoke-Expression "& $(Invoke-WebRequest -UseBasicParsing 'https://raw.githubusercontent.com/mrpond/BlockTheSpot/master/install.ps1') -UninstallSpotifyStoreEdition -UpdateSpotify" [caption id="attachment_60372" align="aligncenter" width="750"] Sau đó sao chép đoạn script sau > Enter[/caption] Bước 3: Khi cài đặt thành công, Spotify sẽ tự động khởi chạy và bạn sẽ không thấy bất kỳ quảng cáo nào hay thông điệp ‘Explore Premium’ nữa. [caption id="attachment_60373" align="aligncenter" width="750"] Đợi ít phút để cài đặt[/caption] Cách 3: Cài đặt mod thủ công Nếu các phương pháp trên không hiệu quả, bạn có thể chuyển sang cài đặt thủ công với các bước sau: Bước 1: Tải xuống file chrome_elf.zip từ GitHub của BlockTheSpot TẠI ĐÂY [caption id="attachment_60374" align="aligncenter" width="750"] Tải xuống file chrome_elf.zip[/caption] Bước 2: Mở thư mục cài đặt Spotify, thường là C:\Users\(user)\AppData\Roaming\Spotify. Bạn có thể truy cập nhanh thư mục này thông qua lệnh RUN (Win+R) với lệnh: %APPDATA%\Spotify [caption id="attachment_60375" align="aligncenter" width="456"] Mở thư mục cài đặt Spotify[/caption] Bước 3: Nhấn ‘Cut’ vào file chrome_elf.zip đã tải [caption id="attachment_60376" align="aligncenter" width="750"] Nhấn ‘Cut’ vào file chrome_elf.zip đã tải[/caption] Bước 4: Dán nó vào thư mục cài đặt Spotify. [caption id="attachment_60377" align="aligncenter" width="750"] Dán nó vào thư mục cài đặt Spotify[/caption] Bước 5: Nhấn chuột phải > Chọn ‘Extract All’ để giải nén thư mục. [caption id="attachment_60378" align="aligncenter" width="750"] Chọn ‘Extract All’ để giải nén thư mục.[/caption] Bước 6: Giải nén vào chính thư mục Soptify đó. [caption id="attachment_60379" align="aligncenter" width="708"] Giải nén vào chính thư mục Soptify đó[/caption] Bước 7: Khi hai file dpapi.dll và config.ini nằm trong thư mục Spotify, bạn sẽ không thấy bất kỳ quảng cáo nào hoặc thông báo 'Explore Premium' trên Spotify nữa. [caption id="attachment_60380" align="aligncenter" width="750"] 2 file dpapi.dll và config.ini nằm trong thư mục Spotify[/caption] Để tắt tự động cập nhật của Spotify, bạn có thể làm theo thao tác sau: Bước 1: Mở file config.ini [caption id="attachment_60381" align="aligncenter" width="750"] Mở file config.ini[/caption]
Bước 2: Chỉnh sửa Enable_Auto_Update=0 như hình [caption id="attachment_60382" align="aligncenter" width="697"] Chỉnh sửa Enable_Auto_Update=0[/caption] Bước 3: Nhấn Save để lưu lại. [caption id="attachment_60383" align="aligncenter" width="697"] Nhấn Save để lưu lại.[/caption] Lời Kết Với 3 cách chặn quảng cáo trên Spotify trên mà mình vừa hướng dẫn ở trên, giờ đây bạn không còn phải lo lắng về quảng cáo làm gián đoạn những giây phút thư giãn, và không cần phải tốn chi phí duy trì Premium hàng tháng. Chúc bạn thành công!
0 notes
Link
0 notes
Text
🔑 Windows New Technology - NTLM: Enhancing Authentication and Security
In the world of computing, security plays a crucial role in safeguarding data and ensuring authorized access to resources. Windows operating systems have evolved over the years to incorporate advanced security features. One such technology is NTLM (New Technology LAN Manager), a widely used authentication protocol.
Read on 👉 https://www.valevpn.com/post/windows-new-technology-ntlm-enhancing-authentication-and-security
NTLM #WindowsAuthentication #SecurityProtocol #AuthenticationTechnology #Kerberos #WindowsSecurity #NetworkSecurity #SingleSignOn #WindowsNT #AuthenticationProtocol #DataSecurity #WindowsServer #Cybersecurity #ComputerSecurity #WindowsOperatingSystem #ActiveDirectory #TechnologyEvolution

0 notes
Text
JWT Explained in Depth | CyberSecurityTv
youtube
Delve into the world of JSON Web Tokens (JWT) with a comprehensive exploration on CyberSecurityTv. Uncover the intricacies of JWT, understand its structure, and learn how it facilitates secure communication between parties. Join us for an in-depth discussion that demystifies JWT, offering valuable insights for developers, security professionals, and anyone keen on understanding this essential aspect of modern web security.
#JWTExplained#CybersecurityEducation#WebSecurity#TokenAuthentication#DigitalIdentity#SecurityProtocols#InfoSecInsights#WebDevelopment#CyberAwareness#LearnSecurity#Youtube
0 notes
Link
0 notes
Text
The email security protocols at my office were supposed to be changed/strengthened today, but with all the disruption of the job changes this week, it took me four days to notice that my phone hasn't synced my work email since March 11. I could understand this being related to the security update, except that was supposed to start today, not four days ago. And, naturally, my weekend just started, and the instructions for how to fix my email are IN my work email, which, for the time being, I can only access at work. Sooo ... derp @ me. Argh!
Update: AHHH ... I was looking at the email server settings on my phone and saw a second place to enter my password (under outgoing server settings) ... so I re-entered my password there, and now the email is syncing!!! Hallelujah! Ah iz tethered to da wurld agin ... whew! 😛
0 notes
Link
0 notes
Text
Pycharm professional 2017.1

PYCHARM PROFESSIONAL 2017.1 MAC OS
PYCHARM PROFESSIONAL 2017.1 SOFTWARE
# $Chocolate圜entralManagementUrl = " # ii. # If using CCM to manage Chocolatey, add the following: $ChocolateyDownloadUrl = "$($NugetRepositoryUrl.TrimEnd('/'))/package/chocolatey.1.1.0.nupkg" # This url should result in an immediate download when you navigate to it # $RequestArguments.Credential = $NugetRepositor圜redential # ("password" | ConvertTo-SecureString -AsPlainText -Force) # If required, add the repository access credential here $NugetRepositoryUrl = "INTERNAL REPO URL" # Should be similar to what you see when you browse Your internal repository url (the main one). # We use this variable for future REST calls. ::SecurityProtocol = ::SecurityProtocol -bor 3072 # installed (.NET 4.5 is an in-place upgrade). NET 4.0, even though they are addressable if. # Use integers because the enumeration value for TLS 1.2 won't exist # Set TLS 1.2 (3072) as that is the minimum required by various up-to-date repositories. # We initialize a few things that are needed by this script - there are no other requirements. # You need to have downloaded the Chocolatey package as well. Download Chocolatey Package and Put on Internal Repository # # repositories and types from one server installation. # are repository servers and will give you the ability to manage multiple
PYCHARM PROFESSIONAL 2017.1 SOFTWARE
# Chocolatey Software recommends Nexus, Artifactory Pro, or ProGet as they # generally really quick to set up and there are quite a few options. # You'll need an internal/private cloud repository you can use. Internal/Private Cloud Repository Set Up # # Here are the requirements necessary to ensure this is successful. Your use of the packages on this site means you understand they are not supported or guaranteed in any way. With any edition of Chocolatey (including the free open source edition), you can host your own packages and cache or internalize existing community packages. Packages offered here are subject to distribution rights, which means they may need to reach out further to the internet to the official locations to download files at runtime.įortunately, distribution rights do not apply for internal use. If you are an organization using Chocolatey, we want your experience to be fully reliable.ĭue to the nature of this publicly offered repository, reliability cannot be guaranteed.
PYCHARM PROFESSIONAL 2017.1 MAC OS
Human moderators who give final review and sign off Mac OS inspiron P圜harm Professional 10.11.6 handy Neu P圜harm Professional torrentday 10.10.1 vivobook turbobit neu verpacken compaq P圜harm Professional (2017.3.1 Build 173.3942.36 / 2017.3.2 Build 173.4127.16 RC) mac App P圜harm Professional 2017.3.1 Build 173.3942.36 / 2017.3.2 Build 173.4127.
Security, consistency, and quality checking.
ModerationĮvery version of each package undergoes a rigorous moderation process before it goes live that typically includes: Welcome to the Chocolatey Community Package Repository! The packages found in this section of the site are provided, maintained, and moderated by the community.
0 notes