#ShinyApp
Explore tagged Tumblr posts
Visit Tumblr Blog
Explore Tumblr blogs with no restrictions, modern design and the best experience.
Last Seen Tumblr Blogs


Fun Fact
Tumblr’s reach among the 26-to-35-year-olds in the US is 11%.
Text
instagram
#ShinyDashboard#RShiny#InteractiveDashboards#DashboardsWithR#RForDataScience#LearnR#RProgramming#ShinyApp#DataVisualization#TechForStudents#AssignmentHelp#AssignmentOnClick#assignment#assignmentwriting#assignment help#assignment service#assignmentexperts#Instagram
0 notes
Photo

Minicurso Pré-Evento | X-Meeting 2025 Free and easy publishing interactive omic data and tools online with R and shinyapps.io Quer compartilhar seus dados ômicos de forma interativa e acessível, sem depender de SQL ou servidores caros? Este minicurso é pra você! 📊 Aprenda a criar aplicativos com R e Shiny e publicá-los gratuitamente no shinyapps.io, permitindo buscas por genes, proteínas e ferramentas como BLAST e HMMER — tudo isso sem precisar configurar servidores ou bancos de dados. 📅 Segunda-feira | 26 de maio de 2025 🕘 09h às 11h30 💻 Curso online 💸 R$25,00 ⚠ Exclusivo para inscritos no X-Meeting 2025! Garanta sua inscrição no evento e aproveite esse curso prático e acessível antes mesmo do congresso começar! #XMeeting2025 #Bioinformática #ShinyApps #Rstats #OmicsData #MinicursoXMeeting #PublicaçãoCientífica #DadosÔmicos
0 notes
Text
Tweeted
Teilnehmer für Online-Studie gesucht! Thema: "Interaktive, feedbackgestützte Statistiklehre" https://t.co/CPJyh4s7wk via @SurveyCircle #fernunihagen #multimedia #interaktiv #feedback #shinyapp #statistiklehre #fernuniversität https://t.co/94xhXFKSnN
— Daily Research @SurveyCircle (@daily_research) May 17, 2023
0 notes
Text
Acer drivers for windows 7 64 bit download 無料ダウンロード.Intel® Graphics Driver for Windows 7*/8.1* [15.36]
Acer drivers for windows 7 64 bit download 無料ダウンロード.Download the RStudio IDE

Select Your Region.Download the RStudio IDE - RStudio
Drivers for commercial Desktops: Link. Find. Show me where to locate my serial number or SNID on my device. Download our serial number detection utility. (Windows operating systems only) Or select your device: Category. Notebook. Ultra-thin Drivers and Manuals. Identify your Acer Device. Enter your device serial number, SNID or model number. Show me where to locate my serial number or SNID on my device. Download our serial number detection utility. (Windows operating systems only) Or select your device: Category. Notebook · download win 7 iso file. newt Member. Posts: 1. October in Archives. I want to create or download a win 7 iso file to rebuild my Acer desktop. Where can I get the DVD. Microsoft tells me to contact the supplier. Where do I do or what can I do?
Acer drivers for windows 7 64 bit download 無料ダウンロード.Download Acer Wireless Ethernet Adapter Driver for Windows 7 64 bit
· ご使用の Acer 製品の BIOS アップデート、マニュアル、ドライバ、およびパッチを検索できます。 Download the RStudio IDE. RStudio is a set of integrated tools designed to help you be more productive with R. It includes a console, syntax-highlighting editor that supports direct code execution, and a variety of robust tools for plotting, viewing history, debugging and managing your workspace · Download Acer support drivers by identifying your device first by entering your device serial number, SNID, or model number
The RStudio IDE is a set of integrated tools designed to help you be more productive with R and Python. It includes a console, syntax-highlighting editor that supports direct code execution, and a variety of robust tools for plotting, viewing history, debugging and managing your workspace. RStudio Workbench. Evaluation Learn more. Learn how RStudio's enterprise-ready pro products help data science teams securely deploy their work, collaborate, and communicate with decision makers.
RStudio requires R 3. Linux users may need to import RStudio's public code-signing key prior to installation, depending on the operating system's security policy. RStudio requires a bit operating system. If you are on a 32 bit system, you can use an older version of RStudio. Download Support Docs Community Products Open Source Get started with R RStudio The premier IDE for R RStudio Server RStudio anywhere using a web browser Shiny Server Put Shiny applications online R Packages Shiny, R Markdown, Tidyverse and more.
RStudio Cloud Do, share, teach and learn data science RStudio Public Package Manager An easy way to access R packages shinyapps. io Let us host your Shiny applications. About RStudio What Makes RStudio Different Events rstudio::conf Conference Careers Analyst Reports Swag.
Open Source. RStudio RStudio Server Shiny Server R Packages. Hosted Services. RStudio Cloud RStudio Public Package Manager shinyapps. RStudio Team RStudio Workbench RStudio Connect RStudio Package Manager. About RStudio Events rstudio::conf Careers Analyst Reports Swag. Download the RStudio IDE RStudio is a set of integrated tools designed to help you be more productive with R. Choose Your Version The RStudio IDE is a set of integrated tools designed to help you be more productive with R and Python.
Learn More about the RStudio IDE. Learn more about RStudio Team. Deliver open source data science at scale Learn how RStudio's enterprise-ready pro products help data science teams securely deploy their work, collaborate, and communicate with decision makers. See our pro products in action. RStudio Desktop Install R. Download RStudio Desktop.
Recommended for your system:. Find your operating system in the table below. All Installers Linux users may need to import RStudio's public code-signing key prior to installation, depending on the operating system's security policy.
OS Download Size SHA Windows 10 RStudio exe zip gz Source Code A tarball containing source code for RStudio RStudio Professional Drivers.
Connect to RStudio Workbench remotely.
0 notes
Text
A semester in France!

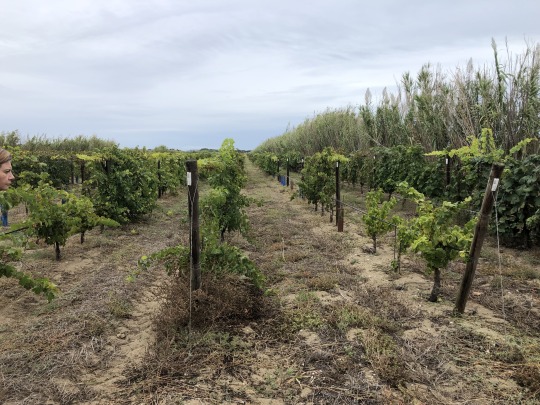
For my final semester, I’ve travelled to Sète, France on the Mediterranean coast to fulfill the stereotype everyone imagines when I say I’m studying winegrape phenology. Well, still more computer work and less wine drinking than people probably imagine but it’s much closer to their vision than Vancouver!
Domaine de Vassal, the INRAE vineyard where I’m working, is essentially on the beach which makes for a beautiful walk from the bus stop in the morning. INRAE didn’t choose the location for its beauty though -- they had a far better reason! The sandy soil prevents the spread of pathogens which was critically important to keep the collection safe from Phylloxera. Yet, with sea levels rising due to climate change, the Sea now threatens the winegrapes and they are in the midst of plans to move the collection inland. A huge task considering they have over 6,000 varieties of winegrapes!
Working here has helped me understand their diverse collection (and my data!) better and gave me the chance to repay them with some coding tasks! I'm working on scripts which will streamline their phenology data processing and a ShinyApp to display differences in variety phenology.
And, of course, I’ve taken advantage of this opportunity to explore as much of the region as possible! How could I not (see castle...)!
--Mira
0 notes

Link
Uses R, Shiny Apps, Leaflet and Plotly to calculate chill portions, chil hours, chill units, growing degree hours, growing degree days for 600 Australian locations.
0 notes
Text
COVID-19
COVID-19 Information Cook County Department of Public Health (CCDPH) serves 2.5 million residents and 127 municipalities in suburban Cook County, excluding Evanston, Oak Park, Skokie and Stickney Township, which have their own state-certified health departments. CCDPH has been working around the clock with public health and emergency management counterparts at all levels of government to respond to the COVID-19 pandemic since the first COVID-19 case was identified on Jan. 24 in a Chicago area resident. This has included case investigations, contact tracing and monitoring; disease surveillance and control; and providing situational updates and guidance to the public, media and partners. We are committed to ensuring that suburban Cook County residents, partners, elected officials and the media get trusted, accurate information about our local situation and response. This section of our website is intended to be a ‘one-stop shop’ for information about COVID-19 in suburban Cook County. Connect with us Cook County ShinyApp for the latest data Call the CCDPH COVID-19 Hotline at 708-633-3319, M-F 9a-4p Main phone number 708-633-4000 Email [email protected] Follow us on Facebook and Twitter Text ALERTCOOK (one-word) to 888-777 for text alerts Resource requests: Visit Resource Requests page and/or download form here. Healthcare providers, hospitals, assisted living and long-term care facilities: To report an illiness or death call 708-633-4000 and follow prompts 24/7 Connect with IDPH IDPH Hotline: 1-800-889-3931 IDPH email [email protected] IDPH Text Alerts: For English, text “COVID” to 312-500-3836. For Spanish, text “COVID ESP” to 312-500-3836. Click on the photo tiles below for more information. Alternative Housing Program Behavioral Health Case Counts CDC Guidance Cleaning and Disinfecting Community & Faith Organizations Everyday Heroes Fact Sheets First Responders Funeral Homes Frequently Asked Questions Grocery Stores Health Inequities Healthcare Providers and Facilities Higher Risk Individuals Homeless and Homeless Shelters Long-Term Care Facilities Partners Protect Yourself and Your Family Resource Requests Resources Restore Illinois School Health Symptoms COVID-19 Resources
0 notes
Text
A
Create a submit button
submitButton(text = "Apply Changes", icon = NULL, width = NULL)
Arguments
text
Button caption
icon
Optional icon() to appear on the button
width
The width of the button, e.g. '400px', or '100%'; see validateCssUnit().
Description
Create a submit button for an app. Apps that include a submit button do not automatically update their outputs when inputs change, rather they wait until the user explicitly clicks the submit button. The use of submitButton is generally discouraged in favor of the more versatile actionButton() (see details below).
Value
A submit button that can be added to a UI definition.
Details
Submit buttons are unusual Shiny inputs, and we recommend using actionButton() instead of submitButton when you want to delay a reaction. See this article for more information (including a demo of how to "translate" code using a submitButton to code using an actionButton).
In essence, the presence of a submit button stops all inputs from sending their values automatically to the server. This means, for instance, that if there are two submit buttons in the same app, clicking either one will cause all inputs in the app to send their values to the server. This is probably not what you'd want, which is why submit button are unwieldy for all but the simplest apps. There are other problems with submit buttons: for example, dynamically created submit buttons (for example, with renderUI() or insertUI()) will not work.
See also
Other input elements: actionButton,checkboxGroupInput, checkboxInput, dateInput, dateRangeInput, fileInput,numericInput, passwordInput,radioButtons, selectInput,sliderInput, textAreaInput, textInput, varSelectInput
Examples
if (interactive()) { shinyApp( ui = basicPage( numericInput("num", label = "Make changes", value = 1), submitButton("Update View", icon("refresh")), helpText("When you click the button above, you should see", "the output below update to reflect the value you", "entered at the top:"), verbatimTextOutput("value") ), server = function(input, output) { # submit buttons do not have a value of their own, # they control when the app accesses values of other widgets. # input$num is the value of the number widget. output$value <- renderPrint({ input$num }) } ) }
0 notes
Text
Intervene: a tool for intersection and visualization of multiple gene or genomic region sets [NEW RESULTS]
Background: A common task for scientists relies on comparing lists of genes or genomic regions derived from high-throughput sequencing experiments. While several tools exist to intersect and visualize sets of genes, similar tools dedicated to the visualization of genomic region sets are currently limited. Results: To address this gap, we have developed the Intervene tool, which provides an easy and automated interface for the effective intersection and visualization of genomic region or list sets, thus facilitating their analysis and interpretation. Intervene contains three modules: venn to generate Venn diagrams of up to six sets, upset to generate UpSet plots of multiple sets, and pairwise to compute and visualize intersections of multiple sets as clustered heat maps. Intervene, and its interactive web ShinyApp companion, generate publication-quality figures for the interpretation of genomic region and list sets. Conclusions: Intervene and its web application companion provide an easy command line, and an interactive web interface to compute intersections of multiple genomic and list sets. They also have the capacity to plot intersections using easy-to-interpret visual approaches. Intervene is developed and designed to meet the needs of both computer scientists and biologists. The source code is freely available at https://bitbucket.org/CBGR/intervene, with the web application available at https://asntech.shinyapps.io/intervene. — bioRxiv : Bioinformatics
#bioRxiv : Bioinformatics#Intervene: a tool for intersection and visualization of multiple gene or g
0 notes
Text
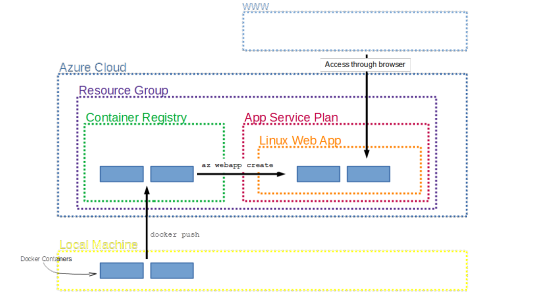
Deploying dockerized R/Shiny Apps on Microsoft Azure
In this article I show how quickly deploying dockerized R/Shiny Apps on Microsoft Azure. So, we make them available globally within seconds. For an introduction to R, see my other post.
R/Shiny Apps are a great way of prototyping, and visualizing your results in an interactive way while also exploiting the R data science and machine learning capabilities. R/Shiny Apps are easy to build in a local development environment but they are somewhat harder to deploy. As they rely on the Linux-based Shiny server to run.
Often, we don’t want to spin up a whole Linux machine or rely on the RStudio native offerings. I show how to quickly deploy this container on Microsoft’s Azure platform and make your R/Shiny available globally within seconds.
In particular, I show how to set up the right services on Azure and deploy single Docker containers. As such the focus of this article is on getting started and achieving results quickly.
What is Azure and what is an App Service
Since you have read so far, you’re probably already familiar with what Microsoft Azure is (see my other post). Azure is Microsoft’s cloud computing service, that allows to build, deploy and host a number of services in the cloud. From storage, to virtual machines to databases and app services.
While Amazon’s Web Service (AWS) was the first on the market and is now the largest provider of cloud computing services, Azure has been catching up quickly and is particularly appealing to those in larger organizations that already have close alliances with Microsoft’s other products.
When developing the Docker element of our R/Shiny apps our focus is all on images and containers. Azure has offerings for these products as well (think Azure Container Instances). Also, it offers what is called an App Service. The Azure App Service enables you to build and host web apps without managing infrastructure. It offers auto-scaling and high availability. As such we can think of the App Service as a fully managed infrastructure platform. This allows us to focus on getting the R/Shiny app deployed, without focusing too much on the backend.
Prerequisites
For deploying dockerized R/Shiny Apps on Microsoft Azure we need to download and install some tools.
To replicate all steps of this article, you need an Azure account, which you can create here for free. While the account is free, Microsoft will charge for the services you use. With a new account, you will receive a budget for playing around with a number of services for the 12 months. Beyond that, the easiest way forward is to have a pay-as-you-go account and pay for the services you need and when you need them. Azure will only charge you for the period you use the services. The basic version of the services I suggest here should cost you no more than 20 cent per day. To get a sense of the costs, check out the Azure Price Calculator. When you create new resources on Azure, it is always a good idea to follow a naming convention; so, it will be easy to find and organize your resources.
Download Docker
You also need Docker installed on your local machine. If you haven’t done so already, you can download Docker Desktop here. Make sure Docker is running, by checking the Moby icon in your notifications area or going to your command line and typing docker --version .
To interact with Azure through the command line you need to install Azure CLI, which you can download here. Once this is done you will be able to run Azure commands in your command line by typing az followed by the command. Typing az --version in your command line shows that Azure CLI is running and lists out the version you’re using.
You can run all lines of code of this article in your preferred command line interface. However, I personally recommend using Visual Studio Code. It has great Azure, Web App, CLI and Docker extensions, offering code completion and visual control of your containers and Azure services.
Setting up Azure
There are three main ways of interacting with Azure. Firstly, Azure Portal, offers a point-and-click GUI and is a great way to see at a glance what services you have running.
Secondly, the Azure command line built in to the portal and referred to as “Cloud Shell”. Cloud Shell allows you to execute commands within the cloud environment, rather than pointing and clicking.
Thirdly, through the command line on your local machine, which allows you to execute code in the cloud from your local machine. I prefer to use this third option, as it allows me to write and save my commands and also to push locally-created containers seamlessly onto Azure. Since I trust that you can write code as least as well I as do, I will build this article around the command line interaction with Azure.
Now, you have set up an Azure account and know how to interact with it. So, we can log onto the account through the command line, typing
az login
which will take you to the browser to enter your credentials.
Creating the services
For deploying dockerized R/Shiny Apps on Microsoft Azure, we have to create some services.
The first thing we need to do is to create a Resource Group. In Azure, a resource group contains all services and resources that are used to architect a particular solution. It is good practice to create one resource group with all services that share a lifecycle. So, this makes it easier to deploy, update, and delete all related services. To create a resource group, we type
az group create --name shinyapps --location northeurope
The resource group is called shinyapps, and I have asked for the group to be deployed on Azure’s North European server farm. Azure has server centres around the world and it might make more sense choosing another location depending on your requirements.
Larger centers offer a comprehensive set of services. It is worth checking if the required services are available when planning to deploy off the beaten track. Note that even when creating a resource group in one location you can also use services in a different location in that same group.
Azure Container Registry
The next thing we need is a Container Registry, or acr for short. While the container registry is more about images than containers. Although, it’s probably best to think about it as your own Dockerhub within Azure. The acr is the place within your resource group that holds the container images we want to deploy. Registries come in different tiers from Basic to Premium. The amount of memory available to store images is the main difference between the tiers. Some additional features relevant to large-scale production environments are available in the Premium tier. For our purposes Basic will be sufficient. To create the acr, type in your commandline:
az acr create -n shinyimages -g shinyapps --sku Basic
This creates a new acr called shinyimages. Note that it needs to be a unique name. It will be created within the shinyapps resource group and we picked the Basic SKU. Once the acr is created you’ll receive a JSON-style printout confirming your settings and listing the URL your acr can be reached at. Note that this will be important when deploying containers, and that it’s not a public address.
Create a new App Service Plan
The last thing we need is an App Service Plan. Think of the service plan as a plan for your phone or your broadband: a framework of the services you can use. The plan defines a set of compute resources available for your web app to run. Similar to the acr there are different tiers from free to premium: the main difference between the tiers is the way compute power is allocated. Plans running on free (or shared) tiers share resources with other apps from other users and get allocated the free quota of CPU and other resources. Basic, Standard and Premium plans run on dedicated compute resource. We’re just testing here so you might be okay with the free tier, but bear in mind that it will take quite a while to load your app. Simply upgrading to the cheapest Basic plan (B1) speeds things up quite a bit. When you think about taking your app into production a tier with dedicated compute will likely be suitable.
az appservice plan create -g shinyapps -n shinyappplan --sku FREE --is-linux
Similar to creating an acr, we specify the resource group, a name for the plan and the SKU. Importantly, we need to ask for a Linux based plan as the Shiny containers we want to deploy are build on Linux.
Deploying R/Shiny apps
Right, now that we’ve set up our architecture, let’s get ready to deploy our R/Shiny app. So far, we have developed on our local machine and we’re confident it’s ready to go and say “hello world”.
The first thing we need to do is to get the Docker image from our local environment pushed into the cloud. This needs a little bit of prep work. Let’s log on to the acr we created on Azure.
docker login shinyimages.azurecr.io
Doing this will prompt you to enter username and password, or you can add the -u and -p arguments for username and password.
Now we create a tag of the image that already exists to have the full name of the acr slash the name we want our image to have on Azure
docker tag shiny_app shinyimages.azurecr.io/shiny_app
And lastly, push up the image:
docker push shinyimages.azurecr.io/shiny_app
Once everything is pushed, you’ll again receive a JSON-style print in the console. To check which images are in your acr, type:
az acr repository list -n shinyimages
This will list out all the images in there, which is one at the moment.
Deploy the image
The last thing left to do now is to deploy the image. We do this by creating a new webapp that runs our image. We specify the resource group (-g), the app service plan (-p), the image we want to deploy (-i) and give our app a name (-n). Note first that the name of the app needs to be unique within the Azure universe (not just your account). Note second that as soon as the webapp has been created it is available globally to everyone on the internet.
az webapp create -g shinyapps -p shinyappplan -n myshinyapp -i shinyimages.azurecr.io/shiny_app
Once the command has been executed you receive a the JSON-style printout, which among other things includes the URL at which your app is now available. This is the name of your app and the Azure domain: https://myshinyapp.azurewebsites.net
That was easy. You might have a set of containers composed together using docker-compose. Deploying a multi-container setup is similarly simple. Rather than specifying the image we want to deploy, we specify that we want to compose a multi-container app, and which compose file we want to use to build our container set up. Make sure you have all images in your acr and the YAML file in the folder you execute the line from.
az webapp create -g shinyapps -p shinyappplan -n myshinyapp --multicontainer-config-type compose --multicontainer-config-file docker-compose.yml
Summary and Remarks
The chart below summarizes the architecture we have constructed to deploy our R/Shiny apps. Once all the services are running it really is just a two lines of code process to first push the containers onto Azure, and then deploy them as app service.
While this was an introduction to get started fast with deploying your R/Shiny app, there are many more features that I have not covered here but that will be useful when taking your app to production. The most important thing to note here is that our app is available to everyone who has access to the internet (and has the link). Using Azure Active Directories, we can restrict access to a limited number of people who we authorize beforehand.
What I have shown here is a manual process of pushing the containers up and then deploying. Azure offers functionalities to build in triggers to quickly rebuild images and ship new versions of the app when, say, you commit a new version to your Git repository.
Finally, I have assumed here that you have admin rights to create each of the services. Working in a larger organization that is likely not the case, so it’s important to watch out for the privileges you have and which you are willing to share when bringing in other people to join your development and deployment process.
Before I let you go, I just want to point out how to clean up when you’re done exploring the functionality. This is good practice and also saves you money for services you are not using. Since we have deployed everything in one resource group, all we have to do is to scrap that group and all services deployed within it will be deleted with it. We do this like so:
az group delete -n shinyapps
Conclusion
In conclusion, this is how deploying dockerized R/Shiny Apps on Microsoft Azure. If you have any question, please use your forum.
The post Deploying dockerized R/Shiny Apps on Microsoft Azure appeared first on PureSourceCode.
from WordPress https://www.puresourcecode.com/programming-languages/r/deploying-dockerized-r-shiny-apps-on-microsoft-azure/
0 notes