#Speed Limiter Removal and Install
Explore tagged Tumblr posts
Visit Tumblr Blog
Explore Tumblr blogs with no restrictions, modern design and the best experience.
Last Seen Tumblr Blogs


Fun Fact
Average visit duration of Tumblr.com is 10 mins and 25 secs.
Text
Throttle Adaptions Specialists: Enhancing Your Vehicle's Performance
Introduction
Are you tired of your car's sluggish performance? Have you noticed a decrease in fuel efficiency or power? It might be time to consider the expertise of throttle adaptions specialists. In this article, we'll explore how these specialists can optimize your vehicle's throttle response, improve fuel economy, and enhance overall performance.
Understanding Throttle Adaptions
Throttle adaptions refer to the process of adjusting the throttle response in a vehicle. The throttle is responsible for regulating the airflow into the engine, which directly affects its performance. Specialists in this field understand the intricacies of throttle systems and can fine-tune them for optimal performance.
Signs Your Vehicle Needs Adjustment
Sluggish Acceleration: If your car hesitates or feels sluggish when accelerating, it could indicate a throttle adjustment is needed.
Poor Fuel Economy: A decrease in fuel efficiency can be a sign of inefficient throttle response.
Unresponsive Pedal: If pressing the accelerator pedal doesn't result in immediate response from the engine, it might be time for adjustment.

Benefits of Throttle Adaptions
Improved Performance: Adjusting the throttle can enhance your vehicle's responsiveness and overall performance.
Better Fuel Economy: Optimizing the throttle response can lead to increased fuel efficiency.
Enhanced Driving Experience: A properly adjusted throttle provides a smoother and more enjoyable driving experience.
How Throttle Adaptions Specialists Work
Throttle adaptions specialists use advanced diagnostic tools to analyze the vehicle's throttle system. They then make precise adjustments to ensure optimal performance. These specialists have the expertise to fine-tune throttle settings for various driving conditions.
DIY vs. Professional Services
While some basic throttle adjustments can be done DIY, it's recommended to seek professional services for more complex issues. Throttle adaptions specialists have the knowledge and experience to diagnose and resolve any underlying issues effectively.
Finding the Right Specialist
When choosing a throttle adaptions specialist, look for experience, certifications, and customer reviews. A reputable specialist will have a track record of delivering quality service and customer satisfaction.
Cost Considerations
The cost of throttle adaptions services can vary depending on the complexity of the job and the specialist's expertise. It's essential to weigh the benefits of improved performance against the cost of service.
Maintenance Tips
To maintain optimal throttle response, regular maintenance is key. This includes keeping the throttle body clean, replacing air filters as needed, and scheduling periodic throttle adaptions adjustments.
Frequently Asked Questions (FAQs)
Q: What are throttle adaptions?
A: Throttle adaptions refer to the process of adjusting the throttle response in a vehicle to optimize performance.
Q: How do I know if my vehicle needs throttle adjustment?
A: Signs include sluggish acceleration, poor fuel economy, and an unresponsive accelerator pedal.
Q: Can I adjust the throttle myself?
A: Basic adjustments can be done DIY, but for complex issues, it's best to seek professional services.
Q: How often should throttle adaptions be performed?
A: It varies depending on driving habits and vehicle condition, but generally, it's recommended during regular maintenance intervals.
Q: What are the benefits of throttle adaptions?
A: Benefits include improved performance, better fuel economy, and a smoother driving experience.
Conclusion
In conclusion, Throttle adaptions specialists play a crucial role in optimizing your vehicle's performance. From improving throttle response to enhancing fuel economy, their expertise can make a significant difference. By understanding the signs that indicate the need for adjustment and finding the right specialist, you can ensure your vehicle operates at its best.
Get in Touch!
Phone: 07915 088304
Email: [email protected]
0 notes
Text
My GIF Making process: Screen capturing using MPV player, Organizing files, 3 Sharpening settings, Basic Coloring PSD + Actions set

This is a very long post so heads up.
I’ll try to be as thorough and true as much as possible to the way I make my gifs (I already use Photoshop Actions which I’ve long since set up but now for this tutorial I’m reviewing them to show you the exact steps I’ve learned to create my gifs 😃) and present them to you in a semi-coherent way. Also, please bear with me since English is my second language.
First things first. Below are the things and tools we need to do this:
Downloaded 4K or 1080p quality videos (let’s all assume we know where to get these—especially for high definition movies and tv series—so this post doesn’t get removed, okay? 😛)
Adobe Photoshop CC or the CS versions can work as well, but full disclosure I haven’t created gifs using the CS versions since 2020. I’m currently using Adobe Photoshop 2024.
mpv player. Use mpv player to get those frames/screenshots or any other video player that has a screen grabber feature. I’ve used adapter for the longest time but I’ve switched to mpv because the press to screenshot feature while the video is playing has been a game changer not to mention ultimate time saver for me. For adapter you need to play it in another video player (like VLC player), to get the start and end timestamps of the scene you want to gif which takes me ages before I can even open Photoshop.
Anyway! Please stop reading this post for a moment and head over to this amazing tutorial by kylos. She perfectly tells you how to install and use mpv player, both for Mac and Windows users.
One thing I have to share though, I had a tough time when I updated my MacOS to Sonoma since MPV is suddenly either duplicating frames or when I delete the duplicates the player seems to be skipping frames :/ I searched and found a solution here, though it didn’t work for me lol. My workaround for this in the meantime is decreasing the speed down to 0.70 then start screenshotting—it’s not the same pre Sonoma update but it works so I’ll have to accept it rather than have jumpy looking gifs.
Now, after this part of kylos’ tutorial:

you can continue reading the following sections of my gif tutorial below.
I want to share this little tip (sorry, this will only cater to Mac users) that I hope will be helpful for organizing the screenshots that MPV saved to the folder you have selected. Because believe me you don’t want to go through 1k+ of screenshots to select just 42-50 frames for your gif.
The Control + Command + N shortcut
This shortcut allows you to create a new folder from files you have pre-selected. As you can see below I have already created a couple of folders, and inside each folder I have selected screenshots that I want to include in one single gif. It's up to you how you want to divide yours, assuming you intend to create and post a Tumblr gifset rather than just one gif.

Another tip is making use of tags. Most of, if not all the time, I make supercorp gifs so I tag blue for Kara and red (or green) for Lena—just being ridiculously on brand and all that.
Before we finally open Photoshop, there's one more thing I want to say—I know, please bear with me for the third? fourth? time 😅
It's helpful to organize everything into their respective folders so you know the total number of items/frames you have. This way, you can add or delete excess or unnecessary shots before uploading them in Photoshop.
For example below there are 80 screenshots of Kara inside this folder and for a 1:1 (540 x 540 px) Tumblr gif, Photoshop can just work around with 42-50 max number of frames with color adjustments applied before it exceeds the 10 MB file size limit of Tumblr.

Sometimes I skip this step because it can be exhausting (haha) and include everything so I can decide visually which frames to keep later on. You'll understand what I mean later on. But it's important to keep the Tumblr 10 MB file size limit in mind. Fewer frames, or just the right amount of frames, is better.
So, with the screenshot organization out of the way, let's finally head over to Photoshop.
Giffing in Photoshop, yay!
Let’s begin by navigating to File > Scripts > Load Files into Stack…

The Load Layers window will appear. Click the Browse button next.
Find your chosen screenshots folder, press Command + A to select all files from that folder then click Open. Then click OK.
After importing and stacking your files, Photoshop should display the following view:

By the way, I'll be providing the clip I've used in this tutorial so if want to use them to follow along be my guest :)
If you haven't already opened your Timeline panel, navigate to Windows > Timeline.
Now, let's focus on the Timeline panel for the next couple of steps.
Click Create Video Timeline, then you’ll have this:

Now click the menu icon on the top right corner then go to Convert Frames > Make Frames from Clips

Still working on the Timeline panel, click the bottom left icon this time—the icon with the three tiny boxes—to Convert to Frame Animation
Select Make Frames From Layers from the top right corner menu button.
So now you have this:

Go and click the top right menu icon again to Select All Frames
Then click the small dropdown icon to set another value for Frame Delay. Select Other…

The best for me and for most is 0.05 but you can always play around and see what you think works for you.
Click the top right menu icon again to Reverse Frames.
I think Photoshop has long since fixed this issue but usually the first animation frame is empty so I just delete it but now going through all these steps there seems to be none of that but anyways, the delete icon is the last one among the line of feature buttons at the bottom part of the Timeline panel.
Yay, now we can have our first proper GIF preview of a thirsty Lena 😜

Press spacebar to watch your gif play for the very first time! After an hour and half of selecting and cutting off screenshots! 😛 Play it some more. No really, I’m serious. I do this so even as early (lol) as this part in the gif making process, I can see which frames I can/should delete to be within the 10 MB file size limit. You can also do it at the end of course 🙂
Now, let’s go to the next important steps of this tutorial post which I’ve numbered below.
Crop and resize to meet Tumblr's required dimensions. The width value should be either 540px, 268px, or 177px.
Convert the gif to a Smart Object for sharpening.
Apply lighting and basic color adjustments before the heavy coloring. I will be sharing the base adjustments layers I use for my gifs 😃.
1. Crop and Resize
Click on the Crop tool (shortcut: the C key)

I like my GIFs big so I always set this to 1:1 ratio if the scene allows it. Press the Enter key after selecting the area of the frame that you want to keep.
Side note: If you find that after cropping, you want to adjust the image to the left or another direction, simply unselect the Delete Cropped Pixels option. This way, you will still have the whole frame area available to crop again as needed and as you prefer.
Now we need to resize our gif and the shortcut for that is Command + Opt + I. Type in 540 as the width measurement, then the height will automatically change to follow the ratio you’ve set while cropping.
540 x 540 px for 1:1
540 x 405 px for 4:3
540 x 304 px for 16:9
For the Resample value I prefer Bilinear—but you can always select the other options to see what you like best.
Click OK. Then Command + 0 and Command + - to properly view the those 540 pixels.

Now we get to the exciting part :) the sharpen settings!
2. Sharpen
First we need to have all these layers “compressed” intro a single smart object from which we can apply filters to.
Select this little button on the the bottom left corner of the Timeline panel.


Select > All Layers
Then go to Filter > Convert for Smart Filters
Just click OK when a pop-up shows up.
Now you should have this view on the Layers panel:

Now I have 3 sharpen settings to share but I’ll have download links to the Action packs at the end of this long ass tutorial so if you want to skip ahead, feel free to do so.
Sharpen v1
Go to Filter > Sharpen > Smart Sharpen…
Below are my settings. I don’t adjust anything under Shadows/Highlights.
Amount: 500
Radius: 0.4
Click OK then do another Smart Sharpen but this time with the below adjustments.
Amount: 12
Radius: 10.0

As you can see Lena’s beautiful eyes are “popping out” now with these filters applied. Click OK.
Now we need to Convert to Frame Animation. Follow the steps below.
Click on the menu icon at the top right corner of the Timeline panel, then click Convert Frames > Flatten Frames into Clips
Then Convert Frames > Convert to Frame Animation
One more click to Make Frames From Layers
Delete the first frame then Select All then Set Frame Delay to 0.05

and there you have it! Play your GIF and make sure it’s just around 42-50 frames. This is the time to select and delete.
To preview and save your GIF go to File > Export > Save for Web (Legacy)…
Below are my Export settings. Make sure to have the file size around 9.2 MB to 9.4 MB max and not exactly 10 MB.

This time I got away with 55 frames but this is because I haven’t applied lighting and color adjustments yet and not to mention the smart sharpen settings aren't to heavy so let’s take that into consideration.
Sharpen v1 preview:

Sharpen v2
Go back to this part of the tutorial and apply the v2 settings.
Smart Sharpen 1:
Amount: 500
Radius: 0.3
Smart Sharpen 2:
Amount: 20
Radius: 0.5
We’re adding a new type of Filter which is Reduce Noise (Filter > Noise > Reduce Noise...) with the below settings.

Then one last Smart Sharpen:
Amount: 500
Radius: 0.3
Your Layers panel should look like this:

Then do the Convert to Frames Animation section again and see below preview.
Sharpen v2 preview:

Sharpen v3:
Smart Sharpen 1:
Amount: 500
Radius: 0.4
Smart Sharpen 2:
Amount: 12
Radius: 10.0
Reduce Noise:
Strength: 5
Preserve Details: 50%
Reduce Color Noise: 0%
Sharpen Details: 50%
Sharpen v3 preview:

And here they are next to each other with coloring applied:
v1

v2

v3

Congratulations, you've made it to the end of the post 😂
As promised, here is the download link to all the files I used in this tutorial which include:
supercorp 2.05 Crossfire clip
3 PSD files with sharpen settings and basic coloring PSD
Actions set
As always, if you're feeling generous here's my Ko-fi link :) Thank you guys and I hope this tutorial will help you and make you love gif making.
P.S. In the next post I'll be sharing more references I found helpful especially with coloring. I just have to search and gather them all.
-Jill
#tutorial#gif tutorial#photoshop tutorial#gif making#sharpening#sharpening tutorial#photoshop#photoshop resources#psd#psd coloring#gif coloring#supercorp#supercorpedit#lena luthor#supergirl#my tutorial#this has been a long time coming#guys. i'm BEGGING you. use the actions set - it was a pain doing all this manually again ngl LMAO#i've been so used to just playing the actions#so this has been a wild refresher course for me too 😆
780 notes
·
View notes
Text
How to Burn Your Own CDs - a guide for Windows users
Are you--yes, you!--tired of paying money to stupid shit like spotify for your music? Do you hate the way that the music industry takes almost all the profit that bands make through streaming and leaves them with pennies? Have you ever wanted to fire up that old CD-Radio in the corner of your bedroom, only to be stopped because all you have on CD is Weezer's blue album and a copy of Kidz Bop 16 that you don't remember buying? Well this guide just might be for you!
Materials you'll need:
A computer. Can't do it without this one.
A CD drive. It can be internal or external, but you'll need one either way. You can find them at Office Depot for fairly cheap and I've heard that some Walmarts carry them.
A pack of CD-Rs. CD-Rs, or CD Recordables, come in packs of 20, 50, or 100. A proper 100-pack should cost you no more than $30, so unless there's some special shortage in your area, don't buy from anywhere selling them at a markup. CD blanks are literally 50c a piece.
CD cases. Sold wherever CD-Rs are, but you can also find these at thrift stores pretty easily.
A sharpie or some kind of permanent marker
Software you'll need:
Jdownloader. You can acquire mp3s through Bandcamp if you're dedicated to righteousness, but for everyone else, install jdownloader or some other kind of open-source download program. I will be proceeding as if you have jdownloader available.
Windows media player. This should open automatically when you insert a CD-R into your CD drive.
Fre:ac audio converter. This is only for the occasion that you encounter OPUS or mp4a files that cannot be interpreted by your CD player.
Note: If you're very determined not to download software onto your computer, you can use free youtube downloaders and audio converters, but these are subject to viruses and other issues such as download speed. I will be proceeding as if you have the programs I listed.
The process:
Decide what you want to burn--anything goes, but keep in mind the time limit on your CD-Rs. Most will record 90 minutes or less.
Open jdownloader, switch to the linkgrabber tab, then paste youtube links in any order until you have all the music you want. I'd personally recommend doing it song-by-song instead of a full album stream, because a massive file will require a lot of work to separate back into searchable tracks.
De-select all files except audio on the right-hand side options menu.
Make a folder inside the music folder of your laptop and label it with the name of your mix CD.
In the properties tab of each song on jdownloader, change the destination folder to the folder you've just created.
Hit "start all downloads".
Once finished, open each folder. If everything is an .mp3 or a .wav, skip the next 2 steps.
Open Fre:ac audio converter to convert all audio files that aren't .mp3 or .wav into .mp3 or .wav.
Drop the converted files next to the unconverted files in your folder. If you wish, you can delete the originals to make the folder easier to browse.
Put your blank CD-R into the CD drive. If external, plug in your CD drive first or the tray will refuse to open.
Windows media player will open automatically. On the right-hand side, you will see the tracklist of your CD-R (which should be blank). On the left, you will see the audio that your computer is able to find in the music folder. Put your selected tracks IN ORDER onto the tracklist.
Listen to the beginning and ending of each track to make sure there isn't a significant time gap. This also prevents accidentally burning a youtuber's stupid outro if you missed it before.
When satisfied, hit "start burn".
On an external drive, the CD tray will open upon completion. You can reinsert it to ensure that the burning went smoothly.
Once satisfied, remove the CD from your drive. With your sharpie or permanent marker, write the name of the album on the front, then store safely inside a CD case.
you did it👍
Ask me if you run into any issues.
Legal disclaimer: this guide is purely for educational purposes and I do not admit to or take responsibility for any piracy committed using the instructions given.
Illegal disclaimer: cops suck my dick
495 notes
·
View notes
Text

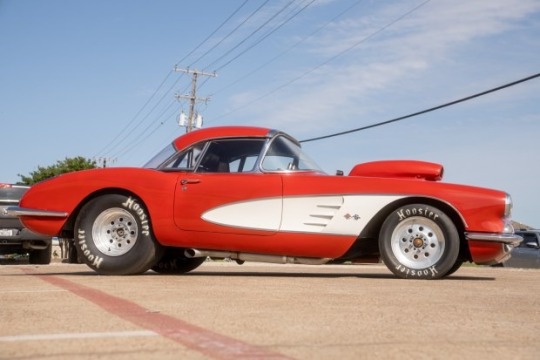
1958 Chevrolet Corvette
This 1958 Chevrolet Corvette underwent a pro-street-style metamorphosis between 2008 and 2011. It is endowed with a 383 cubic inch stroker V8 engine, harmonized with a TH350 three-speed automatic transmission, and a narrowed rear axle featuring a limited-slip differential. The rear suspension has been upgraded with a ladder-bar configuration, adjustable coilovers, and the addition of a lift-off hood. The body, painted a striking red with white coves, comes with a detachable hardtop. Inside, a roll cage has been installed along with a B&M Pro Stick shifter, a shift light, aftermarket gauges, and black Procar bucket seats. The enhancements also include dual Edelbrock carburetors, Hooker headers, side-exit exhaust pipes, 15” alloy wheels, and front disc brakes. Acquired by the current dealer in February 2024, this modified C1 Corvette is now part of the Coffee Walk Corvette Collection in Wylie, Texas, and is offered without reserve, complete with build records and a clean Pennsylvania title.
1958 Chevrolet Corvette
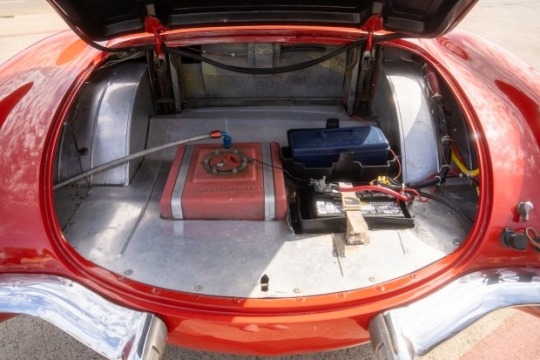
The fiberglass exterior is adorned in red with white coves and includes a removable hardtop and a lift-off hood with an integrated air scoop. A Stewart-Warner fuel-pressure gauge is mounted on the cowl, and the right-rear corner features a battery cutoff switch and external terminals. The gallery reveals cracks in the weatherstripping, pitted chrome, and paint imperfections.
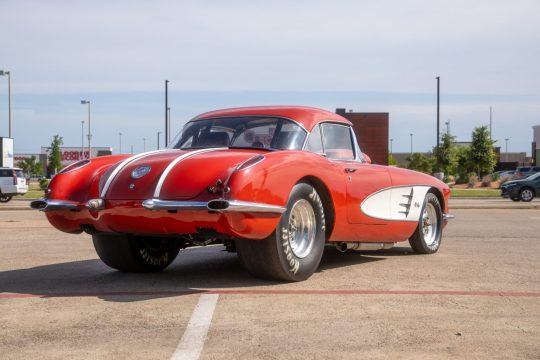
1958 Chevrolet Corvette
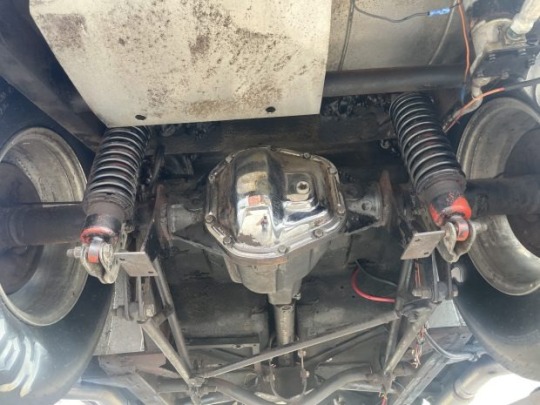
Polished 15” alloy wheels are shod with 25.0×5.0” front and 29.5×11.5” rear Hoosier drag tires, installed in April 2024. A crossmember supports the rear suspension, which has been modified with ladder bars, a diagonal link, and adjustable coilovers. The braking system includes front disc brakes and rear drums.
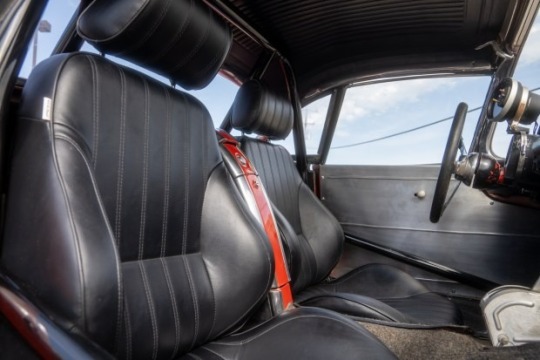
1958 Chevrolet Corvette
The interior is equipped with a roll cage and Procar high-back bucket seats in black. Enhancements include a B&M Pro Stick shifter, an MSD shift light, rocker-switch controls, and fabricated metal door panels. The gallery displays flaking paint and wear on interior surfaces.
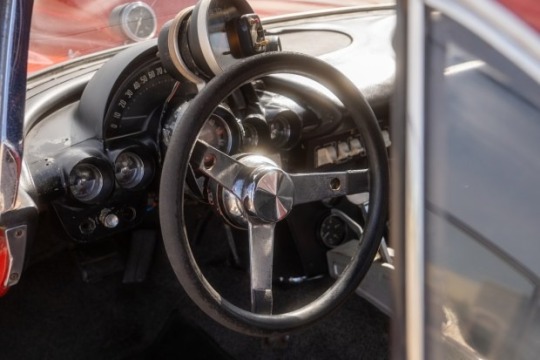
1958 Chevrolet Corvette
The three-spoke steering wheel is positioned in front of a 160-mph speedometer and auxiliary gauges. An AutoMeter pedestal tachometer is mounted atop the non-functional factory tachometer. Additional gauges for coolant temperature and oil pressure are located in the center console. The mechanical odometer is inoperative, and the total mileage remains unknown.
1958 Chevrolet Corvette
A Harwood plastic fuel cell is mounted in the trunk, which has been tubbed with fabricated aluminum panels to accommodate the rear wheels.
1958 Chevrolet Corvette
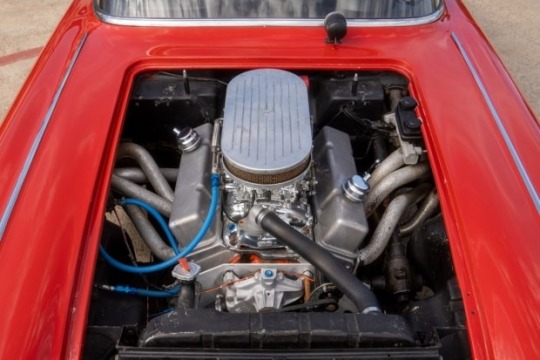
The 350ci V8 engine block, bored and stroked to 383ci, features four-bolt main bearings. The build includes forged pistons, ARP fasteners, a polished Edelbrock intake manifold, dual Edelbrock carburetors, an MSD ignition module, and Hooker long-tube headers that flow into side-exit exhaust pipes.
1958 Chevrolet Corvette
Power is transmitted to the rear wheels through a TH350 three-speed automatic transmission and a narrowed Dana 60 rear axle with a limited-slip differential.

1958 Chevrolet Corvette
155 notes
·
View notes
Note
I feel the most comfortable asking you this but I am STRUGGLING with severe lag in my TS3 game. I just did a clean install, tried smooth patch, took it out bc it was conflicting with Nraas and didn’t make a difference, but it’s still nearly unplayable. I’ve tried every tutorial under the Sun. don’t remember having this issue years ago when I played. Do you have any tips or tutorials that you recommend? TY in advance!
heyy 💛💛
the only tutorial i really followed was the sims 3 performance and bug fix guide hosted on steam which i'm sure most sims 3 players know about. i'm not sure how helpful my answer will be but this is what i would suggest:
smooth patch
i believe nraas and smooth patch conflict in create-a-sim mode, you can't enable master controller's compact mode with smooth patch integrated with it. so what i did was:
first, install smooth patch according to the MTS page instructions. you should have "ld_SmoothPatch" and "ld_SmoothPatch_MasterController" in your Mods/Packages folder
using s3pe, open "ld_SmoothPatch.package"
in the s3pe screen, right-click on the xml thingy named LazyDuchess.SmoothPatch.Tuning
in the right-click menu, click on "Notepad" then make sure kMasterControllerIntegration value = "False"
save and close the notepad window. then, in s3pe, save the change you made and close s3pe.
nraas mc and smooth patch should no longer conflict. this is the only nraas mc and smooth patch conflict that i am aware of, unless there are others...? but that's how i got them to play together.
lag
the main issues that used to cause super long loading times for me and lagging during gameplay were the following:
thousands of unmerged cc packages in my mods folder
laptop had HDD instead of SSD
framerate was not capped
a lot of script mods installed which were probably conflicting with each other and using a lot of resources in the background
sooo the steps i took were:
organized and merged most of my cc packages into packages smaller than 1 GB - reduces lag and load times
changing my laptop's hard drive to a SSD decreased load times and reduced lag dramatically for me - also adding more ram to my laptop probably helped. but this is a pretty extreme option. i had to replace my hard drive with a SSD because it literally died.
when i used to play on my laptop with a HDD, capping the framerate to 30 or 60 FPS helped to reduce the lagging during gameplay. you can limit the game's framerate using smooth patch, using "3Booter", or thru your computer's graphics card.
script mods like nraas story progression and mingos birds and bees are script mods that are known to cause lag in the game because they are resource heavy. the only way to remove the lag is to uninstall them or, for nraas SP, i set the speed of the story progression to the slowest option.
so yeah i hope that is helpful <3
192 notes
·
View notes
Text

Projekt Harevst Moon
Subject Number: 001
Subject Name: Rosie
Subject Age: Between 19 to 25. Exact date unknown.
Current Length of Incubation: 2 Month, 4 Days
Notes:
Subject Number 001 (hereforth referred as SN 001 for simplicity) is a fine example of maturing Mudokon Queens. From her initial medical intake upon arrival; she is a very healthy member of her species. SN 001 is well toned. Upper body muscular is above average for a specimen of her age. Though this is thought to have been a result of SN 001's native lifestyle.
When SN 001 was first discovered, she had already been bred with one of her wild Drones. She was beginning her metamorphosis into her fully stationary Queen life cycle, but had yet to start laying her first clutch of eggs. It was vital that the Homestead Security teams captured SN 001 before she began nesting. The additional weight brought on by the metamorphosis would have made extraction and transport difficult from her native region.
Due to the process of relocation, said clutch was proven unviable and promptly destroyed by Homestead R+D staff as most first clutch eggs tend to be. Wild caught Queens tend to have less productive laying cycles until they're fully settled within their nests. This can take years in native habitats.
To speed up the metamorphic process, we have allocated resources for SN 001 to make it easier on her body. First, we removed her legs, which would have become vestigial if left intact. Once healed, this will provide comfort to SN 001 in the future.
Next, once SN 001 has become stable enough from her amputation, we plan on installing a feeding pump directly into her stomach. This will limit her need to forage and provide her with a constant supply of growth hormones, nutrition and supplements. This will ensure she stays nesting for longer periods. In turn, insuring that her eggs become more valuable.
If hwr product lauch goes well, we are in talks with our Vykkers Labs partners into developing a custom-made Shrink unit for her enclosure.
By removing her basic wants and needs, SN 001 is estimated to be an incredibly competitive and productive Queen with a very long life ahead of her. She is a Queen that is desperately needed now more then ever with the Magog Cartel's aging stock slowing down with her production.
Our goal is simple: To flood the market with Rosie's Labour Eggs come the fall quarter.
- Dr. Edward Ted
Head of Homestead Research and Development
16 notes
·
View notes
Text
Third League Royals: A Guide to Building Standardized nuSLDF BattleMechs
"Third League Royal" is a term coined for refitted and modernized BattleMechs deployed by the Star League Defense Force (SLDF) of the Third Star League from 3151 onward, in the Touchdown AU.
These upgraded designs follow strict formatting guidelines to ensure interoperability, survivability, and networked warfare efficiency in the modern battlefield.
This guide outlines how to construct a Third League Royal using MegaMekLab (MML), with a focus on out-of-universe implementation.
Core Features of a Third League Royal:
1. Mixed Clan Techbase (Unofficial Rules Enabled):
All Third League Royals must use the Mixed Clan techbase.
The Unofficial Tech Level must be enabled in MML to permit these configurations.
Furthermore, under the Tech Progression tab in Options, you must enable "ignore intro/extinct years for Unofficial Tech Level units"
2. Nova CEWS or Equivalent EW Suite:
All standard Third League Royals mount the Nova Combined Electronic Warfare Suite. Usually placed in the head slot, unless:
a) The 'Mech has a traditional head-mounted system that takes priority.
and/or
b) A Small Command Console cockpit is in use.
Exceptions:
Recon or command-focused 'Mechs may instead mount:
a) Clan ECM Suite (fluffed as "Archangel ECM").
and/or
b) Clan Active Probe (fluffed as "Wolfhound Active Probe").
3. Small Cockpits & Command Consoles:
All units use Small Cockpit technology.
Command variants use the Small Command Console Cockpit.
Ensure the cockpit is armored via the Assign Criticals tab in MML.
4. Armored Cowl Equipment:
All designs must mount an Armored Cowl in the head.
Must be armored via the Assign Criticals tab.
5. Clan-Tech Modernization of Legacy Loadouts:
Loadouts should (but do not have to) resemble previous variants of the 'Mech.
Upgrade to Clan equipment wherever appropriate:
IS Medium Lasers → Clan ER Medium Lasers.
IS Gauss Rifle → Clan Gauss Rifle or HAG.
LRM/SRM systems → Clan ATM or Streak launchers.
6. IS Composite Structure:
Must be selected under Structure.
7. Clan Double Heat Sinks:
Exclusively use Clan Double Heat Sinks.
Install as many as the design allows to minimize heat buildup (see below for Quirks that will effect the final number).
8. Supercharger Optimization:
Optional but recommended for weight efficiency:
Downgrade engine rating by one step.
Add a Supercharger to restore original speed.
Example: 300-rated engine → 285-rated + Supercharger.
9. Quirks:
a) Add the following universal Quirks (in addition to any original ones):
Battle Computer (replaces Command Mek Quirk if present on base model)
Combat Computer (+4 sunk per turn on top of normal heat sinks - not shown in MML UI, total heat/heat sunk must be manually calculated)
Cowl
Easy to Pilot
Extended Torso Twist
Improved Communications
Improved Sensors
Multi-Trac
Variable Range Targeting
b) If Jump Jets are present, add:
Reinforced Legs
c) Weapon and AMS Quirks:
i) All weapons (energy, ballistic, missile) must have:
Accurate Weapon
Improved Cooling Jacket (reduces individual weapon heat by one - not shown in MML UI, total heat/heat sunk must be manually calculated)
ii) All AMS types must have:
Directional Torso Mounted Weapon
d) Negative Quirks of the original design should be removed unless given a compelling lore reason.
10) Additional Design Notes:
a) Armor Allocation: Prioritize maximum armor where weight allows, using Clan Ferro-Fibrous or Ferro-Lamellor if possible.
b) CASE II: Highly recommended for Clan ammo-fed weaponry.
c) Head Slot Limitations: If both Nova CEWS and Command Console are needed, prioritize the Command Console and shift Nova to an alternate location.
The Third League Royal format creates a high-performance, standardized set of BattleMechs optimized for 32nd-century mixed-technology, survival-focused, network-centric warfare. By following this guide in MegaMekLab, players can build compliant 'Mechs that reflect the Third Star League's vision of a modern, networked military. Whether deploying a reimagined Atlas or a revitalized Shadow Hawk, your 'Mech will carry the legacy of the Star League forward—into the next era of warfare.
9 notes
·
View notes
Text
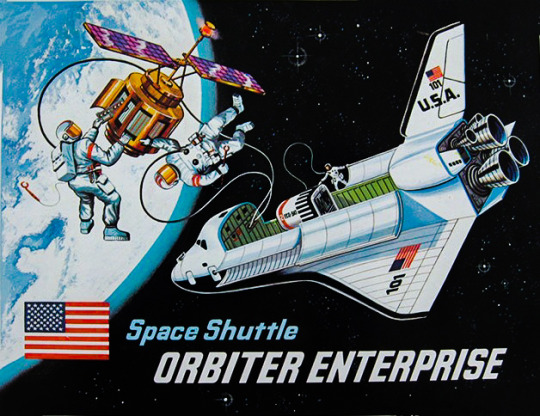
The complete Shuttle Fleet AU
This is just my thoughts about how things might align for Enterprise to be refitted into an operational shuttle. This comes after reading a lot of the behind the scenes decisions and abandoned plans NASA had over the last 40 years. I only listed major events.
It wasn't meant to be this long but I hyperfocused too much on it one morning. Anyways, I hope you enjoy it.
• 1972: NASA started the Space Shuttle Program.
• OV-101 Enterprise: same rollout and testing as our timeline in 1976-77
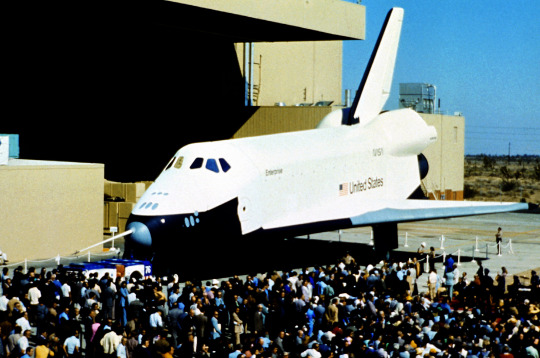
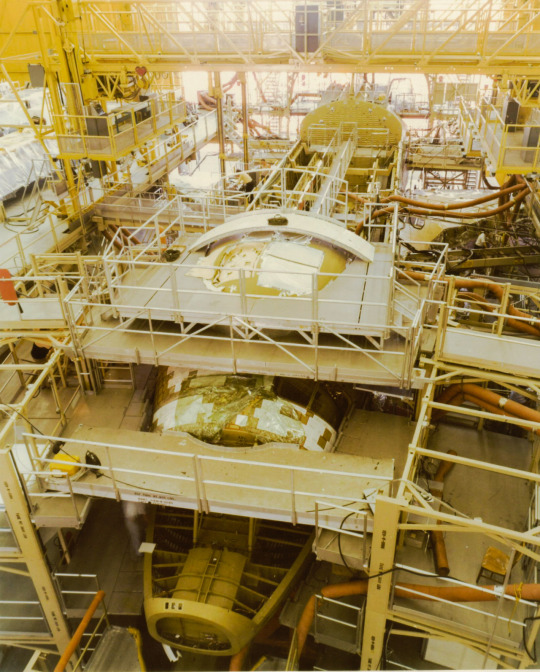
•STA-099: delivered to Lockheed for structural load tests to simulate the launch and re-entry of an operational orbiter in February 1978.
• Point of divergent: The decision to use STA-099 instead of OV-101 as the second operational orbiter came too late as the frame was already tested to 90% stress load. At this point, it would be too costly to repair and bring it back inline. It was decided to continue testing to destruction (as was originally planned in our timeline), although some parts are removed to be refurbished for OV-103.
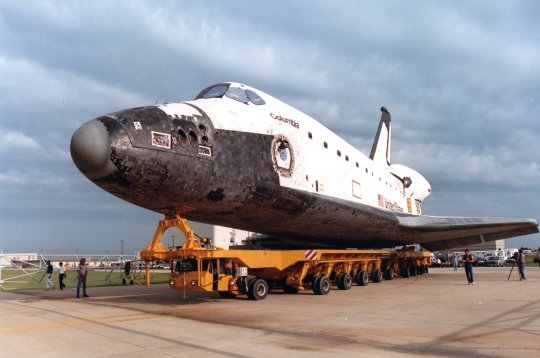
• OV-102 Columbia completed and rolled out in March 1980. (NASA doesn't relocate Columbia to KSC in March 1979 in an attempt to speed up her tile installation, which only delayed her completion).
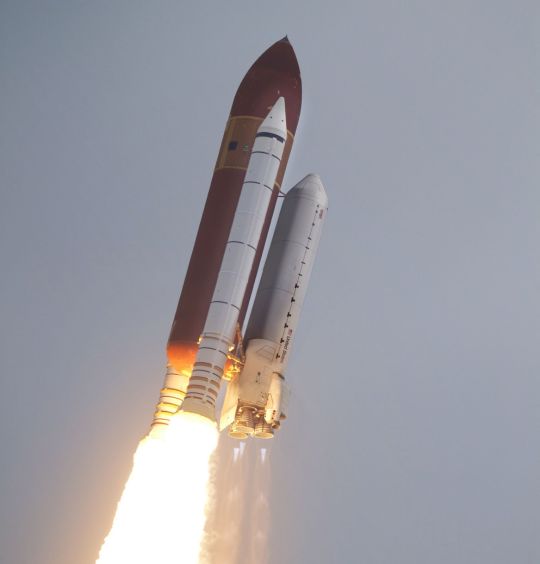
•STS-1 is launched in December 1980 (instead of April 1981)
• NASA gives the go ahead to add Enterprise to the fleet and have her rebuilt after Congress increases their budget, but the work would start once OV-104 is completed.
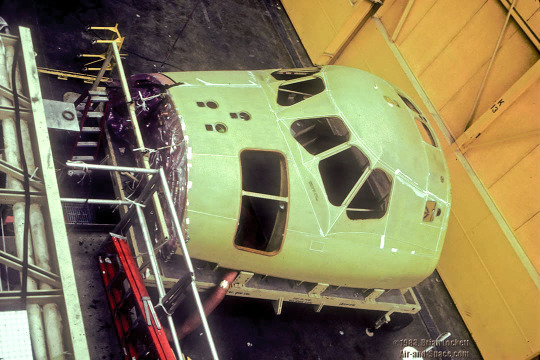
• 1981: long led items for Enterprise's rebuild are started. This includes a new crew pressure vessel and a new aft-fuselage.
• OV-103, starts earlier and it's production is accelerated with parts salvaged from STA-099 (such as the forward fuselage upper section, elevons and vertical stabilizer). Construction completed in 1982 and christened Challenger.
source
• 1983: STS-7 is Challenger's maiden mission. Onboard is Sally Ride.
• 1983: OV-104 is competed and christened Discovery.
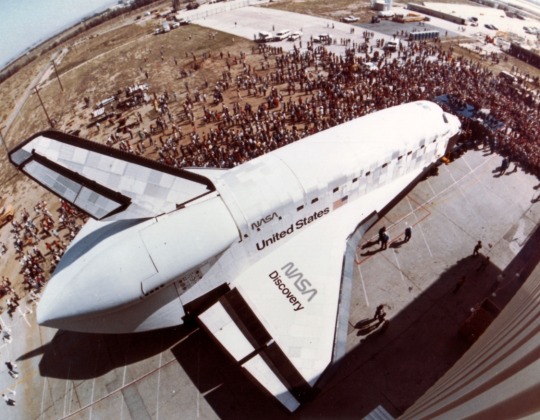
source
• STS-12 is Discovery's first mission.
Note: NASA never uses the STS-41-D format. Where the first digit indicating the federal fiscal year, second digit indicating the launch site (1 was Kennedy Space Center and 2 was Space Launch Complex 6 at Vandenberg Air Force Base), and the letter indicating scheduling sequence. This was due NASA Administrator James M. Beggs's triskaidekaphobia (fear of the number 13). In this timeline, the assistant admins were able to talk him out of it and simply skip STS-13.
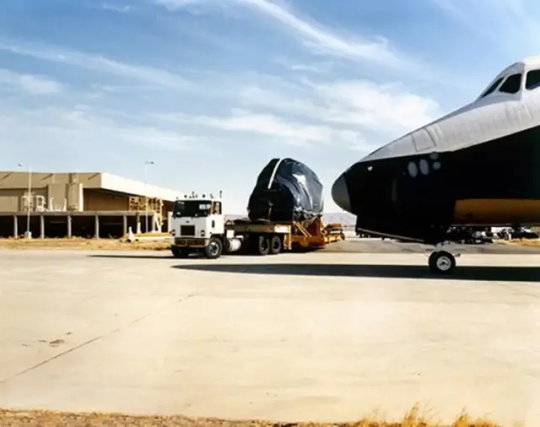
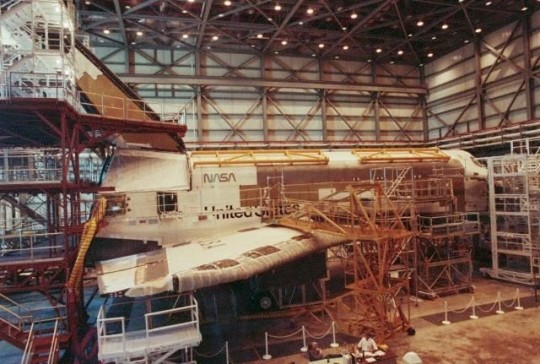
• 1983: Enterprise is returned to Palmdale for her disassembled and rebuild. As a weight saving measure her mid-fuselage is returned to Convair for a complete rebuild to bring it inline with OV-103 and OV-104.
source
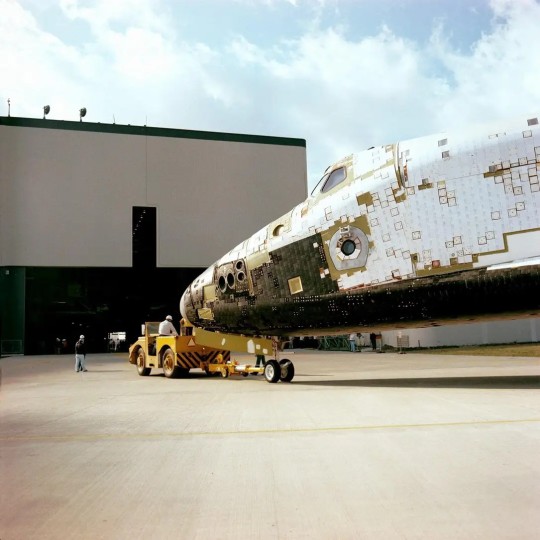
• 1985: at long last, Enterprise is rolled out and joins the fleet. She weighs about the same as Columbia despite weight saving implemented during her rebuild.
• 1985: Columbia is returned to Palmdale for refurbishment and to remove testing equipment (most notable is the ejection seats). This sees her thermal protection system revised and her 32,000 tiles reduced to 24,300. Most are replaced by Advanced Flexible Reusable Surface Insulation blankets which was used on the other three orbiters.
• September 1985: STS-21 is Enterprise's first mission
• STS-25 (STS-51-L in our timeline) launches at a later date due to NASA management listening to the Engineers about icy conditions on January 26, 1986. NASA quietly orders the complete redesign of the Solid Rocket Boosters.
• May 1986: tragedy strikes OV-103 Challenger during STS-27, when the attempted launch of the Centaur carrying the Ulysses probe explodes killing all those onboard. (A real fear in our timeline.)
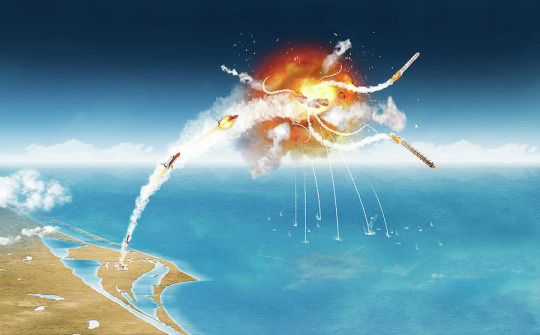
source
• The Shuttle fleet is grounded for a year, during the investigation. Ultimately the Investigation board concluds NASA was trying to do too much with too limited a system/funding and is used by the administration to demand a bigger budget. (It has less of an impact on the American psyche since it wasn't televised).
• The USAF cancels all Shuttle missions from Vandeberg Air Force Base. (Same as our timeline)
• With an increased budget, NASA agrees to Rockwell's offer to build two new orbiters for the price of one offer.
• 1986: Columbia is returned to NASA after her refurbishment. However, he is placed into storage with the rest of the fleet.
• 1987: return to flight with STS-28 with Discovery. Also first launch with the redesigned SRBs.
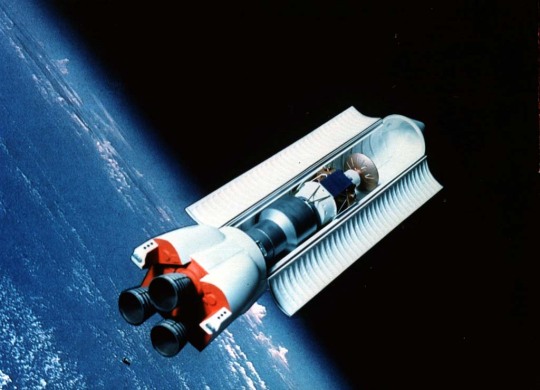
• 1988: NASA launches the Shuttle-C program (or Cargo Transportation System), an expendable unmanned cargo pod, using the existing shuttle hardware. The goal is to increase the number of launches by augmenting the Orbiters and reduce the risks to human lives.
•1988: STS-29 Atlantis suffers a foam strike during launch. Post flight analysis determines the foam came from the bipod connected the ET near the top to the front underside of the orbiter. The orbiter was nearly lost during re-entry if it weren't for the fact the strike happened to a tile that was over less critical areas and the missing tile was over a steel patch for an antenna, which gave extra protection to the spacecraft structure. NASA removes the foam from the bipod connection on all missions going forward.
• OV-105 is built from spares from Challenger and Discovery. Completed in 1990 and christened Atlantis. Her design is the first to include a glass cockpit and other improvements.
• 1991: STS-45 is Atlantis's first mission
• OV-106 is a complete to an slightly improved design, making her lighter and stronger than her sisters. Externally she looks the same. Completed in 1992 and is christened Endeavour.
source
- Structural spares are built to replace the ones used in Atlantis's construction and are designated OV-107.
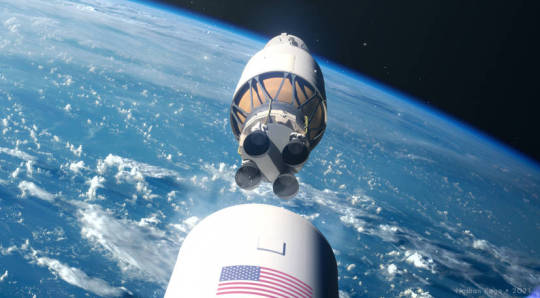
• 1992: first launch of the Shuttle-C (CTS-1). Mission was a success, carrying a DoD payload.
Shuttle-C render by Nathan Koga for Space Flight Insider: link, link
• CTS-3: launches the Ulysses II probe
NASA image: link
• 1993: STS-59 is Endeavour's first mission
• Rockwell International merges with Lockheed to become Lockheed-Rockwell.
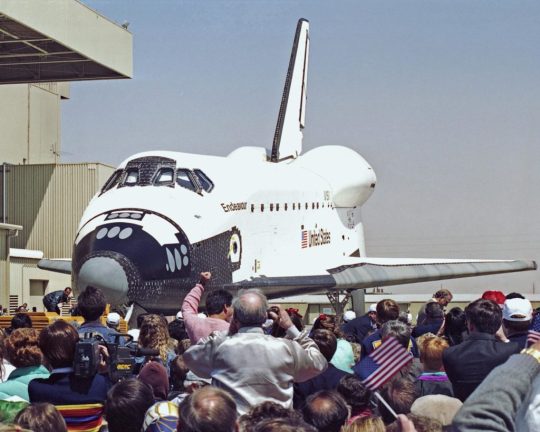
• December 1993: OV-101 Enterprise is retired due to being the oldest in the fleet. Endeavour takes her place in the fleet. Enterprise is given to the Smithsonian with the option of being recalled by NASA if needed.
• 1994: NASA launches the X-33 program to compliment the shuttle as an unmanned reusable launch vehicle (RLV) and replace the Shuttle-C.
• 1996: CTS-5 carries the first component of the International Space Station.

Artwork by okan170: link
•1996: the Shuttle-C program is cancelled to divert funds to the X-33 program.
• 1998: Lockheed-Rockwell design is selected over proposals from McDonnell-Douglas and Northrop-Grumman/Boeing
SDASM Archives: 08_00991
• 1998: NASA begins the X-38 CRV (Crew Return Vehicle) program. The CRV is designed to be a lifeboat for the ISS.
• 2001: X-33 RLV program is shelved due to technical challenges and budget cuts.
• 2003: STS-118, Columbia conducts her first (and only) mission to the International Space Station. While docked, it was discovered an ice strike damaged her reinforced carbon–carbon leading wing edge panel. The crew stays in the ISS a week while waiting for rescue from STS-119 Atlantis. NASA jerry-riggs an autopilot system to have Columbia re-enter the atmosphere unmanned after her leading edge was temporarily repaired. It was expected for her to burn up in the atmosphere and what remained to land in the Pacific Ocean near Hawaii. However, against all odds Columbia survives and lands at Edwards Air Force Base. Although her port land gear collapsed during breaking after tough down and caused additional damage to the batter shuttle.
• The crew of STS-118 ride back on STS-119 Atlantis and land in Kennedy Space Center.
• Unfortunately, the damage to Columbia is too extensive and she is retired. She is placed in storage at Palmdale, California.
• In the wake, NASA begins Project Constellation, with the goal being to complete the original space transportation system (STS) mission. Which was a reusable system to carry astronauts to the moon and beyond. NASA and the US calls on the international community to fund and build the components.
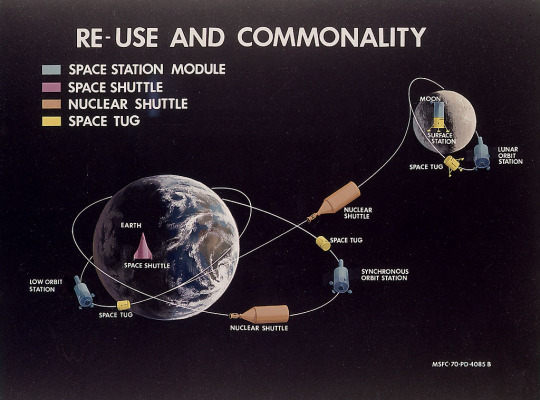
NASA ID: MSFC-70-PD-4085 B
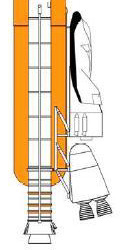
• The ET is modified with a half shell to remove the risks of form/ice strikes and the Shuttle TPS is upgraded with the materials from the shelved X-33 program.
• OV-101 Enterprise is recalled by NASA to be the prototype of an unmanned shuttle and is given a thorough rebuild with newer and lighter wings and other components but entirely unmanned. Some joking refer to her as Enterprise-A, as a reference to Star Trek.
• NASA funds Lockheed-Rockwell to build OV-107, another uncrewed version, to augment Enterprise.
• The ISS construction continues but becomes a research/launching platform for missions to the moon and ultimately beyond
• 2004: the X-38 is launched on a liftover Shuttle-C, modified for lifting body, to the ISS (CTS-10).
source

Artwork by SpacePozzolo: link
• 2005: return to flight with STS-121 Discovery.
• 2008: first flight of Enterprise-A (CTS-11).
• 2008: the ISS is completed

Artwork by NanoRacks: link
• 2009: OV-107 construction is completed and christened Constitution. Her first flight happens later that year (CTS-16).
• 2009: NASA announces the rocket that will carry the components of the Constellation programs beyond Earth orbit will be called the SLS (Space Launch System). Boeing was selected to build the core stage. The SLS will used SSME at the end of their life's and newly constructed expendable versions. A third launch, pad 39C, will be constructed for the SLS.
• 2009: Lunar Transfer Vehicle (LTV, later renamed Orion) is used to transfer crews from LEO to Lunar orbit. Two components make up the vehicle. The crew section is to be built by NASA/CSA and the fuel/propulsion section built by the ESA. The SLS will be used to launch the fuel/propulsion section of the LTV.
- OV-101 and OV-107 are used to launch the crew section of the LTV. Which will rendezvous with the ISS.
- SLS Block II, an upgraded version, is use to launch the Gateway components. Gateway components will be built in the ESA and Japan.
- A Lunar space station, Gateway, launched and constructed in lunar orbit for Orion to rendezvous and house the Altair lunar lander. Three Orions are kept in orbit, one at each station in case of an emergency and a third in use.
• The first is find locations with abundant raw materials for fuel the future moonbase.
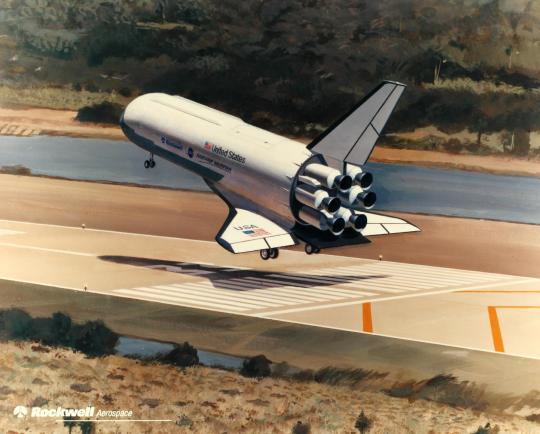
• 2010: NASA announces the X-50 SSTO Program and the Commercial Crew Program, with the goal of replacing the Shuttle (including the Enterprise and Constitution). The X-50 is the successor to the X-33.
• 2012: Lockheed-Rockwell is selected to build the X-50
• 2014: SpaceX Dragon and Sierra Space Dreamchaser are selected as part of the Commercial Crew Program.

• 2017: OV-104, OV-105 & OV-106 are retired when th Dreamchaser and SpaceX Dragon are brought online. List of each shuttle's last mission:
- STS-203 Discovery
- STS-204 Endeavour
- STS-205 Atlantis
• 2018: the maiden flight (CTS-70) of the X-50 Starlight (OV-201 Constellation)
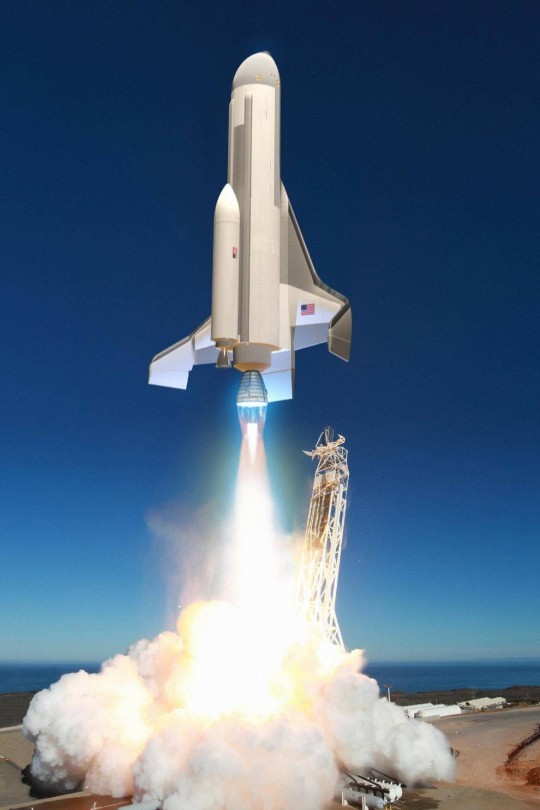

• 2019: OV-101 is retired for the final time when the X-50 Starlight shuttles are brought online. OV-107 is kept in standby but eventually is turned over to a museum. List of their missions:
- CTS-74 Enterprise
- CTS-75 Constitution
• NASA has three operational Starlights. Spares are construction, OV-204.
-OV-201 Constellation
-OV-202 Columbia II
-OV-203 Adventure
• 2019: the first launch of the SLS was a success
Artwork by okan170: link
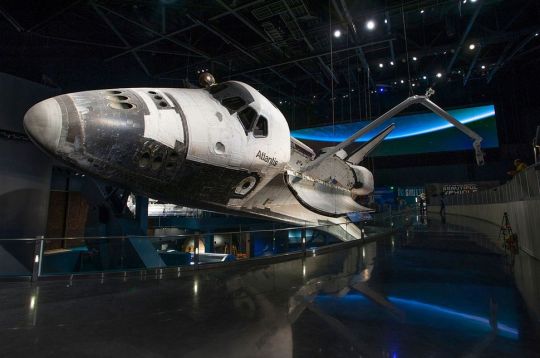
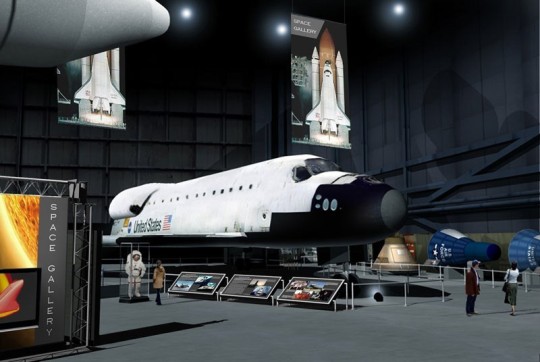
• 2020: the Space Shuttles are displayed in the following cities:
- OV-101 Enterprise: Space Center Houston

- OV-102 Columbia: California Science Center in Los Angeles, California (volunteers at Lockheed-Rockwell repair her enough to be put on display)
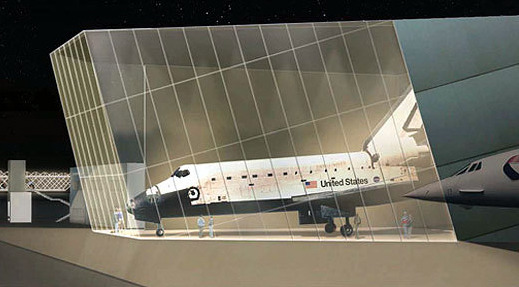
- OV-104 Discovery: Steven F. Udvar-Hazy Center, Smithsonian, in Washington DC

- OV-105 Atlantis: Kennedy Space Center, Florida
- OV-106 Endeavour: Intrepid Sea, Air & Space Museum in New York City, New York

- OV-107 Constitution: National Museum of the US Air Force in Riverside, Ohio
• 2022: the first Orion (LTV-101: Pathfinder) is launched into orbital aboard SLS-2. It conducts tests over several orbits and docks with the ISS.
• 2023: OV-202 Columbia II launches and fuels up the Pathfinder. Four crewmen board the spacecraft and depart for the moon...

Artwork by Seth Pritchard: link
#AU History#Alternate Universe history#alternate history#Space Shuttle#Space Shuttle Enterprise#Enterprise#OV-101#Space Shuttle Columbia#Columbia#OV-102#Space Shuttle Discovery#Discovery#OV-103#Space Shuttle Atlantis#Atlantis#OV-104#Space Shuttle Endeavour#Endeavour#OV-105#OV-106#OV-107#Space Shuttle Constitution#Orbiter#NASA#Space Shuttle Program#X-33#Reusable Launch Vehicle#RLV#Project Constellation#my post
56 notes
·
View notes
Text

Also named as the Universal Gun, for its flexibility on the battlefield, it is considered the standard weapon of choice for the various groundside Man of Iron battle constructs in the Legion Armada.
Given its use of Repulsion fields in exchange of magnetic rails, it is able to make use of anything as ammunition, provided it has mass to affect and repulse. Everything from metal to plastics to plain gas can be utilized with this weapon, granting it immense tactical flexibility that the Imperial Bolt Gun would simply lack. The repulsion field can further be modified to fragment a slug as it travels through its terminal point or be used as a short-range repulsion field that can knock enemies off their feet or even contain them with constant repulsive force.
However, this is not the limits of the RCGs, as their second greatest trait is their modularity. Each Coil is an independent component that can be removed or added to reconfigure the weapon for various purposes, permitting the RCG to be converted from an assault rifle to a grenade launcher and then into a sniper rather quickly in a pinch.
Ammunition Forms:
Depending on the RCG and the Fabricator Feedstock its being used, it would fire solid heavy metal slugs or pellets, bolters and special fluid types.
Solid Metal Projectiles. Given that they are much faster to produce, they tend to be quite common and RCGs making use of these have shown a much higher rates of fire. Do not underestimate the power of these basic rounds, for more powerful Infantry Grade RCGs can fire a ferromagnetic slug with enough force to punch a wide hole through the resilient armour of Astartes with surprising ease.
Reactive Liquids. While they tend to not be as commonly employed, reactive fluids have found their place within the army of the Men of Iron. Given the Repulsion Field's ability to affect anything with mass, RCGs made to fire a steady stream of reactive liquid have their uses. From searing Promethium to Pyrocaustic Substances and the horrendously deadly Graywash [The Man of Iron's term for Nanites], they should not be underestimated.
Ferrum Bolts. While indistinguishable at a glance from standard Imperial Bolts, Men of Iron Bolts are much more compact and as a result are superior to their Imperial counterparts, possessing far greater range, speed and payload, and oftentimes capable of surprising tricks to increase their tactical flexibility. The following is the general list of Ferrum Bolts encountered by the Imperium by the end of the Razing of Prospero.
1(a): Standard Round and their General Sizes [Top to Bottom].
Heavy Bolt
Standard Bolt
Light Bolt
1(b): Special Munitions (Any Size)
Bio-Chem Round: Ranging from neurotoxins to pyrocaustic acids, the Bio-Chem Round is the catch-all term used for RCG Rounds that make their kill through the application of deadly chemical compounds or lethal pathogens. Its most common form is with the use of the Acid-KLR.7, an extremely deadly acid compound that releases hazardous fumes into the air once it begins dissolving matter. Rarely used unless for clearing out organic targets in confined spaces like Hive Networks and Ships, provided that they are used without the worry about civilian casualties.
Wailing Glass Round: A type of Psi-Round made from a synthetic version of the Shimmering Glass of the Reflecting Caves from Prospero. Bolts made with this material contain a heavy impact core energized with traces of Empyrean energy that does great damage to Metaphysical creatures like Daemons. Requiring a special Fabricator to be installed on the unit that intends on firing them, they are easily felt by psychically sensitive creatures for the 'wailing' sound they make as they travel through the atmosphere.
Tactical Round: Further modified Bolt, it is the general designation for Bolts designed for specific tasks in mind. Scatter Type explode mere meters away from a target, causing a shotgun like effect of heavy metal pellets to flay the flesh off their target. Ideal for Light Infantry. Hunter Type are able to make fine course corrections mid air to hit their target with increased accuracy or focus on weak points. Tend to be used for well armoured high-speed targets like Astartes. Restrain Type are light bolts filled with an adhesive and rapidly expanding foam. Used when wanting to incapacitate a target from afar with minimal chances of harming it.
Melta Round: A modified base round that is used mainly against Heavy Infantry and Light Vehicles. It is considered little more than a hybrid between a Bolt and a Melta Charge, yet this demonstrates the Men of Iron's ability to miniaturize advanced technology and mass produce it to a frightening scale.
Nanofluid Round: Made with killing Astartes in mind, it fills the role of a bioweapon designed to eliminate organic targets with an Immunity Rating of 7 and higher, whereas conventional bioweapons would be rendered either ineffective due to the aforementioned immunity or because non-combatants could also be afflicted with them should a bioweapon spread occur. It kills its target by injecting them with short lived Graywash fluid that rapidly shred the internal organs of its victim until all that remains is a darkened liquefied bloody paste, guaranteeing a swift yet very painful death on its target.
1(c): Heavy Special Munitions (Heavy Round Minimal Size Requirement)
Piker Round: Piker Rounds are made to penetrate deep into armour thanks to a Power Field that assists in perforating through vehicle armour with ease and detonating within. Made for taking down vehicles and extremely armoured heavy infantry like Terminators with a handful of shots.
Bullhead Round: Seismic-Grav Impact, made for causing as much damage to structures and heavy vehicles as possible, but limited to the higher-end weight class of RCGs. Upon impact, it releases a gravitational pulse combined with a singular, high-intensity shock wave that is capable of turning ferrocrete blocks into fine gravel.
Lumina Fluid Round: A Bolt Round exclusive to one Specialized RCG. Lumina Fluid is an extremely volatile and unstable psi-reactive substance that requires extensive security mechanisms to safely create and contain. It is oftentimes described as having the worst aspects of raw Warp Energy and Nitro-glycerine combined into the most frighteningly unstable Psi-reactive compound in the Man of Iron's army. As such, Bolts made to contain this Fluid require a miniaturized Stasis Field to avoid an unwanted pre-detonation. When they strike, however, the target is subjected to a miniaturized and explosive Empyrean detonation that no material armour can resist. However, their true target is the Metaphysical organisms that exist within the Warp, as being struck by such a weapon would critically injure even Exalted Daemons.
-Standard RCG Models- {2}
a) Crisis Pistol: Small sidearm for the Peacekeepers. Used mostly against infantry or to deliver specialized ammunition fire.
b) Tri-Angled Modded Crisis Pistol: Due to a quirk in the Repulsion Fields, creating something like a minigun is unfeasible. Instead, high fire rates are achieved by multiplying Repulsion Coil Barrels into a single weapon.
c) Principality Assault Repulsion Rifle: Standard RCG used by most Peacekeeper models.
d) Flamer Modded Principality Repulsor: A modification of the Principality Repulsion Rifle for dispensing a stream of Promethium.
e) Principality Adapted Granade Launcher: Heavy barrelled grenade launcher, capable of fabricating and launching specialized grenade ammunitions at a rapid pace.
f) Providence LMG: Large and heavy hitting firearm, used exclusively by Knights and Paladins. Excellent for eradicating anything in their path.
g) Providence Adapted Sniper Gun: Capable of taking down heavily armoured targets up to seven kilometres away or even further if aided by course correcting ammunitions.
-Specialist RCG Models- {3}
Specialist RCGs are all named in a long-forgotten tongue of Man. For whatever reason, the Man of Iron bears a fancy for ancient unspoken languages.
A) Canto de Dante: To the untrained eye, this RCG may seem like a mere Combi-weapon given its ability to fire both searing beams of molten metal and discharge short range blobs of plasma, however, that could not be further from the truth. Making use of the comparatively most powerful Repulsion fields in union with a component that bears many similarities to the Volkyte systems, it is able to fire a condensed beam of superheated metal at its targets. However, this system bears great flexibility, for it can also heat the very metal inside the containment chamber until the point it becomes a searing glob of barely contained heavy plasma that then gets discharged at close range in a wide cone capable of melting through any target. While the Magnetohydrodynamic beam struggles to penetrate thicker armour at range, the ionized metal discharge up close will succeed where the former fails.
B) Lagrimas de Lilith: Only weapon permitted to fire the infamous Lumina Fluid Round. While internally it is not that dissimilar from a standard medium RCG, its fitted with an E-Injector for charging the Lumina Fluid that it uses, as well as Stasis Field Projector. Externally, it is protected with thick plating to protect the very fragile and volatile components within. However this volatility is also used as a feature in certain cases, as Lilith's Tears can be turned into an impromptu Warp Bomb capable of turning even heavy tanks into a heap of Empyrean Warped metal and screaming scrap.
C) Gota Negra: Specialized weapon designed for producing and dispersing Graywash fluid in various. Its main form of attack is to fire Nanofluid Rounds, yet that is not the limit of its power, for it has three settings to diversify its lethal arsenal, by either releasing a stream of Graywash in a thin condensed jet that breaks down matter and tissue, or disperses clouds of microscopic particulates that are exceedingly dangerous to walk through unprotected, much less inhale.
D) Martillo Esmeralda: Specialized RCG that is less a gun and more a Seismic-grav Thunderhammer with a RCG Barrel and fabricator attached to it. So large and heavy that only Paladins are known to be able to properly wield them, it is in their hands an impossibly agile weapon as the device can regulate its own gravitational mass, capable of tipping over light armour as if they were mere toys with every hit and levelling buildings with frightful ease.
Author's Notes: Okay, I think I went a bit overboard. I have grown a whole new level of respect for concept artists. Phew...
I was meant to do the drawing for the Scythe, but since I already had these weapons in my prior drawing I decided to recycle the used assets and make this before moving onto the fighter jet... little did I know that my urges to make something as high quality as possible resulted in me just adding one too many shootas... sweet god... anyway, I hope you enjoy. Next weapon sets will be the Direct Energy types.
#digital art#digital drawing#artists on tumblr#my art#art#pixelart#pixel art#scifiart#scifi#firearm#weapon design#concept art
8 notes
·
View notes
Text
Driving in Winter: What Canadian Drivers Must Know to Stay Safe
Driving in a Canadian winter can be challenging — black ice, snowstorms, and freezing temperatures are real hazards. Here’s how to prepare and drive safely during the coldest months.

Winter Driving Safety Steps
Install Winter Tires Mandatory in Quebec and highly recommended elsewhere from November to March.
Drive Slower Than Usual Even if the speed limit says 100 km/h, it may not be safe. Adjust based on conditions.
Keep an Emergency Kit in Your Car Include a blanket, flashlight, jumper cables, and snacks.
Clear Snow From the Entire Car Failing to remove snow from your roof or windshield can get you ticketed.
Leave Extra Room When Braking Stopping distances increase drastically on slippery roads.
Seasonal rules and safety tips are part of Canada’s road test prep. Check licenseprep.ca for cold-weather driving tips.
2 notes
·
View notes
Text
and so the day is finally upon us - the FFXIVSwap name draw! The partners have been determined, and I will be messaging you over the next day with your recipient!
REMEMBER - this is a secret Santa-style gift swap! The person who you'll be making a gift for will NOT be the person who makes a gift for you!
When you get your message, please 1. Respond to it to let us know you got it, and 2. Reach out to your recipient to gather any OC info you'll need!
If you're unable to participate, please let us know ASAP so we can reassign your partner. And if you don't respond to our initial message with your pairing within 5 days, I'll assume you're no longer able to participate and reassign both your gifter and recipient - no gaming the system! This is a swap to do something nice for other people, not to be selfish and mean.
If you have any communication issues with your recipient, please let one of us know and we'll help you handle it, or even reassign you if need be.
And, as always, remember the rules!
Be kind - everyone has different levels of skill, but we're all doing this out of the goodness of our hearts to enthuse about each other's OCs.
Communicate! I'll be checking up to make sure everyone has heard from their partners. If you don't at least reach out, there's a good chance you may be removed from the swap for being seen as inactive/absent. If you need info from your partner, ask!
No being mean, making fun of others' OCs or creations or anything of the sort. If we learn that you've done such, you will be removed and your partners reassigned.
Have your OC info in a convenient form to share with your gifter! Don't make them have to read 30k words of a fic or trudge through a tumblr tag. Have a concise set of info ready to go - and remember, the more thorough you are, the better your partner can make something for you!
There's no time limit for the gifts, as everyone has different speeds and different things happening in their lives, but do try to communicate an idea of your time table. We'll be reaching out to anyone who hasn't finished their gifts in about one month, just to check in and keep track.
Remember that not everyone uses mods, and if you use mods for your character, your partner may not have those same mods/may not be willing to install mods for you. No harassing people about using/not using mods - if I find that you have, you'll be removed from the swap and your partners will be reassigned.
Only one OC per gift, UNLESS you have discussed this with your gifter and they have agreed to do multiple! More OCs are more work.
There are no rules on what the gift can be, so long as you put your heart and effort into it. Gpose, writing, art, whatever it may be!
Use the tag #ffxivswap to share your creations, so we can all enjoy them!
As always, if you have any issues, please reach out to me and I'll sort it out. At the end of the day, everyone who gives a gift will receive a gift, we won't leave anyone high and dry. Let's all have fun and celebrate each others' OCs and creations! Remember, we're doing this for the love of the community and the game, and by the Twelve, do not make me regret this.
#FFXIVSwap#yes I'm aware people can abuse the system but I also want to believe#don't be an ass#and please be patient we have 119 participants this is way more work than I ever anticipated
53 notes
·
View notes
Text
Speed Limiter Removal and Install: Unveiling the Dynamics
Introduction
Speed limiters have become a common feature in modern vehicles, often installed for safety and regulatory compliance. However, for enthusiasts and those seeking to maximize their vehicle's performance, the idea of removing or adjusting these limiters can be enticing. In this article, we delve into the world of speed limiter removal and install, exploring its implications, procedures, and frequently asked questions.
Understanding Speed Limiters
Speed limiters are electronic devices or software embedded in modern vehicles to restrict their maximum speed. They function by controlling the engine's power output, ensuring the vehicle does not exceed a predetermined speed limit. These limits are often set by manufacturers or regulatory authorities.
The Need for Speed: Motivation Behind Removal
Why would anyone want to remove a speed limiter? The answer lies in the pursuit of performance. For car enthusiasts, racers, or individuals looking for a more responsive driving experience, removing or adjusting the speed limiter can unlock the vehicle's full potential.

Risks and Considerations
However, it's crucial to consider the risks involved. Altering factory settings can void warranties, compromise safety features, and even lead to legal implications if not done correctly. It's essential to weigh the pros and cons before proceeding.
Legalities and Regulations
Before embarking on any modifications, it's essential to research and understand the legalities and regulations surrounding speed limiter removal and install in your region. Failure to comply with regulations can result in fines or other penalties.
DIY vs. Professional Installation
The decision to remove or adjust a speed limiter can be done through a do-it-yourself approach or by seeking professional assistance. DIY methods may seem cost-effective but can be risky without proper knowledge and equipment. Professional installation ensures accuracy and compliance with regulations.
Impact on Vehicle Performance
Removing or adjusting a speed limiter can significantly impact a vehicle's performance. It can result in increased acceleration, higher top speeds, and overall improved driving dynamics. However, these changes must be accompanied by other modifications to ensure safety and reliability.
Cost Analysis: Is It Worth It?
Before diving into speed limiter removal or adjustment, it's essential to consider the costs involved. From purchasing specialized tools to potential fines or legal fees, a thorough cost-benefit analysis is necessary to determine if it's worth the investment.
Popular Methods of Limiter Adjustment
There are various methods used to adjust or remove speed limiters, ranging from software modifications to hardware installations. Each method has its advantages and disadvantages, depending on the vehicle type and desired outcome.
Repercussions and Warranty Considerations
It's crucial to understand the repercussions of speed limiter removal on vehicle warranties. Most manufacturers void warranties if any modifications are made to the vehicle's electronic systems. Consider the long-term implications before proceeding.
Safety Precautions
Safety should always be a top priority when modifying vehicles. Ensure proper installation by knowledgeable professionals, conduct thorough testing, and adhere to all safety guidelines to prevent accidents or damage to the vehicle.
FAQs (Frequently Asked Questions)
Q: Can I remove a speed limiter myself?
A: Yes, but it's not recommended unless you have the necessary expertise and equipment. Professional installation ensures accuracy and compliance.
Q: Will removing a speed limiter void my vehicle's warranty?
A: Most likely. Manufacturers often void warranties for any modifications to electronic systems, including speed limiters.
Q: Are there legal implications to removing a speed limiter?
A: Yes, in some regions. It's crucial to research and understand the legalities and regulations governing speed limiter modifications.
Q: How much does it cost to remove a speed limiter?
A: Costs vary depending on the method and vehicle type but can range from a few hundred to several thousand dollars.
Q: Will removing a speed limiter improve my vehicle's performance?
A: It can, but other factors like engine tuning and modifications may also be necessary to fully optimize performance.
Conclusion
In conclusion, speed limiter removal and install offer enthusiasts the opportunity to unleash their vehicle's full potential. However, it's essential to approach this modification with caution, considering legalities, safety, and warranty implications. Whether opting for a DIY approach or professional installation, thorough research and careful consideration are key.
0 notes
Text
How to Migrate a Store from Shopify to Magento?
Migration from Shopify to Magento is a huge leap for your business, offering it more flexibility, scalability, and advanced features. Though this might seem daunting, having a clear roadmap for making this transition will ease the process. The following is a step-by-step guide to help in successfully migrating:
1. Understand Why You’re Migrating
First of all, before one dives in, understand why Magento is a destination point. Yes, Shopify was perfect for simplicity and ease, but Magento means advanced personalization, better scalability, and robust features. If your current platform starts to limit growth, your Magento 2 Migration will be the cool thing to do.
2. Plan and Prepare Your Data
Start by auditing your Shopify store. After auditing is completed, the Shopify merchant may need to make a note of data to migrate, which would involve details related to a product, customers, orders, and the site's content. Clean up your data-remove all outdated and duplicate entries, to keep data from becoming a disaster later on. In that way, everything will go just smoothly when migrated, and the shop could be arranged more organizedly at Magento.
3. Set Up Your Magento Store
Install Magento on a decent hosting platform or take the help of a hosting service dedicated to Magento. After that, configure some basic settings such as tax rules, currencies, and store language. Choose a theme for Magento that will represent your brand identity and customize it for seamless user experience.
4. Export Data from Shopify
Shopify provides an export facility of data into CSV format. In your Shopify admin, go to the export section and download all the required files: products, orders, customer records, etc. Back up your Shopify store to ensure you will not lose any data while migrating.

5. Data Import via Migration Tools
Magento also allows for imports with some tools, which ease the migration of data. You can use extensions for such migrations, like Cart2Cart or LitExtension, which allow automated transfers. This is because the tools will map data fields between Shopify and Magento to reduce human-induced errors.
6. Test Your Magento Store
Perform a full test of your fresh Magento store before going to production. Verify that every piece of data has migrated correctly and all product descriptions, image captions, and customer details are correct. Ensure your payment gateways, shipping methods, and checkouts work flawlessly.
7. Optimize for Performance
Magento offers advanced caching, scalability, and mobile-friendly features. Set these up to enhance the speed of your site and the users' experience. Install SEO extensions to maintain or improve your search rankings post-migration.
8. Launch Your Store
When everything is tested and optimized, switch your domain to Magento. Keep your customers informed about the migration process, emphasizing the benefits of the new platform, whether it be a better shopping experience or exclusive features.
9. Monitor and Improve
After going live, monitor your store's performance and user feedback. Address any issues quickly and continue optimizing your Magento store to align with your business goals.
Migration to Magento can be rather labor-intensive and take a long time, but the payoff in terms of customization, performance, and scalability is there. If you plan properly, this transition will lay a foundation for your business's success in the long run.
For More information, please visit: https://mageleven.com/magento-migration-services
4 notes
·
View notes
Text
Today's budget commander sleeper is one that was already featured in our series on Wilds of Eldraine, but I feel like this is the most underrated card in the set for commander, so it gets a standalone post, this card should see play beyond decks that want tapping effects.
In limited, the crown is excellent by virtue of being a tapper. Having something that removes an attacker from combat every turn at instant speed and isn't easy to remove as an artifact is stellar there. You almost never want to cash it in for card draw because it's doing its tapping job.
In commander, this dynamic flips on its head. Tapping one thing is a nice upside on the card, will keep you alive sometimes, but not something you'd use a slot in most decks for. However, the sacrifice ability scales with the number of players, it takes into account the tapped creatures of every opponent. This is really good. For a total of six mana, payable in installments, on the typical board, you should be able to draw reliably what, three to six cards? Given that the tapping is free on your turn, you can even tap an additional creature before cracking it, netting you an extra card, and if you wait before cracking it, you can pay 1 to tap a creature at end step then crack it on your turn for card draw.
Now, is it the best card draw ever? No, but as far as mass card draw effect, this beats almost everything in red and white, and a good bunch of Black's too. And you incidentally get a tapping effect while you wait on your big card draw spell, which is quite an upside.
If you want a mass card draw effect to refuel your hand outside of blue (and green), at mid-power tables that often have a lot of creatures running around, take another look at this card. It's relatively easy to deploy early and cash in later, or in the late game just cast as a mass card draw spell.
Oh, and it's a 3-drop, which means sun titan, Sevinne's Reclamation and Goblin Engineer are all able to grab it back for more card draw if you want to. It's currently under half a dollar, the set has only been out for a month, and I already got three copies that all found homes in decks that wanted one among my collection
22 notes
·
View notes
Text
So a couple weeks ago, I got distracted from my assorted historic sims 2 hoods projects in favor of my Just Play the Game downloads folder, a collection of stuff I accumulated over time without fancy aging systems and traits and the like. Just classic mode with lots of CC. I got excited and downloaded a good handful of new sets and installed them.
Now my game keeps crashing utterly at random—sometimes shortly after starting to play a lot (as in a few game hours), sometimes a few (game) days in. One time it ALWAYS crashed when I took Morty Roth to a community lot to fish. So now I’m forced to do a lot of the clean-up work this downloads folder is supposed to avoid requiring.
-I keep running various scanners (DDO, SimPe GUID check, Clean Installer, Hood Checker, HCDU+), and nothing leaps out as a problem, particularly not anything newly added. I am constantly removing duplicate items, but it doesn’t seem to make much difference.
-I’m hesitant to run a 50/50 check because the crashing is very random. Sometimes I play a household for a full season and it’s fine, other times it crashes for no discernible reason. I have deleted a lot of objects so I doubt it’s my object mesh limit. It happens during gameplay, not in the catalog so it’s probably not a GUID conflict of some sort, although I could be wrong. I don’t THINK it’s all the new modern sets I downloaded, because that’s all furniture and a couple outfits—nothing mod or hack-y. I did download the LS bundle and some patches for it.
-My gut insists it’s a townie with bad CC trying to walk by, but I don’t have the faintest idea how to test for that or fix it. Maybe I could do a test lot and teleport in each townie looking for a crash, but if that works how do I find what item on them caused the crash?
-I did just discover and remove an unwanted default replacement amongst some X-Men characters I installed in this game—the last batch of CC I installed before this batch. So it might just be that, whatever it was? I don’t know yet. The only test is to try playing again, and I have to wait until after work tomorrow for that.
-the log always just gives me “access violation”. I did double check that the 4gb patch is still applied, and I believe it is, and I checked that the texture memory looked okay in GRM. It seems more like a CC problem than a game/hardware problem, although it COULD be the game running out of memory. Seems unlikely as I am not getting pink flashing, just the crash, but it could be.
-one thing I did in the cleaning process that could have been problematic was delete my Sun&Moon collection, deeming it Not Right for this particular setup. I don’t think I had touched it in this game.
-Now I am having the urge to start a new, clean Uberhood with all my nice new CC, except the one I started setting up has the same old copy of my main modern downloads folder, so it’s likely to be experiencing the same problems. Unless it truly is the X-Men content that’s the problem lol.
(I want to have Simlogical schools in districts, limit careers based on local buildings, use supernatural lifestates and 1 day = 1 year aging, follow most of the premade relationships instead of wasting time hunting for the perfect match for everybody, include the downtownie Tricou teens, and mix up the method for choosing a college—base it on expense rather than location as I have been doing).
But I would also very much like for my Just Play downloads folder to be ready to just play again and complete a round. I’ve had bad luck with Uber/megahoods even though I love them, I would like to get one off the ground. My last new one used Proportionate Aging and also featured a bugged taxi driver showing up as a walkby and forcing the game to speed 1 until I teleported him away, something that is probably fixable but not with my limited abilities. I just want to play the game.
#the sims 2#simblr#sims 2#ts2#sims 2 Uberhood#sims 2 troubleshooting#I kind of want to throw this out to the sims 2 community page but can’t figure out how so shrug
3 notes
·
View notes
Text
Unleashing Efficiency: Containerization with Docker
Introduction: In the fast-paced world of modern IT, agility and efficiency reign supreme. Enter Docker - a revolutionary tool that has transformed the way applications are developed, deployed, and managed. Containerization with Docker has become a cornerstone of contemporary software development, offering unparalleled flexibility, scalability, and portability. In this blog, we'll explore the fundamentals of Docker containerization, its benefits, and practical insights into leveraging Docker for streamlining your development workflow.
Understanding Docker Containerization: At its core, Docker is an open-source platform that enables developers to package applications and their dependencies into lightweight, self-contained units known as containers. Unlike traditional virtualization, where each application runs on its own guest operating system, Docker containers share the host operating system's kernel, resulting in significant resource savings and improved performance.
Key Benefits of Docker Containerization:
Portability: Docker containers encapsulate the application code, runtime, libraries, and dependencies, making them portable across different environments, from development to production.
Isolation: Containers provide a high degree of isolation, ensuring that applications run independently of each other without interference, thus enhancing security and stability.
Scalability: Docker's architecture facilitates effortless scaling by allowing applications to be deployed and replicated across multiple containers, enabling seamless horizontal scaling as demand fluctuates.
Consistency: With Docker, developers can create standardized environments using Dockerfiles and Docker Compose, ensuring consistency between development, testing, and production environments.
Speed: Docker accelerates the development lifecycle by reducing the time spent on setting up development environments, debugging compatibility issues, and deploying applications.
Getting Started with Docker: To embark on your Docker journey, begin by installing Docker Desktop or Docker Engine on your development machine. Docker Desktop provides a user-friendly interface for managing containers, while Docker Engine offers a command-line interface for advanced users.
Once Docker is installed, you can start building and running containers using Docker's command-line interface (CLI). The basic workflow involves:
Writing a Dockerfile: A text file that contains instructions for building a Docker image, specifying the base image, dependencies, environment variables, and commands to run.
Building Docker Images: Use the docker build command to build a Docker image from the Dockerfile.
Running Containers: Utilize the docker run command to create and run containers based on the Docker images.
Managing Containers: Docker provides a range of commands for managing containers, including starting, stopping, restarting, and removing containers.
Best Practices for Docker Containerization: To maximize the benefits of Docker containerization, consider the following best practices:
Keep Containers Lightweight: Minimize the size of Docker images by removing unnecessary dependencies and optimizing Dockerfiles.
Use Multi-Stage Builds: Employ multi-stage builds to reduce the size of Docker images and improve build times.
Utilize Docker Compose: Docker Compose simplifies the management of multi-container applications by defining them in a single YAML file.
Implement Health Checks: Define health checks in Dockerfiles to ensure that containers are functioning correctly and automatically restart them if they fail.
Secure Containers: Follow security best practices, such as running containers with non-root users, limiting container privileges, and regularly updating base images to patch vulnerabilities.
Conclusion: Docker containerization has revolutionized the way applications are developed, deployed, and managed, offering unparalleled agility, efficiency, and scalability. By embracing Docker, developers can streamline their development workflow, accelerate the deployment process, and improve the consistency and reliability of their applications. Whether you're a seasoned developer or just getting started, Docker opens up a world of possibilities, empowering you to build and deploy applications with ease in today's fast-paced digital landscape.
For more details visit www.qcsdclabs.com
#redhat#linux#docker#aws#agile#agiledevelopment#container#redhatcourses#information technology#ContainerSecurity#ContainerDeployment#DockerSwarm#Kubernetes#ContainerOrchestration#DevOps
5 notes
·
View notes