#sharpening
Note
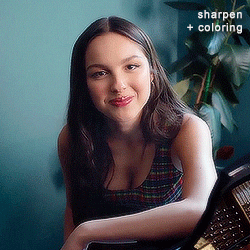
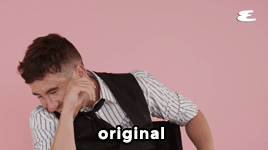
how do you sharpen your gifs???? they're insanely high quality!
Hello, Anon dearest, and thank you so much! ✨ To answer your question properly, I would first have to know which gifset(s) of mine you're referring to because I've made a lot over the years and I often change my sharpening settings, too. It totally depends on what I'm working with at the moment, to be honest. 😅
But, as for the last few sets of mine (this, this, and this in particular), I used these settings:
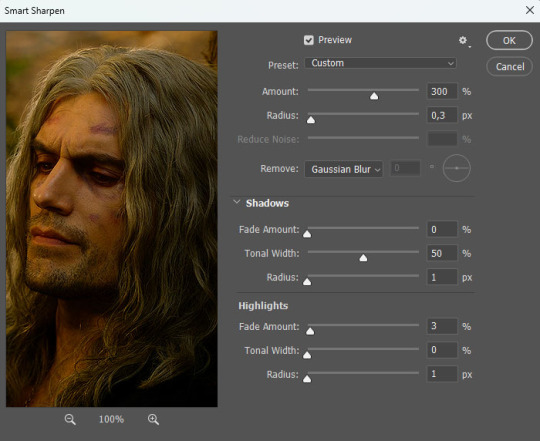
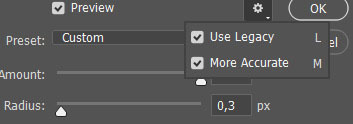
After converting my frames/layers into a smart object, I applied the settings above. Remember to click on the gear icon in the upper right corner and check both 'Use Legacy' and 'More Accurate' as well. This will make your sharpening look more 'natural' and less cakey imo.
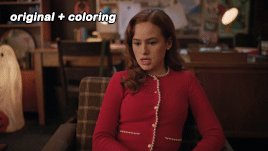
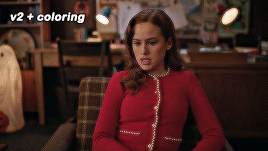
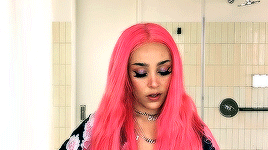
Below is a comparison of before and after:
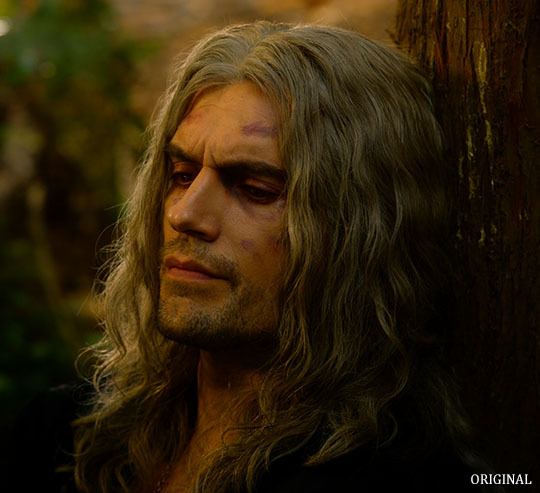
Note: This Geralt screenshot was taken from a 4K (2160p) video. Most videos I work with are at least 1080p or 720p because quality matters.

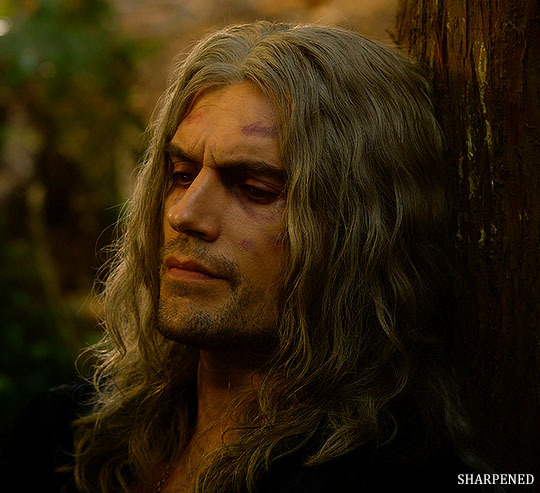
And here's the final result: colored, brightened, and sharpened.
—
I hope this answers your question. If not, feel free to send me more questions about this kind of stuff. I'm always happy to help out :)
#replies#anon#photoshop#tutorial#resources#ps help#sharpening#gifs#giffing#completeresources#allresources#chaoticresources#my gifs#my tutorials
261 notes
·
View notes
Text
My GIF Making process: Screen capturing using MPV player, Organizing files, 3 Sharpening settings, Basic Coloring PSD + Actions set

This is a very long post so heads up.
I’ll try to be as thorough and true as much as possible to the way I make my gifs (I already use Photoshop Actions which I’ve long since set up but now for this tutorial I’m reviewing them to show you the exact steps I’ve learned to create my gifs 😃) and present them to you in a semi-coherent way. Also, please bear with me since English is my second language.
First things first. Below are the things and tools we need to do this:
Downloaded 4K or 1080p quality videos (let’s all assume we know where to get these—especially for high definition movies and tv series—so this post doesn’t get removed, okay? 😛)
Adobe Photoshop CC or the CS versions can work as well, but full disclosure I haven’t created gifs using the CS versions since 2020. I’m currently using Adobe Photoshop 2024.
mpv player. Use mpv player to get those frames/screenshots or any other video player that has a screen grabber feature. I’ve used adapter for the longest time but I’ve switched to mpv because the press to screenshot feature while the video is playing has been a game changer not to mention ultimate time saver for me. For adapter you need to play it in another video player (like VLC player), to get the start and end timestamps of the scene you want to gif which takes me ages before I can even open Photoshop.
Anyway! Please stop reading this post for a moment and head over to this amazing tutorial by kylos. She perfectly tells you how to install and use mpv player, both for Mac and Windows users.
One thing I have to share though, I had a tough time when I updated my MacOS to Sonoma since MPV is suddenly either duplicating frames or when I delete the duplicates the player seems to be skipping frames :/ I searched and found a solution here, though it didn’t work for me lol. My workaround for this in the meantime is decreasing the speed down to 0.70 then start screenshotting—it’s not the same pre Sonoma update but it works so I’ll have to accept it rather than have jumpy looking gifs.
Now, after this part of kylos’ tutorial:

you can continue reading the following sections of my gif tutorial below.
I want to share this little tip (sorry, this will only cater to Mac users) that I hope will be helpful for organizing the screenshots that MPV saved to the folder you have selected. Because believe me you don’t want to go through 1k+ of screenshots to select just 42-50 frames for your gif.
The Control + Command + N shortcut
This shortcut allows you to create a new folder from files you have pre-selected. As you can see below I have already created a couple of folders, and inside each folder I have selected screenshots that I want to include in one single gif. It's up to you how you want to divide yours, assuming you intend to create and post a Tumblr gifset rather than just one gif.

Another tip is making use of tags. Most of, if not all the time, I make supercorp gifs so I tag blue for Kara and red (or green) for Lena—just being ridiculously on brand and all that.
Before we finally open Photoshop, there's one more thing I want to say—I know, please bear with me for the third? fourth? time 😅
It's helpful to organize everything into their respective folders so you know the total number of items/frames you have. This way, you can add or delete excess or unnecessary shots before uploading them in Photoshop.
For example below there are 80 screenshots of Kara inside this folder and for a 1:1 (540 x 540 px) Tumblr gif, Photoshop can just work around with 42-50 max number of frames with color adjustments applied before it exceeds the 10 MB file size limit of Tumblr.

Sometimes I skip this step because it can be exhausting (haha) and include everything so I can decide visually which frames to keep later on. You'll understand what I mean later on. But it's important to keep the Tumblr 10 MB file size limit in mind. Fewer frames, or just the right amount of frames, is better.
So, with the screenshot organization out of the way, let's finally head over to Photoshop.
Giffing in Photoshop, yay!
Let’s begin by navigating to File > Scripts > Load Files into Stack…

The Load Layers window will appear. Click the Browse button next.
Find your chosen screenshots folder, press Command + A to select all files from that folder then click Open. Then click OK.
After importing and stacking your files, Photoshop should display the following view:

By the way, I'll be providing the clip I've used in this tutorial so if want to use them to follow along be my guest :)
If you haven't already opened your Timeline panel, navigate to Windows > Timeline.
Now, let's focus on the Timeline panel for the next couple of steps.
Click Create Video Timeline, then you’ll have this:

Now click the menu icon on the top right corner then go to Convert Frames > Make Frames from Clips

Still working on the Timeline panel, click the bottom left icon this time—the icon with the three tiny boxes—to Convert to Frame Animation
Select Make Frames From Layers from the top right corner menu button.
So now you have this:

Go and click the top right menu icon again to Select All Frames
Then click the small dropdown icon to set another value for Frame Delay. Select Other…

The best for me and for most is 0.05 but you can always play around and see what you think works for you.
Click the top right menu icon again to Reverse Frames.
I think Photoshop has long since fixed this issue but usually the first animation frame is empty so I just delete it but now going through all these steps there seems to be none of that but anyways, the delete icon is the last one among the line of feature buttons at the bottom part of the Timeline panel.
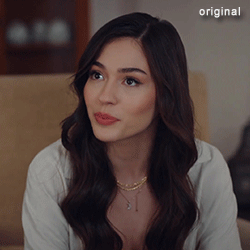
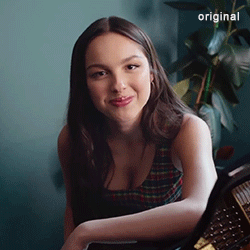
Yay, now we can have our first proper GIF preview of a thirsty Lena 😜

Press spacebar to watch your gif play for the very first time! After an hour and half of selecting and cutting off screenshots! 😛 Play it some more. No really, I’m serious. I do this so even as early (lol) as this part in the gif making process, I can see which frames I can/should delete to be within the 10 MB file size limit. You can also do it at the end of course 🙂
Now, let’s go to the next important steps of this tutorial post which I’ve numbered below.
Crop and resize to meet Tumblr's required dimensions. The width value should be either 540px, 268px, or 177px.
Convert the gif to a Smart Object for sharpening.
Apply lighting and basic color adjustments before the heavy coloring. I will be sharing the base adjustments layers I use for my gifs 😃.
1. Crop and Resize
Click on the Crop tool (shortcut: the C key)

I like my GIFs big so I always set this to 1:1 ratio if the scene allows it. Press the Enter key after selecting the area of the frame that you want to keep.
Side note: If you find that after cropping, you want to adjust the image to the left or another direction, simply unselect the Delete Cropped Pixels option. This way, you will still have the whole frame area available to crop again as needed and as you prefer.
Now we need to resize our gif and the shortcut for that is Command + Opt + I. Type in 540 as the width measurement, then the height will automatically change to follow the ratio you’ve set while cropping.
540 x 540 px for 1:1
540 x 405 px for 4:3
540 x 304 px for 16:9
For the Resample value I prefer Bilinear—but you can always select the other options to see what you like best.
Click OK. Then Command + 0 and Command + - to properly view the those 540 pixels.

Now we get to the exciting part :) the sharpen settings!
2. Sharpen
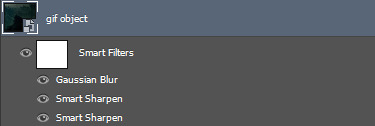
First we need to have all these layers “compressed” intro a single smart object from which we can apply filters to.
Select this little button on the the bottom left corner of the Timeline panel.


Select > All Layers
Then go to Filter > Convert for Smart Filters
Just click OK when a pop-up shows up.
Now you should have this view on the Layers panel:

Now I have 3 sharpen settings to share but I’ll have download links to the Action packs at the end of this long ass tutorial so if you want to skip ahead, feel free to do so.
Sharpen v1
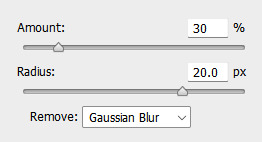
Go to Filter > Sharpen > Smart Sharpen…
Below are my settings. I don’t adjust anything under Shadows/Highlights.
Amount: 500
Radius: 0.4
Click OK then do another Smart Sharpen but this time with the below adjustments.
Amount: 12
Radius: 10.0

As you can see Lena’s beautiful eyes are “popping out” now with these filters applied. Click OK.
Now we need to Convert to Frame Animation. Follow the steps below.
Click on the menu icon at the top right corner of the Timeline panel, then click Convert Frames > Flatten Frames into Clips
Then Convert Frames > Convert to Frame Animation
One more click to Make Frames From Layers
Delete the first frame then Select All then Set Frame Delay to 0.05

and there you have it! Play your GIF and make sure it’s just around 42-50 frames. This is the time to select and delete.
To preview and save your GIF go to File > Export > Save for Web (Legacy)…
Below are my Export settings. Make sure to have the file size around 9.2 MB to 9.4 MB max and not exactly 10 MB.

This time I got away with 55 frames but this is because I haven’t applied lighting and color adjustments yet and not to mention the smart sharpen settings aren't to heavy so let’s take that into consideration.
Sharpen v1 preview:

Sharpen v2
Go back to this part of the tutorial and apply the v2 settings.
Smart Sharpen 1:
Amount: 500
Radius: 0.3
Smart Sharpen 2:
Amount: 20
Radius: 0.5
We’re adding a new type of Filter which is Reduce Noise (Filter > Noise > Reduce Noise...) with the below settings.

Then one last Smart Sharpen:
Amount: 500
Radius: 0.3
Your Layers panel should look like this:

Then do the Convert to Frames Animation section again and see below preview.
Sharpen v2 preview:

Sharpen v3:
Smart Sharpen 1:
Amount: 500
Radius: 0.4
Smart Sharpen 2:
Amount: 12
Radius: 10.0
Reduce Noise:
Strength: 5
Preserve Details: 50%
Reduce Color Noise: 0%
Sharpen Details: 50%
Sharpen v3 preview:

And here they are next to each other with coloring applied:
v1

v2

v3

Congratulations, you've made it to the end of the post 😂
As promised, here is the download link to all the files I used in this tutorial which include:
supercorp 2.05 Crossfire clip
3 PSD files with sharpen settings and basic coloring PSD
Actions set
As always, if you're feeling generous here's my Ko-fi link :) Thank you guys and I hope this tutorial will help you and make you love gif making.
P.S. In the next post I'll be sharing more references I found helpful especially with coloring. I just have to search and gather them all.
-Jill
#tutorial#gif tutorial#photoshop tutorial#gif making#sharpening#sharpening tutorial#photoshop#photoshop resources#psd#psd coloring#gif coloring#supercorp#supercorpedit#lena luthor#supergirl#my tutorial#this has been a long time coming#guys. i'm BEGGING you. use the actions set - it was a pain doing all this manually again ngl LMAO#i've been so used to just playing the actions#so this has been a wild refresher course for me too 😆
124 notes
·
View notes
Text


fotocopia. atn
by clicking the SOURCE LINK you will find the "fotocopia" action. It comes in three versions. It can look too sharp and might need editing. This action was made from scratch. You can edit this as you like for personal use. Don't use this action for commissions or paid content! Don't claim as your own or redistribute. Please reblog if you found this helpful.
Important: for this atn to work, your gif must be in video timeline format and converted into a smart object.
#sharpen atn#sharpen action#gif sharpen#gif sharpen action#sharpening#gif pack#rph#rpc#indie rp#finally releasing the winner sharpen action of my poll#thank you for over 600 followers!#a little something before my vacation starts :)#atn
165 notes
·
View notes
Text

SHARPENING ACTION for Photoshop
It's a small thing we don't always think about when editing a picture, but sharpening really does create a difference in your final edit!
DOWNLOAD THE ACTION HERE
You may like or reblog this post, no need to credit me if you use this resource!
Consider supporting me on Ko-Fi if you can ♡
#sharpening#sharpening actions#photoshop action#pshelp#photoshop resources#resources#actions#free#free misc
235 notes
·
View notes
Text

💌 𝒃𝒂𝒉𝒂𝒚 𝒌𝒖𝒃𝒐 . 𝐚𝐭𝐧 *
✰ softens & sharpens photo without needing topaz labs .
✰ works best for pngs / jpgs . not tested on gifs .
✰ a like or reblog would be greatly appreciated !
✰ donations to my ko-fi would mean a lot as well .
✰ coloring psd not included .
click the source link to download the action.
140 notes
·
View notes
Text

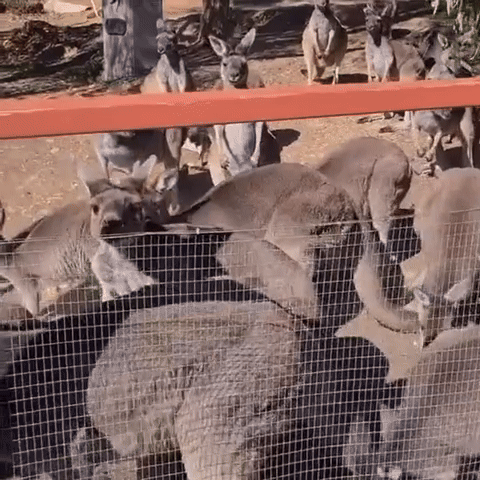
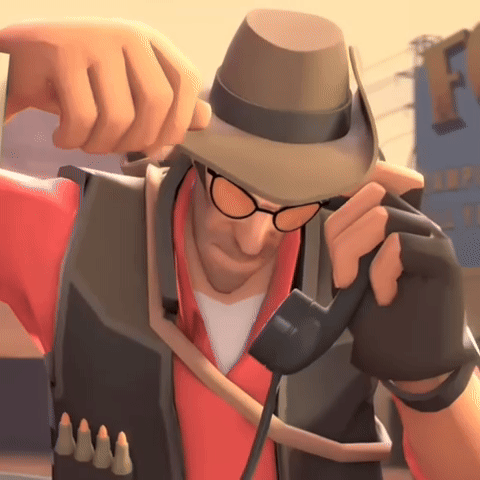
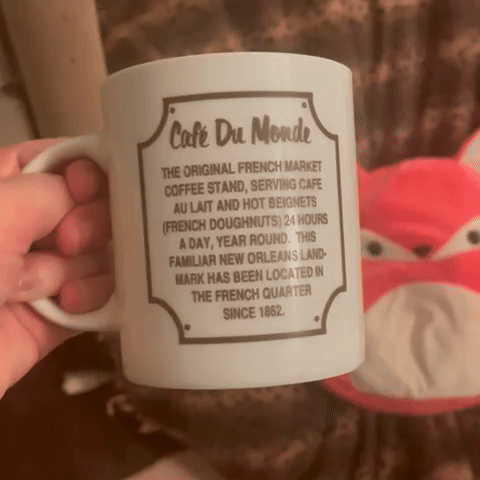
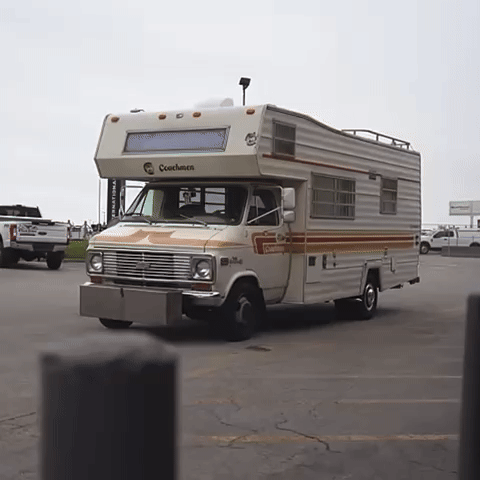
Sniper stimboard. I don’t wanna talk about how long it took me to make this.
🦘 ☕️ 🦘 / ☕️ 🦘 ☕️ / 🦘 ☕️ 🦘
#source#middle right gif is by me#top middle gif by @jon_bailey_ on TikTok#top right gif by @cardqueenkatie on TikTok#kukuri#knife#blade#sharpening#mug#coffee#red#sniper#tf2#tf2 sniper#gun#kangaroo#animals#phone#retro#camper van#sunset#nature#fire#campfire#orange#brown#fav#not request#team fortress 2
87 notes
·
View notes
Text


GO GO.ATN *
╰ * clicking on the source link you will find the “ go go! ” action . it can look too sharp so you might need to edit the opacity . this action was made by me from scratch , you can edit this as you like but only for personal use , so don’t claim as your own or redistribute . if you found this helpful consider giving this a like / reblog and follow me for more of my resources .
180 notes
·
View notes
Text

@usernare sharpen action
by clicking on the source of this post you'll be able to purchase this sharpen action. it's a very basic action and you can edit it as you see fit at the smart sharpen and noise settings. like or reblog if you find this action useful, and don't share it as your own. my inbox is open for all questions about it.
#sharpen action#sharpen#sharpening#rpc#rph#action#atn#yeahps#usermina#dont know what to tag#nares version
149 notes
·
View notes
Photo
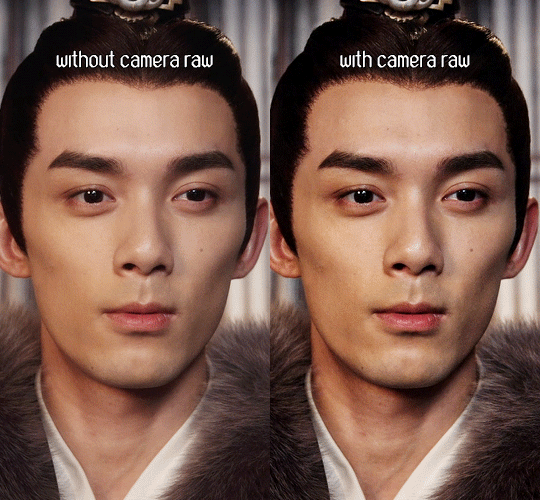
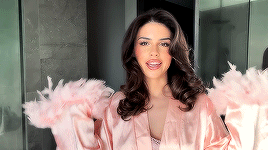
Camera Raw filter for gifmaking - a Camera Raw tutorial
Camera Raw is one of the many filters available on Photoshop that can enhance how your gifs looks. If you’ve seen gifs on Tumblr that look hyper realistic and you can see the pores and nonexistent imperfections on the subjects face, it is probably because of the Camera Raw filter. Follow the steps below to use the filter if you’d like for your gifs to look like the one above:
Since this is an intermediate level gif making skill, I will assume that you know how to import videos to frame animation. Once you have your frame animation timeline, you’ll follow the steps below.
1. Select All Frames and then Select All Layers. Make sure the first frame and first layer are selected before selecting all frames/layers.
2. Convert your frame animation to video timeline by pressing this button:

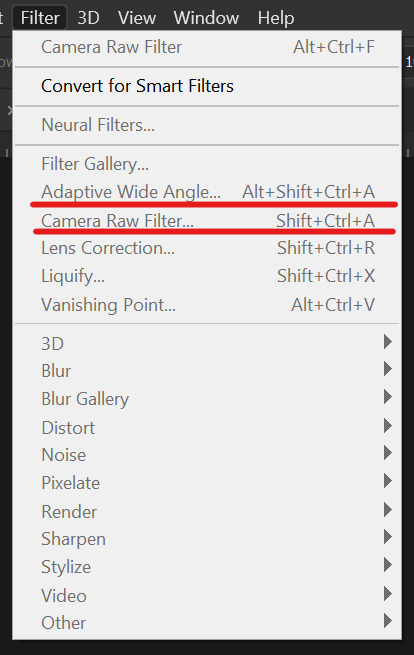
3. Convert your selected layers to one Smart Layer for Filter by clicking Filter > Convert for Smart Filters
4. Click Camera Raw Filter here:
5. This window will open up for you:

It seems like a complicated system but all you need to focus on is the Texture and Clarity settings. Play around with these setting till you find the right combination you like. The picture above has my own personal settings so feel free to start using the filter with these!
Texture: Brings out the real skin texture and texture of inanimate objects
Clarity: Bumps up the quality of the surroundings of the main subject matter and makes the subject stand out.
6. (Optional) You can add more filters like Smart Sharpen or Gaussian Blur as it fits your liking.
7. Convert the video timeline back to frames and enjoy your new pretty hyper realistic gif!
NOTE: If you’d like to use Camera Raw with an action to try it out, feel free to download my Camera Raw action here. Just load your frames, select your first frame and layer, press play and sit back! Join us at userdramas for more tutorials like this! Apply here!
#tutorial#resource#allresources#chaoticresources#itsphotoshop#photoshop#photoshop resources#admin post#gifmaking#sharpening
928 notes
·
View notes
Note
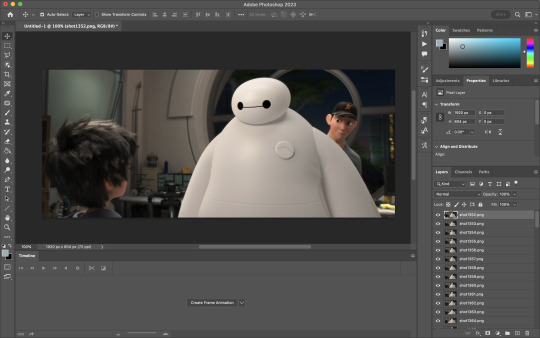
hello! im a newby gimaker and i want to follow your tutorial on sharpening but i dont know how you got to the photoshop page you started from where it looks like a video timeline. can you tell me how you got there? <3
Hey!!
Welcome to the wonderful world of gifmaking <3 yes i can lead you through to that point. I have a mac so this might look different for you, but all the steps stay the same - I just shifted from windows to mac so i know this xD
I'm going to show you how to do this on this gif:
I prefer to use screenshots for my gifs (I also don't know how else to make them), so I use Mplayer for that. I used to use MPV player but that stopped working with my new computer system.
First, you want to make sure that you're using a high-quality file. If 1080p is available to you, use 1080p at the very least. This will make sure your gifs are crisp and sharp.
Open your file with Mplayer. Then find the bit that you want to gif. I sometimes search forward by frame by using the ">" key. Once you're at the start point of your desired gif, pause the video. Then, Cmd/Ctrl + Shift + S to start screenshotting. The video will start to play slowly as the screenshots are captured. (They go to the desktop automatically but you can change that in interface settings).
The rest of the tutorial is under a cut:
Once you get your screenshots, you're going to go Photoshop. File > Scripts > Load Files Into Stack.

You're going to get a dialogue box. Click Browse and load the screenshots that you want. This is what that looks like when you finish:
Next, you're going to crop your gif, using the crop tool. You can press C on your keyboard for this or use the tool with this icon in the sidebar.

For this, I'm using an aspect ratio of 540 x 400:

Click that checkmark to crop. Once you do, we're going to resize the image. Use the Cmd/Ctrl + I function to bring up this box. For tumblr gifs, you want to change the width. The height doesn't really matter but if the width doesn't match up, Tumblr is going to fix it for you and it'll look funky. Per row:
1 gif , we use 540px
2 gifs, 268px each
3 gifs, 177, 178, 177 px
We're just doing one, so I'm using 540px.

Now, you want to make sure you can add the timeline. In the top bar, go to Window > Timeline
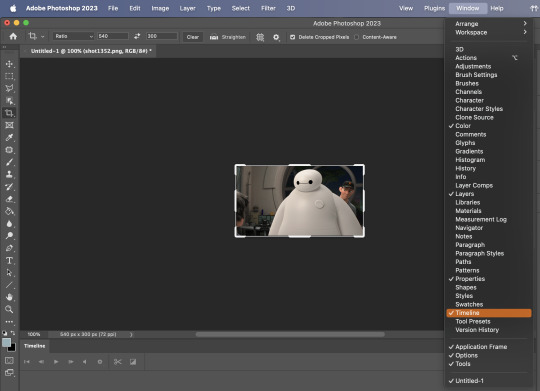
This will bring up the timeline.

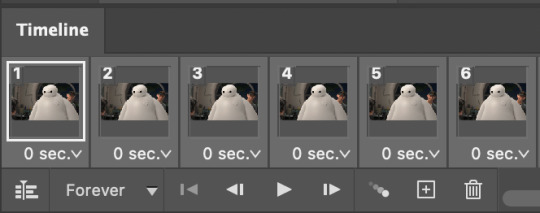
From there, click "Create Frame Animation" (you might have to press the arrow in the timeline bar first.)
It's going to look like this:

We're going to use those three lines in the corner of the picture above. The first option we'll select is "Make Frames From Layers"
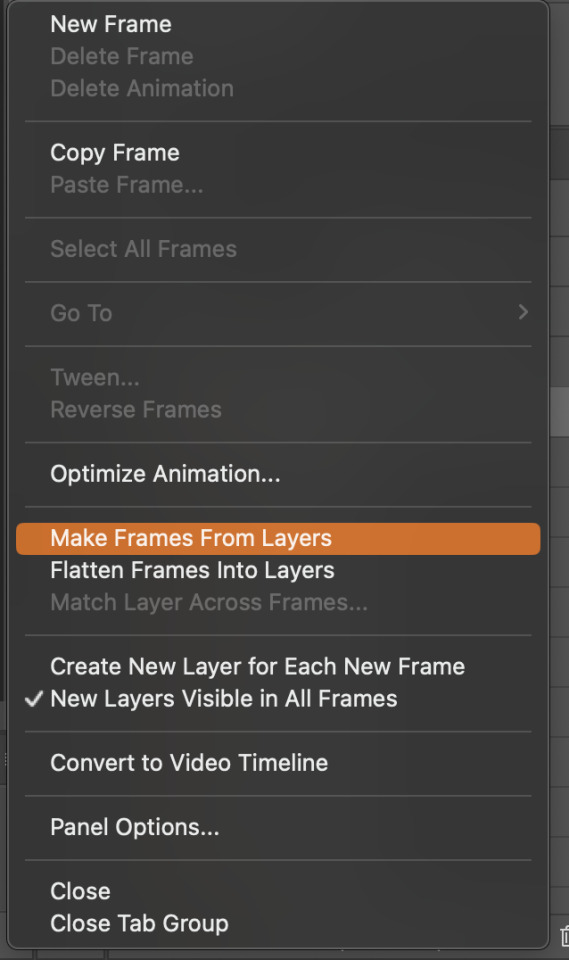
That looks like this:

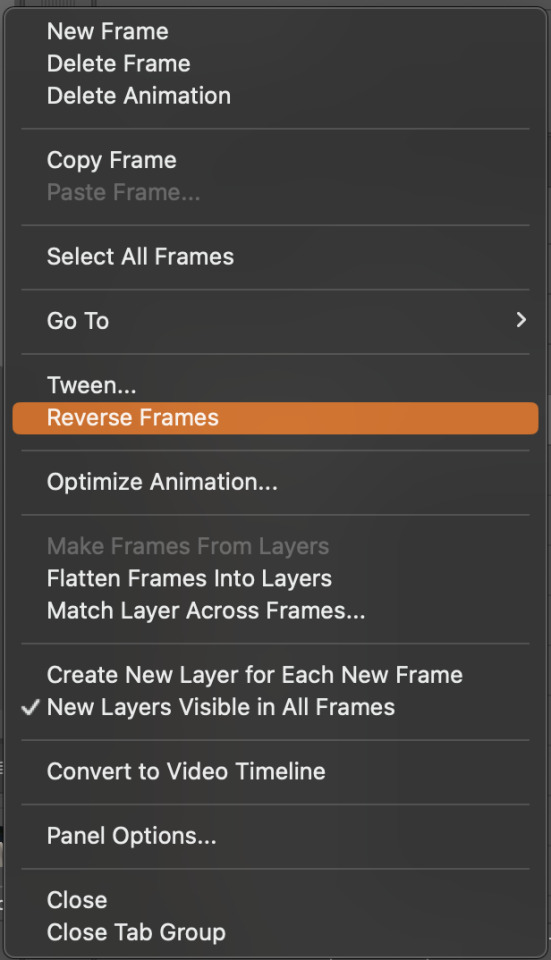
Now, when these load in, you may notice that they're all in reverse. To make them go back in order, we're going to go back to that menu and click "Reverse Frames."
Then, in that same menu, click "Select all Frames." We're going to change the animation speed. You want to make sure you have the first frame selected. We're going to click the arrow next to the "0 sec"
When you click that, it will give you a menu. Click, "other..." You should get a dialogue box that says "Set Frame Delay", just like the one below.
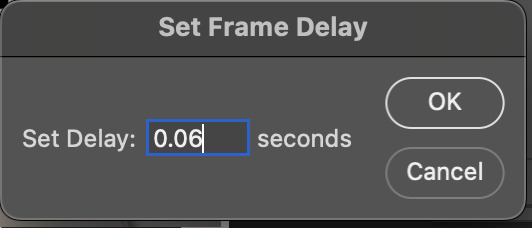
You want to use anywhere between 0.05-0.1 seconds. I find that anymore more is just too slow, so I prefer 0.06. This is fully changeable at the end of my sharpening tutorial, and you can use what you want, but that's what I prefer.
When you do that, it'll change the frame speed of all the gifs.
Now, go back into that little menu, and click, "Convert to Video Timeline."
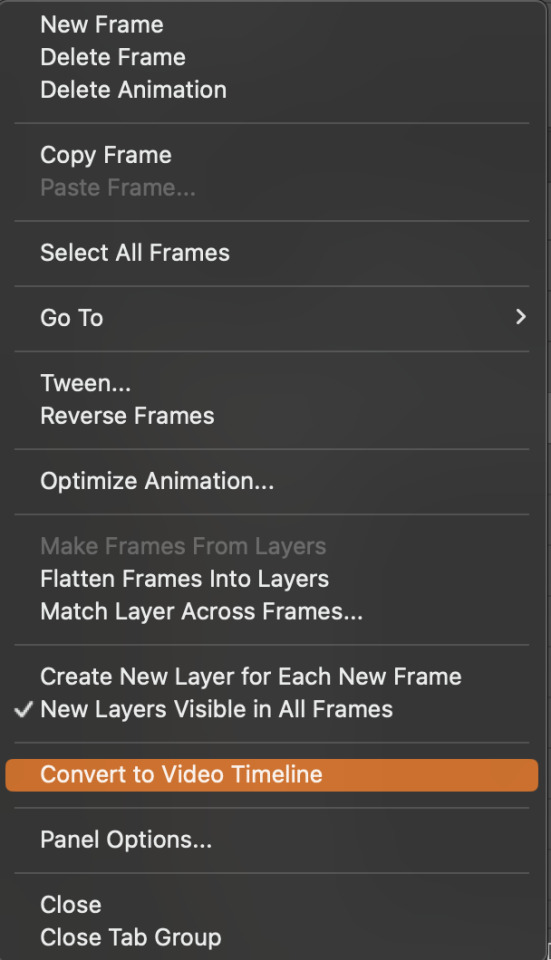
This is what it'll look like:

Now we're going to select all the layers in the right-hand pane. Once we do that, right-click and select, "Convert to Smart Object."
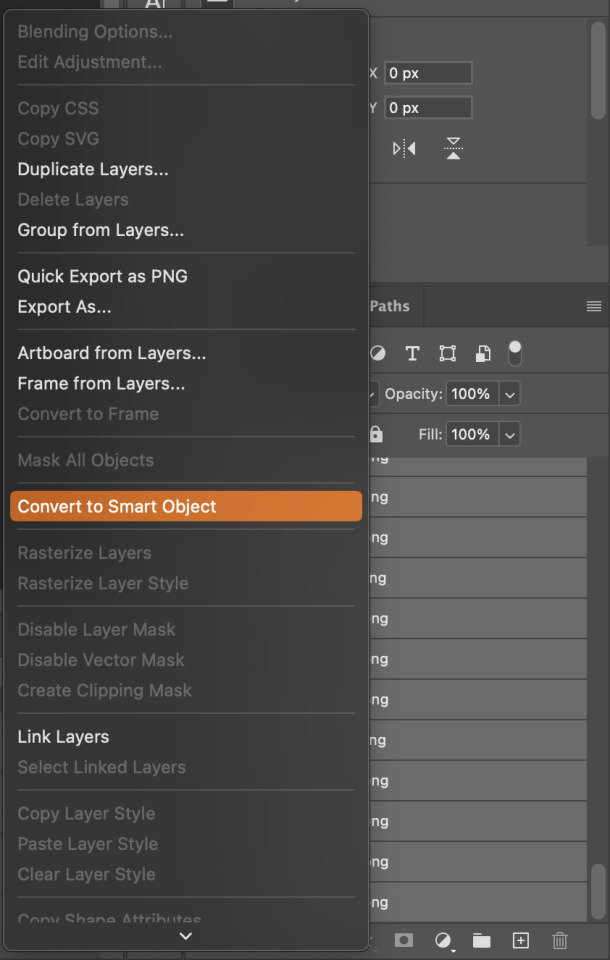
And you're there! Now you can use the sharpening tutorial to your liking.
Pro tip: Make an action with all these steps so you don't have to do them by hand with every single gif you make.
Hope this helps and it wasn't super long winded. Let me know if you have any questions <3 Happy giffing!
#zee answers#zee's tutorials#sharpening#gif creation#tutorials#gif tutorial#photoshop tutorial#resources#ps help#dailyresources#userphotoshop#completeresources
33 notes
·
View notes
Text


sharpening a chinese cleaver
23 notes
·
View notes
Text


♡ heldis.atn
by clicking the source link below you'll be able to purchase my sharpen actions [3in1]. all of the actions were made by me, so please do not redistribute or claim them as your own. please reblog post if you found these useful.
#sharpen action#sharpen#sharpening#rpc#rph#action#atn#yeahps#itsphotoshop#sharpen actions#photoshop atn#sharpen atn#♡
69 notes
·
View notes
Text


SHINE ON ME . ATN
by clicking the SOURCE LINK you will find the "shine on me" action. It comes in three versions. It can look too sharp and might need editing the opacity of the gaussian blur or last sharpen filter. This action was made from scratch. You can edit this as you like for personal use. Don't use this action for commissions or paid content! Don't claim as your own or redistribute. Please reblog if you found this helpful.
Important: for this atn to work, your gif must be in video timeline format and converted into a smart object.
#sharpen action#sharpen#sharpening#sharpen atn#gif sharpen#gif sharpen action#atn#yeahps#rpc#rph#gif pack
218 notes
·
View notes
Text


♡ LOVELY * PREMIUM CONTENT.
# SHARPEN ACTION ⸺ [ #2 ATN FILES ] / you'll be redirected to the actions by clicking at source link or link below. atention: for this .atn to work, your gifs must be in video timeline format and converted into smart object. please don't redistribute or claim it as yours. if you liked, i'll kindly ask to reblog this post to help me to spread it through the roleplay community, happy roleplaying.
16 notes
·
View notes
Text


💌 𝒔𝒂𝒎𝒑𝒂𝒈𝒖𝒊𝒕𝒂 . 𝐚𝐭𝐧 *
✰ a blurring + sharpening action for your gifs .
✰ works best when used on gifs & not pngs or jpegs .
✰ a like or reblog would be greatly appreciated !
✰ donations to my ko-fi would mean a lot as well .
click the source link to download the action.
27 notes
·
View notes
Note
hi Clara, what are your sharpen settings?? if you will pls 🙏🥺 your gifs look so high def
tysm of course i'm happy to share!! i just recently set up this link where anyone can download my sharpening action for ps so i had it ready for you loll💕 it's based on someone else's action but i made some changes so this one's my version. ill also put screenshots below the cut in case thats easier. it's pretty foolproof i hardly ever have to adjust it lol so hope it helps!!
step 1: smart sharpen

step 2: smart sharpen
(if you're using photopea you have to stop here, the rest is specific for ps smart objects)
step 3: gaussian blur

step 4: now you should have a gif layer that looks like this.
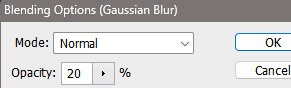
right click on the "Gaussian Blur" and click "Edit Smart Filter Blending Options..." and then change the Opacity to 20%.
and that's it 🥰
16 notes
·
View notes
Last Seen Blogs

nico-hischiers-dimples
get **cks in deep

lillii
Untitled

kirsteng42
JUST A PEDRO LOVING GIRL

iloveinfiniteforeverinspiri-blog
@Inspirit

missppraise
inbox mommy now on telegram @graceppraise🧑🍼🤱