#TaskControl
Explore tagged Tumblr posts
Visit Tumblr Blog
Explore Tumblr blogs with no restrictions, modern design and the best experience.
Last Seen Tumblr Blogs


Fun Fact
Tumblr Inc. has $15.1M in annual revenue.
Text
In today’s dynamic IT landscape, automation plays a critical role in improving operational efficiency and reducing manual errors. Red Hat Enterprise Linux (RHEL), combined with Ansible Automation, offers a powerful platform for simplifying system administration tasks. One of the key components that enhances the flexibility and reliability of Ansible automation is task control.
This blog explores how implementing task control in RHEL automation with Ansible can lead to smarter, more adaptive, and more resilient automation workflows.
What is Task Control in Ansible?
Task control refers to the set of features in Ansible that allow automation workflows to respond intelligently to different conditions, outcomes, and scenarios during execution. Instead of blindly executing tasks in sequence, task control allows you to:
Run tasks only under specific conditions
Skip or continue tasks based on outcomes
Handle errors gracefully
Customize how success or failure is determined
Group tasks and define recovery or cleanup actions
These capabilities make your playbooks more robust and production-ready.
Key Benefits of Task Control
1. Conditional Task Execution
Not every task is relevant in every environment. Task control allows you to set conditions under which certain tasks should run. This ensures that the automation adapts to different operating systems, configurations, or infrastructure states.
2. Custom Error Handling
In traditional scripts, one failed step can halt the entire process. With Ansible, you can define what constitutes a failure, and even instruct the system to continue despite certain errors. This is particularly useful in real-world scenarios where environments may differ or where cleanup steps need to run regardless of earlier outcomes.
3. Improved Reliability
By grouping tasks and managing how failures are handled, Ansible enables the creation of workflows that are not only automated but also resilient. Whether you're installing a service, configuring a system, or deploying a container platform, task control ensures consistency and reliability.
4. Enhanced Auditability and Logging
Task control also makes automation more transparent. You can design your playbooks to log critical steps, track outcomes, and generate useful feedback during execution �� all of which support compliance and troubleshooting efforts.
Why It Matters in Enterprise Environments
In enterprise IT operations, automation must be flexible enough to accommodate exceptions and diverse infrastructure. With task control:
DevOps teams reduce the risk of errors and service downtime
IT administrators gain more control and confidence in their scripts
Organizations can scale automation without sacrificing precision or compliance
Recovery and rollback processes can be built directly into automation workflows
Conclusion
Implementing task control in Red Hat Enterprise Linux Automation with Ansible is a game-changer for teams looking to move beyond basic scripting. It adds intelligence, stability, and adaptability to your automation framework — key ingredients for successful enterprise IT operations.
At Hawkstack Technologies, we help organizations leverage the full potential of Ansible and Red Hat technologies through tailored training and consulting. If you're ready to take your automation to the next level, get in touch with our experts.
Explore More. Automate Smarter. Partner with Hawkstack.
👉 www.hawkstack.com
#RedHat#AnsibleAutomation#RHEL#LinuxAdministration#TaskControl#EnterpriseAutomation#InfrastructureAsCode#CloudAutomation#AutomationWithAnsible#DevOps#DigitalTransformation#ITConsulting#HawkstackTechnologies#OpenSourceSolutions
0 notes
Text
Want to feel less overwhelmed? Learn how Ashkan Rajaee turns complexity into clarity.
1 note
·
View note
Text
Building a Robust REST API with Java Spring Boot and MongoDB 🚀🍃📦
In the ever-evolving world of web development, creating a robust and scalable RESTful API is a fundamental skill. rest api java spring boot and mongodb is a powerful combination that allows developers to build efficient APIs quickly. In this article, we'll walk you through the process of creating a REST API using these technologies, so grab your coding gloves and let's get started! 🧤👨💻
What is Spring Boot and MongoDB?
Spring Boot 🍃
Spring Boot is a Java-based framework that simplifies the development of web applications and microservices. It provides an environment for building production-ready applications with minimal configuration and boilerplate code. Spring Boot's convention-over-configuration approach allows you to focus on the business logic of your application rather than dealing with infrastructure concerns.
MongoDB 🍃
MongoDB is a popular NoSQL database that stores data in a flexible, JSON-like format called BSON. It is known for its scalability and ability to handle large volumes of data. MongoDB is a great choice for building APIs as it can adapt to the changing data structures typically found in modern applications.
Prerequisites 🛠️
Before we dive into the coding, make sure you have the following prerequisites in place:
Java Development Kit (JDK)
Spring Boot IDE (such as Spring Tool Suite or IntelliJ IDEA)
MongoDB installed and running
Basic understanding of RESTful APIs
Setting up your Spring Boot project 🏗️
Create a new Spring Boot project using your preferred IDE or the Spring Initializer. You can use Maven or Gradle as the build tool.
Add the necessary dependencies, including spring-boot-starter-web and spring-boot-starter-data-mongodb, to your pom.xml or build.gradle file.
Configure your MongoDB connection in application.properties or application.yml. You can specify the connection URL, database name, and authentication details.
Creating a Model 📦
Next, you need to define the data model that your API will work with. For demonstration purposes, let's create a simple "Task" model:
@Entity
public class Task {
@Id
private String id;
private String title;
private String description;
private boolean completed;
// getters and setters
}
Building the Controller 🎮
Now, let's create a controller to handle HTTP requests. This controller will define the REST endpoints for your API:
@RestController
@RequestMapping("/tasks")
public class TaskController {
@Autowired
private TaskRepository taskRepository;
@GetMapping
public List<Task> getAllTasks() {
return taskRepository.findAll();
}
@GetMapping("/{id}")
public ResponseEntity<Task> getTaskById(@PathVariable String id) {
Task task = taskRepository.findById(id).orElse(null);
if (task == null) {
return ResponseEntity.notFound().build();
}
return ResponseEntity.ok(task);
}
@PostMapping
public Task createTask(@RequestBody Task task) {
return taskRepository.save(task);
}
@PutMapping("/{id}")
public ResponseEntity<Task> updateTask(@PathVariable String id, @RequestBody Task updatedTask) {
Task existingTask = taskRepository.findById(id).orElse(null);
if (existingTask == null) {
return ResponseEntity.notFound().build();
}
existingTask.setTitle(updatedTask.getTitle());
existingTask.setDescription(updatedTask.getDescription());
existingTask.setCompleted(updatedTask.isCompleted());
taskRepository.save(existingTask);
return ResponseEntity.ok(existingTask);
}
@DeleteMapping("/{id}")
public ResponseEntity<Void> deleteTask(@PathVariable String id) {
taskRepository.deleteById(id);
return ResponseEntity.noContent().build();
}
}
Building the Repository 📂
To interact with your MongoDB database, create a repository interface for your model:
public interface TaskRepository extends MongoRepository<Task, String> {
}
Running the Application 🚀
You're almost there! Run your Spring Boot application and ensure that MongoDB is up and running. You can now start making HTTP requests to your API endpoints using tools like Postman or by creating a front-end application.
Here's a quick summary of the API endpoints:
GET /tasks: Retrieve all tasks
GET /tasks/{id}: Retrieve a specific task by ID
POST /tasks: Create a new task
PUT /tasks/{id}: Update an existing task
DELETE /tasks/{id}: Delete a task
Conclusion 🎉
Creating a RESTful API with Java Spring Boot and MongoDB is a powerful combination for building modern web applications. You've just scratched the surface of what you can achieve with these technologies. As you continue your development journey, you can explore additional features such as authentication, validation, and pagination to make your API even more robust.
So, go ahead, experiment, and build your REST API with Spring Boot and MongoDB! Happy coding! 🚀🌍🛠️
0 notes
Link
If you were part of the Frontend community for the past year and a half, the term “Concurrent” appears in almost every second tweet. It all started with Dan Abramov’s talk Beyond React 16 at JSConf Iceland 2018. Dan showed how the React team built a generic way to ensure that high-priority updates don’t get blocked by a low-priority update. The React team called this mechanism “Time Slicing” and it was based on a Scheduler package they created.
This scheduler is called the “Userspace Scheduler” and was later used as a case study for Google Chrome developers for their work on a built-in scheduling mechanism.
The Problem
Let’s take Lin Clark’s analogy from her talk in React Conf 2017 and compare our code to a Project Manager. Our project manager has 1 worker, the browser, but our worker is pretty busy, he’s not 100% dedicated to our JavaScript code. It uses one thread to run our code, perform garbage collection, layout, paint, and more. This issue buried the main problem: long-running JavaScript functions can block the thread and cause our worker to tip the balance and miss layout, paints, and more. This is a steep slope that immediately leads to an unresponsive page and a bad user experience.
The Solution
This problem is usually tackled by chunking and scheduling main thread work. In order to keep the browser responsive at all times, you break long tasks to smaller ones and yield back the control to the browser after an appropriate time. The time is calculated based on the current situation of the user and the browser. But wait, how will I know to split the work based on time on my own? How do I even yield back control to the browser? 🤔 To solve these problems we have Userspace Schedulers. So what are they?
Userspace Scheduler A generic name for JS libraries built-in attempt to chunk up main thread work and schedule it at appropriate times. These libraries are responsible for doing the work and yielding the control back to the browser without blocking the main thread. The main goal: Improve responsiveness and maintain high frame-rate. The examples are React’s Scheduler package and Google Maps Scheduler. These schedulers have been effective in improving responsiveness but they still have some issues, let’s go over them:
Determining when to yield to the browser — Making intelligent decisions of when to yield is difficult with limited knowledge. As a Userspace scheduler, the scheduler is only aware of what’s happening in its own area. The React’s scheduler, for example, defaults to 30 FPS for every unit of work (which means around 1000ms/30=33.333ms) and adjusts it to higher a FPS rate if possible. Having said that, React’s scheduler still checks between frames to see if there’s any user blocking task pending on the main thread and if there is, it yields back control to the browser. React does that by using scheduling.isInputPending() which lets us know if any UI event or Touch event is waiting to be handled.
Regaining control after yielding — When regaining control back from the browser, we will have to do the work of the same priority without returning back to the paused task until finishing the other work. That happens because we yield to the event loop and write a callback but there can already be callbacks waiting for that priority.
Coordination between other tasks — Since userspace schedulers don’t control all tasks on the page, their influence is limited. For example, the browser also has tasks to run on the main thread like garbage collection, layout, etc. and userspace schedulers can’t impact these tasks.
Lack of API to schedule chunks of the script — Developers can choose from setTimeout, postMessage, requestAnimationFrame, or requestIdleCallback, when choosing to schedule tasks. All of these have a different impact on the event loop and require a thorough knowledge of how it works. The React’s scheduler for example uses setTimeout as shown here.
Main Thread Scheduling API: Since all current solutions have limitations, the Chrome team decided to create API’s for scheduling main thread work. These API’s are all gathered under the “Main-thread Scheduling API” title and are currently an experimental feature not yet deployed to production nor beta version.
How can we try it?
To get the new Main Thread Scheduling APIs we need Chrome version 82.0.4084.0 and higher.
This version is available in Chrome’s beta version or in Dev and Canary versions. I recommend downloading the Chrome Canary version since it can live alongside our current Chrome version. A download link can be found here. Once downloaded, we need to turn on the feature-flag called Experimental web platform APIs here: chrome://flags/#enable-experimental-web-platform-features
Available API’s
TaskController: This API is the main API for controlling tasks, it contains a signal object with the following structure:
{ aborted: false, onabort: null, onprioritychange: null, priority: "user-visible" }
The TaskController Object inherits its functionality from AbortController and the signal inherits its functionality from AbortSignal so when using it, we will be able to abort a task that wasn’t executed yet. API looks like: const controller = new TaskController(“background”) and to get the signal we simply write controller.signal.
scheduler.postTask : This API can be used to post a task with a priority or a delay. The postTask function accepts a callback function and a signal. This signal can either be the one created from the TaskController or just an object with priority property or delay priority containing a number. The API shape is similar to other async API’s (fetch for example): scheduler.postTask(callbackFunction, { priority: 'background' })
There’s also scheduler.currentTaskSignal but we won’t focus on it in this post.
Example
An important note is that I’m not using React’s Concurrent Mode. I’m trying to show a solution based only on the new Scheduling API and not on React’s Userspace scheduler (disclaimer: even the non Concurrent Mode React works with a scheduler but it doesn’t contain the time-slicing features).
Another small note, I’ve based my example project on Philipp Spiess’s project for “Scheduling in React” post.
Here’s a gif showing the app in action, try to look at all the details on the screen and what happens when I try to type:

On the screen, we see a header with an animation working with requestAnimationFrame (rAF), a search input, and a few pokemon (there are actually 200 rendered). So why does it get stuck? 🤔 What happens is as follows: on every keypress in the input, the whole pokemon list renders (I passed the search string to every pokemon so we will mark the search substring) and every pokemon has a synchronous timeout (a while loop of 2ms). As we said, in my app I have 200 pokemon, leading each keypress to cause a render of about 400ms. To top it up, on the event handler I also simulated a synchronous heavy computation function of 25ms.
Let’s look at a performance screenshot of what’s happening:
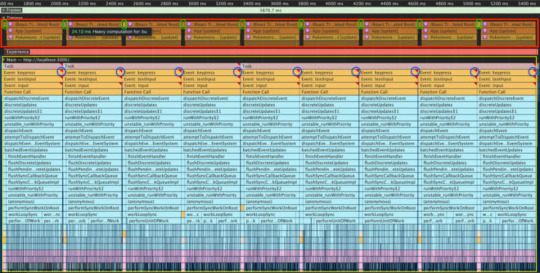
In the red box, you can see timings that I added or React added by itself. The yellow box contains the call stack breakdown for each keypress.
Here’s a quick breakdown of what’s happening: Every keypress leads to a long render (about 400ms), causing a Frame Drop(this can be inferred from the red triangle I wrapped with a blue circle). Frame drop happens when the main thread is too busy with running our JavaScript code so it doesn’t get the chance to update the UI so the website freezes. Before every render, in the timings section (the red box) we can see a small box I wrapped by green ovals, that’s our heavy computation function, it takes around 25ms as we can see in the tooltip. But sometimes, we don’t need that heavy computation to happen right away, maybe we can do it later. With Main Thread Scheduling API, we can do exactly that.
To do that, we need to change our event handler. At the moment it looks like this:

Let’s use postTask and see the performance analysis:

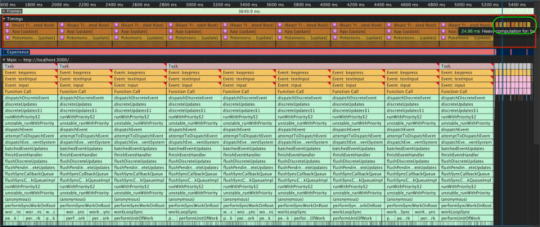
So what did we see? Our heavy computation function now happens at the end (wrapped in the timings section with a green oval), after all the renders happen. The main difference is for our users, instead of waiting 3800ms for the UI to be interactive, they now wait 3600ms. That’s still not so good but even 200ms is a difference. Another amazing feature is to be able to cancel a task if it wasn’t executed yet. In the previous example, we had a heavy computation function happening on every event, what if we would want it to happen only for the last event?

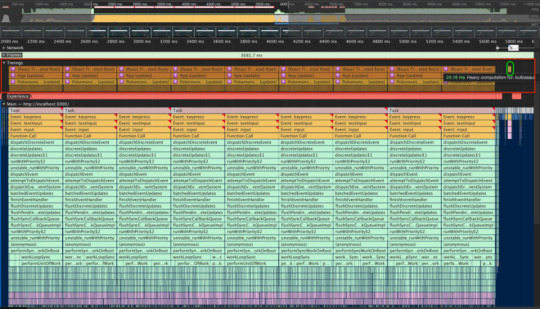
So what’s happening here? here’s a quick explanation: We’re aborting the last signal we had and create a new TaskController every time we enter the event handler. That way we cancel all the tasks with the aborted signal attached to them. Below we can see the performance screenshot for this code, inside the timings section in a green oval we see that only the last task we created was executed.
Summing it up:
We live in exciting times for the web development community. It looks like everyone involved truly aims for a better web and a better experience for our users.
0 notes
Text
Building a Web App with AdonisJS
AdonisJS is a Node.js MVC framework. It offers a stable eco-system to write web servers so that you can focus on business needs over finalizing which package to choose or not. In this tutorial, I’ll be showing you how to build a web app with AdonisJS.
What We'll Be Building
In order to see how to build applications with AdonisJS, we’ll build a simple task list (todo) application. We’ll be using AdonisJS 4.0 in this tutorial. Below is a demo of what the final application will look like:
Requirements
This tutorial assumes you have the following installed on your computer:
Node.js 8.0 or greater
Npm 3.0 or greater
Installing Adonis CLI
We need to first install the Adonis CLI which will help us in creating new AdonisJS applications and also comes with some useful commands:
npm i -g @adonisjs/cli
Create new project
We'll start by creating a new AdonisJS application. We'll make use of the adonis CLI.
adonis new adonis-tasks
The command above will create a new AdonisJS application with the name adonis-tasks using the fullstack app boilerplate. To make sure everything is working as expected, let’s run the newly created app. First, we cd into adonis-tasks and run the command below:
adonis serve --dev
Then visit http://127.0.0.1:3333 in your browser, and you should get something similar to the image below:
Good! Let’s now start fleshing out the application.
Database and Migration
We’ll start by structuring the application database. We’ll be using the AdonisJS migration schema to define our application’s database schema. Before we dive into the migration, let’s quickly take time to setup our database. For the purpose of this tutorial, we’ll be using MySQL. So, we need to install Node.js driver for MySQL.
npm install mysql --save
Next, we need to make AdonisJS know we are using MySQL. Taking a look at config/database.js, you see config settings for different databases including MySQL. Though we can easily enter our MySQL settings directly in the config file, that will mean we’ll have to change these settings every time we change our application environment (development, staging, production etc.) which is actually a bad practice. Instead, we’ll make use of environment variables and depending on the environment our application is running on, it will pull the settings for that environment. AdonisJS got us covered here. All we have to do is enter our config settings in the .env file.
So, open .env and add the snippet below to it:
// .env DB_CONNECTION=mysql DB_HOST=localhost DB_DATABASE=adonis-tasks DB_USER=root DB_PASSWORD=
Remember to update the database name, username and password accordingly with your own database settings.
For simplicity our application will have only one database table which we’ll call tasks. The tasks table will contain 3 fields id, title, created_at and updated_at. We’ll make use of the adonis make:migration command to create the migration file:
adonis make:migration tasks
On prompt choose Create table option and press Enter. This will create a new file within the database/migrations directory. The file name will be a timestamp with the name of the schema (in my case 1504289855390_tasks_schema.js). Open this file and update the up() as below:
// database/migrations/1504289855390_tasks_schema.js up () { this.create('tasks', (table) => { table.increments() table.string('title') table.timestamps() }) }
The increments() will create an id field with Auto Increment and set as Primary key. The timestamps() will create the created_at and updated_at fields respectively. With that done, we can run the migration:
adonis migration:run
With our database and table set up, let’s now create a model. We’ll call it Task. Though we won’t be making extensive use of the model in this tutorial, we'll use models over writing plain database queries because they bring ease of use and provide an expressive API to drive the data flow and also allows us use Lucid (AdonisJS ORM). To make a model, we use the adonis CLI make:model command:
adonis make:model Task
This will create a Task.js within the app/Models directory.
Creating Application Routes
Open start/routes.js and update with the snippet below:
// start/routes.js Route.get('/', 'TaskController.index') Route.post('tasks', 'TaskController.store') Route.delete('tasks/:id', 'TaskController.destroy')
We define three routes for our task list application. The first route will serve as our application landing page. It is bound to the index() of the TaskController (which we’ll create shortly). The second route is a POST request which will handle adding new task to the task list. It is bound to the store() of the TaskController. Lastly, we have a route with a DELETE request which will handle deleting a task. It takes the ID of a task to be deleted as a parameter. It is bound to the destroy() of the TaskController.
Creating The Task Controller
Having defined our application’s routes and bind to methods on the TaskController, it's time to create the TaskController itself. Again, we’ll use the adonis CLI command:
adonis make:controller Task
On prompt choose For HTTP requests option and press Enter. Now we have a TaskController.js file within the app/Controllers/Http directory.
Note: Before we ran the make:controller command, the app/Controllers/Http wasn’t present. It was created after running the command.
As we have seen from the routes above, the TaskController will have 3 methods (index(), store(), and destroy()). Open TaskController.js and add the following code into it:
// app/Controllers/Http/TaskController.js // remember to reference the Task model at the top const Task = use('App/Models/Task') async index ({ view }) { const tasks = await Task.all() return view.render('tasks.index', { tasks: tasks.toJSON() }) }
The index() simply fetches all the tasks that have been created from the database and renders a view. AdonisJS uses ES7 async/await and ES6 Object Destructuring. The tasks fetched is then passed to a view file tasks.index (which we’ll create shortly).
Creating Master Layout
AdonisJS makes use of Edge as its templating engine which has support for layouts. We are going to create a master layout for our application. All view files must be within the resources/views directory. So within the directory, let’s create a new view file and name it master.edge. Edge files have the .edge extension. Open the newly created file and paste the following code in it:
<!-- resources/views/master.edge --> <!DOCTYPE html> <html lang="en"> <head> <meta charset="UTF-8"> <meta name="viewport" content="width=device-width, initial-scale=1"> <title>Task List</title> </head> <body> <section class="section"> <div class="container"> <div class="columns"> <div class="column is-8 is-offset-2"> @!section('content') </div> </div> </div> </section> </body> </html>
We are using Bulma CSS framework. We use AdonisJS view’s css() global to reference our css files on CDN. The layout is simple, it contain only one section which is content.
Tips: The ! within @!section() indicate that it is a self closing section.
Creating The Task View
For simplicity our task list application will have just one view file. Every view specific stuff will be done within this view file. We are going to place this view within a tasks directory. Create a new directory named tasks within the resources/views directory, then within the task directory, create a new view file and name it index.edge. Now, open the index.edge file and paste the following code into it:
<!-- resources/views/tasks/index.edge --> @layout('master') @section('content') <div class="box"> <h1 class="title">Task List</h1> <table class="table is-bordered is-striped is-narrow is-fullwidth"> <thead> <tr> <th>SN</th> <th>Title</th> <th>Action</th> </tr> </thead> <tbody> @each(task in tasks) <tr> <td> </td> <td> </td> <td> <button class="button is-danger is-outlined"> <span>DELETE</span> <span class="icon is-small"> <i class="fa fa-times" aria-hidden="true"></i> </span> </button> </td> </tr> @else <tr> <td colspan="3" class="has-text-centered">No task created yet!</td> </tr> @endeach </tbody> </table> </div> @endsection
First, we indicate we are using the master layout we created above. We simply display the tasks in a table. If there are no tasks, we display a appropriate message. For the SN of the tasks, we are using the index property of Edge’s $loop variable. The index property holds the iteration index, which starts from 0, hence the addition of 1. Lastly, we have a delete button which does nothing for now.
If we visit the application in the browser, since we haven’t added any tasks yet, we should get something similar to the image below:
Adding New Task
Let’s update the index.edge file to include a form for adding a new task. Add the following code immediately after @section('content'):
<!-- resources/views/tasks/index.edge --> <div class="box"> <h2 class="title">New Task</h2> <form action="/tasks" method="POST"> <div class="field has-addons"> <div class="control is-expanded"> <input class="input" type="text" name="title" value="" placeholder="Task title"> </div> <div class="control"> <button type="submit" class="button is-primary"> Add Task </button> </div> </div> </form> </div>
It’s a simple form with one field for the title of the task. We also add a CSRF field since AdonisJS by default prevent us from CSRF attacks. Lastly, we display a validation error message if the form fails validation.
Next, we need to create the store() that will handle adding a new task to the database. Before we create this method, let’s quickly setup Adonis validator which will be used for validating our form. The validator is not installed by default, so we need to install it first:
adonis install @adonisjs/validator
Next, we need to register the provider inside start/app.js:
const providers = [ ... '@adonisjs/validator/providers/ValidatorProvider' ]
Now, let’s create the store() in TaskController.js. Paste the snippet below just after the index():
// app/Controllers/Http/TaskController.js async store ({ request, response, session }) { // validate form input const validation = await validate(request.all(), { title: 'required|min:3|max:255' }) // show error messages upon validation fail if (validation.fails()) { session.withErrors(validation.messages()) .flashAll() return response.redirect('back') } // persist to database const task = new Task() task.title = request.input('title') await task.save() // Fash success message to session session.flash({ notification: 'Task added!' }) return response.redirect('back') }
First, we validate the requests coming from the form against some rules. If the validation fails, we simply save the validation messages to the session and return back to the form with the error messages. If everything went well, we persist the new task to the database and flash a notification message indicating that the task was added successfully then redirect to the form.
With that done, we can now add tasks to the task list. You should get something similar to the image below:
Deleting a Task
The last functionality our task list application will have is “deleting tasks”. To achieve this, we need to update the dummy delete button created earlier to include actual form for deleting a specific task. Replace the delete button entirely with the code below:
<!-- resources/views/tasks/index.edge --> <form action="tasks/" method="POST"> <button type="submit" class="button is-danger is-outlined"> <span>DELETE</span> <span class="icon is-small"> <i class="fa fa-times" aria-hidden="true"></i> </span> </button> </form>
Remember the route handling deleting of task accepts the ID of the task as a parameter, so we are attaching the task ID to the form action. Also, we are passing the request method (DELETE in this case) as query string. This is the AdonisJS way of doing method spoofing, since HTML forms aren’t capable of making requests other than GET and POST.
Next, we add the destroy() to TaskController.js. Paste the code below into it just after the store():
// app/Controllers/Http/TaskController.js async destroy ({ params, session, response }) { const task = await Task.find(params.id) await task.delete() // Fash success message to session session.flash({ notification: 'Task deleted!' }) return response.redirect('back') }
We first get the ID of the task from the params object and then use it to retrieve the task from the database. We then delete the task thereafter. Lastly, we flash an appropriate message and redirect back to the page.
Below is what we get when we delete the task added above:
Conclusion
That’s it. We have been able to build a simple application with AdonisJS. Though this tutorial only covered the basics of AdonisJS, it should get you started in building your application with AdonisJS. I hope you find this tutorial helpful. If you have any questions, suggestions, comments, kindly leave them below.
via Scotch.io http://ift.tt/2jgd6fi
0 notes
Text
TaskControl - Mobile Apps, Mobile Downloads, Games, Widget and Themes
New Post has been published on http://www.mob-apps.com/taskcontrol/
TaskControl
Kill Task & Battery Indicator *Task Tab Process Manager. click to show Menu. *Install Tab Install application manager. click to show Menu. *UnInstall Tab Uninstalled application. You can easily reinstall from ‘google play’.
CURRENT VERSION : 2.1.6 REQUIRES ANDROID : 2.2 and up
0 notes