#Tasksel
Explore tagged Tumblr posts
Visit Tumblr Blog
Explore Tumblr blogs with no restrictions, modern design and the best experience.
Last Seen Tumblr Blogs


Fun Fact
Tumblr was acquired by Yahoo for $1.1B in 2013.
Text
【自分用メモ】Ubuntu22.04で自分用のよく使う環境を用意する
LAMP環境 何回もやっているtaskselで用意することにする。 いつものコマンド sudo apt update sudo apt upgrade

View On WordPress
0 notes
Link

9 notes
·
View notes
Link
5 notes
·
View notes
Text
just logged into the graphical desktop to tasksel and uninstall the desktop environment on a machine i'm setting up, then went to click the shutdown button on the desktop and got an error before it straight up disappeared

2 notes
·
View notes
Text
Setup Nginx and Apache2 Side by Side
Setup Nginx and Apache2 Side by Side
Kita bisa memasang Apache2 Web Server dan Nginx Web Server dalam 1 server dengan membedakan port yang digunakan.
Kebetulan, Nginx adalah web server utamanya. Jadi Apache2 yang harus berubah port listening-nya.
Adapun Cara Install Apache2 dapat dilakukan dengan menggunakan bantuan dari tasksel.
$sudo apt-get install tasksel
kemudian jalankan tasksel :
$sudo tasksel
Pilih LAMP Server, kemudian Ok.…
View On WordPress
#almatins#apache2#config#github#install#konfigurasi#linux#nginx#php#port#postgresql#sidebyside#tasksel#ubuntu#web server
0 notes
Link

0 notes
Link

0 notes
Link

0 notes
Text
Tigervnc viewer

#TIGERVNC VIEWER HOW TO#
#TIGERVNC VIEWER INSTALL#
Provide your desired password as shown below: Password: Next, switch the user to newly created account and set a VNC password with the following command: su - rahul vncpasswd
#TIGERVNC VIEWER INSTALL#
You can install it by running the following command: sudo apt install tigervnc-standalone-server -yĪfter installing TigerVNC, create a new user and set a VNC password for that user.įirst, create a new user named “rahul” (or choose other name of your choice) with the following command: sudo adduser rahul The TigerVNC package are available under default package repositories under Debian 10 system. Next, restart your system to apply the changes. You can set it with the following command: sudo systemctl set-default graphical.target Once all the packages are installed, you will need to set your system boots into the graphical target. Press Tab key to move cursor to Ok button.ĭuring installation it may prompt to choose Keyboard type and continue to install.Move cursor to Debian Desktop Environment in the list.So you will need to add a desktop environment in your server.įirst, install the Tasksel utility to install a desktop environment: sudo apt install tasksel -yĪfter installing Tasksel, launch the Tasksel utility with the following command: sudo tasksel TigerVNC server is designed to controls only desktop systems. The default, Debian servers does have a Desktop Environment. Once your system is updated, follow the next instructions. Prerequisitesįirst, update and upgrade all installed packages on your system with the following command: sudo apt update sudo apt upgrade
#TIGERVNC VIEWER HOW TO#
This tutorial help you to how to install and configure VNC server on Debian 10 Buster Linux system using the TigerVNC server. It is a client/server application that allows you to interact with graphical applications on remote machines. The TigerVNC is a free, open-source and high-performance VNC server used to control or access Linux based desktop remotely. There are multiple software services provides VNC service to access Linux based desktop remotely including, TigerVNC, TightVNC, Vino, vnc4server and more. We can say VNC is a graphical desktop-sharing system that uses the Remote Frame Buffer protocol (RFB). VNC (Virtual Network Computing) allowed to remotely control desktop systems.
0 notes
Text
Uksm status in eve ng

UKSM STATUS IN EVE NG HOW TO
UKSM STATUS IN EVE NG INSTALL
UKSM STATUS IN EVE NG MANUAL
UKSM STATUS IN EVE NG PASSWORD
UKSM STATUS IN EVE NG ISO
If you do not know this IP look for the “Connect” link on the VM object: EVE-NG in Azure – Connect to VMĪctually, you just need to replace the “” with the actual path to the private key, downloaded during VM creation above and you can connect. Now you need to wait until Azure has deployed the VM.Īfter the VM is deployed connect to the VM using its public IP. If you have selected “SSH public key” for “Authentication type” which is my recommendation, download the public key from Azure right after you clicked “Create”. Remember to use a size, which is enabled for nested virtualization. The most important part is the “Image”, which should be “Ubuntu Server 16.04 LTS – Gen1” and the “Size”. Below is the summary of the VM I created for this test: EVE-NG in Azure – VM Settings
UKSM STATUS IN EVE NG HOW TO
I assume you know how to work with Azure. Now you can log in to Azure and create a new VM for EVE-NG. Look for the following comment and VM sizes with “***”: ***Hyper-threaded and capable of running nested virtualization The page contains a list of available Azure VM sizes but not all are capable of nested virtualization. I used the following page to get this information: Before starting the setup, make sure, to check which VM in Azure is capable of nested virtualization. Create the VM for EVE-NG in AzureĪs EVE-NG will virtualize different network devices the first thing to consider is nested virtualization.
UKSM STATUS IN EVE NG MANUAL
The installation itself follows more or less the manual for installing EVE-NG on a bare server. To help others doing this kind of setup as well, the following post describes the installation of EVE-NG in Azure. You can even run Netedit, ClearPass and virtual Controllers (VMC’s).īut as this needs a lot of resources which I do not have at home I came to the idea to do this in Azure. EVE-NG can simulate network devices like the ArubaOS CX switches or the VSR with Comware 7. As I cannot do this at home with limited hardware available I came across EVE-NG. Originally posted 13:11:11.During the last months, I was regularly asked to build up a quick demo for partners and/or customers. That’s it! Your EVE-NG is ready to use now.
Enter the command “ /opt/unetlab/wrappers/unl_wrapper -a fixpermissions” without quotes and hit enter.
Login to EVE-NG via VMWare Console or via Putty.
Navigate to the folder > /opt/unetlab/addons/iol/bin.
UKSM STATUS IN EVE NG PASSWORD
Enter the IP Address of EVE-NG, username as “ root“, password as “ eve” and port as “ 22“.
Launch FileZilla or any FTP Client application.
It’s time to upload some files and modify permission. Once you see the login prompt, the system is successfully configured.
Proxy Server Configuration > Select Direct Connection.
Root Password > It will ask you to create a new root password and confirm new root password.
Enter username as “ root” and password as “ eve“.
Once the installation is completed, it will ask to enter username and password.
It will take sometime to complete the installation – Sit Back and Relax.
Click on CD/DVD (SATA) and under Device status > Click on Connected and OK.
Finish the installation > Right click on Virtual Machine and click on Settings >.
UKSM STATUS IN EVE NG INSTALL
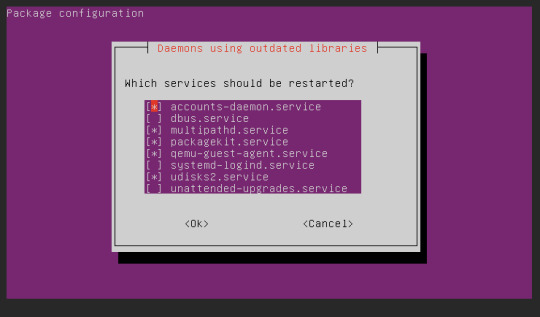
Configuring Tasksel > Choose Install security updates automatically.
Configure the package Manager > Click on Continue.
Configure the hostname> I will leave it as default, you can choose any hostname.
Select your location > Choose your Country Territory.
As soon as you Power ON the machine, you will be prompted to select a language.
UKSM STATUS IN EVE NG ISO
Click on CD/DVD (SATA) > Select the EVE-NG ISO File so that the VM can boot.Click on Processors and Checkbox “ Virtualize Intel VT-x/EPT or AMD-V/RVI“.Click on Memory and change the memory size to 8GB.Maximum Disk Size > 50 GB and click on Next.Virtual Machine Name > Name it as “ EVE-NG” and click on Next.Version > Select “ Ubuntu 64-bit” and click on Next.Guest Operating System > Radio Check “ Linux“.Radio Check “ I will install the operating system later” and click on Next.Radio check on “ Typical” and click on Next.Next is download the above mentioned files in a location. I am assuming that you have already installed VMWare ESXI or Workstation. How to install EVE-NG on VMWare ESXI or VMWare Workstation i86bi-linux-l3-adventerprisek9-15.5.2T.bin – Download it from here.IOUkeygen.py – Download it from our website.EVE-NG ISO/OVA File – Download it from the official website.In our tutorial, we will make use of EVE-NG Community version ISO file to install the EVE-NG. Again, there are two ways to install it i.e., using OVA or ISO file. You can install EVE-NG on VMWare ESXI and Workstation as well.
1 note
·
View note
Text
Konfiguracja VPS ( Instalowanie GUI, VNC, Chrome)
Poradnik pisany oryginalnie na serwerze discord przez moją osobę.
pominę etap wybierania hostingu, płatności.
(polecam ovh)
Rozdział 1 - Logowanie do serwera
w moim przypadku na ovh.pl mam dostęp w przeglądarce do "zdalnego pulpitu" ale opiszę sposób zrobienia tego "na około" aby ten poradnik był zgodny z każdym hostingiem
1. Uruchamiamy program putty , wpisujemy IP serwera po czym klikamy "Open" i logujemy się do systemu (dane powinny przyjść mailem, lub są podane w panelu Hostingu)

2. Na początek zmienimy hasło na takie które będziemy pamiętać w tym celu wpisujemy komendę
passwd
wpisujemy stare hasło po czym 2 razy nowe hasło.
Rozdział 2 - Instalacja GUI
1. uruchamiamy zestaw komend
sudo apt-get update && sudo apt-get upgrade
jeśli pojawi się okno z restartem to walimy pięścią w klawisz ENTER
2. Teraz zainstalujemy manager logowania(?) Slim
sudo apt-get install slim

jeśli wyskoczy nam pytanie Do you want to continue?
to wpisujemy Y (lub T jeśli system jest po polsku)
i klikamy ENTER
3. Pora na właściwą instalację GUI
Wpisujemy komendę
sudo apt-get install tasksel
albo
sudo apt install ubuntu-desktop
po czym uruchamiamy
sudo tasksel

zaznaczamy strzałkami i spacją "ubuntu desktop" i klikamy enter
no i w tym miejscu się zatrzymałem, potrzebuje VNC aby połączyć się z pulpitem ale zapomnialem jak go zainstalowalem dlatego tworzę poradnik aby drugim razem nie zapomnieć XD
część 2 - po roku
gnome mi nie działa na innym vps więc dalsza część poradnika będzie od nowa pod xfce
sudo apt-get update && sudo apt-get upgrade
sudo apt-get install xfce4
sudo apt-get install -y xfce4-goodies
sudo apt install tightvncserver
vncserver
wpisujemy haslo 2 razy jesli nas poprosi
vncserver -kill :1
nano ~/.vnc/xstartup
#!/bin/bash
xrdb $HOME/.Xresources
startxfce4 &
wklejamy te 3 linijki, kasujac poprzednie wpisy.
zapisujemy ctrl+O i klikamy enter
vncserver
gotowe. łączymy sie przez vncviewer IP:5901
[ jak pokazuje sie ze nie mozna zainstalowac firefoxa bo snap zablokowany to tu instrukcja jak zainstalowac ]
sudo apt install software-properties-common
sudo apt-add-repository "deb http://ppa.launchpad.net/ubuntu-mozilla-security/ppa/ubuntu focal main"
echo ' Package: * > Pin: release o=LP-PPA-mozillateam> Pin-Priority: 1001 ' | sudo tee /etc/apt/preferences.d/mozilla-firefox>
echo 'Unattended-Upgrade::Allowed-Origins:: "LP-PPA-mozillateam:${distro_codename}";' | sudo tee /etc/apt/apt.conf.d/51unattended-upgrades-firefox
sudo apt update
sudo apt install firefox
How to Install a Desktop (GUI) on an Ubuntu Server (phoenixnap.com)
0 notes
Text
Установка Ubuntu Server 16.04
Если сравнивать с тем как происходит установка Ubuntu Server 18.04 - это небо и земля. В основном за счет того что установщик Ubuntu Server 18.04 сперва запрашивает у нас всю необходимую информацию и уже потом начинается процесс установки. В отличии от этого, установка Ubuntu Server 16.04 протекает не так стремительно. Мы не сможем быстренько заполнить все нужные данные, и оставить установщик самостоятельно разбираться со всеми оставшимися действиями. Средние затраты внимания на установщик 16.04 гораздо выше, не знаю как вас, а меня это раздражает :). Но в 16.04 прямо в установщик встроен очень удобный пакет tasksel, который позволяет при установке выбирать заранее предустановленные профили с функционалом, который будет загружен прямо в момент установки. Например хотим чтобы после установки нам автоматом запилился дефолтный вариант LAMP, просто выбираем его и после установки он так же будет подгружен. В 18.04 его надо докачивать ручками sudo apt install tasksel Да начнется установка Ubuntu Server 16.04 Выбираем язык установщика Выбираем "Установить Ubuntu Server" Выбираем местонахождение сервера. От того что вы выберите на этом этапе, будет зависеть какая системная локаль будет загружена. Это не только язык системы, это еще и региональные стандарты, важные при работе с 1ской и прочим зависимым от страны дислокации сервера софтом. Read the full article
0 notes
Text
Como convertir Ubuntu Server en Ubuntu Desktop
Como convertir Ubuntu Server en Ubuntu Desktop. Muchos usuarios con equipos un tanto antiguos, tienen problemas para instalar las últimas versiones de Ubuntu. Excesivamente pesado. Si es tu caso, o simplemente eres de los que quieres un Ubuntu limpio (sin aplicaciones innecesarias), en este artículo vemos como convertir un Ubuntu server en Ubuntu Desktop. Tal vez después de seguir esta guía echaras de menos muchas aplicaciones, pero eso es precisamente lo que buscamos, instalar solo lo que tú necesitas. Como convertir Ubuntu Server en Ubuntu Desktop Bajo mi experiencia, el sistema queda mucho más ligero con XFCE puro y duro. También veremos otras opciones, pero nosotros comenzamos con XFCE. Instalar XFCE en Ubuntu Actualizamos e instalamos los requisitos necesarios. sudo apt update && sudo apt upgrade sudo apt install dmidecode sudo apt install tasksel Como administrador de pantalla, podemos elegir entre slim o lightdm. sudo apt install slim # o sudo apt install lightdm Nosotros (por ser más liviano), hemos elegido el administrador SLIM. Si prefieres Lightdm sustituyes slim por lightdm en los siguientes comandos. sudo install xfce4 slim sudo service slim star Tu Ubuntu Server ya es un Ubuntu Desktop con XFCE. Convertir Ubuntu Server a Ubuntu Desktop oficial Talvez el XFCE limpio te resulté un poco limitado, faltan demasiadas herramientas que tú utilizas a diario. Bueno... Read the full article
#BasicUbuntuServer#convertirUbuntuServer#convertirunUbuntuserverenUbuntuDesktop#LightDM#slim#ubuntuDesktop#UbuntuDesktopconXFCE#UbuntuServer#versionesdeUbuntu#xfce
0 notes
Photo

E uma das modificações mais legais que é possível fazer em uma distribuição Linux é trocar a interface gráfica. Alguns exemplos de interfaces gráficas... . Para computadores mais atuais: Gnome, Cinnamon, Pantheon, KDE . Para computadores mais antigos: Mate, XFCE, LXDE, LXQT . Não precisa ter um computador antigo ou com hardware mais fraco para usar XFCE ou LXQT, são ótimas interfaces e tem baixo consumo de recursos (CPU, RAM, HD, GPU). . Existem muitas formas de instalar essas interfaces gráficas. . *Compilar o código fonte *Instalar os pacotes (.deb ou .rpm) *Instalar pelo terminal *Instalar pela central de aplicativos . Uma ótima ferramenta via terminal para escolher qualquer interface gráfica é o Tasksel, também da para instalar o servidor web e de arquivos usando essa ferramenta, além de outras coisas. . - Para instalar no Ubuntu e Linux Mint . sudo apt-get install tasksel . Ou se preferir, também é possível instalar as interfaces digitando no terminal. . Exemplo: . - Para instalar o XFCE no Ubuntu e Linux Mint . sudo apt-get install xfce4 . - E para remover o XFCE do Ubuntu e Linux Mint . sudo apt-get remove xfce4* . Depois de instalar, as interfaces ficam disponíveis na tela de login, basta clicar em logout ou encerrar sessão para escolher qualquer interface instalada. . #AssuntosTech #Linux #OpenSource
0 notes
Video
youtube
MySQL - Install LAMP Server for MySQL Labs (tasksel)
0 notes
Text
CSE451-Assignment3-Setup Git and Files on Ceclnx01 and Openstack Solved
CSE451-Assignment3-Setup Git and Files on Ceclnx01 and Openstack Solved
Setup your openstack instance and do the steps of updating apt, install lamp via tasksel, and adding my public key to the instance.
Create a git repository called cse451-UID-web.
Add me (campbest) as a developer
Clone a copy of this to ceclnx01 in the public_html directory
Clone a copy of your repository to your openstack instances in the /var/www/html directory.
In your working directory create…
View On WordPress
0 notes