#Virtual Disk Recovery Software
Explore tagged Tumblr posts
Visit Tumblr Blog
Explore Tumblr blogs with no restrictions, modern design and the best experience.
Last Seen Tumblr Blogs


Fun Fact
Tumblr Inc. is using 66 technologies for its website.
Text
Architecture Overview and Deployment of OpenShift Data Foundation Using Internal Mode
As businesses increasingly move their applications to containers and hybrid cloud platforms, the need for reliable, scalable, and integrated storage becomes more critical than ever. Red Hat OpenShift Data Foundation (ODF) is designed to meet this need by delivering enterprise-grade storage for workloads running in the OpenShift Container Platform.
In this article, we’ll explore the architecture of ODF and how it can be deployed using Internal Mode, the most self-sufficient and easy-to-manage deployment option.
🌐 What Is OpenShift Data Foundation?
OpenShift Data Foundation is a software-defined storage solution that is fully integrated into OpenShift. It allows you to provide storage services for containers running on your cluster — including block storage (like virtual hard drives), file storage (like shared folders), and object storage (like cloud-based buckets used for backups, media, and large datasets).
ODF ensures your applications have persistent and reliable access to data even if they restart or move between nodes.
Understanding the Architecture (Internal Mode)
There are multiple ways to deploy ODF, but Internal Mode is one of the most straightforward and popular for small to medium-sized environments.
Here’s what Internal Mode looks like at a high level:
Self-contained: Everything runs within the OpenShift cluster, with no need for an external storage system.
Uses local disks: It uses spare or dedicated disks already attached to the nodes in your cluster.
Automated management: The system automatically handles setup, storage distribution, replication, and health monitoring.
Key Components:
Storage Cluster: The core of the system that manages how data is stored and accessed.
Ceph Storage Engine: A reliable and scalable open-source storage backend used by ODF.
Object Gateway: Provides cloud-like storage for applications needing S3-compatible services.
Monitoring Tools: Dashboards and health checks help administrators manage storage effortlessly.
🚀 Deploying OpenShift Data Foundation (No Commands Needed!)
Deployment is mostly handled through the OpenShift Web Console with a guided setup wizard. Here’s a simplified view of the steps:
Install the ODF Operator
Go to the OperatorHub within OpenShift and search for OpenShift Data Foundation.
Click Install and choose your settings.
Choose Internal Mode
When prompted, select "Internal" to use disks inside the cluster.
The platform will detect available storage and walk you through setup.
Assign Nodes for Storage
Pick which OpenShift nodes will handle the storage.
The system will ensure data is distributed and protected across them.
Verify Health and Usage
After installation, built-in dashboards let you check storage health, usage, and performance at any time.
Once deployed, OpenShift will automatically use this storage for your stateful applications, databases, and other services that need persistent data.
🎯 Why Choose Internal Mode?
Quick setup: Minimal external requirements — perfect for edge or on-prem deployments.
Cost-effective: Uses existing hardware, reducing the need for third-party storage.
Tightly integrated: Built to work seamlessly with OpenShift, including security, access, and automation.
Scalable: Can grow with your needs, adding more storage or transitioning to hybrid options later.
📌 Common Use Cases
Databases and stateful applications in OpenShift
Development and test environments
AI/ML workloads needing fast local storage
Backup and disaster recovery targets
Final Thoughts
OpenShift Data Foundation in Internal Mode gives teams a simple, powerful way to deliver production-grade storage without relying on external systems. Its seamless integration with OpenShift, combined with intelligent automation and a user-friendly interface, makes it ideal for modern DevOps and platform teams.
Whether you’re running applications on-premises, in a private cloud, or at the edge — Internal Mode offers a reliable and efficient storage foundation to support your workloads.
Want to learn more about managing storage in OpenShift? Stay tuned for our next article on scaling and monitoring your ODF cluster!
For more info, Kindly follow: Hawkstack Technologies
0 notes
Text
5 IT Cost Saving Strategies for Your Enterprise Infrastructure
Managing enterprise IT infrastructure is a balancing act between performance, reliability, and cost. As technology evolves rapidly, so do expenses. To stay competitive and efficient, IT managers must find smart ways to reduce costs without compromising service quality or security. Below are five proven IT cost-saving strategies that can make a meaningful impact on your enterprise infrastructure.
1. Extend the Life of Existing Hardware
Rather than defaulting to frequent hardware refresh cycles, enterprises can often extend the life of servers, storage devices, and networking hardware through proper maintenance and strategic upgrades. Partnering with a third-party maintenance provider for post-warranty support can reduce costs by 30-70% compared to OEM contracts.
💡 Tip: Use asset lifecycle management tools to monitor hardware health and optimize replacement timing based on performance, not just age.
2. Leverage Cloud and Hybrid Infrastructure
Moving specific workloads to the cloud—or adopting a hybrid cloud model—can reduce the cost of owning and maintaining physical infrastructure. Cloud services provide flexibility and scalability, allowing you to pay only for what you use.
💡 Tip: Use cloud cost optimization tools to avoid waste, identify underutilized instances, and right-size your resources.
3. Optimize Software Licensing
Licensing costs can quietly eat into IT budgets. Regular audits of software usage can help identify unused or underutilized licenses, especially with large suites or per-user subscription models.
💡 Tip: Consider switching to open-source or lower-cost alternatives for certain tools, and negotiate volume discounts or enterprise agreements with vendors.
4. Consolidate and Virtualize Resources
Server consolidation through virtualization reduces the need for physical hardware, power, and cooling. It also simplifies management, backup, and disaster recovery planning.
💡 Tip: Evaluate opportunities for workload consolidation across departments and assess whether underused servers can be decommissioned or repurposed.
5. Implement Preventive Maintenance and Monitoring
Downtime is costly. By implementing proactive monitoring tools and a preventive maintenance strategy, you can catch performance issues before they lead to outages or data loss—saving both money and reputation.
💡 Tip: Schedule regular health checks for your servers and storage systems, and set up alerts for threshold-based issues like CPU spikes or disk failure warnings.
Final Thoughts
Cost optimization isn’t about cutting corners—it’s about making smarter, data-driven decisions. With the right strategies, enterprises can lower IT infrastructure costs while improving agility, performance, and reliability. Evaluate your current infrastructure and consider where these strategies can have the most immediate impact.

0 notes
Text
Top 10 Features of Windows Server 2022 Datacenter That Make It a Powerhouse for Virtualization
In an era where IT infrastructure needs to be more scalable, secure, and cost-efficient than ever, businesses are constantly seeking server solutions that meet these evolving demands. Among the top contenders in 2025, Microsoft Windows Server 2022 Datacenter continues to hold its ground as a virtualization powerhouse.
If your organization relies heavily on virtual environments, containers, and hybrid cloud setups, then the Datacenter edition is designed specifically for you. In this article, we break down the top 10 features of Windows Server 2022 Datacenter that make it the go-to platform for modern enterprise virtualization.
1. Unlimited Virtual Machines (VMs)
Perhaps the biggest draw of the Datacenter edition is its support for unlimited virtualization. Unlike the Standard edition, which limits the number of VMs you can run, Microsoft Windows Server 2022 Datacenter allows you to deploy as many virtual machines as your hardware can handle.
This is a huge cost-saver for:
Data centers
Hosting providers
Enterprises running multi-tenant workloads
You get maximum flexibility without worrying about license constraints per virtual machine.
2. Hyper-V Enhancements for Performance and Security
Hyper-V, Microsoft’s built-in hypervisor, has received significant improvements in Windows Server 2022. Key enhancements include:
Nested virtualization for AMD processors
Improved VM boot times
Enhanced VM security with Shielded VMs
Support for TPM 2.0 passthrough to VMs
These improvements make Microsoft Windows Server 2022 more performant and secure for large-scale virtualization projects.
3. Shielded Virtual Machines (VMs)
In high-security environments, Shielded VMs add a layer of protection that ensures VMs can only run on trusted hosts. This feature:
Encrypts VM disks with BitLocker
Prevents unauthorized host access
Works with Host Guardian Service (HGS)
If you're handling sensitive workloads, this feature alone makes Server 2022 Datacenter a compelling option.
4. Software-Defined Networking (SDN)
One of the core differentiators of the Datacenter edition is support for Software-Defined Networking (SDN). This lets IT administrators:
Create virtual network overlays
Use network security groups (NSGs)
Enable dynamic firewall rules
Implement routing, load balancing, and micro-segmentation
SDN is essential for managing modern, multi-tenant environments where agility and security go hand-in-hand.
5. Storage Spaces Direct (S2D)
High-availability storage is a must for any virtualized environment. S2D allows you to:
Pool storage across multiple servers
Build failover clusters
Use commodity hardware instead of expensive SANs
With S2D, Microsoft Windows Server 2022 lets you build scalable, resilient storage without breaking the bank.
6. Azure Hybrid Capabilities
The future of IT infrastructure lies in hybrid deployment. Windows Server 2022 integrates deeply with Azure to offer:
Azure Arc: Manage on-prem VMs as if they were native to Azure
Azure Backup & Site Recovery: Disaster-proof your VMs
Azure Monitor & Security Center: Real-time visibility and compliance
These features are perfect for organizations transitioning to a hybrid or multi-cloud model while maintaining on-prem environments.
7. Hotpatching for VMs (Preview to Broad Rollout)
While initially released as an Azure-only feature, hotpatching is making its way to broader Windows Server environments in 2025. It allows you to:
Apply updates without rebooting
Minimize downtime for critical workloads
Ensure 24/7 availability
For organizations running mission-critical applications, this feature can significantly reduce maintenance windows.
8. Secured-Core Server Architecture
Security is paramount in virtualization, especially when handling multi-tenant environments. Microsoft’s Secured-Core initiative builds protection directly into the server stack:
Root-of-trust boot protections
DMA protection
VBS (Virtualization-Based Security)
With Secured-Core, Microsoft Windows Server 2022 offers enterprise-grade defense from firmware-level attacks — an increasingly common threat vector.
9. SMB over QUIC for Encrypted File Transfers
One underrated yet powerful feature is SMB over QUIC, which allows secure file sharing without a VPN. This is especially useful for:
Remote workers accessing virtual servers
Organizations with mobile or hybrid workforces
Securing data transfers over untrusted networks
It provides TLS 1.3 encryption, and it’s built to work natively with your virtualized file servers.
10. Centralized Management via Windows Admin Center
Managing virtual environments is simplified through Windows Admin Center (WAC). With WAC, administrators can:
Monitor VMs
Manage Hyper-V settings
Perform remote server tasks
Integrate Azure services directly
It’s an all-in-one dashboard that significantly reduces administrative overhead, especially when managing dozens or hundreds of virtual instances.
Virtualization Use Cases Where Server 2022 Shines
Use CaseBenefitPrivate Cloud InfrastructureUnlimited VMs and SDN make it scalableDisaster Recovery & BackupAzure Site Recovery and S2D ensure failover readinessRemote Work EnvironmentsSMB over QUIC and Shielded VMs enhance secure accessApplication Testing and DevOpsNested virtualization supports robust test labsHosting ProvidersLicense once, deploy many — maximizes ROI
Microsoft Server 2022 vs. Alternatives in 2025
FeatureMicrosoft Windows Server 2022VMware vSphereRed Hat VirtualizationProxmoxUnlimited VMs✅ (Datacenter edition)❌ (requires licensing per socket)❌✅HypervisorHyper-VESXiKVMKVMSDN Support✅✅✅ModerateHotpatching✅Limited❌❌Hybrid CloudAzure-nativeAWS optionalOpenShiftCloud-agnostic
While competitors offer great solutions, Microsoft Windows Server 2022 is ideal for businesses deeply embedded in the Microsoft ecosystem.
Long-Term Viability in 2025 and Beyond
Microsoft has committed extended support for Windows Server 2022 through October 2031, ensuring a stable foundation for virtualization investments made today. Even as Server 2025 begins to roll out, many organizations are sticking with the mature and widely adopted Server 2022 Datacenter edition.
Its robust feature set makes it more than capable of handling future workloads — especially with frequent updates and cloud-connected capabilities.
Final Thoughts
Virtualization is no longer just an IT buzzword — it's the backbone of efficient, scalable, and secure infrastructure. In 2025, Microsoft Windows Server 2022 Datacenter remains one of the most powerful platforms for businesses that rely on heavy VM use, hybrid deployments, and centralized management.
From nested virtualization to Secured-Core architecture, its top 10 features represent the future of enterprise-grade infrastructure — available now.
If you’re ready to transform your virtual environment, this is the operating system to trust.
👉 Get your Windows Server 2022 Datacenter license here.
Frequently Asked Questions (FAQ)
1. Is Microsoft Windows Server 2022 good for virtualization?
Yes. It supports unlimited VMs, enhanced Hyper-V, nested virtualization, and robust security — making it ideal for any size of virtual deployment.
2. What’s the difference between Windows Server 2022 Standard and Datacenter?
The Datacenter edition supports unlimited VMs and includes enterprise features like SDN, S2D, and Shielded VMs — which are not available in the Standard edition.
3. Can I use Server 2022 in a hybrid cloud environment?
Absolutely. Server 2022 integrates natively with Azure services like Arc, Backup, and Site Recovery, making it perfect for hybrid cloud deployments.
4. Is Hyper-V better than other hypervisors like VMware or KVM?
Hyper-V is deeply integrated into Windows environments, is cost-effective (especially in the Datacenter edition), and provides excellent performance and security for enterprise use.
5. Where can I buy a genuine license for Windows Server 2022 Datacenter?
You can purchase it from this trusted source:
0 notes
Text
The Ultimate Guide to Server Management: Best Practices & Tools
Managing servers efficiently is crucial for ensuring optimal performance, security, and uptime for your applications and websites. Whether you’re handling a single server or a complex cloud infrastructure, proper server management can make or break your online presence.
In this blog, we’ll explore: What is Server Management? Key Responsibilities in Server Management Best Practices for Effective Server Management Top Server Management Tools Why Choose CloudMinister for Server Management?
What is Server Management?
Server management involves monitoring, maintaining, and optimizing servers to ensure they run smoothly, securely, and efficiently. It includes tasks like:
Server provisioning & configuration
Performance monitoring & optimization
Security updates & patch management
Backup & disaster recovery
User access control & permissions
Servers can be physical (on-premises), virtual (VMs), or cloud-based, and each requires a tailored management approach.
Key Responsibilities in Server Management
1. Server Setup & Configuration
Installing OS, software, and necessary dependencies.
Configuring network settings, firewalls, and security policies.
2. Performance Monitoring
Tracking CPU, RAM, disk, and network usage.
Identifying bottlenecks and optimizing resource allocation.
3. Security & Compliance
Applying security patches and updates.
Setting up firewalls, intrusion detection, and encryption.
Ensuring compliance with industry standards (GDPR, HIPAA, etc.).
4. Backup & Disaster Recovery
Scheduling automated backups.
Testing recovery plans to minimize downtime.
5. User & Access Management
Managing SSH keys, passwords, and multi-factor authentication (MFA).
Assigning role-based permissions to prevent unauthorized access.
6. Troubleshooting & Maintenance
Diagnosing server crashes, slowdowns, or failures.
Performing regular maintenance to prevent issues.
Best Practices for Effective Server Management
Automate Routine Tasks – Use scripts (Bash, Python) or tools like Ansible, Puppet, or Chef for automation. Monitor Continuously – Tools like Nagios, Zabbix, or Prometheus help track server health. Enforce Strong Security – Regularly update software, disable unused ports, and use fail2ban for intrusion prevention. Document Everything – Keep logs of changes, configurations, and incidents for future reference. Optimize Resource Usage – Use load balancing (Nginx, HAProxy) and caching (Redis, Varnish) to improve performance. Plan for Scalability – Design infrastructure to handle growth (auto-scaling, cloud-based solutions).
Top Server Management Tools
CategoryPopular ToolsMonitoringNagios, Zabbix, Prometheus, GrafanaAutomationAnsible, Puppet, Chef, TerraformSecurityFail2Ban, Wazuh, ClamAV, OpenVASBackupBacula, Rsync, Duplicati, VeeamCloud ManagementAWS Systems Manager, Azure Automation, Google Cloud Ops
Why Choose CloudMinister for Server Management?
Managing servers in-house can be complex and resource-intensive. CloudMinister offers expert server management services, including:
🔹 24/7 Server Monitoring & Support – Proactive issue detection and resolution. 🔹 Automated Backups & Recovery – Ensuring data safety with minimal downtime. 🔹 Security Hardening – Protecting against DDoS, malware, and breaches. 🔹 Cloud & On-Premises Management – Expertise in AWS, Azure, Linux, and Windows servers. 🔹 Cost Optimization – Right-sizing resources to reduce unnecessary expenses.
Focus on your business while we handle your servers! Explore CloudMinister’s Server Management Solutions
Final Thoughts
Effective server management is critical for performance, security, and scalability. Whether you’re a startup or an enterprise, adopting best practices and leveraging the right tools can save time, money, and headaches.
Do you manage your own servers, or do you use a managed service? Let us know in the comments!
0 notes
Text
HDD Data Recovery Services

We are most trusted hard disk data recovery companies, and it has been an expert in data recovery for many years. With a high recovery success rate, our data recovery engineers will help you solve various disk errors without losing data. We also offer free diagnosis of the hard drives and can guarantee. HDDs, commonly found in computers and laptops, store data magnetically on spinning disks called platters. Our hard drive recovery services can help you recover data from an HDD that has experienced logical issues, failure, physical damage, or even the formatted HDD - Hard Disk Data Recovery.
Solid-state Drives (SSDs) use flash memory to store data, providing faster access speeds and greater durability due to the lack of moving parts. If you have encountered NAND chip failures, SSD not showing up, or other SSD failures, choosing our recovery services will maximize the chances of successful data retrieval. SD cards are commonly used for digital cameras, smartphones, drones, and other portable electronic devices. Although SD cards are known for their compact size and versatility, they can still encounter issues leading to data loss, such as accidental deletion, format error, file system corruption, etc. Our data recovery services and perform memory card recovery now - SSD Data Recovery.
Data loss in virtual environments can occur due to various reasons, such as virtual machine corruption, accidental deletion, or storage failure. NAS devices are dedicated file storage servers connected to a network, providing multiple users with centralized storage and data access. Our data recovery service can help you recover data from any vendor's device, including but not limited to the following. It is a comprehensive professional service designed to help users recover data lost for various reasons. This service's hallmark is its essential solutions in data loss emergencies, particularly when data recovery software fails to recover data. For more information, please visit our site https://www.nowdatarecovery.com/
0 notes
Text
Sidetrack: ChromeOS Flex... on a Virtual Machine... with Single GPU Passthrough...
the prospect of running ChromeOS on anything more powerful than a microwave oven is unfathomably cursed - wheezus2000 on discord
So... where do we start here... *checks notes* ah! So yeah, last Sunday I showcased a virtual machine running ChromeOS Flex (the most barebones GUI your grandma can only recognize) over to the aptly named r/ChromeOSFlex subreddit. It was a lot of work but it does work somehow.
Anyways, here's a tutorial to get this abomination up and running using virt-manager!
Prerequisites:
You will need:
ChromeOS Flex Recovery Image
A decent hard drive space (around 24GB is enough)
A nice dedicated GPU (because I'm not sure if it'll work with an iGPU)
more than 4GB of RAM (8GB or more is recommended)
IOMMU support
Lots of patience (you'll see why in a moment)
On the software side, you'll need:
KVM and QEMU
libvirtd and virt-manager
GRUB or any bootloader already set-up for GPU passthrough
On the skills necessary:
Having familiarized with the concept of Linux, and basic command line stuff
Having followed instructions precisely
Potentially, having skills in compiling software and/or fiddling with the operating system and the Linux kernel as well
and... not having an attention span of a script kiddie
Process
Visit this link to download the recovery image from Google.
Scroll down to this part of the page. Click on "ChromeOS Flex installer image".
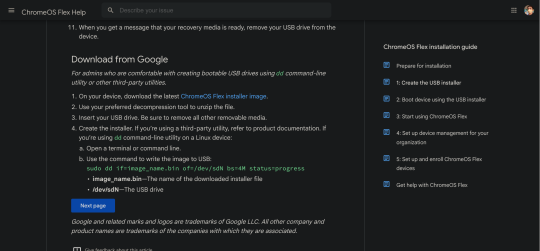
This would then be downloaded.

After that, unzip the file to a convenient place. This would take ~6GB of storage space.
Install the software prerequisites using your favorite package manager.
Once having virt-manager installed, click on the new button.
From there, select "Import existing disk image".

Click on Browse. Then select "Browse Local" to find the recovery image.
In my case, that'll be in the folder called vmdk, stored in my os folder on one of my hard drives. Select the "chromeos_*_reven_recovery..." file.

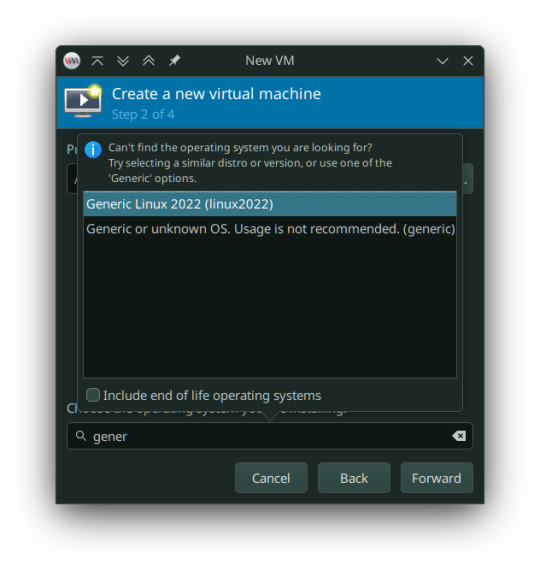
In the "Choose the operating system you are installing" prompt, select linux2022.
In the memory tab, pick 4096MiB and select how many cores you want to be assigned.

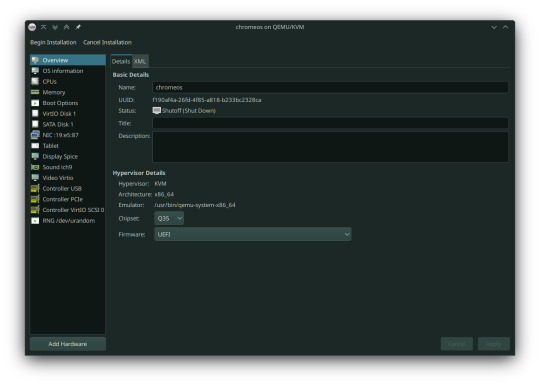
You must select "Customize configuration before install" as we tweak some things.

In the prompt that follows, here's what you need to change:
Firmware: BIOS -> UEFI
Disk: VirtIO -> USB
Video: Anything else -> VirtIO
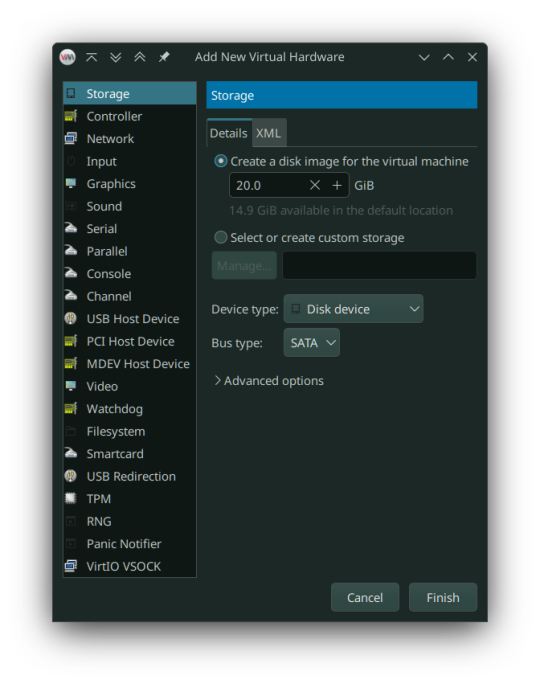
Now add a virtual hard drive by clicking the "Add Hardware" button. It should be 20GB or larger, SATA bus. VirtIO bus doesn't work as it wouldn't be recognized.
Remove any Consoles, RNG and start the install.
Here's the configuration if you follow these steps:
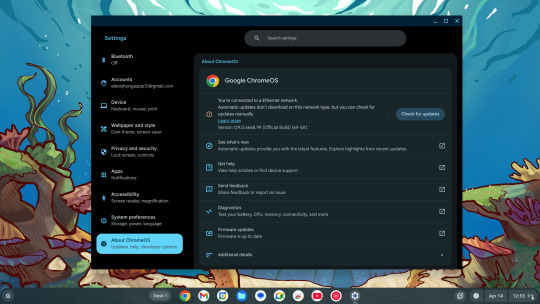
After starting, you can now follow the steps in installing ChromeOS Flex. It should be straightforward, however the graphics are still glitchy as it seems. It'll be fixed once we added our dGPU.
However, ChromeOS at boot will, and definitely (in my case) crash and bootloop a couple times, even when installed, before landing you to the desktop.
If for some reason, the USB tablet device doesn't work or if you prefer a cursor, switch the USB tablet for a PS/2 or USB mouse.
Once installed, you can see your desktop glitching. If you, somehow can navigate the system, you can now turn it off and set up Single GPU Passthrough. I used this one by risingprismtv. Follow the instructions provided in the wiki, and apply it to your VM. This can (and will) be complicated (especially when dealing with IOMMU groups), as it may break your setup, so please proceed with caution. Any issues with the script can be reported through their Discord server.
After setting the scripts, this is my current VM setup:

Now it's time to boot the VM, and voila! You can now use ChromeOS Flex while staying under Linux!
Predicaments, and possible issues
No, it does not work under Windows, well, without complications apparently.
Possible VM bootloops, just like I said. Seems related to the graphics, I presume. Though, this only happens multiple times, before working normally.
You can't update the VM, apparently.
Screenshots

And as always, see ya later!
0 notes
Text
Losing important data is a catastrophe for any individual or business and there are a million ways for it to happen. Accidental deletion, virus attacks, OS crash or partition format. You might not even know when these hit you until you come face to face with inaccessibility of your precious data. That’s the reason the practice of taking backups is emphasized time and again. However, the best of us fall prey to the vicious ways of data loss and have to resort to Mac partition recovery software to regain our data. If you switch on your Mac to find that your familiar disk cannot be search by Finder or they appear to be empty, you should start coming to terms with the fact that you might have lost your Mac partitions. While this may lead to complete data loss, acting quickly to rope in great Mac partition recovery software like Stellar Phoenix Mac Data Recovery could help you recover all your data in time. This guide will be explaining this amazing software in detail so that you’re able to fight back data loss when you need to. Brief Overview Of Mac Partition Loss Many of us may think that it is impossible to recover Mac files after formatting. Well, it’s not! If you’ve just formatted your Mac partitions but not written new data to them, your previous data can very well be salvaged. This is because of the inherent way files are stored on the Mac. Your Mac hard drive maintains an index file that controls the entire file system. The standard formatting only changes the index file, not the actual data. Therefore, although the formatted files are inaccessible, you can recover them with the help of data recovery applications like Stellar Phoenix Mac Data Recovery. What NOT To Do If Partition Loss Occurs If you suspect that your Mac has suffered partition loss, DO NOT attempt the following at all: Re-formatting or re-partitioning of the drive Do not write new data or save new data to the drive or formatted partition Do not try to delete and recreate partitions Do not run any disk utilities or defrag utility Undertaking any of the above mentioned activities in a rush could make matters worse by overwriting data that can still be recovered. Hence, stay calm and resort to good quality software to recover Mac partitions. Recover Formatted Partition Using Stellar Phoenix Mac Data Recovery Stellar Phoenix Mac Data Recovery is a comprehensive Mac Data Recovery software to reclaim files, documents, images, music, movies lost or deleted from any HFS, HFS+, FAT, ExFAT and NTFS file system based storage media. It can recover all files with their original names and even perform RAW recovery to recover entire lost volumes on your Mac. If you can’t see your data on your iMac, MacBook Pro, Air, Mac Mini or Mac Pro, Stellar software can help you out by salvaging your files safely and accurately. Through evolved scanning modes like ‘Quick Scan’ and ‘Deep Scan’, this ultimate software can efficiently claw back your valuable data from formatted drives, volumes and even partitions. It also supports Boot Camp partition recovery. Step For Partition Recovery Here’s how to use this brilliant software: Step 1: Download And Install Download Stellar Phoenix Mac Data Recovery zip file and extract it. Then double-click the dmg file to mount a virtual volume called StellarPhoenixMacDataRecovery. Thereafter drag this application to the Applications folder to install it. Step 2: Run The Application Double-click on StellarPhoenixMacDataRecovery in the Applications folder of your Mac to run this software. You will see the main window of the software displaying the License agreement that you’ll need to accept to proceed. Step 3: Select The Target Partition Once you run the software, you will see all Mac drives and partitions listed on the left hand side of the main software window. Select the partition you want to recover. Step 4: Select Appropriate Recovery Level On selecting a partition, the recovery levels are displayed in a pane adjacent to where the partitions are listed.
Select the recovery level from the options – “Recover Data” (recover lost data), “Deleted Recovery” (recover lost volumes), “RAW Recovery” (recover data from severely corrupted storage media) or “Create Image” (create image of storage media). For partition recovery you should select “Deleted Recovery” by clicking on it. Step 5: Select Scanning Mode Once you select a recovery level, you will be prompted to choose a scanning mode – Quick Scan or Advanced Scan. Select the mode as per your requirement. Step 6: Click on Start Scan to start scanning Finally click on the Start Scan button to start the scanning. The progress of the scan will be shown through a progress bar on the next window. Step 7: Preview Your Files As files are found they will be listed in a preview pane. You can preview each file by right clicking on it and selecting preview or by selecting the file and then pressing the “Eye” button. Important Note: The trial version of this software supports functionality up to this point. You may download the trial version of this software and see if the files you seek are displayed after scanning. If they are and you are satisfied with their preview, you can purchase the full version of this software and recover your files with ease. Step 8: Select The Files You Want To Recover Now select the files you wish to recover. You can select multiple files or recover individual files. Step 9: Click On Recover To Complete The Process You could recover each file by right clicking on it and selecting Recover. Alternatively, you can select multiple files and click on the “Recover” button to recover them all at once. Step 10: Specify Target Location And Reclaim Your Data When you click on Recover, you will be prompted to select the location where you want to save the recovered files. Browse and specific your target location and watch the software restore all your critical data smoothly. Concluding Lines That’s all there is to it. See how easy it is to recover Mac partitions with Stellar Phoenix Mac Data Recovery! Try it out today and take a sigh of relief.
0 notes
Text
Linux Images
In the context of Linux, different types of disk images serve various purposes. Here's an overview of the main types you've mentioned:
1. DVD Image
Purpose: A DVD image, typically in .iso format, is a complete digital copy of the contents of a DVD. It can be used for:
Installation: A DVD image of a Linux distribution (e.g., Ubuntu, Fedora) contains the installation files and packages needed to install the operating system. It is typically burned to a physical DVD or used as a bootable USB.
Live Environment: Some DVD images are made bootable, allowing users to run Linux directly from the image without installing it to the hard drive.
Distribution: A DVD image may also include additional software packages or documentation, intended to be distributed to users on physical media.
2. ISO Image
Purpose: An ISO image (usually with a .iso extension) is a disk image format that is an exact replica of a file system, typically used for distributing software or operating systems. It can be used for:
OS Installation: Like DVD images, ISO images are widely used for Linux OS installation. They are typically bootable and can be written to a USB stick, burned to a DVD, or mounted directly on a virtual machine.
Software Distribution: Many software applications are distributed in ISO image format because it preserves the structure of the software package.
Backup/Archival: ISO images can be used to store large data sets or backup an entire file system in an easily portable format.
Virtual Machines: In virtualization environments like VirtualBox or VMware, ISO images are often used to install guest operating systems.
3. AArch Image (ARM Architecture Image)
Purpose: An AArch image refers to an operating system image or installation media designed for ARM architecture (AArch64 for 64-bit or AArch32 for 32-bit). ARM is a CPU architecture used in many mobile devices, embedded systems, and some servers. The image typically contains:
ARM-specific binaries: Unlike images for x86 architecture, these contain code compiled to run on ARM processors.
OS Installation: Similar to ISO or DVD images, AArch images are used to install Linux on ARM-based systems, such as Raspberry Pi, BeagleBoard, or some ARM-based servers.
Embedded Systems: These images are often used in embedded Linux environments where the CPU architecture is ARM-based.
Cross-platform Development: Developers may use AArch images to test or deploy Linux on ARM-based hardware.
4. Boot Images
Purpose: A boot image is a smaller disk image, usually containing the minimum set of files necessary to start a system (i.e., to boot it). It is critical in the boot process, whether for physical machines or virtual machines. Boot images are:
Boot Loader: They often contain boot loaders like GRUB or Syslinux, which are responsible for loading the Linux kernel into memory and starting the operating system.
Live Systems: Some boot images are part of live environments (e.g., rescue disks or live Linux distributions), allowing you to boot into a fully operational system without installation.
Recovery Tools: Boot images may contain diagnostic tools, recovery utilities, or system repair tools for system administrators or users to troubleshoot and recover systems.
Kernel and Initial RAM Disk (initrd): The boot image often includes the Linux kernel and an initial ramdisk (initrd) or initial ramfs, which is used to load the necessary drivers and mount the root filesystem at boot time.
Minimal Installations: Some boot images may contain a very basic Linux environment used for troubleshooting or for creating a minimal installation framework.
Summary of Purposes:
DVD Image
Full operating system distribution, often for installation on physical media, live
environments, or large software packages.
ISO Image
A generic disk image of a file system, used for distributing OS installations, software,
virtual machines, and backups.
AArch Image
OS images built for ARM architecture (AArch64/32), used for ARM-based devices like
Raspberry Pi or ARM servers.
Boot Image
Small image to facilitate the boot process, containing boot loaders, Linux kernels,
recovery utilities, or minimal environments for system repair or live usage.
Each image type has a specific role in the Linux ecosystem, whether for installation, recovery, or system booting.
for more details visit www.qcsdclabs.com
0 notes
Text
Managed Server Enterprise Support: What You Need to Know
Enterprise IT environments demand reliable, secure, and high-performance server management to ensure business continuity. Managed server enterprise support provides proactive monitoring, maintenance, security, and troubleshooting for on-premises, cloud, or hybrid infrastructures.
1. Key Features of Managed Server Enterprise Support
🔹 24/7 Monitoring & Performance Optimization
✔ Real-time server health monitoring (CPU, memory, disk, network usage) ✔ Proactive issue detection to prevent downtime ✔ Load balancing & resource optimization
🔹 Security & Compliance Management
✔ Firewall & intrusion detection to block cyber threats ✔ Patch management & software updates to fix vulnerabilities ✔ Compliance audits (ISO 27001, HIPAA, GDPR)
🔹 Backup & Disaster Recovery
✔ Automated backups with offsite storage ✔ Disaster recovery solutions for business continuity ✔ RAID configuration & data redundancy
🔹 Server OS & Software Support
✔ Windows Server (2016, 2019, 2022) & Linux distributions (Ubuntu, CentOS, RHEL) ✔ Database management (MySQL, PostgreSQL, MS SQL) ✔ Virtualization & cloud integration (VMware, Hyper-V, AWS, Azure)
🔹 Helpdesk & Technical Support
✔ Dedicated IT support team with rapid response times ✔ Troubleshooting & issue resolution ✔ Custom SLAs for uptime guarantees
2. Types of Managed Server Enterprise Support
🔹 On-Premises Server Management
✔ Ideal for businesses with in-house data centers ✔ Supports hardware maintenance, OS updates, security patches ✔ Best for: Enterprises requiring full control over infrastructure
🔹 Cloud & Hybrid Server Management
✔ Managed services for AWS, Azure, Google Cloud ✔ Optimized for cloud security, scalability & cost-efficiency ✔ Best for: Enterprises adopting hybrid or multi-cloud strategies
🔹 Fully Managed vs. Co-Managed Support
✔ Fully Managed: Service provider handles everything (monitoring, security, backups, troubleshooting) ✔ Co-Managed: Internal IT team works alongside provider for collaborative management
3. Benefits of Enterprise Server Support
🔹 Minimized Downtime: 24/7 monitoring & quick response prevent disruptions 🔹 Stronger Security: Proactive firewall management, encryption & threat monitoring 🔹 Scalability: Adapt server resources as business grows 🔹 Cost Savings: Reduces IT staff workload & lowers infrastructure costs 🔹 Compliance Assurance: Meets industry security & legal requirements
4. How to Choose the Right Managed Server Provider
✔ Service Level Agreements (SLAs): Ensure 99.9%+ uptime guarantees ✔ Security Protocols: Must include firewalls, DDoS protection, and backups ✔ Support for Your Tech Stack: Compatible with Windows/Linux, databases, virtualization ✔ Customization & Scalability: Can adjust services based on business growth ✔ 24/7 Support & Response Time: Fast issue resolution & technical assistance
5. Cost of Managed Server Enterprise Support
💰 Pricing Models: ✔ Per Server: $100–$500/month (basic), $500–$2,500/month (enterprise) ✔ Per Resource Usage: Based on CPU, RAM, storage & bandwidth ✔ Custom Plans: Tailored pricing for hybrid & multi-cloud environments
6. Who Needs Managed Server Enterprise Support?
✔ Large Enterprises: Need mission-critical uptime & security ✔ eCommerce & SaaS Businesses: Require high-performance cloud hosting ✔ Financial & Healthcare Organizations: Must comply with data security regulations ✔ Growing Startups: Benefit from scalable, cost-effective infrastructure
Need a Custom Managed Server Plan?
Let me know your server type, workload, and business needs, and I can recommend the best managed enterprise support solution!

0 notes
Text
Getting Started with macOS Ventura: Using Virtual Machines and Installation Files
MacOS Ventura is packed with exciting new features and improvements designed to enhance user experience and productivity. For those who want to explore macOS Ventura without committing to a full system upgrade, using a macOS Ventura .ISO or VMDK file to set up a virtual machine is an excellent solution. This blog will guide you through the process and benefits of using these files.
Why Use macOS Ventura .ISO?
A macOS Ventura .ISO file provides a convenient and flexible way to install and test the operating system on various hardware setups. Here are a few reasons why you might want to use a macOS Ventura .ISO:
Testing and Development: Developers can test applications on macOS Ventura without upgrading their primary system.
Compatibility: Users with non-Mac hardware can experience macOS features.
Backup and Recovery: An .ISO file can be used as a recovery tool in case of system failures.
Obtaining macOS Ventura .ISO
To get your hands on the macOS Ventura .ISO file, you can follow these steps:
Official Sources: The safest method is to download it from official Apple channels such as the Apple Developer website or the Mac App Store.
Create Your Own ISO: If you have access to a Mac, you can create an ISO file from the official macOS installer using Terminal commands.
Setting Up macOS Ventura Virtual Machine
A virtual machine (VM) allows you to run macOS Ventura on your existing hardware without replacing your current operating system. Here's how you can set up a macOS Ventura virtual machine:
Using VirtualBox
Download VirtualBox: Install the latest version of VirtualBox from the official website.
Create a New VM: Open VirtualBox and click "New" to create a new virtual machine. Choose "Mac OS X" as the type and "macOS 10.13 High Sierra (64-bit)" as the version.
Allocate Resources: Assign sufficient RAM and create a virtual hard disk.
Mount the .ISO File: Go to the VM settings, navigate to Storage, and add the macOS Ventura .ISO file as a virtual optical disk.
Start the VM: Start the virtual machine and follow the on-screen instructions to install macOS Ventura.
Using macOS Ventura VMDK
A VMDK (Virtual Machine Disk) file is another option for setting up a macOS Ventura virtual machine. It’s similar to an .ISO but designed specifically for virtual machine environments. Here’s how to use a macOS Ventura VMDK:
Download the VMDK File: Obtain the macOS Ventura VMDK file from a reliable source.
Create a New VM in VirtualBox: Follow the same steps as above to create a new VM.
Use the VMDK File: Instead of an .ISO, select the macOS Ventura VMDK file as the hard disk for the virtual machine.
Start and Install: Boot up the VM and proceed with the installation.
Benefits of Using macOS Ventura Virtual Machine
Flexibility: Easily switch between different OS versions and configurations.
Safety: Test new features without risking your primary system’s stability.
Convenience: Quickly set up and dismantle virtual environments as needed.
Conclusion
Follow the steps outlined in this guide to get started with your macOS Ventura virtual machine and enjoy all the new features and improvements. Using a macOS Ventura .ISO or VMDK file to set up a virtual machine provides a flexible and efficient way to explore Apple’s latest operating system. Whether you’re a developer testing new software, an IT professional preparing for deployment, or simply an enthusiast eager to experience macOS Ventura, these methods offer a practical solution.
0 notes
Text
SAN Storage: The Backbone of Enterprise Data Management
In the world of enterprise data management, Storage Area Network (SAN) technologies play a pivotal role in meeting the escalating demands for efficient, resilient, and scalable data storage. SAN storage solutions underpin the infrastructure that supports mission-critical applications, high-performance computing, and the vast expanse of data that modern businesses generate and rely upon. This comprehensive guide illuminates the key concepts, current trends, and best practices for leveraging SAN technologies to optimize enterprise data management strategies.
Why Is SAN Storage Crucial for Modern Enterprises?
Before examining SAN storage in further depth, it's essential to understand the context that makes such storage solutions a critical component of modern enterprise architectures.
Scalability and Performance
Enterprise data is not only growing in volume but also in complexity and types. From structured data in databases to unstructured data in files, the storage solution must accommodate a variety of data types while providing fast and reliable access to support business operations. SAN storage can be easily scaled to handle growing data requirements without significant impact on performance, thereby ensuring that applications operate at the required efficiency levels.
Consolidation and Virtualization
The trend toward data center consolidation and virtualization has made SAN storage almost indispensible. By centralizing storage resources, SANs help in more efficient use of storage capacity and also facilitate data protection and disaster recovery. Virtualization technologies can further enhance these benefits, allowing for efficient allocation of storage resources and simplification of data management tasks.
Reliability and Management
SAN storage arrays typically offer a suite of features for maintaining data integrity, such as automatic failover, snapshot capabilities, and remote replication. Additionally, SAN management software provides a unified interface for monitoring and controlling the entire storage network, which can be quite extensive in large enterprises.
What Is a Storage Area Network (SAN)?
A Storage Area Network is a dedicated, high-speed network that interconnects and presents shared pools of storage devices to multiple servers. SANs are typically composed of storage elements that include disk arrays, servers, switches, and connectivity devices and are designed to be highly available and fault-tolerant.
Components of a SAN
The fundamental building blocks of a SAN are:
Host Bus Adapters (HBAs): These network interface cards (NICs) are specifically designed for connecting servers to the SAN.
Switches: High-speed fiber channel or Ethernet switches connect the components within the SAN to facilitate data transfer.
Storage Devices: SAN can support various types of storage devices, from traditional hard disk drives to the latest in All-Flash Arrays (AFAs).
Storage Network Software: This includes the firmware that runs on the storage devices and the SAN management software that oversees the operation of the entire storage environment.
SAN Topologies
There are several SAN topologies, each designed to meet specific requirements:
Fibre Channel: Historically the most common and preferred protocol due to its high performance and reliability.
iSCSI: An IP-based protocol allowing organizations to use existing network infrastructures for SAN connectivity.
Fibre Channel over Ethernet (FCoE): A convergence technology that allows Fibre Channel traffic to run over Ethernet networks.
Converged Enhanced Ethernet (CEE): A standard for transport of Fibre Channel over Ethernet that incorporates Quality of Service (QoS) for prioritization of storage traffic.
Key Considerations for Implementing SAN Storage
Implementing a SAN storage solution is a non-trivial task, and several considerations should be taken into account to ensure success.
Requirements Analysis
Start with a comprehensive analysis of your organization's storage needs. Consider factors such as capacity, performance requirements, budget, and future growth projections. This analysis is essential for choosing the right type of SAN for your enterprise.
Design and Architecture
The design of the SAN architecture involves selecting the right components and connectivity to meet your performance and availability goals. Redundancy and failover mechanisms should be integral parts of the design to provide business continuity.
Security and Compliance
Data security is paramount in enterprise storage solutions. SANs should be designed with appropriate access controls, encryption technologies, and in compliance with industry regulations and best practices to protect sensitive data.
Scalability
The SAN architecture must be flexible enough to grow with the organization. This means using components that can be easily expanded, adding new switches, and integrating new storage arrays without causing significant downtime.
Best Practices for Managing a SAN
Once a SAN is in operation, efficient management is crucial to its success and the continuity of business services.
Regular Monitoring
Continuous monitoring of SAN performance and health indicators can help identify potential issues before they escalate and impact business operations.
Automation
Leverage automation tools to simplify routine management tasks and improve the efficiency of storage operations. These tools can handle tasks such as provisioning, snapshot and replication management, and performance tuning.
Training and Expertise
SAN technology is complex and constantly evolving. Investing in training for IT staff and staying current with the latest SAN advancements can ensure that your team remains proficient in managing the storage environment.
Regular Updates and Patches
Keep SAN software up to date with the latest patches and firmware updates. This not only ensures that the SAN is secure but also that it benefits from new features and performance enhancements.
Trends Shaping the Future of SAN Storage
The storage industry is dynamic, and several emerging trends are influencing the evolution of SAN technology.
Software-Defined Storage (SDS)
SDS abstracts storage resources from the underlying hardware, allowing for greater flexibility, cost savings, and simplified management. SANs are increasingly being re-architected to support SDS models.
NVMe Over Fabrics (NVMe-oF)
This technology extends the benefits of Non-Volatile Memory Express (NVMe) storage directly over a network fabric, such as a SAN. It enables even higher performance and lower latencies than traditional SAN setups.
Hybrid Cloud Integration
SAN manufacturers and cloud service providers are working to integrate SAN storage more seamlessly with hybrid cloud environments, allowing organizations to extend their on-premises storage into the cloud with greater ease.
Data Management and Analytics
Intelligent data management and analytics are finding their way into SAN storage solutions, providing insights into storage usage trends, optimizing performance, and supporting more informed decisions.
In Conclusion
SAN storage remains an invaluable asset in the enterprise data ecosystem, providing the reliability, performance, and scalability necessary for modern business demands. By understanding the key principles, best practices, and future trends discussed in this guide, IT professionals, data center managers, and storage engineers can better harness the power of SAN technologies to transform their enterprise data management strategies. Whether it's enabling virtualization, enhancing disaster recovery, or laying the foundation for future storage innovations, the role of SAN solution is only set to grow in the coming years.
0 notes
Text
Top Data Recovery Services

Data recovery services are like the spare tire in the trunk of your car. You hope you never have to use it, but when you need it you really need it! Just like you would have no way of getting home without that extra tire, a data recovery service might be your only hope of saving your data if you have a damaged or corrupted hard drive. A hard drive recovery service is a company that specializes in the recovery of lost, damaged, or corrupted data. Many data recovery companies offer recovery software that can be used remotely, but their primary function is to physically repair and salvage the data from affected storage media - Hard Disk Data Recovery.
There are many reasons that you may need to use a data recovery service. Data recovery software can only restore data from devices that can still be logically accessed by the operating system. A data recovery service can perform hard drive recoveries on media that are physically damaged and is not able to be repaired with software alone. Here is an overview of some quality data recovery services. We hope it helps you choose the best hard drive recovery service for your situation. We have been providing quality data recovery services for over many years using technically advanced proprietary hardware and software solutions - SSD Data Recovery.
Our confidence in its recovery capabilities led them to introduce the now industry-wide practice of not charging for failed recoveries. The company’s goal is to constantly devise better recovery methods and tools. They strive to exceed industry standards for security and media handling protocols and engage in regular external audits to maintain compliance. Expert technicians can get back data from damaged SSDs, hard drives, and virtually any other type of storage device. Data can be returned to users via new storage devices or through downloads based on the volume of recovered information. In cases where recovery is impossible, the device will be securely destroyed or can be returned to the client if desired. We provide a full range of data recovery services that can help customers save data from damaged or corrupted storage media. For more information please visit our site https://www.nowdatarecovery.com/
0 notes
Text

10 Most Important Server Management Best Practices
Effective server management is the backbone of a robust IT infrastructure, ensuring seamless operations, security, and performance. Whether you're an expert system administrator or new to server management, understanding and implementing best practices is essential. In this comprehensive blog, we will discuss the 10 most crucial server management best practices to enhance efficiency, reliability, and security in your server environment.
What is Server Management?
Server management refers to the ongoing process of overseeing and maintaining the health, security, performance, and overall functionality of a server or a group of servers within a network. Servers are fundamental components of IT infrastructure, responsible for hosting applications, managing data, and facilitating communication between devices. Effective server management is essential to ensure the optimal performance, security, and reliability of these critical systems.
Server Management Best Practices
Regular Software Updates:
Keeping your server's operating system, applications, and security software up to date is paramount. Regular updates patch vulnerabilities, improve performance, and enhance overall stability. Establish a routine for monitoring and applying updates to mitigate security risks and ensure optimal functionality.
Robust Security Measures:
Implement a multi-layered security approach, including firewalls, intrusion detection systems, and antivirus solutions. Regularly review and update security configurations to adapt to emerging threats. Conduct periodic security audits to identify vulnerabilities and proactively address potential risks.
Data Backup and Recovery:
Create a comprehensive backup strategy to safeguard critical data. Regularly back up essential files and configurations, and ensure the backups are stored securely. Test the recovery process periodically to verify the integrity of your backup system and minimize downtime in the event of data loss.
Monitoring and Performance Optimization:
Utilize monitoring tools to keep a close eye on server performance metrics. Set up alerts for potential issues such as high CPU usage, low disk space, or memory leaks. Regularly analyze performance data to identify trends, plan for scalability, and optimize server resources for optimal efficiency.
Effective Resource Management:
Allocate server resources judiciously to ensure optimal performance. Monitor resource usage patterns and adjust allocations as needed. Implement resource pooling and virtualization technologies to efficiently utilize hardware and scale resources based on demand.
Documentation and Change Management:
Maintain detailed documentation of server configurations, network layouts, and operational procedures. Implement a robust change management process to track and approve modifications. Documentation ensures consistency, facilitates troubleshooting, and streamlines collaboration among team members.
User Access Control and Authentication:
Implement strict access controls and user authentication mechanisms. Enforce the principle of least privilege to restrict user access to only necessary resources. Regularly review user permissions and revoke unnecessary privileges to minimize the risk of unauthorized access and potential security breaches.
Disaster Recovery Planning:
Develop a comprehensive disaster recovery plan outlining procedures for data recovery, system restoration, and continuity of operations in the event of a catastrophic failure. Conduct regular drills and tests to validate the effectiveness of the plan and identify areas for improvement.
Network Segmentation and Isolation:
Segment your network to isolate critical services and applications. This practice enhances security by containing potential threats within specific segments and prevents lateral movement in the event of a security breach. Implementing network segmentation adds an extra layer of defense to your server infrastructure.
Regular Audits and Compliance Checks:
Conduct regular audits to assess server configurations, security settings, and adherence to compliance standards. Ensure that your server environment complies with industry regulations and internal policies. Regular audits help identify potential issues, ensure regulatory compliance, and enhance the overall security posture.
Conclusion
Mastering server management requires a holistic approach that encompasses various aspects, from security and performance optimization to disaster recovery planning. By adhering to these 10 crucial best practices, you can establish a robust foundation for your server infrastructure, ensuring reliability, security, and efficiency in the ever-evolving landscape of IT operations. Implementing these practices will not only enhance the overall performance of your servers but also contribute to a resilient and future-ready IT environment.
#dedicated server#server problems#server announcement#tech#technology#server#server management#cloud management
1 note
·
View note
Text
Microsoft Certified Azure Fundamentals - Nanfor.com
This course provides a basic understanding of cloud concepts, the main Azure services, and Azure management and governance features and tools.
This course is suitable for IT staff just getting started with Azure. This audience wants to know about our offerings and get hands-on experience with the product. This course primarily uses the Azure portal and the command line interface to create resources. No scripting knowledge required. Students in this course will gain confidence to take other role-based courses and certifications, such as Azure Administrator. This course combines lectures, demonstrations, and hands-on labs. This course will also help prepare someone for the AZ-900 exam. Microsoft Certified Azure Fundamentals
Module 1: Cloud Concepts
In this module, you'll take an entry level end-to-end look at Azure and its capabilities, which will provide you with a solid foundation for completing the available modules for Azure Fundamentals.
Lesson
Introduction to Azure fundamentals
Fundamental Azure concepts
After completing this module, students will be able to:
Understand the benefits of cloud computing in Azure and how it can save you time and money
Explain concepts such as high availability, scalability, elasticity, agility, and disaster recovery
Module 2: Core Azure Services
In this module, you learn about core Azure services like Azure database, Azure compute, Azure storage, and Azure Networking.
Lesson
Core Azure Architectural components
Core Azure workload products
Azure networking services
Azure storage services
Azure database services
After completing this module, students will be able to:
Describe core Azure architecture components such as subscriptions, management groups, and resources
Summarize geographic distribution concepts like Azure regions, region pairs, and availability zones
Understand services available in Azure including compute, network, storage, and database
Identify services such as Azure Virtual Machines, Azure Container Instances, and Azure Kubernetes
Compare Azure's database services such as Azure Cosmos DB, Azure SQL, and Azure Database for MySQL
Examine Azure networking resources such as Virtual Networks, VPN Gateways, and Azure ExpressRoute
Summarize Azure storage services such Azure Blob Storage, Azure Disk Storage, and Azure File Storage
Module 3: Core Solutions
In this module, you'll learn about AI machine learning, Azure DevOps, monitoring fundamentals, management fundamentals, serverless computing fundamentals. and IoT fundamentals.
Lesson
Choose the best Azure IoT service
Choose the best AI service
Choose the best Azure serverless technology
Choose the best tools with DevOps and GitHub
Choose the best management tools
Choose the best Azure monitoring service
After completing this module, students will be able to:
Choose the correct Azure Artificial Intelligence service to address different business challenges
Choose the best software development process tools and services for a given business scenario
Choose the correct cloud monitoring service to address different kinds of business challenges
Choose the correct Azure management tool to address different technical needs and challenges
Choose the right serverless computing technology for your business scenario
Choose the best Azure IoT service for a given business scenario
Module 4: General security and networking features
In this module, you will learn how to protect yourself against security threats, and secure your networks with Azure.
Lesson
Security Tools and Features
Secure Network Connectivity
After completing this module, students will be able to:
Strengthen your security posture and protect against threats by using Microsoft Defender for Cloud
Collect and act on security data from many different sources by using Microsoft Sentinel
Manage dedicated physical servers to host your Azure VMs by using Azure Dedicated Host
Identify the layers that make up a *defense in depth* strategy
Explain how Azure Firewall enables you to control what traffic is allowed on the network
Configure network security groups to filter network traffic to and from Azure resources
Explain how Azure DDoS Protection helps protect your Azure resources from DDoS attacks
Module 5: Identity, Governance, Privacy, and Compliance
In this module, you will learn about Azure identity services, how to build a cloud governance strategy, and privacy, compliance, and data protection standards on Azure. AZ-220: Microsoft Azure IoT Developer
Lesson
Core Azure identity services
Azure Governance Methodologies
Privacy, Compliance, and Data Protection standards
After completing this module, students will be able to:
Explain the difference between authentication and authorization
Describe how Azure Active Directory provides identity and access management
Explain the role single sign-on (SSO), multifactor authentication, and Conditional Access play
Make organizational decisions about your cloud environment by using the CAF for Azure
Define who can access cloud resources by using Azure role-based access control
Apply a resource lock to prevent accidental deletion of your Azure resources
Apply tags to your Azure resources to help describe their purpose
Control and audit how your resources are created by using Azure Policy
Enable governance at scale across multiple Azure subscriptions by using Azure Blueprints
Explain the types of compliance offerings that are available on Azure
Gain insight into regulatory standards and compliance on Azure
Explain Azure capabilities that are specific to government agencies
0 notes
Text
Cyber Safe and Sound: Proven Strategies for Protecting Your Business and Personal Data
In today's digital age, cyber security is more important than ever. With so much of our personal and business information being stored online, it's crucial to take steps to protect ourselves from cyber attacks. These attacks can range from simple email scams to sophisticated hacking attempts and can result in the loss of sensitive information, financial loss, and even reputational damage. In this blog post, we'll explore some proven strategies for keeping yourself and your business cyber safe and sound. We'll cover everything from basic security measures to advanced techniques, so whether you're a business owner or an individual, you'll learn something new. So, let's dive in and start protecting ourselves in the digital world!
One of the most basic but effective strategies for protecting your business and personal data is to use strong, unique passwords. This may seem like common sense, but many people still use easily guessable passwords such as "12345" or "password". When creating a password, it's important to use a mix of uppercase and lowercase letters, numbers, and special characters, and to avoid using personal information such as your name or birthdate. Additionally, you should consider using a password manager to generate and store complex passwords for you.
Another key strategy is to keep your software and devices up to date. This includes everything from your operating system to your web browsers and apps. Software updates often include important security patches and bug fixes, so it's essential to install them as soon as they become available. Additionally, you should ensure that your anti-virus and firewall software is up to date and active at all times.
In addition to these basic strategies, you can also take more advanced measures to protect your data. One option is to use encryption to secure sensitive information. This can be done at the file or disk level, and essentially makes it impossible for anyone to read the data without the correct key. Another advanced strategy is to use a virtual private network (VPN) to encrypt your internet connection and protect against hackers and snoops.
For businesses, it's also important to have a comprehensive security plan in place. This should include regular security assessments, employee training, and incident response procedures. It's also a good idea to have dedicated IT staff to manage your organization's security systems. Additionally, you should consider investing in a professional security service, such as a managed service provider (MSP) or security-as-a-service (SaaS) provider, to help safeguard your networks and data.
Finally, a robust Backup and Disaster recovery plan will go a long way to mitigate the risk of data loss due to any possible events, including cyber attacks. Backup copies of all your important data should be kept in a secure location, like cloud storage, and those copies should be regularly updated.
In conclusion, the key to protecting your business and personal data is a multi-layered approach, implementing basic and advanced strategies, stay informed, and being proactive with the latest cyber threats. Regularly reviewing and testing your security protocols will help to ensure that your data remains safe and secure.
2 notes
·
View notes
Text
MacBook Pro 2021-11-15
EtreCheckPro version: 6.5.4 (6F017)
Report generated: 2021-11-15 18:53:51
Download EtreCheckPro from https://etrecheck.com
Runtime: 2:13
Performance: Excellent
Problem: No problem - just checking
Major Issues:
Anything that appears on this list needs immediate attention.
Unsigned files - There are unsigned software files installed that could be adware and should be reviewed.
Minor Issues:
These issues do not need immediate attention but they may indicate future problems or opportunities for improvement.
No Time Machine backup - Time Machine backup not found.
x86-only Apps - This computer has x86-only apps might not work on future versions of the operating system.
Limited drive access - More information may be available with Full Drive Access.
Kernel extensions present - This computer has kernel extensions that may not work in the future.
Hardware Information:
MacBook Pro (13-inch, 2019, Four Thunderbolt 3 ports)
MacBook Pro Model: MacBookPro15,2
2,4 GHz Quad-Core Intel Core i5 (i5-8279U) CPU: 4-core
8 GB RAM - Not upgradeable
BANK 0/ChannelA-DIMM0 - 4 GB LPDDR3 2133
BANK 2/ChannelB-DIMM0 - 4 GB LPDDR3 2133
Battery: Health = Normal - Cycle count = 176
Video Information:
Intel Iris Plus Graphics 655 - VRAM: 1536 MB
Color LCD (built-in) 2880 x 1800
Drives:
disk0 - APPLE SSD AP0512M 500.28 GB (Solid State - TRIM: Yes)
Internal PCI-Express 8.0 GT/s x4 NVM Express
disk0s1 - EFI [EFI] 315 MB
disk0s2 [APFS Container] 499.96 GB
disk1 [APFS Virtual drive] 499.96 GB (Shared by 6 volumes)
disk1s1 - M********************s (APFS) [APFS Virtual drive] (Shared - 17.85 GB used)
disk1s2 - Preboot (APFS) [APFS Preboot] (Shared - 272 MB used)
disk1s3 - Recovery (APFS) [Recovery] (Shared - 1.10 GB used)
disk1s4 - VM (APFS) [APFS VM] (Shared - 20 KB used)
disk1s5 (APFS) [APFS Container] (Shared - 15.69 GB used)
disk1s5s1 - Macintosh HD (APFS) [APFS Snapshot] (Shared - 15.69 GB used)
disk1s6 - Update (APFS) (Shared - 508 KB used)
disk2 - USB SanDisk 3.2Gen1 30.75 GB
External USB 5 Gbit/s USB
disk2s1 - EFI (MS-DOS FAT32) [EFI] 210 MB
disk2s2 [APFS Container] 30.54 GB
disk3 [APFS Virtual drive] 30.54 GB (Shared by 1 volumes)
disk3s1 - 32G (APFS) (Shared - 13.84 GB used)
disk4 - Apple Disk Image 304 MB ()
External Virtual Interface
disk4s1 - T***************************r (Mac OS Extended) 304 MB (276 MB used)
Mounted Volumes:
disk1s1 - M********************s [APFS Virtual drive]
499.96 GB (Shared - 17.85 GB used, 464.90 GB available, 464.89 GB free)
APFS
Mount point: /System/Volumes/Data
Encrypted
disk1s2 - Preboot [APFS Preboot]
499.96 GB (Shared - 272 MB used, 464.89 GB free)
APFS
Mount point: /System/Volumes/Preboot
disk1s4 - VM [APFS VM]
499.96 GB (Shared - 20 KB used, 464.89 GB free)
APFS
Mount point: /System/Volumes/VM
disk1s5s1 - Macintosh HD [APFS Snapshot]
499.96 GB (Shared - 15.69 GB used, 464.90 GB available, 464.89 GB free)
APFS
Mount point: /
Read-only: Yes
disk1s6 - Update
499.96 GB (Shared - 508 KB used, 464.89 GB free)
APFS
Mount point: /System/Volumes/Update
disk3s1 - 32G
30.54 GB (Shared - 13.84 GB used, 16.64 GB available, 16.63 GB free)
APFS
Mount point: /Volumes/32G
Encrypted
Owners enabled: No
disk4s1 - T***************************r
304 MB (276 MB used, 28 MB free)
Mac OS Extended
Disk Image
Mount point: /Volumes/T***************************r
Owners enabled: No
Read-only: Yes
Network:
Interface en6: USB 10/100/1000 LAN
Interface en0: Wi-Fi
Interface bridge0: Thunderbolt Bridge
System Software:
macOS Monterey 12.0.1 (21A559)
Time since boot: About 2 hours
Notifications:
TechTool Pro 14.app
one notification
Security:
Gatekeeper: App Store and identified developers
System Integrity Protection: Enabled
Antivirus software: Apple
Unsigned Files:
Launchd: /Library/LaunchDaemons/com.micromat.techtoolpro14.TTP14BackgroundTool.plist
Executable: /Library/PrivilegedHelperTools/com.micromat.techtoolpro14.TTP14BackgroundTool
Old Applications:
2 x86-only apps
Kernel Extensions:
/Applications/TechTool Pro 14.app
[Not Loaded] spdKernel.kext - com.micromat.driver.spdKernel (Micromat, Inc., 1.0 - SDK 10.14)
System Launch Daemons:
[Not Loaded] 37 Apple tasks
[Loaded] 183 Apple tasks
[Running] 155 Apple tasks
[Other] One Apple task
System Launch Agents:
[Not Loaded] 15 Apple tasks
[Loaded] 187 Apple tasks
[Running] 147 Apple tasks
[Other] One Apple task
Launch Daemons:
[Running] com.micromat.TechToolProDaemon.plist (Micromat, Inc. - installed 2021-11-15)
[Loaded] com.micromat.techtoolpro14.TTP14BackgroundTool.plist (? 0 - installed )
Launch Agents:
[Running] com.micromat.TechToolProAgent.plist (Micromat, Inc. - installed 2021-11-15)
3rd Party Preference Panes:
TechTool Protection (Micromat, Inc. - installed 2021-11-15)
Backup:
Time Machine Not Configured!
One other local snapshot
Performance:
System Load: 2.17 (1 min ago) 1.99 (5 min ago) 1.96 (15 min ago)
Nominal I/O speed: 0.10 MB/s
File system: 15.47 seconds
Write speed: 1983 MB/s
Read speed: 2375 MB/s
CPU Usage Snapshot:
Type Overall
System: 2 %
User: 5 %
Idle: 93 %
Top Processes Snapshot by CPU:
Process (count) CPU (Source - Location)
EtreCheckPro 17.88 % (Etresoft, Inc.)
Brave Browser Helper (Renderer) (11) 12.24 % (Brave Software, Inc.)
WindowServer 11.96 % (Apple)
kernel_task 3.20 % (Apple)
com.apple.AppleUserHIDDrivers 2.70 % (Apple)
Top Processes Snapshot by Memory:
Process (count) RAM usage (Source - Location)
Brave Browser Helper (Renderer) (11) 1.38 GB (Brave Software, Inc.)
EtreCheckPro 532 MB (Etresoft, Inc.)
kernel_task 357 MB (Apple)
Brave Browser 286 MB (Brave Software, Inc.)
MTLCompilerService (24) 261 MB (Apple)
Top Processes Snapshot by Network Use:
Process Input / Output (Source - Location)
corespeechd 4 KB / 17 MB (Apple)
biometrickitd 498 KB / 128 KB (Apple)
mDNSResponder 96 KB / 91 KB (Apple)
remoted 66 KB / 86 KB (Apple)
Mail 36 KB / 23 KB (Apple)
Top Processes Snapshot by Energy Use:
Process (count) Energy (0-100) (Source - Location)
Brave Browser 5 (Brave Software, Inc.)
Brave Browser Helper (Renderer) (11) 5 (Brave Software, Inc.)
WindowServer 5 (Apple)
coreaudiod 1 (Apple)
Brave Browser Helper (GPU) 1 (Brave Software, Inc.)
Virtual Memory Information:
Physical RAM: 8 GB
Free RAM: 151 MB
Used RAM: 5.80 GB
Cached files: 2.05 GB
Available RAM: 2.20 GB
Swap Used: 0 B
Software Installs (past 60 days):
Install Date Name (Version)
2021-11-13 macOS 12.0.1 (12.0.1)
2021-11-13 MRTConfigData (1.85)
2021-11-13 XProtectPlistConfigData (2151)
2021-11-13 Core Services Application Configuration Data 12.0 (120.72)
2021-11-15 TechTool Pro 14.0.3 (1.0)
Diagnostics Information (past 7-30 days):
End of report
3 notes
·
View notes