#and making an enemy that constantly chases you across the map outside of its area is both difficult from a developers pov
Explore tagged Tumblr posts
Visit Tumblr Blog
Explore Tumblr blogs with no restrictions, modern design and the best experience.
Last Seen Tumblr Blogs


Fun Fact
Tumblr is available in 18 languages.
Text
I'd love to read like, an academic article on the racism in Zelda games but I swear some of these read like the author has never played a video game before
#the enemies in this game will stop chasing you after a certain amount of distance#yeah thats not an example of how video game monster races are a form of unacceptable othering#it's an example of a video game being a computer program that requires a finite amount of energy to run#and making an enemy that constantly chases you across the map outside of its area is both difficult from a developers pov#and unfair for the players since once you engage in such a fight there is no way to disengage#that is not evidence supporting your thesis#which is a shame because i want to read more about your thesis
12 notes
·
View notes
Note
Hey there, recently god rain world and I am struggling though it lol.. wondering if you'd have any tips other than just "get used to dying a bunch" haha. I'm literally playing as the survivor (default slugcat, sorry if I'm remembering the names wrong). Anyway, thank you for the help if you have it, and if not, I'll just power through lol
look up the advanced movement video on youtube. most important takeaways: -how to slide -throwing an object while jumping makes you jump farther, with spears boosting the jump distance most -how to backflip and throw a spear straight down (i've never been able to pin an enemy this way outside of the arena, but there are some places only accessible if you can throw a spear into the ground and use it as leverage by climbing it like a pole) -how to fast swim without boosting by pressing A
any object you come across, it's good to look at its wiki, there's a ton of stuff that's never stated in the game.
always give scavengers pearls and always save pearls or take them with you when you can. if you end up on their bad side, it's also easy to avoid their attacks by moving vertically, as they can only throw horizontally. but scavengers will generally let even low reputation slugcats through tolls for a pearl (excluding artificer). also, crouch when near scavengers if you aren't high reputation with them yet and drop all weapons or they may attack you anyway.
start to memorize "easy" shelters such as shelters with food nearby and the rooms surrounding those shelters.
play with remix options on to make the game as easy as you need it to be.
do not play aggressively and try to fight creatures you can run from. pressing A to jump constantly when fleeing makes it more difficult for an enemy to grab you. if you learn to slide and spear boost the slide spears may have more worth in fleeing than fighting (i never learned to slide well). especially true for survivor, who can't even eat the meat from predator creatures.
that said, most enemies are incapacitated with a spear throw or two, even though it won't kill them. vultures may start to flee and have a difficult time getting back into the air, lizards fall off the background and poles they're trying to climb repeatedly and may also flee depending on their health, and so on. being able to get one good spear shot in pretty much guarantees safety from a predator who isn't already right in your face, but it often incapacitates and stuns predators who have even grabbed you in their mouth already enough to get away from them. the worst creature to do this with is the green lizard, who is heavier and takes significantly more hits. it really pisses them off if you spear them. they can't climb, though, so they are easily fled from.
learn to juke enemies by going through connections or doorways repeatedly while they try to chase you. they can't attack you while you're going through, although they can attack you in the doorway or connection opening (the little arrows). this is possibly the most vital skill i can think of in rain world. usually when i'm juking i will bait lizards if they don't chase me depending on which way i want to go. i'll either run in the opposite direction on the other side of the door once they go through or go back through the door again to spear them in the back because they are slow to turn around. do not try to juke king vultures (vultures who can shoot lampoons from their face). just run for cover. i learned this the hard way, multiple times--
if you're getting slaughtered by a specific enemy over and over again, give up on getting past them and practice killing them. it makes them less scary overall and gives you a lot experience getting away from them. assuming your karma is at the bottom of the ladder anyway, it's really no loss besides affecting your score.
have a map open to consult which way you should go.
a lot of enemies don't spawn immediately and they don't stay in their spawn rooms forever. you can get through some areas by leaving immediately and trying to get through before an enemy spawns, or by waiting a bit and seeing if they aren't even there.
i elect to always have something in my paws when i can, even if it's just two pieces of rubbish. a piece of rubbish works just as well to force a lizard to let go of me if it's latched its tongue on or cause it to fall into a pit while it's climbing the background.
that's all i can think of off the top of my head. i'm not even a great rain world player, most advanced movement i can't do because of how precise it is (fast pole climbing for example is a frame-perfect trick over and over again), but these things got me through all of the scug campaigns except for enot and monk (presumably i can do monk, i just never bothered to)
11 notes
·
View notes
Text
Dead Space: Horror Through Design
Dead Space is a game that needs little introduction. A claustrophobic sci-fi horror set in space that manages to rise above its action horror roots to become something truly chilling at times. One of the main ways in which it achieves this is through the visual and environmental design of its levels; or rather level, because the game takes place all in one contained space – the USG Ishimura.
In this post we're going to be looking at how the game creates tension, how this permeates the entire game and how this game-feel effects the player. The main sources of horror in Dead Space is of course the Necromorphs, the flagship enemy of the franchise which can only be killed by what the designers termed “tactical dismemberment”; but these monsters quickly become a stale exercise in jump scares and enemy gauntlets. Well designed body horror will only get your horror design so far if you're only willing to engage with players through predictable gameplay beats and genre convention.
In my opinion the more tense sections of the game are the first few sections, where Necromorphs are few and far between and the suggestion of the monster is more than enough to send shivers down your spine. The game suggests monsters more than throws them at you and asks who are you and how are you, a mere engineer, to defeat these monstrosities? That question, that “what if?” is a prime source of tension through suggestion and demonstration. The game shows you how powerful these enemies are in an opening sequence that proffers you no option but run -and run fast- and then spends the next half an hour both teaching you how to defeat them in one-on-one encounters, and creating a distinct fear of “they could jump out at any time”. This is clever, allowing the player to face off against enemies in singulars, to practice the games dismemberment system before it really starts to throw hoards at you, but it also compounds upon the horror.
It achieves this in two ways. The first is of course through the narrative story bit of “here's the monster killing a bunch of people who surely [according to existing game convention] are more than well equipped enough to deal with it”; that initial splash of subversive jump-scare is a shock so early – not even 3 minutes – into the game and during a completely innocuous section to boot. It is a very good example of “show, don't tell”. Instead of having someone tell you something is aboard the ship, the main enemy bursts into play and makes its presence and danger to you, the player, known. And then of course, a fast fumble into gameplay where you could be assailed at any moment and which sets up a clear predator-prey dynamic for the rest of the game – you are being chased, you are not the chaser. It does all of this without telling you, without audio logs or “I'm being followed”, which would perhaps be ham-fisted. This of course erodes as the story goes on and you equip bigger and better weapons, begin to predict the jump-scares and find exactly those sorts of logs, but that first slice of horror is delicious.
The second way in which the game introduces tension to the player is by showing, repeatedly, Necromorphs climbing back into the walls and vents, ready to emerge again at any point, from anywhere, or so it seems – and to the player, feels- for one very important reason; the very vents, shafts and walls from which they jump out and retreat back into are littered all over the environment, all around you. In several scripted sections Necromorphs specifically watch you from them, making them feel omnipresent and constant but aside from these visual cues, you can hear their thunks and clicks as they climb about, unseen but very much felt. This reinforces the predator-prey dynamic and oppressive atmosphere. You are firmly within the spider's' web, a fly. They are all around you, sometimes making themselves known, sometimes not, but always there – audible, and palpable.
This horror is only as effective as its opening sections. In my opinion as the game goes on and you get stronger and more desensitised to the jump scares of the game, the shock of seeing an enemy climb out of an open vent or back into one, accompanied by a scare chord, is lessened slightly. After all, when they climb out, you'll be able to deal with it in all likelihood. To a lesser degree another way in which the game uses environmental design is less to do with the actual design of the ship so much as placement of objects throughout the game; the presence of bodies. The first time you pass one, it might lay prostrate and in your mind dead. But when you return, inevitably after having picked up an essential item, they may spring back to life with shocking certainty. The first few times this happens it is undoubtedly scary but when every [monster] body in the game bar one does this, it quickly loses its shock value and in my mind, is a good example of why jump scares stale so fast – through predictability and player anticipation. The best jump scare is sporadically used, not the very crux of the horror itself.
That constant, oppressive feeling of “they're everywhere, all around me” is compounded by the very nature of the USG Ishimura. It is a ship, drifting in the dark annals of space, that final frontier. You cannot leave because you have no escape option. The corridors are winding, gaping maws filled with environmental storytelling in the form of scrawled messages, crazed passengers and an intense feeling of claustrophobia. It is easy to get lost and disoriented on the ship, especially when many corridors lead to dead ends and you are constantly backtracking and crisscrossing over your previous paths, opening new ones and returning to prior areas through previously inaccessible doors. It can be very disorienting after 2 hours of exploring one section, to suddenly find yourself back in an area from 4 hours ago, emerging from a door you probably forgot existed until this moment. Clever changing of previous environments as things happen in game – bits of ship getting blasted off or reconnected to energy grids allowing for more exploration, the meaty growths spreading across the ship and new enemies appearing and bodies disappearing all help older areas to feel fresh, rather than stale retreads. All of this, also, done without words, without telling the player. It all contributes to a feeling of confusion and being truly lost in what is actually, a rather small gameplay area and this in itself is a really clever use of space and navigation to make a game feel larger than it is.
But this clever design is slightly watered down somewhat by one of the navigation mechanics in the game. You can press a button and a visual guide will pop up showing you the path to the next objective. Honestly, this feature feels entirely ancillary to me; there are signposts clearly telegraphing areas you need to go; there's a map on the tram that pops up at the beginning and end of every chapter-so why not incorporate that somehow-; and the rest of the game prides itself on having no user interface so why have something as clunky and immersion-breaking as this tool? It undermines the very horror of feeling lost, of encroaching deeper and deeper into the abyss, and it also undermines the clever design beats that include signposts and symbols that show you where to go. Your companion, Kendra, also gives you directions so your knowledge of the games' space and how it all connects together, is actually unnecessary and at no point is the player required to demonstrate their knowledge of the layout, or even allowed to get lost which could really have added to the fear and feeling of being trapped. That feeling is entirely undermined for the sake of convenience.
However, one way in which the claustrophobia of the level design is compounded is in the cameras, and tightness of the corridors. Taking cues from Resident Evil 4, Dead Space features an over-the-shoulder camera of almost cinematic proportions. We are following Isaac through the game, watching everything almost -almost- from his perspective, and we see exactly what he sees. Necromorph bodies and open vents, and text scrawled on walls, and all. This camera, twinned with the tight, narrow corridors, contributes also to a feeling of closeness, of the walls and very cameras closing in on you, everything so close together. You are being watched, by the camera and the Necromorphs both.
Another design choice, namely the light being twinned with the weapon you are using, adds to this. All outside of your narrow target is often too dark to see in certain areas where the game ups the tension using darkness. You could be focused entirely upon an enemy, torchlight glaring furiously in its face, but that will be all you can see; which forces you to confront the horror in front of you, and leaves you with a question. What if there's another outside of the light, outside of your view? This is another way in which the design of the game uses suggestion and “what ifs” to scare the player. Not only this but that most primal of fears, nyctophobia, is incurred. That light in darkness is a pinprick, barely allowing for you to see ahead of yourself, and making you feel, again, like everything is closing in on you. Darkness all around, the ships walls all around, Necromorphs all around.
Other areas of the game use the very colour of lighting – harsh oranges, reds and yellows – to signify danger, fear and that an area isn't yet safe. In enemy gauntlets, you will find an alarm blaring and an orange beam flickering, to show you that there are yet still enemies around that you must kill before you can progress. This is one thing that, I think, enemy gauntlets do well – you are trapped in a confined space [within an already confined space] and must get rid of all the enemies before you become their next victim and all aspects of design in this case are telling you “danger, get out” as well as allowing you breathing room once the danger is alleviated.
All of these design choices – the enemies established in the walls, limited lighting, winding corridors, the tight camera, the maze-like structure of levels and the disorienting feel of repeating back on yourself all contribute to a very precise feeling within the player. You are trapped, you are tracked, and this all creates tension, unease, and fear. Of course, this is just one of the ways in which Dead Space creates fear.
14 notes
·
View notes
Text
Dangan Thieves Third Palace
...This is over 4300 words - last I checked. I hope this makes up for all the delays of the Third Palace and revives the AU. Thank you all for waiting! I had to take a hiatus from writing this summary and @shsl-shipper-gamer-fangirl also got pretty busy. Plus writer’s block decided to knock my head up for the Boss Battle and ending bit. Luckily for everyone, that’s all gone now for this to arrive. As you can tell, we got ourselves Juzo Sakakura being the Third Palace Ruler and let me say - it was a blast figuring out how this would go down. Without any further delay, let’s begin anew! PS Don't blame any mistakes in here because this took long enough as is. Might revise it later if I feel like it needs one. Consider this your Christmas Present everyone!
Third Palace/The Prison Palace
Keywords: Juzo Sakakura, Hope's Peak Academy Security Building/Faculty Building, Prison
“Playable” Thieves: Hajime, Chiaki, Komeada, Ibuki, and Fuyuhiko with Monomi
The world inside the Metaverse created by Juzo Sakakura, it formed itself quite differently compared to the previous two. Even the way they find themselves entering the Palace is different than before. Rumors of the supposed Dangan Thieves spread throughout the campus and none of the group knows how to handle the fact their popularity is growing. And as much as Hajime, Chiaki, and Nagito would like to continue - a longer question keeps them under pressure from doing so quickly. From the last Palace, not even Nagito could understand what his cognition meant by a strange animal. It has them wanting to learn more - something that they believe may or may not backfire later on down the line. Constantly meeting up after school, their adventures to the Metaverse and Mementos continue onward slowly. In one such case, a certain student just so happened to be minding their own business when they overheard a meeting before a trip to Mementos. Unbeknownst to them, not being aware of their surroundings most of the time would be their undoing. Sometime later, Hajime, Chiaki, and Nagito are meeting up for some downtime - with nothing really relating to their identities as the Dangan Thieves when Ibuki surprises them. Startled very much at first, the group is very confused at how Ibuki even found them. She admits to stalking them and being a huge Dangan Thieves fan; it gets to the point where her loud noisy voice gets the attention of a security. Catching the attention of one of the guards in the area, the group gets scared off when that guard releases that Hajime isn’t supposed to be in that part of the school. Getting off without much of punishment, this would only be the beginning of the next Palace’s discovery. Days go on as Ibuki keeps pestering the group to have her join one of their adventures to the Metaverse. As much as it annoys Hajime, the attention starts to bring Juzo Sakakura into the whole ordeal. Everything starts off as small, minor annoyances to the party - mainly to Chiaki since Fuyuhiko’s sister isn’t at all punished whenever she visits her brother as with Mahiru visiting Sato. The weird fixation Juzo has for Hajime gets to the point where the Head of Security gets restraining orders on the poor students. No matter what Nagito and Komaeda - though mostly Chiaki - try to get the restraining orders lifted, Juzo won’t budge one bit. Now forced to meet up outside of school ground and far away from the sight of any security guards, they believe that this has to stop. Yet even that clearly an objective due to the fact it could have repercussions and could get Hajime expelled if it proceeds any further. No leads for them to go on, it is then Ibuki appears and apologizes for getting them into that mess. Hajime still isn’t at all forgiving since Ibuki caused him a new annoyance. Still, the Ultimate Musician wishes to join them in the Metaverse and comes up with a solution. Using her mobile device, the trio discovers that somehow Ibuki gained access to the strange Navigator App and is able to find out Juzo has a Palace. The thought of a Palace didn’t really cross their minds since they couldn’t even think or believe it got to that point. Having the information in hand, Ibuki agrees to help get them to the Palace with her “distracting” music recordings if they agree to take her to the Palace. A goal clearly set a way to get past security by Ibuki’s boisterous loud mouth, they accept it in order to lift the restraining orders on Hajime. When the first attempt into the Palace begins, it doesn’t appear to be anything fancy. It first appears to be the security building and is fairly straightforward. Possessing a single floor without any real map, the Thieves quickly sweep it with ease and find themselves getting into the Treasure seemingly way too easily. At first, they seem pretty cautious since it looked to be way too much of a walk in the park. Yet temptation gets the better of them and they reach out to the “Treasure” - something Ibuki is an entrance to the glowing chest. By a twist of predictable fate, however, that was but a trap! Getting surrounded by many Shadows appearing as Prison Officers holding various equipment. Even worse is the fact of not only being outnumbered is the liability of Ibuki. Despite her somewhat well-meaning intentions, her voice goes unheard as they try to fight them off. The battle rages on until one by one, the party is knocked out and Ace has no time to react to the sound of sirens blaring is the last thing he hears. The next thing he knows, he awakens in a prison room with Pierrot welcoming him to their cell. Much to his surprise, Ace finds that while they were unarmed, their rebellious appearance still remains. A relief to the leader since everything might become compromised if his real identity was known. Shocked at not seeing Bonnie, Monomi nor Ibuki with them, neither of the Thieves even have an idea on how to get out. Yet by looking through the bars of the cell, Pierrot places his hand on the lock and by chance or just his pure luck, it opens up for them to escape. While they still possess their outwards appearances, both Ace and Pierrot realize very quickly that neither of their Persona was summoning one bit; something that nearly cost them both their lives by mistakenly engaging in a battle. Resorting to the stealth techniques of actual thieves, they sneak around the Prison and come across Bonnie not far from their cell. Unlocking the cell door for her to escape, the trio quickly tries to locate Monomi and Ibuki to make sure they’re okay before reclaiming their weapons and escaping. As they go more and more through the Palace, they come to find that every flight of stairs didn’t lead them to anyplace where there were windows. Everything seemed to be shut off from the natural light and instead lit by the electrical system powering the place. None of them could really explain just why this was going on but soon enough, they encountered Ibuki yelling her in what appears to the lobby of the prison building with Monomi trying to get Ibuki to calm down. It is there that they find a Shadow carrying a large sack - the same one being chased by the obnoxious yelling and not trying to harm Monomi nor Ibuki. Really perplexed on what’s going, the Thieves discover that on the ground floor that they can summon their Personas. Having their power back, the Shadow is quickly defeated and the sack is dropped to the floor to reveal the missing weapons. Pumped up by the action, Ibuki starts making a ruckus - much to the dismay of the Thieves that eventually gets the attention of the prison officers and are forced to fight some of them off. Exhaustion from the floors and the last battle tolls a good deal of hinderance on the Thieves. Monomi worries for their well being but as the battle continues, Ibuki is watching and getting excited but worried about the Thieves since even she was threatened. No matter how much she shot and yells out, it doesn’t seem to be helping all she wishes to do is to help. She feels powerless in all sense of the words due to the fact that not even becoming a distraction is helping the situation at all. This sparks triggers her awakening to her Persona and a great asset to the battle since her starting powers are Nuclear and hits all the enemies. The force of her powers suddenly causes a power outage yet opens up an escape route for the Thieves to flee. Escaping to the real world after that deadly encounter, Ibuki is hyper-energetic about awakening to her Persona, everything stops when they realize where they are. Wait for a second - when did they get to the Faculty Building?! Yep - much to their shock and horror in Hajime’s case - Juzo’s Palace is split into two different parts. The strange one-floor area that was a trap and then the prison. Nagito notes that they only escaped from the lower floors and didn’t get a chance to go up those floors in the Palace. Trying to collect their thoughts, Ibuki realizes that it wouldn’t be ideal to continue since she’s pretty tired and everyone else appeared to be also. With the thought that everyone else is quite tired as well, they agree to come back tomorrow with Ibuki - much to her joy and group’s reluctance. Yet as they are leaving the area, a certain somebody notices their activity but speaks nothing of it as they leave. The next day, the group meets up to try and get back in order to quickly change Juzo’s heart. Even with not encountering the Shadow Self, upon their return they find that the Prison is inaccessible for any of them. Ibuki even tries making a ruckus in front of the prison gates and in the first area to no avail. Stumped on just what exactly to do to get back in, Monomi questions the group on how they even got in there in the first place. Ace explains the restraining order and how strange it was that they couldn't go back inside. The magical talking bunny suggests it may be because of Ibuki’s Nuclear power spiking and causing the prison to reset its systems that by chance his cognition would have reset on who he saw at a major threat - so even if the Thieves attempted to get back inside it wouldn’t let them. A major threat that he had to restrain even more due to the rumors students were gossiping to each other. Now in order to reset it and get them back inside, somebody would have to appear as a prisoner in order to get them inside. Knowing that Hajime could no longer by their ticket to get in, Chiaki suggests for the group to investigate the rumors going about and see if there was any way to seemingly get Hajime or any of them “caught” to allow them back inside the Palace. Taking some time, their chance doesn't really show up on Nagito’s, Chiaki’s or Ibuki’s end at all. Fortunately for Hajime, he just so happened to notice how Natsumi seemed to be upset and alone during one of their classes. By some persistence and slowly gaining her trust, she lets it slip that her brother got in trouble for meeting up with her. It was so bad that Peko got hurt pretty badly and she could tell Fuyuhiko wasn’t at all pleased. She confesses that it's even spooked Mahiru and Sato for meeting up - a thought she scowls at. Nothing she seems to be doing is getting him to talk to her. Yet she fears that Sato might be losing her and starting to blame both herself and Hajime for not being able to meet with Mahiru. Hajime tries his best to cheer her up and Natsumi appreciates his help before leaving. Getting that information from the younger sister to the Ultimate Yakuza, he goes to text the others with that lead and hopes that by talking with Fuyuhiko they can get caught and get back into the Prison Palace. Meeting with Fuyuhiko sometime after the news, it surprises the group to see him alone with Peko by his side - something Hajime believed wouldn’t be the case. At first, the Ultimate Yakuza is reluctant to comply with even speaking with the group. Ignoring them seemed to be a priority until Hajime brought up what happened to Peko from the information his little sister told him. This pisses of Fuyuhiko and puts him on the defensive on just how he acquired that knowledge. Finally getting him to talk, they slowly get out of him that Juzo had apparently gotten information from somebody about false dealings that would disrupt order for both the Main and Reserve Course. It wasn’t anything he knew about but Peko got badly hurt inside of him and he wasn’t going to deal with any more of that shit. Of course, this was climax since afterward Juzo comes along to break them. Upon seeing Hajime, Fuyuhiko, and Ibuki with the other Dangan Thieves, hell breaks loose and the group flees the scene before the Head of Security can catch them. By either Komaeda’s turn of good luck or by the wheels of destiny, they happened to get out of getting caught by accidentally finding themselves at a corner of the school. How they escape would be something to question. Recollecting themselves, they found that Fuyuhiko had joined them in running off, only for him to scoff it off since Ibuki had dragged him along with her phone open. Her gleeful smile shocks the group when it suddenly transports everyone into the other world. This grandiose event that gets them into the Metaverse to not only freak out the Ultimate Yakuza but everyone as to why Ibuki would do such a dangerous thing. They’d be arguing a bit with trying to explain to Fuyuhiko just what’s going until security Shadows from Juzo’s Palace roam by and once again kick their asses back in into the Palace’s lower sections. Fortunately this time, Ace and Pierrot find that neither their Weapons or Personas are gone this time - at least for the floor they are on. Losing Bonnie, Noise, Monomi, and Fuyuhiko once again, they break out and begin to examine the floor fully this time. What the two find unusual is a security room on their level and how it seemed to be broken. Going to an above them, their Personas once again won’t appear but having their weapons, they soon come across Monomi cowering inside a security room in that level. Testing out a theory, they end of smashing the head controls of the room to find that their Personas appear once the power in that room goes out. Monomi makes a comment that it would best to destroy all the security rooms they come across and to find the others. Going up the floors again, they destroy the power sources of each room to allow access to their Personas and regroup with their remaining members. Upon reaching the main floor of the building, somebody finally decides to grab them a map during their regrouping moment. When they notice Fuyuhiko is still missing and that on the bottom floor of the Palace looked to be the main generator room, Ace decides to attack their to make sure the security rooms won’t have the power to restrict their Personas and that on their way down they can try and locate Fuyuhiko before bailing out. Descending down below with banter between the group, it comes to Bonnie’s realization that even with the map they have of the lower levels that not even Monomi knows where the Treasure Room is located. Monomi apologizes for not being of much help and reminds the Thieves that even while they are going to change Juzo’s heat, to be aware that anyone not welcomed in a strong Palace’s cognition could easily be killed. A warning - though rarely late - gets the party motivation to continue onward when they hit that roadblock. Through every level they descend, none of them are aware of a certain figure following behind them. Not only that, but the security rooms are mysterious repaired whenever they leave and return. One way or another, the group finally reaches the main generator room and find it guarded by Shadows. Having no other real choice, they ambush the guards and defeat them to gain access to the generator. Getting a clean access to the generator, their next issue is trying to the big power off switch. Noise finds the switch first on the other side of the room and goes over to pull the switch. Just as she is about to grab the switch, she stops upon hearing something upstairs and their only exit has it bursting wide open as Fuyuhiko falls down the stairs. Pierrot and Ace go to see if he’s alright only to find themselves surrounded by shadow guards as everyone in their party is forced to the center of the room. It is here of all times does Shadow Juzo makes his appearance on the very top the railing, all the while belittling the thieves for breaking in and trying to cause an uprising for all the crimes those ‘prisoners’ have committed. Being in a high position compared to the Thieves, his presence alone makes them angry - especially Fuyuhiko at how arrogant the guy is. What gets to the Ultimate Yakuza is how Shadow Juzo only refers to Peko as ‘some common convict’ and not as her own person - in fact, her name is only brought up by Fuyuhiko during the whole exchange between the Thieves and Shadow Juzo. Their exchange of words only lasts so long until Shadow Juzo gets fed up and uses his position as the cognition’s prison warden to order them executed before leaving - not wanting to waste his time watching them. Another battle begins between the waves of shadow guards and the Thieves while Fuyuhiko and Monomi watch it all happen. Ibuki tries to cheer the Ultimate Yakuza to see if she gets him to awaken his Persona but to no avail. Fuyuhiko awakens his Persona more on his own after taking what Shadow Juzo said and comparing it to how he really feels about Peko. Getting the resolve he needs in order to have Peko avenged, his awakening happens and Agrippa’s first action is to rain down flaming bullets that explode upon contact. Yeah, let’s just say Gangster comes out guns ablaze to get all the remaining forces and leave burning remains inside the room. We’ll go with that, and I’m going to leave it at that since afterward the group realizes Gangster’s outburst caused a major blackout as it somehow destroyed the generator. They do escape somehow unharmed and no longer trapped inside the Palace. Just don’t question how they did it in pitch black darkness and no backup generators; ACCEPT. IT. Blame Komaeda’s luck ok? Or that it “overloads” the Palace and the Palace itself kicks them out to the real world. Either one is acceptable. Probably a few days afterward since Fuyuhiko would obvious pass out after causing that much destruction the group would all meet up. Now, they got Fuyuhiko who agrees to join their cause to mainly avenge Peko and get the whole deal with not meeting with his younger sister over with. With Gangster finally added to the party, Monomi introduces the whole switching party member things and almost everyone goes back main lobby before Gangster points out how stupid that idea is. Then through some search, they find a secret entrance to the back part of the prison and finally, Monomi gets to sensing the Treasure Room. Gangster is also while more reckless when fighting he’d another level-headed member help keep everyone in check as long as they didn’t piss him off. Solving puzzles involving finding the right key cards and avoiding the protocols set up to stop them, the group goes through them one by one until they reach the Treasure Room. And where was the room they were searching for all this time? By the looks and the irony of the Thieves… it's the exact same place they first enter! Yelp, it's the main security office/room but now looks more like the hideout of Shadow Juzo with many monitors and backup generators running. Though now they see the misty like a sphere of where the Treasure would appear for them. Monomi confirms it as Ibuki goes and has her hand faze through the cognition’s unstable form of the Treasure. So now after going through all that hassle to get to the room, it is very reasonable for the party to finally have the chance to now send the Calling Card. As to how they send the Calling Card, it's either getting a mass amount sent to Juzo’s office or Fuyuhiko pulls some strings to get the Calling Card to Juzo. Who knows, maybe he does both; he does whatever he wants but either way it's delivered to the man himself. Of course, it triggers the Treasure to appear and then the Thieves enter to steal the Treasure. Entering the security room, the group finds that its manifest into what appeared to be a large arena surrounded by cells and filled with inmates they recognized or know... And while the group questions it a bit, they are quickly cut off when Shadow Juzo appears by nearly shooting Ace’s head off. Ace only barely gets away from the stray bullet due to Gangster noticing it ahead of time. Shadow Juzo appears with his gun snarking at how easy it lured petty thieves into the grand arena of his. Deciding to use them as the perfect pieces of scrap metal, he makes them examples to the rest of the ‘furnace’ and the begins the battle. Shadow Juzo has a similar start to how Shadow Chisa began, sending out inmates of all sorts and kinds out from the cells on the arena’s floor. He’ll be out of range of the attacks for the time being. The Thieves will have to focus down the waves of enemies to even have a chance at facing the Shadow Prison Warden. He’ll even have Shadow Guards of his give status ailments of Rage to the party or the Shadows they are facing if not taking down the guards quickly. One of Shadow Juzo’s moves is an instant K.O to everyone left in the open. The only way to survive is to get into the empty cells around the arena to survive the attack. It also kills the Shadows on the field as well, so it is risky since Shadow Juzo might fake people out with it at times. About halfway through the battle, Shadow Juzo is getting tired of watching the Thieves win and decides to take things into his own hands… ...Or heads in this case since when he lands and destroys the remaining Shadows, he transforms into his second state. While the Shadow mainly is based on the guardian dog of the Underworld Cerberus, this form is quite different as while there are three, dog heads that are floating. Not connected to anybody but just floating, severed heads. Each one has a guillotine collar around the neck to symbolize that the leash/collar was too tight and it literally killed him. What makes this worse is while unleashing powerful Curse, Fire and Physical attacks one by one, their most deadly attack are when the three combine their strength. Together, the trio can unleash a deadly attack that will drop the party’s health to 1 and nullify all buffs followed up by one head making a strike to KO another party member. This makes it very challenging to face the heads working together, so the gimmick with this is distracting the heads to prevent this from happening. Who are the ones best at distracting the heads? Well, it would be Ace, Noise, and Gangster since they were the ones to piss off Shadow Juzo the most. Only one can distract one head at a time, and while Gangster and Ace will only distract ahead, Noise ends up not only distracting ahead, but causes that distracted head to attack another. After one member is sent to distract a head, they’ll need a break before another chance to distract a head comes around. Each head is weak to a different attack: Curse to Bless, Fire to Ice, and Physical to Gun. Also, each head has a move to revive another head at fifty percent health that might use used if one head falls. Through distracting each head and ganging up, they finally take down the Shadow Juzo and the fight ends, returning the room back to normal and the Treasure finally materializes as a security badge, glittering gold and making Monomi super excited. Shadow Juzo gets to here all the Thieves and does agree to go back and give the real Juzo a change of heart. The Shadow doesn’t directly state the blackmails, but mentions that “they” weren’t kidding underneath his breath. None of the Thieves hear what he says before he vanishes. Then, as soon as they take the Treasure into their possession, suddenly the alarms go off and they look at the monitors around the room. Much to their surprise, the Palace collapses as a prison riot breaks out and gives them a new challenge. Escaping while trying not to get caught in the riots. A timer begins as they escape as they must leave before it runs out. Once they escape, everyone returns to the outside world and confirms that the Palace has vanished and all are accounted for. Ibuki cheers in excitement at their successful heist and Fuyuhiko admits that the group isn’t that bad to hang out with. Of course, the hyperactive student takes this as meaning he’s permanently going to hang out with them. Everyone laughs it off a bit until Fuyuhiko points out the treasure in Chiaki’s hands. The Ultimate Gamer is confused at first about what he meant until realizing that the Treasure was in its real form. Much to everyone’s surprise, they find it to be a photo - much like Chisa’s Treasure. What made this different is the obvious crudely cut letters pasted on it blackmailing Juzo into doing everything. Though instead of a name being signed - the group finally learns of the Despair Bear named Monokuma. Getting this lead of sorts, the true race of finding out what’s really going on begins and prompts them to stick together.
#dangan thieves au#third palace au#danganronpa 2#I'm too lazy to tag the rest#this is also the christmas surprise#so if you will excuse me#I need to unwind a bit
32 notes
·
View notes
Text
A Guide to Woodie/Kiting in the Forge
A Semi-Complete Guide to Woodie Kiting (by Crowe)
I hear a lot of people saying that Woodie is a very weak character with no real perks, that he’s extremely useless and not recommended to play as. This guide on how to use him to carry your team to victory will serve as my counterargument, and I hope that this will be helpful information for whomever is attempting to play as a kiter in a Forge match. As someone who has won three Forge matches as a kiter Woodie, I am very eager to share the information I have learned.
_____
Let’s start off with some of Woodie’s perks.
#1: Lucy
When Woodie throws his special axe, Lucy, it will instantly draw aggro onto him. This is an incredible perk of its own, and it will be very helpful in later stages.
When thrown, Lucy can also stop spinning Snortoises, provided that you are lucky/skillful enough to hit them.
#2. Higher HP
While he can’t be resurrected as quickly as Wes, Woodie has relatively high health, his maximum being 200 HP. This means that, even with the lowest defense armor (60% protection), Woodie can survive 4-5 hits from the Boarilla/Grand Forge Boarrior before death. This allows a few mistakes from the player, and also increases Woodie’s survivability in difficult situations.
#3. Quick attack speed
When attacking normally with Lucy, Woodie’s attack speed is greatly increased. This isn’t as useful as his other two perks, but in a pinch, he can make short work of weaker enemies.
_____
NOTE: It is a given that Woodie will be using the feather helm (20% more movement speed) and the reed armor (10% more movement speed), but I recommend switching to a higher defense armor during the fight with the Grand Forge Boarrior (splinted mail is a great choice).
_____
Levels:
1. Pit pigs
The first wave is relatively easy. You can chop down the lone pigs or throw Lucy from a distance as the tanks demolish them. It becomes a bit harder to use Lucy’s melee attack once there are multiple groups of pigs— hang back and throw Lucy at your discretion, making sure to keep an eye on the reviver.
2. Crocommanders
Fighting these head-on is not recommended. Use Lucy to instantly destroy the banners, and draw the fire of the Crocommanders if your health is high enough. This can help the team a lot, especially when the tanks are being attacked by multiple enemies.
3. Snortoises
This is where Woodie starts to show his usefulness. Explain to the team that you are going to distract the top group of Snortoises, and proceed to head in that direction. These top two can be kept in an endless loop of aggression until your team is ready to destroy them.
I have had the most success in kiting the Snortoises into the shape of an 8 (one walking behind the other). Moving in a half circle around them, you can quickly run to the top and throw Lucy at the Snortoise at the front of the pair, then circle back to throw at the bottom one. This ensures that they are constantly aggressive towards you, but their slow speed allows you to complete this process with almost 100% safety.
Note: As mentioned above, the Snortoises are very slow, so make the circle you run around them extremely small— just out of the range of their “pufferfish” spike attack. This is an added measure to keep their focus on you, and not on the rest of your team. Try to keep them occupied as far away from the team as possible.
Another note: Lucy’s throw has the ability to stop the spinning Snortoises in their tracks! If you can make the shot, go for it, especially if there’s a spinning Snortoise attacking your healer.
Scorpeons:
The strategy for these should be the same as the strategy for the Snortoises, but you are in a bit more danger than before, as the Scorpeons have attacks that can melt even the most armored tank. The team also may need your assistance more than before, since tanks can quickly be overwhelmed if not watched closely. While it is the healer’s job to attend to them, they may not always be nearby.
Keep an eye on the health bars of your teammates on the upper left. If one of them appears to be in a bad spot, or being attacked by multiple enemies, you can use Lucy’s instant-aggro throw to make their lives a bit easier. Of course, use your own judgement as to whether or not this is necessary, since keeping two Scorpeons away from the team for the entire level is also useful.
Boarilla, Part One:
I cannot emphasize this enough— please make sure that you have healed up during the last round. It will be a lot less stressful for you to be kiting the Boarilla with 200 hp rather than 140. By now, you should have the feather hat and reed armor, so keeping out of the boss’s range is not impossibly difficult.
The Boarilla will spawn at the bottom right portal. Leave the smalls for the tanks and dps immediately after they spawn— you don’t want to draw their aggro at this point.
Camp the Boarilla’s spawn portal and throw Lucy as soon as you see him. I recommend to lead him along the outer border of the map, so that there is much less chance of the boss accidentally targeting the team. However, this is not always a good choice, as the fight with the smaller enemies doesn’t always take place in the center of the map. Once again, use your own judgement when deciding which path to lead the Boarilla on.
The Boarilla will take anywhere between 3-5 steps chasing you before he attacks. I suggest letting him attack at you twice, then throw Lucy to reclaim aggro, maintaining your position just outside his attack range. You can also throw Lucy after every attack, if you are more comfortable with that. You may have to slow down at times to make sure the Boarilla’s focus is on you at all times.
When the team has finished off all the grunts, lead the Boarilla towards them. Hang back while they destroy it— take the time you need to heal up before the next fight, if you’ve sustained some damage.
Boarilla, Part Two:
Communicate with your team as to which Boarilla you will be kiting, top or bottom. Remind them to drag their Boarilla to the middle of the map if they can, as it will make your time a lot easier.
Kiting the 2nd Boarilla is more of the same; the most dangerous part of this level is when the two waves of smaller enemies appear. When you see Pugna’s warning speeches, try to avoid going near the spawning portals, but this is not always an option while dragging the Boarilla across the map.
The job of the DPS and/or the tanks is to keep the smaller enemies off of you and the healer, dividing their focus between this and taking care of their own Boarilla. This can create a very tense and hectic situation, as you may lose aggro of your Boarilla during this fight. If this happens, lead it to a healing area if possible and let it sleep, then reclaim aggro after you heal yourself a bit.
The Crocommanders are definitely the worst during this part of the fight. Their homing projectiles will always hit you if they lock onto you, and if you are caught by the Pit Pigs or Boarilla during the duration for which the projectile stuns you, you’re practically a goner (unless you are saved by some miracle).
The best advice I can give, at my current level of knowledge, is to stay as far away from the Crocommanders as possible. Be sure not to lose your focus, though— this is a crucial time for the team, so try as hard as you can to not lose the attention of your Boarilla.
Grand Forge Boarrior:
This is it, you’ve made it this far. By now, there should be one or no Boarillas left. Usually there is one left, so make sure you’ve healed up to at least 3/4 health and go to the bottom right portal to meet the Boarrior.
Let your team take care of the Boarilla while you kite the Boarrior around the arena. He won’t start doing his groundpound + fire attacks until he’s lost a substantial amount of health, so you can lure him with relative ease and little danger to yourself while your team takes care of the last Boarilla.
Once the fight with the Grand Forge Boarrior commences, you should equip some heavier armor. Splinted mail is the best option, but wood armor is another option if someone else has equipped the splinted mail. I highly advise against standing behind or in front of other people, as the Boarrior’s ground-pound attacks may unintentionally harm you or others near you.
Your role becomes slightly different during this fight. The healer is often targeted by the Boarrior, especially in the later stages of the battle, and teammates are constantly dying. You MUST (and this is a big MUST) keep the Boarrior from attacking the healer while he/she is reviving or casting. Do not attack the Boarrior much during the fight; save your health for those moments when aggroing the Boarrior can buy the healer those crucial seconds to complete a revival or cast the life flowers.
This is especially important when the Grand Forge Boarrior summons his minions, which is announced by the Boarrior clapping his swords together, making a hollow banging sound. Take down the standards as swiftly as possible. This is the most chaotic part of the game, and many of my teams have met their demise during this time.
With any luck, you will be able to keep the Boarrior off of the healer during times of misfortune, while also keeping an eye on the smaller enemies. Do not let yourself or others become swarmed, as you can be stunlocked into an instant and brutal death. Always watch your Wilsons. Take note of how much health they have in the upper left corner of the screen.
After the smalls have been taken care of, hang back and heal. Watch the Boarrior and try to remain at a decent amount of health so that you can distract him if need be. Don’t throw Lucy at him when the healer is casting life flowers on top of the Boarrior, as this will draw him out of the healing circle (he avoids the circles during the latter part of the fight, thus he will not sleep unless the circle is cast DIRECTLY on him).
With a little luck, a little skill, and a lot of teamwork and communication…you and your team will be able to get the better of the Grand Forge Boarrior and tell Battlemaster Pugna to stick it where the sun don’t shine! Congratulations— and good luck!
16 notes
·
View notes
Text
The Legend of Zelda: Breath of the Wild Review: The Joy of Discovery

By now, most everyone has heard about how amazing Breath of the Wild is, if all the acclaim and 10/10 reviews are any indication. I’m not exactly striking while the iron is hot or likely telling anyone anything they don’t already know, but I’d like to take this review to express my thoughts on this wonderful game all the same. Most of my reviews are somewhat…clinical, I feel. I dissect something piece by piece. The story was good, the gameplay was bad. This is why it was bad, etc. But for Breath of the Wild, I want to try something a little different and talk more about how I felt during the game than focus on all of the stuff in the game. Partially because there is a LOT of stuff in this game and we’d be here all day if I went at it like I usually do, and partially because this game fills me with the kind of joy and wonder that I haven’t felt from a game in a very, very long time.
This game is many things: it is a massive 3D open world game, a game that deliberately defies the conventions of the Zelda games that came before it, and a game that emphases the joy of discovery. Constantly throughout the game I am seeing and learning new things about the world and rules that govern it. Cries of “I could do that?!” have been constant in my time with the game, alongside excited (and sometimes terrified) squeals of “What’s happening?!” Breath of the Wild is a game that is constantly giving, secrets abundant. In the past, open-world games have been called “sandbox games,” games that drop you off in a big ol’ sandbox to play and shape the world around you, and that’s a great way to describe Hyrule this time around. Ravaged by a being known as the Calamity Ganon for 100 years, by the time Link gets around to saving the day, much of Hyrule has been largely overtaken by wilderness, not to mention monsters. It truly is a vast world, larger than several other high-profile open-world games out there, but Breath of the Wild doesn’t just go for scope; it goes the extra mile to make it a world worth exploring.

From forests of many different shapes and sizes, to snowy mountains, volcanos and deserts, there’s plenty of variety within the vast reaches of the game. After what amounts to the tutorial section is completed and players are given all of the tools needed to survive the rest of the game, you are given the option to go wherever you want. It’s even possible to make a beeline straight for the final boss, but good luck beating it that way. Link starts with nothing, in his underwear at that, and from moment one you’re basically on your own. Hyrule is treacherous and while it’s true you can go anywhere…if you aren’t prepared for what lies ahead, you’ll end up dead.
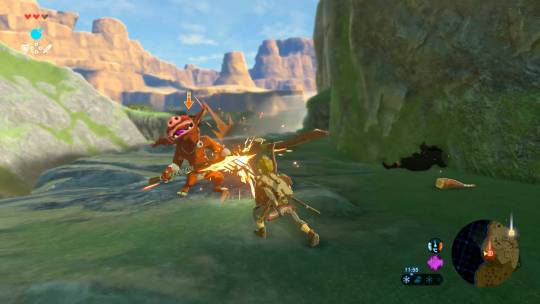
Breath of the Wild is unquestionably the hardest 3D Zelda yet, and that’s due in no small-part to the fact that everywhere you go, there’s something trying to kill you. From the many enemies you fight, to nature itself, it’s quite dangerous to go alone. I learned the hard way that enemies don’t just move fast and hit hard, but they’re also relatively smart too. My first encounter in the game with the common Bokoblin enemies didn’t go nearly as smoothly as I planned. Armed with fragile tree branches, I came upon a group of three. I successfully snuck up on them and attacked, but was only able to dispatch one before my weapons broke. I was able to snag one of their bows, only to discover I hadn’t gotten any arrows. My options were limited, so I ran away. I ran away from what amounted to the basic Goomba of the game. Constantly throughout my adventure, the enemies have proven clever and I’ve had to step up my game to best them. Think you can cheese them out by bombing them when they give chase? They’ll kick your bombs back at you so they blow up in your face. Fighting near a campfire, they might light their wooden weapons on fire for an extra edge. Should you catch an enemy unarmed, they’ll make for the closest weapon they can find and use it to good effect, and quite a few will improvise if no weapon is available. And so it becomes apparent that good tactics win the day.
When approaching any given enemy encounter, there are tons of ways to deal with them. I could just run in guns blazing and beat them all down, or I could pick them off from afar with my bow. Better yet, use a well-placed Fire Arrow on some exploding barrels to take them all out at once. Or I could light the dry grass on fire and let that do the work for me. Or push a rock down a cliff and have it stomp them flat. And on top of all of that, I could choose to be stealthy and run in, steal their weapons (and maybe the treasure they’re guarding) and run off before they even know I’m there. Keep in mind there’s likely ten other ways I could tackle the same scenario I’m not even thinking of, and that should give you an indication of how open-ended a lot of this game is.
This extends to exploration too. I could run through the entire game, or I could tame a wild horse (among other things) to ride through areas a bit faster. You can sail on rafts, or use your Cryosis rune to make ice pillars to cross watery sections. You can climb on almost anything in the game, provided you have enough stamina and then use a Paraglider to get down safely or cover large gaps in no-time. The world design is top-notch in this regard, giving you plenty of ways to get to most locations, and giving you plenty of locations to visit. At almost any random point on the map if you pan around, you’ll likely find something of interest to travel to, and you’ll likely get lost when something else catches your attention on the way to your destination. Breath of the Wild is the kind of game where it’s FUN to be lost, to let yourself be distracted. Some of my favorite moments in the game have often been on the journey to places, and not where I ended up.
When journeying to an important plot-related city, I was suddenly in a small bit of forest and unknowingly in the midst of an enemy camp. A camp filled with archers armed with Shock Arrows. From the darkness streaks of lighting came at me from all directions. Too many archers to count, no way to know where was safe. I could only run and hope for the best. Then there’s the time my horse and I tag-teamed an enemy in a moment that can probably never be replicated. Or the time I took on a skeleton monster while riding a bear. That was on fire. This is the kind of game you can get together with friends and gush about, trading stories. It might just be the only way you can find out about some of the more nuanced systems in the game or learn of an NPC’s existence. Having a game that doesn’t just completely bare itself is kind of…refreshing, as I feel a sense of elation every time I learn something new.
Breath of the Wild seems to be designed with the approach of a Zelda game, but following real-world rules when possible. So physics and common sense rule all, and mastering those rules lets you do some cool or funny things. Most of the time. In superhot areas, for example, you can just drop food on the ground and watch it get cooked. Or discover that a Bomb Arrow instantly detonates in your face when it’s that hot. You can use your Magnesis rune to control metal objects in a variety of ways, like using a metal door that’s been ripped off its hinges and make a walkway to a treasure chest…or use the rune to bring the metal treasure chest to you. If you can imagine it, often the game will let you do it. This leads to some comical workarounds, like making makeshift catapults, and in a lot of cases you can completely trivialize puzzles, combat challenges or platforming if you’re smart enough.

Speaking of puzzles, they’re a big part of the Zelda series, and some might be wondering how this game handles them. Outside of the few major story missions (which are still optional anyway!), traditional dungeons are largely absent in favor of Shrine Trials. Scattered all across Hyrule are shrines that house various trials within. Rarely you’ll find a combat trial or, rarer still, shrines that give you rewards straightaway, since getting to said shrine was enough of a challenge in the first place. Most of the time, though, they’re bite-sized dungeons, usually one or two rooms dedicated to a single puzzle or theme. As with the rest of the game, you can approach most of these puzzles in any variety of ways, some of which might not be intentional but were left in the game anyway. With more than 100 of these things, some aren’t all that fun or memorable, but they usually make me feel clever when I’m done with them, so they’re alright in my book. Acting as fast-travel points doesn’t hurt either, and you don’t even have to SOLVE them to warp to them!
Combat is a fairly chaotic experience, quite messy at times, but in a good way. You often have to adapt, and even when you think you have a plan, it can go awry, so you best be flexible. Link can use a bunch of different weapons now: from swords to spears, hammers, axes and more, with the bow and arrow being incredibly useful. You can find weapons anywhere; some are in chests, others can be found out in the open, or swiped from enemies. Generally, any weapon an enemy can use, Link can use (and vice-versa, so watch out!) But don’t get too attached, as they all break eventually. The weapon durability in this game is pretty much love-it-or-hate-it. For what it’s worth, I think as a concept it’s fine, but can be a tad extreme. It makes every weapon feel brittle, and often I dislike getting weapons from a treasure chest as a result. Coupled with this, you don’t have a lot of inventory space for weapons at the start and though that can be GREATLY alleviated later on, the actual process of upping that inventory can be kind of tedious and hard to figure out…or rather, hard to find the NPC that’ll let you do it. But the game, again, has weapons EVERYWHERE, so I never had to worry about being left defenseless. The Bayonetta-esque Flurry Rush attack is great, a reward for dodging at the perfect moment, and add to that a satisfying parry and combat’s solid.
Exploration makes or breaks these types of games, but Breath of the Wild largely nails it. I already mentioned how the game’s world is designed to almost always point you in the direction of something worthwhile, but it bears repeating. From interesting locales, to treasure, to enemy camps, there’s always something going on. At times, I’ll even stumble upon NPCs out and about when they get attacked by a pack of monsters, so I’ll divert from my route and help them out. There are a variety of sidequests you can engage in, some even unlocking shrines that are otherwise hidden. The areas you visit often have such life in them, so many small details coming together to create a genuine world that I loved exploring and being a part of it all.
That attention to detail shows real craftsmanship at work with Breath of the Wild, and those little touches often impressed me, endearing the game to me even more. From the fact that Link stubs his toe if he kicks open a chest without any boots on, to the NPCs having set routines you can follow them on, there seems to be no limit to the variables in this game. This extends to the weather too, and the time of day. At times it can be kind of annoying though. During rain storms, surfaces become slick and almost impossible to climb. In a game where climbing is pretty much THE way to get around places, sometimes the only way, it really is frustrating when some rain rolls in, usually right when you don’t want it to. Thunderstorms, while rarer, are also causes for concern. Lighting will strike down at times, and if you have on anything metal, you’ll get shocked too…and it’ll hurt. It’s not so bad if you have some wooden weapons or non-metallic armor to switch to, but there have been times I’ve had to pretty much become defenseless due to the rain and lightning. You CAN wait it out, or go a step further and make a campfire to pass the time, but that isn’t always ideal and leads to frustration more often than I’d like.

On the subject of story…it’s kind of a mixed bag. What’s there is genuinely interesting; we’re experiencing a Zelda story dealing with the fallout of the bad guy winning, for one. The characters you meet during the key quests of the game are often interesting and some (including a certain prince) have already endeared themselves to fans. And yet, there’s barely anything to them. This largely comes down to the game mostly giving you breadcrumbs of story, strewn about various landscapes that will trigger a memory in Link, and a cutscene for the player. These memories are the primary way we see Zelda fleshed out as a character, and her interactions with Link are great, right up there with Skyward Sword’s own Zelda (my personal favorite at the moment). And yet, there’s not a lot there to work with unfortunately, which makes it all the more confusing why THIS is the Zelda game that decided to use voice acting. I’ve seen a lot of people bashing the English voices, but I honestly don’t understand the complaints; the delivery seems fine and the voices are fitting enough….my sole complaint is that there’s so LITTLE of it. A character will be introduced, speak a few lines of dialogue…and then go back to the text boxes of old. Major cutscenes get spoken lines, but again, they are few and far between. Considering you can skip pretty much ALL of this if you really wanted to though, I can see why there wasn’t that big of an emphasis on it, but it’s still a shame.
And lastly, as fun as the game is, as much as its game world design is a triumph and the way it rewards creativity is to be commended…it does have some technical issues. No matter which version you play, there are some frame drops here or there, especially in more hectic scenarios. For the record, I’m playing the Wii U version and from what I’ve read, the Switch version isn’t all that different, so if you’re desperate to play it and don’t want to get a new console to do so, you’ll be fine in the Wii U’s corner. That said, the fact that the game can stutter and freeze whenever I fight a Moblin is worrying, as is the 10-15 second loading it has to do if you ever hit the HOME button and go back again.
With all of this said…and I said a lot more than I intended to…these flaws don’t really bother me much. The game’s high points are so high, these come off more like nitpicks than general problems. That won’t necessarily hold true for others (like say….a certain Mr. Sterling), but that’s the case with me. I won’t ever call it some flawless masterpiece; the durability issues, the annoying weather and the fact that you can’t pet the adorable dogs ARE flaws…but they’re miniscule imperfections in a beautiful gem of a game as far as I’m concerned. My time with Breath of the Wild has been…magical. A breath of fresh air (I just HAD to say it!) for the Zelda series and for games as a whole. Few games have gripped me as tightly as this one has. It’s the kind of game you can play all day and forget to eat, a weekend gone in the blink of an eye. As it stands, The Legend of Zelda: Breath of the Wild is a fantastic game I can’t recommend enough. Just like A Link to the Past and Ocarina of Time before it, I have a feeling it’ll be fondly remembered for years to come and will likely heavily influence the Zelda games that come after.
Until next time.
-B
1 note
·
View note
Text
Marker Man Misadventures 4
Welcome to world 3. The reason why I thought this world is going to be more exciting is because the cutscene that introduced world 3 involved marker man being chased down by a giant boulder. Oh yes. I will be so excited if we are going to see boulders.
Another strange thing about this world is the background music kind of sounds like the song Eleanor Rigby using plucking string instruments, which I do not mind. At least I wouldn't mind if the looping time wasn't only nine seconds long.

Looks like my earlier theory is true, in that enemies in later worlds deal more damage. Shoe boy deals 3 damage now. Yay for scaling! There's not too much going on here, except for the massive swimming pool and the giant chain of disappearing blocks near the top right of the map. You basically have only one chance to make it to the other side because the blocks don’t reappear. Just use the trick of placing a line on top of the blocks and you'll be fine.

There's a pretty nasty fall at the start of the level. Technically survivable, but probably not worth the risk. This is another 3 exit level, and all of the exits take you like 10 levels in the future. Ohhhhh boy there is so much splitting going on. I hope I am able to find out all the possibilities using my only 4 save files, or else I'll have to start one over from the beginning.

Oh boy, more splitting! I have a feeling the more splitting that happens, the more times levels will be revisited, assuming the developers only really planned out 15-20 levels for this world. Anyways, this level feels like too many other levels I've played. The only arguably distinguishing feature of this level is the slightly symmetric bouncy area in the beginning. You have to be pretty careless to die here.

It can be broken up into three sections. The first section is a long and uninteresting pathway that can be passed quickly using the speed power up. The second section is a giant lake and bouncy platform section at the bottom. The third section is a purely vertical platforming challenge. Not much else to say about it.

I do not understand how the save system works in Marker Man. If you play a level, use or gain some markers, then quit the game, you would expect Marker Man's markers to revert back to the number before you started playing that level. That is not what happens. Those markers you have when you exit are the ones you end up with when starting the level again. But that is only if you exit through the in-game pause menu. If you force shut off the game, then you end up with the markers you had before you started the level! Anyways, there's three more branching paths and also zombies now. Yay.
One last stupid thing. I tried drawing partial shapes, like a letter L, and it can be interpreted as a circle, a rectangle, or a triangle! So much for a faster method of drawing shapes. There must be a better way to reliably draw a rectangle....
Zombie

It roams around like most other enemies, only it is much more dangerous for two reasons. The first reason is that the damage is a lot higher, similar to the spiky shoe boy's damage in that you can die in like a second. The second reason is that it is the height of Marker Man, meaning that Marker Man cannot just jump over it like with most of the other enemies. Oh, never mind... yes you can still jump over them. Their hitbox only covers the lower half of their body for some strange reason. They also make a really strange sound when you touch them. Sure, okay.

This level is slightly harder because of two sections. There is a moving platform halfway through the level that you cannot simply jump to, and placing a walkway to it won't work because it will just move out of the way. I ended up drawing a tall rectangle on the platform underneath so that I was close and high enough to jump to it when it came down. The other part is near the end where you have to climb up to the exit. This climb is difficult because of the platform directly above marker man. There is no way to build a shape that sticks on a wall so that marker man can climb up it without it falling over. I have designed a strategy for this section below. Or you could just use the super jump power.... you cheater. The level itself is alright, I guess. Still disappointed that there are no boulders.

Mushroom

They are almost equivalent to the zombie, as far as I can tell. Tall, low hit box, and high damage per second. The only difference is that the zombie likes to stop or turn around occasionally, and the mushrooms are constantly walking between two specific points.

Well, the least I could do is thank whoever made this level, because this was MUCH easier to map out than all the other levels in this world. This is a simple, linear area with useless fish and some water. Enjoy the simplicity while it lasts.
Flounder

Our first water enemy! Well.... less of an enemy and more of an obstacle? It moves and pushes marker man around, but doesn't actually deal any damage. I guess watch out if you're building in the water for some reason?

Oh, so they didn't forget the raccoons. This level is kind of a mess. Long, uninteresting hallways followed by tall, uninteresting platform scattering. But hey, there's a bonus level exit here!

This is a very short, linear level. The spike walls are easy enough to dodge if you are using the speed power up. The problem is that dumb pendulum near the end. If you manage to get on the platform underneath the pendulum, it can't actually push you off at that point. Just be aware that it has a stupidly large hitbox.
Star Spike Wall

A reskin of the regular spike wall.
Death Pendulum

This was a huge surprise for me. The part that sticks out swings back and forth angrily and has a huge hitbox for some reason. Both the pendulum and the non moving block on top should not be touched, as it pushes marker man away violently, and considering where this enemy is, that's definitely not a good thing. Even though the indication of getting hurt happens, this enemy actually does no damage.

This is the first level where I was actually like "hey, this is pretty cool". The new enemy is weak, but the fact that its spears transfer momentum allows for some interesting experimentation. Unfortunately, the spear doesn't seem to have enough momentum for some lolphysics such as launching my character across the map, but it does provide for some potential fun building problems if the spears can knock them down.
I added some pink line connections in this level to show which platform pairs belonged to each other because the cluster of moving platforms at the right side of the map looked confusing otherwise.
Spear Thrower

These are enemies that hide in bushes and can attack by throwing a spear horizontally to the left or right. Their sight range reaches outside the camera view and the spears they throw appear to travel in a straight line infinitely. Fortunately the spears only do 3 damage, but a good way to avoid damage is to draw an object between marker man and the spear so that the object soaks up the damage.
There are two very interesting properties about the spear. The first thing is that the spear transfers its momentum to any drawn objects on hit; the drawn shape will get pushed quite a bit from the collision. The second thing is that the spear actually starts at 0 velocity and accelerates as it flies through the air. This means that the farther a shape is away from where the spear spawned, the more force will be put on that object on collision. This brings up an interesting strategy where a shape, if drawn so that it is directly on top of the spear spawning location, will soak up the spear and not move, thus preventing that spear from doing any damage to the player. Standing directly on top of the bush also prevents the spear thrower from coming out.

There are zombies everywhere and two exits will take you backwards. Have fun! It's actually the exit that takes the least amount of effort to get to that is the "correct" one. Is that a pattern with levels that have exits that take you backwards? I want to say it is. I'm too lazy to check that.
I don't know what else to say about this level, so I will instead say something that I learned about the game. There is a way to completely negate fall damage! For some reason, if marker man lands on a drawn object, no damage is taken. This could be really powerful if the player can tactically drop lines in front of a long fall and can ensure that marker man will land on that line and survive. That would've made my life so much easier for some of the levels...

There is basically no reason to take the right side. Use a super jump power and just climb the left side all the way up, collecting all those juicy markers. Yes, I did abuse copying and pasting parts of the map to help finish mapping this level. I bet the developers did the same thing.

There is finally an interesting use for the spear throwers. At the beginning of the level in the pit it is very difficult to get back up. The reason for this is the spear thrower on the left is tactically placed so that its spears will hit any lines you draw against the wall on the way back up and end up falling through the hole underneath it. The simplest solution is to place a rectangle large enough so that it cannot fall into the hole and stays where it's at. There's only a couple a cases where this happens, but it's a lot more engaging than whatever else is going on with this game. Anyways, it's a pretty simple level with lots of sweet loot under the water, AND an exit to the third dog level!

So the chompers are back! That's cool. Remember how they did 1 damage every frame? Yeah, well that damage has scaled up with the world as well. Now it's 3 damage per frame. It hurts.
The exit is actually a little tough to find! You basically have to use the camera panning feature in order to notice that there is a hole high in the tree from the platform with the marker. With how short the level is it feels like the game just wants me to leave the level as quickly as possible. Fine by me! I'll take an easy drawing.

Very short, and even easier than the last one. Alright game, jeez, I'll go back to level 34.

I want to create a narrative for this level that this is in fact a testing area for the developers, and they just added it to the game because they didn't feel like making a fully fleshed out level. Therefore, level 38. I guess the same argument could be made for level 36 and level 37. Hmm.

Hey look a level.

The third dog level! Finally. I noticed I got way too good at compacting the levels, because this is a REALLY small image. This level is vertical-based and utilizes a lot of seesaws. One interesting thing about the seesaws is that marker man has a weight that influences the platforms, but any shape drawn on a seesaw somehow overrides the weight of marker man completely. This means that a small line can be put on one of the seesaws and it will send the platform that marker man stands on upwards. A fast reaction is needed because stepping on the platform beforehand causes the second platform to raise to a point where a shape cannot be drawn on it. I consider this one of the most difficult levels in the game so far due to the dexterity required to placing weights on platforms and taking care not to get trapped on a seesaw platform in a hole. There are only 2 seesaw pairs, which is basically 4 columns to go through before the difficulty eases and the level ends!
And you know what? THERE WAS NOT A SINGLE BOULDER IN THIS WORLD. I AM SO UPSET BY THAT. I think that's the main problem with this game. It has so much potential, like with the boulders and the drawing abilities and the switches and the enemies, but it almost never combines them in any interesting way. There are moments of synergy between enemy placement and level design but the occurrence is so rare it feels like those moments happens purely by accident and not by intention. I almost want to just make a level myself so I can use all the elements available to their fullest potential. But I guess I'll settle for World 4 for now.
Oh yeah. World map time. There were so many branches so this picture is a mess. I don't know graph theory, okay? I don't know how to untangle all of this or if it is even possible. I had to go online to find a directed graph creator just so I can figure out the best way to show all this information. The things I do for this game...

Each update in the future will now encompass an entire world. So next time... World 4!
0 notes