#and then i had to duplicate it for the shadow and outline it and everything
Explore tagged Tumblr posts
Visit Tumblr Blog
Explore Tumblr blogs with no restrictions, modern design and the best experience.
Last Seen Tumblr Blogs


Fun Fact
In February 2021, Tumblr had 518.6 million blog accounts.
Text

i love being late to trends. my new years resolution is to be late to every trend ever. and you know im serious because im even late to new years.
(theres an inverse version of this by @chamiryokuroi , you should go check it out! i started making this before i saw theirs, but i think its cool that now theres both versions)
#art#fanart#digital art#dc comics#bernard dowd#timber#timbern#tim drake#tim drake fanart#bernard dowd fanart#red robin#red robin fanart#dc fanart#i dont usually do more graphic styles like this so it was a fun challenge#theres so many little parts to the original that i had to notice and include#i didnt wanna download or make my own heart and star stamps just to use them maybe 6 times each so those are all hand drawn#i adjusted the colors of the heart outlines like 6 times before i was satisfied#also the fact that bernard has a red jacket and pink shirt in this changes the color profile completely so i had to change some things about#-the OG colors so it fit in well#but im happy to report that i didnt use any major blend mode layers over everything at the end to get the colors to mesh well#which is a thing ive been doing for a long time but isnt very conducive to actually learning color theory#also also i spent like a full 45 minutes trying to get the text to look right#bc i dint have whatever font that is so i had to improvise with the fonts i did have and a little bit of editing#and then i had to duplicate it for the shadow and outline it and everything#it was pretty fun tho#seeing the end product was especially satisfying#i havent read ‘go for it nakamura!’ but i assume from context clues the little squid things on the cover are-#-calling him a simp/being supportive wingmen so i replaced them with steph and dick#who i imagine are watching bernard and tim’s relationship like a soapy romcom#and occasionally heckling them (affectionately!) when theyre being lovey-dovey
2K notes
·
View notes
Text
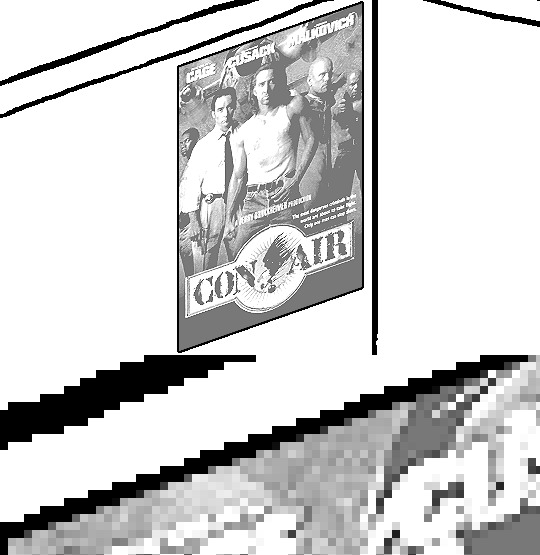
Tidbit: Persnickety About Posters
If you want to avoid overly dark or blurry posters in your fan adventures, then follow my lead:
1) Download JPEG off of Google Images.
2) Import, scale down, and skew/shear it. Use an interpolation method such as Bilinear or Bicubic Sharper. Doing both transformations at once is better than repeatedly transforming the image (i.e. resizing it, applying the transform, and then skewing it), as it helps prevent the image and edges from becoming too blurry. This will be important later.
You can hold down Ctrl + Shift to constrain the Move tool along a single axis so it won't go out of alignment as you're skewing it. If you don't see the Transform Controls by default, enable it in the tool options bar at the top, or go to Edit>Free Transform.
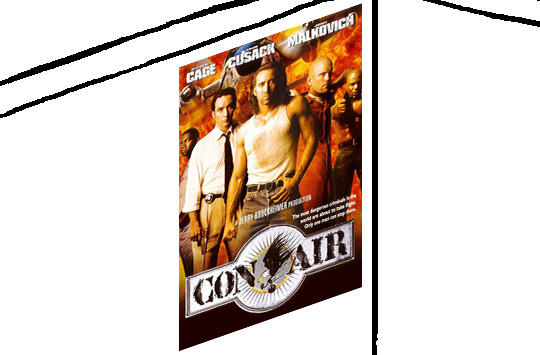
3) Desaturate it. Desaturate means to turn color grayer, until it becomes black and white.

4) Adjust the brightness and contrast using the Levels adjustment tool. It's much too dark as it is! In Photoshop, it is located under Image>Adjustments>Levels..., but I recommend creating an adjustment layer from the bottom of the layers tab instead. Doing so will allow you to make edits non-destructively, meaning you can go back and change any parameters until it looks right.

You could use a Brightness/Contrast adjustment with "Use Legacy" enabled instead to achieve a similar effect, but it won't clip the shadows and highlights as easily. You would have to create an additional duplicate adjustment and turn the brightness and contrast way down on the first one to do so. It's somewhat easier to use but less efficient than Levels in this case.
5) Apply a simple sharpen to the image as it is still too blurry for our purposes. In Photoshop, it is located under Filter>Sharpen>Sharpen... Do not use any other filter, such as Unsharp Mask, unless you absolutely have to in lieu of a basic one. If you must, turn down the radius a bit and the threshold all the way to 0.

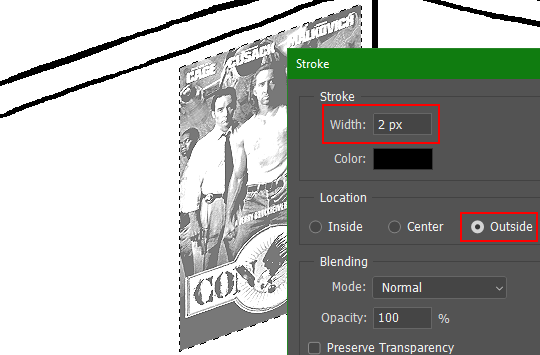
6) Make a selection around the image. Ctrl + left click on the layer's thumbnail to make a selection around it. Doing it this way makes it inherit the level of transparency any pixels have. If you can't, use the Magic Wand tool with "Anti-alias" enabled to select the transparent area outside, then invert it using Shift + Ctrl + I, or go to Select>Inverse.
Create a new layer above the image, then go to Edit>Stroke... and add a black stroke with a width of 2px located Outside. Leave everything else at the default. Doing it this way will create a stroke with anti-aliasing based on the selection you made. This should generally turn out pretty sharp if you follow my advice from Step 2. If you had used the Stroke Effect available from the Blending Options' layer styles, it will always result in a very smooth outline instead. You do not want this.
Voila, and Bob's your uncle, you're done!

The instructions above are Photoshop specific, but it should still be pretty software-agnostic. Here is the recreation PSD, and below the read-more link are additional notes, such as transferring the steps to something like GIMP.
ADDENDUM
You may be questioning why I deliberately made the stroke anti-aliased. "Isn't that an MSPArt cardinal sin??", I hear you clamoring. Well, my dear readers, let me briefly elucidate you on why your ass is wrong. Exhibit A:

The clearly semi-opaque pixels that can be found in every poster outline, which is especially pronounced here in the Little Monsters poster. I can also see that Hussie actually created a stroke on the same layer as the poster and merged it down into the white background like a dumbass. I omitted this in step 6 for the sake of convenience (and also the fact that you can't add a stroke to a smart object in Photoshop without rasterizing it first).
He had to use the magic wand tool in order to extract it from the layer for this panel, and then fill it in with the paint bucket tool. I can even tell he had the color tolerance set up very high on the magic wand to grab all those near-black and very light gray pixels, AND he had anti-alias enabled and the tolerance on the bucket tool set to be at least higher than 0 to tint similar colors. Exhibit B:


I also didn't address exactly how to desaturate something in Photoshop. Honestly it was because I was feeling pretty lazy. I would have had to rewrite step 4 to not include redundant information about adjustment layers. You can add either a Black & White adjustment layer or a Hue/Saturation one and turn the saturation all the way down to 0. The resulting tones will be slightly different from each other but I'll explain why that is in another tutorial.
Speaking of another tutorial, read this one if you believe this post is missing the step of using a posterize filter.
Now onto applying some steps to GIMP.
RE: step 2) In GIMP, there is a dedicated Unified Transform tool separate from the Move tool, unlike in Photoshop where both features are combined into one. This is how you scale and skew (AKA shear in GIMP) both at the same time, among other things such as rotating.
You'll also find that instead of any interpolation methods labeled "Bilinear" or "Bicubic", there are only ones named "Linear", "Cubic", "NoHalo", and "LoHalo". Basically, Linear and Bilinear are the same, so are Cubic and Bicubic, naturally. I guess NoHalo would be similar to Bicubic Smoother and LoHalo would be kind of similar to Bicubic Sharper as well. It's not an exact 1:1, though.
Honestly it doesn't really matter what you use to reduce the size as long as it isn't None/Nearest-Neighbor. You're going to have to sharpen it no matter what. This applies to Photoshop as well.
RE: step 3) Go to Colors>Hue-Saturation... and repeat turning the saturation down to 0, or go to Colors>Desaturate>Desaturate... and select the Lightness (HSL) method.
RE: step 4) Go to Colors>Levels... or Colors>Brightness-Contrast... The Brightness-Contrast adjustment tool already functions almost exactly like in Photoshop with "Use Legacy" enabled.
RE: step 5) In GIMP 2.10, the developers squirreled away the basic Sharpen filter, making it inaccessible from the Filters menu. To use it, hit the forward-slash (/) key or go to Help>Search and Run a Command... to bring up the Search Actions window and type in "sharpen". Select the option that just reads "Sharpen..." and has a description of "Make image sharper (less powerful than Unsharp Mask)". I find that using a sharpness value of around 40 to be similar to Photoshop's sharpen filter.
RE: step 6) Instead of holding down Ctrl, you hold down Alt and click on the layer thumbnail to make a selection around it. Make a layer underneath the image this time since there isn't an option to place the stroke outside the selection rather than the middle. Go to Edit>Stroke Selection... and create a stroke using these settings:

I recommend keeping anti-aliasing disabled however, as GIMP produces lines that are a little too smooth for my taste.

With "Antialiasing" enabled
Without
If you're using a program that doesn't have a stroke feature available, you could draw a straight 1px thick line across the top of your poster, duplicate it, and move it down 1px. Merge them together, duplicate it again, and move it all the way down to the bottom of the poster. Then repeat the exact same process for the sides. I used to do this before I even knew of the stroke feature, haha.
Another reason I had to do it this way was because my dumb ass did the thing I said not to in step 2, scaling down the image with the scale tool, and then shearing it separately with the shear tool. This caused the edges to become too blurry to be used for a stroke automatically. Oh well, live and learn.
148 notes
·
View notes
Note
Hello! I absolutely love the airbrush look on that g3 wysteria drawing. Would you be willing to share the brush/settings, or have any tips for achieving the look? I understand if not though, so no need to answer this if you don't want to!
HI THANK YOU!!! ill try my gbest to explain! i used this brush for everything on that piece:

i use it at around 25px on a 2000x2000px canvas if that means anything to anyone
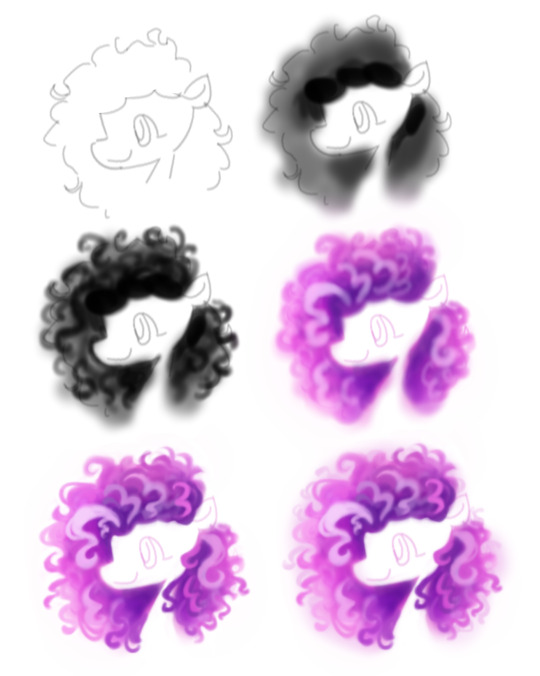
i tried to recreate the process here, heres my little annotations: 1. kind of just make a rough outline of the shape u want 2. add shadows, with black closest to the face so the hair has like a gradient effect 3. add sqiggles!!! your worms!!! this will be cleaned up so go as messy as you want 4. colours, change the black to a purplish colour(or whatever shade you want im doing pink hair so purple goes well with that yknow) on a linear burn layer on like 80ish percent with your colours underneath, i just scribble these in and keep it lighter around the edges again, ill flatten everything and then draw lighter curls on top to make it look cool 5. clean up, this is the longest part uits essentially colour picking parts of the hair and making them more prominent, i kind of just mess around here and keep whatever i think looks good 6. its basically finished now but i like to go with an extra extra light pink underneath and do an airbrush effect around the hair and then add in more curls- and then flatten everything -> duplicate -> gaussian blur at like 15% maybe -> change layer opacity to around 30 or whatever looks good to get more of that airbrush 'ethereal' effect
really i tend to just 'fuck around and find out' when it comes to art, i had to redraw this piece like 3 times until it looked right to me so i think just scribble around and see what you like really. i hope this helped if u need anything else LMK ta
23 notes
·
View notes
Note
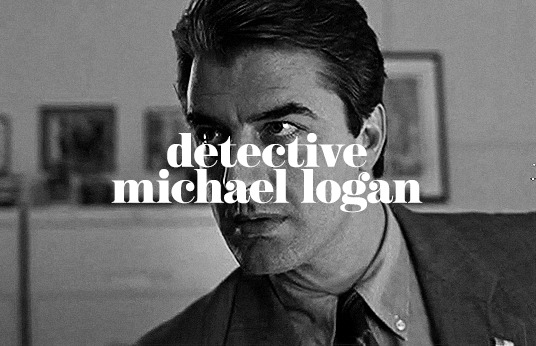
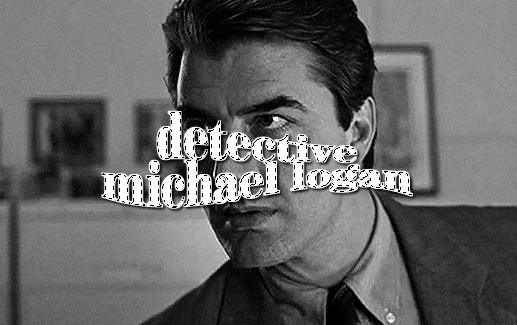
hi your edits are so so pretty!! I was wondering if you could please do a tutorial or give some tips on how you made this Typography? /post/716216798240980992/detective-michael-logan-leader-of-the-nypds
i'd be happy to! it's super easy and fun! ignoring the awful quality and slow framerate, i still love this set tbh
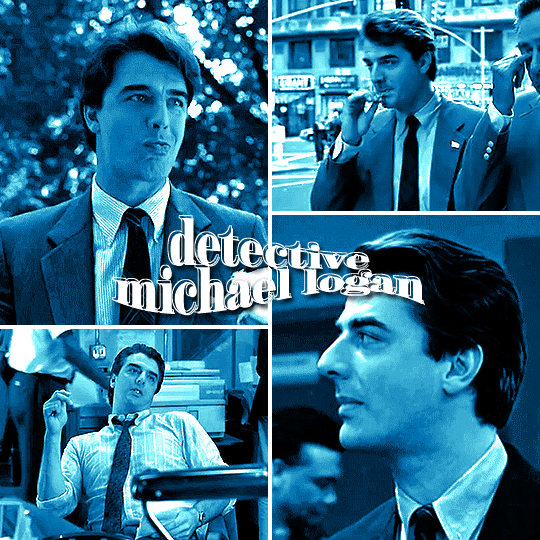
i still have the psd for this, but for some reason, i rasterized all the text layers, so i had to do everything from scratch anyway. i'm pretty sure this is the same font i used, so here are my settings for a 540px gif

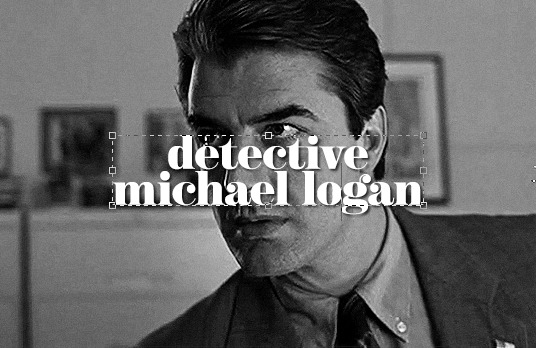
so here's our starting point:
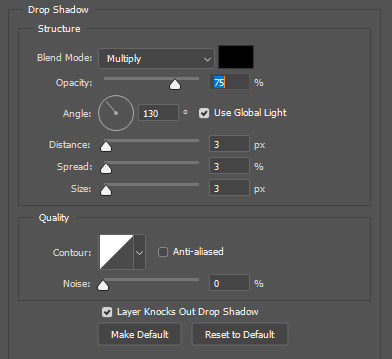
and add a drop shadow, though this will vary by font and gif
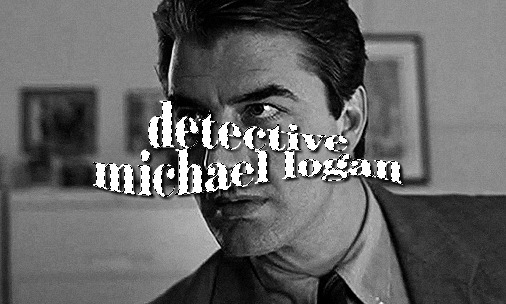
now for the fun part: the text warp tool! make sure you're still in the text menu for this to show up.

the dropdown menu gives you a bunch of different options to choose from. for this particular effect, i chose fish. some of my other favorites are flag, wave, and twist. here were the settings i used. i will say i rarely adjust anything but the bend just out of personal preference. i honestly recommend to just play around with the sliders and see what you like best!

as a side note, when warping text, you'll want to make sure your text box is as small as possible. i'm sure everyone does it differently, but when i make a text box, i start on the left edge of the gif and drag it all the way across to the right edge so it's centered vertically, so when i use text warp, i need to drag those ends back in once i have the size and font settings i want.
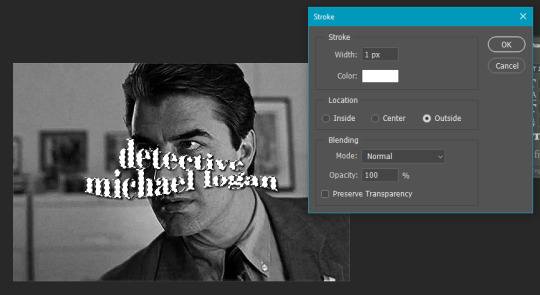
you could leave your text as is, but if you want that extra outline bit, it's also quick and easy! first, duplicate your text layer and then rasterize it (right click on the layer and select rasterize type). then, click on the little thumbnail the arrow is pointing to and click "select pixels"

this is what you'll see. you're selecting only the text on the layer rather than selecting the entire rectangle of your gif. then go to edit > stroke
i do this effect a LOT, and i almost always use 1px. i also usually use white, but that will totally depend on what you're going for. this color is going to determine the color of your outline, though you could always change it later with a color overlay layer style.
your text is still selected, but now you can see the outline we just created. this is the important part! use transform (ctrl+t) and move the selection somewhere else on the canvas where it's not touching your centered text and outline.
it's still selected (and this ended up being the part i always forgot when i first started doing this effect), so click anywhere on your gif to deselect it. the dotted lines will go away. then erase that text bc we don't need it.

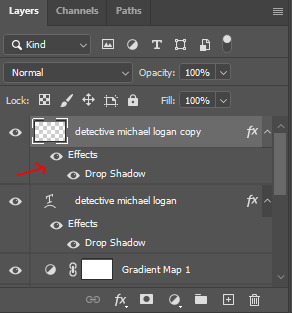
it really doesn't matter when you do this, but switch off the effects on this new rasterized layer bc we don't want the outline to have a drop shadow, just the original text layer underneath.
it totally doesn't matter in what direction you move your outline, but i almost always use ctrl+t and move the outline using my arrow keys up two and to the left two.
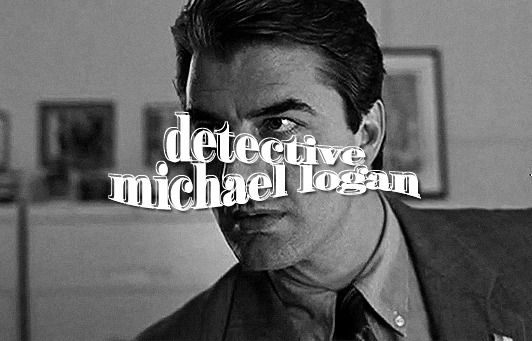
and we're left with the effect in my set you referenced! this effect looks even cooler when you change the original text layer's blend mode like in these gifs:
please let me know if you have any questions on this or anything else!
29 notes
·
View notes
Note
Haiiiii friend!!!!! :D
If I may ask, what's your drawing process like? I've seen your speedpaints, but I do wonder what layer types you use and such :P
Sure ^^
I made the last post i made as a speedpaint. For it to be a example :0
First of all I'm using IbisPaint
1. Sketch
Just making general sketch how I would like it to be etc.
Here I just made one 1 but sometimes I made sketch on sketch if the first one is too messy.
2. Sketch Flat colors
Making seperate layer and coloring the sketch
3. Checking proportions
I'm not doing that much always. Usually just checking if everything is alright and if it's not moving with liquify pen. Here I did a bit more. I made another layer painted on everything in red and then moved everything.
4. Setting lightning on sketch.
Now I'm setting lightning on sketch to visualise and reused some of the lightning layers later.
1 layer multiply.
I choose the main color for the lightning. Here was dark blue. So I made whole canva that color. Set it to multiply. (Idk how much % I set here because later I merge layers) I usually set layers opacity here like 15%-50%. To be honest it depends. Just lower the opacity.
1 add layer
I made main yellow lightning from the lantern. Set it to add. Lower the layer opacity.
5. Merging sketch layers
I merge sketch and sketch flat colors layers together. And lower opacity.
6. Sometimes lineart i guess??? Sometimes fuck lineart and colors
Usually i turn off layers from nr 4 here
I really hate lineart so I'm not always making it :3
Here really depends if my sketch is really clean. (They usually not)
If they are:
I overpaint on it make it clean. In someplaces making lineart to some elements from scratch. (Here example eyes.)
If they are not but lineart is in a huge focus:
I just make lineart
Pain
If they are not but it's not a huge focus:
I use a brush with outline
Really depends but I usually mixing those 3 steps
And ofc doing flat color
7. Setting down the atmosphere ?
I turn on nr 4 layers which are lightning.
Here if I like i add more multiply and add layers if I want.
And adding things
It really depends to be honest
Here I added some leaves
To not make them the main point of focus I blured them. Filters in ibispaint -> Blur -> Gaussian blur
8. Lightning
Add layer on add layer on add layer....
Multiply layer on multiply layer on multiply layer....
To be honest this is the best explanation because I used add and multiply like crazy. Depend but here I had at least 5 add layers and at least 7 multiply.
But let's try disassemble steps.
Main add layer:
Main lightning for example here tips of the fingers. I use almost white like yellow but not white.
Another add layer:
Under the main add layer I use 20% airbrush (btw this is the main brush which I use a lot). Set it to add. It's to make less hard edges. I think you can see on hair the best.
Multiply layers:
I made multiply layer and make everything darker. I usually use dark blue or purple. If the lightning is more daylike i use dark red.
If something is not dark enough I just made another multiply and use a bit darker color then before. Later if not enough do it again and again.
Other add layers:
If i'm not satisfied with lightning so far. I add some yellow with 20% airbrush. Just like multiply do it again until it's alright.
9. Lightning part 2 elements
If I had some elements for example here leaves.
I duplicate layer with them. Choose the layer which is under the other one.
Filters in ibis -> Adjust color -> Black and white
Usually making it black with it but there are some situations when I use white.
It's just for the shadow
Next after making it black move the layer a bit. Lower the opacity.
10. Merging everything
11. Having fun with filters
Here there should be just 1 layer. Duplicate.
Blur:
Choose the layer above.
Filters -> Blur -> Gaussian Blur
Set the opacity on 5%-10‰ something like that
Now duplicate the first layer again (not the blur one) if I said duplicate later I mean the same layer
Noise:
Now u should have 3 layers. Choose 2 one.
Filters -> Artistic -> Noise
Adjust and lower the opacity
Duplicate 1 layer again
Gradation map:
Filters -> Adjust color -> Gradation map
Set the map u like. Here I used yellow, purple one. Mostly I use the basic one which is red blue.
Set the layer to overlay and lower the opacity
Not everyone has gradation map. Parallel gradiation is a great alternatve. It's in draw section.
Those are the usually 3 I use everytime. But mostly I'm just playing with it and checking what's best.
The other ones which I sometimes use: Anime background, glitch, chromatic abberation, retro game, bloom, stained glass.
And it's the same for those like with gradation map
Set overlay and lower the opacity
As you can see in a speedpaint here I struggle to choose xd
12. Merging
Merge everything again
13. Playing with brushes
Here I choose some brush and add finishing toches
Sometimes i add some dots, sparkles etc.
Depending on what I do I set the brush layer on add, multiply, overlay, screen, hard light or soft light.
Sometimes I also use glitch or chromatic abberation on the brush layer.
Here is a example in speedpaint.
I used rain like? I guess brush. Set add. Filters -> Artistic -> chromatic abberation. Duplicate layer. Set the one below to blur. And that's how I made the efect. Erase with 20% eraser the ones which are to bright.
14. Finished ^^
I think i explain everything
At least I hope so
Anyway thanks for the ask have a great day ^^
9 notes
·
View notes
Note
Hi hi, hope you're doing well!! Wanted to ask if you could explain how you pick colours! They're always so appealing to look at... (If you could also explain how you pick blush colours it'd be great! I never manage to pick good ones, no matter how hard I try :'))
hi anon, i'm doing fine!! it's summer right now where i live and that's healing all my problems (◡ ω ◡)
i have recorded the process of some of my drawings and everything is posted in my youtube channel (in twitter too), so i'll drop the link here and try my best to explain the coloring part to you. the short answer is that none of the colors you see in my drawings are similar to those i initially picked.
i try to keep my lineart loose but i pay attention to the outlines so i can quickly select the outer parts, invert the selection and fill it with the bucket tool. my base colors are all 100% opaque and i don't use any fancy brushes here.
as to how i pick colors, i never use the color picker tool, i eyeball everything. that's important for me because i tend to make all of them warmer: the greens are dark yellows, the pinks are light reds, and everything that's close to blue is very desaturated. i do this even for drawings that turn out much different later, unless i have a very specific vibe in mind from the beginning. i also never use pure whites for anything, and if something is black i make it part of the lineart.
then i always color my lineart!! there's no trick to that, the layer is in normal mode and i just paint it with a darker color than what's below it. i usually add the shadows and highlights at this stage of the drawing too. you're going to kill me for this but shade with gray set in color burn or linear burn (never multiply). i just don't want to think about color variety at this stage because it makes things more difficult for later. sometimes i add textures and some basic color correction here (curves, color balance, layers set in overlay, etc.) but i mostly leave that for the next part.
as to how i choose blush colors, i usually pick the base color and move it towards the saturated end of the color wheel, and a bit more pink. sometimes i add a multiply layer and airbrush hot red over the base colors at low opacity. coloring the lineart with hot colors surrounding the blush areas helps a lot too :)
i also almost always duplicate the lineart, blur it and set it in linear burn (i paint this layer in a light gray). this adds a lot of depth to the drawing, especially if later combined with the bloom effect.
the key to why the colors in my art pop so much is that i don't enjoy drawing as much as i enjoy postprocessing pictures 😂🤣😅👌✌️👍 once i'm satisfied with the "base" colors i merge everything except the background, open a new canvas and go crazy with filters and textures. that's why i use ibispaint X even if i do the lineart elsewhere (krita), and even if it works a bit wonky with big canvases.
i do something different for each drawing here, so first i'm going to explain my reasoning so that you understand my process: i used to have a problem of using very strong colors that overshadowed my beloved lineart into which i had put a lot of effort, so my goal nowadays is to make everything look less contrasted without losing the visual impact of saturated colors. that way the lineart remains a strong point and not just a way to separate one color from another.
what i usually do is duplicate the new merged layer, set it to exclusion mode, add a gradient map and play with the opacity. then i duplicate that and do the same thing with another gradient or another blending mode. i tend to add like 3-6 layers of bullshit over my drawings, including textures and other filters like "bloom" or "sharpen". i understand everything that's going on there but i don't think too deeply about it, i just pick whatever looks best.
for the final touches i always pull up the saturation and contrast (since a lot of it gets lost in the process), and i usually have to manually change some colors (ibispaint X has a filter to do that) or tweak the curves. then i add chromatic aberration, noise set to overlay and little polka dots set to linear dodge.
here are some comparisons of the before and after of recent drawings. the 1st one is very subtle, but you can clearly see how much warmth and depth it gains it gets after all the postprocessing. the 2nd one is so different that i understand why you're curious about how i pick colors. i don't think i can replicate that look just from picking nice colors, there's a lot more going on!! the 3rd one personally feels like it had potential lost (i liked the yellow highlights), but the colors were too strong and all over the place, so the finished result looks more intimate and calm and i like it a lot more.

thank you for the interest anon, i'm very happy that you like the way i color things and i hope i have explained myself. good luck with your own journey!!
24 notes
·
View notes
Text
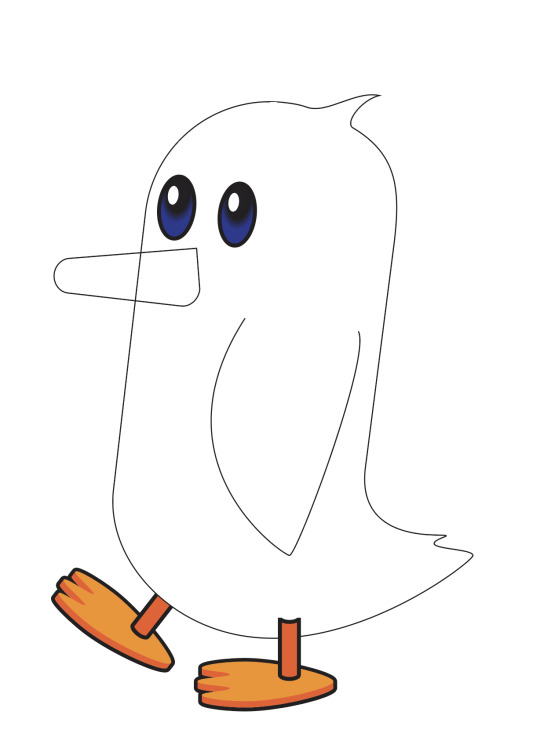
Shadows and Starlight
Book 7: The Stuffed Duckling
-
Deep within his laboratory in his cavern lair, Malakar had gathered and assembled everything he needed for his latest project.
No, he was not concocting his latest vile of potions, he was making something special for little Aurora. Recently, Aurora had become interested in ducks after seeing a mother duck and her ducklings swimming in the pond during one of their forest walks. With the inspiration set in his mind, he decided that he was going to make a stuffed duckling for Aurora.
Malakar tied his silky, long, black hair back so it would not be in the way of his work and got started on making the stuffed animal.
The first thing he did was take yellow, orange, and pink fabric, and using a thin piece of black charcoal, he outlined the body, beak, and feet of the duckling. Then, he took a pair of scissors to cut out the parts. The body of the duckling was yellow like the morning sun, its beak was orange like a freshly bloomed tiger lily, and its feet were pink like a shimmering rose quartz gem. With a snap of his fingers, the parts that he cut out were duplicated.
Next, he took out a satchel and put it on the counter. What was in the bag you may ask? See, when Malakar was a little boy, he had once overheard a toy vendor in the village say that the best stuffed animals were stuffed with the fuzz from a pussy willow plant. Malakar was able to find an abundance of fuzz from a freshly bloomed pussy willow plant while on a morning walk.
After stitching the parts of the duckling together with golden yellow thread, he stuffed the body, beak, and feet with the pussy willow fuzz before doing the final stitchwork on the duckling to close it up. Then, he grabbed two brown buttons that had fallen off one of his older outfits. He was going to use those for the eyes.
He made sure to stitch on the buttons extra tight to prevent Aurora from stuffing them into her mouth and choking. He sewed them tight with matching brown thread. Then, he fastened the rest of the parts of the duckling together until it looked like a friendly little duckling.
He squeezed it gently to ensure that it was huggable enough for Aurora.
Malakar took a step back and admired his handy work. The duck had a bright yellow body, orange beak, and pink feet. Its brown, buttoned eyes made it friendly, just as Malakar had hoped.
He put the stuffed duckling in a velvet-lined box and tied it with a long, silver, ribbon.
"Perfect," Malakar said to himself.
Once the duckling was finished, he took it upstairs and walked to Aurora's nursery. He wanted to give it to her right away because he knew that this was the time she would be waking up from her nap.
Quietly opening the door to the room, he found his beloved daughter wide awake in her cradle, cooing contently. At the sight of her father, her dark olive eyes lit up and she giggled happily.
"Hello there, my sweet Aurora," said Malakar, "I have a surprise for you."
He picked up Aurora from the cradle and put the box in front of her. Her eyes widened in curiosity as Malakar opened the box and revealed the beautiful stuffed duckling. At the sight of the toy, Aurora's face lit up and she squealed in delight, reaching her hands out eagerly.
"Do you like it darling?" asked Malakar.
However, his answer was clear Aurora did like it once he saw her hugging the stuffed duckling close to her chest.
Malakar's heart swelled with pride as he saw his little girl play with the duckling, not just made with stuff and fluff, but also, out of the love he had in his heart.
0 notes
Text
Third Class

We firstly started off by recapping what we had learned by practicing examples of all four of the point types. Just a quick refresher on what we had previously learned.


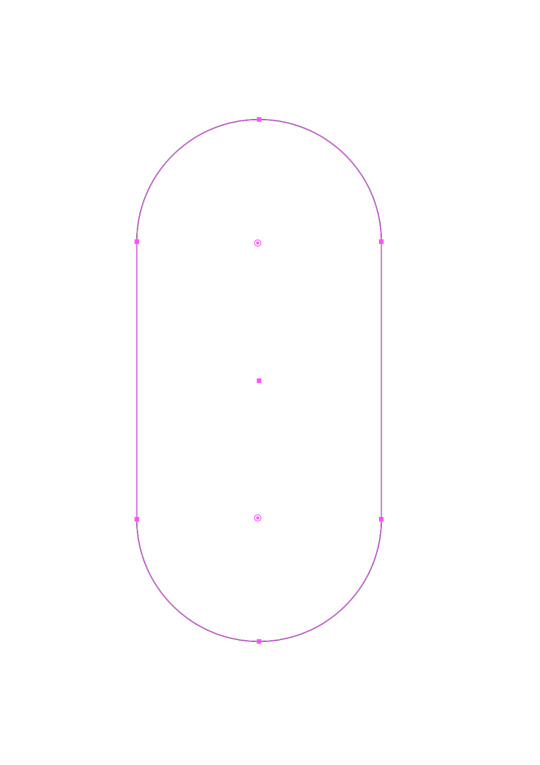
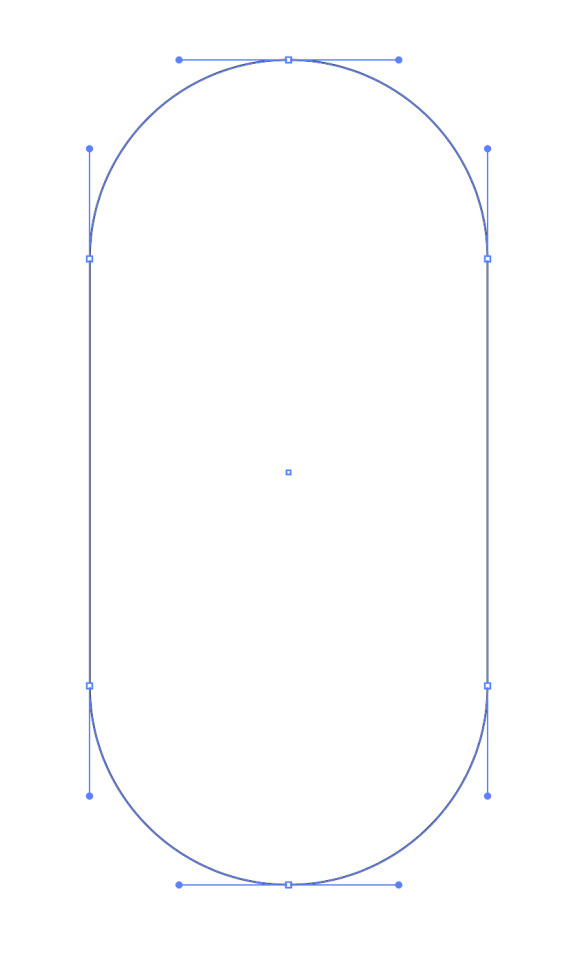
We then started to create a penguin. Firstly by using the Ellipse tool to create a circle, then separating it into two halves, and then connecting them with the Join command (which is in the notes at the bottom of this post) to create a pill shaped object. This was to be the main body for the penguin.
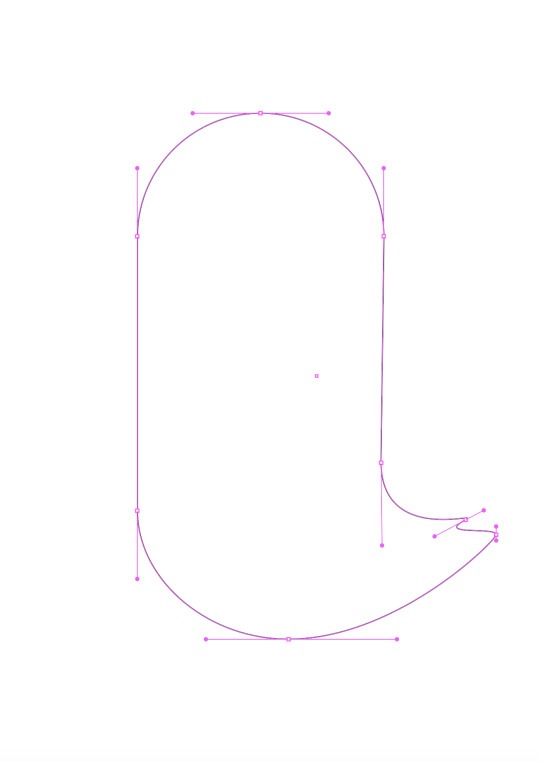

We then added a tail, and a little feather on the top of its head. This was achieved with another tool that created anchor points wherever you click. We used this tool to create extra anchor points that we would then drag outward to create the shapes necessary.


After this, we added some more features to the penguin, this included creating a wing, a beak, and the eyes. The beak was made from a rectangle, with the corners being rounded off with some adjustments to create a more beak-like shape. The wing was created simply with some curve and broken anchor points. The eyes were more complicated, using the Ellipse tool again to create a circle, then adding a gradient to it, changing the colour to blue and black, then adding another white circle to act as a highlight/glint in the eye. We also thickened the line around the shape. Then we grouped the glint with the eyeball so they would move together, and then duplicated it to create two eyeballs.


We then created the feet, this was done by creating half the initial shape, then using commands to symmetrically match the other side. Once the shape was created, we then duplicated it, and removed some segments from the duplicate to create a depth effect for the foot, which is the darker orange section. We then grouped the 2 pieces of the foot and created a duplicate of the whole object, then using Pathfinder we created an outline. We then grouped everything together and the foot was finished.

After the feet, we made some simple legs by making this cylindrical shape shown above. It just involved the bottom halves of some Ellipses being connected, then coloured in with orange.


After the legs were made, we were finally able to put everything together and colour it in. The beak colour was matched with the darker areas of the feet, and the other colours were free choice. Now, the next part was quite confusing for me, but I got it done. It involved separating the parts of the penguin into different layers, as shown above. We then created a shape for the penguins lighter body part, after colouring the whole body a darker colour, and making a duplicate layer. Then using pathfinder, matched it to the outline of the penguin. This was as far as we got, there was still a little more that is covered in some online tutorials which I'll be watching. It covers pretty much adding shadows and more details to the body.
This was a lot tougher than previous classes, but I think I did alright.
NOTES

0 notes
Note
The lighting on your most recent gamkar piece. It's like. So soft? So sublime but still so noticeable? I really like the way the lines kind of mesh with it, or like. Idk if im wording things right, but at least don't interfere?
That's so sweet! I mostly do shading by The Vibes, but I'll try to break down what I did with the lighting/coloring/shading in [that one], and hopefully it's helpful as a tutorial because it's also going to show my whole ass about how messy my shading layers are lol
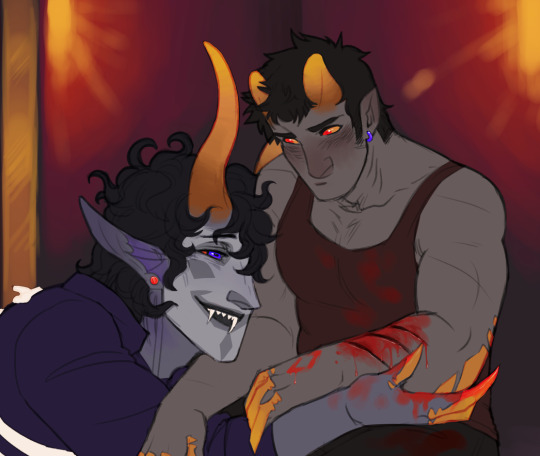
I get all my flats down and set my lines to overlay--that's probably what you're seeing RE: "the way the lines mesh with it", if I had to guess! It isn't very noticeable here except in places like Karkat's pupils or the lines on the horns/claws, but later as lighting layers are added it'll give a softer edge to places that are being hit by light. I'm a huge sucker for backlighting and rimlighting so I went ahead and threw some vague, blurry lightsources into the background, to be glowed up later in the process.
2. first multiply layer, for the hardest/darkest shadows--real color on the left, set to "multiply" on the right for comparison. This is for places most hidden from the light source, like under the nose, eyebrows and jaw, or where two things are pressed together (ie the intersection of their hands). Sometimes for pictures where the light is warm-colored I'll choose a cooler cast for the shadows, a desaturated purple or blue, but I wanted the whole piece to be kind of a soft, dreamy red-through-gold, so I kept the tones of the shadows warm.

3. second multiply layer, softer-edged, to darken up broad areas of the characters that are turned away/hidden from the light. Worth noting; the layers in steps 2, 3, and 4 are all "clipped" to the layer with the flat colors on it, which just means I pressed the button that tells Paint Tool Sai "no matter how much I scribble around, only show it if it's on top of [flat color layer]"
4. overlay layer, for the places the light is falling on people (and a few places maybe it shouldn't, technically, but what can I say I shade by the vibes). The lights in the background are gold, so I kept the saturation pretty high on this one, to give everything a goldish look.
5. Two final layers--on the left we have a hard light layer in pale gold, outlining the edges most sharply hit by light. I paint this on there full opacity so it's easy to see what I'm doing, but it looks overwhelming if it's too bright, so it's about 50% opacity in this one.
6. On the right; I duplicate the layer I made in step 5 and use the "gaussian blur" function to make it blurred and soft, then adjust the brightness and fuck around between different layer types (I tend to end up with "add", "hard light", or "linear dodge") until it looks as glowy as I want it to. In this case, it's a linear dodge layer at 75%. In an effort to cut down on how many layers I use, you can see I also took the opportunity while I was linear-dodging to add some extra glow to the lamps behind them, to sell them as actual light sources a little better.

7. profit????? Honorary mention to Karkat's blood, which is its own layer, and the shine on things like eyes, blood, and jewelry. Final tally (layers named for clarity because I'm a slob and never name my layers):

#Splickedydoodles#I guess I used to sometimes tag these#Art Tutorial#or#Art Reference#Homestuck#I hope this helps somebody! It's kind of fun to run through the process
85 notes
·
View notes
Text
Comms Week 3: Penguin
This week we made a penguin. We used everything we've learned from bezier lines and some new tools like pathfinder.
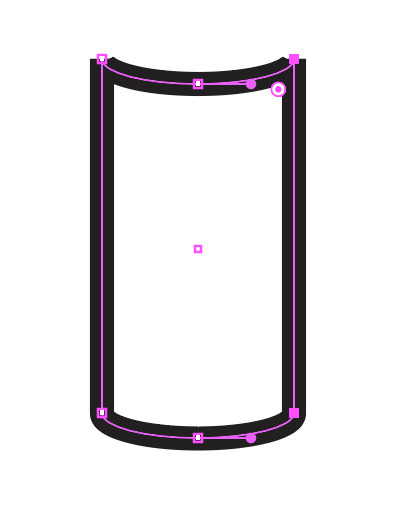
We first started by making the penguin body. This was done with six anchor points and dragging out the handles to create the curve. I dragged each handle out the same amount so it formed a perfect pill shape.


We then added a tail to the penguin. First, I added an extra anchor point and dragged it out to the left. I then lengthened the right handle on the lowest anchor point to maintain that rounded body shape. At this point I was keeping my anchor points vertical as it keeps the shape simple and clean. Then I added another two anchor points and dragged the middle point inwards. This created the tail feathers but for the middle anchor points I had to make the handles diagonal as otherwise the shape is too rounded.
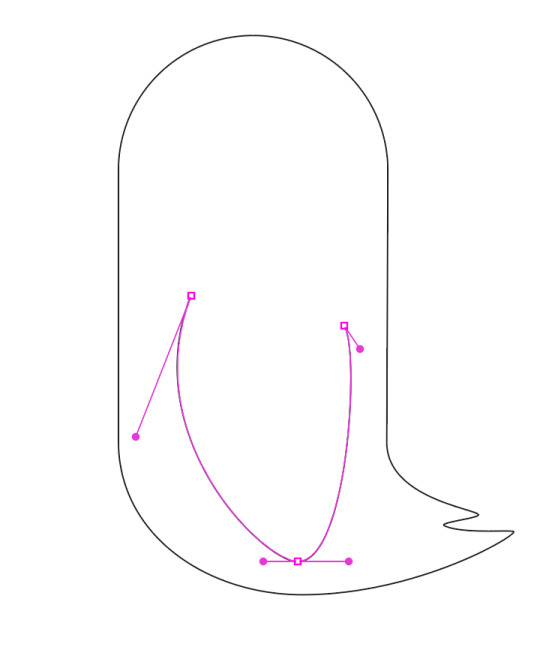

I then added a wing to my penguin. To create the rounded shape, I manipulated the handles in size and direction. For the beak since it is a small shape compared to the wing, I am able to keep the handles small making it 'cleaner'.
At this point, everything I had was really as it was just using bezier lines and making simple shapes and curves withe handles. I used as little anchor points as possible so if I needed to go back and edit the shape later it would be easy.

We then moved on to the eyes. We used a new tool for them called the gradient tool. We were able to select a colour and then change the gradient, whether is was having more black than green or the direction. We then added the white highlight to the eye as a small oval. This was slightly more difficult as it was a new experience but I found it really interesting learning all of the different options and fun messing with the colours of the eyes.


We then moved on to creating the feet. This was definitely the hardest part of the entire penguin. First we created the top shape and then duplicated it by dragging and holding down option. We then reflected it vertical and lined the two up. We then used the join tool or Command + J to join the two shapes into one symmetrical shape. We then added an outline and a 3D effect before adding a short leg.

We then added colour and shadows to our penguins. I made my penguin yellow and gave him a paler yellow stomach feather colour. I created the shape of the stomach feathers with the pen tool and then placing the wing on the level above the shape to hide the part of the shape that should be under the wing. We created the shadow on the penguin by making the shape and then lowering the opacity to 10%. The shadow at the bottom was done by making an oval and I then lower the opacity of my oval to 17%.

I then added a few extra details like eyebrows, some highlights, some clouds and a penguin tattoo. Overall, I found this exercise relatively easy but it was very time consuming. The eyes and feet were definitely the hardest part of this task as it involved quite a few new tools like join, pathfinder, and the gradient tool. This definitely made me more confident with bezier lines and other simple tools.
2 notes
·
View notes
Text

You gained a power beyond humans. Do you remember that time? "Power beyond humans"? Huh, you mean that thing…? What do you want with it? I intend to summon that power. But… it needs to be tamed. Minazuki's eyes waver like red flames. …Hm, I see. Looks like he's been given "power," just like me. For that, I require your assistance. You will cooperate with me. You have no choice in this. Minazuki points his katana at me again. With my power, I didn't have much control. I was taken over by some mysterious force and had no memory of it. He's poked around my personal profile, but he's missing the most important part? I guess he's just some brat after all; he can't do his research. To be honest, I really don't want to get involved in this, but the right choice is to act like I'm interested and get as much information out of this kid as possible. Depending on how things go, this guy might become a hindrance to me. I'll decide how to make my move once I've heard what he has to say. After I make an interested face, he surprisingly tells me the full outline of his plan. He's going to gather Shadows until he has a giant collection of them, like a pile of sculpting clay. Using that as a "vessel," he plans to summon what he called "power beyond the bounds of man" to inhabit it. But in order to pacify such a powerful being, he apparently needs "Persona fragments" that are created when Personas use their powers on one another. So he thought up the idea of creating a one-on-one tournament between Persona-users, calling it the "P-1 Climax." Plus, he's made some exact duplicates of people out of Shadows in order to force them into fighting one another. I have to admit, he made an effort. In addition, he's already taken some Persona-users belonging to an organization called the Shadow Operatives hostage. He's definitely planned for this, though I don't really get the point of crucifying his captives on those tacky crosses. Anyway, blah blah blah, I've been "called in" to help him collect the fragments and help him get a hold of that power within the giant Shadow. It all sounds pretty stupid, really, but Minazuki is deadly serious. He really intends to go through with this. Ugh… How did he manage to come up with a plan that's such a convoluted pain in the ass? Maybe it's just because I haven't been around for a while, but I'm actually impressed at how ridiculous this scheme of his is. Haha… Just… for curiosity's sake… How were you planning to use me…? Hahahahaha! I think you're misunderstanding me! You know the whole "taming" business…? I wasn't planning to rely on your knowledge to begin with, moron! All I need… is your Persona! I was gonna rip off your Persona, turn it into a Shadow, slam it into the gathered Shadows, and prrresto! Adachi's part is done. He was going to turn my Persona into a Shadow and fuse it with the Shadows he was collecting? I don't have a clue what he's talking about. As I lie there, confused, Sho holds his stomach and laughs merrily. Hyaaahahahaha! Ooh, I love that stupid look on your face! It's so great, I'm gonna let you in on some more secrets. Seems like the power left in you interferes with the thing I'm planning to absorb! I guess that "power beyond humanity" clashes with each other? But when that happens, that thing won't be at its full strength! So, if you think about it the other way around, using your power stops that thing from doing whatever it wants! And then I get to tame it! So, in order to control the "power" he was going for, he has to counter it with even more power, huh? I think I see a flaw in that reasoning, but given that we're talking about a "power surpassing the realm of man" here, logic might be going out the window. Once everything was ready and I cut up the rest of them, I was going to kill you slow! Still… aI at least gave you the chance to have some fun, you piece of sh
2 notes
·
View notes
Text
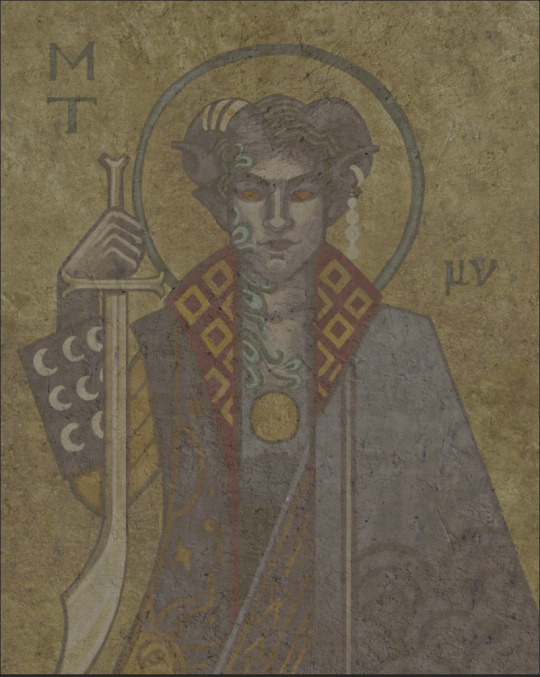
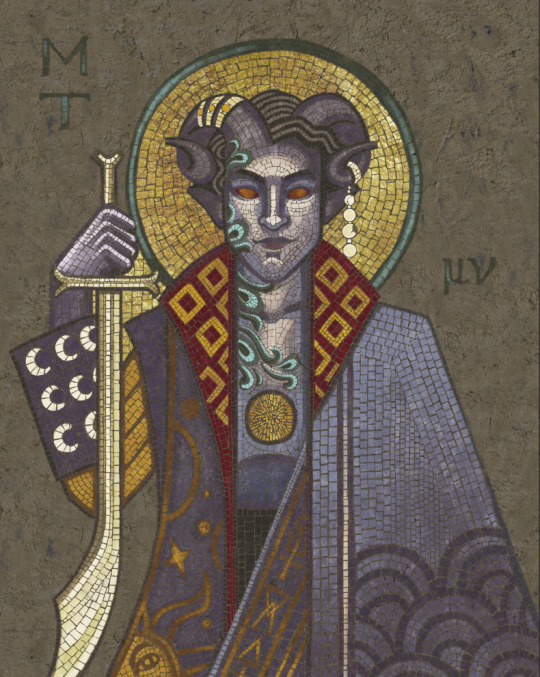
How I Did the Mosaic Effect
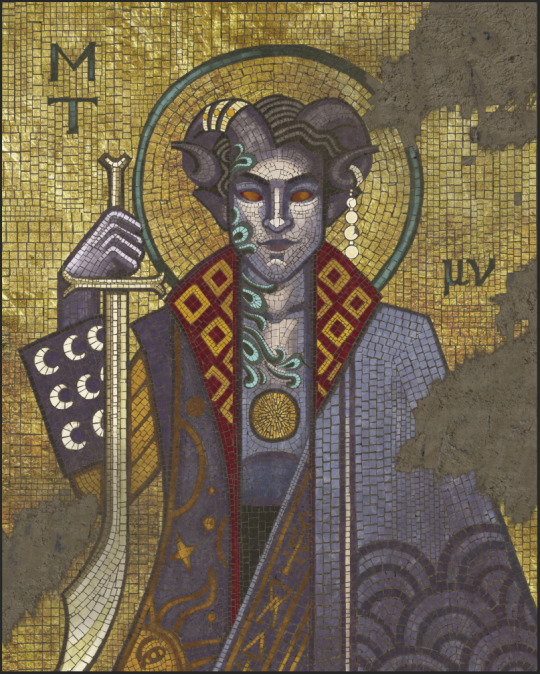
You asked for it, so here it is- a shoddily composed but nonetheless candid and hopefully useful tutorial on the Mosaic Effect I used in the Mollymauk portrait. Those of a stout and courageous spirit, read on.

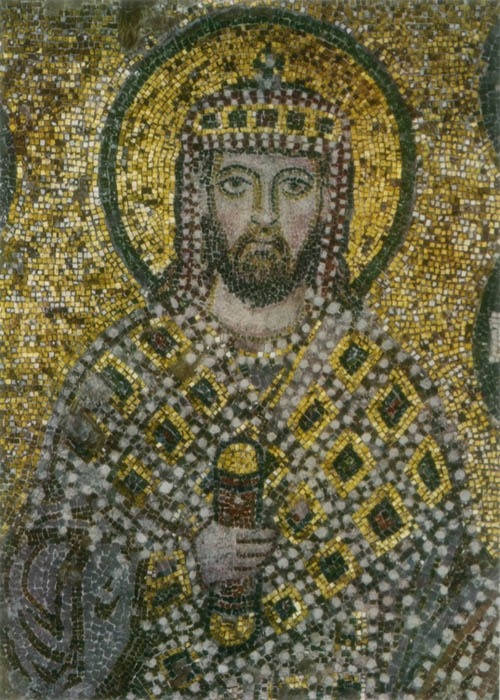
Start with a sketch. I was heavily referencing the Byzantine mosaics found in Ravenna and Istanbul, so my sketch is boxy and simple. The detail and structure comes from the shape of the tesserae, so there’s no need to put in a lot of fine lines in the sketch. In fact, you probably won’t be able to replicate really small details.
Next lay in the gold textures where you want guilding to be. I used multiple layers of gold textures, piecing things by where I wanted the visual interest. Blend the edges by erasing with a soft brush, but don’t make anything too smooth. Sparkle comes from the difference between dark and light. You can see I placed the highest texture in the halo and in his chest, and darkened the sides by his arms a lot. NOTE- I eventually found this color gold to be too warm, and cooled it down significantly.
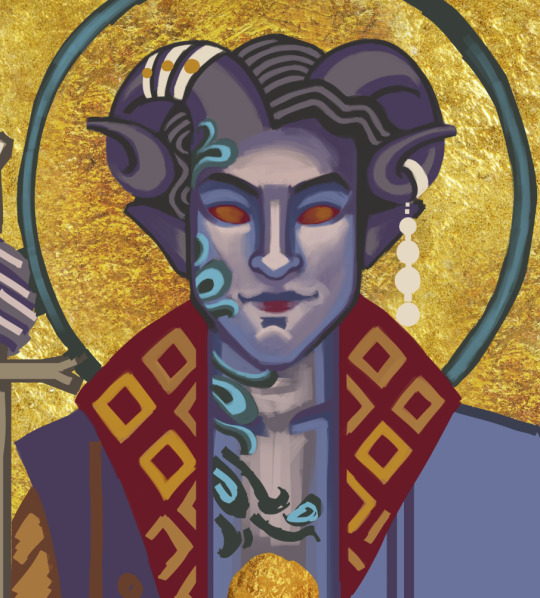
Time to paint! Try really hard to block things in without lines. If you do draw lines, make them bold enough that they can serve as a line of tesserae in the finished piece. Use motifs that echo the style you are going for, and the end texture will do the rest.
For example, I cribbed the diagonal square pattern on Molly’s coat from a famous mosaic in the Hagia Sophia. Also make note of the shifting line patterns of the gold tiles, which create a circular shape in Alexandros’ halo, while building mostly on geometric patterns in the background. That’ll come up later.

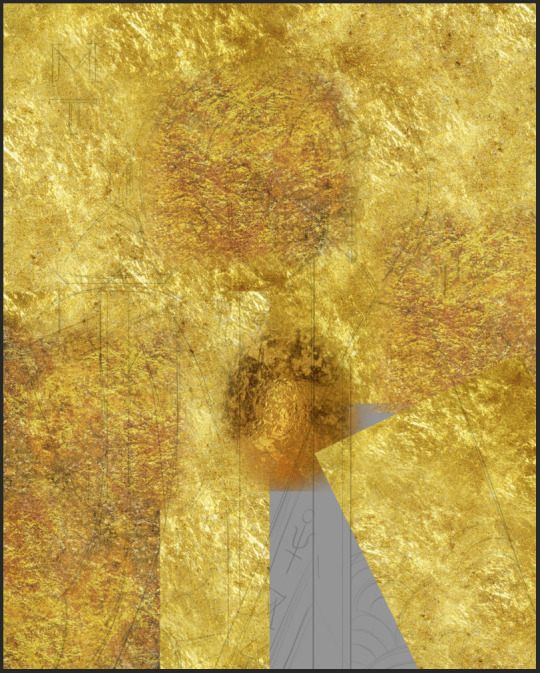
Apply a stone texture to the painted section. Once again, it doesn’t have to be perfect or absolutely convincing, it just has to break up the brush marks that inevitably make up the underpainting. I went with a marbled look, but you can go in any direction you like. Most Byzantine mosaics have satin polished stones making up the tesserae, so I wanted a smoother look.

Okay here is the magic part- Place a stone or plaster texture over the whole piece. I used a photo of a plaster wall from textures.com, but I’m fairly confident anything will work.

Now darken the plaster texture to a midtone, something that matches very few areas of your underpainting, in terms of darkness levels.

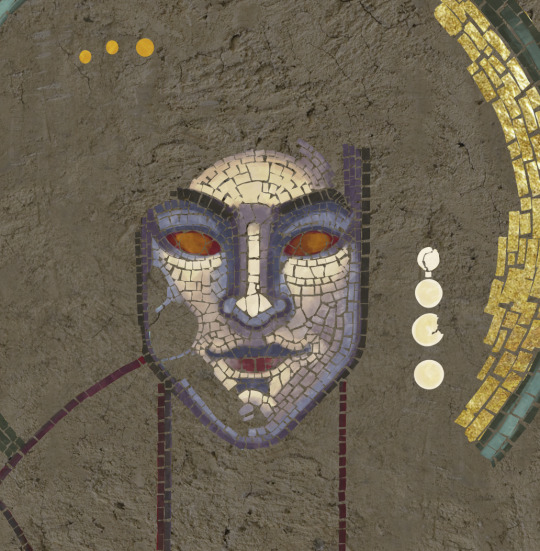
Put the following layer style setting on your plaster texture layer. There’s a purpose here- you are making a very tiny shadow around every tesserae you draw. It makes a huge difference on areas of the finished painting where the tesserae colors are similar to the background color. Lemme give you an example-
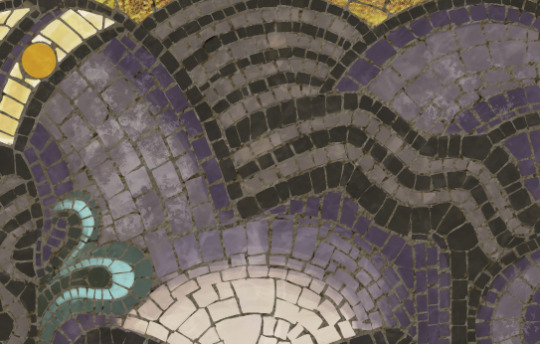
This is Molly’s hair without the Inner Glow styling. See how you can hardly see the individual tiles on the lighter sections?
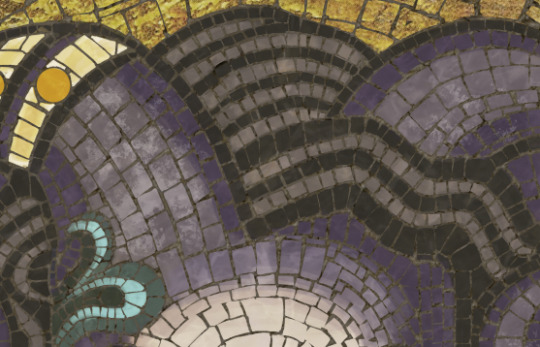
Here’s the same section WITH the layer styling. Big difference.
Now- apply a layer mask to your plaster texture. Set your texture to a lower opacity- say 70%. Get yourself a slightly geometric brush with hard edges. Choose the color absolute black and choose your layer mask to paint on. Set your brush to 100% opacity. Are you ready?

BEGIN TO PAINT OUT THE TESSERAE. This takes practice. You’ll probably have to go back and forth between making the texture layer 30% opaque and 70% opaque. The goal is to be able to track the shapes you are making while still being able to see the underpainting.
This part takes a while to get the hang of and even after you’ve mastered it, it takes forever. Keep turning your background to 100% opacity to check how it’s going.
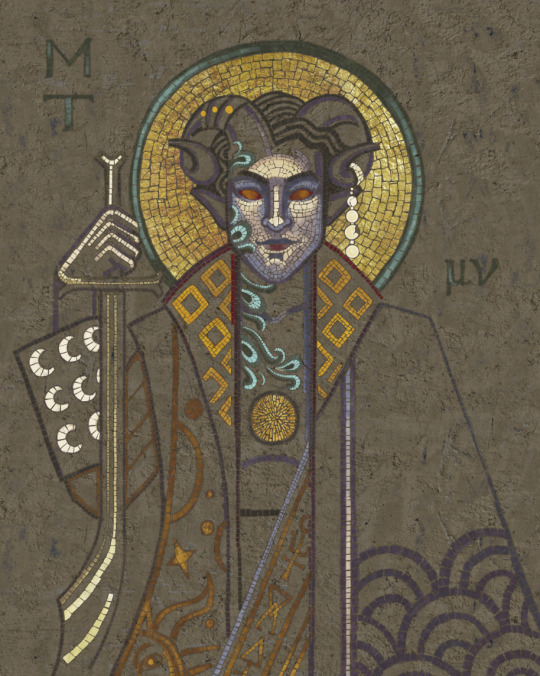
My advice is to start with the outlines of everything. I know I finished the face first, but by the time I was patching up the other interiors I had learned so much that I basically had to do mass parts of the face over again in their entirety.

At some point I decided that Molly’s skin wasn’t purple enough- color choice is one of my weaknesses, so I had sampled colors off of actual Byzantine mosaics. They don’t really include violet as a tone at all, so I eventually had to make the decision to abandon historical accuracy in pursuit of lavender.
Okay so that’s the interior finished!
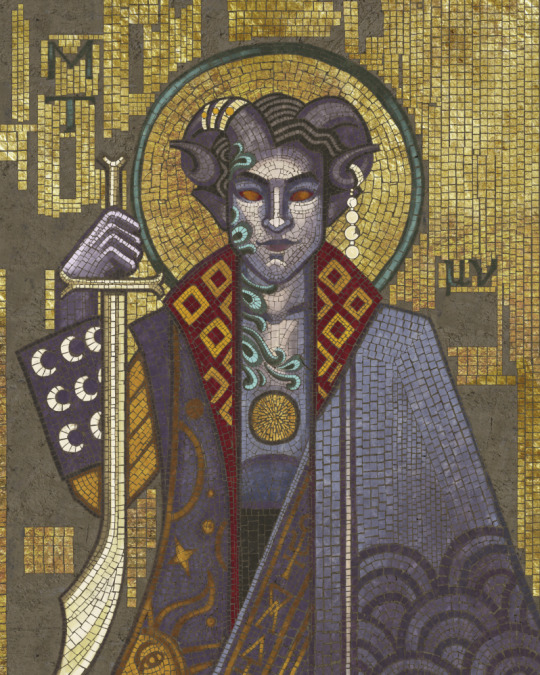
For the external background, I made a brush. Well, I took a hard square brush and took away all size jitters and transfers. Then, after a few lines, I added a 1% angle jitter so that it wouldn’t look Too Perfect. Actual Byzantine mosaics have very regularly irregular backgrounds. They try to make as much of it out of square stones as possible, but then they keep the matching ones all in one little patch and then just sort of bang that patch into other patches. So, in an effort to imitate that, you can see my hastily-developed system. I picked a size and plotted out a small area in that size. Then I built lots of other small areas of various sizes until they started to collide. I left the imperfect spaces alone, for a minute....
Then I went back and filled them with my hard brush, by hand. This was an absolute necessity in curved areas, like the edge of the halo, but also looked really slick where tiles didn’t line up quite right. It gave it that imperfect, handmade look.
Okay DAMN ALMOST DONE! I made the damaged bits by taking a cloud brush, setting it to pure white, and going to town on the layer mask. When you feel good about the shapes, take a hard brush and bust up the edges to that it mostly takes out whole tiles instead of just... ghosting them to death.
NOTE- I almost gave myself a heart attack because I forgot to duplicate the texture layer first and ended up having to recover the original finished pic from some Well of Lost Souls in the back of my computer. So learn from that and do elegant damage AFTER DUPLICATING YOUR TEXTURE LAYER.
OKAY THAT’S IT! Go into the world with this knowledge and make me a bunch of mosaic effect drawings. It was tedious but fun, right???
#art tutorial#mosaic effect#okay talking this out wasn't as hard as I thought it might be#but it's still not one of those pretty tutorials#but still useful right?!
7K notes
·
View notes
Text
The Toolbox (1/2)
Read on AO3.
Angst Prompt #2: ‘You deserve better.’
Alex sits in the front seat of his car. He’s parked at the junkyard, engine still running. It’s early morning, the sun barely up. He darts his eyes up to his rearview mirror and frowns at the toolbox in his backseat. The toolbox is ordinary - gray metal, covered in various scratches and dents. A completely unremarkable object in every way except one - it belongs to Michael Guerin.
Which is also unremarkable unless you are Alex Manes and Michael Guerin is your ex.
He returns his stare to the airstream’s door. The Chevy is parked to the left of him, so it’s a safe bet Michael is home. Another fifteen minutes pass and he still hasn’t moved. He glances over his shoulder at the toolbox. A stray sunbeam bounces off the corner, the glare momentarily blinding - like the damn thing is mocking him.
Sighing, Alex opens his door and slides down to the ground. He pulls the toolbox from his backseat and walks to the trailer’s door. The only sound is the generator running and a couple of enthusiastic songbirds. He knocks and takes a step back. ‘It’s me, Guerin.’
A few minutes go by before Alex hears Michael shuffling around inside. When he finally opens the door, Michael is only half-dressed. Low slung sweatpants and no shirt. Alex is also pretty certain there’s nothing underneath said sweatpants. No matter how many times he’s seen Michael naked, the sight of his bare skin never fails to leave him breathless.
‘Alex? Did I know that you’d be here at ass o’clock in the morning?’
No. He didn’t know. They haven’t talked in ages. Nothing more than the occasional head nod or wave when they see each other around town. And Alex hadn’t called or texted about this meeting because he hadn’t known this would be the morning he found the courage until his alarm had gone off earlier than expected.
‘You didn’t. Sorry. I just wanted to stop by and return your toolbox.’ Michael doesn’t say anything, just blinks at him. Sleep still crusted in the corners of his eyes. ‘I’m...uh...cleaning out my garage. So.’ He holds up the toolbox by it’s rusted handle, but Michael doesn’t move to take it.
Finally, Michael yawns and leans against the door frame. ‘Did I ask for it back?’
The question is unexpected and catches Alex off guard. Which he hates. ‘No. But when you borrow something, it’s polite to give it back.’ Tired of holding the heavy toolbox, Alex sets it down at his feet. Michael just watches him and it makes Alex uneasy. ‘I guess I should go. Thanks for letting me borrow it. And sorry to bother you.’
Walking away, he slows his pace and listens for Michael to call out his name, asking him to stay. For a cup of coffee or just to talk. The reason doesn’t matter. The reason will never matter so long as he asks. But all Alex hears is the sound of the door slamming shut.
Alex pauses. Fights with himself to keep from looking back over his shoulder. Or worse, turning around and begging Michael to be let inside. It was hard being away from him all those years, but it’s much lonelier now being so close. Clenching his fists, he climbs back into his Explorer and pounds his fist against the steering wheel, accidentally sounding the horn. Startled, he looks up at the airstream for any signs Michael noticed. Nothing until his phone vibrates in his pocket.
Michael: You alright?
Alex: Fine. Sorry.
Michael: Stop saying you’re sorry.
And that’s it. Alex doesn’t know how to respond and Michael doesn’t offer anything further. So he fastens his seatbelt and cranks his engine. With one last look at the toolbox sitting lonely on Michael’s stoop, Alex puts his car in reverse and leaves the junkyard.
The ride home is uneventful. He spends a lot of time cursing himself for being so needy and desperate. Forrest had moved to New York only two weeks ago and already he’s crawling back to the boy who clearly no longer loves him. Alex hates nothing more than being a constant disappointment to himself.
He spends the rest of the day distracting himself with chores. Mainly, decluttering his garage so that he can begin the long, arduous process of converting the small space into a music studio. The idea has been banging around his head since before he’d even closed on the house. Imagining himself recording his first album in a place that he’d built with his own two hands. With maybe Michael’s two hands helping - another failed dream.
At noon, Alex stops for lunch. Making a couple of sandwiches and settling into his favorite patio chair. It’s not long before he hears the familiar sounds of Michael’s truck growing closer. He shifts in his seat and looks on as Michael parks in the gravel next to his cluttered driveway. Heart rate rising at the first glimpse of his black cowboy hat.
He frowns when he sees what Michael’s carrying.
It’s the toolbox. The one Alex had returned only a few hours ago. The guitar incident quickly replays through his head. Dread pooling in his gut.
Michael strolls through Alex’s patio gate like he owns the place. Tossing his hat on the table in front of Alex and dropping the toolbox at his feet. ‘You forgot this when you left.’
Alex’s lips part while he tries to find something to say. Confusion rendering him mute. The best he comes up with is a raised eyebrow.
Michael sighs. ‘It’s not mine. It’s yours.’ Said like it’s the most obvious thing in the world.
He shakes his head. ‘I remember you giving me the toolbox, Michael. Last year when I asked for a pipe wrench.’
‘Right. And I could have just given you the pipe wrench. But instead, I walked around the junkyard putting this together for you - gathering the tools I didn’t need or had duplicates of. So that you’d be taken care of next time.’ Michael collapses into the chair next to Alex, exasperated.
Alex makes an annoyed noise deep in his throat. ‘How in the holy hell was I supposed to know that?’
Michael throws his hands up. ‘Because we were in a good place!’ He sighs and presses his knuckles into eyes.
‘Guerin, the only thing you said to me when I picked up that toolbox was let me know if you need help with anything.’ He kicks Michael’s boot softly. ‘Not a single indication you were giving me a gift.’
‘Open your garage door.’ Michael jumps to his feet, startling Alex. He bounces on his heels and tugs Alex out of his chair. ‘Now, Alex. Open the door.’
Growing more annoyed by the minute, Alex does as told despite wanting to strangle Michael. He heads into the house and through the hallway to his garage. Stepping inside and pushing the button to raise the door. Slowly, the chains grind through the opener and sunshine eats away at the shadows. Michael being revealed inch by gradual inch.
Michael looks around at the empty space. ‘Where’d everything go?’
‘The driveway mostly. I’m converting the garage into a studio.’ Alex waves to the piles outside. ‘If you want anything, feel free. It’s mostly junk.’
‘Huh.’ Another indecipherable response. But he marches to a spot in the back corner and points at his feet. ‘The toolbox lives here. There’s even a rusted outline because it’s sat here so long.’ Michael drops the toolbox to the ground with a bang. ‘Which means water is probably seeping up through the concrete foundation. You should definitely have that checked out before starting construction.’
He moves to leave, not sparing Alex another glance until he’s back in the sunlight. Hands on his hips, he spins around and narrows his eyes. ‘Why would you return the toolbox if you were about to start renovating?’
Alex grits his teeth so hard it hurts. ‘Because it’s not mine! Because I’m trying to clean out the garage.’ He closes his eyes and gives up. ‘And my heart.’ He blinks his eyes back open and glares at Michael.
‘Is he here?’
‘Forrest?’
‘Yes, Alex. Forrest. I need to know if he’s about to charge out here to kick my ass for yelling at his boyfriend.’ Michael’s eyes shift to the door behind Alex. ‘Well, he can try anyway.’
‘He’s not here.’ He doesn't offer any further information despite the pounding of his heart.
‘Good.’ In just a few strides, Michael is within arm’s length. ‘You don’t get to do that. You don’t get to show up at my door unannounced. You don’t get to return toolboxes. And goddammit, Alex, you don’t get to return me. That’s not how this fucking works.’
Anger flames in Alex’s chest. Before he can stop himself, he storms over to the toolbox, picks it up with a huff, and walks it to his ever growing trash pile, dumping it unceremoniously on top. ‘It’s you who doesn’t get to talk to me like that. Now go home, Michael.’
It’s frustrating. How their story never seems to change. No matter how much both of them want nothing more than to crawl into each other’s arms.
On the way to his truck, Michael stops and gives Alex one last look. ‘You’re right, Alex. You deserve better. You always have. Glad you found it.’ And then he climbs into his truck and disappears.
Fuming, Alex steps back onto his patio determined to finish his lunch. But everything goes to shit as soon as he spots Michael’s black hat abandoned on the table. He groans and mutters a weak fuck before heading inside in a feeble attempt to ignore everything.
The toolbox and now the hat. And a universe that just won’t let them quit each other.
47 notes
·
View notes
Text
First Encounters
A fic for @wooshofficial‘s au of @/mine-sara-sp‘s shadow people au
tws: mentions of forest fires, implications of being stuck in something similar to a violent time loop
The vibes from the update notification were weird as hell. There weren’t many other patch notes beside a few bug fixes and Herobrine getting removed again. In the message, it had said that new mobs were a way to renew resources that normally would be non-renewable.
Dream brushed off the weird energy of the update notice, and stepped inside the so called Shadow Temple. ao3
Dream checked his communicator one last time before stepping into the temple. All of his friends were busy doing other things, and everyone from L’manberg was apparently off looking for their own copy of the building he stood in front of.
When the server updated, everyone had received an alert of the new structure that generated, and the new shadow mob that came with it. The update page was scarce, simply informing the players that the shadows could be summoned with an armor stand in one of the temples, and would be, “a shadow of the player that summoned it.”
The vibes from the update notification were weird as hell. There weren’t many other patch notes beside a few bug fixes and Herobrine getting removed again. In the message, it had said that shadows were a way to renew resources that normally would be non-renewable.
Dream brushed off the weird vibes of the update notice. He stepped inside. The armored man took a moment to admire the decorations of the so-called temple. For being a fairly small structure in a warm biome, it seemed very cold and uninviting.
The main attraction seemed to be a raised, circular platform in the back of the structure. Dream pulled an armor stand out of his hotbar. The only light in the room came from the sun outside, along with a few scant light sourced by the entrance, causing Dream’s outline to stand out against the floor and the back wall of the temple.
He set the armor stand down on the center of the dais and took a step back. The armor stand glowed for a second, before entirely vanishing. Looking down, the fighter watched as the shadow below him began to move.
The darkness roiled for a moment, before an armored hand broke the surface, and pulled itself to its feet. A copy of Dream pulled itself out of the silhouette. It was wearing full nephrite armor with an enchanted sword in hand. Yellow particles danced around the gray entity.
The communicator pocket vibrated in Dream’s pocket, indicating that it had a new message. He ignored it, instead keeping both eyes on the entity in front of him. The mob blinked. Then, it swung its sword, and Dream danced out of its reach, preparing for a fight.
There wasn’t really one.
He easily stayed out of the shadow’s reach as it tried to attack him. It was exactly like fighting a single zombie. Eventually, Dream whittled down its health, and the entity dropped an exact copy of everything in Dream’s inventory.
The man paused for a moment, because breaking into shocked laughter and digging through the pile sitting on the floor. That was the easiest fight in the world! And he got an entire set of netherite armor and tools from it. Even the durabilities between the sets of armor were identical.
This time, Dream made sure to dump anything that was unnecessary from his inventory on the jungle floor outside of the temple. His inventory was going to get cluttered very quickly.
He paused for a moment, remembering that his communicator had buzzed when he’d summoned his shadow.
Dream has summoned their shadow!
<TommyInnit> oh come on!!
<TommyInnit> WE JUST FOUND ONE
Dream’s shadow has been slain by Dream.
<Sapnap> is it going to say that every time?
Dream quickly typed out a response.
<Dream> lets find out
The fighter loaded his crossbow and walked back towards the dais. He set another armor stand on the platform. Just like before, the shadow at Dream’s feet began moving before something climbed out of it.
Dream immediately shot it with his crossbow and began hacking away at the mob’s health.
The shadow flinched at the impact of the bolt, and made an aborted movement to grab at the arrow lodged in its shoulder. The motion was forgotten as the entity moved to the side to doge Dream’s next assault. Its attacks were much faster this time, and Dream couldn’t just back up and stay out of its reach.
By the time he killed it, the fighter was at about half health.
Okay, so it got more difficult each time you killed it. That was interesting. He checked his communicator again, and a message did appear every time a shadow was summoned or killed.
Dream waited until he regened his health before loading his crossbow and summoning his shadow again. As soon as the shade under his feet started moving, Dream equipped his shield.
The shadow didn’t appear with it equipped, and it was easily killed. It tried to get behind him a few times, but Dream killed it before it could do any real damage.
He walked outside again and stood, watching the setting sun for a moment. Then, he got to work. He cut down a nearby tree using it to make a crafting table and a few chests. Dream now had eight sets of netherite armor, along with several copies of his various tools and weapons. They couldn’t all fit in his inventory, so some were still sitting on the floor of the temple. He put most of the items in the chest and tossed a few non-important things that had also duplicated into the foliage of the jungle.
At this point, the fighter was being greedy, but he’d never seen this much netherite before, and he wasn’t about to let this opportunity go to waste. Dream piled as much of the precious materials as he could hold into his inventory, and summoned his shadow for the fourth time.
Again, he set down the armor stand without the shield, but equipped it as soon hostile mob began forming. The monster appeared without a shield on its arm, but quickly equipped it mimicking its summoner. Dream backed up to the entrance of the temple, caging the thing inside the darkened building. He shot it until it was dead. His piercing crossbow broke through its shield easily.
Dream glanced at all the armor on the floor, before moving to place what he was carrying in the chest and collecting the rest off the ground where the shadow had been cowering in the corner. He repeated this a few more times, with no new reaction from the shadow. When the third double chest was about half full, the fighter began to get nervous. There had to be more to the update than this. The mob had acted the same the last six times it had been killed.
He placed the armor stand down, and was treated with a crossbow bolt to the shoulder even before the entity had even fully emerged from his shadow. An axe cracked through the wood of his shield as the shadow shoved him to the side. Dream fell on his ass.
The shadow shot past him into the sunlight. It reloaded the crossbow and shot its summoner one more time before fully committing to sprinting through the jungle foliage.
In shock, the fighter watched his copy run into the jungle. He then scrambled to his feet and made chase.
Whatever part of the code that decided which aspects of the players that the shadows received, this one had gotten the best of Dream's parkour skills. It slowly gained a lead from the fighter, as Dream struggled to make it over foliage that the shadow cleared smoothly.
Suddenly, the mob dipped out of Dream's sight. He skidded to a stop at the edge of a massive ravine. The shadow paused at the bottom for a moment, before bolting into one of the caves intersecting the gouge in the world.
Dream steeled himself. Then he leaped into the depths after his shadow. The enchanted netherite boots absorbed most of the impact, but the fall still took him down to half health.
He hurried down the same tunnel and was immediately struck by the issue that he didn’t have any light. The warrior had tossed out all of his torches when his inventory started to get cluttered, but the enchanted shimmer of the shadow’s armor and the yellow particles that hovered around it led Dream farther and farther into the cavern.
The fighter lost precious ground to the entity every time he had to slow to eat or a hostile mob blocked his path. The aggressive entities ignored the shadow as it sprinted past them, but turned to attack Dream every time he rounded a new corner.
Dream skidded to a stop in a circular room of the cavern. He’d lost sight of the mob around the sharp turns and intersecting caves systems. Huffing, he quickly glanced down all of the pathways, but silently admitted defeat when he spied no glowing particles or enchanted armor in sight.
He had no way to track down the escaped shadow. Pulling out a pickaxe, Dream dug a staircase to the surface. He broke into sunlight after several minutes and climbed out of the hole in the savanna surface. The jungle was visible in the distance. He sighed and headed towards the forested biome.
It took Dream nearly an hour to find the shadow temple again. The dark structure was squirreled away in a cliff face. He only found it again because of the chests he’d left by the entrance. Nothing in the chests had been touched or moved at all. Pulling out his communicator, Dream noted down the coordinates.
It looked like the citizens of L’manburg had been having their own adventures with shadows. Both Wilbur and Tubbo had been killed by Wilbur’s shadow and Tommy’s shadow had been killed and resummoned a few times. Shrugging to himself, Dream stuck his communicator back in his pocket and began the long trek towards the spawn town.
---
“I still think you’re messing with us. There’s no way you got this much crap in a few hours.” Sapnap nagged from the back of his mule. “Is this structure a dungeon or something?”
“You’ll have to wait and see.” Dream was sitting backwards on his horse, while the steed continued forward without prompting. He’d practically had to beg his friend’s to get them moving as soon as he got back to spawn. He didn’t want anyone from L’manburg to follow him to the jungle and steal his look.
George and Sapnap trailed behind Dream on a donkey and mule accordingly. George was also leading a caravan of llamas that they had found on the journey to the jungle.
“Why can’t you lead the llamas, Dream?” George’s donkey plodded along at the back of the train with the llamas trailing after him.
“Because I have to lead you to the temple. I can’t be in the back.”
Sapnap urged his mule in front of Dream’s horse and the rider and equine duo started cantering toward something in the distance.
“Well turn around and start leading then, because it looks like the jungle is gone now,” he shouted at his friend.
Dream turned around in his saddle and hurried his steed after his friend.
George sighed as he and his donkey were left in the dust. They couldn’t go any faster without snapping the lead to the llamas.
As Sapnap and Dream walked across the transition from savanna to what used to be a jungle, their steed’s started pulling at the reins. Neither the horse nor donkey wanted to tread farther on the fresh ash of the jungle. Many of the larger trees were still smoking and Dream could still see red embers inside some of the trunks. Dream tried to urge his horse farther into the smoldering forest.
The beast reared up on its back leg and dropped its rider onto the ground, stirring up a cloud of cinders. Sapnap slid off his donkey and grabbed the horse’s halter. After a few moments, the horse calmed down. They still seemed anxious, but weren’t about to lash out again.
Sapnap glanced at Dream, making sure he was okay before attaching a lead to the horse’s halter, and another to the halter of his mule.
“Let’s leave these guys in the savanna. We can get the loot ourselves and bring it out here.”
On the ashen ground, Dream coughed from the smoke and soot, but nodded at his friend and got to his feet. His dark armor was coated in the gray powder.
They met George at the border of the destruction. He had already driven a stake into the ground and tied up the donkey and llamas. When he saw Sapnap emerging from the burnt forest the other two steeds and Dream on his tail, George waved his friend down.
He planted another fence post in the ground, and Sapnap immediately tied up his and Dream’s mounts as well. Once all the animals were secured, George and Sapnap turned to the person who had been in the area before.
Gesturing towards the ashen landscape, George said, “I’m guessing it wasn’t like this the first time you were here?”
“Nope.” Dream shook his head, still coughing from the ash he’d inhaled. “There must be a lava pit around here that ignited it. The chests weren’t beside any plants though, so they should be fine. The temple should be right around here.”
He set off into the jungle, with his friends trailing after him. A little way into the ashy wasteland, they split up to look for the building. After a few minutes, Sapnap yelled that he’d found something.
Dream was the last of the trio to the front of the structure. The chests had been to the right of the entrance when Dream had left the jungle. Now, none of the chests were there and a crater and a source block of lava was in its place.
He stood looking at the destruction for a moment before saying, “You have to be fucking with me.”
Sapnap snickered at his friend’s plight. “I’m guessing this also wasn’t here before.”
“NO!” Dream started pacing around the area outside the temple, simultaneously talking to his friends and trying to rationalize what had happened while he was gone. “There were two double chests full of netherite armor when I left! Something had to have-”
Dream cut himself off. He spun around to face his friends. “My shadow did this.”
George barked out a laugh at the idea. “Your shadow? That’s just a mob-”
Dream cut off George’s doubts with a shout.
“What else could have done this? Look!” Dream pointed at the lava and hole in the ground. “It tried to burn the armor with lava, but since netherite doesn’t burn, it had to use TNT to get rid of it. That's why the lava is floating above the hole.”
The lava source was in fact floating above the hole, where the ground level should have been if the terrain hadn’t been destroyed.
Sapnap blinked, taking in the damages in a new light. “Yeah, a player could do that. But there’s still no way a mob could.”
Dream took a deep breath, before explaining what he’d figured out about the shadow mobs through trial and error.
“Every time you kill them, they get smarter and stronger. I killed my shadow about fifteen or twenty times, before it stopped fighting me and instead ran for it.”
“Really.” George didn’t sound convinced. “A preprogrammed mob figured how to make mine iron, make a bucket, and pick up lava. Then when that didn't work, it figured out how to kill creepers and make TNT.”
“Yes! When we were still in the temple, it figured out that axes disable shields without me doing it first.”
“Okay, okay.” Sapnap made calming motions with his hand as he walked into the dark structure. A few steps inside, he turned back around to face his friends.
“Let’s stay that a mindless mob managed to both escape Dream, and destroy the chests, where the hell did you-” he pointed at Dream, “-find chests full of netherite in the first place, because you definitely didn't find it in this little shack.”
Dream paused for a second to think, before saying, “Give me a few minutes to do some stuff. Showing you will convince you more than me telling you.”
Sapnap considered it for a moment before nodding and sitting down on the edge of the dais. George joined him on the improvised seat as Dream sprinted out of the temple. After a few minutes, the fighter returned with a few armor stands in hand.
Then he started pulling his armor off. “Sapnap, take your armor off too, and give it to George.”
“Uhh, alright?” Sapnap sounded suspicious, but complied, handing over his armor along with his weapons to their british friend.
Dream handed the armor stands to George, and then pointed at the platform in the very middle.
“Put the armor stand there and then back up a bit.” He instructed.
With that, Dream hopped off the raised platform and turned to watch. Beside him, Sapnap looked marginally worried. George gave Dream an odd look, but turned around and set the armor stand in the center of the dais.
George took a step back as the armor stand glowed and then disappeared. He took another, more shaky step back as the shadow below his feet began to boil. A hand emerged from the silhouette, followed soon by the rest of the mob. Just like with Dream’s shadow, it was almost an exact replica of its summoner, except that it was colored in with gray and yellow.
The new summoner stood in shock for a moment, only being shaken out of his stupor by the shadow swinging at him with its sword. After the initial surprise attack, George dealt with the mob easily. It didn’t even try to use its shield as George hacked through its health.
A few moments later, the shadow died. Sapnap and George stood gaping at the pile of netherite armor and weapons on the ground.
“Dude!” Sapnap quickly fell to his knees, digging through the drops on the ground. He paused when his hands fell upon the hilt of a sword. Pulling it out of the pile, he inspected it for a moment before turning to George.
“You still have my sword, right?”
“”Yeah.” George nodded and after a moment, Sapnap’s sword materialized out of his inventory and into his palm. George handed it back to its rightful owner.
Sapnap took a moment to compare the weapons before turning to face Dream.
“Dude, what the hell?”
Dream simply shrugged and replied, “Everytime you kill your shadow, you get a duplicate of everything in your inventory.”
Sapnap moved the swords into his inventory and went back to scrounging through the loot, picking out his armor and putting it back on. “That’s so overpowered, you just need to kill your shadow a few times and you can have so much netherite.”
“Yeah,” Dream walked up and started strapping on his armor from the pile as well. “I had over two double chests of stuff. Also, the more times you summon your shadow, the stronger it gets. I killed mine about 10-ish times before it ran away.”
Sapnap stood up, armor glowing with enchantments. "Let's kill George's a few more times before we leave, so we aren't completely empty handed."
Dream nodded and handed the rest of his armor stands to his friend. "And if it gets too hard, we can help you kill it."
With his friends fully equipped and backing him up, George put another armor stand down on the dais.
As soon as the mob emerged from George's shadow, Dream shot it with a crossbow bolt. The projectile went right through the shadow, and stuck in the wall behind it. Dream took a step back in surprise.
Sapnap's sword found its way through a gap in the shadow's armor and into its abdomen. Its head turned to look at its new attacker. The entity slammed into Sapnap with its shield. He was thrown off balance and fell to the ground, trapped behind his shield by the shadow's attacks.
Dream fired another crossbow bolt at the mob. It went straight through its chest, through Sapnap's shield, and into the wall beside his head.
"DREAM! STOP THAT, WE CAN'T HURT IT." Sapnap yelled. "GEORGE, YOU HAVE TO KILL IT."
Sapnap's yelling broke George out of his stupor. With the shadow's attention firmly centered on Sapnap, the british man killed it from behind without impedition.
Once it was dead, Sapnap slumped back against the blackstone wall. He pulled his helmet off and set it in his lap.
From his position on the floor, the warrior announced their newest findings. “Okay, new thing learned: only the player who summoned a shadow can hurt it.”
He jammed the helmet back on his head. Using the wall, Sapnap got back on his feet.
“You good?” Dream’s voice was laced with concern.
Sapnap nodded. “Yeah, that just threw for a bit.” He brandished his saber and tapped the point on the stone floor. “My sword went through it like nothing was there. It felt like I’d stabbed an empty suit of armor.”
“What, like, ‘Error 404: Shadow not found.” George posited.
Sapnap laughed at the brit’s joke. “Kinda, yeah.”
Dream shifted his grip on his crossbow. Instead of the usual comfort a sword or loaded crossbow brought, his hotbar was now effectively full of dead weight. It was unsettling to have a problem he couldn’t fight his way through. He swapped the crossbow out for a sword.
Turning to his friend he asked, “Do you want to go again, George? Me and Sapnap can draw attacks with shields, even if we can’t hurt it.”
George nodded, and grabbed an armor stand out of the new pile of stuff on the floor.
They killed the shadow 3 more times before it stopped attacking Dream and Sapnap, and instead ran past George’s attacks to the entrance of the temple.
It stopped at the threshold of the build. Stock still, it stared at the destroyed and ash covered jungle. George killed it with a crossbow bolt to the back.
Dream’s couldn’t see its expression from behind, but from how similar the shadow was to George, it looked like the mob had stopped in shock because the destruction outside.
He decided not to mention it. The three gathered all of the valuables laying on the ground, and Sapnap got rid of the float lava. Then, they started the trek back to the savanna where they’d left their steeds.
As they approached, Dream noticed something missing.
“Is my horse gone?” He asked.
The llamas were milling around the area, with the leader of the caravan still tied up beside George’s donkey, but Sapnap’s mule was tied up on its own, instead of with Dream’s horse.
“They couldn’t have gone far.” George said, as he started unloading items into his donkey’s saddlebags. “They probably snapped their lead and are just wandering around.”
“I’m gonna have to disagree with you, George. It looks like someone took the horse.” Sapnap was crouched on the ground beside the post that his donkey was tied to. “There’s a sign that says, ‘I’m sorry that I took your horse. I will take good care of them.”
Dream paused for a second, processing what Sapnap had said. Then, he shouted, “MY SHADOW STOLE MY HORSE.”
George let out a bark of laughter, while Sapnap fell on his ass, cackling.
“Can they even do that?” George asked, bewildered.
“Apparently!” Dream stormed over to where Sapnap was dying laughing in the grass to read the sign himself. It was exactly what Sapnap had read, word for word.
Sapnap wiped tears out of his eyes, and through a fit of giggles said, “They also can write apparently.”
Dream held his head in his hand and announced, “My shadow is a nightmare.”
“That can be his name, then.”
“What?” Dream turned to George in confusion.
“If he can steal a horse and apparently feel sorry for it, I think he counts as sentient, and he should have a name.” George shrugged and untied his animals from their post.
“What are we going to call your’s then? 404?”
George considered it for a moment, then said, “Why not? I think that sounds like a cool name.”
Dream sighed. “Alright. Now, how am I gonna get home?”
Already on his mule, Sapnap trotted over and stood beside George’s donkey. “Hop on a llama and enjoy the ride, I guess.”
“Fiiiiiine. ” Dream whined. “But I get to sit on the llama in the front.”
George snorted at his Dream’s annoyed tone. Sapnap laughed and said, “Alright, llama boy.”
Dream groaned and hopped on the back of one of the llamas. George pulled his donkey around and attacked a lead to the llama Dream was sitting on. The rest of the camelids formed a light behind the first.
Sapnap walked his donkey so he was standing beside Dream. The warrior struck up a teasing conversation with his friend.
Smiling at his friend’s banter, George clicked twice at his donkey and gave it a small squeeze with his legs, signaling it to go forward. After a moment, the equine started moving, and they’d begun the long journey back home.
#dream team#dreamwastaken#sapnap#georgenotfound#shadow people au#i wrote this a While ago but never made a proper post about it on tumblr#heres to hoping it actually shows up in the tags this time#my writing#im also not @ing sara because i dont want to annoy her
29 notes
·
View notes
Photo

for @yourappa and many others who requested <3
version deux! lets go! :o
what i’ll be using:
Photoshop 2019 ( ᵈᵒⁿᵗ ᵗᵉˡˡ ᵐᵒᵐ ) 🌙
Topaz Clean 3 and Topaz Studios 🌙
Loish Brushes 🌙
My hair brush 🌙
Smudge Tool 🌙
Avonlea’s (poolbrops) smooth actions 🌙
Okay first to note i use my own homebrew reshade in CAS to get a nice base for my image:

I edited out the flower cage, but the rest is reshade lmao. Reshade is not necessary to follow my edit and can just use a nice psd you like instead!
Time to mask your image! (unless you like the cas background then just skip)
Select Colour Range (Select>Colour Range) and set fuzziness to 0. Use the eyedropper to select your background. This will ensure that your subject will be completely outlined:

Click okay then select Inverse. Click Mask and then Double click on your layer mask to play around with with the settings till you’re happy with the result:
If you have to clean up any extra background lines that were leftover dont stress! I had to clean up alot around the flowers. :o(
Once completely masked and cleaned up, choose your background! It can be anything you’d like. I’m using a simple solid colour yellow!
If you remember from my november tutorial, I like to use a soft light layer to do the first part of shading. Dark reds and browns are good for this. Using a smart mask, estimate where the figurative light is hitting your sim, and then shade in the nooks and crannies to your desired preference. I’ll be using the loish soft shade brush for the majority of this:
FYI: pressing alt inbetween your new layer and subject will create a smart mask! This mask makes for drawing on top of your subject easier and makes for less cleanup.
Once you like what you’ve shaded, use the smudge tool I’ve linked to lightly blend. Remember to clean up any messy edges:
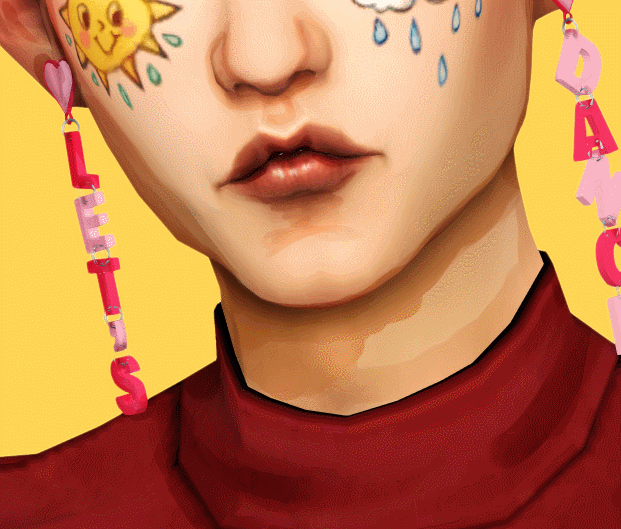
XTRA TIP: I like to blur my shading afterwards to completely smooth everything :o)
Here’s a comparison between unedited vs. the soft light looks like! You can stop here if you wish or continue with me for more over complicated editing lmao:
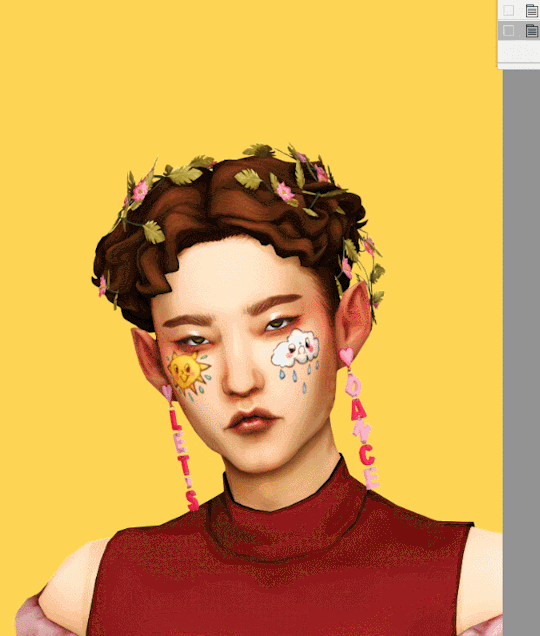
Now for more shading! Yay! Basically repeating the soft light technique, create another smart mask and shade with an off black on a Multiply Later. (Note: Unless you stopped at soft lighting, do not merge your layers yet!) :
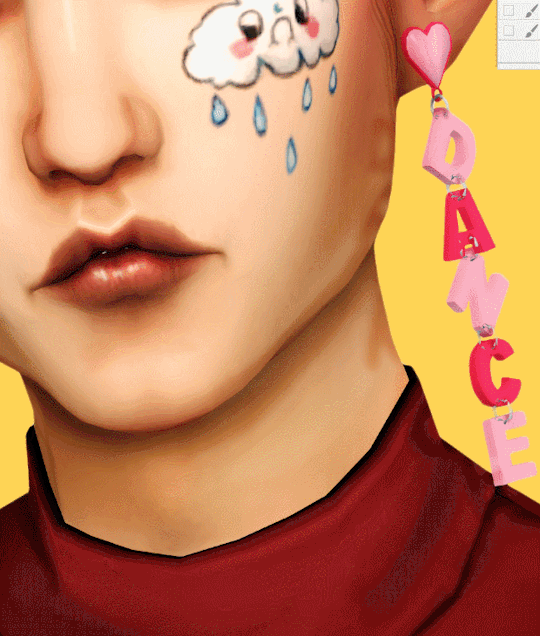
XTRA TIP: take breaks from looking at your image! this helps just sorta centering yourself and gives a fresh perspective once you come back.
Again like before, you’re accentuating and creating details you did not have before! I’m still using the loish soft shade brush for this step.
Blend like in the soft shade step with the smudge tool (blur if you want for xtra smoothness) and clean up any messy shading.
A comparison of how this shading has made for a more dynamic image:

Okay now for more detailing *sweats*. Hair (w my hair brush that i provided), skin, clothes, the whole shabang! I draw hair, smooth any outstanding pixels, and pores and lil more detail to the face! I also used a Colour layer and a dark red to add a flush to my sim! :
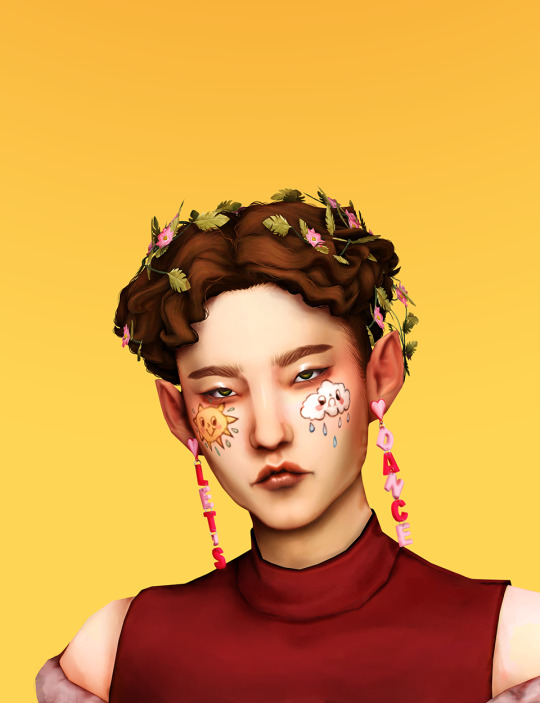
XTRA TIP: Using a dark red on said colour layer with a low opacity can add more colour variation to your edit! I put more colour in his cheeks, shoulders and neck! Don’t go too crazy unless you like over saturated images lmao
You can stop here if you’d like and play around more with your image!
I now add eye shine and shadowing.
First I “round” my eyeball with low opacity of multiply. Smudge and blur like in the shading steps. Clean up as you go or else you’ll end with a flat lookin eye:
Then on another separate multiply layer, add the shadow. Think of that figurative light again when doing this. Draw your shadow along the edges of the upper lid. Change opacity to your liking once done. Blur at points that touch corners for a more dynamic shape:

Now for the eye shine. Use a lighten layer and doodle little dots or streaks!

XTRA TIP: Curve the shine! Like I said eyeballs are curved, so the light would be aswell.
Merge your layers! Phew! Finally! :o
Continue tweaking! One thing I like to do is play with rendered lights!
Duplicate your layer and then go to Filters>Render>Lightening Effects and futz around! Once done I set the duplicated layer to Overlay at an opacity lower than 20%! Merge any outstanding layers.
For highlighting I use the dodge tool on highlight effect and highlight lightly; eyes, tip of nose, chin, lips and center of eyelids.:

Now for a tonal shift. I don’t like over saturated images so I open Topaz Studios and pop my image in. I use the second black and white filter and set to 0.07:

This makes a nice cushion for my colours I guess. Idk I like it but you dont have to do it!!
Home stretch! Time to Blur! Blurring adds dimension to your edit and it’s really fun to do!
Blur at dark shadowed areas or areas that you think would be out of focus. Pretty straightforward!:

After this I use avonlea’s smooth action and then use a smart sharpen.(Filters>Sharpen>Smart Sharpen) This is essentially more tweaking and you can use any action you normally would.
Then add Noise (Filters>Noise>Add Noise). I use a gaussian noise distribution on 2.0 or below:

Annnnnddddd...Now Resize Image and we’re done! I resize to about these dimensions for edits:
( thank u @sadb0ysims for helping me with those crisp dimensions for tumblr sizing lmao )
Well that was alot and I suppose I could of simplified this but hey! I aint a simple lad. Hopefully this was easy to follow and remember not everything has to be exact! Editing is finicky and if you’ve seen my past edits, it’s a learning process as well!
Good Luck! You’ll do great! :o)
765 notes
·
View notes
Text
Web of Stories
Written for @wolfsongroar as a winner for this! I hope it’s to your liking! Also on AO3!
Due to the massive Spiderverse spoilers this phic contains, I’m posting it on my DP sideblog so that the readmore should properly work and not autoload for mobile on danphan because tumblr functions as a website. The spoilers begin IMMEDIATELY, and so the entire phic is under the Read More cut.
Miles meets a fellow superhero during the dimensional crossover who, while he doesn’t hold the Spiderman title, understands him all too deeply: Danny Phantom.
Dear Uncle Aaron,
I gotta do something, and I don’t know if I can do it. I’m scared, man. I’m just tired of letting everybody down. You’re the only one I can talk to. I just wish you were here.
Miles sighed heavily as he stared at his own words. A million thoughts were running through his head, and he bit his lip. He put the pen to the paper, prepared to continue writing. He paused, and he listened.
Footsteps, faint but clear, on the fire escape. He looked up, a smile pulling at his lips as relief washed over him. Uncle Aaron was home. Miles prepared to rip the note out of the paper, to toss it away when he paused. The figure came to the window, and clawed hands slipped through the crack of the window, grasping it and pushing it up.
The Prowler stepped into the seemingly empty room. He paused, scanning carefully. Seeing nothing. Footsteps slowly creaked through the small apartment, and Miles shifted to press himself to the back of his TV. His fingers quickly went up and jerked his mask down. He could feel the footsteps, the weight of heavy boots as they came closer.
A swift motion and the Prowler was glaring hard at nothing. Miles stared up with wide, worried eyes staring into the oblivious, but suspicious glare of his enemy. A ring filled the apartment, and the Prowler put a hand to his ear.
“Hello, Mr. Frisk. I’ve got the security tapes from the tunnel right here, I’ll find him.” The Prowler’s voice send shivers down Miles’s spine as the man stood up straight. He pulled his mask off, and it froze the young Spiderman still. “You know me, sir. I don’t ever quit.”
Miles didn’t stay frozen for long. It took everything to not begin audibly hyperventilate. He could feel his mask pressing against his lips and blowing out as he began to breath hard and fast. This...this wasn’t real. It couldn’t be. Miles began to slowly crawl backwards as his uncle, no, the Prowler. No...Uncle Aaron was focusing on his conversation. He turned his back to him, and Miles took this chance to scramble to his feet and leave through the window.
Aaron froze and quickly turned to see the blur of the window half-closing. His eyes narrowed, and he pulled his mask back on.
Miles half-slipped as he turned the sharp corner of the alleyway, mind racing faster than his legs but somehow the thought process had come to a shrieking halt. Bursting out of the alleyway, his feet skidded as he bumped into a car. He pushed himself from the car, and he ran. Down the street, barely avoiding people, trees, newspaper stands.
An engine roared, revving. He ran past an alley, glancing into it. His eyes widened, and he forced shaky legs to go an extra boost. The Prowler burst from the alley on a bike. Oh no. Oh no, oh no oh no oh no oh no. He couldn’t outrun a bike!
Miles huffed as he pushed himself. Please, please. Just go. Work! Anything! He desperately wiggled his wrists in attempt to get his web slinger to work. Nothing. Now would be the best time for anything, for something, to work!
He grabbed onto a lamp-post, intending to use it to swing around. His body jerked hard. Panic flowed through him as he desperately tried to pry his hand off. He grabbed the pole with his other hand. Bad move. Miles was completely stuck, and he put his feet on the pole, hurriedly thrashing around like a trapped animal. WHEN I SAID ANYTHING WORK I DIDN’T MEAN THE STICKY! His eyes stung with scared tears.
A hand grabbed the back of his costumed shirt, grasping it tightly. It pulled, and Miles’s eyes widened. His hands broke free from the lamp post, just in time for the Prowler to grab at him. Or rather, attempt.
Despite the mask, Miles could see the absolute shock on Uncle Aaron’s face as his claw went completely through him with no damage. Their eyes locked, and Miles felt sick. He loved surprising his uncle. He loved the fear of surprise and shock, and he always tried to make a habit out of it. But now…
The Prowler’s shock soon disappeared, and both hands were put on his bike. He revved his engine, and began to continue the chase.
His rescuer seemed to swing with the most grace Miles had felt thus far. He tried to glance back, but only saw black and white mixing in with the dark night sky, and highlights of the city’s lights on the form. His eyes focused back to his uncle, only for his view to change as his savior turned.
Miles was shifted to lay against somebody, looking up, and the grasp on his back had quickly moved to wrap a protective arm around his waist. He knew that they were not swinging. They were flying. And for the shortest of time, he was taken aback just how wonderful his city looked at this angle.
Life seemed to move in slow motion. The lights took a distorted, long exposure view. A beautiful mix of pinks and yellows, bright reds and blues, hints of green and purple creating an explosion of color that he had seen so many times, but had never experienced like this. It took his breath away.
A small explosion broke his gaze, and he craned his neck to look at the streets just in time. The Prowler’s motorcycle had a burst tire, green smoke coming from it. He was stranded to a halt, and he was staring intently up at the pair. Uncle Aaron was ignoring traffic, as he always did. Miles always remembered his dad grabbing his uncle and preventing him from just freely jaywalking across New York streets.
He had no clue how to feel anymore.
His rescuer soon took him to an alleyway, setting him down. Miles immediately took a step forward. He looked at his rescuer properly for the first time as he tried to collect himself. He was a white haired teen with glowing green eyes, in a spandex suit. He had a symbol on his chest. Miles squinted at him as he tried to focus, but his spider sense didn’t go off. The other stared back at him, squinting slightly.
“You’re...you’re a superhero,” Miles noted, his voice a bit quiet and confused. “But...you’re not a Spiderperson?” Miles leaned back a bit, motioning to the other up and down. “You look so much like one of us, but...I’m not sensing…?” Miles closed his eyes briefly, shaking his head as he tried to collect his thoughts. Uncle Aaron, the Prowler, Spiderman, Peter B. Parker. “Wh-who are you?” The teen gave a half-smile at him.
“Alright, let’s start at the beginning, one last time. My name is Danny Phantom.”
A title card comes to the screen, stylized like a comic book. The title reads “Along Came A Spider”, and the subcaption “A web of stories come together!” Danny and Miles are side by side, swinging towards the camera, Miles in his current kiddie costume, and Danny as Fenton in the white suit with black details. Danny is using ecto construct as a makeshift web slinging, his “web” green and glowing. In the background is the looming shadow of Fisk.
“I stepped into my parents’ ghost portal, and the shock turned me into a half-ghost.”
A black haired Danny Fenton stood within the outline of his parents’ portal. His hand brushed against the on button, and an explosion of color flashed as the shock turned the familiar white haired, green eyed hero.
“And for the last two years, I thought I was the one and only hero. I regularly save Amity Park, my hometown, from ghosts. Then I saved my hometown from the Ghost King.”
Danny, in his normal ghost form, is seen chasing ghosts and hunting them down, sucking them into his thermos. A suited up Danny punched Pariah Dark. A duplicated grabbed the Ghost King, pushing him into the Sarcophagus of Forever Sleep, his duplicate shutting it closed. The scene flashed to Amity Park, previously surrounded by the glowing green swirls of the Ghost Zone, flicking back to it’s normal spot on the American map.
“I regularly dodge the Guys in White, my parents, and foil my arch enemy’s plot. My arch enemy is my dad’s, quote unquote, best friend. He’s also a halfa, but he’s terrible. Morally, I mean. The dude wants to date my mom.”
Danny is zooming down the streets of Amity, dodging blasts from Guys in White. They are weaving in and out of traffic on motorbike styled vehicles. Scene flashes to Danny with his eyes wide, hands up in surrender as his mom shoves an ectogun against his nose. Before she can pull the trigger, he quickly smacks the gun from her hand and phases through the floor. Another flash, and Danny is seen shoving his thermos into an invention of Vlad’s causing steam to rise from it and the large machine to shake and burst at a weak spot. Vlad is coming from his behind, ready to pounce when Danny turns at the last second to send him to the floor with a zap of the Plasmius Maximus. Vlad hits the floor, turning human in a daze. A flash, and Vlad is seen trying to put his arm around Maddie. She glares at him, shrugging him off. Danny is in the background, crossing his arms and narrowing glowing green eyes.
“I was doing the normal, ya know, running from my ex-girlfriend, when this weird thing happened. A portal opened up. I’m used to portals, but this one...it was different.”
Danny Phantom zooms close to the ground of the park, dodging trees or simply phasing through them. His pursuer, the Red Huntress, is hot on his tail, shooting at him with an ecto gun. Danny turned onto his back, firing up a ghost ray to shoot at her board. He just needs to slow her down.
A portal opened up underneath him, causing him to stop so fast he, quite literally, did a flip before he was pulled in. He tries hard to grasp the side, but is ultimately sucked in. The Red Huntress flies past him, but screeches to a halt and attempts to go back to investigate the area. Danny is flung through a kaleidoscope of bright colors. This definitely wasn’t the cold green color palette of the Ghost Zone.
He’s spit out in New York. He does a few flips in the air, but manages to catch and steady himself. Danny looks up, and his eyes widen.
“I was in...New York. Which, admittedly, isn’t too weird. But I saw the headlines.”
BREAKING NEWS: NEW YORK’S HERO, SPIDER-MAN, FOUND DEAD AT 26.
Danny stares up in disbelief.
“Spiderman isn’t real where I’m from. He’s fiction. A comic book hero. I knew this had to be an alternate dimension where he...not only existed but he’s...He was always my favorite hero, ya know.”
Danny, now as Fenton, is standing in front of a newspaper stand. He phases his hand through the box, taking out a newspaper. The front page was entirely devoted to the passing of grad student Peter Parker. He clutches it tightly.
“Out of every superhero comic I’ve ever read...out of all of them...I always related to him the most...I may not have been doing the superhero thing for very long, but I knew that whatever killed him had to...had to have brought me here. That wasn’t the kind of portal I’m used to.”
Miles stared at the white-haired teenager with wide eyes.
“I...I thought the collider only brought Spiderpeople here,” Miles said slowly. “If you’re here...how many heroes are in New York?”
“Hey, let’s not worry about that right now,” Danny told him, and he reached out to put a hand on the dude’s shoulder. Miles glanced up at him. “Are you okay?”
“I-I, yeah. I’m cool, man. T-thanks for-for saving me,” Miles replied, and he brushed off the other teen’s touch. He turned towards the street, taking a few steps from the other. Danny stared at him, studying him.
“Dude, I know that look,” he lightly accused. “Who was chas-IOPAIGDSFYH.”
Miles turned on his feel to see Danny on the ground. He was jerking hard as he glitched, curled up in a ball with distorted yells. Miles immediately rushed back, hovering anxiously over him. After a moment, he stopped, and Danny was left panting hard on the floor with wide eyes. He was clutching his side, staring upwards before looking to Miles. Miles bit his inner cheek as he offered a hand to Danny. The half-ghost laid motionless for a moment before accepting his hand. Miles pulled him up, squeezing his hand hard as the other stood on shaky legs.
“Look, you gotta come with me,” Miles said. “You’re going to die if you stay here. Come with me, I can get you home.” Danny squeezed his hand in return before they both let go. They both automatically briefly fist-bumped.
“Thanks. So who are you? You seem to know a lot about what’s going on.”
“My name’s Miles Morales,” Miles introduced himself. “I…” He cut himself off as he thought. His gut twisted up. “I’m…” Danny leaned in a bit.
“You mentioned a spider sense,” Dany told him. Miles snapped his attention to him, wide eyed.
“I never told you about my spider sense!” he cried out. Danny snapped his fingers before giving him a finger gun.
“You did just now,” he grinned. Miles’s face fell hard, and he began to play with the hems of the cuffs on his costume. Danny’s grin quickly turned into a sympathetic grin. “Dude. It’s chill. You’re new to this, aren’t you?” Miles swallowed a hard lump in his throat. Was it that obvious?
“I’m...I’m supposed to be Spiderman,” he began, and his breath hitched. “But I’m...I can’t...I’m so sticky.”
“I...I don’t know what that means,” Danny admitted, giving him a bit of an odd stare. “But, uh, let’s get going. Where is this collider?”
“We need to get the other Spiderpeople,” Miles explained. He shoved his hands into his pocket, and he jerked his head for Danny to follow him. Danny shifted to begin walking next to him.
“Aren’t you worried about your mask?” Danny questioned. Miles smiled, despite knowing his fellow he-his fellow teen couldn’t see. “Like, standing out as Spiderman.”
“I don’t think I have to worry much about it,” he said, and he lifted a hand to motion to New York. There were plenty of people also wearing Spiderman gear in memory of the fallen hero. The true hero of New York. Danny just nodded, and he began to walk alongside Miles. “So, Danny, right? I can’t help but notice that you’re still in costume. And you don’t have a mask.” Danny grinned.
“Yeah, I don’t think I exist here,” he admitted, rubbing the back of his neck. “So I’m not worried walking around as Phantom. It actually makes it kind of easier, cause I can better tolerate the cold better like this.”
“And the lack of mask?” Miles questioned. Danny shrugged.
“My hair and eyes are different like this. And it’s been working for me so far. I mean, my own parents have pointed a gun in Danny Phantom’s face before, and neither one have caught on,” Danny replied. He must have noticed Miles’s wide eyes, and to his light horror, Danny just laughed.
“Your-your parents? They’ve pointed a gun at you!?” Miles choked out.
“Just an ecto-gun,” said the teen, as if that made it any better. “They’re ghost hunters. I’m a ghost. That’s what they do.”
“And it doesn’t hurt you?” Miles spoke only just loud enough for Danny to hear. “That your family...wants to...to kill you?”
“Can’t kill what’s already dead,” Danny joked, grinning. Miles didn’t see the humor in it, and Danny’s grin dropped as he sighed. “I mean, it’s not like they know it’s me. Ultimately, I know they love me. I’m their son. No matter what, they will always love me. I know they’ll accept me.”
“How do you know that?” Miles questioned. He stopped at a crosswalk amongst a crowd. Nobody paid any mind to the odd duo.
“Due to timeline stuff, let’s just say that I’ve been revealed before, and they’ve accepted me. I know that they will always love me,” Danny replied. He sounded so...confident. Miles envied him.
“...” Miles looked at the ground, the slush and the reflections of his city in the half-melted snow. His throat tightened as he tried to find the words. “That man who was chasing me...The Prowler...that was my uncle.” He stole a glance at Danny, who looked sympathetic to him. Miles returned his attention to the water. It rippled, the beautiful lights breaking, as a car broke the puddle’s surface.
“...I’m sorry, man.” Miles felt Danny’s hand pat his shoulder comfortingly, giving it a light squeeze. “Does he know?” Miles shook his head.
“No,” he choked out. He could see, despite the water rippling, that they were allowed to pass. Danny let go of him, and they continued. “But...man, we’re so close. I just...I looked up to him. So much, and I just...he wants to kill me, and I…”
“You guys hang out often?” Danny interrupted his thoughts with an unexpected question.
“All the time,” Miles felt an unexpected lightness and warmth. “Uncle Aaron and I are artists. He helps me throw up my art all the time. He always finds the best spots for me to display it.” A gut punch as flashes of all the spots came to mind. Now…oh god...that’s…That’s why Uncle Aaron always knew…
“He’ll love you no matter what,” Danny told him. Miles snapped his gaze to him. How could Danny sound so confident and assure of what he was saying. “Trust me.”
“He wants to kill me,” Miles tried to protest. “It’s, it’s his literal job-” Danny cut him off.
“Miles, trust me. This is coming from somebody whose parents hunt him.” Danny stopped, and Miles did too. People passed them, completely oblivious. “The only reason I haven’t told my parents is because I can’t have them worry for me like this. My sister knows though. But my parents knowing would also limit what I can do. But at the end of the day? I know once I turn human in front of them, they will never hunt Phantom again and that they will instantly love him. Because Phantom is Fenton, and Fenton is, and will always be, their family.” Miles felt anxiety rush through him at the idea of coming clean.
“But it’s not just my uncle! My dad,” Miles spoke up, his voice choking. “He thinks Spiderman’s a menace! He’s a cop. He wants to arrest Spiderman, which is still like, a thousand times better than my uncle wanting to kill Spiderman.” Danny chuckled.
“Miles, I swear to you. If you ever chose to expose your secret to your family, they will instantly love Spiderman. Because Spiderman is Miles Morales, and Miles Morales is their son and nephew.” Miles felt his eyes watering up. It felt so weird to hear that he was Spiderman, especially spoken so confidently by a hero. “Above all, you were family before Spiderman.”
He felt a strange surge of comfort and confidence, and he took a deep breath. Danny smiled at him.
“Come on, man. Let’s go get everybody home. I’m actually really curious to meet all these Spiderpeople you keep talking about,” he told him. Miles gave a smile.
“Yeah. Let’s go.” Miles began to take a step. Danny put a hand on his chest to stop him. He raised an eyebrow at the half-ghost. Danny’s eyes were sparkling.
“Dude. Let’s take the scenic route. I know Spiderman can’t fly, and we just went for a bit of a flight, but...wanna go again?”
Miles broke out into a grin, his own eyes sparkling excitedly as he nodded eagerly.
#phics#my phics#danny phantom#into the spiderverse#crossover#spiderverse#danny fenton#miles morales#oc#I HOPE IT'S GOOD FOR YOU...#i tried to write it in the style of the movie so it may come off a bit weird asoifh
120 notes
·
View notes