#ts4 tutorial
Explore tagged Tumblr posts
Visit Tumblr Blog
Explore Tumblr blogs with no restrictions, modern design and the best experience.
Last Seen Tumblr Blogs


Fun Fact
25% of US internet users with an annual income of $80-100K use Tumblr.
Text

IF YOU CAN'T ENABLE CC 🌸
Sul sul ^^
After today updates, I wasn't able to enable CC again. It doesn't matter how many times I closed and launched the game.
So I remembered that this had already happened to me before.
If you're going through the same problem, this is how you can fix it:
🌸🌸🌸🌸🌸🌸🌸🌸
HOW TO ENABLE CC AGAIN:
1- On the game home page, in the bottom right corner of the screen, you can see what the current game version is. After today's update, mine was: 1.108.318.1020. Launch the game and check the number that appears for you.
2- In your game folder (Documents>Electronic Arts> The Sims 4) you'll find a file called "GameVersion". There will be a number.
The number in that file has to match the current game version number.
When I opened mine, it was "1.107.151.1020". So I just updated it to "1.108.318.1020" and saved. Then when I launched the game I could enable CC again.
Note 1: There's a "space" before the number in "GameVersion" (as if it were a paragraph). Keep that space. Change the numbers exactly where they are.
Note 2: If you prefer, before changing the number, make a backup copy of "GameVersion" just in case. It won't harm your game, but it's better, just to prevent and make it safer.
💎 If you want a tutorial video, I made one about it some time ago. You can watch it here :)
🌸🌸🌸🌸🌸🌸🌸🌸
ALSO IMPORTANT AFTER UPDATES:
Remember to delete "localthumbcache". You can find the tutorial here.
🌸🌸🌸🌸🌸🌸🌸🌸
I'm currently checking my CC to see if they're still working.
If anything, I'll let you know :)
I hope it helps you if you're having any problems :)
Happy Simming ^^
4K notes
·
View notes
Text

Since folks are trying to paywall written guides, here's all of my written guides, free. (The links aren't all broken this time, yay)
Making a Pose: From Start to Finish
How to make your Pose Packs Easy to Use
How to Make a Deco Sim
Reducing CC File Size
Tips for Posing Expressions
How to make a Toy / Action Figure of your Sim
How I made the Deco Gryphons from 'Gryphon Rider' Pose Pack
How to make a Fun Wall Light using Vector Images
How to Edit Poses to fit Fat Sims
How to make a UI Emotions Pose Override
Non-CC-related
Sims Story / Challenge Planning Document
Sims Story Character Questions
Guide on How to Start and Plan a Sims Story
Guide to GShade
Custom Content Editing: Terms of Use
Side note for those of you learning posing... A lot of posemakers don't allow reuploads with edits, but I do - my Pose Terms of Use ALLOW EDITING AND RE-UPLOADING under the following conditions:
Poses based on mine MUST credit me in the pose pack's in-game description and on the post you share it on, and you must link back to the original pose pack you used as a base.
No paywalls, AdFly, SimsFinds/Simsdom or CurseForge.
223 notes
·
View notes
Text
mini tutorial: reducing polycount in Blender with selective dissolve
Hey simblr, I threw together a short tutorial thing on how I manually reduce meshes in Blender. I'm not a fan of the Decimate modifier and avoid it as much as possible. I wrote this with Blender 3.0+ in mind (I'm using 4.3.2 myself). It probably also applies to earlier versions but I don't know if the shortcuts/keybindings are the same.


Make sure to only dissolve edges that aren't contributing to the overall shape/silhouette of the mesh.
Here's another approach to selecting and dissolving edges.


Here's the same cube reduced manually and by modifier.

Please share and/or let me know if you found this helpful!
#itsonlythee-sims#sims 4 blender tips#ts4 blender#ts4 resources#ts4 tutorial#cc making tutorial#sorta lol#blender#ts4 cc resources
160 notes
·
View notes
Text
L&D Trans Sim Tagging: EA Made an Oopsie
Xan here. Remember how I never got into Fullbody outfits, in the original Trans Sim tutorial? Well, I am honor-bound to get into it a little. Why? Because I made a discovery, and it's...not great.
TL;DR: The Part Flags for most of Life & Death are messed up. Trans Sims are wearing the wrong meshes and it cannot be avoided; EA has to fix it.
If this concerns you, please upvote the report, and spread the word. They have ignored the Sims community about gender-related glitches in the past. Help us make them fix this, so we don't have to.
In-depth explanation about the problem below.
I was stoked to see we got clothes for both frames in the newer packs. Finally, Sims can wear whatever gender clothing they want! That's the goal, right? But, recent testing made me wonder how they handle opposite-frames. I thought I could learn something to help with inclusive tagging. So, I stuck Carmen in a dress from L&D, and:

It passes from the front, but...her chest. That's the opposite gender distortion. The one caused by putting a AM (masc frame) mesh on any AF (female) Sim, trans or not. I've definitely talked about this.

I went and cloned both meshes to check the tags, and sure enough:

Quick tagging lesson: toggling Restrict Opposite Frame means Carmen can't wear the AF one. She has to wear the AM frame dress, because as a trans Sim, her frame is AM. (Literally, the Opposite Frame of her gender.) But because she has breasts, she inherits the chest distortion all female Sims get wearing a man's top. The same applies for Erik, her counterpart (AM w/AF frame).
With a sinking feeling, I went back to the game and tried...everything.

I ran out of space, there are more. Trans-men are the same. I got halfway through the AM catalog and ran out of willpower. I'm betting almost every item made for both frames in this pack is tagged wrong. It's locked by frame, instead of gender. With pants, that's not a problem--but tops, dresses and suits will all be swapped.
So, now we know Fullbody meshes work similarly to tops. They need to be locked by Gender. And it's really just that tag. To test, I went back to my cloned dresses, and fixed it with two clicks:

This means all women regardless of frame can use the AF, and all men can use the AM. And here's the result: AF dress on AF Sim, AM dress on AM Sim. They literally swapped dresses.


So, easily fixed! That's 2 files out of...all of them. (sigh) I filed a Bug Report, linked above. Hopefully the amount of evidence I provided will get an actual response. That, or they'll think I'm an arrogant prat for telling them how their game works. But, I didn't break it.
Moral of the Story: this is a great example of what not to do if you make cc, or if you retag what you download. Remember, if you want to limit who can wear a mesh:
"Restrict Opposite Gender" for Tops and Fullbody; this makes sure all AF and AM Sims wear their meshes, and don't end up with chest lumps.
"Restrict Opposite Gender" for AF Bottoms; Trans-AM Sims break in half. Don't Restrict AM Bottoms at all. They fit everyone.
Or, Don't Restrict Anything, if you want all options. Note: distortions will happen. Mark your gender filters. They help a lot.
Earrings, Hats, Makeup, Gloves, Socks, Tights work for everyone
Necklaces and Nails are "Restrict Opposite Frame"; Trans Sims can't wear these from their own gender. They don't fit.
If you got this far, thank you for sticking it out. My innocent question turned into a tagging lesson (again). But, if it helps anyone in the future, I'll be glad. At least now we know there's a problem.
Please boost the Bug Report, share if you found it useful, and thanks for reading. I'm on the soap box again re: trans inclusion, but it's still Pride and I can't not stand up for my people. The more we know, the better we can do on our side.
Finally, tagging some folks who might want to know, if they don't already (feel free to ignore): @sejianismodding @the-crypt-o-club @yooniesim @whyhellosims @thefoxburyinstitute @sims4tutorials @mmfinds @gncc
#sims 4 bugs#ts4 bugs#s4 tutorial#ts4 tutorial#sims 4 studio#lgbt sims#ts4 trans#carmilla#phantom#realizing I never actually explained how tagging works#might be time soon#in my defense I didn't know when I wrote the first guide#but I'd rather not annoy everyone banging on about this
149 notes
·
View notes
Text
youtube
NEW VIDEO TUTORIAL 🩷
After almost two years it's time for a new and improved version of my "How to make CAS CC" video. This time I will explain how to create a frankenmesh out of a jumpsuit and a dress for adult Sims! It's VERY beginner friendly so if you weren't successful yet with starting to make CC, maybe this one will give you the help you need!
All the topics I cover in this video below the cut:
00:00 Intro
01:00 Software
01:36 Downloading & Installing Sims 4 Studio
01:56 Downloading & Installing Blender 4.2
02:10 Downloading & Installing GIMP
02:20 Introducing Sims 4 Studio
03:03 S4S | Gathering assets to work with
04:09 S4S | Textures
05:12 Project Folder
05:34 S4S | Gathering assets to work with
07:10 Introducing Blender
10:17 Blender | Edit mode (Select, Delete, Wireframe)
12:38 Blender | Append second mesh (Proportional Editing, UV overlapping)
18:23 Blender | Join two meshes (Material, Merge)
20:03 Blender | Cleaning up the mesh (UV editing, Merge, Rip)
22:14 Blender | Cut number
22:43 GIMP | Making a texture (Select, Delete, Healing, Smudge)
24:52 Photoshop | Making a texture (but make it easy)
25:15 GIMP & Blender | Preview of the texture
25:43 GIMP | Making color swatches (Layers, Lighting, Fill tool)
28:33 S4S | Introducing the CAS area
29:15 S4S | Creating a package file
30:25 S4S | Importing all our assets
31:17 GIMP | Creating a shadow texture
32:24 S4S | The specular map
32:39 GIMP & Browser | Creating a normal map
35:58 S4S | Vertices & Polygons, LODs
37:02 Blender | Creating LODs
38:20 S4S | Categories (Tags, Allow for random, Gender restrictions)
39:36 S4S | Tuning tab (not covered)
39:47 Sims 4 | Results & Outro
435 notes
·
View notes
Text


Hii I was asked how I made my gameplay edits and I decided to do a little tutorial in case other people might find this useful!
There are several ways you can capture and edit notifications but this is just the way I do it nowadays and I find it quite easy and painless 😘
136 notes
·
View notes
Text
how I edit my sims ts3/ts4 screenshots (day-time edition)
A helpful? guide for editing screenshots during the day (this is not so easy for me as i prefer taking screens at night but my sims can't always be in the dark so let us all struggle together ok? ok.) this tut is done in procreate on the iPad.

Before taking screenshots:
Help yourself as much as you can in-game, utilise in-game lighting as shadows/lighting is created for you
Understand good/bad composition and add variety by using different angles to make scenes look interesting
I take LOTS of photos just to end up with 1 or 2 good ones

step 1: i would use liquify to smooth out any sharp edges or paint over them

step 2: create new layer, blending mode "multiply" use the colour picker on the area you want to add shadows to, use the selection tool to draw the shadow. you can either colour fill or just shade into the area with the brush. If you colour fill you can then erase lines that are too harsh or use the smudge tool to soften them.


step 3: do this same step but for the clothing. remember shadows are not usually completly black so i use shades of blue to shade her clothes and then shades of green for the tree.


step 4: create new layer, blending mode: overlay. outline the left side of the sim this is to make the light source more prominant. as natural light is not usually just white, i picked a slight orange tint.

step 5: add more lighting to enhance the effect. *create new layer* blending mode: add, and do the same thing as step 4 but with this layer i'll add more lighting to the parts that will be affected most by the light

step 6: i edit the hair. you can look here for my in depth hair tutorial
step 7: add lighting effects *create new layer* blending mode: add. i used the default procreate brushes 'flare' and 'glimmer' [found in luminace] to immitate light rays

step 8: merge all layers, *duplicate layer* add bloom effect and change opacity and erase parts where bloom is too strong.

step 9: merge again, then go into photshop and colour grade using 'camera raw filter' then 'smart sharpen', use 'topaz labs' effect then done!

if you have any questions feel free to direct them to my inbox & u can check out other tutorials here
211 notes
·
View notes
Text
Small tip on how to take better resolution screenshots of the game's UI elements for your gameplay pictures (moodlets, notifications etc.)

This is probably not new, but i just wanted to share something i found out recently. Since i started sharing gameplay screenshots, I've been adding the occasional moodlet and notification boxes from the game in some of my pictures. I think it's a nice little touch, and i love when people do it, it adds a bit more context to their story. My only problem was that I wanted them to be bigger, but they looked pretty bad upscaled. So, i started looking everywhere if there was another way to take bigger screenshots of it, but i couldn't find anything apart from using SRWE, which i dont even think it works tbh. The other day while messing on the settings in game, i found completely by chance that we can make the UI bigger already in the accessibility menu, and i felt so silly lol. When i did it, there it was... some nice and big crispy boxes. I go into that menu all the time and never thought i could use that for this... but anyways, if you didn't know it like me, now you do, yay! :D
All you gotta do is press ESC > Game Options > Accessibility and make the UI as big as you want. After taking your screenshots, you can just go there again, and revert things back to what it was.


(turned off my reshade for this btw)
I'll admit, i'm a little bit lazy and will definitely forget to do this, but at least there's the option for it. Sorry if anyone's already made a guide about this and i couldn't find it btw! Hope this can be of use for someone :)
242 notes
·
View notes
Text


I MADE MY FIRST TUTORIAL!!!!! This was crazy putting together but I hope this helps other fellow simmers to create. This tutorial is free since I learned how to do this by piecing together other free sources, you don't need to be a member or anything, THIS IS FOR EVERYONE! The only thing I ask is that if you do decide to share what you make to keep it free!


#Peachys CC#sims 4 resources#sims 4 tutorial#ts4 tutorial#ts4#sims 4#simblr#my sims#the sims 4#sims 4 screenshots#sims 4 community#ts4 simblr#my cc#sims 4 cc#the sims 4 custom content#ts4 custom content#the sims 4 cc#ts4 cc
80 notes
·
View notes
Text
*Tutorial* How to make outfits for "👻Invisibles and Skeletons💀"
I finished posting all of the tutorials!
Hi! I'm so happy that you are enjoying my CC "👻Invisibles and Skeletons💀." Thank you for your interest!
*CC
👻Invisibles👻
💀Skeletons💀
💀Skeletons Hair Useable Body Version💀
👻Outfits for Invisibles and Skeletons💀
*Tutorial
📝Easy Way
📝Step-by-step. 1
📝Step-by-step. 2 and EP01Detective Outfit CC
FOLLOW ME on X Twitter / Patreon / Curseforge Thank you for your support. If you like my CC pls like and reblogging💝
@sssvitlanz @maxismatchccworld @mmfinds @maxismatch4sims @gncc @mmoutfitters @love4sims4 @sims-4-maxis-match @sims4downloads @alwaysfreecc
#the sims 4#sims 4#ts4cc#s4cc download#ts4#s4 download#maxis match#ts4 download#ts4 custom content#ts4cc tutorial#ts4 tutorial#s4 tutorial#tutorial#s4acc female#ts4 cc female#s4cc female#s4acc male#s4cc maleo#s4 cas#s4mm#s4cc#s4ccfinds#s4 custom content#ts4 cas#ts4 simblr#ts4 screenshots#ts4 occult#ts4 outfits#sims 4 skeleton#ts4 mm
67 notes
·
View notes
Text
quick tutorial on how to “copy/paste” poses into another blend file with @vyxated's ea rigplus
for those who have all their poses in separate files like me because there’s no tutorials on it for some reason
DISCLAIMER: this does NOT go over how to make poses, work the rigplus, or navigate blender!!!

// before we proceed, prepare the following:
blend file containing your pose with a timeline window open (hereafter referred to as [BLEND A])
blend file containing the rigplus for the pose to be “pasted” into with an asset browser window open (hereafter referred to as [BLEND B])
// ok let’s get on with the actual tutorial now
in [BLEND A], insert a keyframe with BOTH rigs visible. make sure the normal rig is still selected! (for good measure, i like to clear my keyframes for both rigs to make sure i don’t have any duplicates or anything)
hide the normal rig and select the rigplus. then, in your timeline window, click “copy pose as asset”.
without closing [BLEND A], open [BLEND B]. in your asset browser, switch the library from “all” to “current file”. then on the header, click “asset > paste as new asset”.
hide the normal rig and select the rigplus (again). right click on your newly created pose asset, hit “apply pose”, and profit (don’t forget to keyframe again as you normally would!)
// troubleshooting
i can’t paste the pose as a new asset!
make sure you do NOT close the blend file you’re copying the pose from! leave it open until after you’ve added the pose to the asset library.
when i try to apply the pose, nothing happens!
this is probably because you didn’t have the right rig selected. after inserting a keyframe, make sure the normal rig is hidden and the rigplus is selected when you copy the pose!
// miscellaneous notes
this is the method i figured out when i was making my first all-in-one pose animation. copy-pasting poses as you would with the normal rig doesn't work with the rigplus, so i fiddled around a bit until i came up with this!
dm me or send an ask if you have any questions! i'm certainly no expert, but i'll do my best to help!
@ts4-poses @thefoxburyinstitute
#ts4 tutorial#sims 4 tutorial#ts4 pose tutorial#sims 4 pose tutorial#ts4 resources#sims 4 resources#rigplus#by bomusim
63 notes
·
View notes
Text
TUT: CONVERTING SKINS INTO OVERLAYS
for my precious mootie @thesimselfsworld
I was asked on this post for a tutorial on how to turn custom skins into overlays, so here it is! this is sloppily put together, so I APOLOGIZE. All you'll need is Sims 4 Studio and a photo editing software (I used photopea, but photoshop/krita will work the same)
1. Pick your skin and open it in Sims 4 Studio through the 'My Projects' button (I used one by RemusSirion as an example)
note I would recommend choosing a skin that doesn't come with eyebrows or any facial hair as they will make the end product look weird
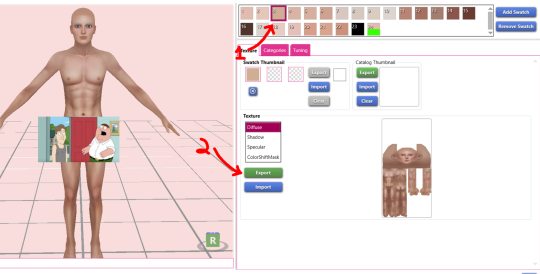
2. Choose a medium - light toned swatch and export the texture
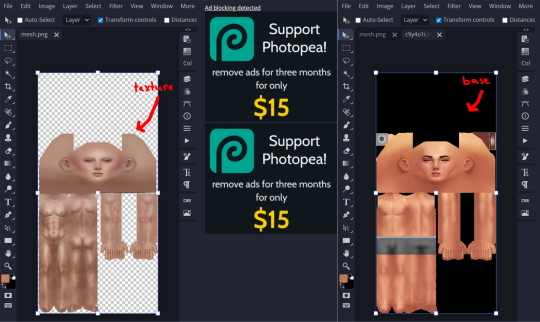
3. Download this skin detail base and choose either the female or male frame, depending on the skin. Then, open both the exported texture and the base in your photo editing software
4. Copy the exported texture into the base and align them. Do NOT change the blend setting even though it looks kinda weird right now!
6. Back in Sims 4 Studio, close your current project and create a blank one. Go back to the main menu, then click 'Cas' (make sure its on the 'create CAS stand-alone'). In the 'part type' drop down, scroll until you see 'skin detail, forehead'. Choose that and pick a the first one. Name it whatever and save it to your mod folder, this is the file that will show up in your game
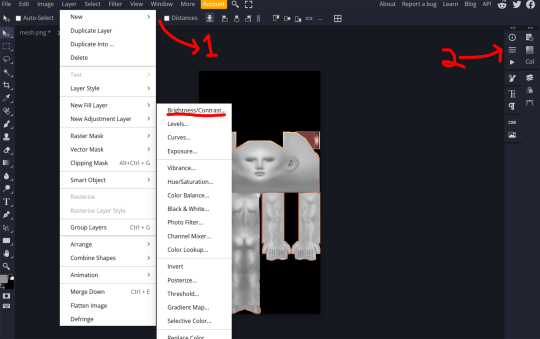
5. In the 'layer' tab in the upper left corner, find the 'new adjustment layer' tab and choose 'vibrance'. Lower the vibrancy to -100% and the saturation to -100%. Then, looking at the layers tab again. left-click on the vibrance layer and create a clipping mask so only the texture is affected. Export this as a PNG
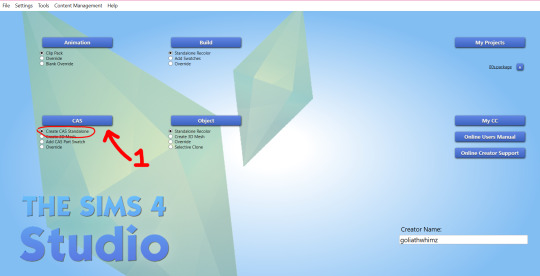
note the preview sim may show the female frame even though you're converting a male skin (or vice versa). To fix this, go into the 'categories' tab and unselect the frame you don't want, then select teen. This should fix that
7. Import the PNG and hit save.
9. In small amounts, adjust the brightness so that the texture. Export the file whenever you're satisfied with the brightness and import it into s4s as another swatch. I like to get 2 additional swatches and increase the brightness by 20
8. Now, you could be done here, but I like to add different opacity levels. So, go back into photopea (or whatever you used) and add a brightness/contrast adjustment layer (you can find this in the same place where you got the vibrance adjustment layer). Create another clipping mask for this layer.
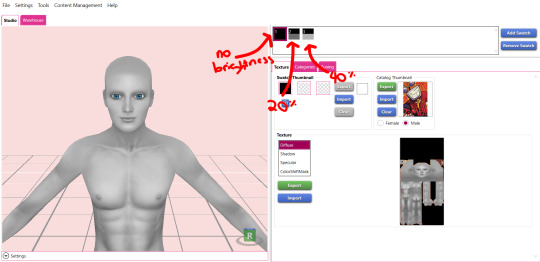
AND TAADAA!!! You're done :D Save your package one more time and enjoy. I wouldn't recommend sharing this anywhere, as it might go against the OG creator's TOS. Keep this for your personal use!
Feel free to ask me any questions :3
#my tutorials#ts4 tutorial#the sims 4 tut#ts4 tut#sims 4 tutorial#the sims 4#ts4 simblr#my cc#the sims community#sims 4#ts4
34 notes
·
View notes
Text
youtube
♡ How to move Eyelash CC to new Eyelash category in 30 seconds ♡
It's super simple to move all of your existing eyelash CC to the new category in CAS using Sims 4 Studio ♡ྀི ₊
#sims 4#ts4#ts4cc#the sims community#ts4ccfinds#ts4 lookbook#sims lookbook#ts4 hair#ts4 maxis match#the sims 4#ts4 cas#ts4 simblr#ts4 gameplay#ts4 legacy#ts4 screenshots#simblr#ts4 tutorial#ts4 eyelashes#Youtube
161 notes
·
View notes
Text
PXL'S Anatomy of Screenshots
So you want to take better screenshots? There are multiple factors to consider, and if you don't enjoy tweaking reshade settings for every image, my ultimate method may not be for you. That being said, there are tips and resources in this guide that are applicable to everyone and you can select to explore those that are useful to your specific situation.
Disclaimer: I am not claiming to be an expert, nor am I offering to provide troubleshooting on an individual basis. This is a general guide and if you are unfamiliar with any of the concepts, please use the mighty power of the internet to find tutorials. I promise everything that I have learned over the years has been published and documented a thousand times better than I ever could.
There are five factors to address:
Your computer's inherent capabilities
The game's limitations
The mods you're using
Reshade
Post Processing
Graphics Card Settings & Drivers:
Become familiar with your graphic options. If you don't have a dedicated graphics card (i.e. a desktop or gaming laptop, these features may be unavailable and you should skip.)
I have an AMD Radeon Pro card which is designed for workstation level systems. It's overkill for sims, but useful for 3D rendering and modelling work. I have changed the following settings for DirectX 9 applications:
anti-aliasing - enhance application settings
anisotropic filtering - enabled
anisotropic filtering level - 16x
texture filtering quality - high
surface format optimization - high
Consider overclocking your graphics card to unlock it's full potential. DO NOT pursue this venture unless you are ok with the risk of burning out your card prematurely. I use at present, overclocked Bootcamp Drivers from BootcampDrivers.com obviously, if you're not playing on an intel based mac through Bootcamp, this is irrelevant to you.
None of these settings are useful until you address the default games limitations, which leads nicely into the next factor.
Addressing The Sims 4's Graphic Limitations:
Everyone should be familiar at this point with lighting mods, 4k, textures, disabling ssao, etc. but, I'm still going to spell it out. None of this is new information and has been covered many a time by various players ad nauseum.
remove ugly blue toned lighting in the world by choosing a lighting mod from @softerhaze here
overhaul your graphics.cfg file (i use a custom blend with features specific to me), however @simp4sims has done a ridiculous amount of work in providing a simple to install file that can be found here - read through their tutorials!! they have provided an excellent oversight of exactly what this does and why it matters
improve the indoor lighting for your sims - previously i used @luumia's no blu, no glo - recently i switched to @northernsiberiawinds better in game lighting mod here, though i have tweaked some of the settings to suit my own personal preferences
i don't use the HQ mod, i don't find that it makes enough difference for the amount of effort it requires to convert CAS CC
It should go without saying, but tweaking your graphics config file is absolutely useless if you can't play TS4 at it's maximum in game graphic settings!
The Mods You're Using:
Now that you've put in all this work into getting the game ready to make use of quality mods where do you start? Well, the CC you install matters. Whatever your preference, whether it be maxis-match, alpha or somewhere in between, priority should be given to using items textured in 2k or 4k resolutions, and specific attention should be paid to using wall and flooring textures with bump maps, and or high quality resolutions (this is important later for reshade if you intend to learn about ray tracing).
I will separately post a guide to creators with crispy textures because that is it's own novel.
Reshade:
Phew. Still with me?
There are many many many reshade presets out there, most are alike, but none employ ray tracing, and that is because a) it needs to be manually adjusted for every screenshot, b) they are paid shaders, and c) this requires advanced knowledge of reshade and a decent enough graphics set up that won't overheat - games running native ray tracing recommend a minimum VRAM of 8GB (please note RAM and VRAM are not the same) - i therefore do not recommend pursuing this option if your system does not meet those minimum requirements.
Start here to understand what ray tracing for reshade is. In my opinion, the shaders are well worth the price of $5 for the amount of work that has gone into creating them by the talented Pascal Gilcher. That link is a comprehensive starting point into expanding your knowledge of reshade and it's capabilities.
I have always created my own reshade presets from scratch, and while the core colorization settings I utilize remain largely the same, using ray tracing and re-light means every screenshot needs to be manually adjusted (lights repositioned, bounce and AO factors adjusted, etc) before being captured. @pictureamoebae just published a very timely post discussing the re-light shader and you can read it here.
Post Processing
Reshade does 99.99% of the work that traditionally would be accomplished in a photo editing software like photoshop. Occasionally, I need to adjust exposure manually, add depth of field manually, or color correct. Beyond that I use it to scale images to fit the resolution and file size limits of various platforms. Conceptually this reduces the amount of uncontrolled loss encountered when platforms like tumblr auto compress files that are too large. In reality, tumblr still makes images crappy compared to how they appear in my file folder.
optimize your images for various social media platforms using this guide
fix exposure or colorization issues using a software like photoshop
I hope that this gives you a starting point into expanding your methodologies. My process is continuously evolving and I find this aspect of the game most entertaining. For others who don't enjoy this process, it's probably not worth it!
Thanks for reading ❤ PXL
493 notes
·
View notes
Text
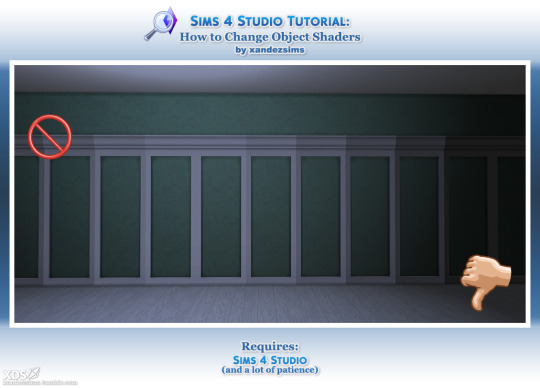
Tutorial: Change Object Shaders in Sims 4 Studio, or How to Fix Patchy Shading on Objects
I was discussing shaders with @moontaart and it led to this. I'm sharing just in case it's useful to anyone. This fix is for things that tile against a wall, like wall panels, shelves, and cabinets, but the technique can be applied to swapping any object shaders.
Difficulty: Middling. Easier if you know S4S. It's mostly repetitive.
You'll Need:
Sims 4 Studio
Coffee and/or Patience
I strongly recommend saving a backup copy of your package. And do this before you add swatches. There are 2-3 Entries to change for every swatch, so if you have a lot, Step 8 will take ages.
If you have swatches already, you can Export All to file, save your Palette, and delete all but the first swatch. When you're done, apply the saved Palette to the package, delete everything but your textures from the export folder, and Import All to put everything back.
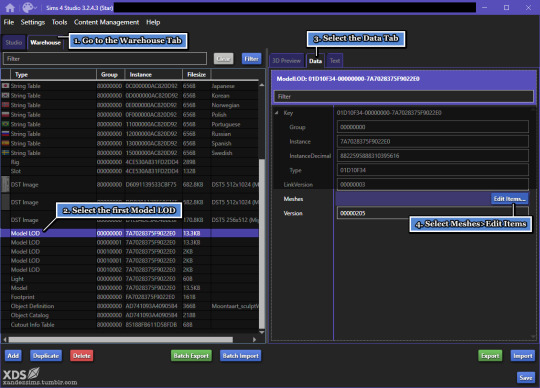
1. Open your file and go to the Warehouse tab. Scroll down.
2. At the bottom, find the first item marked Model LOD. This is your LOD 0. Click it, and a 3D Preview of the mesh should appear to the right.
3. Next to the 3D Preview tab, open the Data tab.
4. Beside Meshes, click Edit Items.
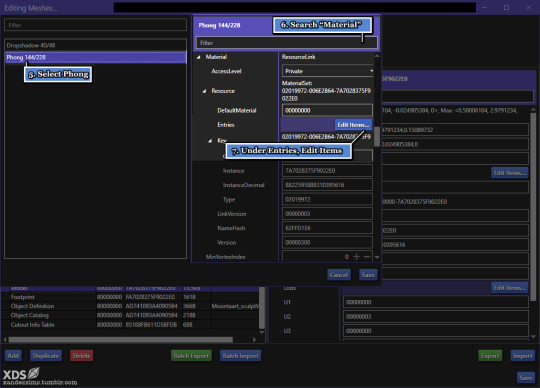
5. This will give you a list. These are the mesh groups. (If your mesh has 3 groups--i.e. glass, metal, and shadow--there will be one for each.) For this file, I have Dropshadow and Phong. Phong is the panel. To fix the lighting, I'll change Phong to Cabinets, so its evenly lit. Select the part you want to edit.
6. Go to the search bar and type 'Material'. Or, you can scroll down.
7. Under Material > Resource, you'll see Entries > Edit Items. If you scrolled down, it's the fourth button.
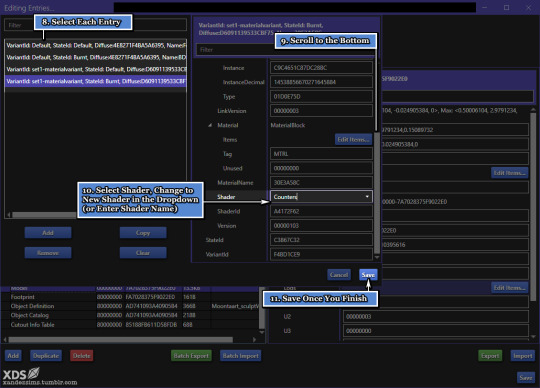
8. These Entries are the Variants for each swatch, with the top ones being the 'default' state. With 1 swatch and 2 mesh groups, we have 4 Variant Entries to fix. Choose the top line.
9. Scroll to the bottom.
10. Next to Shader is the name of the shader we want to change. Pick a new one from the dropdown, or key it in if you know it. (Tip: once the name is filled, highlight it and CTRL/CMD+C to copy.) Go back to the list, pick next VariantId Entry, and repeat. Do this for all of them. The more swatches you have, the more there will be.
11. Save; the window will close. Save the previous window too. This will put you back in the Warehouse.
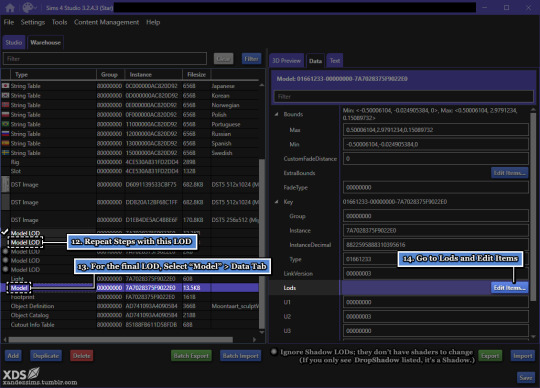
12. Click the next Model LOD--LOD 1--and repeat Steps 8-11. This is where copying the shader name comes in handy.
13. LOD 2 is hidden under Model. Ignore the other Model LODs, which are the shadows. Instead, go Model > Data tab.
14. Under Lods, Edit Items.

15. (Not pictured) Don't panic. It looks worse than it is.
16. A list of meshes will pop up. Pick LowDetail and under Meshes, Edit Items.
17-19. This looks familiar! Repeat Steps 8-11, Save all windows when you finish. Then, Save the file.
Mostly done! Now, for the last part:
20. Check the result in game. If you get the effect you want, you're done!
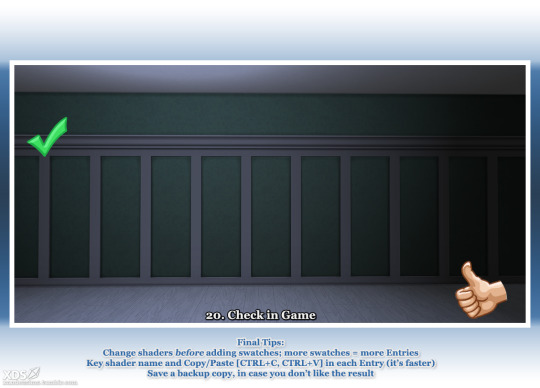
I recommend taking "before" and "after" screenshots to compare. (Easier if you set a camera shortcut, and use the same test lot.)
Leave a like if this helped.
@thefoxburyinstitute @sims4tutorials
References:
How to Find an Object's Shader Data in Studio by orangemittens Help Thread: Color of Cabinets Looks Different in Games
#ts4#the sims 4#simblr#s4 tutorial#sims 4 studio#ts4 tutorial#sims 4 tutorial#s4 build buy tutorial#tutorials
45 notes
·
View notes
Text
youtube
NEW VIDEO TUTORIAL 🩷
In this video I show you how to bring your own models that you created in Blender into The Sims 4 Create A Sim mode! Some experience with basic Blender controls and Sims 4 Studio options is neccessary to keep this video short and on point (and you all obviously watched my last video where I explained Blender AND Sims 4 Studio lol).
I hope this video helps to get your own things into the game. If you are stuck and need help, don't hesitate to ask me! 🩷
Timestamps below if you are looking for something specific:
0:00 Intro
01:17 Blender | Starting with your own model
02:15 S4S | Exporting a reference mesh
02:49 Blender | Preparing the reference mesh
03:04 Blender | Adding your own model
03:40 Blender | UV_0 and UV_1
04:14 Blender | Data Transfer the UV_1
05:07 Blender | Merging reference and own model
05:56 Blender | Weights & Weight Transfer
07:45 Blender | Vertex Paint
08:55 Blender | Mesh Groups & Cut Number
09:59 S4S | Creating a package file and importing the files
10:27 The Sims 4 | Final asset in the game & Outro
98 notes
·
View notes